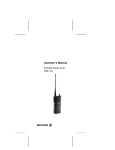
1
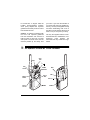
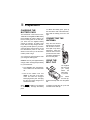
5W 8 Channel 2-Way Business Band Radio
OWNER’S MANUAL — Please read before using this equipment.
Your RadioShack 5W 8 Channel 2Way Business Band Radio is a portable, easy-to-use, two-way transceiver
that you can carry almost anywhere. It
is approved with commercial-grade
standards to give you clear, reliable
communication.
your family living in the same household can also operate the transceiver.
PLL–Controlled Circuitry — provides
accurate and stable channel selection.
Built-in Modulation Limiter Circuit
— automatically adjusts for a wide variety of voice levels to ensure an understandable transmission.
Your transceiver provides personal
communication with family members or
other licensees. You can use the transceiver for recreational communications
while you hike, ski, or fish. You can
even use the transceiver to coordinate
your activities with other family members. When you get a license to operate the transceiver, other members of
LCD Display with Backlight — illuminates for 5 seconds when pressing any
key except LOCK/PTT.
Splash Proof (JIS Level 4) — provides excellent water resistance.
ˆ FCC Information
FCC LICENSE
REQUIRED
This transceiver is intended for use in
the operation of commercial activities,
in educational, philanthropic, or ecclesiastical institutions, and hospitals,
clinics, or medical associations.
The Federal Communications Commission (FCC) requires you to be licensed before you operate this
transceiver. Unless you are already li-
censed to operate on one of the preset
frequencies, you must apply for a frequency through the PCIA (Personal
Communication Industry Association),
a non-profit organization that assigns
frequencies nationwide to help prevent
conflicts between different businesses
using transceivers in the same area.
For more information about getting a license, contact the PCIA at 800-7590300, extension 3068 (in Virginia 703739-0300, extension 3068).
© 2001 RadioShack Corporation. All Rights Reserved.
RadioShack and RadioShack.com are trademarks
used by RadioShack Corporation.
For other questions concerning the license application, contact the FCC at
717-337-1212, or write:
• You can let unlicensed persons
operate this transmitter, as long as
you take precautions to prevent
unauthorized transmissions.
FCC
P.O. Box 1040
Gettysburg, PA 17325
• You must use this transceiver only
for the commercial use of your
business, and only when other
commercial channels (such as the
telephone) are either not available
or not practical.
For the latest FCC application form
and instructions, call the FCC's fax-ondemand service at 1-202-418-0177
from a fax machine and request one or
more of the following documents:
• You must always yield the operating frequency to communications
that involve the safety of life or
property.
All forms and instructions ....... 000600
Form 600 instructions only ...... 006001
Main Form 600 only................. 006002
• You must take reasonable precautions to prevent harmful interference to other services operating
on the same frequency.
Form 600 schedules only ........ 006003
If you do not have a fax machine, you
can call the Government Forms Distribution Center at 1-800-418-FORM and
request that the form and instructions
be mailed to you.
• You must not transmit program
material of any kind used in connection with commercial broadcasting.
FCC Part 90 Rules
• You must not provide a service
that is normally handled by telephone or telegraph unless such
broadcasts involve the safety of
life or property or in emergencies
such as an earthquake, hurricane,
flood or a similar disaster where
normal communication channels
are disrupted.
You must be familiar with Part 90 of
FCC Rules before you operate your
transceiver. The operation instructions
in this manual conform to Part 90, but
do not cover all items in Part 90.
Overall, Part 90 states that:
• You must have a valid license
before you use the transceiver.
• During each transmission or
exchange of transmissions, you
must identify your station with the
call sign issued to you by the
FCC, or once each 15 minutes
• As licensee, you are responsible
for proper operation of all transceivers operating under your
license’s authority.
2
ADDITIONAL FCC
REGULATIONS
during periods of continuous operation.
• You must keep a written record of
any maintenance or modification
made to the transceiver, and you
must make this record available
for inspection upon demand by
the FCC.
The Business Radio Service is under
the jurisdiction of the FCC. Any adjustments or alterations that would alter
the performance of the transceiver so it
no longer meets the original FCC type
acceptance or would change the frequency-determining method are strictly
prohibited.
Violating any of the provisions of Part
90 can result in fines and/or confiscation of equipment.
Replacement or substitution of crystals, transistors, ICS, regulator diodes,
or any other component that is of a
unique nature with components other
than those recommended can violate
the technical regulations of the FCC
Rules or violate type acceptance requirement of the rules.
Your transceiver might cause TV or radio interference even when it is operating properly. To determine whether
your transceiver is causing the interference, turn off your transceiver. If the
interference goes away, your transceiver is causing it. Try to eliminate the
interference by:
Before you operate the transceiver,
you must obtain your license. It is illegal to transmit without the appropriate
license, which you can get by submitting a completed FCC Form 600 to the
FCC (or through the PCIA). Furthermore, you are required to understand
Part 90 of the FCC Rules and Regulations prior to operating your transceiver. It is the user's responsibility to see
that this unit is operating at all times in
accordance with the FCC Rules and
Regulations.
• moving your transceiver away
from the receiver
• contacting your local RadioShack
store for help
If you cannot eliminate the interference, the FCC requires that you stop
using your transceiver.
SAFETY INFORMATION
Your transceiver contains a low power
transmitter. When the Push-to-Talk
button is pushed, it sends out radio frequency (RF) signals. The device is authorized to operate at a duty factor not
3
to exceed 50%. In August 1996, the
Federal Communications Commissions (FCC) adopted RF exposure
guidelines with safety levels for handheld wireless devices.
your face. If you wear the handset on
your body while using the headset accessory, use only the supplied belt clip
and when transmitting, take it out of
the belt to ensure that the antenna is at
least 1 inch (2.5 cms) from your body.
Caution: To maintain compliance with
the FCC’s RF exposure guidelines
hold the transmitter and antenna at
least 2 inches (5 cms) from your face
and speak in a normal voice, with the
antenna pointed up and away from
Use only the supplied antenna. Unauthorized antennas, modifications, or attachments
could
damage
the
transmitter and may violate FCC regulations.
ˆ A Quick Look at Your Radio
SQL
VOL/
OFF
¿/
PTT/
LOCK
MON/
FUNC
Battery
Release
QUIET/
Q-SCAN
HI/LO/
APO
SPK
MIC
Belt Clip
À/SKIP
4
CHRG
ˆ Preparation
CHARGING THE
BATTERY PACK
To detach the battery pack, push up
the arrow at the side of the transceiver,
then slide the battery pack off to the
right.
The transceiver comes with an 8.4V,
1300mAH rechargeable Ni-MH battery
pack installed for power. Before you
use the battery pack for the first time,
you must use the supplied battery
charger to charge it for about 14-16
hours. After it is fully charged, the battery pack provides power to your transceiver for about 10 hours when you set
the transmission power to low, and
about 6 hours when you set the transmission power to high.
CONNECTING THE
ANTENNA
Align the slots around
the antenna’s connector
with the tabs on the antenna jack on top of the
transceiver. Press the
antenna down over the
jack and turn the antenna’s base clockwise until it locks into place.
You cannot use the transceiver while
you charge the battery pack.
USING THE
BELT CLIP
Caution: Use only the supplied battery
charger, which is designed specifically
for your transceiver.
The supplied
belt clip lets
you
easily
attach
the
transceiver
to your belt.
1. Turn OFF/VOL fully counterclockwise to OFF to turn the transceiver
off.
2. Pull out the rubber cover over
CHRG on the side of the transceiver and insert the charger’s
barrel plug into the jack. Then plug
the other end of the charger into a
standard AC outlet.
To
attach
the belt clip,
slide the belt clip down onto the plastic
tab.
When
(low battery icon) appears
on the display, recharge the battery
pack.
To detach the belt clip, lift up the tab
and slide off the belt clip.
5
USING AN OPTIONAL
HANDSTRAP
• Once you set the volume do not
increase it. Over time, your ears
adapt to the volume level that
does not cause discomfort might
still damage your hearing.
You can attach an optional hand strap
(not supplied) to the transceiver. Slide
the hand strap’s small loop under the
hole at the side of the transceiver.
(You might need to use a small screwdriver or a straightened paper clip to
do this.) Then pull the strap’s large
loop through the small loop.
Traffic Safety
Do not use an earphone with your
transceiver when operating a motor
vehicle or riding a bicycle in or near
traffic. Doing so can create a traffic
hazard and could be illegal in some areas.
CONNECTING AN
EARPHONE/EXTERNAL
SPEAKER
If you use an earphone with your transceiver while riding a bicycle, be very
careful. Do not listen to a continuous
broadcast. Even though some earphones let you hear some outside
sounds when listening at normal volume levels, they still can present a traffic hazard.
To listen privately or to hear better in a
large area such as a warehouse, you
can pull up the rubber cover on the MIC
and SPK jacks on the side of the transceiver, then plug an optional earphone
or external speaker with a 1/8-inch (3.5
mm) plug into the SPK jack. This automatically disconnects the built-in
speaker.
USING AN EXTERNAL
SPEAKER/
MICROPHONE
Listening Safely
An external speaker/microphone can
make it easier to use the transceiver
when you clip it to your belt, so you do
not have to lift the transceiver to your
mouth each time you transmit. Lift up
the rubber cover on the MIC and SPK
jacks, then connect an optional microphone or speaker with a 3/32-inch (2.5
mm) mini plug and a 1/8-inch (3.5 mm)
plug to the MIC and SPK jacks on the
side of the transceiver. This automatically disconnects the transceiver’s
built-in speaker and microphone
To protect your hearing, follow these
guidelines when you use an earphone.
• Set the volume to the lowest setting before you begin listening.
After you begin listening, adjust
the volume to a comfortable level.
• Do not listen at extremely high volume levels. Extended high-volume listening can lead to
permanent hearing loss.
6
3. Within 10 seconds, press ¿/ or
À/SKIP to select a channel. Then
repeatedly press LOCK/PTT to set
the selected channel to ON or
OFF. 21 appears when the channel is turned on, and 2) appears
when the channel is turned off.
SETTING THE
CHANNELS
Ch.
#
Frequency
(MHz)
TX Power
Color
Hi
Lo
1
464.5000
Brown
5W
1W
2
464.5500
Yellow
5W
1W
3
467.7625
J
2W
1W
4
467.8125
K
2W
1W
5
467.8500
Silver
Star
2W
1W
6
467.8750
Gold
Star
2W
1W
7
467.9000
Red
Star
2W
1W
8
467.9250
Blue
Star
2W
1W
4. To store the setting and exit the
channel set-up mode, press MON/
FUNC.
Note: If you do not press any key
for 10 seconds, the transceiver
automatically stores the setting
and exits the channel set-up
mode.
QUIET CODES
Quiet codes help eliminate interference between different users on the
same frequency, letting you talk and
listen to people who are using other
transceivers set to the same frequency
and quiet code. This is like having a
sub-channel within a channel, giving
you greater communication flexibility.
Channel 2 is preset to ON. Follow
these steps to set the channels to on
or off.
Note: If you do not set any channels
besides CH 2 to ON and you try to
scan the channels, an error tone
sounds. (See “Selecting a Channel”
chart on Page 10.)
When you set a quiet code (there are
38 to choose from) and turn on this
feature, the transceiver transmits a
tone with your transmission, letting you
communicate with anyone who has a
transceiver set to the same frequency
and code. This tone is too low for you
to hear, but other transceivers can detect it.
1. To turn off the transceiver, rotate
OFF/VOL counterclockwise until it
clicks.
2. Hold down HI/LO/APO and QUIET/
Q-SCAN while turning on the transceiver. The channel number
flashes. 21 or 2) appears to indicate whether or not the channel is
selected.
If Quiet Code is turned on and set to
the same tone on the receiving transceiver, it only receives those transmis-
7
Temporarily Changing the
Quiet Code
sions that include the tone. If two
different groups operate transceivers
in the same area on the same frequency, they do not hear each other’s
broadcasts if they both use different
quiet codes.
You can temporarily change the quiet
code setting during normal operation,
without permanently storing it in the
transceiver.
Press QUIET/Q-SCAN to turn this feature on or off. 48,(7 and the code appear when the feature is on.
1. Hold down QUIET/Q-SCAN until
48,(7 and the quiet code flash.
or À/SKIP to select
2. Press ¿/
the desired quiet code.
Setting a Quiet Code
1. To set the desired channel, follow
Steps 1–3 in “Setting the Channels” chart on Page 7.
2. Press QUIET/Q-SCAN.
the quiet code flash.
3. Press QUIET/Q-SCAN.
When you turn off the quiet feature or
the transceiver, the new quiet code is
temporarily stored. When you change
the channel, the code you originally set
during channel set-up resumes. If you
did not set a quiet code, a quiet code
does not appear.
48,(7 and
3. Press ¿/
or À/SKIP to select
the desired quiet code. (See the
“Quiet Codes” chart on Page 9 for
a complete list of quiet codes.)
If you did not set a channel’s quiet
code during channel set-up, press QUIET/Q-SCAN to set the last displayed
quiet code as the code for the current
channel.
4. Press QUIET/Q-SCAN to store the
setting.
Notes:
• We recommend that you select
a quiet code from 7 to 30. If you
select a code below or above
that range, you must wait 1–2
seconds after holding down
LOCK/PTT before you begin
talking.
• If you set the quiet codes for all
active channels to 0, or you do
not set any quiet codes, the
quiet code returns to the default
setting (12).
8
Quiet Codes
Frequency
(Hz)
Code
Frequency
(Hz)
Code
Frequency
(Hz)
11
97.4
21
136.5
31
192.8
12
100.0
22
141.3
32
203.5
13
103.5
23
146.2
33
210.7
77.0
14
107.2
24
151.4
34
218.1
79.7
15
110.9
25
156.7
35
225.7
6
82.5
16
114.8
26
162.2
36
233.6
7
85.4
17
118.8
27
167.9
37
241.8
38
250.3
Code
Frequency
(Hz)
1
67.0
2
71.9
3
74.4
4
5
Code
8
88.5
18
123.0
28
173.8
9
91.5
19
127.3
29
179.9
10
94.8
20
131.8
30
186.2
ˆ Operation
Rotate OFF/VOL to turn the transceiver
on or off and adjust the volume.
LOCK/PTT when you finish your trans-
mission.
Hold down ¿/
to scan up through
the channels, or À/SKIP to scan down
through the channels.
To receive, simply release LOCK/PTT.
%XV\ appears when a call is received.
Set QUIET/Q-SCAN to the desired code
to provide greater communication flexibility.
Hold down MON/FUNC to hear everything on a channel, even weak transmissions. )81& appears. Release
MON/FUNC to turn squelch back on.
If you did not set the transceiver to use
a quiet code, wait until there is no signal on the channel. Then turn SQL
clockwise until the background noise
between signals stops.
The display’s backlight turns on for five
seconds when you press any key except LOCK/PTT. To turn on the backlight without changing the transceiver’s
setting, press MON/FUNC.
To transmit, hold down LOCK/PTT.
Then hold the transceiver about 3 inches from your mouth and speak slowly
in a normal voice. 7; appears. Release
9
stops scanning and 48,(7 flashes.
The transceiver goes on scanning
after the signal disappears.
SELECTING A CHANNEL
Note: You can only select, or scan,
channels when you set two or more
channels.
3. Press any key other than QUIET/QSCAN to stop scanning. The transceiver stays on the quiet code just
scanned.
To manually select a channel, press
¿/ or À/SKIP. The selected channel
number appears.
Note: If you press QUIET/Q-SCAN to
stop scanning, the transceiver stays on
the pre-set quiet code.
To scan through the channels, hold
down ¿/ or À/SKIP for about 2 seconds. 6&$1 appears. The transceiver
automatically scans through the channels and pauses on each active channel for about 5 seconds. Press ¿/ or
À/SKIP to change the scan direction.
Press any key other than ¿/ or À/
SKIP to stop scanning.
SETTING KEY TONE
Hold down MON/FUNC and press ¿/
to turn the key tone beep on or off.
(tone icon) appears when the key tone
is on.
To skip a channel to be scanned,
press ¿/ or À/SKIP to select the desired channel. Hold down MON/FUNC
and press À/SKIP.
(skip icon) appears.
Note: The key tone does not beep
when you press LOCK/PTT or MON/
FUNC, even if the key tone is on.
USING APO/HI/LO
To resume scanning the skipped channel, select the skipped channel, hold
down MON/FUNC, and press À/SKIP.
disappears.
Press APO/HI/LO to set the transmitting
power to high for long distance transmission or low for short distance transmission. +, or /2 appears.
USING QUIET CODE
SCAN
Hold down MON/FUNC and press APO/
HI/LO to turn Auto Power Off function
on or off. $3# 21 or $3# 2) appears.
When Auto Power Off is on, the transceiver automatically turns off when it is
idle for 2 hours.
1. Press QUIET/Q-SCAN to turn on
quiet code. 48,(7 and the quiet
code appear.
2. Hold down MON/FUNC, then press
QUIET/Q-SCAN. 6&$1 appears.
When matching with an appropriate quiet code, the transceiver
Press any key to turn the transceiver
back on.
10
USING KEY LOCK
CARE
You can lock ¿/ , À/SKIP, QUIET/QSCAN, and APO/HI/LO on your trans-
Keep the radio dry; if it gets wet, wipe it
dry immediately. Use and store the radio only in normal temperature environments. Handle the radio carefully;
do not drop it. Keep the radio away
from dust and dirt, and wipe it with a
damp cloth occasionally to keep it
looking new.
ceiver to avoid accidentally pressing
them. Hold down MON/FUNC, then
press LOCK/PTT to lock or unlock
these keys.
When these keys are locked, /2&. appears. If the key tone is on, an error
tone sounds when you press any of
these keys.
Modifying or tampering with the radio’s
internal components can cause a malfunction and might invalidate its warranty and void your FCC authorization
to operate it. If your radio is not performing as it should, take it to your local RadioShack store for assistance. If
the trouble is affecting the telephone
lines, the phone company can ask you
to disconnect your radio until you have
resolved the problem.
SETTING THE
COURTESY TONE
Hold down LOCK/PTT while turning on
the radio to turn the courtesy tone on
or off. A tone sounds. While the courtesy tone is on, &0721( appears and the
party you are communicating with
hears the courtesy tone when you finish a transmission.
RESETTING THE
TRANSCEIVER
If the transceiver stops operating properly, hold down QUIET/Q-SCAN while
turning on the transceiver to reset the
transceiver. All the set channels are
cleared, the current channel is Channel 2, quiet codes are off, and key tone
and courtesy tone are on.
11
SPECIFICATIONS
Bandwidth ...................................................................................................................................... 12.5 kHz
Frequency Range ................................................................................................. 464.5000-467.9250 MHz
Power Source ....................................................................................................................................... 8.4V,
1300mAH Ni-MH Battery Pack
12V, 200mA AC/DC Charger
Sensitivity at 12dB SINAD ................................................................................................................... 0.5uV
Adjacent Channel Rejection ................................................................................................................ 45 dB
Audio Distortion ....................................................................................................................................... 7%
Output Power .............................................................................................................. 1W / 5W @ 8.4 VDC
Harmonic Emissions:
Hi ......................................................................................................................................................... 55 dB
Lo ........................................................................................................................................................ 48 dB
Dimensions (HWD) ............................................................. 55/16 × 25/16 × 15 /16 inches (135 × 58 × 33 mm)
Weight ..................................................................................................................................... 13 oz (370 g)
Specifications are typical; individual units might vary. Specifications are subject to change and improvement without notice.
Limited One-Year Warranty
This product is warranted by RadioShack against manufacturing defects in material and workmanship under normal
use for one (1) year from the date of purchase from RadioShack company-owned stores and authorized RadioShack
franchisees and dealers. EXCEPT AS PROVIDED HEREIN, RadioShack MAKES NO EXPRESS WARRANTIES AND
ANY IMPLIED WARRANTIES, INCLUDING THOSE OF MERCHANTABILITY AND FITNESS FOR A PARTICULAR
PURPOSE, ARE LIMITED IN DURATION TO THE DURATION OF THE WRITTEN LIMITED WARRANTIES CONTAINED HEREIN. EXCEPT AS PROVIDED HEREIN, RadioShack SHALL HAVE NO LIABILITY OR RESPONSIBILITY TO CUSTOMER OR ANY OTHER PERSON OR ENTITY WITH RESPECT TO ANY LIABILITY, LOSS OR
DAMAGE CAUSED DIRECTLY OR INDIRECTLY BY USE OR PERFORMANCE OF THE PRODUCT OR ARISING
OUT OF ANY BREACH OF THIS WARRANTY, INCLUDING, BUT NOT LIMITED TO, ANY DAMAGES RESULTING
FROM INCONVENIENCE, LOSS OF TIME, DATA, PROPERTY, REVENUE, OR PROFIT OR ANY INDIRECT, SPECIAL, INCIDENTAL, OR CONSEQUENTIAL DAMAGES, EVEN IF RadioShack HAS BEEN ADVISED OF THE POSSIBILITY OF SUCH DAMAGES.
Some states do not allow limitations on how long an implied warranty lasts or the exclusion or limitation of incidental or
consequential damages, so the above limitations or exclusions may not apply to you.
In the event of a product defect during the warranty period, take the product and the RadioShack sales receipt as proof
of purchase date to any RadioShack store. RadioShack will, at its option, unless otherwise provided by law: (a) correct
the defect by product repair without charge for parts and labor; (b) replace the product with one of the same or similar
design; or (c) refund the purchase price. All replaced parts and products, and products on which a refund is made, become the property of RadioShack. New or reconditioned parts and products may be used in the performance of warranty service. Repaired or replaced parts and products are warranted for the remainder of the original warranty period.
You will be charged for repair or replacement of the product made after the expiration of the warranty period.
This warranty does not cover: (a) damage or failure caused by or attributable to acts of God, abuse, accident, misuse,
improper or abnormal usage, failure to follow instructions, improper installation or maintenance, alteration, lightning or
other incidence of excess voltage or current; (b) any repairs other than those provided by a RadioShack Authorized
Service Facility; (c) consumables such as fuses or batteries; (d) cosmetic damage; (e) transportation, shipping or insurance costs; or (f) costs of product removal, installation, set-up service adjustment or reinstallation.
This warranty gives you specific legal rights, and you may also have other rights which vary from state to state.
RadioShack Customer Relations, 200 Taylor Street, 6th Floor, Fort Worth, TX 76102
We Service What We Sell
RadioShack Corporation
Fort Worth, Texas 76102
12/99
19-1208
63-1120811-A00
02A01
Printed in Hong Kong