1
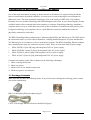
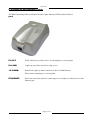
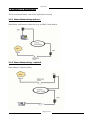
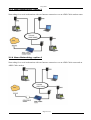
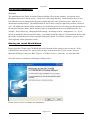
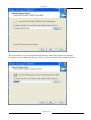
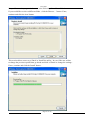
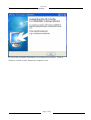
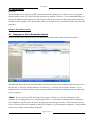
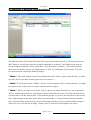
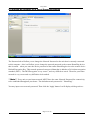
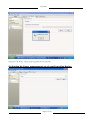
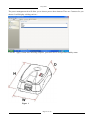
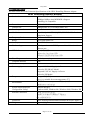
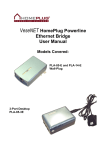
Easy Start
HP01 HomePlug Ethernet Adaptor
Easy Start
Version 1.2
CONTENTS
1 Introduction to HP01 HomePlug Ethernet Adaptor………….…….2
1.1 Package contents………………………………………….……......2
1.2 Important Safety Instructions………………..…………………......3
2 Connection and Indicator Lights……………..………………...….…4
3 Examples of Applications……………………………………….……..5
3.1.1 Home Networking-option 1………………………………….…..5
3.1.2 Home Networking-option 2…………………………………..….5
3.1.3 Home Networking-option 3……………………….………….….6
3.1.4 Home Networking-option 4………………………..………….…6
3.2 Care Instructions……………………………………………….…..7
4 PLCConfig Installation………………………………………..………8
Running the InstallShield Wizard……………………………..……… 8
5 Configuration………..………………………………………..………12
5.1 Diagnose a Local Powerline Device………………..……..………12
5.2 Diagnose a Network Powerline device……………………………13
5.3 Setting Up Security on a Local Powerline device.…………..……14
5.4 Setting Up power management on a Local Powerline device.……15
6 Technical Data………………………………………………………...17
7 Frequently Asked Questions……………………………….…. .……18
Product warranty does not apply to damage caused by lightning, power surges or wrong voltage usage
Page 1 of 19
Easy Start
1 Introduction to HP01 HomePlug Ethernet Adaptor
One of the major drawbacks in setting up home network is the absence of required wiring inside the
house to interconnect networked computers. In recent years several technologies have attempted to
address the issue. The most prominent technology so far is the family of WIFI (802.11X) products
Recently, however, another technology called HomePlug has come forth. It uses electrical grids, already
available inside walls to transmit data from computer to computer. HomePlug technology modulates
computer data in a way to enable them use power grid as a medium of transmission from point to point.
Using this technology, two computers have a virtual Ethernet connection without the need to be
physically connected to each other.
The HP01 HomePlug Ethernet Adaptor has 3 indicator lights(LEDs) and Ethernet port. The LEDs depict
the connection status, as well as other information , enabling detailed diagnosis of system malfunction.
The Ethernet port is to connect to a device in the home network. The HP01 HomePlug Ethernet Adaptor
has a standard power plug for connection to power outlet. There are four main kinds of power plugs:
HP01-UK(UK)-3 pins UK plug with integrated 230V AC power supply.
HP01-EU(EUR)-2 pins EU plug with integrated 230V AC power supply.
HP01-US(US)-2 pins US plug with integrated 120V AC power supply.
HP01-AU(AU)-3pins AU plug with integrated 230V AC power supply
Computer networking in the office or home has the following advantages:
1. Share centrally stored data
2. Share one printer
3. Multi-access to one Internet connection
4. Multi-user games over network.
1.1 Package Contents
Make sure that you have the following items. If any of the items is damaged or missing, please contact
your dealer immediately.
HP01-A2 HomePlug Ethernet Adaptor(Qty:2)
CD (Qty:1)
CAT-5 UTP Straight Ethernet Network cable(RJ-45)(Qty:2)
Page 2 of 19
Easy Start
1.2 Important Safety Instructions
Please read these instructions carefully:
1. Unplug the HP01 HomePlug Ethernet Adaptor from the wall outlet before cleaning. Do not use liquid
cleaners or aerosol cleaners. Use a damp cloth for cleaning.
2. Do not use the HP01 HomePlug Ethernet Adaptor near water.
3. The HP01 HomePlug Ethernet Adaptor should never be placed near or over a radiator or heat register,
or in a built-in installation unless proper ventilation provided.
4. The HP01 HomePlug Ethernet Adaptor should be operated form the type of power indicated on the
marking label. If you are not sure of the type of power available, consult your dealer or local power
company.
5. The HP01 HomePlug Ethernet Adaptor relies on the building’s electrical installation for short-circuit
(over current ) protection. Ensure that a fuse or circuit breaker no larger than 120 VAC or 230
VAC(depends on the power supply type in your country ) is used on the phase conductors(all
current-carrying conductors).
6. Plug the HP01HomePlug Ethernet Adaptor directly into a 100V AC ~ 240V AC(depends on the power
supply type in your country ) wall outlet. Do not use an extension cord between the adapter and the
AC power source.
7. Do not attempt to service the HP01 HomePlug Ethernet adaptor yourself, as opening or removing
covers may expose you to dangerous voltage points or other risks as well as ruin product warranty.
Refer all servicing to qualified service personnel.
8. Unplug the HP01 HomePlug Ethernet Adaptor from the wall outlet and refer the product to qualified
service personnel for the following conditions:
-
If liquid has been spilled into the product .
If the product has been exposed to rain or water.
If the product does not operate normally when the operating instructions are followed.
If the product exhibits a distinct change in performance.
Page 3 of 19
Easy Start
2. Connection and Indicator Lights
The HP01 HomePlug Ethernet Adaptor has three lights indicator(LEDs) and an Ethernet
port:
PL-ACT:
Flash when the powerline device is transmitting or receiving data.
PL-LINK:
Lights up powerline network is ready to use.
10/100MB:
Red/Green Lights up when connector to the 10/100M Ethernet.
Flash when transmitting or receiving data.
ETHERNET:
This is the connection point for connecting it to a computer or other devices with
Ethernet port.
Page 4 of 19
Easy Start
3. Examples of Applications
This section demonstrates some of the application scenarios.
3.1.1 Home Networking-option 1
Workstation with Internet connection over an ADSL/Cable modem
3.1.2 Home Networking—option2
Networking for Online Gaming.
Page 5 of 19
Easy Start
3.1.3 Home Networking—option 3
Networking for several workstations with one Internet connection over an ADSL/Cable modem router
3.1.4 Home Networking—option 4
Networking for several workstations with one Internet connection over an ADSL/Cable router and an
ADSL/Cable modem
Page 6 of 19
Easy Start
3.2 Care Instructions
Network Volume
The maximum number of HomePlug adaptors in a single-family house is theoretically 253 connections,
but in practice more than 15 devices should be transferring data simultaneously.
Network Security
Normally the electric meter forms a physical barrier, i.e. only devices connected to this meter can be part
of the network and benefit from the phase coupling . We strongly recommend that you use the HP01
HomePlug Ethernet Adaptor internal device encryption. It is configured with the HP01 HomePlug
Ethernet Adaptor Configuration Utility.
Page 7 of 19
Easy Start
4 PLCConfig Installation
Overview
The installation of the Turbo Powerline Ethernet Bridge will only take minutes .Laying long wires
throughout the house is not necessary . The device is also plug-and-play , which means as soon as two
Powerline devices are plunged into the power outlets under the same electrical circuit , both devices
should start communicating . The traditional RJ-45 LAN cable is simply replaced by in-house electrical
wire . No additional software utility and driver are needed for the device to become operational. However ,
the enclosed software utility allows advanced users to manipulate the device for different needs , for
example , device discovery ,changing default settings , increasing security , management , etc . If you
decide to install the enclosed software utility , just simply install the software CD included in the box and
physically connect the devices into computers and power outlets .For further assistance , please refer to
our Frequently Asked Questions section .
Running the Install Shield Wizard
Please insert the CD into your CD-ROM and wait a moment for the setup screen to come up . If the
CD-ROM does not run the CD , please click on 'Start' at the bottom left of your screen ( for most
Microsoft Windows ) and go to 'Run' .Type in : (CD Drive Letter ): \eth\setup . exe and click 'OK' .
Once the software is loaded it will display a dialog such as :
Please click on 'Next' to continue the installation .
Page 8 of 19
Easy Start
This section allows you to change the default directory where the program was installed.
If you don't want to change the directory click on ‘Next’ to continue the installation process.
Page 9 of 19
Easy Start
Setup will create the program's shortcuts in the following ‘Start Menu folder’.
If you would like to select a different folder , click the 'Browse…' button. If not,
continue and click the 'next' button.
This section allows a user to go 'Back' or 'Install' the utility . In case if the user wishes
to change the previous options then go ahead and click on 'Back' to change the settings .
If not , continue and click the 'Install' button .
Page 10 of 19
Easy Start
This screen shows the progress of the installation .
his screen shows that the installation was completed successfully . Click on
'Finish 'to exit the wizard . Restart the computer or not .
Page 11 of 19
Easy Start
5 Configuration
Overview
The Powerline device uses 56-bit DES encryption to block outside access .The key is set by using the
software utility on the CD . By default ,the protection is enabled . However , it is recommended that you
change the default network password . All your Powerline devices must use the same network password
in order for the computers to be networked . Make sure that all devices are loaded with the same network
password .
Diagnose Powerline network
5.1 Diagnose a Local Powerline Device
Double click the PLCConfig icon on your desktop to open this utility show in the screen below
The Main tab shows the Powerline units that are connected to the current computer and other devices on
the network . It will also tell Mac Address of each device . It will let you refresh the window , if you
change devices , and also will allow you to connect to different networks if multiple units are connected
to your computer .
*Note* If you do not see ANY unit in the device status , and there is a device connected to your
computer ,try to unplug all devices , and plug them back in . Also make sure that the cable connecting
your computer to the Powerline device is the right type and working correctly . If all of this seems to be
correct , and you still receive nothing in the Device window , try rebooting your computer . If the problem
still persists , please contact technical support .
Page 12 of 19
Easy Start
5.2 Diagnose a Network Powerline Device
The Main tab shows all the other Powerline Units on your powerline network . It will represent them by
MAC Address ,and will also show the available bandwidth to each unit ( Units farther away from the
current computer might have a lower Data Rate , since the distance is farther ) .If you add or subtract
units from your home network , you might want to re-Scan , by clicking the "Scan" button . This will
rescan the network ,and refresh with any changes .
**Note** Only units with the same Network Password will be shown , please check that first , to make
sure they all have the same network password (Case sensitive ) .
**Note**If a Unit shows MAC Address of all 0's , this unit might not have a solid connection ,or might
not connect at all . If this is the case please contact technical support .
**Note** If there are Units in your home , that you do not see in this Network scan , try to unplug all
devices , and plug them back in ( Only do this with the Units that you do not view in the network screen ,
you don't have to do this with all units . If the problem persists , try to move the unit closer to this current
unit ( adjacent plugs on the same wall socket is most preferable ) . If the problem still persists and that
unit is still not shown on the network , then the unit might be defective please contact technical support .
Otherwise if you view the unit working , distance and / or electrical circuit might be the causes .
Page 13 of 19
Easy Start
5.3 Setting Up Security on a Local Powerline Device
The Password tab will allow you to change the Network Password to the unit that is currently connected
to this computer . Also it will allow you to change the network password to the remote HomePlug device
that is scaned when you enter the device password of the remote HomePlug device to the remote device
Default Encryption Key .This network password encrypts all data that is added to a 56-bit data encryption
standard ( DES ) . The DES Encryption is very secure , and very difficult to crack . Therefore your home
network is very secure and very difficult to be breached .
**Note** Every unit on your home network MUST have the same Network Password for connectivity
to be established throughout your home . The default network password is " HomePlug" .
You may input a new network password. Then click the 'Apply' button. It will display a dialog such as :
Page 14 of 19
Easy Start
Click the 'OK' button, change network password successfully
5.4 Setting Up Power management on a Local Powerline Device
Page 15 of 19
Easy Start
The power management tab will allow you to choose power down timeout. There are 5 statuses for you
choose. It will display a dialog such as :
Click the ‘Apply’ button after choosing complete, powerline device will put into standby status.
Figure 1
Page 16 of 19
Easy Start
6 Technical Data
The table below shows the Technical Specifications of the HP01 HomePlug Ethernet Adaptor.
HP01 HomePlug Ethernet Adaptor
Standards
100Base-T/10Base-T Ethernet, IEEE 802.3u
100Mbps/10Mbps Auto MDI/MDLx Support
HomePlug 1.0 compatible
Protocols
CSMA/CA MAC control
Transfer rate
50Mbps(HP01-A1) or 85Mbps(HP01-A2)
Transfer procedure
Asynchronous
Modulation
16QAM,64QAM OFDM,DQPSK,DBPSK,ROBO Carrier
Modulation Support
Frequency Band
4.3Mhz to 20.9Mhz band
Range
Up to 5000 square feet
Security
56 bit EDS
Platform Support
OS Independent with TCP/IP protocol installed and with
Ethernet port.
1×10/100Mb LED
LED Indicators
1×Powerline Link Status LED
1×Ethernet Link/Activity Status LED
HomePlug connection
Standard power plug
Computer interface
RJ45
Current consumption
40mA
Power supply
Integrated 230V AC Supply via Power
Socket for EU/UK/AU Model
Integrated 120V AC Supply via Power
Socket for US Model
Storage:-25℃-70℃
Operation: suitable for room temperature,27℃
Temperature
Environment
Suitable for room temperature,27℃﹐10-90%
humidity(non-condensing)
System requirements(for
Configuration Utility)
External Connectors
Ethernet interface
Windows 98SE, Windows Me, Windows 2000, Windows XP
1×Electrical Power Socket
1×RJ45 for 10Base-T/100Base T Ethernet
(AutoMDI/MDI-X)
Dimension
Plastic housing 96mm×68mm×34mm(H×W×D)(see figure 1)
Weight
Approx. 110g
Page 17 of 19
Easy Start
7 Frequently Asked Questions
Q. What's the speed of Powerline operate over a standard home power line network ?
A. Powerline operates up to 50Mbps or 85 Mbps bandwidth over a standard home power line network .
Q. What's the Estimated Range of Powerline ?
A. Approximately 300 meters in wall power lines ( one household ) .
Q. Will Powerline signal pass through circuit breakers ?
A. Yes , Powerline signal work will have no problem passing though circuit breakers but not through
power transformers .
Q. Does Powerline work with AC input 100 - 240 V ?
A. Yes , Powerline works with AC input 100 - 240 V .
Q. Does Powerline cause any interference with other my other home networking device ?
A. No , Powerline operated in a different frequency band than other power line control devices and can
co-exist technologies as X - 10 , CEBus , and LONworks .
Q. Can my neighbor receive my Powerline signal ?
A. It is possible for your neighbor receive your Powerline signal between two adjacent homes . To
prevent this happen , please enable the 56 – bit DES security encryption on your Powerline Device . To
do that , you must run the Powerline Configuration Utility on each Powerline device in your power line
network . This will only allow computers with the same security password to be able to receive
information .
Q. How do I find out what's my current speed and my signal strength of my Powerline device ?
A. Run the PLCConfig , it will show your current speed and your signal strength .
Q. One of the Powerline LED's doesn't light up after I plug the Powerline directly into a wall outlet ?
A. Test that wall outlet with other electric devices first , make sure that wall outlet is working properly .
Then , try to plug your Powerline device again , if the same problem happens again , plug both Powerline
units into adjacent sockets , and see if the lights light up . If you are still having problems please contact
Technical Support .
Q. The Ethernet LED doesn't light up on my Turbo Powerline Ethernet Bridge ?
A. Most likely , if the Ethernet LED doesn't light on your Turbo Powerline Ethernet Bridge is because the
Ethernet port on it doesn't a LAN connection .Check your Ethernet adapter on your computer , and make
Page 18 of 19
Easy Start
sure its enable and working properly . Also , check your Ethernet cable , make sure you use the right type ,
it's plugged in correctly , and it's working properly .
Q. I can't connect to internet and other computers on my power line network ?
A. 1. Check your IP address and TCP/IP protocol are set up properly for all the computers on your power
line network and try to ping your gateway .
2.See if Powerline Configuration Utility to detect all other Powerline device on your power line
network .Try plugging both Powerline units into Adjacent sockets and see if the lights light up . If you are
still having a problem , please contact Technical Support.
Q. How many Powerline devices do I need to setup a powerline network ?
A. You must need two or more Powerline devices to setup a powerline network .
Q. In order to making the Turbo Powerline Ethernet Bridge working properly , do I have to install the
Powerline Configuration Utility on every single computer who has the Turbo Powerline Ethernet Bridge
plug into it ?
A. No , the Powerline Configuration Utility is a utility to diagnose or setup encryption for Powerline
device . Due to Turbo Powerline Ethernet Bridge is a fully plug & play device , no driver require to
install . So technically speaking , the Powerline Configuration utility is not a requirement to install on
your computer . In other words , you can install the utility , setup the encryption , and delete it from your
computer , but your Turbo Powerline Ethernet Bridge will still working properly .
Q. How many Turbo Powerline Ethernet Bridges that I can install into one same Local Area Network ?
A. It recommended install up to 15 Turbo Powerline Ethernet Bridges in one same password powerline
network .
Page 19 of 19