1
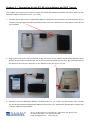
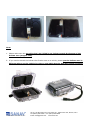
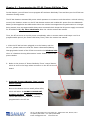
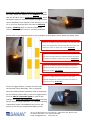
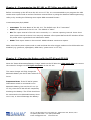
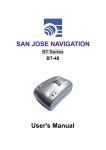
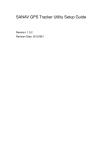
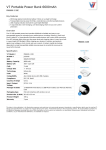
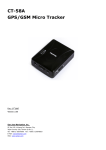
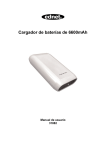
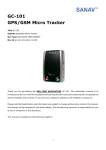
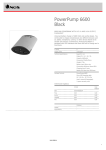
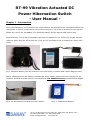
RT-99 Vibration Actuated DC
Power Hibernation Switch
- User Manual Chapter 1 - Introduction
This is the preliminary user manual for the RT-99 Vibration Actuated DC Power Hibernation Switch with
instructions on how to configure and use the device properly. The RT-99 is intended for use with the
SANAV GC-101/CT-24, the SANAV 3.7V 6600mAh battery and the Pelican GPS Tracker case.
Important Note: The RT-99 is compatible with both the SANAV GC-101 and the CT-24 GPS Trackers.
However, when using the RT-99 with the CT-24, the CT-24 should be set to “Always On” power save
mode.
Fig 1: 6600mAh Battery with RT-99 and GC-101 GPS Tracker in Pelican GPS Tracker Magnetic Case
Before operating the RT-99 vibration-actuated DC power switch, please make sure that the RT-99
vibration-actuated DC power switch is connected to a 3.7V 6600mAh battery purchased from SANAV.
Fig 2: RT-99 Vibration Actuated DC Power Switch
SAN JOSE NAVIGATION, INC.
Fig 3: 3.7V 6600mAh Battery
9F, No. 105 Shi-Cheng Rd., Pan-Chiao City , Taipei Hsien 220, Taiwan, R.O.C
Tel: (886-2) 2687-9500 Fax: (886-2) 2687-8893
Email: sanav@sanav.com
www.sanav.com
Chapter 2 – Connecting Up the RT-99 to the Battery and GPS Tracker
This chapter will instruct you how to connect up the RT-99 vibration-actuated DC power switch to the
6600mAh battery and the GC-101 (or CT-24).
1. Connect the RT-99 to the 3.7V 6600mAh battery using the 3 pin connector, so that the black wire is
closest to the top edge of the RT-99 board and the red wire is closest to the mini button on the RT-99
circuit board.
2. Plug in the small 3-pin white connector on the end of the 3 wire (Black, Red & Yellow/Orange) cable
directly to the socket inside the GC-101 or CT-24. Note the black wire on the 3-pin connector should
be closest to the 18-pin connector on the bottom of the GC-101 or CT-24.
3. Carefully insert the 6600mAh battery, RT-99 and GC-101 (or CT-24) into the Pelican case, so that
the RT-99 fits between the 6600mAh battery and the GC-101, with the RT-99 switches, buttons and
indicator LED’s facing upwards.
SAN JOSE NAVIGATION, INC.
9F, No. 105 Shi-Cheng Rd., Pan-Chiao City , Taipei Hsien 220, Taiwan, R.O.C
Tel: (886-2) 2687-9500 Fax: (886-2) 2687-8893
Email: sanav@sanav.com
www.sanav.com
Note:
1. Please make sure the top side of GC-101/CT24 is not facing towards the bottom of the
Pelican case (magnet side).
2. If you need to attach the Pelican GPS Tracker case to a vehicle, please put the Pelican case in
different places on the vehicle in order to test which has the best GPS signal reception.
SAN JOSE NAVIGATION, INC.
9F, No. 105 Shi-Cheng Rd., Pan-Chiao City , Taipei Hsien 220, Taiwan, R.O.C
Tel: (886-2) 2687-9500 Fax: (886-2) 2687-8893
Email: sanav@sanav.com
www.sanav.com
Chapter 3 – Programming the RT-99 ‘Power-ON Delay Time’
In this chapter, you will learn how to program RT-99 Power-ON Delay Time and then put the RT-99 into
vibration sensing mode.
The RT-99 vibration-actuated DC power switch operates in a manner such that when a vehicle is being
moved, the vibration sensor on the RT-99 detects motion and enables DC power from the 6600mAh
battery to be supplied to the GPS tracker. When the vehicle has stopped moving and motion is no longer
being sensed, then a programmable delay timer is started which keeps the DC power supply connected
for an additional 5, 10, 15 or 20 minutes after the vehicle motion has ceased.
Thus, the RT-99 turns on the DC power immediately when it senses motion and keeps it on for a
programmable period (the ‘Power-ON Delay Time’) after the motion has ceased.
1. After the RT-99 has been plugged in to the battery and the
GC-101, please make sure that the ‘Power Hibernation/Battery
Charging Mode’ switch of the RT-99 is moved to the left hand side
when in ‘Vibration Sensing Hibernation’ mode. Please refer to the
picture below:
2. Below is the picture of ‘Power-ON Delay Timer’ control button’
which is next to the large white connector on the RT-99 circuit
board.
3. Press the “Power-ON Delay Time” toggle
button quickly.
Next to the button are two small yellow LEDs,
which will either be ALWAYS-ON BRIGHT,
ALWAYS-ON DIM or UNLIT to indicate the
‘Power-ON Delay Time’ which is currently
programmed in the RT-99.
SAN JOSE NAVIGATION, INC.
9F, No. 105 Shi-Cheng Rd., Pan-Chiao City , Taipei Hsien 220, Taiwan, R.O.C
Tel: (886-2) 2687-9500 Fax: (886-2) 2687-8893
Email: sanav@sanav.com
www.sanav.com
Press the toggle button once for 3 seconds and
the LED’s which are always-on will FLASH to indicate
that the RT-99 is now in programming mode. Press
the button quickly 3-4 times to toggle through the four
‘Power-ON Delay Time’ options on the RT-99 (i.e. 5, 10,
15 or 20 mins) and the LED’s will now be flashing
brightly, flashing dimly or unlit to indicate the
‘Power-ON Delay Time’ which is currently selected.
Please refer to the diagram below for the indication of LED lights versus ‘Power-On Delay Time’.
Always-on or flashing bright yellow LED on the left hand side
next to the toggle button indicates that after the motion has
ceased, the power-on delay time is set to 5 minutes.
Always-on or flashing bright yellow LED on the right hand side
away from the toggle button indicates that after the motion
has ceased, the power-on delay time is set to 10 minutes.
Always-on or flashing Bright yellow LED’s on both sides
indicates that after the motion has ceased, the power-on
delay time is set to 15 minutes.
Always-on or flashing dim yellow LED’s on both sides
indicates that after the motion has ceased, the power-on
delay time is set to 20 minutes.
Press the toggle button a couple of times until
the desired ‘Power-ON Delay Time’ is selected.
When the desired Power-ON delay time is confirmed
by the flashing yellow LED’s, press the toggle button
once for about 3 seconds again to confirm the
setting. This turns off all the yellow LED’s and puts
the RT-99 into normal operation, i.e. vibration sensing
‘hibernation mode’. Immediately the GC-101 will
power up for the pre-programmed delay period.
SAN JOSE NAVIGATION, INC.
9F, No. 105 Shi-Cheng Rd., Pan-Chiao City , Taipei Hsien 220, Taiwan, R.O.C
Tel: (886-2) 2687-9500 Fax: (886-2) 2687-8893
Email: sanav@sanav.com
www.sanav.com
Chapter 4 - Programming the GC-101 or CT-24 for use with the RT-99
Before connecting up the RT-99 to the GC-101 or CT-24, it is recommended to pre-program the GPS
tracker auto-report mode to a short fixed time interval either by using the Windows USB Programming
Utility or by sending the following auto-report SMS command format :#username,0000,6,60,9999*
•
username: The User Name of the GC-101. The default user ID is “username”.
•
0000: The password of the GC-101. The default is “0000”.
•
60: The report interval of the GC-101 in seconds, i.e. 1 minute reporting interval. Use a short
auto-report interval or the GC-101 may only transmit a few reports before the RT-99 shuts off the
DC power when it goes back into hibernation mode.
•
9999: Total report times to the terminal. 9999 indicates continuous reports.
Make sure that the auto-report mode is used and that the other trigger modes on the GPS tracker are
disabled (e.g. geofence, speed/park, SOS-Panic, ‘power save’ on CT-24).
Chapter 5 - Charging the Battery with the RT-99 and GC-101
Move the ‘Power Hibernation/Battery Charge’ switch on the RT-99 to the right hand side and connect
the mains AC charger to the 15-pin connector on the GC-101.
The mains charger will fully charge the
6600mAh battery via the RT-99 in about 5-6
hours.
Important Note: If the RT-99 DC power
hibernation switch is connected to the
6600mAh battery, but not the GC-101 (or
CT-24), then the RT-99 will still completely
discharge the battery. The RT-99 should not
be connected to the 6600mAh battery when
not in use, or this will damage the battery.
SAN JOSE NAVIGATION, INC.
9F, No. 105 Shi-Cheng Rd., Pan-Chiao City , Taipei Hsien 220, Taiwan, R.O.C
Tel: (886-2) 2687-9500 Fax: (886-2) 2687-8893
Email: sanav@sanav.com
www.sanav.com