1
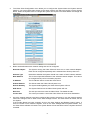
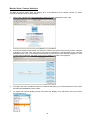
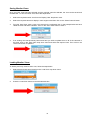
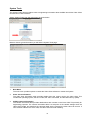
BBV Omnivision Video Client
User Guide
DRAFT
Building Block Video Ltd.,
17 Apex Park,
Diplocks Industrial Estate,
Hailsham, East Sussex, BN27 3JU UK.
Tel: +44 (0)1323 842727
Fax: +44 (0)1323 842728
Support: +44 (0)1323 444600
www.bbvcctv.com
Table Of Contents
Pre-Installation Checks And Safety Procedures .....................................................................................................3
Introduction ..............................................................................................................................................................5
Terminology .............................................................................................................................................................5
BBV Omnivision Video Client Initial Setup ..............................................................................................................6
Configuring The Video Client Network Settings ......................................................................................................8
Monitor View / Camera Selection ..........................................................................................................................10
Saving Monitor Views ............................................................................................................................................12
Loading Monitor Views ..........................................................................................................................................12
Deleting Monitor Views..........................................................................................................................................13
Start up Monitor Views ..........................................................................................................................................13
System Tools .........................................................................................................................................................14
2
Pre-Installation Checks And Safety Procedures
UNPACKING
Check Packaging - Upon taking delivery of the unit, inspect the packaging for signs of damage. If
damage has occurred, advise the carriers and/or the suppliers immediately.
Check Contents - Upon taking delivery of the unit, unpack the unit carefully and check that all the
items are present and correct. If any items are missing or damaged, contact your equipment dealer.
Retain Packaging - The shipping carton is the safest container in which to transport the unit. Retain
undamaged packaging for possible future use.
IMPORTANT SAFETY PRECAUTIONS
Read Instructions - All relevant safety, installation and operating instructions should be read before
attempting to install, connect or operate the unit.
Retain Instructions - All safety, installation and operating instructions should be retained for future
reference.
Heed Warnings - All warnings on the unit and in any relevant safety, installation or operating
instructions should be adhered to.
Cleaning - Unplug the unit from the power outlet before cleaning. Do not use liquid cleaners or
aerosol cleaners. Use a damp cloth for cleaning.
Attachments - Do not use attachments not recommended by the product manufacturer as they may
cause hazards.
Water and Moisture - Do not expose the internal electronics of this unit to water or dampness; for
example, in an unprotected outdoor installation, or in any area classified as a wet location.
Accessories - Do not attach this unit to an unstable stand, bracket or mount. The unit may fall,
causing serious injury to a person and serious damage to the unit.
Power Sources - This unit should be operated only from the type of power source indicated on the
manufacturer’s label. If you are not sure of the type of power supply you intend to use, consult your
equipment dealer or local power company. For units intended to operate from battery power or other
sources, refer to operating instructions.
Power Connector - This unit is equipped with coaxial power connector mounted at the edge of the
PCB for low voltage power input. Do not attempt to alter this connector in any way.
Power Cord Protection - Power supply cords should be routed so that they are not likely to be
trapped, pinched or otherwise damaged by items in close proximity to them, whether inside the unit or
outside it. Particular attention should be paid to cords at plugs, connection units and the point of exit
from the unit.
Overloading - Do not overload outlets and extension cords, as this can result in fire or electric shock.
Object and Liquid Entry - Never push objects of any kind into the unit, as they may touch dangerous
voltage points or short out parts that could result in fire or electric shock. Never spill liquid of any kind
on or inside the unit.
Servicing - Servicing of the unit should only be undertaken by qualified service personnel, as opening
or removing covers may expose you to dangerous voltages or other hazards.Damage Requiring
Service - Servicing by qualified personnel should be carried out under the following conditions:
(a)
When the power-supply cord or plug is damaged.
(b)
If liquid has been spilled or objects have fallen into the unit
(c)
If the internal electronics of the unit have been exposed to rain or water
(d)
If the unit does not operate normally by following the operating instructions. Adjust only those
controls that are covered by the operating instructions, as improper adjustment of other
controls may result in damage and will often require extensive work by a qualified technician
to restore the unit to normal operation.
3
(e)
(f)
If the unit has been dropped or the enclosure is damaged.
If the unit exhibits a distinct change in performance. This indicates a need for service.
Replacement Parts - If replacement parts are required, ensure that only replacement parts
recommended by the product manufacturer are used.
Safety Check - Upon completion of any service or repairs to the unit, safety checks should be
performed to ensure that the unit is in proper operating condition.
Pre-installation Checks - It is recommended that the unit be bench-tested prior to installation on the
site.
Safety During Installation or Servicing - Particular care should be taken to isolate the dome in order
to prevent operation while engineering work is being carried out on the VA1.
Adhere to Safety Standards - All normal safety precautions as laid down by British Standards and
the Health and Safety at Work Act should be observed.
WARNING
TO PREVENT DANGER OF FIRE OR SHOCK, DO NOT EXPOSE THE INTERNAL COMPONENTS
OF THIS EQUIPMENT TO RAIN OR MOISTURE.
The “lightning flash with arrowhead” symbol inside an equilateral triangle is used to warn the user of
this equipment that there are sufficiently high voltages within the enclosure to constitute a risk of
electric shock.
The “exclamation point” symbol inside an equilateral triangle is used to alert the user of this equipment
to important operating and maintenance (servicing) instructions in the literature accompanying the
appliance.
4
Introduction
Product Description
The BBV Omnivision Video Client takes multiple Cisco IP video streams and enables them to be viewed on a
PC using a VGA or HDMI monitor.
Set-up is via a simple to operate web interface and any authorised operator can use these to set up new
streams when required, using any network connected device e.g. laptop/ipad//tablet.
Technical Specification
Hardware Specification
BBV-I7 Hardware:
Intel® Core™ i7, 6GB of System RAM, and NVidia
High Performance Video Card.
BBV-I7 Power Requirements:
240VAC
BBV-I7 Dimensions (external):
Length
Width
Height
BBV-I7 Weight:
3 Kilo Grams
BBV-I7 Temperature range:
0° Celsius to +40° Celsius
440mm
230mm
44mm
Software Specification
Operating System:
Microsoft Windows 7 Embedded 64-bit OS
Installed Software Packages:
Microsoft .NET Framework 4.0
Microsoft SQL Compact
Microsoft Internet Explorer 9 (64-bit)
Cisco Multipane Client x64 (64-bit ActiveX)
Terminology
BBV Omnivision
Video Client
The BBV software used to receive and display video footage from Cisco Media
servers.
System
The computer hardware (PC) that the BBV Omnivision Video Client software is running
on.
Cisco Camera
Streams
The video footage received from Cisco compatible IP cameras via the Cisco Media
Server.
5
BBV Omnivision Video Client Initial Setup
1.
When first loaded the Video Client will not have any Cisco VSM settings configured. You will be
presented with a screen similar to that shown below. The IP address, web port, and debug port are
displayed.
3.
Using a device connected on the same network, e.g. laptop/ipad/tablet, load the video client
configuration web pages using a web browser (e.g. Internet Explorer or Firefox). The configuration
web pages are accessible via the video clients IP address and the default web port is 8081.
E.g. In the example above you would enter http://192.168.1.52:8081 into the web browser to access
the configuration web pages.
From the main menu you can access additional setup pages. The Video Client and Cisco Client
software versions are also listed. These are important when technical support is required.
6
4.
Click on the ‘Cisco VSM 7 Configuration’ button. Enter the IP Address, User Name, and Password
required to log in to the Cisco VSM Media Servers VSOM. If you do know these details please
contact you Cisco VSM system administrator. Press the Save Settings button and the video client will
automatically restart.
5.
While the video client is restarting it will display an estimation of how long until it is ready to use
again. The time taken may be longer than the estimated time depending on the number of cameras
configured on the Cisco VSM.
6.
After the Video Client has restarted you will see screen similar to that shown below. At the top of the
display you should see a message indicating that the Video Client is ready for use. In addition the IP
addresses of the video client, web port, control port, debug port, and Cisco VSM IP address are also
displayed.
7.
The Video Client is now ready to display Cisco camera streams.
7
Configuring The Video Client Network Settings
To configure the BBV Omnivision Video Client network details follow the steps below.
1.
Press the ‘Cisco VSM 7 Configuration’ button on the main menu.
8
2.
The Video Client Configuration menu allows you to configure the System Name and System network
details. If you have multiple video clients on the same network, they will each require a unique System
Name. When the System Name is changed the system will require a full restart before the change will
take effect.
3.
Below are details about each network setting that can be configured.
4.
Network Adapter
The System running the Video Client will have one or more network adapters.
Each can be configured separately and is selected from this drop down box.
Address Type
Determines whether the System should use a static or DHCP network address.
MAC Address
This is the unique MAC address of the selected network adapter. This cannot
be changed and is just for information purposes.
IP Address
The IP address used to access the Video Client.
Subnet Network
The Subnet mask the Video Client System is on.
Default Gateway
The System default gateway the Video Client System will use.
DNS Server
The System DNS server the Video Client System will use.
Web Port
The web port used to access the Video Client. The default is 8081.
Control Port
The control port used to control the Video Client via Omnivision Workstation.
Once the network settings have been configured they need to be saved. If only the network settings
have been changed, click on either of the ‘Save Settings’ buttons. The Video Client will restart, but not
the System.
If the System Name has been changed, click on the ‘Save Settings and Restart System’ button. If
there is a reason not to restart the System, click on the ‘Save Settings Without System Restart’, only
the Video Client software will restart. The System Name will not take effect until the System has been
restarted.
9
Monitor View / Camera Selection
The BBV Omnivision Video Client can display up to 16 simultaneous Cisco camera streams. To select
cameras for display follow the steps below.
1.
Click on the ‘Camera and View Configuration’ button from the configuration main menu.
2.
The camera selection page allows you select the monitor view (multi screen layout) and the cameras
to display in that view. The main area of the page is occupied by a representation of the currently
selected monitor view. In the example screen below we have a full screen selected (Segment 1), and
a single camera selection drop down menu used to display a camera in that segment.
3.
The right hand menu provides access to the features that allow you to select different monitor views
and also save/load/delete monitor views.
4.
To change the currently display monitor view select the ‘Display View’ drop down menu and choose
the required layout.
10
5.
The page display will change to represent the newly selected view. There is a camera drop down
menu in each segment. To select a camera to use for a segment simply select it from the relevant
drop menu and then select the ‘Select Camera’ button.
6.
For Apple IPod/IPad/IPhone and Andriod based Tablet/Phone users, the monitor view/camera
selection screen appears in a slightly different format as shown below. Drop down menus are provided
for each monitor view segment, but these do not appear as a representation of the actual monitor view
layout due to the reduced screen resolution of these devices.
7.
Below is a screen showing how the actual monitor view appears is comparison to the web page
representation.
11
Saving Monitor Views
Once a monitor view has been selected and the required camera’s selected, the view can be saved and
recalled later. To save a monitor view, follow the steps below.
1.
Select the required monitor view from the ‘Display View’ drop down menu.
2.
Select the required camera to display in each segment and then click on the ‘Select Camera’ button.
3.
From the ‘Save View’ menu, enter a new name for the configured view. In the example below we have
called the view ‘HD Office Cameras’. Click on the ‘Save View’ button to save it.
4.
If an existing view has previously been saved and you wish to update some or all of the cameras in
this view, click on the ‘Save View’ drop down menu and select the required view. Then click on the
‘Save View’ button to update it.
Loading Monitor Views
To load a previously saved monitor view, follow the steps below.
1.
Select the previously saved view from the ‘Load View’ drop down menu.
2.
Press the ‘Load View’ button to load the selected view.
12
Deleting Monitor Views
To delete a previously saved monitor view, follow the steps below.
1.
Select the previously saved view from the ‘Delete View’ drop down menu.
2.
Press the ‘Delete View’ button to delete the view.
Start up Monitor Views
A single monitor view can be configured to always display when the video client loads. To configure the
default startup view, follow the steps below.
1.
Select the required view from the ‘Startup View’ drop down menu.
2.
Press the ‘Set as Startup View’ button to save the setting.
13
System Tools
The System Tools page provides access to engineering information about the BBV Omnivision Video Client
and the Cisco VSM 7 cameras.
Select ‘System Tools’ from the main menu as shown below.
Below is shown typical information you will find the System Tools page.
1.
Main Menu
The main menu provides options to restart the Video Client software or restart the System.
2.
Video Client Information
The video client information table provides details about the system running the video client. This
includes the operating system, the CPU model, the video card model, and the total memory (RAM).
3.
CVSM 7 Camera Information
The camera information table provides details about each camera on the Cisco VSM. This primarily for
engineering purposes. The camera information table is a snap shot of the camera settings when the
video client loaded, and therefore the cameras listed are the cameras the video client can access. If
new cameras added to the Cisco VSM, the video client will need restarting.
14