1
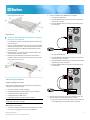
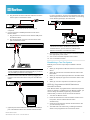
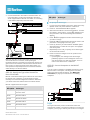
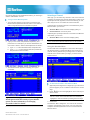
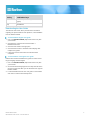
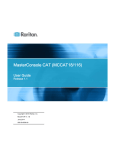
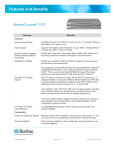
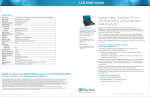
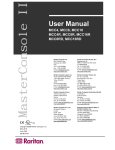
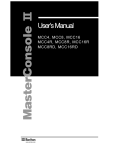
MasterConsole CAT® Quick Installation and Setup Guide (for MCCAT28/216 only) Congratulations on your purchase of the "two-user" MasterConsole CAT (MCCAT) switch―MCCAT28 or MCCAT216, the most friendly and easy-to-use KVM (Keyboard, Video and Mouse) switch. This Quick Setup Guide explains how to install the product. Follow the instructions carefully to ensure a quick and easy installation. For more detailed information on any aspect of the product, consult the User Guide accessible from the Raritan website "Firmware and Documentation" Support page. For instructions, see Downloading the User Guide (on page 8). Note: For information on "one-user" MCCAT switches, MCCAT18 and MCCAT116, see the Quick Installation and Setup Guide that comes with them, or download the MCCAT User Guide for MCCAT18/116 from Raritan's Firmware and Documentation webpage (http://www.raritan.com/support/firmware-and-documentation/). Package Contents Based on the package you ordered or purchased, your package may or may not contain the MCCAT user station. If you purchase MCCAT28-UST or MCCAT216-UST, the package surely contains the MCCAT user station. • • • • • • MCCAT switch x 1 Power cord x 1 Rackmount kit x 1 (including brackets and associated screws) Quick Installation and Setup Guide x 1 Warranty card x 1 MCCAT user station package (Optional) Note: For detailed contents of the user station package, see the Quick Installation and Setup Guide that ships with the MCCAT user station. If anything is missing or damaged, contact the local dealer or Raritan technical support for help. QS Rule What to Read MCCAT28 and MCCAT216 share the same features. The only difference is the number of channel ports: MCCAT28 has eight channel ports, and MCCAT216 has sixteen. You can use either product to establish a one-tier MCCAT system, which comprises of one single MCCAT switch, or a two-tier MCCAT system, which comprises of multiple MCCAT switches. Depending on the type of the system you want to establish, the sections that you should read vary. If you need to install the MCCAT switch in your rack, first read: • MCCAT Rack Mount (on page 1) For a one-tier system, read: MCCAT28/216 QSG QSG-MCCAT2-0A-v2.0-E y 255-20-0004-00 • • • • Connecting Computers (on page 2) Login (on page 5) Selecting a Channel (on page 6) Logout (on page 7) For a two-tier system, read: • • • • • Establishing a Two-Tier System (on page 3) Connecting Computers (on page 2) Login (on page 5) Selecting a Channel (on page 6) Logout (on page 7) QS Rule MCCAT Rack Mount MCCAT switches can be mounted in 1U (1.75", 4.4cm) of vertical space in a standard 19" equipment rack. To rack mount an MCCAT switch, use the brackets and screws (Bracket Assy of P2-HUBPAC) that came with the device. You can mount the MCCAT switch facing the front of the rack or the rear. Forward Mount To rack mount the MCCAT switch with the front panel facing the front of the rack 1. Let the MCCAT switch's front panel and the bracket's "ear" face toward you. 2. Align two oval-shaped holes close to the ear of the bracket with two threaded holes on one side of the MCCAT switch. 3. Secure the bracket to the MCCAT switch with two of the included screws. 4. Repeat Steps 1 to 3 for securing the other bracket to the other side of the MCCAT switch. 5. Mount the entire assembly in the rack, and secure the brackets' ears to the rack's front rails with your own screws, 1 bolts, cage nuts, and so on. 2. Connect a USB or PS/2 MCIM to the computer. If using the MCIM-USB: a. Plug the MCIM's USB connector into one of the USB ports of the computer. b. Plug the MCIM's video connector into the VGA port of the computer. Rear Mount To rack mount the MCCAT switch with the front panel facing the rear of the rack 1. Let the MCCAT switch's rear panel and the bracket's "ear" face toward you. 2. Align two oval-shaped holes far from the ear of the bracket with two threaded holes on one side of the MCCAT switch. 3. Secure the bracket to the MCCAT switch with two of the included screws. 4. Repeat Steps 1 to 3 for securing the other bracket to the other side of the MCCAT switch. 5. Mount the entire assembly in the rack, and secure the brackets' ears to the rack's front rails with your own screws, bolts, cage nuts, and so on. If using the MCIM-PS2: a. Plug the MCIM's PS/2 mouse connector into the PS/2 mouse port of the computer. b. Plug the MCIM's PS/2 keyboard connector into the PS/2 keyboard port of the computer. c. Plug the MCIM's video connector into the VGA port of the computer. QS Rule Connecting Computers Preparing Requisite Items Collect these components or devices before connecting any computer to the MCCAT switch. • • • • • Cat5 UTP cables (one per computer) MCIMs: MCIM-PS2 or MCIM-USB (one per computer) A standard PS/2 or USB keyboard A standard PS/2 or USB mouse A standard monitor with HD15 VGA connector Note: If the computer is a Sun server, you must prepare DCIM-USB G2 instead of MCIM. 3. Connect the computer to one of the channel ports on the MCCAT switch via a standard Cat5 UTP cable. a. Plug one end of the Cat5 UTP cable into the RJ45 port of the MCIM being connected with the computer. Making the Connection 1. Turn OFF the MCCAT switch and all devices that you want to connect, including the monitors and computers. MCCAT28/216 QSG QSG-MCCAT2-0A-v2.0-E y 255-20-0004-00 2 For more information, see the Quick Installation and Setup Guide shipped with the MCCAT user station or Connecting a User Station (Optional) in the User Guide. b. Plug the other end of the Cat5 UTP cable into one of the channel ports on the MCCAT switch. 4. Repeat Steps 2 to 3 until you finish connecting all computers. 5. Connect the PS/2 or USB keyboard and mouse to the MCCAT switch. a. Plug the mouse's connector into the PS/2 or USB port of the MCCAT switch. b. Plug the keyboard's connector into the PS/2 or USB port of the MCCAT switch. Tip: The MCCAT switch is compatible with the Paragon II enhanced user station, P2-EUST. If you have the P2-EUST device, you can connect it, instead of the MCCAT user station, to the MCCAT switch. 8. Connect power cords to every device in the MCCAT system and appropriate power outlets. 9. Turn on the connected computers and monitors. 10. Turn on the MCCAT switch. QS Rule Establishing a Two-Tier System Basically, there are five major steps to establish a two-tier system: Note: Do NOT connect both of PS/2 and USB keyboards or both of PS/2 and USB mice simultaneously. If you do so, only the USB input devices work properly. 6. Connect a monitor to the MCCAT switch by plugging the monitor's VGA connector into the VGA port of the MCCAT switch. • • • • • STEP (A): Programme an MCCAT switch as a second-tier device STEP (B): Connect the second-tier MCCAT switch to the base switch STEP (C): Connect input/output devices to the base switch STEP (D): Specify the type of the second-tier device in the OSD STEP (E): Connect computers to the MCCAT system STEP (A): Programme an MCCAT Switch as a Second-Tier Device Each MCCAT switch is programmed as a base switch (first-tier device) by default. To establish a two-tier MCCAT system, you have to change the default programming of the MCCAT switches that you want to set as the second-tier devices. 7. (Optional) Connect the MCCAT user station to the User 2 port of the MCCAT switch via a standard Cat5 UTP cable. MCCAT28/216 QSG QSG-MCCAT2-0A-v2.0-E y 255-20-0004-00 1. Turn OFF the MCCAT switch. 2. Press and hold down the channel number 2 button on the front panel, and turn ON the MCCAT switch simultaneously. 3. Continue to hold down the channel number 2 button until you hear the beep sound. 4. The TIER LED is lit continuously, indicating the MCCAT switch is now programmed as a second-tier device. 3 5. Repeat Steps 1 to 4 to change the programming of more MCCAT switches. Note: To programme a second-tier device back as the base switch, follow the same procedure but press the channel number 1 button instead. When the TIER LED's light is off, the device is programmed as a base switch. STEP (B): Connect the Second-Tier MCCAT Switch to the Base Switch • • Directly connect them to the PS/2 or USB ports and VGA port of the base switch, or Connect them to the user station, which is connected to the base switch To connect input/output devices directly to the base switch Connect a PS/2 or USB keyboard, mouse, and a VGA monitor to the base switch. See Steps 5 to 6 in the section Making the Connection (on page 2) for more information. Now connect the second-tier MCCAT switches to the MCCAT base switch. You can mix different MCCAT models in the system. For example, you may connect the MCCAT28 switch to the MCCAT216 switch. 1. Turn OFF all of the MCCAT switches. 2. Connect the second-tier MCCAT switch to the base switch via a Cat5 UTP cable. a. Plug one end of the Cat5 UTP cable into the User 2 port of the second-tier MCCAT switch. b. Plug the other end of the Cat5 UTP cable into one of the channel ports of the base switch. To connect input/output devices to the user station, which is connected to the base switch 1. Connect a PS/2 or USB keyboard, mouse, and a VGA monitor to the MCCAT user station. Note: Unlike "one-user" MCCAT switches (MCCAT18/116), it is NOT necessary to use MCIM-PS2 for cascading multiple "two-user" MCCAT switches. 3. Repeat Step 2 to connect more second-tier MCCAT switches to the base switch. 4. Connect appropriate power cords to all MCCAT switches and appropriate power outlets if you haven't. 5. Turn ON all second-tier devices. 6. After hearing the beep sounds of the second-tier devices, turn ON the base switch. Make sure you turn on the second-tier devices before turning on the base switch so the base switch downloads correct channel data from the second-tier devices. STEP (C): Connect Input/Output Devices to the Base Switch There are two methods of connecting input/output devices (keyboard, mouse and monitor) to the base switch: MCCAT28/216 QSG QSG-MCCAT2-0A-v2.0-E y 255-20-0004-00 4 2. Connect the MCCAT user station to the base switch. For more information, see the Quick Installation and Setup Guide shipped with the MCCAT user station or Connecting a User Station (Optional) in the User Guide. OSD option Device type MCC16 MasterConsole II product, MCC16 To specify the device type Note: You can also connect input/output devices directly to the "second-tier devices." However, users operating the input/output devices connected to the second-tier devices only gain access to the channels of the second-tier devices where they access. To view all channels of the whole system, you must operate the input/output devices connected to the base switch directly or via the user station. STEP (D): Specify the Type of the Second-Tier Device in the OSD 1. If you do not see the OSD on the screen, press the hot key (default: Scroll Lock) twice QUICKLY to activate it. 2. Press F5. The Administration Menu appears. 3. Select the third submenu, Channel Configuration. To select the submenu, either press 3, or press Æ to highlight it and then press Enter. The Channel Configuration submenu appears. 4. Press Æ or Å to highlight the channel whose device type you want to change. 5. Press Tab or Ä to select the field in the Device column, and press Enter. The highlight color turns green. 6. Press any arrow key to switch between available options, and press Enter to confirm the new option. The highlight color turns yellow. 7. Repeat Steps 4 to 6 until you specify correct device types for all second-tier devices. 8. Press S to save the changes or Esc to quit the current menu or submenu. If pressing Esc, the message “Save the changes [Y/N/ESC]” appears on the message bar. Press Y to save the changes, N to abort the changes, or Esc to return to the current menu or submenu. STEP (E): Connect Computers to the MCCAT System You can connect computers to available channel ports of any MCCAT switch in the system, including those of the base switch and of the second-tier devices. See Making the Connection (on page 2) for instructions on connecting computers. MCCAT cannot detect which types of devices are connected to its channel ports. Therefore, you must specify the types manually in the Channel Configuration submenu. Otherwise, you cannot access the channels of the second-tier devices. MCCAT supports these device types: OSD option Device type CPU Computer or any non-KVM-switch device, such as a router CAT18 MCCAT18 switch CAT116 MCCAT116 switch CAT28 MCCAT28 switch QS Rule CAT216 MCCAT216 switch MCC8 MasterConsole II product, MCC8 MCCAT28/216 QSG QSG-MCCAT2-0A-v2.0-E y 255-20-0004-00 Login The login mechanism prevents unauthorized users from accessing the system or changing the settings. To access any computer, you may log in with any user account. To configure 5 the system settings in the Administration Menu, you must log in with the administrator account. To log in to the MCCAT system 1. The Login box appears on the screen connected to the MCCAT device (either the MCCAT switch or user station) after turning ON all devices in the MCCAT system. Selecting a Channel After login, you can select any channel to view, and control the computer connected to the channel. Depending on which set of input/output devices (keyboard, mouse and monitor) you use, there may be two or one method for channel selection. If operating the input/output devices connected directly to the MCCAT switch, you can use: • • Selection Menu of the On-Screen Display (OSD), or Channel buttons on the front panel If operating the input/output devices connected to the MCCAT user station, you can use: • 2. Type your user name and password respectively, and press Enter. For example, if you are the administrator, the user name is "admin," and the default password is "raritan." a. Type admin in the User Name field, and press Enter. b. Type raritan in the Password field, and press Enter. The password is case sensitive. Selection Menu of the On-Screen Display (OSD) Note: The front-panel-button operation is also NOT available on the "second-tier" MCCAT switches in a two-tier system. Using the Selection Menu The first OSD menu that appears on the screen after login is the Selection Menu. The Selection Menu does not show any channel name by default until you assign them. To select the channel for the first time after your login, you must use the Selection Menu. 3. The Selection Menu appears, indicating your login is successful. To select the channel in the Selection Menu 1. (Optional) Press Page Down or Page Up to go to the next or previous page if you do not find the channel on the current page. 2. Press Æ or Å to move the highlight bar to the channel you want to select. Important: It is strongly recommended to change the default password for the security of your MCCAT system. For more information, see Changing Passwords in the User Guide. QS Rule MCCAT28/216 QSG QSG-MCCAT2-0A-v2.0-E y 255-20-0004-00 Tip: You can press the corresponding number shown in the “No” column of the Selection Menu to immediately highlight the channel instead of pressing the arrow keys. 3. Press Enter. The Selection Menu disappears. The video of the accessed computer now appears on the screen. You can control the computer with the keyboard and mouse connected with the MCCAT device. 6 Warning: MCCAT does not support real-time channel detection. Therefore, do NOT disconnect the computer and reconnect a different one to the channel you are accessing. Otherwise, mouse or keyboard input issues may occur with the channel you are accessing. At this time, re-select the channel in the Selection Menu to solve the problem. To select a different channel in the Selection Menu again 1. If you do not see the OSD on the screen, press the hot key (default: Scroll Lock) twice QUICKLY to activate it. 2. Highlight a different channel and press Enter to select it. For more information on the Selection Menu, see Selection Menu Elements in the User Guide. The Login box appears, indicating that you have successfully logged out. QS Rule Emulating Special Sun Keys Several keys on a Sun keyboard are unique. They are not available on regular PS/2 or USB keyboards so Raritan recommends that you control Sun servers using the Sun USB keyboard. However, in case of certain scenarios when special Sun keys do not function properly or are not available, the MCCAT switch provides you with the combination-key alternative for emulating these keys. Special Sun keys do NOT function properly if the keyboard signals passes through the User 2 port of any MCCAT switch when: • Using Channel Buttons The front panel buttons will function only after you have accessed a channel with the Selection Menu (see "Using the Selection Menu" on page 6). Note that the method of pressing front panel buttons is only available when you operate the input/output devices connected directly to the MCCAT switch. • To select the channel by pressing channel buttons • 1. If you see the OSD on the screen, press Esc until it disappears. 2. Press the channel button whose number corresponds to the channel port where the computer you want to access is connected. MCCAT28 channel buttons You connect the Sun USB keyboard to the MCCAT user station, which is connected to the User 2 port of the MCCAT switch. You connect the Sun USB keyboard directly to the MCCAT switch, but the Sun server that you access is connected to the "second-tier device," which is connected to the base switch through its User 2 port. Special Sun keys are not available when: You control Sun servers from regular PS/2 or USB keyboards. When any of these scenarios occurs, use the combination keys instead. Sun key Combination keys Again Ctrl + Alt + F2 Props Ctrl + Alt + F3 Undo Ctrl + Alt + F4 Front Ctrl + Alt + F5 Copy Ctrl + Alt + F6 Open Ctrl + Alt + F7 Paste Ctrl + Alt + F8 Find Ctrl + Alt + F9 Cut Ctrl + Alt + F10 Logout Help Ctrl + Alt + F11 After completing your computer tasks or changes to the MCCAT settings, you must log out of the system to prevent unauthorized people from accessing the MCCAT system. Mute Ctrl + Alt + F12 Compose Ctrl + Alt + * (the asterisk symbol on the keypad) Volume + Ctrl + Alt + + (the plus symbol on the keypad) MCCAT216 channel buttons The video of the accessed computer now appears on the screen. You can control the computer with the keyboard and mouse connected with the MCCAT device. QS Rule To log out of the MCCAT system 1. If you do not see the OSD on the screen, press the hot key (default: Scroll Lock) twice QUICKLY to activate it. 2. Press F9. MCCAT28/216 QSG QSG-MCCAT2-0A-v2.0-E y 255-20-0004-00 7 Sun key Combination keys Volume - Ctrl + Alt + - (the minus symbol on the keypad) Stop Pause/Break QS Rule Downloading the User Guide The MCCAT User Guide, which provides more information regarding the product features and operation, is downloadable from the Raritan website. To download the English user guide 1. Link to the Raritan website (http://www.raritan.com) with your browser. 2. Click Support > Firmware and Documentation > MasterConsole CAT. 3. Click the User Guide on the right pane. 4. Click the latest version to download if the webpage lists multiple user guides. 5. Follow the onscreen instructions until the download completes. To download the non-English user guide Raritan offers several translated user guides for users whose tongue language is NOT English. 1. Link to the Raritan website (http://www.raritan.com) with your browser. 2. Choose the desired language from the drop-down list of the Choose Country field. Now you are directed to the regional Raritan website. 3. Locate the MasterConsole CAT user guide on the website and click it to start the download process. MCCAT28/216 QSG QSG-MCCAT2-0A-v2.0-E y 255-20-0004-00 8