1
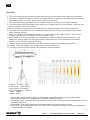
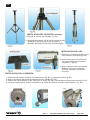
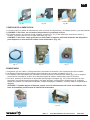
WFS 1200
User Manual / Manual de Uso
Rev 1.0
EN
CAUTIONS
1. The bulb is fragil, please operate carefully and put them into special box when they are not working.
2. In order to avoid the bulb blows up due to be heated when it is running, do not touch the bulb's quartz
with hands directly. If it is dirty, please wash it with alcohol at once.
3. The bulb emits strong light and ultraviolet radiation when it is running. Do not watch it directly.
4. The bulb reaches high temperature when working, so it needs cooling. If the electrical cooling fan can
not run, please do no use the device.
5. Do not exceed the lamp maximum current when it is working. Please, refer to bulb instructions.
6. The fixed bulb connection wire must be fastness properly. It it is loose, it can produce short circuits
and to damage the bulb.
7. When you finish to operate with the device, do not turn off the power supply at once. The fan must
running continually for 10 minutes in order to cool the device.
8. When installing it, ensure that there is no flammable or explosive devices closed the device. This
equipment must be away from rain and moisture. Remember turn off the electrical source before
open the cover or before replacing the lamp.
9. The lens need to be adjusted before and after in order to obtain the best light performance.
10. Please, check the voltage in the outlet before to connect the device
11. In order to ensure the user's safety, this equipment must be earthed.
Voltage:AC 220V 50Hz
Lamp-house:CSR 1200 /2
Lamp socket : G22/30X53
Color Temperature:7200º K
Power:1300W
Weight:49 kg
1. Macro glass reflector dish is used to enhance light usage efficiency, Be reflecting infrared light
(hot portion) to the rear to dissipate heat, and thus extending bulb life.
2. Redesigned optic zooming technology. It delivers a smooth even field and superior brightness by using
advanced optic lens.
3. The durable, high-quality aluminum body makes easier to release heat from inside.
4. With CMY° color mixing system and CTO filter (Color Temperature Orange, converts the 7200K lamp
color temperature to 3200K).
PAG. 1
User Manual/Manual de Instrucciones
WFS 1200
EN
STAND INSTALLATION (included)
1. Extract the stand from its packing box ( fig. A1)
2. Loosen the legs and turn the central scew (fig A2),
adjust the height of the stand according to your
desire and tight the screw to fix the position (fig A3)
BRACKET INSTALLATION
Yoke (bracket)
1. Screw out the two screws placed
on the top of the stand (fig A4).
2. Line the hole of the screws on the
bracket with the holes of the stand
and tight them (fig A5).
3. Loose the yoke of the bracket to
adjust the follow spot to the correct
position, tighting the yoke again.
LAMP INSTALLATION
1. Screw out the fixing screws placed in the back lid (fig. B1) and extract the lamp holder (fig. B2).
2. Loose the fixing screw on the top lid and open the upper cover (fig. B3)
3. Insert a new lamp (CSR 1200/2) in the lampholder (fig. B4), tightening it firmly (fig. B5).
4. Pull out the back lid, insert the lamp through the middle hole of the reflector, install the screws and tighten
it (Fig. B6).
Fig. B1
Fig. B3
Fig. B2
PAG. 2
User Manual/Manual de Instrucciones
WFS 1200
EN
Fig. B4
Fig. B5
Fig. B6
POWER CONNECTION
1. Connect all power cables between the follow spot and external ballast and supply the external ballast to
power source
2. WARNING !!! Please, not supply the power to the device until the earth wire of the device will be
connected.
3. The ballast is connected to the follow spot through the joint cable (Fig. C1). This cable has male and female
end. Connect each one in the suitable connection (fig. C2).
WARNING !!! Please, notice that there should have enough space to disperse the heat of the external
ballast (Fig. C3)
Fig. C3
Fig. C2
Fig. C1
STARTING
1. Ensure that the power cables are connected according to the requirements and the lamp is correct installed.
2. The red power lamp indicator in the ballast should light when the power switch is turned on. (fig. C4)
3. The green indicator lamp in the ballast should light when the switch on the follow spot is pressed (fig. C5),
simultaneously, the lamp starts to light (the brightness of the lamp will become the maximal after 2 minutes).
4. Please, press the start switch on the follow spot when the lamp need turn off (fig. C5). This switch is a selflock switch, one push for on and another for off), the lamp will be off but the cooling fan will work, the indicator
lamp is light. When the power switch in the ballast is off, the device is completely turned off.
WARNING !!! When the lamp is turned off, please wait about 15 minutes before turn on the lamp again,
if it is started at once, the life of the trigger will be shortened.
Fig. C5
Fig. C4
PAG. 3
User Manual/Manual de Instrucciones
WFS 1200
EN
FOCUSING PROCESS
1. When the lamp is just installed and turned on, due to not focusing, the light spot is gray commonly. Fig. 1
2. Turn the vertical and horizontal zoom screws (fig. F1), the light dot of the spot will move vertically and levelly
respectively. The light spot will be approximately like fig. 2 and fig. 3.
3. Turn the vertical and horizontal focusing screws continually until to move the light dot to the center of the
spot, like fig. 4.
4. Turn the lamp´s focusing knob, enlarge the light dot and adjust vertical & horizontal focusing screws at the
same time, keep the light in the center, like fig. 5.
5. Turn the lamp´s focusing knob continually, make the light spot become the lightest and biggest, at this time,
the edge of the light spot is still hazy, like fig. 6.
6. Adjust the position the two focusing handles on the front and back (fig. F2), make the edge of the spot
become clear completely, like fig. 7.
7. When the two focusing handles are adjusted to the middle (relatively), the light spot is the biggest.
Fig. F1
Fig. F2
PAG. 4
User Manual/Manual de Instrucciones
WFS 1200
EN
OPERATING
1. Light cutting instrumment: Using for light cutting instantaneously, to
make the manual frequency flashing effect or light cutting function
(indicating that the lamp`s brightness is kept, whereas do not let the
Iris
light out from light door).
2. Color temperature slice: When using this color temperature slice, the
temperature of the light source can be dropped from 7200ºK to 3200ºK
3. Color slice 1: Cyan
4. Color slice 2: Yellow
5. Color slide 3: Purple
6. Different effect of mixing color can be get through using to pieces of
color slice simultaneously.
7. Iris: Modulating the diameter of hole for light passing, it is possible to modify the diameter of round light spot.
TRIGGER REPLACING PROCESS
1. Ensure that the power cables are
and switch in the ballast are off.
2. Loosen the cover board screw on
the trigger and pull out it.
3. Remove the bad trigger and install
the same type new trigger.
4. Especially notice that the wire order
connecting to the trigger can not
be wrong.
5. Recover the board on the trigger
and tighten the screw.
Trouble
Reason
Check parts
Solution
No voltage input
Check the switch of ballast
Turn on the switch
Theballastt does not run
Not turn on the lamp switch
If the power switch is turned on,
Check the power swtich of ballast the cooling fan and lamo ought to
run
Check the position of the switch
Turn on the switch
The trigger does not run. We can
hear the high frequency pulse
noise when the switch is pressed
under normal condition.
Check wheter there is input
voltage of AC
If the voltage is normal, it is
possible that the trigger is invalid,
replace it; if there is not voltage
or it is abnormal, please check
the rectifier part
The circuit connect not well
check all connections
Corresponding repair
The lamp is broken
There is high frequency pulse
current between the electrodes
of light pipe
Replace with new lamp
Check corresponding parts
Repair
The lamp pipe does
not discharge
The trigger runs well, The contact of output cable is not
but the lamp does
well or the lamp contact is not
not light
well
Restart again after waiting for 15
minutes
Turn off lamp just now
PAG. 5
User Manual/Manual de Instrucciones
WFS 1200
ES
PRECAUCIONES
1. La bombilla es frágil, por favor, manéjela con cuidado y guárdela en una caja cuando no la use.
2. Con el fin de evitar que la bombilla se funda debido al calor, no toque el cristal con los dedos desnudos.
Si está sucia límpiela con alcohol.
3. La bombilla emite una potente luz y radiación ultravioleta al funcionar. NO la mire directamente.
4. La bombilla alcanza una elevada temperatura al funcionar, por lo que necesita refrigeración. Si el ventilador
eléctrico de la unidad no funciona. No utilice el dispositivo.
5. No exceda la corriente máxima de la lámpara. Por favor, lea las instrucciones de la lámpara.
6. La lámpara debe estar bien fijada en su zócalo . Si no es así puede producir cortocircuitos y dañarse la
lámpara.
7. Cuando termine de operar con el dispositivo, no lo apague de la alimentación. El ventilador debe funcionar
durante unos 10 minutos para enfriar el dispositivo.
8. Cuando lo instale, asegúrese que no hay dispositivos inflamables o explosivos junto a la unidad. Este
dispositivo debe estar apartado de la lluvia o la humedad. Recuerde desconectarlo de la red eléctrica antes
de abrir la tapa o antes de sustituir la lámpara.
9. La lente necesita ser ajustada antes y después del cambio de lámpara para obtener el mejor resultado.
10. Por favor, compruebe la alimentación de la toma mural antes de conectar el dispositivo.
11. Para garantizar la seguridad del usuario, este dispositivo debe conectarse a tierra.
Alimentación:AC 220V 50Hz
Tipo de lámpara:CSR 1200 /2
Zócalo : G22/30X53
Temperatura de Color:7200º K
Potencia:1300W
Peso:49 kg
1. El reflector de crsital interno se usa para incrementar la eficacia lumínica, reflejando la luz infrarroja en
la parte traseray disipar el calor, extendiendo la vida útil de la bombilla.
2. Tecnología de zoom óptico que permite un suave campo visual y brillo superior utilizando lentes ópticas
avanzadas.
3. El chasis de aluminio de gran calidad y durabilidad permite una fácil disipación del calor interior.
4. Con un sistema de mezcla de colores CMY y filtros CTO ( Temperatura Color Naranja), convierte los
7200 ºK de temperatura de color de la lámpara en 3200 ºK.
PAG. 6
User Manual/Manual de Instrucciones
WFS 1200
ES
INSTALACION DEL SOPORTE (incluido)
1. Extraiga el soporte del embalaje ( fig. A1)
2. Despliega las patas y gire el tornillo central (fig A2),
ajustando la altura del soporte a la posición
deseada, apretando firmemente el tornillo (fig A3)
INSTALACION DEL ASA
Yoke (bracket)
1. Atornille los 2 tornillos situados en la
parte superior del soporte (fig A4).
2. alinee los agujeros del tornillo del
asa con los agujeros del soporte
y apriételos. (fig A5).
3. Afloje la palomilla del soporte para
ajustar el cañón en la posición
deseada, apretando la palomilla
de nuevo.
INSTALACION DE LA LAMPARA
1. Destornille los tornillos situados en la tapa trasera (fig. B1) y extraiga el zócalo (fig. B2).
2. Afloje el tornillo de fijación de la cubierta superior y ábrala (fig. B3)
3. Inserte una nueva lámpara (CSR 1200/2) en el zócalo (fig. B4), fije firmemente la lámpara al zócalo (fig. B5).
4. Coloque la tapa trasera, inserte la lámpara en el medio del reflector. Atornille la tapa trasera ( Fig. B6).
Fig. B1
Fig. B3
Fig. B2
PAG. 7
User Manual/Manual de Instrucciones
WFS 1200
ES
Fig. B4
Fig. B5
Fig. B6
CONEXION DE ALIMENTACION
1. Conecte todos los cables de alimentación entre el cañón de seguimiento y el balastro externo y su alimentación.
2. CUIDADO !!! Por favor, no encienda el dispositivo sin conectarlo a tierra
3. El balastro externo se conecta al caól mediante el cable (Fig. C1). Este cable tiene conectores macho y
hembra. Conecte cada uno en su lugar adecuado (fig. C2).
CUIDADO !!! Por favor, tenga presente que debe haber el espacio suficiente alrededor del dispositivo
para dispersar el calor tanto del cañón como del balastro. (Fig. C3)
Fig. C3
Fig. C2
Fig. C1
COMENZANDO
1. Asegúrese que los cables y la lámpara están conectados de acuerdo a los requerimientos de la unidad.
2. La lámpara indicadora roja del balastro debe iluminarse al encender el balastro (fig. C4).
3. El indicador verde del balastro se encenderá cuando presione el interruptor del cañón (fig. C5), la lámpara
comenzará a encenderse (el brillo de la lámpara llegará al máximo transcurridos unos 2 minutos).
4. Por favor, presione el interruptor de encendido para apagar la lámpara (fig. C5). Este interruptor es autobloquante, una pulsación para encendido y otra para apagado, la lámpara se apagará pero el ventilador
estará funcionando y el indicador encendido. Cuando se apague el balastro, el cañón estará completamente
apagado.
CUIDADO !!! Cuando apague la lámpara, espere unos 15 minutos antes de volver a encenderla, si lo
hace de inmediato, puede acorta la vida útil del arrancador.
Fig. C5
Fig. C4
PAG. 8
User Manual/Manual de Instrucciones
WFS 1200
ES
PROCESO DE ENFOQUE
1. Cuando la lámpara esté colocada y encendida, debido a que no está enfocada, la salida lumínica es grisácea.
Fig. 1
2. Gire los tornillos de zoom vertical y horizontal (fig. F1),el círculo de luz se moverá verticalmente y
horizontalmente. El foco será aproximadamente como el de la fig. 2 y fig. 3.
3. Gire los tornillos de enfoque vertical/horizontal hasta mover el círculo iluminado al centro, como la fig. 4.
4. Gire el mando de enfoque, alargue el circulo de luz y ajuste el enfoque vertical/horizontal a la vez,
manteniendo la luz en el centro, como la fig. 5.
5. Gire el mando de enfoque continuamente haciendo que el círculo de luz sea más intenso y grande, el borde
del círculo será difuso, como fig. 6.
6. Ajuste la posición de os 2 mando de ajuste de delante hacia atrás (fig. F2), haciendo que el borde del círculo
sea completamente claro, como fig. 7.
7. Cuando los 2 mandos de enfoque estén ajustados en el medio (aproximadamente), el círculo de luz será el
más grande posible.
Fig. F1
Fig. F2
PAG. 9
User Manual/Manual de Instrucciones
WFS 1200
ES
FUNCIONAMIENTO
1. Cuchillas para el haz: Use estas cuchillas para cortar la luz
realizando efectos de flash manuales o cortando el haz
(tenga en cuanta que el brillo de la lámapra no se altera a pesar que se
Iris
corte el haz).
2. mando de temperatura de color: Cuando use este mando, la unidad
coloque un filtro para bajar la temperatura de color de 7200ºK a 3200ºK
3. Mando de color 1: Cyan
4. Mando de color 2: Amarillo
5. Mando de color 3: Púrpura
6. Se pueden logar diferentes mezclas de cor utilizando varios de los
mandos de color de manera simultánea.
7. Iris: Modula el diámetro de agujero por donde pasa el haz de luz, modificando el diámetro del círculo de luz
SUSTITUYENDO EL ARRANCADOR
1. Asegúrese que el balastro está
desconectado.
2. Destornille y retire la tapa que
cubre el arrancador y sáquelo.
3. Retire el arrancador estropeado y
sustitúyalo por otro igual.
4. Tenga especial cuidado en el orden
correcto de los cables.
5. Vuelva a poner la tapa y fijarla con
los tornillos.
Problema
Razón
No hay alimentación de entrada
El balastro no funciona
No se enciende la lámpara
Comprobación
Compruebe el balastro
Compruebe la aliment. de balastro
Compruebe el interruptor
La lámpara no se
descarga
El arrancador no funciona. Se
oye el ruido del pulso de alta
frecuencia cuando se actúa el
p.ulsador en condiciones
normales
El circuito de conexión va mal
La lámpara está rota
El arrancador va bien, Los contactos del cable de salida
pero la lámpara
o de la lámpara no están
no se enciende
bien
Compruebe si hay entrada de
alimentación AC
compruebe las conexiones
Solución
Encienda el interruptor
Si está encendido, el ventilador,
y la lámpara deben de
funcionar
Encienda el interruptor
Si la alimentación es normal,
puede ser que el arrancador esté,
mal, sustitúyalo. Si no hay
alimentación o tiene un valor
inusual, compruebe el rectificador
Debe reparse
Hay un pulso de alta frecuencia
entre los electrodos del
zócalo
Cambie la lámpara
Compruebe zócalo y cable
Debe reparse
Vuelva a encender en unos 15
minutos
La lámpara se apaga
PAG. 10
User Manual/Manual de Instrucciones
WFS 1200
This symbol on the product or on its packaging indicates that this product
shall not be treated as household waste. Instead it shall be handed over to
the applicable collection point for the recycling of electrical an electronic
equipment. By ensuring this product is disposed of correctly, you will help
prevent potential negative consequences for the environment and human
health, which could otherwise be caused by inappropriate waste handling
of this product. The recycling of materials will help to conserve natural
resources. For more detailed information about recycling of this product,
please contact your local city office, your household waste disposal service
or the shop where you purchased the product.
Manufactured by
EQUIPSON, S.A.
http://www.equipson.es