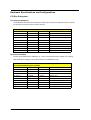
1
Acer Altos G510
Service Guide
Service guide files and updates are available
on the CSD web; for more information,
please refer to http://csd.acer.com.tw
PART NO.: VD.G51V7.001
PRINTED IN TAIWAN
Revision History
Please refer to the table below for the updates made on Acer Altos G510 service guide.
Date
II
Chapter
Updates
Copyright
Copyright © 2001 by Acer Incorporated. All rights reserved. No part of this publication may be reproduced,
transmitted, transcribed, stored in a retrieval system, or translated into any language or computer language, in
any form or by any means, electronic, mechanical, magnetic, optical, chemical, manual or otherwise, without
the prior written permission of Acer Incorporated.
Disclaimer
The information in this guide is subject to change without notice.
Acer Incorporated makes no representations or warranties, either expressed or implied, with respect to the
contents hereof and specifically disclaims any warranties of merchantability or fitness for any particular
purpose. Any Acer Incorporated software described in this manual is sold or licensed "as is". Should the
programs prove defective following their purchase, the buyer (and not Acer Incorporated, its distributor, or its
dealer) assumes the entire cost of all necessary servicing, repair, and any incidental or consequential
damages resulting from any defect in the software.
Acer is a registered trademark of Acer Corporation.
Intel is a registered trademark of Intel Corporation.
Pentium and Pentium II/III are trademarks of Intel Corporation.
Other brand and product names are trademarks and/or registered trademarks of their respective holders.
III
Conventions
The following conventions are used in this manual
:
IV
Screen messages
Denotes actual messages that appear
on screen.
NOTE
Gives bits and pieces of additional
information related to the current
topic.
WARNING
Alerts you to any damage that might
result from doing or not doing specific
actions.
CAUTION
Gives precautionary measures to
avoid possible hardware or software
problems.
IMPORTANT
Reminds you to do specific actions
relevant to the accomplishment of
procedures.
Preface
Before using this information and the product it supports, please read the following general information.
1.
This Service Guide provides you with all technical information relating to the BASIC CONFIGURATION
decided for Acer's "global" product offering. To better fit local market requirements and enhance product
competitiveness, your regional office MAY have decided to extend the functionality of a machine (e.g.
add-on card, modem, or extra memory capability). These LOCALIZED FEATURES will NOT be covered
in this generic service guide. In such cases, please contact your regional offices or the responsible
personnel/channel to provide you with further technical details.
2.
Please note WHEN ORDERING FRU PARTS, that you should check the most up-to-date information
available on your regional web or channel. If, for whatever reason, a part number change is made, it will
not be noted in the printed Service Guide. For ACER-AUTHORIZED SERVICE PROVIDERS, your Acer
office may have a DIFFERENT part number code to those given in the FRU list of this printed Service
Guide. You MUST use the list provided by your regional Acer office to order FRU parts for repair and
service of customer machines.
V
VI
Table of Contents
Chapter 1
System Introduction
1
Features . . . . . . . . . . . . . . . . . . . . . . . . . . . . . . . . . . . . . . . . . . . . . . . . . . . . . . . .1
System Block Diagram . . . . . . . . . . . . . . . . . . . . . . . . . . . . . . . . . . . . . . . . . . . . .3
System Board Layout . . . . . . . . . . . . . . . . . . . . . . . . . . . . . . . . . . . . . . . . . . . . . .4
Front Bezel . . . . . . . . . . . . . . . . . . . . . . . . . . . . . . . . . . . . . . . . . . . . . . . . . .7
Front Panel . . . . . . . . . . . . . . . . . . . . . . . . . . . . . . . . . . . . . . . . . . . . . . . . . .8
Rear Panel . . . . . . . . . . . . . . . . . . . . . . . . . . . . . . . . . . . . . . . . . . . . . . . . .10
Internal Components . . . . . . . . . . . . . . . . . . . . . . . . . . . . . . . . . . . . . . . . . .12
Hardware Specifications and Configurations . . . . . . . . . . . . . . . . . . . . . . . . . . .14
PCI Bus Subsystem . . . . . . . . . . . . . . . . . . . . . . . . . . . . . . . . . . . . . . . . . . .14
System Management Bus Interface . . . . . . . . . . . . . . . . . . . . . . . . . . . . . . .15
RQ Assignments . . . . . . . . . . . . . . . . . . . . . . . . . . . . . . . . . . . . . . . . . . . . .15
State Transition . . . . . . . . . . . . . . . . . . . . . . . . . . . . . . . . . . . . . . . . . . . . . .18
Chapter 2
System Utilities
20
Entering setup . . . . . . . . . . . . . . . . . . . . . . . . . . . . . . . . . . . . . . . . . . . . . . . . . . .21
Main . . . . . . . . . . . . . . . . . . . . . . . . . . . . . . . . . . . . . . . . . . . . . . . . . . . . . . . . . .22
Advanced . . . . . . . . . . . . . . . . . . . . . . . . . . . . . . . . . . . . . . . . . . . . . . . . . . . . . .24
Super I/O Configuration . . . . . . . . . . . . . . . . . . . . . . . . . . . . . . . . . . . . . . . .25
IDE Configuration . . . . . . . . . . . . . . . . . . . . . . . . . . . . . . . . . . . . . . . . . . . . .26
Primary / Secondary IDE Master/ Slave . . . . . . . . . . . . . . . . . . . . . . . . . . . 27
Floppy Configuration . . . . . . . . . . . . . . . . . . . . . . . . . . . . . . . . . . . . . . . . . . .28
PCI/PnP Configuration . . . . . . . . . . . . . . . . . . . . . . . . . . . . . . . . . . . . . . . . .29
Boot Settings Configuration . . . . . . . . . . . . . . . . . . . . . . . . . . . . . . . . . . . . .30
Event Log Configuration . . . . . . . . . . . . . . . . . . . . . . . . . . . . . . . . . . . . . . . 32
Onboard Devices Configuration. . . . . . . . . . . . . . . . . . . . . . . . . . . . . . . . . . .33
Power . . . . . . . . . . . . . . . . . . . . . . . . . . . . . . . . . . . . . . . . . . . . . . . . . . . . . . . . .35
Boot . . . . . . . . . . . . . . . . . . . . . . . . . . . . . . . . . . . . . . . . . . . . . . . . . . . . . . . . . .36
Boot Device Priority . . . . . . . . . . . . . . . . . . . . . . . . . . . . . . . . . . . . . . . . . . .36
Hard Disk Drives . . . . . . . . . . . . . . . . . . . . . . . . . . . . . . . . . . . . . . . . . . . . . .37
Removable Devices . . . . . . . . . . . . . . . . . . . . . . . . . . . . . . . . . . . . . . . . . . .38
Security . . . . . . . . . . . . . . . . . . . . . . . . . . . . . . . . . . . . . . . . . . . . . . . . . . . . . . . .39
To set a Supervisor / User Password . . . . . . . . . . . . . . . . . . . . . . . . . . . . . .40
To change the Supervisor / User Password . . . . . . . . . . . . . . . . . . . . . . . . .40
To remove the User Password . . . . . . . . . . . . . . . . . . . . . . . . . . . . . . . . . . .40
Exit . . . . . . . . . . . . . . . . . . . . . . . . . . . . . . . . . . . . . . . . . . . . . . . . . . . . . . . . . . .41
Chapter 3
Machine Disassembly and Replacement
42
Disassembly FlowChart . . . . . . . . . . . . . . . . . . . . . . . . . . . . . . . . . . . . . . . . . . .43
General Information . . . . . . . . . . . . . . . . . . . . . . . . . . . . . . . . . . . . . . . . . . . . . .44
Before You Begin . . . . . . . . . . . . . . . . . . . . . . . . . . . . . . . . . . . . . . . . . . . .44
Opening the Housing Panels . . . . . . . . . . . . . . . . . . . . . . . . . . . . . . . . . . . . . . .45
Opening the Front Panel Door . . . . . . . . . . . . . . . . . . . . . . . . . . . . . . . . . .45
Removing the Front Bezel . . . . . . . . . . . . . . . . . . . . . . . . . . . . . . . . . . . . .45
Removing the Side Panel . . . . . . . . . . . . . . . . . . . . . . . . . . . . . . . . . . . . . .46
Removing the Server . . . . . . . . . . . . . . . . . . . . . . . . . . . . . . . . . . . . . . . . . . . . . .47
To remove the air baffle . . . . . . . . . . . . . . . . . . . . . . . . . . . . . . . . . . . . . . .47
To remove the Rear Fan . . . . . . . . . . . . . . . . . . . . . . . . . . . . . . . . . . . . . . .47
To remove the Heatsink . . . . . . . . . . . . . . . . . . . . . . . . . . . . . . . . . . . . . . .47
To remove the HDD Cage . . . . . . . . . . . . . . . . . . . . . . . . . . . . . . . . . . . . .48
To remove the Safety Board . . . . . . . . . . . . . . . . . . . . . . . . . . . . . . . . . . . .48
To remove the Backplane Board . . . . . . . . . . . . . . . . . . . . . . . . . . . . . . . . .49
To remove the CD-ROM . . . . . . . . . . . . . . . . . . . . . . . . . . . . . . . . . . . . . . .49
To remove the Floppy . . . . . . . . . . . . . . . . . . . . . . . . . . . . . . . . . . . . . . . . .49
VII
Table of Contents
To remove the Power Supply . . . . . . . . . . . . . . . . . . . . . . . . . . . . . . . . . . .50
To remove the PDB . . . . . . . . . . . . . . . . . . . . . . . . . . . . . . . . . . . . . . . . . .50
To remove the Front Fan . . . . . . . . . . . . . . . . . . . . . . . . . . . . . . . . . . . . . .50
To remove the Mainboard . . . . . . . . . . . . . . . . . . . . . . . . . . . . . . . . . . . . . .51
To remove the LED . . . . . . . . . . . . . . . . . . . . . . . . . . . . . . . . . . . . . . . . . . .51
Chapter 4
Troubleshooting
53
AMIBIOS POST Checkpoint Codes . . . . . . . . . . . . . . . . . . . . . . . . . . . . . . . . . .53
Uncompressed Initialization Codes . . . . . . . . . . . . . . . . . . . . . . . . . . . . . . .53
Bootblock Recovery Codes . . . . . . . . . . . . . . . . . . . . . . . . . . . . . . . . . . . . .53
Uncompressed Initialization Codes . . . . . . . . . . . . . . . . . . . . . . . . . . . . . . .54
Bus Checkpoint Codes . . . . . . . . . . . . . . . . . . . . . . . . . . . . . . . . . . . . . . . . . . . .59
AMIBIOS Beep Codes . . . . . . . . . . . . . . . . . . . . . . . . . . . . . . . . . . . . . . . . . . . .60
Chapter 5
Jumper and Connector Information
62
Jumpers and Connectors . . . . . . . . . . . . . . . . . . . . . . . . . . . . . . . . . . . . . . . . . .62
Connector & LED . . . . . . . . . . . . . . . . . . . . . . . . . . . . . . . . . . . . . . . . . . . . . . . .63
Power Connector . . . . . . . . . . . . . . . . . . . . . . . . . . . . . . . . . . . . . . . . . . . . . . . .65
LED Light . . . . . . . . . . . . . . . . . . . . . . . . . . . . . . . . . . . . . . . . . . . . . . . . . . . . . .65
Front Panel LED Status and LED Board . . . . . . . . . . . . . . . . . . . . . . . . . . . . . .66
MLB Jumper Setting . . . . . . . . . . . . . . . . . . . . . . . . . . . . . . . . . . . . . . . . . . . . . .66
CPU Frequency Ratio Setting . . . . . . . . . . . . . . . . . . . . . . . . . . . . . . . . . . . . . . .67
Chapter 6
FRU (Field Replaceable Unit) List
68
Exploded Diagram . . . . . . . . . . . . . . . . . . . . . . . . . . . . . . . . . . . . . . . . . . . . . . .69
Appendix A
Model Definition and Configuration
80
Appendix B
Test Compatible Components
82
Microsoft Windows 2000 Environment Test . . . . . . . . . . . . . . . . . . . . . . . . . . . .83
Microsoft Windows NET Environment Test . . . . . . . . . . . . . . . . . . . . . . . . . . . .85
DOS 6.22 Environment Test . . . . . . . . . . . . . . . . . . . . . . . . . . . . . . . . . . . . . . . .87
Linux 7.3/8.0 Environment Test . . . . . . . . . . . . . . . . . . . . . . . . . . . . . . . . . . . . .89
Netware 6 Environment Test . . . . . . . . . . . . . . . . . . . . . . . . . . . . . . . . . . . . . . .91
Unixware 7.1.1 Environment Test . . . . . . . . . . . . . . . . . . . . . . . . . . . . . . . . . . . .93
OpenServer 5.0.6 Environment Test . . . . . . . . . . . . . . . . . . . . . . . . . . . . . . . . .95
Microsoft Windows NT 4.0 Environment Test . . . . . . . . . . . . . . . . . . . . . . . . . . .97
Appendix C
VIII
Online Support Information
100
Chapter 1
System Introduction
Features
System
T
Processor
Dual Intel Xeon processor (PGA604 package) with FSB 400/533MHz.
T
Cache
Integrated 512K L2 cache per processor
T
Chipset
T
T
North Bridge: ServerWorks CMIC-SL
T
South Bridge: ServerWorks CSB5
T
PCI-X Controller: ServerWorks CIOB-X2
System Bus
400/533 MHz system bus capability
T
T
System Memory
T
DDR266 specification
T
4DIMM slots
T
Up to 4GB memory support
T
128MB/256MB/512MB/1GB Registered DDR200/266 SDRAM with ECC
I/O Expansion Slots
T
Four 64bit PCI expansion slots (3.3V)
T
Two 32bit/33MHz expansion slots (5V)
T
Networking
Integrated 10/100/1000 Gigabit Ethernet
T
Graphics
ATI Rage XL Integrated with 8MB memory ( 32bit/33MHz PCI Interface )
T
Host Disk Controller
T
T
2-channel IDE controller ( support for ATA 100 on Primary & Secondary IDE)
T
1 channel Ultra320 SCSI Controller
Disk Storage
Maximum 876GB of SCSI disk storage ( with six 146GB SCSI HDD installed )
T
T
Chapter 1
Device Bays
T
Two External 5.25” Bays
T
One Internal cage with 3*3.5 Bay
T
One externally accessible 3.5” floppy drive ( pre-installed )
T
One externally accessible IDE CD-ROM drive ( pre-installed)
Integrated I/O Interface
T
One 25-pin parallel port
T
One 9-pin serial port
T
Two PS/2 port
1
T
2
T
One 9-pin video port
T
One RJ-45 network port
T
Two USB port
Power Supply
T
450W Single PFC Power Supply ( basic SKU)
T
450W 1+1 Redundant Power Supply ( full SKU )
Chapter 1
System Block Diagram
Chapter 1
3
System Board Layout
4
Chapter 1
Item
Description
BT1
Battery
BZ1
Buzzer
CN1
+12V Power Connector
CN2
ATX Power Connector
CN3
USB Ports
CN4
VGA / Monitor Port
COM1
Serial Port
CPU 1 and CPU 2
CPU sockets
DM1- DM4
DIMM slots
J2
Front Panel Connector
J3
Floppy disk drive connector
J4
Primary IDE Connector
J5
Secondary IDE Connector
J7
Chassis intrusion connector
J9
BMC daughter board connector
J10
MLB Jumper
1-2 Password Enable ( Default Setting : OFF )
3-4 Clear NVRAM ( Default Setting : OFF )
5-6 Recovery Mode ( Default Setting : OFF )
J13
Wake on LAN Connector
J14
SCSI RAID card HDD LED connector
JF1
CPU 1 Fan connector
JF4
Front Fan connector
JF5
CPU 2 Fan connector
JF8
Rear System Fan connector
JP2
Power Supply management cable connector
( connected to PDB board )
JP8
IPMB connector
JP9
SCSI HDD management cable connector
( connected to Hot Plug HDD cage backplane board )
JP10
Connector for Remote Management Card ( RMC )
J15
Power On/Off connector for RMC
J16
Reset Connector for RMC
KM1
Upper: PS/2 mouse port
Lower: PS/2 Keyboard port
LAN1
Gigabit LAN port ( 10/100/1000 Mbps )
LTP1
Parallel / Printer Port
SLOT 1
64-bit / 66 MHz PCI bus slot ( Zero Channel RAID compliant ) ( Green )
SLOT 2
64-bit / 66 MHz PCI bus slot ( White )
SLOT 3 and SLOT 4
64-bit / 100 MHz PCI-X bus slots ( Blue )
SLOT 5 and SLOT 6
32-bit / 33 MHz PCI bus slot ( 5V Support ) ( White )
SCSI 1
SCSI Connector
Chapter 1
5
Item
6
Description
U4
ServerWorks CMIC - SL chipset ( north bridge )
U12
System clock
U18
BCM5702 Gigabit LAN chipset
U19
LSI 53C1020 SCSI Chipset
U27
ServerWorks CIOBx2 chipsets ( I/O bridge )
U34
ATI Rage XL VGA chipset
U45
ServerWorks CSB5 chipset ( south bridge )
U46
Flash BIOS
U48
PC87414 SIO - Super I/O chipset
U49
Video RAM
USB1
USB Connector
VRM 9.1
Onboard VRMs ( Voltage Regulator Module )
Chapter 1
Front Bezel
No.
Description
1
Power indicator
2
Hard disk activity indicator
3
System fault indicator
4
Hard disk fault indicator ( for Altos G510 model only )
5
Security keylock
6
Front Bezel
Chapter 1
7
Front Panel
Altos G510 model
Altos G510 Basic model
8
Chapter 1
NOTE: Unless otherwise indicated, all front panel features indicated on the table below apply to both
the Altos G510 and Altos G510 Basic models.
No.
Description
1
CD-ROM drive Stop/Eject button
2
CD-ROM drive activity indicator
3
CD-ROM drive
4
Volume control
5
CD-ROM drive Headphone/ Earphone port
6
5.25-inch half - height bay
7
Altos G510- BPL6 Hot Plug HDD cage
Altos G510 Basic -non- Hot Plug HDD cable cage
8
HDD carrier ( for BPL6 Hot Plug HDD Cage only)
9
Floppy drive Eject button
10
Floppy drive
11
Floppy drive activity indicator
12
Power button
13
Reset button
14
Power indicator
15
Hard disk activity indicator
16
System fault indicator
17
Hard disk fault indicator ( for Altos G510 model only )
18
Hot Plug HDD power indicator1 ( for BPL6 Hot Plug HDD Cage only )
19
Hot Plug HDD access indicator 2 ( for BPL6 Hot Plug HDD Cage only )
1.
This indicator lights up green to indicate HDD power on and lights up in red when a HDD fault occurs.
2.
This indicator light up green to indicate drive access.
Chapter 1
9
Rear Panel
Altos G510 model
Altos G510 Basic model
10
Chapter 1
NOTE: Unless otherwise indicated, all rear panel features indicated on the table below apply to both the
Altos G510 and Altos G510 Basic models.
No.
Description
1
Altos G510 model - Main power supply unit
2
PS/2 keyboard port
3
PS/2 mouse port
4
USB ports
5
RDM LAN port ( 10Mbps )1
This port is not accessible on Altos G510 and G510 Basic
models.
6
Serial port
7
Parallel/Printer port
8
VGA / Monitor port
9
Gigabit LAN port ( 10/100/1000 Mbps )
10
Expansion slots
11
Main power supply indicator2
( for Altos G510 model only )
12
Main power supply fail indicator3
13
Main power supply AC power indicator4
( for Altos G510 model only )
14
Main power supply cable socket
15
Rear System Fan
16
Ventilation Slots
1.
N/A on Altos G510 or G510 Basic model. Reserved for future models.
2.
This indicator will light up green when the power supply module is functioning properly.
3.
This indicator will light up amber when the power supply module or any PSU internal fan fails.
4.
This indicator will light up green when the input voltage is within the AC input voltage range.
Chapter 1
11
Internal Components
Altos G510 model
Altos G510 Basic model
12
Chapter 1
NOTE: Unless otherwise indicated, all internal components indicated on the table below apply to both
the Altos G510 and Altos G510 Basic models.
No.
Description
1
Altos G510 model - Power supply module bay for redundant
PSU1
Altos G510 Basic model - Standard 450-watts PSU
2
Rear System Fan
3
Rear System Fan release latch
4
PCI bus slot
5
Mainboard
6
Air Baffle
7
Power distribution board ( for Altos G510 model only )
8
Hot-swap HDD SAF-TE board ( for Altos G510 model only )
9
Hot-swap HDD backplane board ( for Altos G510 model only )
1.
Though the system supports two hot-swappable power supply module bays, the system comes
bundled with a single power supply module only. You have the option to purchase an extra power
supply module to provide the system with redundant power source.
Chapter 1
13
Hardware Specifications and Configurations
PCI Bus Subsystem
PCI Addressing Mapping
The table below summarizes the assignments of IDSEL pins and the PCI addresses of all PCI devices,
and the figure shows the locations of all PCI devices.
PCI Device No. Map
PCI Bus No.
Device No.
AD No. ( H.W.)
RAGE_XL_A
0
14
D_AD30
BCM5702
0
2
D_AD18
PCI_SLOT5
0
4
D_AD20
PCI_SLOT6
0
6
D_AD22
SCSI_LSI1020
1
4
P_AD20
PCI_SLOT1
1
2
P_AD18
PCI_SLOT2
1
6
P_AD22
PCI_SLOT3
2
2
S_AD18
PCI_SLOT4
2
4
S_AD20
System PCI REQ/GNT
The PCI 32-bit arbiters built in CNB20HE_SL. The PCI 64-bit arbiters built in CIOB20. The following
table identifies the mapping of each individual device and REQ/GNT Usage:
PCI Device Arbitrate & Clock No. map
Clock chip-ICS932S203/Cypress CY28329
Request No.
14
Grant No.
Clock No.
RAGE_XL_A
-PCIREQ4
-PCIGNT4
VGA_PCLK
BCM5702
-PCIREQ0
-PCIGNT0
540_PCICLK
SCSI_LSI1020
-P_REQ2
-P_GNT2
SCSI_PCICLK
PCI_SLOT1
-P_REQ0
-P_GNT0
PCICLK_SLT1
PCI_SLOT2
-P_REQ1
-P_GNT1
PCICLK_SLT2
PCI_SLOT3
-S_REQ0
-S_GNT0
PCICLK_SLT3
PCI_SLOT4
-S_REQ1
-S_GNT1
PCICLK_SLT4
PCI_SLOT5
-PCIREQ1
-PCIGNT1
PCICLK_SLT5
PCI_SLOT6
-PCIREQ2
-PCIGNT2
PCICLK_SLT6
Chapter 1
System Management Bus (SMBus) Interface
There are one SMBus (I2C) on G510 system been used for reading SPDs of DIMMs, accesses the
CNB20HE_SL PCI configuration space, control the FAN and access the hardware monitor data.
Item
1
2
3
Target
CPU1
CPU2
CMIC
Device
Address
Comment
MEMORY
1010100xb
A8
THERMAL SNSR
1001001xb
52
MEMORY
1010101xb
AA
THERMAL SNSR
1001010xb
54
FUNCTION0
1100000xb
C0
1100100xb
C8
FUNCTION1
FUNCTION2
4
CIOBX2
5
CSB5
6
DIMM1
DIMM SPD
1010000xb
A0
7
DIMM2
DIMM SPD
1010001xb
A2
8
DIMM3
DIMM SPD
1010110xb
AC
9
DIMM4
DIMM SPD
1010111xb
AE
0011000xb
30
0101100xb
58
10
2
I C Buffer
13
BMC
14
ADM 1026
80
RQ Assignments
There are three IO/APIC built in G510.One is ISA IO/APIC and the other two are PCI IO/APIC.
Chapter 1
15
ISA IO/APIC IRQ Default Setting
System IRQ
Device
IRQ0
8254 Timer
IRQ1
Keyboard Controller
IRQ2
Cascade
IRQ3
Serial Port
IRQ4
Serial Port
IRQ5
USB
IRQ6
Floppy Controller
IRQ7
Parallel Port
IRQ8
RTC
IRQ9
Used for ACPI SCI
IRQ10
IRQ11
IRQ12
Mouse controller
IRQ13
System Interrupt/FERR
IRQ14
Primary IDE Controller
IRQ15
Secondary IDE Controller
PCI Interrupt Routing in PCI Mode
To program the PCI interrupt router is via PCI interrupt routing index and data registers. The index
register of PCI interrupts routing is C00h and the data register is C01h. The bit 7-4 of data register is
reserved. The value programming into data register is the mapped IRQ number. The value “0” is
represented that disables the mapping and IRQ2, 8 & 13 are reserved.
Interrupt Routing
Device
16
INTA
USB
-PCIIRQ15
RAGE_XL_A
-PCIIRQ2
INTB
INTC
INTD
BCM5702
-PCIIRQ0
SCSI_LSI1020
-PCIIRQ13
PCI_SLOT1
-PCIIRQ1
-PCIIRQ2
-PCIIRQ3
-PCIIRQ4
PCI_SLOT2
-PCIIRQ4
-PCIIRQ3
-PCIIRQ2
-PCIIRQ1
PCI_SLOT3
-PCIIRQ5
-PCIIRQ6
-PCIIRQ7
-PCIIRQ8
PCI_SLOT4
-PCIIRQ8
-PCIIRQ7
-PCIIRQ6
-PCIIRQ5
PCI_SLOT5
-PCIIRQ9
-PCIIRQ10
-PCIIRQ11
-PCIIRQ12
PCI_SLOT6
-PCIIRQ12
-PCIIRQ11
-PCIIRQ10
-PCIIRQ9
Chapter 1
PCI Interrupt Routing in APIC Mode
IOAPIC Entry
IO APIC
Interrupt Source
INTIN0
ISA IO APIC
IRQ0/INTR
INTIN1
ISA IO APIC
IRQ1
INTIN2
ISA IO APIC
IRQ2/SMI
INTIN3
ISA IO APIC
IRQ3
INTIN4
ISA IO APIC
IRQ4
INTIN5
ISA IO APIC
IRQ5
INTIN6
ISA IO APIC
IRQ6
INTIN7
ISA IO APIC
IRQ7
INTIN8
ISA IO APIC
IRQ8#
INTIN9
ISA IO APIC
IRQ9
INTIN10
ISA IO APIC
IRQ10
INTIN11
ISA IO APIC
IRQ11
INTIN12
ISA IO APIC
IRQ12
INTIN13
ISA IO APIC
IRQ13
INTIN14
ISA IO APIC
IRQ14
INTIN15
ISA IO APIC
IRQ15
INTIN0
PCI IO APIC
NIC 82540EM
INTIN1
PCI IO APIC
Slot 1 INTA# & Slot 2 INTD#
INTIN2
PCI IO APIC
Slot 1 INTB# & Slot 2 INTC#
INTIN3
PCI IO APIC
Slot 1 INTC# & Slot 2 INTB#
INTIN4
PCI IO APIC
Slot 1 INTD# & Slot 2 INTA#
INTIN5
PCI IO APIC
Slot 3 INTA# & Slot 4 INTD#
INTIN6
PCI IO APIC
Slot 3 INTB# & Slot 4 INTC#
INTIN7
PCI IO APIC
Slot 3 INTC# & Slot 4 INTB#
INTIN8
PCI IO APIC
Slot 3 INTD# & Slot 4 INTA#
INTIN9
PCI IO APIC
Slot 5 INTA# & Slot 6 INTD#
INTIN10
PCI IO APIC
Slot 5 INTB# & Slot 6 INTC#
INTIN11
PCI IO APIC
Slot 5 INTC# & Slot 6 INTB#
INTIN12
PCI IO APIC
Slot 5 INTD# & Slot 6 INTA#
INTIN13
PCI IO APIC
LSI53C1020 INTA#
INTIN14
PCI IO APIC
INTIN15
PCI IO APIC
Chapter 1
USB IRQ#
17
State Transition
The sleeping states supported by G510 are only S1 and S5.
Table below shows the wake up events in each state.
Wake up Events
States Can Wake From
RTC
S5
Power Button
S5
RI#
S5
PME#
S5
KB
S1
MOUSE
S1
USB
S1
The way to transfer system to S5 from S0 in ACPI OS. Use OS build-in function:
ACPI OS provide the interface to allow user directly execute this function.
S0 to S5 ( G2 )
Item
Description
Set Timer
ACPI OS provide the interface to allow user directly execute this function.
Power Button
When power button is pressed, PC87414 will issue an SCI ( via
SIO_WAKEUP).
Sleep Button
When sleep button is pressed, CSB5 will issue an SCI( Not Implement).
The ways to wake up system from S5.
S5 to S0
Item
Description
Power Button
When power button is pressed in S5, the ONCTRL# will be asserted
and system will power on.
PME#
Whenever PME# is asserted by one of the PCI devices in S5, the
ONCTRL# will be asserted and system will power on.
RI
Whenever RI is asserted from COM1 in S5, the ONCTRL# will be
asserted and system will power on.
RTC Alarm
When an alarm condition is detected, the ONCRTL# will be asserted
and system will power on.
G3 ( Power Failure) & Auto Power Recovery
Power failure means the AC power is lost. In this state, only battery power exists. G510 uses
“Auto Power Recovery” to manage the AC power recovers in G3 state. It means that when AC power is
back in G3 state, the system will back to S5 state first and determine it should stay in this state or assert
the ONCTRL# to power on system. In our design, the system will remember the state that it loses
the AC power. Then it will back to the “remembered state” when AC is back.
18
Chapter 1
Chapter 2
System Utilities
Most system are already configured by the manufacturer or the dealer. There is no need to run Setup when
starting the computer unless you get a Run Setup message.
The Setup program loads configuration values into the battery-backed nonvolatile memory called
COMS RAM. This memory area is not part of the system RAM.
NOTE: If you repeatedly receive Run Setup messages, the battery may be bad. In this case, the system
cannot retain configuration values in CMOS. Ask a qualified technician for assistance.
Before you run Setup, make sure that you have saved all open files. The system reboots immediately after
you exit Setup.
As you change your BIOS Setup, examine the system configuration values. When you are satisfied that all
the values are correct, write them down. Store the recorded values in a safe place. In the future, if the
battery loses power or the CMOS chip is damaged, you can easily recreate your Setup.
Chapter 2
20
Entering setup
Power on the server to start the system POST ( Power On Self Test ) process. During bootup, press
Ctrl-Alt-Esc to enter the BIOS setup.
NOTE: You must press Ctrl-Alt-Esc while the system is booting. This key combination does not work
during any other time.
There are several tabs on the setup screen corresponding to the six major BIOS menus:
T
Main
T
Advanced
T
Power
T
Boot
T
Security
T
Exit
The programeters on the screens shown in this Service Guide display default system values. These
values may not be the same as those in your system.
Note the following reminders when moving around the setup screen:
T
Use the Left and Right arrow keys to move to the next page or to return to the previous screen.
T
Use the Up and Down arrow keys to select an item.
T
Use the + and - keys to select an option.
T
Use the Tab key to select a field.
T
Use the Enter key to display a submenu screen.
T
Press F1 for General Help on using the BIOS setup.
T
Press F10 to save changes and does the BIOS setup.
T
Press Esc to close the BIOS setup.
In the descriptive table following each of the screen illustrations, settings in boldface are the default
and suggested parameter settings.
21
Chapter 2
Main
Then Main menu displays basic and important information about the system. These information is
necessary for troubleshooting and may be required when asking for technical support.
The last two parameters on the screen lets you define the system’s time and date settings. The real-time
clock keeps the system date and time. After setting the date and time, you do not need to enter them every
time you turn on the system. As long as the internal battery remains good and connected, the clock
continues to keep the date and time accurately even when the power off.
BIOS SETUP UTILITY
Main Advanced Power
AMIBIOS Version
BIOS Build Date
BIOS ID
System Time
System Date
:
:
:
Boot
Security
Exit
07.00.xx
08/09/02
S531A01
[14:21:40]
[Wed 08/09/2002]
ЧШ
ХЦ
+Tab
F1
F10
ESC
> System Information
> Product Information
Select Screen
Select Item
Change Option
Select Field
General Help
Save and Exit
Exit
V02.03 ©Copyright 1985-2000, American Megatrends Inc.
Parameter
Description
AMIBIOS Version
Version of the BIOS setup
BIOS Build Date
Date when the BIOS setup was created
BIOS ID
ID number of the BIOS setup
System Time
Sets the time following the hour-minute-second
format. Valid values for hour, minute, and second
are:
Hour: 00 to 23
Minute: 00 to 59
Second: 00 to 59
Chapter 2
22
Parameter
System Date
23
Description
Sets the date following the weekday-month-day-year
format. Valid values for weekday, month, day, and
year are:
Weekday: Sun, Mon, Tue, Wed, Thu, Fri, Sat
Month: 1 to 12
Day: 1 to 31
Year: 1980 to 2079
Chapter 2
Advanced
The advanced menu contains parameter values that define how the system behaves on startup.
WARNING:Be cautious in setting parameter values in the Advanced menu as any incorrect value may
cause the system to malfunction.
Press Enter to enter the submenu screen of the parameters shown in the screen below.
BIOS SETUP UTILITY
Main Advanced Power
Boot
Security
Setup Warning
Setting items on this screen to incorrect values
may cause the system to malfunction!
Exit
Configure SuperIO
Chipset Nat414
> SuperIO Configuration
> IDE Configuration
> Floppy Configuration
> PCIPnP Configuration
> Boot Settings Configuration
> Event Log Configuration
> OnBoard Devices Configuration
> Remote Access Configuration
ЧШ
ХЦ
Enter
F1
F10
ESC
Select Screen
Select Item
Go to Sub Screen
General Help
Save and Exit
Exit
V02.03 ©Copyright 1985-2000, American Megatrends Inc.
Chapter 2
24
Super I/O Configuration
The Super I/O Configuration submenu lets you define the parameter settings for the system’s parallel
and serial ports.
Parameter
Description
Serial Port 1
( Addres/ IRQ)
Serial port 1 address and IRQ ( interrupt request )
setting
Parallel Port Address
Sets a logical base address for the parallel port
Parallel Port IRQ
Assigns an IRQ for the parallel port.
If you install an add-on card that has a
parallel port whose
Parallel Port Mode
Sets the operation mode for the parallel port
ECP Mode DMA Channel Assigns a DMA ( Direct Memory Access) channel for
the ECP ( Extended Capabilities Port ) parallel port
function. This parameter is configurable only if you
select ECP as the operation mode.
25
Chapter 2
IDE Configuration
The IDE Configuration submenu lets you define the parameter settings related to the hard disk/s.
Parameter
Description
Onboard PCI IDE
Controller
Selects which system IDE controller to enable
Primary IDE Master
Press Enter to access the Primary IDE Master
submenu.
Primary IDE Slave
Press Enter to access the Primary IDE Slave
submenu.
Secondary IDE Master
Press Enter to access the Secondary IDE Master
submenu
Secondary IDE Slave
Press Enter to access the Secondary IDE Slave
submenu
Hard Disk Write Protect
Enables or disables the hard disk write protect
function.
Chapter 2
26
Primary/Secondary IDE Master/ Slave
These items let you select the IDE hard disk parameters that the system supports.
Parameter
Description
Device
Type of IDE device
Vendor
Vendor of the selected IDE device
Size
Size of the select device
Type
Driver Type
Option
Auto
CD-ROM
ARMD
Not Installed
LBA/Large Mode Selects the hard disk drive translation
Auto
method. For drivers with more than 504 MB, Disable
the LBA mode is necessary.
Block Mode
27
Enhances disk performance depending on
the hard disk in use.
If you set this parameter to Auto, BIOS
setup automatically detects if the installed
hard disk drive supported, it allows date
transfer in blocks ( multiple sectors ) at a
rate of 256 bytes per cycle. If you set this
parameter to Disabled, data transfer from
and to the device occurs one sector at a
time.
Auto
Disabled
Chapter 2
Parameter
Description
Option
PIO Mode
When set to Auto, BIOS setup automatically
detects if the installed hard disk supports the
function. If supported, it allows for faster
data recovery and read/write timing that
reduces hard disk activity time. This
results in better hard disk performance.
Mode 0 to 4 provide successive increase
of performance.
Auto
0
1
2
3
4
DMA Mode
Selects DMA ( Direct Memory Access )
mode. Options include:
Auto: Auto detected
SWDMAn: SingleWordDMAn
MWDMAn: MultiWordDMAn
UDMAn: UltraDMAn
Auto
SWDMAn
MWDMAn
UDMAn
S.M.A.R.T
Auto
Enables or disables the S.M.A.R.T ( SelfDisabled
Monitoring, Analysis and Reporting
Enabled
Technology) function of the internal hard
disk.
If “Auto” is selected, BIOS setup will enable
the S.M.A.R.T function if the driver supports
it.
32-bit Data
Transfer
Enables or disables the 32-bit data
transfer function
ARMD
Selects the ARMD ( ATAPI Removable
Emulation Type Media Device ) emulation type.
Disabled
Enabled
Auto
Floppy
Hard Disk
Floppy Configuration
The Floppy Configuration submenu displays the type of floppy drive installed in the server.
Chapter 2
28
Parameter
Floppy Drive A
Description
Floppy Disk drive type
Option
1.44MB, 3.5-inch
None
PCI/PnP Configuration
The PCI/PnP Configuration submenu lets you specify the settings for the PCI devices.
29
Chapter 2
Parameter
Description
Option
Plug & Play OS
No
When this parameter is set to Yes, BIOS
setup initializes only PnP boot devices such Yes
as SCSI cards.
When set to No, the BIOS setup initializes
all PnP boot and non-boot devices such as
sound cards.
Note: Set this parameter to Yes only if the
operating system is Windows 95/98 or a
later version.
Reset Configure Data
BIOS setup stores the configuration data of No
Yes
Plug and Play devices in NVRAM ( Nonvolatile Random Access Memory). When
this parameter is set to Yes, current data is
deleted and a new set of information is
created during the next system bootup.
PCI Latency Timer
Sets a timing parameter for the PCI bus
64
USB Function
Enables the system’s USB ports
Enabled
Disabled
Legacy USB Support
Enable this parameter when you intend to
use a USB device and are using a
non-Plug and Play operating system,
such as DOS.
Disabled
Auto
ARMD Emulation Type
Selects the ARMD ( ATAPI Removable
Media Device ) emulation type
Hard Disk
Auto
Floppy
Chapter 2
30
Boot Settings Configuration
The Boot Settings Configuration submenu lets you specify the preferred settings for system bootup.
B IO S S E T U P U T IL IT Y
Advanced
B o o t S e ttin g s C o n fig u r a tio n
A llo w s B IO S to s k ip
____________________________________________________
c e r ta in te s ts w h ile
Q u ic k B o o t
[E n a b le d ]
b o o tin g . T h is w ill
Q u ie t B o o t
[E n a b le d ]
d e c r e a s e th e tim e
____________________________________________________
H y p e r T h r e a d in g
[E n a b le d ]
A u to -d e te c t C P U F re q u e n c y
[E n a b le d ]
C P U F r e q u e n c y to B u s R a tio
[2 1 to 1 ]
B o o tu p N u m -L o c k
[O n ]
P S /2 M o u s e S u p p o r t
[E n a b le d ]
W a it F o r ‘F 1 ’If E r r o r
[E n a b le d ]
M P S 1 .4 S u p p o r t
[E n a b le d ]
M e m o ry Te s t
[E n a b le d ]
n e e d e d to b o o t th e
s y s te m .
Ч Ш
S e le c t S c r e e n
Х Ц
S e le c t Ite m
+ -
C h a n g e O p tio n
F1
G e n e r a l H e lp
F10
S a v e a n d E x it
ESC
E x it
V 0 2 .0 3 © C o p y r ig h t 1 9 8 5 -2 0 0 0 , A m e r ic a n M e g a tr e n d s In c .
Parameter
31
Description
Option
Quick Boot
Allows the system to boot faster by skipping Enabled
some POST routine
Disabled
Quiet Boot
Enables or disables the Quiet Boot function. Enabled
Disabled
When set to Enabled, BIOS setup is in
graphical mode and displays only an
identification logo during POST and while
booting. After booting, the screen displays
the operating system prompt ( such as
DOS ) or logo ( such as Windows). If
any error occurs while booting, the system
automatically switches to text mode.
Even if your setting is Enabled, you may
still switch to text mode while booting by
pressing the Delete key when you see the
“ Press CTRL-ALT-ESC key to enter setup”
message on the screen.
When set to Disabled, BIOS setup is in the
conventional text mode where you see the
system initialization details on the screen.
Chapter 2
Parameter
Description
Option
Hyperthreading
Enabled
Enable or disables the hyperthreading
Disabled
function of the processor.
When enabled, one physical processor acts
as two logical processors by “ threading”
two sets of data instructions in parallel
streams for processing. The processor can
then simultaneously manage incoming
data from different applications without
losing track of the data processing status
of each.
Auto-Detect CPU
Frequency
BIOS will set the CPU optimal speed to its
highest speed without re-entering BIOS
Setup to load default settings.
Enabled
Boot up Num Lock
Activates the Num Lock function upon
booting
On
Off
CPU Frequency to Bus
Ratio
CPU/Bus ratio of the system. The clock
21 to 1
speed of the bus does not necessarily equal
the CPU’s. Mostly, the bus clock speed is
slower than the CPU clock speed.
PS/2 Mouse Support
Enable this parameter if you intend to use
a mouse or trackball with a PS/2 interface.
Enabled
Disabled
Wait for “F1” if Error
When this item is enabled you will be
prompted to press F1 when an error is
detected during boot up.
Enabled
Disabled
MPS 1.4 Support
If you enable this item, the system BIOS MP Enabled
table will be compatible with MultiProcessor Disabled
Specification version 1.4
Memory Test
Allows BIOS to skip certain tests while
Enabled
booting. Then will decrease the time needed Disabled
to boot the system.
Event Log Configuration
The Event Log Configuration submenu lets you specify the appropriate settings for the system’s event
handling function.
The system event log enables you to record and monitor events that occur in the system( e.g. system
temperature changes, fan stops, etc.).
Chapter 2
32
BIOS SETUP UTILITY
Advanced
ENABLED: Allow logging
ASF Information
____________________________________________________ of events.
ASF Specification Version
1.03
Event Logging
Clear All Event Logs
> View Event Log
[Enabled]
[No]
Event Control Interface
BIOS POST Event Logging
ECC Event Logging
PCI Device Event Logging
AC Power Lost/Recovery
Intrusion Event Logging
Clear Intrusion Status
Reset Reduction Memory
[Enabled]
[Enabled]
[Enabled]
[Disabled]
[Enabled]
[No]
[No]
ЧШ
ХЦ
+F1
F10
ESC
Select Screen
Select Item
Change Option
General Help
Save and Exit
Exit
V02.03 ©Copyright 1985-2000, American Megatrends Inc.
Parameter
Description
Option
ASF
Specification
Version
Version number of ASF
Event Logging
Enables or disables the event logging function of the Enabled
system
Disabled
Clear All Event
Logs
When this item is set to Enabled, the event log is
cleared and this parameter is set to Disabled for
the next system bootup.
No
Yes
View Event Logs Opens the system event log file for viewing
33
BIOS POST
Event Logging
BIOS checks the bad processors and memory
modules during the POST process.
When this parameter is enabled, it will make a
log of this operation.
Enabled
Disabled
ECC Event
Logging
ECC ( Error Correction Code ) tests the accuracy
of data as it passes in and out of memory.
When this parameter is enabled, single-bit and
multi-bit memory errors will be recorded in the
event log.
Enabled
Disabled
PCI Device
Event Logging
PCI ( Peripheral Component Interconnect ) is a 32-bit Enabled
Disabled
bus that supports a 64-bit extension for new
processors, such as Pentium processors. It can
run at clock speeds of 33 or 66 MHz.
When this parameter is enabled, any PCI device error
will be recorded in the event log.
Chapter 2
Parameter
Description
Option
AC Power
Lost/Recovery
When this parameter is enabled, any instance of
AC power lost will be monitored and logged in the
event log.
Disabled
Enabled
Intrusion
Event Logging
Allow logging of chassis intrusion events.
Enabled
Clear Intrusion
Status
Clear chassis intrusion status on next Boot.
Yes
No
Reset Reduction When this paramter is enabled, only the system’s
Memory
healthy memory size is displayed during the POST
process.
Chapter 2
No
Yes
34
Onboard Devices Configuration
The onboard Devices Configuration submenu lets you specify settings that are relatd to the system
hardware.
Parameter
35
Description
Option
Onboard LAN
Enables or disables the onboard LAN
controller
Enabled
Disabled
Onboard SCSI
Controller
Enables or disables the onboard SCSI
controller
Enabled
Disabled
Onboard PCI
VGA
Enables or disables the onboard PCI VGA
controller
Enabled
Disabled
Chapter 2
Power
The power menu allows you to configure the system’s power management feature.
Parameter
Description
Option
ACPI-aware O/S This parameter indicates whether the system’s OS support
the ACPI ( Advanced Configuration and Power Interface )
standard of power management.
Yes
No
Power
Management
When this parameter is enabled, it allows some OS, such as
Windows 95/98 to implement APM (Advanced Power Management) functions.
Enabled
Disabled
AC Power
Failure
Defines the power state to resume to after a system shutdown Last State
Stay Off
that is due to an interruption in AC power.
When set to Last State, the system will return to the active
power state prior to shutdown.
When set to Stay Off, the system remains off after power shutdown.
Power Button
Mode
When set to On/Off, the power button serves as a standard
on/off button.
When set to Suspend, pressing the power button will
activate the power-saving suspend mode.
Chapter 2
On/Off
Suspend
36
Boot
The Boot menu allows you to specify the preferred setting during system bootup.
Press Enter to enter the submenu screen of the parameters shown in the screen below.
Boot Device Priority
The Boot Device Priority submenu lets you specify the boot search sequence during the POST process.
BIOS setup will display an error message if the drive(s) specified is not bootable.
37
Chapter 2
Parameter
1st Boot Device
Description
Sets the device from which the system will first attempt to boot up.
2nd Boot Device Sets the device from which the system will attempt to boot up when
the first attempt failed.
3rd Boot Device Sets the device from which the system will attempt to boot up when
the first and second attempts failed.
Hard Disk Drives
The Hard Disk Drives submenu lets you specify the devices that will be considered as the primary
and secondary hard drives.
Parameter
Description
1st Hard Drive
Sets the device to be considered the primary hard
drive.
2nd Hard Drive
Sets the device to be considered the secondary hard
drive.
Chapter 2
38
Removable Devices
The Removable Devices submenu displays the type of removable devices available in the system.
ATAPI CD-ROM Devices
The ATAPI ( Advanced Technology Attachment Packet Interface ) CD-ROM submenu displays the type of
ATAPI CD-ROM available in the system.
BIOS SETUP UTILITY
Boot
st
1 ATAPI CDROM [IDE SECONDARY MASTER - xxx]
Specifies the boot
sequence from the
available devices.
à ß Select Screen
á â Select Item
+Change Option
F1
General Help
F10
Save and Exit
ESC Exit
V02.03 ©Copyright 1985-2000, American Megatrends Inc.
39
Chapter 2
Security
The Security menu allows you to safeguard and protect the system from unauthorized use by setting
up access passwords.
Parameter
Description
Option
Supervisor
Password
Prevents unauthorized access to the BIOS setup.
User Password
Secures your system against unauthorized use. Once Not Installed
you set this password, you have to type it whenever Installed
you boot the system. User password is available
only when a Supervisor password is set.
Change User
Password
Press Enter to change the User password.
Change
Supervisor
Password
Press Enter to change the Supervisor password.
Clear User
Password
Press Enter to remove the User password.
Chapter 2
Not Installed
Installed
40
To set a Supervisor/User Password
1.
Use the up/down keys to highlight a password parameter ( Supervisor Password or User Password )
then press Enter.
A password box will appear.
2.
Type a password then press Enter.
The password may consist of up to six alphanumeric characters ( A-Z , a-z , 0-9 ).
3.
Retype the password to verify the first entry then press Enter again.
After setting the password, the system automatically sets the chosen password parameter to installed.
To change the Supervisor/User password
1.
Use the up/down keys to highlight either change password parameters ( Change Supervisor
Password or Change User Password ) then press Enter.
2.
Type the original password then press Enter.
3.
Type a new password then press Enter.
4.
Retype the password to verify the first entry then press Enter again.
To remove the User password
1.
Use the up/down keys to highlight the Clear User Password parameter then press Enter.
2.
Enter the current password then press Enter.
3.
Press Enter twice without entering anything in the new and confirm password fields.
After doing this, the system automatically sets the User password parameter to Not Installed.
41
Chapter 2
Exit
The Exit menu displays the various options to quit from the BIOS setup. Highlight any of the exit
options then press Enter.
Parameter
Description
Exit Saving Changes
Saves changes made and close the BIOS setup
Exit Discarding Changes
Discards changes made and close the BIOS setup
Load Optimal Defaults
Loads the optimal settings for all BIOS setup
parameters. Optimal settings are quite demanding
in terms of resources consumption. If you are using
low-speed memory chips or other kinds of lowerperformance components and you choose to load
these settings, the system might not function
properly.
Load Failsafe Defaults
Loads the failsafe settings for all BIOS parameters.
Failsafe settings, compared to the optimal settings,
are not quite as demanding in terms of resoureces
consumption so you can be sure to have a stable
system performance even if you are using
low-grade components.
Discard Changes
Discards all changes made on the BIOS setup.
Chapter 2
42
Chapter 3
Machine Disassembly and Replacement
This chapter contains step-by-step procedures on how to disassemble the server system for
maintenance and troubleshooting.
NOTE: The screws for the different components vary in size. During the disassembly process, group the
screws with the corresponding components to avoid mismatch when putting back the components.
Chapter 3
66
Disassembly FlowChart
67
Chapter 3
General Information
Before You Begin
Before proceeding with the disassembly procedure, make sure that you do the following:
1.
Turn off the power to the system and all peripherals.
2.
Unplug the AC adapter and all power and signal cables from the system.
3.
Open the system according to the instruction.
4.
Follow the ESD precautions described in this section when handling a server component.
5.
Remove any expansion board(s) or peripheral(s) that block access to the DIMM socket or other
components connector.
ESD Precautions
Electrostatic discharge (ESD) can damage the processors, motherboard, disk drives, expansion boards,
or other components. Always observe the following precautions before you exchange a server component:
1.
Do not remove a component from its protective packaging until you are ready to install it.
2.
Wear a wrist grounding strap and attach it to a metal part of the server before handling components.
If a wrist strap is not available, maintain contact with the server throughout any procedure requiring
ESD protection.
Post-installation instructions
Observe the following after installing a server component:
1.
See to it that all components are installed according to the describled step-by-step instructions.
2.
Reinstall any expansion board(s) or periphera(s) that you have previously removed.
3.
Reinstall the air baffle.
4.
Reinstall the chassis panels.
5.
Connect the necessary cables.
6.
Turn on the system.
CAUTION: After completing the component upgrade/replacement procedures, do not forget to reinstall the
air baffle before replacing the chassis panels. Failure to do so will reduce the system’s cooling
efficiency which can adversely affect performance or cause damage due to overheating.
Chapter 3
44
Opening the Housing Panels
CAUTION: Before you proceed, make sure that you have turned off your computer and all peripherals
connected to it.
Opening the Front Panel door
A security lock secures the front door to protect against unauthorized access.
To open the front door:
1.
Insert the key into the lock and turn it clockwise until it points to the unlocked icon.
2.
Pull open the front panel door.
Removing the Front Bezel
69
1.
Simultaneously slide the thumb catches at the top.
2.
Then push down to release the latches.
3.
Open the panel 90 degrees, until it is perpendicular to the chassis.
4.
Gently pull the inner panel away from the chassis.
Chapter 3
Removing the Side Panel
1.
Loosen the three thumb screws located at the end of the left panel closest to the front panel.
2.
Slide the left panel slightly forward then upward before detaching it from the chassis.
Chapter 3
70
Opening the Server
To remove the air baffle
Remove the air baffle to allow easy access to the motherboard and system components.
1.
Press the release latches on both ends of the air baffle.
2.
Pull out the air baffle to remove it from the chassis.
To remove the Rear Fan
1.
Unplug all cables from the rear fan.
2.
Lift up the rear fan and release it from the chassis.
To remove the Heatsink
71
1.
Depress then lift up each of the locking levers to a 90 angle.
2.
Remove both heatsinks.
3.
Lift up the CPU locking lever until it is fully extended and pull it from the socket.
Chapter 3
To remove the HDD Cage
1.
Loosen the four thumb screws as shown here to release the HDD cage.
2.
Slightly pull out the cage from the housing.
3.
Pull out the hard disk carrier from the cage.
4.
Loosen the two screws on both side to release the hard disk from the carrier.
5.
Then pull the hard disk unit from the carrier.
To remove the Safety Board
1.
Loosen the one screw shown here to release the hard disk safety board.
2.
Then pull the hard disk safety board from its position.
Chapter 3
72
To remove the Backplane Board
1.
Loosen the one thumb screw to release the hard disk backplane board.
2.
Pull the hard disk backplane board from rear of the cage.
To remove the CD-ROM
1.
Loosen and remove the two screws from each side of the CD-ROM drive before pulling it from the
chassis.
To remove the Floppy
Pull the floppy unit from the chassis.
73
Chapter 3
To remove the Power Supply
Grasp the handle bar to pull the power supply from the chassis.
To remove the PDB
1.
Loosen the thumb screw as highlight.
2.
Then pull the power supply PDB from the chassis.
To remove the Front Fan
Open the front fan door then pull the front fan module away.
Chapter 3
74
To remove the Mainboard
1.
Unscrew the thumb screw in the rear of the chassis to release the mainboard.
2.
Then push backward to release and pull the mainboard from the chassis.
To remove the LED
Unscrew the one screw to release the LED then take the LED away.
75
Chapter 3
Chapter 4
Troubleshooting
This chapter provides troubleshooting information for the Altos G510:
1.
AMIBIOS POST Checkpoint Codes
a.
Uncompressed Initialization Codes
b.
Bootblock Recovery Codes
c.
Uncompressed Initialization Codes
2.
Bus Checkpoint Codes
3.
AMIBIOS Beep Codes
Chapter 4
52
AMIBIOS POST Checkpoint Codes
When AMIBIOS performs the Power On Self Test, it writes diagnostic codes checkpoint codes to I/O port
0080h. If the computer cannot complete the boot process, diagnostic equipment can be attached to the
computer to read I/O port 0080h.
Uncompressed Initialization Codes
The uncompressed initialization checkpoint codes are listed in order of execution:
Checkpoint Code
Description
D0h
The NMI is disabled. Power on delay is starting.
Next, the initialization code checksum will be
verified.
D1h
Initializing the DMA controller, performing the
keyboard controller BAT test, starting the memory
refresh, and entering 4 GB flat mode next.
D3h
Starting memory sizing next.
D4h
Returning to real mode. Executing any OEM patches
and setting the stack next.
D5h
Passing control to the uncompressed code in
shadow RAM at E000:0000h. The initialization code
is copied to segment 0 and control will be transferred
to segment 0.
D6h
Control is in segment 0. Next, checking if <Ctrl>
<Home> was pressed and verifying the system
BIOS checksum.
If either < Ctrl ><Home> was pressed or the system
BIOS checksum is bad, next will go to checkpoint
code E0h.
Otherwise, going to checkpoint code D7h.
Bootblock Recovery Codes
The bootblock recovery checkpoint codes are listed in order of execution:
Checkpoint Code
53
Description
E0h
The onboard floppy controller if available is initialized. Next, beginning the base
512KB memory
test.
E1h
Initializing the interrupt vector table next.
E2h
Initializing the DMA and Interrupt controllers next.
E6h
Enabling the floppy drive controller and Timer IRQs.
Enabling internal cache memory.
Edh
Initializing the floppy drive.
Eeh
Looking for a floppy diskette in drive A:. Reading the
first sector of the diskette.
Efh
A read error occurred while reading the floppy drive in drive A:.
F0h
Next, searching for the AMIBOOT.ROM file in the root directory.
Chapter 4
Checkpoint Code
Description
F1h
The AMIBOOT.ROM file is not in the root directory.
F2h
Next, reading and analyzing the floppy diskette FAT
to find the clusters occupied by the AMIBOOT.ROM file.
F3h
Next, reading the AMIBOOT.ROM file, cluster by cluster.
F4h
The AMIBOOT.ROM file is not the correct size.
F5h
Next, disabling internal cache memory.
FBh
Next, detecting the type of flash ROM.
FCh
Next, erasing the flash ROM.
FDh
Next, programming the flash ROM.
FFh
Flash ROM programming was successful. Next, restarting the system BIOS.
Uncompressed Initialization Codes
The following runtime checkpoint codes are listed in order of execution. These codes are uncompressed
in F0000h shadow RAM.
Checkpoint Code
Description
03h
The NMI is disabled. Next, checking for a soft reset or a power on condition.
05h
The BIOS stack has been built. Next, disabling cache memory.
06h
Uncompressing the POST code next.
07h
Next, initializing the CPU and the CPU data area.
08h
The CMOS checksum calculation is done next.
0Ah
The CMOS checksum calculation is done. Initializing the CMOS status register
of date and time next.
0Bh
The CMOS status register is initialized. Next, performing any required
initialization before the keyboard BAT command is issued.
0Ch
The keyboard controller input buffer is free. Next, issuing the BAT command to
the keyboard controller.
0Eh
The keyboard controller BAT command result has been verified. Next,
performing any necessary initialization after the keyboard controller BAT
command test.
0Fh
The initialization after the keyboard controller BAT command test is done. The
keyboard command byte is written next.
10h
The keyboard controller command byte is written. Next, issuing the Pin23 and
24 blocking and unblocking command.
11h
Next, checking if <End> or <Ins> keys were pressed during power on. Initializing
CMOS RAM if the Initialize CMOS RAM in every boot AMIBIOS POST
option was set in AMIBCP or the <End> key was pressed.
12h
Next, disabling DMA controllers 1 and 2 and interrupt controllers 1 and 2.
13h
The video display has been disabled. Port B has been initialized. Next,
initializing the chipset.
14h
the 8254 timer test will begin next.
19h
The 8254 timer test is over. Starting the memory refresh test next.
1Ah
The memory refresh line is toggling. Checking the 15 second on/off time next.
Chapter 4
54
Checkpoint Code
55
Description
23h
Reading the 8042 input port and disabling the MEGAKEY Green PC feature
next. Making the BIOS code segment writable and performing any necessary
configuration before initializing the interrupt vectors.
24h
The configuration required before interrupt vector initialization has completed.
Interrupt vector initialization is about to begin.
25h
Interrupt vector initialization is done. Clearing the password if the POST DIAG
switch is on.
27h
Any initialization before setting video mode will be done next.
28h
Initialization before setting the video mode is complete. Configuring the
monochrome mode and color mode settings next.
2Ah
Bus initialization system, static, output devices will be done next, if present.
2Bh
Passing control to the video ROM to perform any required configuration before
the video ROM test.
2Ch
All necessary processing before passing control to the video ROM is done.
Looking for the video ROM next and passing control to it.
2Dh
The video ROM has returned control to BIOS POST. Performing any required
processing after the video ROM had control.
2Eh
Completed post-video ROM test processing. If the EGA/VGA controller is not
found, performing the display memory read/write test next.
2Fh
The EGA/VGA controller was not found.The display memory read/write test is
about to begin.
30h
The display memory read/write passed. Look for retrace checking next.
31h
The display memory read/write test or retrace checking failed. Performing the
alternate display memory read/write test next.
32h
The alternate display memory read/write test passed. Looking for alternate
display retrace checking next.
34h
Video display checking is over. Setting the display mode next.
37h
The display mode is set. Displaying the power on message next.
38h
Initializing the bus input, IPL, general devices next, if present.
39h
Displaying bus initialization error messages.
3Ah
The new cursor position has been read and saved. Displaying the hit < DEL >
message next.
3Bh
The hit <DEL > message is displayed. The protected mode memory test is about
to start.
40h
Preparing the descriptor tables next.
42h
The descriptor tables are prepared. Entering protected mode for the memory
test next.
43h
Entered protected mode. Enabling interrupts for diagnostics mode test.
44h
Interrupts enabled if the diagnostics switch is on. Initializing data to check
memory wraparound at 0:0 next.
45h
Data initialized. Checking for memory wraparound at 0:0 and finding the total
system memory size next.
46h
The memory wraparound test is done. Memory size calculation has been done.
Writing patterns to test memory next.
47h
The memory pattern has been written to extended memory. Writing patterns to
the base 640KB memory next.
Chapter 4
Checkpoint Code
Description
48h
Patterns written in base memory. Determining the amount of memory below
1MB next.
49h
The amount of memory below 1MB has been found and verified. Determining
the amount of memory above 1MB memory test.
4Bh
The amount of memory above 1Mb has been found and verified. Checking for a
soft reset and clearing the memory below 1MB for the soft reset next.
If this is a power on situation, going to checkpoint 4Eh next.
4Ch
The memory below 1MB has been cleared via a soft reset. Clearing the memory
above 1MB next.
4Dh
The memory above 1MB has been cleared via a soft reset. Saving the memory
size next. Going to checkpoint 52h next.
4Eh
The memory test started, but not as the result of a soft reset. Displaying the
first64KB memory size next.
4Fh
The memory size display has started. The display is updated during the memory
test. Performing the sequential and random memory test next.
50h
The memory below 1 MB has been tested and initialized. Adjusting the
displayed memory size for relocation and shadowing next.
51h
The memory size display was adjusted for relocation and shadowing. Testing
the memory above 1MB next.
52h
The memory above 1MB has been tested and initialized. Saving the memory
size information next.
53h
The memory size information and the CPU registers are saved. Entering real
mode next.
54h
Shutdown was successful. The CPU is in real mode. Disabling the Gate A20
line, parity, and the NMI next.
57h
The A20 address line, parity, and the NMI are disabled. Adjusting the memory
size depending on relocation and shadowing next.
58h
The memory size was adjusted for relocation and shadowing. Clearing the Hit
< DEL> message next.
59h
The Hit < DEL > message is cleared. The < WAIT...> message is displayed.
Starting the DMA and interrupt controller test next.
60h
The DMA page register test passed. Performing the DMA Controller 1 base
register test next.
62h
The DMA controller 1 base register test passed. Performing the DMA controller
2 base register test next.
65h
The DMA controller 2 base register test passed. Programming DMA controllers
1 and 2 next.
66h
Completed programming DMA controllers 1 and 2. Initializing the 8259 interrupt
controller next.
67h
Completed 8259 interrupt controller initialization.
7Fh
Extended NMI source enabling is in progress.
80h
The keyboard test has started. Clearing the output buffer and checking for stuck
keys. Issuing the keyboard reset command next.
81h
A keyboard reset error or stuck key was found. Issuing the keyboard controller
interface test command next.
82h
The keyboard controller interface test completed. Writing the command byte and
initializing the circular buffer next.
Chapter 4
56
Checkpoint Code
57
Description
83h
The command byte was written and global data initialization has completed.
Checking for a locked key next.
84h
Locked key checking is over. Checking for a memory size mismatch with CMOS
RAM data next.
85h
The memory size check is done. Displaying a soft error and checking for a
password or bypassing WINBIOS Setup next.
86h
The password was checked. Performing any required programming before
WINBIOS setup next.
87h
The programming before WINBIOS Setup has completed. Uncompressing the
WINBIOS Setup code and executing the AMIBIOS Setup or WINBIOS Setup
utility next.
88h
Returned from WINBIOS Setup and cleared the screen. Performing any
necessary programming after WINBIOS Setup next.
89h
The programming after WINBIOS Setup has completed. Displaying the power
on screen message next.
8Bh
The first screen message has been displayed. The <WAIT...> message is
displayed. Performing the PS/2 mouse check and extended BIOS data area
allocating check next.
8Ch
Programming the WINBIOS Setup options next.
8Dh
The WINBIOS Setup options are programmed. Resetting the hard disk
controller next.
8Fh
The hard disk controller has been reset. Configuring the floppy drive controller
next.
91h
The floppy drive controller has been configured. Configuring the hard disk drive
controller next.
95h
Initializing the bus option ROMs from C800 next.
96h
Initializing before passing control to the adapter ROM at C800.
97h
Initialization before the C800 adapter ROM gains control has completed. The
adaptor ROM check is next.
98h
The adaptor ROM had control and has now returned control to BIOS POSt.
Performing any required processing after the option ROM returned control.
99h
Any initialization required after the option ROM test has completed.
Configuring the timer data area and printer base address next.
9Ah
Set the timer and printer base address. Setting the RS-232 base address next.
9Bh
Returned after setting the RS-232 base address. Performing any required
initialization before the Coprocessor test next.
9Ch
Required initialization before the Coprocessor test is over. Initializing the
Coprocessor next.
9Dh
Coprocessor initialized.Performing any required initialization after the
Coprocessor test next.
9Eh
Initialization after the Coprocessor test is complete. Checking the extended
keyboard, keyboard ID, and Num Lock key next. Issuing the keyboard ID
command next.
A2h
Displaying any soft errors next.
A3h
The soft error display has completed. Setting the keyboard typematic rate next.
A4h
The keyboard typematic rate is set. Programming the memory wait states next.
Chapter 4
Checkpoint Code
Description
A5h
Memory wait state programming is over. Clearing the screen and enabling parity
and the NMI next.
A7h
NMI and parity enabled. Performing any initialization required before passing
control to the adaptor ROM at E000 next.
A8h
Initialization before passing control to the adaptor ROM at E000h completed.
Passing control to the adaptor ROM at E000h next.
A9h
Returned from adaptor ROM at E000h control. Performing any initialization
required after the E000 option ROM had control next.
Aah
Initialization after E000 option ROM control has completed. Displaying the
system configuration next.
Abh
Uncompressing the DMI data and executing DMI POST initialization next.
B0h
The system configuration is displayed.
B1h
Copying any code to specific areas.
00h
Code copying to specific areas is done. Passing control to INT 19h boot loader
next.
Chapter 4
58
Bus Checkpoint Codes
The system BIOS pases control to different buses at the following checkpoints:
Checkpoint Code
Description
2Ah
Initializing the different bus system,static,and output devices, if present.
38h
Initialized bus input, IPL, and general devices, if present.
39h
Displaying bus initialization error messages, if any.
95h
Initializing bus adaptor ROMs from C8000h through D8000h.
Additional Bus Checkpoints
While control is inside the different bus routines, additional checkpoints are output to I/O port address
0080h as word to identify the routines being executed.
These are word checkpoints. The low byte of checkpoint is the system BIOS checkpoint where
control is passed to the different bus routines.
The high byte of checkpoint indicates that the routine is being executed in different buses.
High Byte
Bits
59
Description
Bits 7-4
0000 Function0. Disable all devices on the bus.
0001 Function1. Initialize static devices on the bus.
0010 Function2. Initialize output devices on the bus.
0011 Function3. Initialize input devices on the bus.
0100 Function4. Initialize IPL devices on the bus.
0101 Function 5. Initialize general devices on the bus.
0110 Function 6. Initialize error reporting on the bus.
0111 Function 7. Initialize add-on ROMs for all buses.
Bits 3-0
Specify the bus
0 Generic DIM Device Initialization Manager.
1 Onboard System devices.
2 ISA devices
3 EISA devices
4 ISA PnP devices
5. PCI devices
Chapter 4
AMIBIOS Beep Codes
Except for beep code #8, these codes are always fatal.
Beep
Description
1 beep
Refresh failure
2 beeps
Parity error
3 beeps
Base 64K memory failure
4 beeps
Timer not operational
5 beeps
Processor error
6 beeps
8042-gate A20 failure
7 beeps
Processor exception interrupt error
8 beeps
Display memory read/write failure
9 beeps
ROM checksum error
10 beeps
CMOS shutdown register read/write error
11 beeps
Cache memory bad
For 1 beep, 2 beeps, or 3 beeps try reseating the memory first. If the error still occurs, replace the
memory with known good chips.
For 4 beeps, 5 beeps, 7 beeps, or 10 beeps the system board must be sent in for repair.
For 6 beeps try reseating the keyboard controller chip. If the error still occurs, replace the keyboard
chip. If the error persists, check parts of the system relating to the keyboard, e.g. try another
keyboard, check to see if the system has a keyboard fuse.
8 beeps indicate a memory error on the video adapter. Replace the video card or the memory on the
video card.
9 beeps indicate faulty BIOS chip(s). It is not likely that this error can be corrected by reseating the
chips. Consult the motherboard supplier or an AMI product distributor for replacement part(s).
If no beeps are heard and no display in on the screen. The first thing to check is the power supply.
Connect an LED to the POWER LED connection on the motherboard. If this LED lights and the
drive(s) spin up then the power supply will usually be good.
Next, inspect the motherboard for loose components. A loose or missing CPI, BIOS chip, Crystal
Oscillator, or Chipset chip will cause the motherboard not to function.
Next, eliminate the possibility of interference by a bad or improperly set up I/O card by removing
all card except the video adapter. The system should at least power up and wait for a drive time-out.
Insert the cards back into the system one at a time until the problem happens again. When the
system does nothing, the problem will be with the last expansion card that was put in.
If the above suggestions fail to cause any change in the disfunction of the system, the motherboard
must be returned for repair.
Chapter 4
60
61
Chapter 4
Chapter 5
Jumper and Connector Information
Jumpers and Connectors
The following figure shows the jumper and connector locations on the system board:
Chapter 5
98
Connector & LED
USB1: USB Port Header ( Option )
Pin No.
Description
1.
USB Power
3.
USBP2-
5.
USBP2+
7.
GND
9.
NC
2.
USB Port
4.
USBP3-
6.
USBP3+
8.
GND
10.
Key
Pin No.
Item
Description
JF1
CPU 1 FAN
Controlled and sensed by BMC/ADM 1026
JF4
System Front FAN
Controlled and sensed by BMC/ADM 1026
JF5
CPU 2 FAN
Controlled and sensed by BMC/ADM 1026
JF8
System Back FAN
Controlled and sensed by BMC/ADM 1026
FAN Pin Out
Pin No.
Description
1.
GND
2.
Power
3.
Sense Pulse
ITP CONN.
Pin No.
Description
JP1
ITP Setting
1P : 2-3
2P : NI
JP9
SCSI Backplane Connector
J2: Front Panel CONN.
Pin No.
99
Description
Pin No.
Description
1.
Power LED
2.
Key
3.
GND
4.
HDD Fail LED
5.
System Fault LED
6.
3V_STBY
7.
Reset Button
8.
Power Button
9.
VCC5
10.
HDD Active LED
Chapter 5
Battery
Name
Description
BT1
Battery ( CR-2032 ) coin type
J13: WOL CONN
Pin No.
Description
1.
3V STBY
2.
GND
3.
WOL Active
J10: AMI Maga RAC CONN.
Pin No.
Description
Pin No.
Description
1.
RAC SMI#
2.
I2C Clock
3.
GND
4.
GND
5.
Power On/Off
6.
I2C Data
7.
3V Standby
8.
NC
9.
System Fault LED
10.
NC
11.
Reset
12.
GND
13.
GND
14.
Power Good
15.
Reserved
16.
GND
17.
Reserved
18.
NC
19.
NC
20.
RAC PRSNT#
JP8: IPMB CONN.
Pin No.
Description
1.
IPMB SDA
2.
GND
3.
IPMB SCL
4.
NC
J14: SCSI RAID Card HDD LED CONN
Pin No.
Description
1.
HDD LED Active Low
2.
NC
3.
NC
4.
HDD LED Active Low
J15: RAC Card Power-On CONN ( The same location of JP10 pin 5, 3)
Pin No.
Description
1.
Power On/Off
2.
GND
Chapter 5
100
J16: RAC Card Reset CONN ( The same location of JP10 pin 11, 13)
Pin No.
Description
1.
Reset
2.
GND
Power Connector
CN2: SSI Power Connector
SSI Power Connector Pinout
Pin No.
Description
Pin No.
Description
1
+3.3V
13
+3.3V
2
+3.3V
14
-12V
3
GND
15
GND
4
+5V
16
-PS_ON
5
GND
17
GND
6
+5V
18
GND
7
GND
19
GND
8
Power OK
20
Reserve
9
+5V SB
21
+5V
10
+12V
22
+5V
11
+12V
23
+5V
12
+3.3V
24
GND
CN1: +12V Power Connector
E-Bay 12V Power Connector
Pin No.
Description
Pin No.
Description
1
GND
5
+12V
2
GND
6
+12V
3
GND
7
+12V
4
GND
8
+12V
LED Light
Item
101
Description
D2
Green : Standby Power On.
Off : AC Off
D31~ D38
Message LED ( Default use as 80 port LED )
Chapter 5
Front Panel LED Status of LED Board
Pin No.
Item
Description
D1
Power LED
Green Light : DC ON
Green Blinking : Suspend
OFF : DC OFF
D2
HDD LED
Green Blinking : Access HDD
OFF : Un-Access HDD
D3
System Fault LED
Amber Light : System Fault
Occurred
OFF : System Fault Un-Occurred
D4
HDD Fail LED
Amber Light : HDD Fault Occurred
(TBD)
OFF : HDD Fault Un-Occurred
MLB Jumper Setting
J10
Pin. No
Function
Default Setting
Description
1-2
Password Enable
OFF
ON: Enable
Password
OFF : Normal
3-4
Clear NVRAM
OFF
ON : Clear NVRAM
OFF : Normal
5-6
Recovery Mode
OFF
ON : Recovery
OFF : Normal
J12
Pin No.
Function
1-2
Support ZCR Card / Intel
RAIDIOS Card
3-4
NC
Chapter 5
Default Setting
ON
Description
ON: Support ZCR Card
( Default )
OFF : Support Intel
RAIDIOS Card
102
CPU Frequency Ratio Setting
System Bus-to-Core Frequency Ratio
103
Core Frequency
1/16
1.60 GHz
1/17
1.70 GHz
1/18
1.80 GHz
1/19
1.90 GHz
1/20
2 GHz
1/21
2.10 GHz
1/22
2.20 GHz
1/24
2.40 GHz
Chapter 5
Chapter 6
FRU (Field Replaceable Unit) List
This chapter gives you the FRU ( Field Replaceable Unit ) listing in global configurations of Acer Altos G510.
Refer to this chapter whenever ordering for parts to repair or for RMA ( Return Merchandise Authorization ).
Please note that WHENORDERING FRU PARTS, you should check the most up-to-date information
available on your regional web or channel. For whatever reasons a part number change is made, it will
not be noted on the printed Service Guide. For ACER AUTHORIZED SERVICE PROVIDERS, your Acer office
may have a DIFFERENT part number code from those given in the FRU list of this printed Service Guide.
You MUST use the local FRU list provided by your regional Acer office to order FRU parts for repair and
service of customer machines.
NOTE: To scrap or to return the defective parts, you should follow the local goverment ordinance or
regulations on how to dispose it properly, or follow the rules set by your regional Acer office on
how to return it.
Chapter 6
68
Exploded Diagram
Full SKU.
69
Chapter 6
Basic SKU.
Chapter 6
70
No.
Picture
Full
SKU
Basic
SKU
Part Name
Part No.
Board
1
1
LED Board G700
Refer to FULL/BASIC SKU
Exploded Diagram No.
55.G70V7.003
2
Power Distribution Board (PDB) 55.G51V7.001
24
SCSI Backplane Board
55.G51V7.002
25
SAF-TE Board G700
TA.G7001.001
SCSI Cable 8CON/68PIN
CA.G5101.001
LED Cable (12PIC/10PIN)
50.G510V7.002
Cable
71
Chapter 6
No.
Picture
Chapter 6
Full
SKU
Basic
SKU
Part Name
Part No.
Intrusion Switch Cable
50.G51V7.003
Power Cable 20 PIN
50.G51V7.004
Power Cable 24PIN
50.G51V7.005
Power Cable 8PIN
50.G51V7.006
Signal Cable
50.G51V7.007
FDD Cable
50.G51V7.008
72
No.
Picture
Full
SKU
Part Name
Basic
SKU
Part No.
Cable M/B-RAIDCARD 4PIN/
4PIN
50.G51V7.014
HDD Cable ATA-100 IDE
50.G51V7.010
Fan Cable
50.G51V7.011
Management Cable 6PIN
50.G51V7.012
Power Cable 10PIN
50.G51V7.013
SCSI Cable 2CON/68PIN
CA.G5101.002
Outter Bezel W/I Name Plate,
Lock and Key
42.G51V7.001
Case
3
73
2
Chapter 6
No.
Picture
Chapter 6
Full
SKU
Part Name
Basic
SKU
Part No.
4
3
Inner Bezel
42.G51V7.002
5
4
Side Panel - Left W/I Quick
Guide
60.G51V7.001
5
Cable HDD Cage For G510
Basic SKU
TC.CAG01.005
6
6
Air Duct
42.G51V7.003
7
7
Front Fan Holder
42.G51V7.004
8
8
Retension Module W/I 2 screws 42.G51V7.005
74
No.
Picture
75
Full
SKU
Part Name
Basic
SKU
Part No.
9
9
Chassis Foot W/O screw
42.G51V7.006
10
10
Top Cover
60.G51V7.002
11
11
Side Panel - Right
60.G51V7.003
12
12
FDD Tray
60.G70V7.008
13
13
Altos G510 Chassis W/I Top,
Left, Right Panel and feet
60.G51V7.004
14
14
PCI Slot BKT
60.G51V7.005
Chapter 6
No.
Picture
Full
SKU
Basic
SKU
Part Name
Part No.
Hot Plug HDD Cage Module.
Includes:
1. Hot Plug HDD Cage
( P/N: 60.G51V7.006 )
2. Plus 6pcs of HDD Tray
( P/N:TZ.CAR02.001 )
TC.CAG01.004
22
Hot Plug HDD Cage
60.G51V7.006
23
HDD Tray W/I 4 Screws
TZ.CAR02.001
CD-ROM Drive
15
15
CD-ROM 52X AOPEN/CD952E
91.39D37.237
16
16
System Fan ( Front ) for G510
HI.G5102.001
FAN
Chapter 6
76
No.
Picture
Full
SKU
Basic
SKU
Part Name
Part No.
17
17
System Fan ( Rear ) for G510
HI.G5102.002
18
18
3 Mode FDD 1.44MB MITSUMI
D353M3D-R694005
KF.35301.001
19
19
XEON CPU Heatsink W/I Fan
HI.G5102.003
20
20
Altos G510 Mainboard W/I MB
Tray, 4 Retension Modules
MB.G5106.001
FDD
Heatsink
Mainboard
Power Supply
21
77
Redundant Power Supply 450W PY.G7005.002
Chapter 6
No.
Picture
Full
SKU
Basic
SKU
21
Chapter 6
Part Name
450W Standard SPS For G510/
G700 Basic SKU
Part No.
PY.45005.002
78
Appendix A
Model Definition and Configuration
The Altos G510 Model No. Define:
1.
Trade Mark:
2.
Brand Name: Acer
3.
Description: Dual 604-pin sockets
4.
Model No: G510
5.
Product Name: Altos G510
Appendix A
86
Appendix B
Test Compatible Components
Altos G510 compatibility is tested and verified by Acer’s internal testing department. All of its system
functions are tested under Windows 2000 Server and Windows NET environment. In
addition to these tests, the network communication functions are also tested under DOS6.22、Linux 7.3/8.0
、Netware 6、Unixware 7.1.1、OpenServer 5.0.6 and NT4.0 environments.
Refer to the following lists for components, adapter cards, and peripherals which have passed these tests.
Appendix B
82
Microsoft Windows 2000 Server Environment Test
Items
Specifications
CPU
Xeon 2.8GHz/ 533FSB/512KB
Xeon 2.66GHz/533FSB/512KB
Xeon 2.4GHz/533FSB/512KB
Xeon 2.0GHz/533FSB/512KB
Prestonia, C1 stepping, FC-mPGAS2P/INT-m PGA,
Xeon 2.8GHz/400FSB/512KB
Xeon 2.4GHz/400FSB/512KB
Xeon 2.0GHz/400FSB/512KB
Xeon 1.8GHz/400FSB/512KB
DDR module ( with ECC)
1GB PC2100 DDR registered
Infineon DDR 64x4x36, (128x4x18 stacked) CL2, 1.2"
HYB25D256400 BT-7/HYS72D128521GR-7-B
Apacer DDR 64x4x36, (128x4x18 stacked) CL2, 1.2"
Infineon HYB25D256400 BT-7
512MB PC2100 DDR registered
256MB PC2100 DDR registered
Infineon DDR 64x4x18 CL2, 1.2"
HYB25D256400 BT-7/HYS72D64500GR-7-B
Apacer DDR 64x4x18 CL2, 1.2"
HYB25D256400 BT-7
Infineon DDR 32x8x9 CL2, 1.2"
HYB25D256800 BT-7/HYS72D32500GR-7-B
Apacer DDR 32x8x9 CL2, 1.2"
Infineon HYB25D256800 BT-7
128MB PC2100 DDR registered
Apacer DDR 16x8x9 CL2
Infineon HYB25D128800 AT-7
SCSI RAID card
ASRC/1Q
4ch Ultra160 RAID card, PCI
ASRC/1D
2ch Ultra160 RAID card, PC
ASRC/1S
1ch Ultra160 RAID card, PCI
LSI Enterprise 1600,
64bit/66MHz Q12160A, i960RN 64/66,
Battery Backup Unit & 128MB SDRAM
f/w C170, W2K driver 5.25, Acer Altos CD 4.0
LSI Elite 1600
64MB SDRAM, 64bit/66MHz PCI, i960RN,
f/w C170, Acer Altos CD 4.0, W2k driver 5.25
LSI Elite 1600
128MB with Battery back up, 64bit/66MHz PCI, i960RN,
f/w C170, Acer Altos CD 4.0, W2k driver 5.25
LSI Express500
32/33Mhz PCI, i960RM-100, 32MB SDRAM, f/w C170, W2k driver
5.25, Acer Altos CD4.0
SCSI Card
ASC/1D
2ch U160 SCSI card
83
U160 53C1010R 2ch, 64bit/66Mhz PCI-2.2
BIOS 4.19 with 7conn U160 SCSI cable/terminator,
w/o SDMS CD4.8 for Altos
Appendix B
Items
ASC/1S
1ch U160 SCSI card
Specifications
U160 53C1000R 1ch, 64/66Mhz PCI-2.2,
BIOS 4.19 with 7 conn U160 SCSI cable/terminator,
w/o SDMS CD4.8 for Altos
SCSI Hard Drive (80 pin)
146GB, U320, 10K RPM
73GB, U320, 10K RPM
Seagate Cheetah 146LP ST3146807LC f/w 0003
IBM Daytona146Z10 IC35L146UCDY10, f/w S23C
Seagate Cheetah 146LP ST373307LC f/w 0003
IBM Daytona146Z10 IC35L073UCDY10, f/w S23C
36GB, U320, 10K RPM
18GB, U320, 10K RPM
Seagate Cheetah 146LP ST336607LC f/w 0003
IBM Daytona146Z10 IC35L036UCDY10, f/w S23C
IBM Daytona146Z10 IC35L018UCDY10, f/w S23C
SCSI Hard Drive (68 pin)
146GB, U320, 10K RPM
73GB, U320, 10K RPM
Seagate Cheetah 146LP ST3146807LW f/w 0003
IBM Daytona146Z10 IC35L146UWDY10, f/w S23C
Seagate Cheetah 146LP ST373307LW f/w 0003
IBM Daytona146Z10 IC35L073UWDY10, f/w S23C
36GB, U320, 10K RPM
18G, U320, 10K RPM
Seagate Cheetah 146LP ST336607LW f/w 0003
IBM Daytona146Z10 IC35L036UWDY10, f/w S23C
IBM Daytona146Z10 IC35L018UWDY10, f/w S23C
ATA Hard Drive
120GB, ATA100 7200RPM
Seagate Cuda V "Avalanche" ST3120023A f/w 3.31
80GB, ATA100 7200RPM
Seagate Cuda V "Avalanche" ST380023A f/w 3.31
60GB, ATA100 7200RPM
Seagate Cuda V "Avalanche" ST360015A f/w 3.31
Redundant Power Supply
Altos G700/510 redundant SPS
Appendix B
SPS 450W DELTA DPS450FBA Power Supply Unit
84
Microsoft Windows.NET Environment Test
Items
Specifications
CPU
Xeon 2.8GHz/ 533FSB/512KB
Xeon 2.66GHz/533FSB/512KB
Xeon 2.4GHz/533FSB/512KB
Xeon 2.0GHz/533FSB/512KB
Prestonia, C1 stepping, FC-mPGAS2P/INT-m PGA,
Xeon 2.8GHz/400FSB/512KB
Xeon 2.4GHz/400FSB/512KB
Xeon 2.0GHz/400FSB/512KB
Xeon 1.8GHz/400FSB/512KB
DDR module ( with ECC)
1GB PC2100 DDR registered
Infineon DDR 64x4x36, (128x4x18 stacked) CL2, 1.2"
HYB25D256400 BT-7/HYS72D128521GR-7-B
Apacer DDR 64x4x36, (128x4x18 stacked) CL2, 1.2"
Infineon HYB25D256400 BT-7
512MB PC2100 DDR registered
256MB PC2100 DDR registered
Infineon DDR 64x4x18 CL2, 1.2"
HYB25D256400 BT-7/HYS72D64500GR-7-B
Apacer DDR 64x4x18 CL2, 1.2"
HYB25D256400 BT-7
Infineon DDR 32x8x9 CL2, 1.2"
HYB25D256800 BT-7/HYS72D32500GR-7-B
Apacer DDR 32x8x9 CL2, 1.2"
Infineon HYB25D256800 BT-7
128MB PC2100 DDR registered
Apacer DDR 16x8x9 CL2
Infineon HYB25D128800 AT-7
SCSI RAID card
ASRC/1Q
4ch Ultra160 RAID card, PCI
ASRC/1D
2ch Ultra160 RAID card, PC
ASRC/1S
1ch Ultra160 RAID card, PCI
LSI Enterprise 1600,
64bit/66MHz Q12160A, i960RN 64/66,
Battery Backup Unit & 128MB SDRAM
f/w C170, W2K driver 5.25, Acer Altos CD 4.0
LSI Elite 1600
64MB SDRAM, 64bit/66MHz PCI, i960RN,
f/w C170, Acer Altos CD 4.0, W2k driver 5.25
LSI Elite 1600
128MB with Battery back up, 64bit/66MHz PCI, i960RN,
f/w C170, Acer Altos CD 4.0, W2k driver 5.25
LSI Express500
32/33Mhz PCI, i960RM-100, 32MB SDRAM, f/w C170, W2k driver
5.25, Acer Altos CD4.0
SCSI Card
85
ASC/1D
2ch U160 SCSI card
U160 53C1010R 2ch, 64bit/66Mhz PCI-2.2
BIOS 4.19 with 7conn U160 SCSI cable/terminator,
w/o SDMS CD4.8 for Altos
ASC/1S
1ch U160 SCSI card
U160 53C1000R 1ch, 64/66Mhz PCI-2.2,
BIOS 4.19 with 7 conn U160 SCSI cable/terminator,
w/o SDMS CD4.8 for Altos
Appendix B
Items
Specifications
SCSI Hard Drive (80 pin)
146GB, U320, 10K RPM
73GB, U320, 10K RPM
Seagate Cheetah 146LP ST3146807LC f/w 0003
IBM Daytona146Z10 IC35L146UCDY10, f/w S23C
Seagate Cheetah 146LP ST373307LC f/w 0003
IBM Daytona146Z10 IC35L073UCDY10, f/w S23C
36GB, U320, 10K RPM
18GB, U320, 10K RPM
Seagate Cheetah 146LP ST336607LC f/w 0003
IBM Daytona146Z10 IC35L036UCDY10, f/w S23C
IBM Daytona146Z10 IC35L018UCDY10, f/w S23C
SCSI Hard Drive (68 pin)
146GB, U320, 10K RPM
73GB, U320, 10K RPM
Seagate Cheetah 146LP ST3146807LW f/w 0003
IBM Daytona146Z10 IC35L146UWDY10, f/w S23C
Seagate Cheetah 146LP ST373307LW f/w 0003
IBM Daytona146Z10 IC35L073UWDY10, f/w S23C
36GB, U320, 10K RPM
18G, U320, 10K RPM
Seagate Cheetah 146LP ST336607LW f/w 0003
IBM Daytona146Z10 IC35L036UWDY10, f/w S23C
IBM Daytona146Z10 IC35L018UWDY10, f/w S23C
ATA Hard Drive
120GB, ATA100 7200RPM
Seagate Cuda V "Avalanche" ST3120023A f/w 3.31
80GB, ATA100 7200RPM
Seagate Cuda V "Avalanche" ST380023A f/w 3.31
60GB, ATA100 7200RPM
Seagate Cuda V "Avalanche" ST360015A f/w 3.31
Redundant Power Supply
Altos G700/510 redundant SPS
Appendix B
SPS 450W DELTA DPS450FBA Power Supply Unit
86
DOS 6.22 Environment Test
Items
Specifications
CPU
Xeon 2.8GHz/ 533FSB/512KB
Xeon 2.66GHz/533FSB/512KB
Xeon 2.4GHz/533FSB/512KB
Xeon 2.0GHz/533FSB/512KB
Prestonia, C1 stepping, FC-mPGAS2P/INT-m PGA,
Xeon 2.8GHz/400FSB/512KB
Xeon 2.4GHz/400FSB/512KB
Xeon 2.0GHz/400FSB/512KB
Xeon 1.8GHz/400FSB/512KB
DDR module ( with ECC)
1GB PC2100 DDR registered
Infineon DDR 64x4x36, (128x4x18 stacked) CL2, 1.2"
HYB25D256400 BT-7/HYS72D128521GR-7-B
Apacer DDR 64x4x36, (128x4x18 stacked) CL2, 1.2"
Infineon HYB25D256400 BT-7
512MB PC2100 DDR registered
256MB PC2100 DDR registered
Infineon DDR 64x4x18 CL2, 1.2"
HYB25D256400 BT-7/HYS72D64500GR-7-B
Apacer DDR 64x4x18 CL2, 1.2"
HYB25D256400 BT-7
Infineon DDR 32x8x9 CL2, 1.2"
HYB25D256800 BT-7/HYS72D32500GR-7-B
Apacer DDR 32x8x9 CL2, 1.2"
Infineon HYB25D256800 BT-7
128MB PC2100 DDR registered
Apacer DDR 16x8x9 CL2
Infineon HYB25D128800 AT-7
SCSI RAID card
ASRC/1Q
4ch Ultra160 RAID card, PCI
ASRC/1D
2ch Ultra160 RAID card, PC
ASRC/1S
1ch Ultra160 RAID card, PCI
LSI Enterprise 1600,
64bit/66MHz Q12160A, i960RN 64/66,
Battery Backup Unit & 128MB SDRAM
f/w C170, W2K driver 5.25, Acer Altos CD 4.0
LSI Elite 1600
64MB SDRAM, 64bit/66MHz PCI, i960RN,
f/w C170, Acer Altos CD 4.0, W2k driver 5.25
LSI Elite 1600
128MB with Battery back up, 64bit/66MHz PCI, i960RN,
f/w C170, Acer Altos CD 4.0, W2k driver 5.25
LSI Express500
32/33Mhz PCI, i960RM-100, 32MB SDRAM, f/w C170, W2k driver
5.25, Acer Altos CD4.0
SCSI Card
87
ASC/1D
2ch U160 SCSI card
U160 53C1010R 2ch, 64bit/66Mhz PCI-2.2
BIOS 4.19 with 7conn U160 SCSI cable/terminator,
w/o SDMS CD4.8 for Altos
ASC/1S
1ch U160 SCSI card
U160 53C1000R 1ch, 64/66Mhz PCI-2.2,
BIOS 4.19 with 7 conn U160 SCSI cable/terminator,
w/o SDMS CD4.8 for Altos
Appendix B
Items
Specifications
SCSI Hard Drive (80 pin)
146GB, U320, 10K RPM
73GB, U320, 10K RPM
Seagate Cheetah 146LP ST3146807LC f/w 0003
IBM Daytona146Z10 IC35L146UCDY10, f/w S23C
Seagate Cheetah 146LP ST373307LC f/w 0003
IBM Daytona146Z10 IC35L073UCDY10, f/w S23C
36GB, U320, 10K RPM
18GB, U320, 10K RPM
Seagate Cheetah 146LP ST336607LC f/w 0003
IBM Daytona146Z10 IC35L036UCDY10, f/w S23C
IBM Daytona146Z10 IC35L018UCDY10, f/w S23C
SCSI Hard Drive (68 pin)
146GB, U320, 10K RPM
73GB, U320, 10K RPM
Seagate Cheetah 146LP ST3146807LW f/w 0003
IBM Daytona146Z10 IC35L146UWDY10, f/w S23C
Seagate Cheetah 146LP ST373307LW f/w 0003
IBM Daytona146Z10 IC35L073UWDY10, f/w S23C
36GB, U320, 10K RPM
18G, U320, 10K RPM
Seagate Cheetah 146LP ST336607LW f/w 0003
IBM Daytona146Z10 IC35L036UWDY10, f/w S23C
IBM Daytona146Z10 IC35L018UWDY10, f/w S23C
ATA Hard Drive
120GB, ATA100 7200RPM
Seagate Cuda V "Avalanche" ST3120023A f/w 3.31
80GB, ATA100 7200RPM
Seagate Cuda V "Avalanche" ST380023A f/w 3.31
60GB, ATA100 7200RPM
Seagate Cuda V "Avalanche" ST360015A f/w 3.31
Redundant Power Supply
Altos G700/510 redundant SPS
Appendix B
SPS 450W DELTA DPS450FBA Power Supply Unit
88
Linux 7.3/8.0 Environment Test
Items
Specifications
CPU
Xeon 2.8GHz/ 533FSB/512KB
Xeon 2.66GHz/533FSB/512KB
Xeon 2.4GHz/533FSB/512KB
Xeon 2.0GHz/533FSB/512KB
Prestonia, C1 stepping, FC-mPGAS2P/INT-m PGA,
Xeon 2.8GHz/400FSB/512KB
Xeon 2.4GHz/400FSB/512KB
Xeon 2.0GHz/400FSB/512KB
Xeon 1.8GHz/400FSB/512KB
DDR module ( with ECC)
1GB PC2100 DDR registered
Infineon DDR 64x4x36, (128x4x18 stacked) CL2, 1.2"
HYB25D256400 BT-7/HYS72D128521GR-7-B
Apacer DDR 64x4x36, (128x4x18 stacked) CL2, 1.2"
Infineon HYB25D256400 BT-7
512MB PC2100 DDR registered
256MB PC2100 DDR registered
Infineon DDR 64x4x18 CL2, 1.2"
HYB25D256400 BT-7/HYS72D64500GR-7-B
Apacer DDR 64x4x18 CL2, 1.2"
HYB25D256400 BT-7
Infineon DDR 32x8x9 CL2, 1.2"
HYB25D256800 BT-7/HYS72D32500GR-7-B
Apacer DDR 32x8x9 CL2, 1.2"
Infineon HYB25D256800 BT-7
128MB PC2100 DDR registered
Apacer DDR 16x8x9 CL2
Infineon HYB25D128800 AT-7
SCSI RAID card
ASRC/1Q
4ch Ultra160 RAID card, PCI
ASRC/1D
2ch Ultra160 RAID card, PC
ASRC/1S
1ch Ultra160 RAID card, PCI
LSI Enterprise 1600,
64bit/66MHz Q12160A, i960RN 64/66,
Battery Backup Unit & 128MB SDRAM
f/w C170, W2K driver 5.25, Acer Altos CD 4.0
LSI Elite 1600
64MB SDRAM, 64bit/66MHz PCI, i960RN,
f/w C170, Acer Altos CD 4.0, W2k driver 5.25
LSI Elite 1600
128MB with Battery back up, 64bit/66MHz PCI, i960RN,
f/w C170, Acer Altos CD 4.0, W2k driver 5.25
LSI Express500
32/33Mhz PCI, i960RM-100, 32MB SDRAM, f/w C170, W2k driver
5.25, Acer Altos CD4.0
SCSI Card
89
ASC/1D
2ch U160 SCSI card
U160 53C1010R 2ch, 64bit/66Mhz PCI-2.2
BIOS 4.19 with 7conn U160 SCSI cable/terminator,
w/o SDMS CD4.8 for Altos
ASC/1S
1ch U160 SCSI card
U160 53C1000R 1ch, 64/66Mhz PCI-2.2,
BIOS 4.19 with 7 conn U160 SCSI cable/terminator,
w/o SDMS CD4.8 for Altos
Appendix B
Items
Specifications
SCSI Hard Drive (80 pin)
146GB, U320, 10K RPM
73GB, U320, 10K RPM
Seagate Cheetah 146LP ST3146807LC f/w 0003
IBM Daytona146Z10 IC35L146UCDY10, f/w S23C
Seagate Cheetah 146LP ST373307LC f/w 0003
IBM Daytona146Z10 IC35L073UCDY10, f/w S23C
36GB, U320, 10K RPM
18GB, U320, 10K RPM
Seagate Cheetah 146LP ST336607LC f/w 0003
IBM Daytona146Z10 IC35L036UCDY10, f/w S23C
IBM Daytona146Z10 IC35L018UCDY10, f/w S23C
SCSI Hard Drive (68 pin)
146GB, U320, 10K RPM
73GB, U320, 10K RPM
Seagate Cheetah 146LP ST3146807LW f/w 0003
IBM Daytona146Z10 IC35L146UWDY10, f/w S23C
Seagate Cheetah 146LP ST373307LW f/w 0003
IBM Daytona146Z10 IC35L073UWDY10, f/w S23C
36GB, U320, 10K RPM
18G, U320, 10K RPM
Seagate Cheetah 146LP ST336607LW f/w 0003
IBM Daytona146Z10 IC35L036UWDY10, f/w S23C
IBM Daytona146Z10 IC35L018UWDY10, f/w S23C
ATA Hard Drive
120GB, ATA100 7200RPM
Seagate Cuda V "Avalanche" ST3120023A f/w 3.31
80GB, ATA100 7200RPM
Seagate Cuda V "Avalanche" ST380023A f/w 3.31
60GB, ATA100 7200RPM
Seagate Cuda V "Avalanche" ST360015A f/w 3.31
Redundant Power Supply
Altos G700/510 redundant SPS
Appendix B
SPS 450W DELTA DPS450FBA Power Supply Unit
90
Netware 6.0 Environment Test
Items
Specifications
CPU
Xeon 2.8GHz/ 533FSB/512KB
Xeon 2.66GHz/533FSB/512KB
Xeon 2.4GHz/533FSB/512KB
Xeon 2.0GHz/533FSB/512KB
Prestonia, C1 stepping, FC-mPGAS2P/INT-m PGA,
Xeon 2.8GHz/400FSB/512KB
Xeon 2.4GHz/400FSB/512KB
Xeon 2.0GHz/400FSB/512KB
Xeon 1.8GHz/400FSB/512KB
DDR module ( with ECC)
1GB PC2100 DDR registered
Infineon DDR 64x4x36, (128x4x18 stacked) CL2, 1.2"
HYB25D256400 BT-7/HYS72D128521GR-7-B
Apacer DDR 64x4x36, (128x4x18 stacked) CL2, 1.2"
Infineon HYB25D256400 BT-7
512MB PC2100 DDR registered
256MB PC2100 DDR registered
Infineon DDR 64x4x18 CL2, 1.2"
HYB25D256400 BT-7/HYS72D64500GR-7-B
Apacer DDR 64x4x18 CL2, 1.2"
HYB25D256400 BT-7
Infineon DDR 32x8x9 CL2, 1.2"
HYB25D256800 BT-7/HYS72D32500GR-7-B
Apacer DDR 32x8x9 CL2, 1.2"
Infineon HYB25D256800 BT-7
128MB PC2100 DDR registered
Apacer DDR 16x8x9 CL2
Infineon HYB25D128800 AT-7
SCSI RAID card
ASRC/1Q
4ch Ultra160 RAID card, PCI
ASRC/1D
2ch Ultra160 RAID card, PC
ASRC/1S
1ch Ultra160 RAID card, PCI
LSI Enterprise 1600,
64bit/66MHz Q12160A, i960RN 64/66,
Battery Backup Unit & 128MB SDRAM
f/w C170, W2K driver 5.25, Acer Altos CD 4.0
LSI Elite 1600
64MB SDRAM, 64bit/66MHz PCI, i960RN,
f/w C170, Acer Altos CD 4.0, W2k driver 5.25
LSI Elite 1600
128MB with Battery back up, 64bit/66MHz PCI, i960RN,
f/w C170, Acer Altos CD 4.0, W2k driver 5.25
LSI Express500
32/33Mhz PCI, i960RM-100, 32MB SDRAM, f/w C170, W2k driver
5.25, Acer Altos CD4.0
SCSI Card
91
ASC/1D
2ch U160 SCSI card
U160 53C1010R 2ch, 64bit/66Mhz PCI-2.2
BIOS 4.19 with 7conn U160 SCSI cable/terminator,
w/o SDMS CD4.8 for Altos
ASC/1S
1ch U160 SCSI card
U160 53C1000R 1ch, 64/66Mhz PCI-2.2,
BIOS 4.19 with 7 conn U160 SCSI cable/terminator,
w/o SDMS CD4.8 for Altos
Appendix B
Items
Specifications
SCSI Hard Drive (80 pin)
146GB, U320, 10K RPM
73GB, U320, 10K RPM
Seagate Cheetah 146LP ST3146807LC f/w 0003
IBM Daytona146Z10 IC35L146UCDY10, f/w S23C
Seagate Cheetah 146LP ST373307LC f/w 0003
IBM Daytona146Z10 IC35L073UCDY10, f/w S23C
36GB, U320, 10K RPM
18GB, U320, 10K RPM
Seagate Cheetah 146LP ST336607LC f/w 0003
IBM Daytona146Z10 IC35L036UCDY10, f/w S23C
IBM Daytona146Z10 IC35L018UCDY10, f/w S23C
SCSI Hard Drive (68 pin)
146GB, U320, 10K RPM
73GB, U320, 10K RPM
Seagate Cheetah 146LP ST3146807LW f/w 0003
IBM Daytona146Z10 IC35L146UWDY10, f/w S23C
Seagate Cheetah 146LP ST373307LW f/w 0003
IBM Daytona146Z10 IC35L073UWDY10, f/w S23C
36GB, U320, 10K RPM
18G, U320, 10K RPM
Seagate Cheetah 146LP ST336607LW f/w 0003
IBM Daytona146Z10 IC35L036UWDY10, f/w S23C
IBM Daytona146Z10 IC35L018UWDY10, f/w S23C
ATA Hard Drive
120GB, ATA100 7200RPM
Seagate Cuda V "Avalanche" ST3120023A f/w 3.31
80GB, ATA100 7200RPM
Seagate Cuda V "Avalanche" ST380023A f/w 3.31
60GB, ATA100 7200RPM
Seagate Cuda V "Avalanche" ST360015A f/w 3.31
Redundant Power Supply
Altos G700/510 redundant SPS
Appendix B
SPS 450W DELTA DPS450FBA Power Supply Unit
92
Unixware 7.1.1 Environment Test
Items
Specifications
CPU
Xeon 2.8GHz/ 533FSB/512KB
Xeon 2.66GHz/533FSB/512KB
Xeon 2.4GHz/533FSB/512KB
Xeon 2.0GHz/533FSB/512KB
Prestonia, C1 stepping, FC-mPGAS2P/INT-m PGA,
Xeon 2.8GHz/400FSB/512KB
Xeon 2.4GHz/400FSB/512KB
Xeon 2.0GHz/400FSB/512KB
Xeon 1.8GHz/400FSB/512KB
DDR module ( with ECC)
1GB PC2100 DDR registered
Infineon DDR 64x4x36, (128x4x18 stacked) CL2, 1.2"
HYB25D256400 BT-7/HYS72D128521GR-7-B
Apacer DDR 64x4x36, (128x4x18 stacked) CL2, 1.2"
Infineon HYB25D256400 BT-7
512MB PC2100 DDR registered
256MB PC2100 DDR registered
Infineon DDR 64x4x18 CL2, 1.2"
HYB25D256400 BT-7/HYS72D64500GR-7-B
Apacer DDR 64x4x18 CL2, 1.2"
HYB25D256400 BT-7
Infineon DDR 32x8x9 CL2, 1.2"
HYB25D256800 BT-7/HYS72D32500GR-7-B
Apacer DDR 32x8x9 CL2, 1.2"
Infineon HYB25D256800 BT-7
128MB PC2100 DDR registered
Apacer DDR 16x8x9 CL2
Infineon HYB25D128800 AT-7
SCSI RAID card
ASRC/1Q
4ch Ultra160 RAID card, PCI
ASRC/1D
2ch Ultra160 RAID card, PC
ASRC/1S
1ch Ultra160 RAID card, PCI
LSI Enterprise 1600,
64bit/66MHz Q12160A, i960RN 64/66,
Battery Backup Unit & 128MB SDRAM
f/w C170, W2K driver 5.25, Acer Altos CD 4.0
LSI Elite 1600
64MB SDRAM, 64bit/66MHz PCI, i960RN,
f/w C170, Acer Altos CD 4.0, W2k driver 5.25
LSI Elite 1600
128MB with Battery back up, 64bit/66MHz PCI, i960RN,
f/w C170, Acer Altos CD 4.0, W2k driver 5.25
LSI Express500
32/33Mhz PCI, i960RM-100, 32MB SDRAM, f/w C170, W2k driver
5.25, Acer Altos CD4.0
SCSI Card
93
ASC/1D
2ch U160 SCSI card
U160 53C1010R 2ch, 64bit/66Mhz PCI-2.2
BIOS 4.19 with 7conn U160 SCSI cable/terminator,
w/o SDMS CD4.8 for Altos
ASC/1S
1ch U160 SCSI card
U160 53C1000R 1ch, 64/66Mhz PCI-2.2,
BIOS 4.19 with 7 conn U160 SCSI cable/terminator,
w/o SDMS CD4.8 for Altos
Appendix B
Items
Specifications
SCSI Hard Drive (80 pin)
146GB, U320, 10K RPM
73GB, U320, 10K RPM
Seagate Cheetah 146LP ST3146807LC f/w 0003
IBM Daytona146Z10 IC35L146UCDY10, f/w S23C
Seagate Cheetah 146LP ST373307LC f/w 0003
IBM Daytona146Z10 IC35L073UCDY10, f/w S23C
36GB, U320, 10K RPM
18GB, U320, 10K RPM
Seagate Cheetah 146LP ST336607LC f/w 0003
IBM Daytona146Z10 IC35L036UCDY10, f/w S23C
IBM Daytona146Z10 IC35L018UCDY10, f/w S23C
SCSI Hard Drive (68 pin)
146GB, U320, 10K RPM
73GB, U320, 10K RPM
Seagate Cheetah 146LP ST3146807LW f/w 0003
IBM Daytona146Z10 IC35L146UWDY10, f/w S23C
Seagate Cheetah 146LP ST373307LW f/w 0003
IBM Daytona146Z10 IC35L073UWDY10, f/w S23C
36GB, U320, 10K RPM
18G, U320, 10K RPM
Seagate Cheetah 146LP ST336607LW f/w 0003
IBM Daytona146Z10 IC35L036UWDY10, f/w S23C
IBM Daytona146Z10 IC35L018UWDY10, f/w S23C
ATA Hard Drive
120GB, ATA100 7200RPM
Seagate Cuda V "Avalanche" ST3120023A f/w 3.31
80GB, ATA100 7200RPM
Seagate Cuda V "Avalanche" ST380023A f/w 3.31
60GB, ATA100 7200RPM
Seagate Cuda V "Avalanche" ST360015A f/w 3.31
Redundant Power Supply
Altos G700/510 redundant SPS
Appendix B
SPS 450W DELTA DPS450FBA Power Supply Unit
94
OpenServer 5.0.6 Environment Test
Items
Specifications
CPU
Xeon 2.8GHz/ 533FSB/512KB
Xeon 2.66GHz/533FSB/512KB
Xeon 2.4GHz/533FSB/512KB
Xeon 2.0GHz/533FSB/512KB
Prestonia, C1 stepping, FC-mPGAS2P/INT-m PGA,
Xeon 2.8GHz/400FSB/512KB
Xeon 2.4GHz/400FSB/512KB
Xeon 2.0GHz/400FSB/512KB
Xeon 1.8GHz/400FSB/512KB
DDR module ( with ECC)
1GB PC2100 DDR registered
Infineon DDR 64x4x36, (128x4x18 stacked) CL2, 1.2"
HYB25D256400 BT-7/HYS72D128521GR-7-B
Apacer DDR 64x4x36, (128x4x18 stacked) CL2, 1.2"
Infineon HYB25D256400 BT-7
512MB PC2100 DDR registered
256MB PC2100 DDR registered
Infineon DDR 64x4x18 CL2, 1.2"
HYB25D256400 BT-7/HYS72D64500GR-7-B
Apacer DDR 64x4x18 CL2, 1.2"
HYB25D256400 BT-7
Infineon DDR 32x8x9 CL2, 1.2"
HYB25D256800 BT-7/HYS72D32500GR-7-B
Apacer DDR 32x8x9 CL2, 1.2"
Infineon HYB25D256800 BT-7
128MB PC2100 DDR registered
Apacer DDR 16x8x9 CL2
Infineon HYB25D128800 AT-7
SCSI RAID card
ASRC/1Q
4ch Ultra160 RAID card, PCI
ASRC/1D
2ch Ultra160 RAID card, PC
ASRC/1S
1ch Ultra160 RAID card, PCI
LSI Enterprise 1600,
64bit/66MHz Q12160A, i960RN 64/66,
Battery Backup Unit & 128MB SDRAM
f/w C170, W2K driver 5.25, Acer Altos CD 4.0
LSI Elite 1600
64MB SDRAM, 64bit/66MHz PCI, i960RN,
f/w C170, Acer Altos CD 4.0, W2k driver 5.25
LSI Elite 1600
128MB with Battery back up, 64bit/66MHz PCI, i960RN,
f/w C170, Acer Altos CD 4.0, W2k driver 5.25
LSI Express500
32/33Mhz PCI, i960RM-100, 32MB SDRAM, f/w C170, W2k driver
5.25, Acer Altos CD4.0
SCSI Card
95
ASC/1D
2ch U160 SCSI card
U160 53C1010R 2ch, 64bit/66Mhz PCI-2.2
BIOS 4.19 with 7conn U160 SCSI cable/terminator,
w/o SDMS CD4.8 for Altos
ASC/1S
1ch U160 SCSI card
U160 53C1000R 1ch, 64/66Mhz PCI-2.2,
BIOS 4.19 with 7 conn U160 SCSI cable/terminator,
w/o SDMS CD4.8 for Altos
Appendix B
Items
Specifications
SCSI Hard Drive (80 pin)
146GB, U320, 10K RPM
73GB, U320, 10K RPM
Seagate Cheetah 146LP ST3146807LC f/w 0003
IBM Daytona146Z10 IC35L146UCDY10, f/w S23C
Seagate Cheetah 146LP ST373307LC f/w 0003
IBM Daytona146Z10 IC35L073UCDY10, f/w S23C
36GB, U320, 10K RPM
18GB, U320, 10K RPM
Seagate Cheetah 146LP ST336607LC f/w 0003
IBM Daytona146Z10 IC35L036UCDY10, f/w S23C
IBM Daytona146Z10 IC35L018UCDY10, f/w S23C
SCSI Hard Drive (68 pin)
146GB, U320, 10K RPM
73GB, U320, 10K RPM
Seagate Cheetah 146LP ST3146807LW f/w 0003
IBM Daytona146Z10 IC35L146UWDY10, f/w S23C
Seagate Cheetah 146LP ST373307LW f/w 0003
IBM Daytona146Z10 IC35L073UWDY10, f/w S23C
36GB, U320, 10K RPM
18G, U320, 10K RPM
Seagate Cheetah 146LP ST336607LW f/w 0003
IBM Daytona146Z10 IC35L036UWDY10, f/w S23C
IBM Daytona146Z10 IC35L018UWDY10, f/w S23C
ATA Hard Drive
120GB, ATA100 7200RPM
Seagate Cuda V "Avalanche" ST3120023A f/w 3.31
80GB, ATA100 7200RPM
Seagate Cuda V "Avalanche" ST380023A f/w 3.31
60GB, ATA100 7200RPM
Seagate Cuda V "Avalanche" ST360015A f/w 3.31
Redundant Power Supply
Altos G700/510 redundant SPS
Appendix B
SPS 450W DELTA DPS450FBA Power Supply Unit
96
Windows NT4.0 Environment Test
Items
Specifications
CPU
Xeon 2.8GHz/ 533FSB/512KB
Xeon 2.66GHz/533FSB/512KB
Xeon 2.4GHz/533FSB/512KB
Xeon 2.0GHz/533FSB/512KB
Prestonia, C1 stepping, FC-mPGAS2P/INT-m PGA,
Xeon 2.8GHz/400FSB/512KB
Xeon 2.4GHz/400FSB/512KB
Xeon 2.0GHz/400FSB/512KB
Xeon 1.8GHz/400FSB/512KB
DDR module ( with ECC)
1GB PC2100 DDR registered
Infineon DDR 64x4x36, (128x4x18 stacked) CL2, 1.2"
HYB25D256400 BT-7/HYS72D128521GR-7-B
Apacer DDR 64x4x36, (128x4x18 stacked) CL2, 1.2"
Infineon HYB25D256400 BT-7
512MB PC2100 DDR registered
256MB PC2100 DDR registered
Infineon DDR 64x4x18 CL2, 1.2"
HYB25D256400 BT-7/HYS72D64500GR-7-B
Apacer DDR 64x4x18 CL2, 1.2"
HYB25D256400 BT-7
Infineon DDR 32x8x9 CL2, 1.2"
HYB25D256800 BT-7/HYS72D32500GR-7-B
Apacer DDR 32x8x9 CL2, 1.2"
Infineon HYB25D256800 BT-7
128MB PC2100 DDR registered
Apacer DDR 16x8x9 CL2
Infineon HYB25D128800 AT-7
SCSI RAID card
ASRC/1Q
4ch Ultra160 RAID card, PCI
ASRC/1D
2ch Ultra160 RAID card, PC
ASRC/1S
1ch Ultra160 RAID card, PCI
LSI Enterprise 1600,
64bit/66MHz Q12160A, i960RN 64/66,
Battery Backup Unit & 128MB SDRAM
f/w C170, W2K driver 5.25, Acer Altos CD 4.0
LSI Elite 1600
64MB SDRAM, 64bit/66MHz PCI, i960RN,
f/w C170, Acer Altos CD 4.0, W2k driver 5.25
LSI Elite 1600
128MB with Battery back up, 64bit/66MHz PCI, i960RN,
f/w C170, Acer Altos CD 4.0, W2k driver 5.25
LSI Express500
32/33Mhz PCI, i960RM-100, 32MB SDRAM, f/w C170, W2k driver
5.25, Acer Altos CD4.0
SCSI Card
97
ASC/1D
2ch U160 SCSI card
U160 53C1010R 2ch, 64bit/66Mhz PCI-2.2
BIOS 4.19 with 7conn U160 SCSI cable/terminator,
w/o SDMS CD4.8 for Altos
ASC/1S
1ch U160 SCSI card
U160 53C1000R 1ch, 64/66Mhz PCI-2.2,
BIOS 4.19 with 7 conn U160 SCSI cable/terminator,
w/o SDMS CD4.8 for Altos
Appendix B
Items
Specifications
SCSI Hard Drive (80 pin)
146GB, U320, 10K RPM
73GB, U320, 10K RPM
Seagate Cheetah 146LP ST3146807LC f/w 0003
IBM Daytona146Z10 IC35L146UCDY10, f/w S23C
Seagate Cheetah 146LP ST373307LC f/w 0003
IBM Daytona146Z10 IC35L073UCDY10, f/w S23C
36GB, U320, 10K RPM
18GB, U320, 10K RPM
Seagate Cheetah 146LP ST336607LC f/w 0003
IBM Daytona146Z10 IC35L036UCDY10, f/w S23C
IBM Daytona146Z10 IC35L018UCDY10, f/w S23C
SCSI Hard Drive (68 pin)
146GB, U320, 10K RPM
73GB, U320, 10K RPM
Seagate Cheetah 146LP ST3146807LW f/w 0003
IBM Daytona146Z10 IC35L146UWDY10, f/w S23C
Seagate Cheetah 146LP ST373307LW f/w 0003
IBM Daytona146Z10 IC35L073UWDY10, f/w S23C
36GB, U320, 10K RPM
18G, U320, 10K RPM
Seagate Cheetah 146LP ST336607LW f/w 0003
IBM Daytona146Z10 IC35L036UWDY10, f/w S23C
IBM Daytona146Z10 IC35L018UWDY10, f/w S23C
ATA Hard Drive
120GB, ATA100 7200RPM
Seagate Cuda V "Avalanche" ST3120023A f/w 3.31
80GB, ATA100 7200RPM
Seagate Cuda V "Avalanche" ST380023A f/w 3.31
60GB, ATA100 7200RPM
Seagate Cuda V "Avalanche" ST360015A f/w 3.31
Redundant Power Supply
Altos G700/510 redundant SPS
Appendix B
SPS 450W DELTA DPS450FBA Power Supply Unit
98
Appendix C
Online Support Information
This section describes online technical support services available to help you repair your Acer Systems.
If you are a distributor, dealer, ASP or TPM, please refer your technical queries to your local Acer branch
office. Acer Branch Offices and Regional Business Units may access our website. However some information
sources will require a user i.d. and password. These can be obtained directly from Acer CSD Taiwan.
Acer's Website offers you convenient and valuable support resources whenever you need them.
In the Technical Information section you can download information on all of Acer's Notebook, Desktop and
Server models including:
T
Service guides
T
User's manuals
T
Training materials
T
Bios updates
T
Spare parts lists
T
TABs (Technical Announcement Bulletin)
For these purposes, we have included an Acrobat File to facilitate the problem-free downloading of our
technical material.
Also contained on this website are:
T
Detailed information on Acer's International Traveler's Warranty (ITW)
T
Returned material authorization procedures
T
An overview of all the support services we offer, accompanied by a list of telephone, fax and email
contacts for all your technical queries.
We are always looking for ways to optimize and improve our services, so if you have any suggestions or
comments, please do not hesitate to communicate these to us.
Appendix C
106
107
Appendix C