1
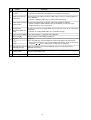
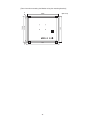
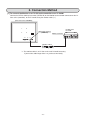
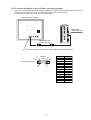
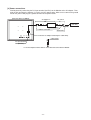
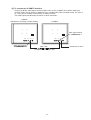
Version 1.3
Created in December 2004
Instruction Manual
for
IV-08MTV
LCD Color Monitor
Thank you for purchasing our IV-08MTV LCD
Color Monitor.
Before using it, read this manual carefully to
become familiar with its functions and proper
use.
Notes
- This manual was written with the utmost care. However, if you have any questions
or inquiries concerning the product, please feel free to contact our dealers or service
agents.
- Copying all or part of this booklet is prohibited.
- The contents of this manual may be revised or modified for improvement without
prior notice.
Safety Precautions
Read this user's manual and the attached documents carefully before installing, operating, or performing any
maintenance, in order to keep the machine working correctly. Make sure you understand all of the equipment
details, safety information, and cautions before using this machine. In this user's manual, the safety
precautions are categorized as "Caution."
Caution
: Improper handling may cause dangerous situation, moderate or light injury, or damage
to equipment.
Caution is given, serious results may occur depending on the circumstances. In all
Even when only a
cases, important points are described. Be sure to follow the advice given.
The following symbols are used to prohibit or explain required action.
: This means do not do what is described. For example, prohibited disassembly is shown as
(1) Installation
Caution
- Use only in the environments specified in the leaflet, or instruction manual.
Electric shock, fire or malfunction may result if used in high temperature, high humidity,
dusty or corrosive environments, or if excessive vibration or impact occurs.
- Install the equipment only as described in the instruction manual.
An improper installation may cause the equipment to fall, breakdown, or malfunction.
- Never leave wire cuttings or any other foreign matter lying about.
A fire, breakdown or malfunction may result from inappropriate objects left near the equipment.
(2) Connection
Caution
- To provide power to the IV-08MTV, use only the specialized AC cord and adapter that
come with the monitor.
- The included AC power cord is for plugging the monitor into a 100 VAC outlet.
- If you need to plug the monitor into a 200 VAC outlet, please contact our sales division or
the shop where you purchased the monitor.
- Do not use the specialized AC cord and adapter that come with the IV-08MTV to power
any other devices.
(3) Maintenance
Prohibit
- Don't disassemble or modify the Monitor.
Fires, breakdowns or malfunctions may occur, if the monitor is disassembled.
-1-
.
1. Outline / Features
The IV-08MTV (or simply the Monitor) is a compact, 8.4" screen liquid crystal color monitor.
- It meets the IP65 regulations (when installed in a frame) making it suitable for FA use.
- The Monitor's brightness, color, and contrast can be adjusted and the display language can be
switched between Japanese and English.
- An external monitor can be connected to its video output terminal.
The Monitor has an NTSC video output terminal so a separate monitor can be used to check the settings
on IV series controllers or for remote monitoring.
- NTSC video input and analog RGB input terminals are standard
The Monitor can be used as a display monitor for any equipment with an NTSC output, such as the
SHARP IV-S30 series, IV-C35M etc., and it can be used as a monitor for the SHARP IV-S51M (analog
RGB output) or as a monitor for a personal computer.
-2-
2. Precautions for Use
Please note the following points when handling the Monitor.
(1) Installation location and environment
- The Monitor should be used in a location with an ambient temperature of 0 to 45 oC and a relative
humidity of 90%RH or less.
If the ambient temperature is higher than the maximum temperature above, install a fan for forced air
cooling or an airconditioner to conditioning the space to bring the ambient temperature within the
specified range.
- Do not install the Monitor in a location subject to condensation due to rapid temperature changes.
- Do not install the Monitor in a location exposed to direct sunlight.
- Do not install the Monitor in a location directly subject to vibration or mechanical shock.
- Do not install the Monitor in a location exposed to corrosive or combustible gas, or to solvents or
coolants.
Do not install it in a location where there is lots of dust, salt in the air or metal powder.
(2) Installation
- Allow adequate ventilation space. If the ventilation area is blocked the internal temperature of the
Monitor may increase enough to cause a fire.
- Do not install the Monitor in a panel that contains high-voltage equipment. Install the Monitor at least
200 mm away from high voltage lines or power lines.
(3) Use
- Use only the AC cord and adapter that come with the Monitor. Using any other cord or adapter may
cause a fire.
- If the Monitor will not be not used for a long time, unplug cord from the AC outlet.
- If a fault or error occurs in the Monitor (overheating, abnormal odor, or smoke), stop operation
immediately and contact the shop where you purchased the Monitor or contact our service company.
- Glass is used in the display. Therefore, do not drop it or bang it.
- In a dry atmosphere, static electricity may build up on your body. If the static electricity is discharged
by touching the display, the electronic parts inside the Monitor may be damaged. Discharge any static
electricity in your body by touching a grounded metal object before touching the Monitor.
(4) Maintenance
- Only authorized service personnel are allowed to remove the back cover on the Monitor.
Some parts in the Monitor use high voltage and you may receive an electric shock or damage the
Monitor if you are not trained.
- Turn OFF the power before cleaning the Monitor. Wipe off any dirt using a dry, soft cloth. Use of any
thinner or other chemicals may damage the frame or screen and may cause color changes. If the
cloth is too hard, it may scratch the display surface.
-3-
3. System Configuration
IV-08MTV
*1
IV-S30 series
IV-C35
Monitor cable *2
(cable length: 2 m)
Adj.
POWER
*1
IV-S51M
IV-S51M
POWER
FG
+24V
USB
+0V
Y0
COM
Y1
Y2
Y3
USB
Y4
Y5
TERMINATOR
Y6
LINK
Y7
Y8
Y9
Y10
Y11
EXP
LAN
Y12
RX
Y13
ANALOG
RGB
Y14
Y15
RDY
HALT
C (-)
CAMERA1
X0
X1
X2
X3
Video cable
(Commercially available item:
Less than 10 m)
X4
IV-08MTV
Adj.
IV MONITOR
ONLY
X5
X6
Analog RGB cable
(Commercially available item)
CAMERA2
X7
X8
X9
X10
X11
X12
X13
X14
X15
C (+)
Personal
computer
(Commercially
available
item)
POWER
[For simultaneous monitoring
at another location]
*1: The Monitor is compatible with the following IV-S30 series controllers.
Product name
Controller (model name)
IV-S31M, IV-S32M, IV-S33M
IV-S31MX, IV-S32MX, IV-S33MX
Compact color image sensor camera IV-C35M
IV-S51M
Image sensor camera
Compact image sensor camera
(IV-S30 series)
*2: The monitor cable comes as an accessory with the IV-S30 series (controller),
and the IV-C35M.
If you need a cable longer than 2 m, purchase a standard cable locally.
-4-
4. Name and Function of Each Part
[Top view]
220.6
(Unit: mm)
(7) Mounting holes
(4 positions: two at bottom)
[Side view]
53.3
[Front view]
192
177.6
235
POWER
Adj.
key
(6)
key
(5) Power lamp
Adj key
Power key
[Rear view]
(8) M4 Screw hole
(4 positions: For the mounting stand)
36
(9) Cable clamp
36
ANALOG VIDEO VIDEO
RGB
OUT
IN DC24V
(1) DC input terminal
(4) Analog RGB connector
(3) Video output terminal
(2) Video input terminal
-5-
Name
Function
(1)
DC input terminal
(24 VDC)
Terminal used to supply power to the Monitor.
- Connect the cable from AC adapter here (Monitor accessory).
(2)
Video input terminal
(VIDEO IN)
Terminal used to supply an NTSC video signal (from an IV-S30/C35M etc.)
to the Monitor.
- Connect a monitor cable here (IV-S30/C35M accessory).
(3)
Terminal used to output an NTSC video signal from the Monitor.
Video output terminal
- Connect another video monitor here (or IV-08MTV) to see the same
(VIDEO OUT)
image elsewhere at the same time.
Analog RGB
(4) connector (ANALOG
RGB)
(5) Power lamp (POWER)
Power key
(6)
[Adj] key
key
key
Terminal used to input analog RGB signals from an IV-S51M, or a personal
computer.
- Connect an analog RGB cable here (available locally).
Lights when power is supplied to this Monitor.
Turn the power to this Monitor ON/OFF.
[Adj] key
Press the [Adj] key and the adjustment menu will appear on the display.
- Select items (brightness etc.) on the adjustment menu. Then set the value
using the
/
keys. Confirm the setting with the [Adj] key.
(7) Mounting hole (for the Holes (4 positions) to install the Monitor using the mounting bracket
mounting bracket)
(Monitor accessory).
(8) Screw hole (for a
support stand)
Screw holes (4 positions) for installing the Monitor on a specialized support
stand (custom order item).
(9) Cable clamp
Secure the AC adapter cord (Monitor accessory).
-6-
5. Installation Method
Secure the Monitor using the mounting bracket (Monitor accessory) in the mounting holes on the Monitor
housing (4 positions). For specific external dimensions, see Section 4. "Name and Function of Each Part",
in this manual.
1) Cut a rectangular hole (222±0.5 x 179±0.5 mm) in the control panel (thickness: Max. 7 mm) and
install the Monitor housing in this hole.
x.
Ma
m
7m
Mounting hole in the
mounting bracket
Installation section
(4, including 2 on
the bottom)
192 mm
IV-08MTV
A
(See the cross section view below)
23
5m
m
2) Insert a mounting bracket (2 each at the top and bottom) into each mounting hole on the housing, and
secure the mounting brackets using the mounting screws.
Max. 7 mm
Mounting bracket
Installation section
Mounting screw
53.3 mm
Mounting holes of the mounting brackets
(totally 4 including top and bottom sides)
5.6 mm
(Cross-section from position A in the figure above)
-7-
220.6
(Unit: mm)
192
177.6
10.6
198.8
10.6
[Rear view when mounting the Monitor using the mounting brackets]
235
-8-
When using the specialized stand
Install the Monitor on the specialized stand (custom order item). Then the Monitor can be used in a
standalone configuration.
Rotation center
IV-08MTV
Stand
■ Dimensional drawings when the Monitor is installed on the stand
Mounting screws on
the Monitor housing
(stand accessories)
Plan view of the stand
230
22.9
8
235
130
235
148
230.7
192
53.3
2.5
230
-9-
125
127.5
23.5
5.2
125
127.5
125
2.5
Mounting holes
(4 positions)
6. Connection Method
[1] To connect the Monitor to an IV-S30 series controller or an IV-C35M
Connect the NTSC video input terminal (VIDEO IN) on the Monitor to the monitor connector on the IVS30 series (controller), or the IV-C35M, using the monitor cable (*1).
[Rear view of the IV-08MTV]
Video input terminal
(VIDEO IN)
ANALOG
RGB
VIDEO
OUT
VIDEO
IN
IV-S30 series
IV-C35M
Monitor connector
DC 24V
Monitor cable *1
(Cable length: 2 m)
*1: The monitor cable is an IV-S30 series and IV-C35M accessory.
If you need a cable longer than 2 m, purchase one locally.
- 10 -
[2] To connect the Monitor to an IV-S51M or a personal computer
Connect the analog RGB connector (ANALOG RGB) on the Monitor to the analog connector on the IVS51M or personal computer using an analog RGB cable (purchase one locally).
A connection example using an IV-S51M is shown below
[Rear view of the IV-08MTV]
IV-S51M
IV-S51M
POWER
FG
+24V
USB
+0V
Y0
COM
Y1
Y2
Y3
USB
Y4
Y5
TERMINATOR
Y6
LINK
Y7
Y8
Y9
Y10
Y11
LAN
EXP
Y12
RX
Y13
ANALOG
RGB
Y14
Y15
Analog RGB
monitor connector
(ANALOG RGB)
RDY
HALT
C (-)
ANALOG
RGB
VIDEO
OUT
VIDEO
DC 24V
IN
X0
CAMERA1
X1
X2
X3
X4
IV MONITOR
ONLY
X5
X6
CAMERA2
X7
X8
X9
X10
X11
X12
X13
Analog RGB cable
(purchased locally)
X14
X15
C (+)
∼
∼
"Pin numbers and signal names" in the analog RGB connector (ANALOG RGB)
5
10
ANALOG
RGB
1
6
D-Sub (female) 15-pin
15
11
- 11 -
Pin No.
1
2
3
4
5
6
7
8
9
10
11
12
13
14
15
Signal name
VGA-R
VGA-G
VGA-B
−
DGND
AGND
AGND
AGND
D5V
DGND
−
DDC SDA
HSync
VSync
DDC SCL
[3] Power connections
Provide power by connecting the DC input terminal (24 VDC) on the Monitor to the AC adapter. Then
plug the AC cord from the adapter (*2) into a 100 VAC power outlet. Make sure to connect the ground
line on the power cord plug to a ground terminal on the power outlet.
[Rear view of the IV-08MTV]
AC adapter *2
AC cord *2
Power output
(100 VAC)
Power cord plug
IV-08MTV connector
ANALOG
RGB
VIDEO
OUT
VIDEO
DC 24V
IN
Ground line
Secure the AC adapter cord using the cable clamp.
Cable clamp
DC input terminal
(24 VDC)
DC 24V
*2: The AC adapter and AC cord are accessories that come with the Monitor.
- 12 -
[4] To connect two IV-08MTV monitors
Connect the NTSC video output terminal (VIDEO OUT) on the IV-08MTV to the NTSC video input
terminal (VIDEO IN) on another IV-08MTV using a standard video cable (available locally: less than 10
m). Then, you can monitor simultaneously at another location.
The video output and video input terminals are RCA connectors.
IV-08MTV
[Simultaneous monitoring at another location]
IV-08MTV
Video output terminal
(VIDEO OUT)
ANALOG
RGB
Video input terminal
(VIDEO IN)
VIDEO
OUT
VIDEO
DC 24V
IN
ANALOG
RGB
Video cable
(available locally: less than 10 m)
- 13 -
VIDEO
OUT
VIDEO
DC 24V
IN
IV-S30 series or others
7. How to Adjust the Screen Display
This chapter describes the adjustment procedures and display items on the Monitor.
[1] Adjustment procedure
Adjust the display as follows.
1. Turn ON the power to the Monitor (Press the power key on the Monitor).
2. Press the [Adj] key on the Monitor.
=> The main menu will appear.
3. Select the item you want to adjust from the main menu using
and keys. Then press the [Adj]
key.
=> A detailed menu will appear.
4. On the detailed menu, select the item you want to adjust using and keys. Then press the [Adj]
key.
=> The setting for that item will be displayed.
5. Set (or change) the item using the and keys. Then press the [Adj] key.
6. When through making changes, use the and keys to select "RETURN" and then press the [Adj]
key.
7. Use the and keys to select "EXIT." Then press the [Adj] key.
=> The adjustment screen will be closed and the current settings will be saved.
[2] Adjustment item
The items affecting the screen display (that can be adjusted) vary with the type of input signal
(ANALOG RGB or VIDEO).
(1) When a video input signal is used
Main menu
LUMINANCE
CHROMINANCE
DISPLAY
LANGUAGE
OSD DISPLAY
TIMER *
MODEL SELECT
SOURCE
Detailed menu (default values)
BACKLIGHT (85)
BRIGHTNESS (70)
CONTRAST (75)
RECALL
RETURN
SATURATION (80)
HUE (50)
RECALL
RETURN
SHARPNESS (53)
QUALITY (20)
H.POSITION (43)
V.POSITION (56)
RECALL
RETURN
JAPANESE/ENGLISH (JAPANESE)
OSD H-POS (50)
OSD V-POS (50)
OSD TIMER (11)
OSD TRANSPARENCY (50)
RECALL
RETURN
TIMER (0)
SHARP IV/OTHER (SHARP IV)
VIDEO 1
ANALOG RGB
RETURN
RECALL
EXIT
- 14 -
(2) When an analog RGB input signal is used
Main menu
AUTO SETUP
LUMINANCE
DISPLAY
LANGUAGE
OSD DISPLAY
TIMER *
SOURCE
Detailed menu (default values)
BASIC ADJUST AUTO COLOR ADJUST
RETURN
BACKLIGHT (85)
BRIGHTNESS (100)
CONTRAST (100)
RECALL
RETURN
H.POSITION (43)
V.POSITION (56)
CLOCK (50)
PHASE (0)
SHARPNESS (0)
QUALITY (20)
SUB PIXEL
RECALL
RETURN
JAPANESE/ENGLISH (JAPANESE)
OSD H-POS (50)
OSD V-POS (50)
OSD TIMER (11)
OSD TRANSPARENCY (50)
RECALL
RETURN
TIMER (0)
VIDEO 1
ANALOG RGB
RETURN
RECALL
EXIT
* The TIMER above is the "off delay timer" for switching OFF the
backlight. (Can be set to 5, 10, 15, 30, 60, or 120 minutes)
- 15 -
8. Specifications
(1) General specifications
Item
Specifications
Power supply
Power consumption
100 to 240 VAC, 50/60 Hz (using the accessory AC adapter)
Ambient storage
temperature
- 20 to + 60 oC
Ambient operating
temperature
0 to 45 oC
Ambient humidity
35 to 90 %RH (non condensing)
Environmental
atmosphere
No corrosive gases
10 W
Protective construction Conforms to IP65 (front operation section only)
Meets JIS B 3502 standards (when mounted in a control panel)
Vibration and acceleration: 0.15 mm (10 to 58 Hz), 9.8 m/s2 (58 to 150 Hz)
Vibration proof
Vibration frequency: 10 to 150, 150 to 10 Hz. (1 octave/minute)
2 hours each in the X, Y, and Z directions (Number of sweeps: 15)
Shock proof
Meets JIS B 3502 standards (when mounted in a control panel)
147 m/s2 (3 times each in the X, Y, and Z directions)
Noise immunity
1000 Vp-p, 1 µs width impulse
- Test made using a noise simulator. Charge voltage (100 VAC) on the
primary side of the AC adapter
Dielectric strength
Insulation resistance
One minute at 1500 VAC (between the plug of the AC cord and the chassis)
500 VDC, 10 M-ohm or more (between the plug of the AC cord and the
chassis)
External dimensions
(mm)
235 W x 192 H x 53.3 D
Panel cutout
dimensions (mm)
222 ±0.5W x 179 ±0.5H
Weight
Accessories
Approx. 1.6 kg
One AC cord, One AC adapter, 4 mounting brackets, one Instruction manual.
- 16 -
(2) Performance specifications
Item
Display size
Display type
Driving system
Number of pixels
Display color
Screen brightness
Backlight working life
Number of pixels
Signal system *3
Image input connector
Specifications
8.4 inches diagonal: 170.4 W x 127.8 H mm
Transmissive type TFT liquid crystal panel
TFT active matrix driving system
921,600 pixels: (640 W x 480 H) x 3, Ratio of functional pixels: 99.99%
or better
Approximately 262,000 colors
230 cd/m2
20,000 hours on average *1
800 x 600 pixels *2
NTSC, analog RGB (when connected to an IV-S51M)
RCA connector (1 channel), D-sub 15 pin (1 channel)
Image output connector RCA connector (1 channel)
- When inputting an NTSC video
- Common to NTSC VIDEO INPUT
signal:
and ANALOG RGB INPUT:
SATURATION, HUB, MODEL
BRIGHTNESS, CONTRAST,
Fine adjustment
SELECT
BACKLIGHT, SHARPNESS,
function (Display
When
inputting
an
ANALOG
RGB
QUALITY, horizontal/vertical
language selectable:
signal:
position adjustment, position of
Japanese/English)
AUTO SETUP (position, color
the adjustment display screen,
etc.), CLOCK, PHASE, SUB
OSD TIMER, OSD TRANSPIXEL.
PARENCY, change default
setting between NTSC VIDEO /
ANALOG RGB, RECALL.
*1: The life span is determined when the ambient temperature is held at 25 ±5 oC and the brightness
remains above 50% of the default value (or the backlight does not flicker).
*2: When connecting the Monitor to a personal computer with screen resolution greater than 800 x 600
pixels (such as 1024 x 786), a "NOT supported" message will appear. Before connecting the
personal computer, change the screen resolution on the personal computer to "800 x 600."
*3: The input signal selection can be changed on the adjustment screen.
If you want the Monitor to connect equipment made by other manufacturers, check the compatibility
using the actual equipment.
- 17 -