1
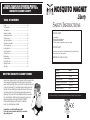
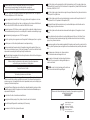
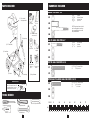
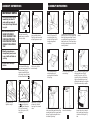
PART NO. 1440-400/REV. D
MOSQUITO MAGNET
Liberty
OPERATION MANUAL
Your trap will
begin capturing
immediately, but
allow 4-6 weeks
to interrupt the
breeding cycle.
US Patents: No. 6,145,243, No. 6,286,249
AU Patent No. 726575, NZ Patent No. 335035
MADE IN USA
For Outdoor Use Only
®
NOTICE: PLEASE READ THE ENTIRE MANUAL
BEFORE ASSEMBLING AND STARTING UP YOUR
MOSQUITO MAGNET LIBERTY.
MOSQUITO MAGNET
Liberty
TABLE OF CONTENTS
Safety…………………………..……...........................................2-4
Parts included……………………...........................................……5
Tools needed……….………………............................................…5
Hardware included………………...........................................……6
Assembly instructions………………..........................................7-10
Trap Placement………………………...........................................10
Start-Up Instructions………………..........................................….11
Shut-Down Instructions………………...........................................11
Tank Changing Tips..............................................................................11
For Best Results...................................................................................12
Quick-Clear valve………………….........................................…...12
Gas Reset Tool......................................................................................13
Maintenance........................................................................................13
Troubleshooting……………………...................................….......14
Burying The Cord.................................................................................15
Operation Codes..................................................................................15
Warranty………………....................................................................15
SAFETY INSTRUCTIONS
FOR YOUR SAFETY
If you smell gas:
1. Shut off gas to the appliance.
2. Extinguish any open flame.
3. If odor continues, immediately call your gas supplier.
FOR YOUR SAFETY
Do not store or use gasoline or other flammable vapors and liquids in the
vacinity of this or any other appliance.
WARNING: For Outdoor Use Only
Model No.:
HOW THE MOSQUITO MAGNET WORKS
Humans exhale carbon dioxide (CO2), which has been scientifically proven to be the
natural compound that mosquitoes and other biting insects use to navigate to
people. The Mosquito Magnet mimics a person’s breath by catalytically converting
propane to carbon dioxide (CO2). The Mosquito Magnet can be placed near the
mosquito’s resting and breeding spots, trapping the mosquitoes at their source
(see trap placement section). The female, egg-laying, biting mosquitoes are
drawn away from you and to the Mosquito Magnet, where they are vacuumed
into a net and dehydrate. Within 4-6 weeks, the reproductive cycles of your
biting insect population are interrupted. NO EGGS. NO INSECTS.
The Mosquito Magnet targets only biting insects, not beneficial
insects such as butterflies, bees and moths.
Congratulations on your Mosquito Magnet purchase!
Please read your owner’s manual completely before assembling
and operating your unit.
1
LIBERTY
Serial No.:
Type of Gas:
Propane
Manifold Pressure:
100-110 psi
Minimum Gas Supply Pressure:
11.0 in. WC
Input Rating:
650Btu/Hr.
Minimum Clearances:
20-24”
For Outdoor Use Only. If Stored Indoors, Detach and Leave Propane Cylinder Outdoors.
2
®
WARNING: Improper installation, adjustment, alteration, service or maintenance
can cause injury or property damage. Read the installation, operating and
maintenance instructions thoroughly before installing or servicing this equipment.
CAUTION: The gas pressure regulator provided with this appliance must be used. This regulator is
set for an outlet pressure of 11.0 in. Water Column.
The gas supply must be turned off at the LP-Gas supply cylinder when this appliance is not in use.
The installation must conform with local codes or, in the absence of local codes, with the National
Fuel Gas Code, ANSI Z223.1-1998 for US and with the CAN1-B149 for Canada.
Adequate clearances of 20-24 inches around air openings into the combustion chamber, clearances
from combustible material, provisions for accessibility and for combustion and ventilating air supply.
The minimum inlet gas supply pressure is 11”WC from regulator.
To test for a gas leak, place soapy water around the regulator. If bubbles appear, there is a gas leak.
Route the power cord in the safest possible manner to avoid personal injury.
The hose assembly must be replaced prior to the appliance being put into operation if there is evidence of excessive abrasion or wear, or if the hose is damaged. The instructions shall state that the
replacement hose assembly shall be that specified by the manufacturer.
The Mosquito Magnet is equipped with a hot surface ignition device. Failure to follow starting procedure will result in the trap not starting.
Children and adults should be alerted to the hazards of high surface temperatures
and should stay away to avoid burns or clothing ignition.
Young children should be carefully supervised when they are in the area of the heater.
Keep out of reach of children.
The LP-Gas cylinder must be provided with a shutoff valve terminating in an LP-Gas supply cylinder valve
outlet specified for Connection No. 510 in the Standard for Compressed Gas Cylinder Valve Outlet and Inlet
Connections, ANSI/CGA-V-1-1977.
The LP-Gas cylinder supply system must be arranged for vapor withdrawal and the cylinder must include a
collar to protect the cylinder valve.
The LP-Gas cylinder used shall be constructed and marked in accordance with the specifications for LPGas cylinders of the U.S. Department of Transportation (DOT).
The Mosquito Magnet shall be used outdoors only in a well ventilated space and shall not be used in a
building, garage, or any other enclosed area.
The LP-Gas cylinder must be disconnected and removed from the appliance, if the appliance is stored
indoors.
LP-Gas cylinders must be stored outdoors in a well ventilated area out of the reach of children. Disconnected cylinders must have threaded valve plugs tightly installed and must not be stored in a building,
garage, or any other enclosed area.
The pressure regulator and hose assembly supplied with this appliance must be used for connection to the
LP-Gas cylinder. Replacement pressure regulators and hose assemblies must be specified by the manufacturer.
Avoid improper use of extension cords. Keep connections
away from moisture and avoid damage to the cord.
If the supply cord is damaged, it must be replaced by the manufacturer or its service agent or a similarly qualified person in
order to avoid hazard.
WARNING- an electric shock hazard may exist if water from a
garden hose is directed at the Mosquito Magnet.
Clothing or other flammable materials should not be hung from
the heater, or placed on or near the heater.
Installation and repair should be done by a qualified service person. The heater should be inspected
before use and at least annually by a qualified service person. More frequent cleaning may be required as necessary. It is imperative that the control compartment, burners, and circulating air passageways of the heater be kept clean.
Keeping the Mosquito Magnet area clear and free from combustible materials, gasoline, and other
flammable vapors and liquids. The appliance is not to be used in locations where flammable vapor or
explosive dust is likely to exist.
Do not obstruct the flow of combustion and ventilation air.
Please contact American Biophysics Corporation if you experience any problems
with your Mosquito Magnet:
1-877-699-8727
Keeping the ventilation openings of the cylinder enclosure free and clear from debris.
Clean the Mosquito Magnet with a water damp cloth, if necessary.
A maximum of a 20 lb. LP-Gas cylinder shall be used.
3
American Biophysics Corporation
2240 South County Trail
East Greenwich, RI 02818-1536
P: 401-884-3500 F: 401-884-6688
www.mosquitomagnet.com
email: info@mosquitomagnet.com
4
PARTS INCLUDED
HARDWARE INCLUDED
WHEELS: FOR STEPS 3-5
(2)
(2)
(2)
(2)
A1
(1) Self-contained
Liberty powerhead
(1) Adaptor
NOTE: All parts are shown at actual
size. Use the graphics to match up
the corresponding part, or use the
ruler provided below.
A3
A4
(1) Octenol Cartridge
(Added Attractant)
LEGS TO BASE: FOR STEPS 6-7
(2) 3/8“x2”
(2) 3/8”
(2) 3/8”
B1
(1) CO2 Tube (black)
(1) Reset Tool
(1) Base Frame
Washers
Aluminum Sleeves
Hex Head Bolts
Nyloc Nuts
A2
(1) Net
(2) Upper Legs
3/ “
8
1/ “OD
2
3 1/4“
3/ “-16
8
(1) L-Shaped
Adaptor
Hex Head Bolts
Washers
Nyloc Nuts
B2
B3
(10) Metal Cord
(1) Instruction
Burying
Manual
Clips
FEET TO LEGS: FOR STEPS 8-10
C2
(2) Wheels
(2) Lower Legs
(2) 1/4“-20 x 2 1/2 Panhead Phillips
1/ “-20 Nyloc Nuts
(2)
4
C1
(1) Bag of hardware
(2) Feet
UPPER LEGS TO LOWER LEGS: FOR STEPS 12-13
IMPORTANT NOTICE
D1
Per Federal Regulations, a CO2 Cartridge has not been
included with your purchase. Please visit
www.mosquitomagnet.com or your local
Mosquito Magnet dealer to purchase.
D2
TOOLS NEEDED
Phillips Head screw driver
(2) 1/4“-20 x 1 3/4“ Panhead Screws
1/ “-20
(2)
Nyloc Nuts
4
1/ “ Washers
(2)
4
D3
1
INCHES
3/8” and 1/4” Open End Wrench
2
3
4
5
6
7
Adjustable wrench
0
Vaseline
Ratchet Wrench
5
CM
1
2
3
4
5
6
7
8
9
6
10
11
12
13
14
15
16
17
18
19
ASSEMBLY INSTRUCTIONS
IMPORTANT NOTES:
ASSEMBLY INSTRUCTIONS
1
8
9
10
L
1. Your trap will begin capturing
immediately, but allow 4-6
weeks with trap running 24
hours/day to interrupt the breeding cycle.
2
R
HOLE
B
HOLE
A
2. DO NOT MOVE MOSQUITO
MAGNET WITH TANK ATTACHED. DISCONNECT TANK
FROM REGULATOR BEFORE
RELOCATING TRAP TO AVOID
DAMAGE TO REGULATOR OR
TRAP.
Take base frame and lay
upside down on a raised flat
surface (i.e. table).
Insert lower legs into base
(parts are labeled Left and
Right). Align with screw holes
and push leg down to snap in.
4
3
3. Should you experience an
interruption of power, be sure
to press the Restart button on
your trap.
4. Trap can be left running in
the rain.
5
Using two wrenches,
tighten to a snug fit.
Attach wheel with flat surface
facing out. Insert washer (A1) and
aluminum sleeve (A2) onto
longest hex head bolt (A3) and
place through hole on flat side of
wheel and insert into hole B .
6
Place base frame on its side.
Insert 2 1/2” pan head (C1)
screw through hole in leg
and into foot. Align foot with
straighter edge toward
curved leg.
Turn base frame over and hold foot firmly
against leg. Drop nut (C2) into leg (flat side
down). Apply pressure with back of pencil
or screwdriver while turning the screw to
allow thread to catch. Place frame back on
side. Apply outward pressure to foot while
screwing clockwise.
11
12
Turn completed base/leg/
wheel assembly over to
upright position. Add vaseline
to top of legs.
Attach upper legs by sliding
onto lower legs.
14
15
13
Attach nyloc nut (A4) to
wheel assembly.
7
Insert hex head bolt (B1) into
hole A . Head of bolt to be
outside of base. Add washer
(B2) to bolt from inside of
base. Attach nyloc nut (B3)
and tighten.
7
Repeat procedure for opposite foot.
Repeat steps 2-6 for opposite lower leg. Note that
lower legs turn in, towards
center.
Add vaseline to tops of legs first. Using two
hands, mount Liberty power head onto leg
assembly matching holes in power head to
leg tops. Gas hose and regulator to face
rear wheels. Tighten legs.
Align holes in upper and lower legs and
insert pan-head screws (D1) with
washer (D2) and nyloc nuts (D3) on
inside of leg. Secure until moderately
tight by using adjustable wrench and
phillips head screwdriver. Do not tighten
fully until entire assembly is complete.
16
Take black carbon dioxide
tube with slotted side up.
8
Insert carbon dioxide tube into
trumpet. Align slots in tube with
tabs in power head tube and turn
clockwise until latching the CO2
tube.
ASSEMBLY/STARTING INSTRUCTIONS
ASSEMBLY/STARTING INSTRUCTIONS
17
18
19
26
27
Peel cover from attractant
cartridge. Using a coin,
unscrew cover from attractant compartment inside of
CO2 tube.
Slide attractant cartridge into
compartment. Recap and
secure tightly.
Unlatch net door by turning
clockwise.
Place standard 20 lb. propane tank (not included) into
round cradle hole in base.
Clip tether from bottom of
Liberty around tank handle.
Tighten securely making sure
not to dislodge tank from
cradle position.
20
21
Carefully open net door.
22
Take net and hold with string of
net facing door. Make sure net
entrance is fully open and that
drawstring is not pulled at all,
causing the entrance to be
partially blocked.
Align bottom of net guide over
top of black slotted collar. Slide
net over collar. You will hear a
click when net is secured.
28
25
24
which bear the UL mark are intended for
use with LP provided in North America).
31
29
30
Turn propane on by slowly turning
counterclockwise. Take care not to
turn too quickly to avoid engagement
of safety check valve in regulator.
Plug power connector into
Liberty unit located on backside of unit.
CAUTION: Do not move
trap with tank attached
23
Making sure propane tank is fully
closed, attach propane regulator
hose to propane tank. Secure tightly
by hand. Do not use tools. (Products
Plug adaptor into properly
grounded electrical outlet. This
adaptor is not intended to be
mounted. For UL listed trap, use
120VAC adapter. For CE marked
trap, use 230VAC adapter.
TRAP PLACEMENT INSTRUCTIONS
1 Determine the direction of the prevailing wind.
2 Stand in the center of the area you are trying to protect and look toward the prevailing wind. Proper placement
of the Mosquito Magnet will be 30-40 feet in front of you, within 5-6 feet of ground cover (i.e., bushes,
flowerbeds, treeline, marshbed, etc.)
3 It is recommended that the trap be placed in the shade.
4 Do not place trap directly above water source (sprinklers, hose, etc.).
5 Make sure unit is not directly up against a blockade such as a building or fence.
Attach back of net onto tab
provided inside of net housing.
Place excess length of string
towards door to avoid string
getting drawn into fan.
Close door and lock turning
latch counter-clockwise. Trap
will not maintain catch properly
if net is not inserted correctly.
9
Using handle on front of Liberty,
move your trap to desired
location in yard. See “Trap
Placement Instructions”.
6 Trap must be placed on level ground to avoid tipping or uneven propane distribution.
7 For more information, refer to trap placement section of our website at www.mosquitomagnet.com
10
FOR BEST RESULTS
STARTING INSTRUCTIONS
1 Install additional attractant in designated compartment. (#18)
1 Your trap will begin capturing immediately, but allow 4-6 weeks with trap running 24 hours/day to significantly
reduce the biting insect population and interrupt breeding cycle.
2 Install Net - You will hear a snap when bag is secure. (#20-23)
2 Should you experience an interruption of power, be sure to restart the trap.
3 Close and turn latch on net door. Be sure net door is closed securely. (#24)
3 Clear door must be tightly secured to maximize catch.
4 Make sure propane tank is fully closed. Attach propane regulator to propane tank. (#28)
5 Turn propane tank on (slowly turn valve knob all the way counter-clockwise). (#29)
6 Plug power connector into trap. (#30)
4
Never spray insecticide in or around trap.
5 DO NOT MOVE TRAP WITH TANK ATTACHED! TANK MUST BE DISCONNECTED FROM
REGULATOR BEFORE TRAP IS RELOCATED TO AVOID DAMAGE TO REGULATOR
AND/OR TRAP. BE ADVISED, DAMAGE CAUSED FROM FAILURE TO COMPLY WITH
THIS INSTRUCTION IS NOT COVERED UNDER WARRANTY.
6 Trap can be left running in the rain.
7 Plug AC adapter into electrical outlet. (#31) Caution: To avoid the risk of electrical shock, connect only to properly grounded outlets. Adaptor unit is not intended to be mounted.
7 If using lime or lawn regenerative compounds, be sure to shut down the Mosquito
Magnet first to prevent dust or fine mist from being drawn into trap and clogging net.
8 Press “On/Reset” button – You will hear the fans start.
8 A standard, outdoor rated extension cord may be used to increase your trap area.
9 Yellow light will blink for approximately 5-7 minutes (Warm-Up Stage).
10 Following warm-up, yellow light will become constant for approximately 3 minutes (trap has reached specific
temperature).
11 Yellow light turns off, green light will turn on (trap is fully operational).
SHUT DOWN INSTRUCTIONS
To shut down the Liberty, simply close the valve on the propane tank and press the “Off” button.
DO NOT UNPLUG UNIT. MOSQUITO MAGNET LIBERTY MUST REMAIN PLUGGED IN FOR 5 MINUTES AFTER SHUT
DOWN OR UNTIL FAN STOPS TO AVOID HEAT DAMAGE.
9 Octenol cartridge does not disintegrate. Smell will dissipate over time.
QUICK-CLEAR VALVE
Recommended for use at first tank change, and every second tank change thereafter. Also recommended for use
before seasonal storage to avoid build up of contaminant’s during off-season.
The Quick-Clear valve is used to clear out propane contaminants in the fuel line, which may block the flow of
propane from the tank to your Mosquito Magnet. The Quick-Clear valve is a gold, threaded knob located on the back
of your trap. It should be used with the black and gold, L-shaped adapter included in the box with your Mosquito
Magnet, and a 12 gram threaded CO2 cylinder available on our website at www.mosquitomagnet.com or your local
Mosquito Magnet Dealer.
Important: Extinguish all smoking materials prior to use of Quick-Clear Valve.
Do not stand directly behind cylinder during operation.
1 Shut down your Mosquito Magnet. Let fan run until it stops. (about 5 mins.)
Any open octenol or other added attractant packages should be removed and discarded. The net should also be
discarded prior to storing the Mosquito Magnet Liberty.
2 Close the propane tank valve by turning to the “Off” position. (turn the tank valve clockwise)
STORAGE: Mosquito Magnet Liberty should be stored indoors in the off-season. Cover unit with trap cover (available
at www.mosquitomagnet.com) or with a tarp and secure tightly at the bottom to keep out dust, spider webs and
other debris.
4 Hand-screw gold end of L-shaped adapter on to Quick-Clear valve, until tight.
3 Remove the protective cap from Quick-Clear valve on your trap.
5 Hand-screw the CO2 cylinder into black end of L-shaped adapter clockwise until hand tight.
6 Unscrew CO2 cylinder 1/4 turn only in counter-clockwise direction. The flow of CO2 will begin, lasting approximately 3 minutes. Be sure to allow CO2 to run out completely. (hissing will stop when cylinder is empty. Note:
CO2 cylinder will be cold to the touch)
TANK CHANGING TIP
When attaching the regulator handle to a tank after a tank change, be sure to fully tighten the regulator handle
onto the tank. No need to use tools, but do turn the handle as far as possible by hand. When this is done, loosen
the handle 1/4 turn, then re-tighten the handle. Frequently this action will result in additional turns beyond the 1/4
turn. The purpose for this is to fully engage the regulator onto the tank. If the regulator is not fully engaged, the
flow of gas may be restricted to the point where the trap will show a gas empty code. If this occurs, press the off
button, close the tank valve, and remove the regulator from the tank. Re-attach the regulator and try again.
7 Continue unscrewing the CO2 cylinder to remove. Discard empty CO2 cylinder after use, it is not reusable or
re-fillable. (Use caution when removing CO2 cylinder, as some residual CO2 may come out at this time.)
8 Remove L-shaped adapter by unscrewing gold end clockwise. (Remember to KEEP the black and gold adapter
for future use!)
9 Replace Quick-Clear valve protective cap, and proceed with normal start up of your Mosquito Magnet.
If use of Quick-Clear valve feature does not resolve starting trouble, contact Tech Support 877-699-8727.
11
12
Use of protective
eyewear is
recommended
GAS RESET TOOL INSTRUCTIONS
If your Mosquito Magnet fails to start, it may be the result of poor gas flow from the propane tank through the regulator to the trap.
The attached tool has been designed to reset the internal mechanisms of the propane regulator and release any back pressure
from your tank. Please follow these steps:
TROUBLESHOOTING GUIDE
PROBLEM
POSSIBLE CAUSES
SOLUTIONS
Unit won’t start
1) Is Propane tank empty?
1) Weigh tank and check against “empty” weight
written on tank.
2) If Propane tank is new, has it
been purged?
2) Bring tank to filling location. Air may be in fuel line.
Ask for tank to be purged. *Hint-If you have another propane powered device operating on a stan
dard, 20lb propane tank, try hooking that tank up to the
Mosquito Magnet to verify that your issue is with your
tank.
3) There could be a loose
connection.
3) Verify all electrical connections. Make sure
regulator is fully engaged, and propane tank valve
is fully open.
4) If tank has been opened too
quickly, security check valve
may have triggered.
4) Refer to Reset Tool Instructions on page 12.
1) Issues 1and 3 may apply.
1) Go through above steps 1 & 3.
2) Fuel line may be blocked by
propane contaminates.
2) See Quick-Clear valve instructions.
1 Shut down your Mosquito Magnet.
2 Completely close the propane tank valve by turning to the “Off” position. (turn valve clockwise)
3 Disconnect the regulator from the propane tank valve.
4 Screw the threaded end of the reset tool into the propane tank valve until it is fully engaged.
You may hear a small “hiss” sound. This is the pressure being released from the propane tank.
Note: the threads in the tank valve are left handed threads. (turn valve counter clockwise)
5 Screw the regulator connector to the opposite end of the reset tool until fully engaged.
Note: hold the reset tool to prevent it from backing out of the tank.
6 The regulator and propane tank are now reset. Disconnect the reset tool from the
regulator connector and the propane tank.
Unit won’t stay running
7 Re-attach regulator connector to the propane tank valve.
8 Slowly turn the propane tank valve on .
3) See Tank Changing Tips on page 11.
3) Regulator is not fully engaged.
9 Restart your trap.
Low or No Catch
If not getting bitten
1) Insects may not be out yet.
MAINTENANCE
1) Verify temperature is consistently above 50°F (10°C).
If getting bitten
2) Trap placement issue.
1 Propane tank should be refilled every 21 days.
2) Follow steps in the “Trap Placement” section of
your owner’s manual or go to
www.mosquitomagnet.com “Placement” section.
2 Empty or replace net every 21 days.
3 See added attractant packaging for maintenance/ replacement instructions.
3) Biting insect reproductive
cycles have not yet been broken.
3) Keep trap in constant operation 24 hours/day,
7 days/week for 4-6 weeks to interrupt
the breeding cycle.
4) CounterFlow may be disrupted.
4) Conduct a “tissue test” by holding a facial tissue
up to horn to check for airflow.
5) Added attractant may be
incompatible with species of
mosquito.
5) Call your local mosquito control department to find
out if Asian Tiger is your primary species of mosquito. Asian Tiger mosquitoes are not attracted to
Octenol. Remove Octenol cartridge from your unit,
and wipe Octenol compartment with alcohol wipe
to eliminate scent.
4 Accessories can be ordered at www.mosquitomagnet.com.
5 Store Octenol in a cool, dry place.
6 Clean net periodically for tree pollen or debris.
7 In the event the snap-on screen becomes clogged, remove and clean gently with toothbrush and cold
water. Snap back in place aligning bottom edge first.
8 Periodically wipe down the outside of the Mosquito Magnet with a clean water damp cloth.
All of us at American Biophysics want you to get complete satisfaction from your
Liberty. Should you have any problems you cannot resolve, simply call one of
our trained Technical Service Representatives at:
1-877-699-8727. We will help you get up and running.
13
14
PRODUCT REGISTRATION
BURYING THE POWER CORD
Mail completed form today or register on-line at www.mosquitomagnet.com
First Name
Last Name
Address
City
State/Province
DETACH HERE BEFORE MAILING
Use the Cord Burying Clips supplied. Place clips approximately 5’ apart, tap into ground with a hammer making sue not to
damage power cord. Make sure unit is unplugged and in proper position. For alternate placement follow steps illustrated below.
Place cord into
Use cedar shingle
Use straight-edge
trench carefully
or folded cardboard
shovel or garden
stretching as you
to place cord into
spade, dig a
go to remove any
bottom of trench.
trench about 3-4
twists in cord.
Recover the trench
inches deep from
with removed soil.
power source to
trap.
OPERATION CODES
PROBLEM
Net is not installed properly
Gas is empty
Ignitor not working
Thermistor not working
Solenoid not working
High temperature reading
Fan not operating
RED LIGHT
YELLOW LIGHT
On
On
On
On
On
On
On
Off
On
On
Flashing
Flashing
Off
Flashing
GREEN LIGHT
Flashing
Flashing
On
On
Flashing
On
Off
After calling for warranty service, please contact the retailer where you bought your unit to determine if it is covered by any exchange policy.
If American Biophysics Corp. determines there may be a defect, American Biophysics Corp. will issue a return authorization (RMA) number.
The defective unit or parts must be returned for warranty inspection using the RMA number, when applicable, as identification within (30) days of
return authorization date. DO NOT return products to our factory without our prior consent, as they, as well as C.O.D. shipments will be refused.
American Biophysics Corp., at its option, shall replace the unit, replace the defective part(s) and return such unit to you. American Biophysics Corp.’s
sole obligation and your exclusive remedy under this warranty shall be limited to such replacement.
LIMITATIONS AND EXCLUSIONS: The warranty shall not apply to problems arising from normal wear, or failure to adhere to the enclosed instructions.
In addition, the foregoing warranty shall not apply to serial numbered products if the serial number has been removed or defaced; products subject to
negligence, accident, improper operation, maintenance or storage; products damaged by circumstances beyond American Biophysics Corp.’s control; or products modified (including, but not limited to modifications through the use of unauthorized parts or attachments) or repaired by anyone other
than American Biophysics Corp. or its designee.
THE FOREGOING WARRANTY IS EXCLUSIVE AND IN LIEU OF ALL OTHER WARRANTIES, EXPRESS OR IMPLIED, INCLUDING WITHOUT LIMITATION
THE IMPLIED WARRANTIES OF MERCHANTABILITY AND FITNESS FOR A PARTICULAR PURPOSE. IT SHALL NOT EXTEND BEYOND THE DURATION
OF THE EXPRESS WARRANTY PROVIDED HEREIN, AND THE REMEDY FOR VIOLATIONS OF ANY WARRANTY SHALL BE LIMITED TO REPAIR OR
REPLACEMENT OF THE DEFECTIVE PRODUCT PURSUANT TO THE TERMS CONTAINED HEREIN. AMERICAN BIOPHYSICS CORP. SHALL NOT BE
LIABLE FOR ANY CONSEQUENTIAL OR INCIDENTAL DAMAGES WHATSOEVER.
This warranty gives you specific legal rights and you may also have other legal rights which may vary based on location.
15
Email Address
1. How did you find out about the Mosquito Magnet (check all that apply)?
Radio Ad
Direct Mail
TV Ad
Friend/Family
Website
Magazine Ad
Newspaper Ad
News Article (newspaper, magazine, TV, etc.)
Frontgate
In-Store Display
Other
NECESSARY INFORMATION
IN ORDER TO PROPERLY
REGISTER YOUR PRODUCT
WITH AMERICAN BIOPHYSICS
CORPORATION, THE FOLLOWING INFORMATION IS
REQUIRED.
4. Are there any children in your household?
Yes
No
5. What are the two most important reasons influencing this purchase?
Protection from disease
Science/technology behind product
Recommendation of friend/family member
Recommendation of salesperson
Reputation of quality
Comfort
Received as gift
Other
DETACH HERE BEFORE MAILING
For warranty service, please contact American Biophysics Technical Center (877-699-8727). Please indicate the nature of the defect.
Phone Number
3. What is your marital status?
Married
Single
LIMITED WARRANTY
American Biophysics Corp. warrants its products to be free from defects in materials and workmanship for the warranty period by the original purchaser/user.
Country
2. In your household who decided to purchase the Mosquito Magnet?
Male
Female
Both
If you should experience
an Operation Code
Problem, please contact
our Technical Support
Hotline at 1-877-699-8727
or visit our website at:
www.mosquitomagnet.com.
This warranty, (1) year from the purchase of the unit, is extended only to the original purchaser/user of products.
Zip Code
6.
7.
What is your age?
25-35
36-45
46-55
56-70
What is your level of education?
High School Diploma
College Degree
Serial Number:
Date of purchase:
Place of purchase:
70+
Graduate Degree
8. Which best describes the size of your yard?
1/4-1/2 acre
1/2-3/4 acre
3/4-1 acre
9. What is your annual income?
$25,000-40,000
$40,000-60,000
Type of unit:
Doctoral Degree
Technical/Professional
1-2 acres
$60,000-90,000
Over $90,000
10. What other brands of insect abatement have you tried?
Zappers
Sprays
Pesticides
Other CO2 Traps Name
11. Would you consider giving a testimonial once you are thoroughly convinced of the effectiveness of the Mosquito Magnet?
Yes
No
12. Would you recommend the Mosquito Magnet to a friend?
Yes
No
13. Were the assembly directions and operation instructions explained clearly and simply?
Yes
No
14. Did you require customer service?
Yes
No
16
Consumer Confidentiality
All of the information that has been gathered on this reply card
is solely for the internal sales and marketing efforts of American
Biophysics Corporation. None of the information that you may
have provided will be sold, rented or leased to any other
company, organization or agency for any purpose whatsoever.
None of this information will be posted on our company website
or any other vehicle that can be obtained by the public domain.
If you wish to make additional comments or testimonials about
our product, please address them separately and send them to
our Marketing Department at the address listed inside the
manual.