1
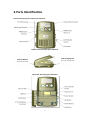
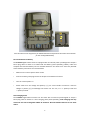
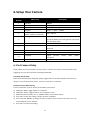
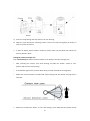
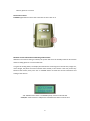
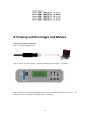
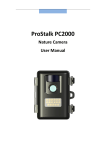
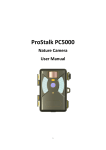
ProStalk Nature Camera PC3000IR User Manual 1 Index 1. Introduction ............................................................................................................... 3 2. ProStalk Specifications .............................................................................................. 4 3. Parts Identification..................................................................................................... 5 4. Packing Contents ....................................................................................................... 6 5. Battery and SD Card Installation................................................................................ 7 6. Setup Your Camera .................................................................................................. 10 6.1 Set Camera Delay ..................................................................................................... 10 6.2 Set Camera State...................................................................................................... 11 6.3 Set Date, Year and Time........................................................................................... 11 6.4 Set Image Resolution................................................................................................ 12 6.5 Set Movie Length ..................................................................................................... 12 6.6 Turn on/Turn off the IR Flash ................................................................................... 12 6.7 Set Camera Duty Time.............................................................................................. 13 6.8 Setup User Information............................................................................................ 13 6.9 Setup or Clear Password .......................................................................................... 14 6.10 Change the Menu Language .................................................................................... 14 6.11 Setting the Day Time ................................................................................................ 15 7. Using the Camera..................................................................................................... 16 8. Viewing and the Images and Movies ....................................................................... 19 9. Glossary.................................................................................................................... 21 2 1. Introduction Congratulations on your purchase of the ProStalk Digital Scouting Camera. This weatherproof and rugged trail camera is designed to record the activity of wildlife game in the outdoors with its still image and movie modes. Main Features: True 3.0 MP High Quality Full Color Photos Date and Time imprint on Each Photos Built-in Microphone 10~90 seconds Adjustable Video Recording with Voice Fast trigger speed -Motion Activated with 2 PIRs to Increase the View Angle 2x8 LCD Display with Backlight 7days 24hr Scouting Burst mode – up to 3 images in at a time Night Vision Supported with Powerful IR (36 infrared LEDs) Flash Easy Toggle Switch System Flexible Image Delay Setting Moon Phase Imprint User Information Imprint (Name, Location etc) Password Protection SD Card Slot (2GB card supplied) Low Battery Indicator Weatherproof and Rugged ABS Case Can be locked with padlock Support both Solar Power and 6V External Battery 3 2. ProStalk Specifications Model Member PC3000IR Image Sensor 1/2" Color CMOS sensor with 3.0 million effective pixel Lens Focusing PIR Sensor F/2.8, effective focal length 8mm. Sight range: 52 degrees Multi-layer glass lens with coating 3 meter - Infinity 2 * PIR; Low noise, high sensitivity passive infrared sensor. Range: 15 meters; Angle 48 degrees Memory SD Card up to 2GB Working LED Indicator Yes Low Battery Indicator Yes 36 Infrared LEDs IR Flash Auto/Off Infrared LED strobe control Infrared Range – 16 meters IR Filter Display Yes. It will automatically switch by the day time and night time. From 6:00 ~ 18:00 will be the day time, 18:00 to the second day of 6:00 will be the night time. 2*8 dot matrix LCD display with back light Standard JPEG: 2048x1536 (3.1MP); 1280*1024 (1.3MP); 640x480 (0.35MP) File Format Movie: AVI 320x 240 pixels per frame with voice (10~90 seconds adjustable, 15 seconds by default). DCF version 1.0 file management. Date Time Imprint Yes Moon Phase Imprint Yes User Information Imprint Yes. User can input the name, telephone and camera location (Max 16 characters) Built-in Microphone Yes Exposure Auto White Balance Auto 4*D Cell Battery Power Supply Optional: External 6V Lead Acid Battery (sold separately) External solar charging panel with D Cell re-chargeable battery (sold separately) Approximately 30 days (w/standard alkaline batteries). Or ≥6 mo. using solar panel with NiMh Battery Life rechargeable batteries. (actual battery life will vary with temperature, camera activity and IR Flash usage) Password Protection 6 digits Password Interface Type USB 1.0 4 3. Parts Identification Front housing image with major parts indication Bottom view with major parts indication Solar Charging Jack External Battery Solar panel sold separately Battery sold separately Open view with major parts indication 5 4. Packing Contents • ProStalk Digital Scouting Camera • User Manual • USB cable • Mounting Kit • 2GB SD Card 6 5. Battery and SD Card Installation Warning: Do not use different Voltage lead acid battery and solar charging panel other than the one specified in this section. Doing so will damage the camera and will void the warranty. Notice: Our system optimizes the power system for rechargeable and alkaline battery. Make sure to put the battery selection switch to the right position according to the type of the battery you use. Model ProStalk Digital Nature Camera operates using 1. 4*D Cell Battery 2. External 6V Lead Acid Battery 3. External solar charging panel with D Cell re-chargeable battery NOTE: Always have camera in OFF position when installing or removing batteries. D cell Battery (not supplied) The internal battery compartment accepts either rechargeable or alkaline 4 D cell batteries. Be sure to use high quality brand name alkaline batteries. Install batteries in correct polarity (+/-) as noted inside battery compartment. ▲ When the camera has detected low batteries, the camera unit will power off automatically and the working indicator will blink. Please replace with new batteries. ▲ Important note. In order to maximize the battery life, our system optimizes the power system for rechargeable and alkaline battery. We have a switch for this option, which is built at the bottom of the battery container. 7 Push the switch to the top position for alkaline batteries and pull down the switch to the bottom for the rechargeable battery 6V Lead Acid External Battery The ProStalk Digital Nature Camera is equipped with an external power jack designed to accept a barrel plug cable to attach to a sealed lead acid battery (Sold separately). Battery cable and complete 6V Lead Acid battery kits are available wherever the cameras are sold. Only ProStalk external battery accessories are recommended. • Make sure the camera power switch is OFF. • Insert the battery pack plug into the DC 6V jack of the bottom of camera. • Turn the camera power on. • Please make sure the voltage and polarity (+/-) are correct before connection. Incorrect voltage or polarity (+/-) will damage the camera. For our unit, it is “+” polarity inside and “-“polarity outside. Solar Charging Panel The ProStalk Digital Nature Camera can also work with an external jack designed to accept a barrel plug cable to attach to a solar charging panel (Sold separately). Solar Charging will only work with 4*D Cell rechargeable NiMh “D” batteries. Normal Alkaline batteries do not work with it. 8 Solar Charging Panel and D Cell NiMh Rechargeable Battery • Make the solar panel to be positioned facing UPWARD, to collect solar energy to power rechargeable NiMh “D” batteries (sold separately) installed in the camera. • Insert the solar charging plug into the solar charging jack of the bottom of camera housing • Please make sure the voltage and polarity (+/-) are correct before connection. Incorrect voltage or polarity (+/-) will damage the camera. Make sure using the solar panel supplied from the authorised dealer. Memory Your ProStalk Digital Nature Camera works with an expendable media card slot capable accepting up to 2GB SD card (supplied). Inserting SD card Make sure camera is in the OFF position whenever adding or removing memory. • Insert SD memory card in to the SD card slot completely and in the correct direction as shown by the sticker located at the side of the housing. • To remove the SD memory card, depress the SD card and pull out the card gently. ▲ SD cards must be clean (no images from other sources), if you are using the SD card from other cameras, please make sure to format the SD card prior use in the camera. New cards are good to use straight from the package. 9 6. Setup Your Camera Menu Serial Number Menu Item Description 1 Set Date MM/DD 2 Set Year YYYY 3 Set Time HH:MM (24H military time format). 4 Img Size 3.1MP, 1.3MP, 0.35MP 5 Delay (Only displays when " Delay" switch at "customize" 1min~60mins M Length Adjust the movie length (10~90 seconds). 15 seconds by default. This setting will be memorised even losing the power. IR Flash Auto; Off DutyTime All Time; day (6:00~18:00); night (18:00~6:00); Customize 9 UserInfo Max 16 characters 10 Password 6 digits Language English, German, Portuguese. Day Time 06—18 (day time—night time) 6 7 8 11 12 France, Spain, Italian, 6.1 Set Camera Delay Camera Delay is to set the amount of preset time in minutes the camera will sleep between PIR triggering. User can have two kinds of settings listed below. Frequently Used Setting Select the Camera Delay by sliding the “Delay” toggle switch to the desired preset time interval in minutes. User can select 1mins, 5mins, 15 mins or even select “customize”. Customize Camera Delay Setting If select “customize”, user can set the Camera Delay in the menu. a) Sliding the “Delay” toggle switch to “customize” b) Sliding the “Power” toggle switch to “On” and then to “Set” c) Rotate the menu items by “UP” or “DOWN” button, until it shows “Delay” d) Press “OK” to enter the setting. It shows “30 mins” by default. e) Press “UP” and “DOWN” to change the value, and press “OK” to confirm the value. User can choose between 1 min ~ 60mins. f) Press “OK” to confirm the setting. 10 6.2 Set Camera State To set the number of pictures or movie the camera will take per PIR triggering. Select the Camera State by sliding the “State” toggle switch 1P: Single image capturing per PIR triggering 3P: Three images continuous capturing per PIR triggering Mov: 10~90 seconds video clip per PIR triggering (default is 15 seconds ex-factory) 6.3 Set Date, Year and Time Setting the Date, Year and Time to make them stamp in the picture. 1) Set Date a) Sliding the “Power” toggle switch to “On” then to “Set”. b) Rotate the menu items by “UP” or “DOWN” button, until it shows “Set Date” c) Press “OK” to enter the setting. It shows in “MM/DD”. d) Press “UP” and “DOWN” to change the value of the “MM-month”, and press “OK” to confirm the value and proceed to the next setting “DD-date”. e) Press “UP” and “DOWN” to change the value of the date, and press “OK” to confirm the value and proceed to the next setting “Set Year”. The year value is from 2008 to 2030. f) Press “UP” and “DOWN” to change the value of year, and press “OK” to confirm the value. 2) Set Time a) Sliding the “Power” toggle switch to “On” then to “Set” b) Rotate the menu items by “UP” or “DOWN” button, until it shows “Set Time” c) Press “OK” to enter the setting. It shows in “HH/MM” (24H military time format). d) Press “UP” and “DOWN” to change the value of “HH-hour”, and press “OK” to confirm the value and proceed to the next setting. e) Press “UP” and “DOWN” to change the value of “MM-minute”, and press “OK” to confirm the value. ▲ Date & Time setting will be lost whenever the batteries are removed from camera. Don’t forget to reset the Date & Time stamp after you replace the batteries. 6.4 Set Image Resolution The resolution the user can select is listed below. Model High Med 11 Low TC3001N a) b) c) d) 2048x1536 (3.1M) 1280*1024 (1.3M) 640x480 (0.35M) Sliding the “Power” toggle switch to “On” then to “Set” Rotate the menu items by “UP” or “DOWN” button, until it shows “Img Size” Press “OK” to enter the setting. It shows “3.1 MP” by default. Press “UP” and “DOWN” to change the value, and press “OK” to confirm the setting. 6.5 Set Movie Length ProStalk can set the movie length between 10 ~ 90 seconds. System default is 15 seconds. This setting will be memorized even losing the power. a) b) c) d) Sliding the “Power” toggle switch to “On” then to “Set” Rotate the menu items by “UP” or “DOWN” button, until it shows “M Length” Press “OK” to enter the setting. Press “UP” and “DOWN” to choose the right time length, and press “OK” to confirm the setting. 6.6 Turn on/Turn off the IR Flash The IR Flash will be automatically activated if the camera system thinks the environment light is not enough. Picture in IR Flash is in black and white. User can also choose to turn off the IR Flash. If this option is selected, the camera will not take pictures in low light environment to save the power. On the other hand, all pictures taken in this mode are colour pictures. a) b) c) d) Sliding the “Power” toggle switch to “On” then to “Set” Rotate the menu items by “UP” or “DOWN” button, until it shows “IR Flash” Press “OK” to enter the setting. Press “UP” and “DOWN” to choose between “Auto” and “Off”, and press “OK” to confirm the setting. Every time you turn off and turn on the unit, the setting will be automatically restored to “Auto”. 6.7 Set Camera Duty Time The user can make the camera work in a specific time period of the day. We call this as duty time model. By system default, the camera works 24 hours a day. 12 The Camera has four options: a) All time. The camera works 24 hours a day. b) Day. The camera works from 6:00 ~ 18:00. c) Night. The camera work from 18:00 to next day 6:00. d) Customize. User can set the camera working at any time period. Setting the Duty Time a) Sliding the “Power” toggle switch to “On” then to “Set” b) Rotate the menu items by “UP” or “DOWN” button, until it shows “DutyTime” c) Press “OK” to enter the setting. d) Press “UP” and “DOWN” to choose the “Alltime”, “Day”, “Night” and “Customiz”, press “OK” to confirm the setting. e) When come to the 4th option - “Customiz”, the display will show for example “06--18”. The first 2 digits represent the starting point and last 2 digits represent the ending point. Press the "Up" or "Down" button to set time of 24 hour clock for the start hour desired. Press “OK” to set the start time. Then, underscore will move to the second 2 digits. Press the "Up" or "Down" button to set time of 24 hour clock for the end hour desired. Press “OK” to confirm the setting. Example: 07—18 would define DAY as from 7AM to 6PM (6PM=18:00 hours on 24 hr clock). 20—04 would define DAY as from 8PM to next day 4AM (8PM=20:00 hours on 24 hr clock). 6.8 Setup User Information The camera allows user to setup the user information in the unit. This information will be stamped on each photo. For example, user can input the name, telephone and camera location to mark each photos. a) Sliding the “Power” toggle switch to “On” then to “Set” b) Rotate the menu items by “UP” or “DOWN” button, until it shows “UserInfo” c) Press “OK” to enter the setting and will display the information that set last time and the cursor will blink at the first letter. d) Press “UP” and “DOWN” to choose the first letter and press “OK” to confirm this letter and proceed to the next. The camera can display “A~Z”, “0-9”, “-“, space, “(“and “)”. The maximum length of the information is 16 characters. e) Press “OK” to confirm the setting 6.9 Setup or Clear Password a) Sliding the “Power” toggle switch to “On” then to “Set” 13 b) Rotate the menu items by “UP” or “DOWN” button, until it shows “Password” c) Press “OK” to enter into this setting. d) If you are going to set a password for this camera, then rotate the menu items by “UP” or “DOWN” button to select “Yes” and Press “OK” to enter the setting, otherwise to select “No” to clear the password. e) Press “OK” to select “Yes”. f) Press the Up or Down key to select the first password digit of 0-9. g) Press “OK” to confirm, the cursor will move to the next digit to the right. Repeat the process using “UP” or “DOWN” and “OK” button to enter your sit digit password. h) Press “OK” to confirm the setting 6.10 Change the Menu Language ProStalk Digital Nature Camera supports 6 languages. They are English, German, France, Spain, Italian, and Portuguese. a) b) c) d) Sliding the “Power” toggle switch to “Set” Rotate the menu items by “UP” or “DOWN” button, until it shows “Language” Press “OK” to enter the setting. Press “UP” and “DOWN” to choose the right language, and press “OK” to confirm the setting. 6.11 Setting the Day Time There is an automatic IR filter switch built-in the camera. In the day time, the IR filter switch will be turned off to let all visible lights come into the camera to make a full colour picture. In the night time, IR filter switch will be turned on to let all invisible infrared lights come into the camera to have a black and white picture. This setting determines this switch when to turn on and turn off. a) b) c) d) Sliding the “Power” toggle switch to “Set” Rotate the menu items by “UP” or “DOWN” button, until it shows “Day Time” Press “OK” to enter the setting. The LCD will show and underscore under the first 2 digits in the DAY TIME mode. Press the “UP” or “DOWN” keys to set time of 24 hour clock for the specific DAY TIME start hour desired. Press “OK” to set the DAY TIME start time. e) Then, underscore will move to the second 2 digits in the DAY TIME mode. Press the “UP” or “Down” keys to set time of 24 hour clock for the specific DAY TIME end hour desired. Press “OK” to set the DAY TIME end time. 14 ▲ Now your DAY TIME is defined (NIGHT is defined as the period between DAY end and start times). If you do not make your own settings for DAY, a default of 6AM~6PM is used. Example: 07—18 would define DAY as from 7AM to 6PM (6PM=18:00 hours on 24 hr clock). ▲ It’s better to observe the right time for the day and night in the camera location to get good picture quality. 7. Using the Camera Mounting the Camera It is recommended that you mount the camera 1.2~1.5 meters off the ground with the camera pointed at a slight downward angle. Be sure to avoid mounting the camera facing east or west as the rising and setting of the sun could produce false triggers and overexposed images. So as not to block the camera lens or PIR sensor, clear branches and other debris away from the front of the camera. 15 a) Insert the strap through the strap slots on the rear housing. b) Wrap the strap around the mounting surface. Secure the strap and tighten the buckle in order to secure the camera. ▲ In order to obtain proper weather resistance, please make sure that both door latches are securely locked in place. Testing the camera coverage area One of ProStalk Digital Nature Camera’s features is the ability to test the coverage area. • After mounting the camera, open front housing and slide the “Power” switch to “Set” position and close the front housing. • A red indicator light on the front will blink when you have intruded the coverage area. • Adjust the camera position as needed and repeat testing until the desired coverage area is achieved. ▲ Make sure to switch the “Power” to “On” after setting is over. Otherwise the camera will not 16 take any pictures or movies. Secure Your Camera ProStalk Digital Nature Camera has a lock hole to have a lock on it. Read the Current Information and Setting of the Camera Whenever the camera setting is finished, the system will enter the standby status for 30 seconds and then taking pictures or movies after that. In a general working status, the display will indicate the remaining size of the SD card, image size, movie length, the photo and movie number taken already in the camera if the user presses any button of the camera, then press “UP” or “DOWN” button to rotate the current information and setting of the camera. “SD: 1234M” means there is 1234 MB capacity remain on the SD card “0168/088” means there are 168 pictures and 88 movies taken in the SD card 17 If the SD card is full, it will show “FULL” on the display. “06/ 05/ 08 13:45” means June 5th 2008. “Img Size: 3.1MP” means current photo resolution setting is 3.1M. “M Length: 15s” means current movie length is 15 seconds per trigger. ▲ Whenever the camera was trigged with a capture, the system will record an event in “Event.txt” a text file which is stored in the memory. 18 8. Viewing and the Images and Movies Connect the Camera to PC directly Step 1 - Connect USB cable to PC Step 2 - Turn on Pro-Stalk Camera - The screen will display ‘Trail Camera’ - see below Step 3 - Wait for Trial camera to disappear from the LCD and attach USB cable to the camera. At this stage the screen displays SD card information - see below. 19 NB - Be sure to connect the USB cable after trail Camera LCD has been displayed, but before the camera enters capture mode - approximately 5 seconds. Read Images by Card Reader 1. Depress the SD card and pull out the card gently. 2. Put the SD card into the card reader – Not supplied. 3. Read images and movies from the card reader. 9. Glossary PIR: Passive Infrared Sensor. Senses motion like typical security motion detector. To trip the sensor to assure detection of live animals, requires infrared energy (heat) in addition to motion 20 Event: Any time the camera captures a picture it counts it as an event. Events are recorded to the SD card in a text file. Camera Delay: Time elapsed between photos while events are sensed and recorded. This is user-set based on wildlife activity in area. Resolution: The resolution selection that you have selected. MP = Mega Pixels = 1 million pixels High (2048 x 1536): 3.1M pixels image. (High image quality, big file size) Med (1280 x 1024): 1.3M pixels image. (Medium image quality, medium file size) Low (640 x 480): 0.35M pixels image (small file size) Video resolution (320 x 240): This is the resolution during video capturing. Movie Length: User can set the movie time length between 10 ~ 90 seconds. System default is 15 seconds. Duty Time: User can make the camera working in a specific time period of the day. By system default, the camera works 24 hours a day. User Information: The camera allows user to setup the user information in the unit, this information will be stamped on each photos. For example, user can input the name, telephone and camera location to mark each photos. Password: It controls the permission of using this camera. Password length is 6 digit. Moon Phase: The activities of animals are sometimes related with the moon phase. Our unit features to imprint a moon phase stamp on each photo to provide more information to the hunters. IR Flash: Also called IR LED Array. This is especially useful for night photos when a visible flash is undesirable. The Infrared LED Night Vision feature emits a burst of infrared light which is invisible to the human eye. It can be turned off to saving the power in the menu. SD Card: Memory card used to store images and events. The camera is compatible with up to 2GB capacity SD cards. Battery Life: Time that camera will function in the field. This is dependent on temperature, number of images and number of flashes during that time. Burst: To set the number of pictures the camera will take per PIR triggering 1P: Single image capturing per PIR triggering 3P: Three images continuous capturing per PIR triggering FULL: When memory capacity is full, this front LCD screen will show “FULL” 21 ProStalk Product Warranty Your new product has a 12 month warranty against defects in material and/or workmanship provided that the unit has not been abused, used incorrectly, taken apart or serviced by any party other than Deben Group Industries Ltd. This warranty does not cover failure from fair wear and tear This warranty is limited to the original purchaser and is not transferable. Your receipt of purchase should accompany any warranty claim. No guarantee can be given if dated proof of purchase is not supplied. Should any original defect appear, package the unit and return prepaid to the Service Manager at the address of your ProStalk distributor, for repair or replacement at the option of the guarantor. The name, address and telephone number of the sender must be included in the package along with details explaining the defect found. This guarantee is in addition to and does not affect any rights, which the consumer may have by virtue of the sale of goods act. Deben Group Industries Ltd, Avocet House, Wilford Bridge Rd, Melton, Suffolk, IP12 1RB, UK www.deben.com 22