1
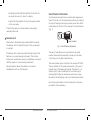
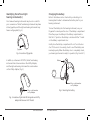
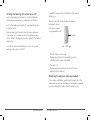
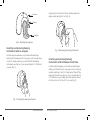
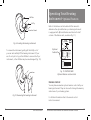
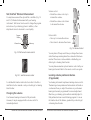
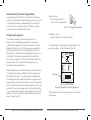
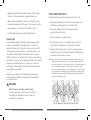
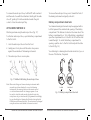
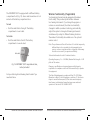
Behind-the-Ear
Hearing Instruments
User Manual
Thank you for purchasing a Siemens Hearing Instrument.
Siemens Hearing Instruments are designed to achieve the
highest in quality and reliability. We are sure that you will
be very pleased with our product.
If this Hearing Instrument is being purchased for an infant or
young child, please confirm with your Audiologist or Hearing
Care Provider that it is recommended for this purpose and to
ensure appropriate supervision and use of the product.
Hearing Aid Information
Serial Number:
Left: Right:
Battery Size:
Left: Right:
Purchase Date:
Left: Right:
Dispenser Info stamped here
Table of Contents
Getting Started
Your hearing instruments . . . . . . . . . . . . . . . . . . . . . . . . . . 4
Safety information . . . . . . . . . . . . . . . . . . . . . . . . . . . . . . . 4
Feature card . . . . . . . . . . . . . . . . . . . . . . . . . . . . . . . . . . . . 6
Identification information . . . . . . . . . . . . . . . . . . . . . . . . . . 7
Identifying the left and right hearing instrument(s) . . . . . 8
Changing the battery . . . . . . . . . . . . . . . . . . . . . . . . . . . . . 9
Battery tips . . . . . . . . . . . . . . . . . . . . . . . . . . . . . . . . . . . . 10
Using the eCharger . . . . . . . . . . . . . . . . . . . . . . . . . . . . . . 11
Turning the hearing instrument on or off . . . . . . . . . . . . 12
Attaching the earpiece . . . . . . . . . . . . . . . . . . . . . . . . . . . 13
Inserting and removing hearing
instrument with an earpiece . . . . . . . . . . . . . . . . . . . . . . 14
Inserting and removing the hearing
instrument with Life Tube or S-Life Tube . . . . . . . . . . . . 15
Operating Your Hearing InstrumentOptional Features
Operating Your Hearing InstrumentProgrammable Features
Wireless functionality . . . . . . . . . . . . . . . . . . . . . . . . . . . . 29
Push button on/off . . . . . . . . . . . . . . . . . . . . . . . . . . . . . . 31
Power on delay . . . . . . . . . . . . . . . . . . . . . . . . . . . . . . . . . 31
Low battery indicator . . . . . . . . . . . . . . . . . . . . . . . . . . . . 31
Volume control alert tones . . . . . . . . . . . . . . . . . . . . . . . 32
Program change alert tones . . . . . . . . . . . . . . . . . . . . . . . 32
Listening Tips . . . . . . . . . . . . . . . . . . . . . . . . . . 33
Maintenance and Care . . . . . . . . . . . . . . . . . . 35
Performance Checklist . . . . . . . . . . . . . . . . . . 37
Health Considerations . . . . . . . . . . . . . . . . . . 38
Important Notices . . . . . . . . . . . . . . . . . . . . . . 39
Warranty and Service . . . . . . . . . . . . . . . . . . . 43
Remote Control . . . . . . . . . . . . . . . . . . . . . . . . . . . . . . . . . 17
Tek®/miniTek™ . . . . . . . . . . . . . . . . . . . . . . . . . . . . . . . . . . 18
Changing the volume . . . . . . . . . . . . . . . . . . . . . . . . . . . . 18
Learning volume preference feature . . . . . . . . . . . . . . . . 19
SoundLearning® feature . . . . . . . . . . . . . . . . . . . . . . . . . . 20
Changing the program . . . . . . . . . . . . . . . . . . . . . . . . . . . 20
Directional microphone system . . . . . . . . . . . . . . . . . . . . 22
Telecoil . . . . . . . . . . . . . . . . . . . . . . . . . . . . . . . . . . . . . . . 22
AutoPhone®/Autophone magnet accessory . . . . . . . . . . . 23
Audio input . . . . . . . . . . . . . . . . . . . . . . . . . . . . . . . . . . . . 24
Battery compartment door lock . . . . . . . . . . . . . . . . . . . . 27
2
TABLE OF CONTENTS
TABLE OF CONTENTS
3
Getting Started
• Ensure appropriate supervision when your child is
wearing the hearing instruments.
Your hearing instruments
By wearing your hearing instruments you may once again
enjoy the sounds of the environment and conversation
with your family and friends. Your decision to purchase
hearing instruments manufactured by Siemens reflects
the importance you place on quality and reliability.
Your Siemens Behind-the-Ear (BTE) hearing instruments
are designed for comfort, performance and durability. They
should fit comfortably behind your ears and are attached to
custom-made earpieces or flexible LifeTubes and LifeTips.
• Check the integrity of the hearing instruments regularly.
• Ensure that your child does not detach the hearing
instrument from the ear mold.
• Consult your Audiologist or Hearing Care Provider if
the housing is deformed.
• Keep the battery compartment locked. Verify the proper function of the locking mechanism.
WARNING
Please read this manual carefully to benefit from all the
features of your new hearing system.
Risk in explosive environments, e.g., mining areas
Safety information
• Don’t use your hearing instruments (and remote control)
in areas where there is danger of explosions.
WARNING
Please read this manual carefully to benefit from all the
features of your new hearing system.
Choking hazard posed by small parts.
• Keep hearing instruments, batteries and accessories out
of children’s reach.
• If swallowed consult a physician or hospital immediately.
• If infants, small children or mentally disabled persons need to wear hearing instruments ensure adequate
supervision.
Caution
Risk of injury caused by incorrect use of Life Tip
• Always wear the Life Tube with the Life Tip.
• Make sure that the Life Tip is completely attached
to the Life Tip adapter.
• Change the Life Tube or Life Tip when they are cracked.
4
GETTING STARTED
GETTING STARTED
5
• Carefully insert the Life Tube with the Life Tip into the
ear canal. Be sure not to insert too deeply.
• Use the Life Tube and the Life Tip in the way described
in this user guide.
If the Life Tip remains in the ear, have it removed by a
medical professional.
Identification information
Your hearing instruments have a serial number engraved on
them. The location of the serial number will vary according to
the style of hearing instrument you have chosen. Record the
serial number in the front of this manual for future reference
(Fig. 1).
t
AY12345
Feature card
Serial number
Please refer to the feature card included with this manual.
The feature card is located at the back of this user manual
in a pocket.
The feature card contains important information about the
features in your new hearing instruments. This includes
battery size, serial number location, and features associated
with the operation of your hearing instruments.
More information about these features is located in
the Operation section of this manual.
Fig. 1: Identification information
The year of manufacture is incorporated into the serial
number. Please note the warranty is based upon the date
of purchase, not the date of manufacture.
The serial number may look similar to this sample: AY12345.
The second letter of this serial number refers to the year of
manufacture of the hearing instrument. The letters Y or A
indicate a 2011 year of manufacture. Your Audiologist or
Hearing Care Provider can answer any questions you may
have about the identifying code on your hearing instrument.
Record the serial numbers of each instrument in the space
provided for future reference.
6
GETTING STARTED
GETTING STARTED
7
Changing the battery
Identifying the left and right
hearing instrument(s)
Your Siemens hearing instruments may be color-coded for
your convenience. The left ear hearing instrument may have
a blue typeplate, and the right ear hearing instrument may
have a red typeplate (Fig. 2).
Refer to the feature card or check with your Audiologist or
Hearing Care Provider to determine the battery size for your
hearing instrument.
To insert the battery into the hearing instrument, use your
fingernail to swivel open the door of the battery compartment.
Place the proper size battery in the battery compartment so
that the “+” symbol on the battery coincides with the “+” mark
on the battery compartment door.
Gently close the battery compartment. Do not force the door
shut. If it does not close easily, check to see if the battery was
inserted properly. When the battery door is completely closed,
your hearing instrument is ready for operation (Fig. 4 and 4.1).
Typeplate
Fig. 2: Location of Typeplate
In addition, on Siemens Life™ BTEs, the left ear hearing
instrument has a blue number on the LifeTip Adapter,
and the right ear hearing instrument has a red number
on the LifeTip Adapter (Fig. 3).
Battery
+
Color-coded number
on Tip Adapter
Color-coded number
on Tip Adapter
Fig. 4: Inserting the battery
Fig. 3: Location of right and left designator on LifeTip
adapter for Siemens Life™ Product
8
GETTING STARTED
GETTING STARTED
9
Using the eCharger
If you have the optional charger, refer to the charger
instruction manual for operating instructions. Use only
the rechargeable batteries delivered with the charger or
available through your Audiologist or Hearing Care Provider.
The lifetime of a rechargeable battery is approximately one
year, depending on individual use.
CENTRA
Life the battery
Fig. 4.1:
Inserting
Your hearing instrument may be programmed to inform you
when the battery should be replaced.
NOTE: D
o not attempt to charge standard,
non-rechargeable batteries!
Refer to the low battery indicator information in the Operation
section (page 31) of this manual for further information.
NOTE: The hearing instrument must be turned off then on after
removing from the charger. This is required to turn the
instrument on.
Battery tips
• If a battery is accidentally swallowed, seek medical attention immediately, or call the National Battery Hotline collect at (202) 625-3333. Quebec residents, call le Centre Antipoison at (800) 463-5060.
• Always use the recommended battery size for your hearing instrument. The battery size information for your hearing instrument is located on the feature card.
• Remove the battery from your instruments when not in use. This prevents possible damage from expansion or leakage of the battery, if the instruments are not fully turned off.
• Always carry spare batteries in the event that your current battery goes dead. Place each spare battery in an individual, non-metallic container to prevent contact with other
batteries or metal objects, such as keys or coins.
Fig. 4.2: eCharger
• Follow your local recycling rules for battery disposal.
10 =
GETTING STARTED
GETTING STARTED
11
Turning the hearing instrument on or off
To turn the hearing instrument on, insert a battery into
the hearing instrument and completely close the door.
To turn the hearing instrument off, open the battery door
to the first catch.
Siemens hearing instruments may also be programmed
to allow you to turn them on and off using the program
button. Refer to the Operation section (page 31) for further
information.
Some BTE’s may also have a LED light (Fig.5) near the
battery door.
The LED (optional) shows whether the hearing
instruments are on.
LED can be covered
or programmed on/off
LED light
You can also use an optional remote control to turn the
hearing instruments on and off.
Fig. 5: LED light
• The LED shines continuously.
The hearing instruments are switched on and
sufficient battery power is available.
• The LED is off.
The hearing instruments are switched off or the
battery must be replaced.
Attaching the earpiece (where provided)
If your earpiece detaches, gently insert the earhook of the
hearing instrument into the tubing of the earpiece supplied
by your Audiologist or Hearing Care Provider (Fig. 6).
12
GETTING STARTED
GETTING STARTED
13
Earhook
Lightly push on the back of the ear to help release the
earpiece and gently pull it out (Fig. 8).
Tubing
Earpiece
Fig. 6: Attaching the earpiece
Inserting and removing hearing
instruments with an earpiece
Fig. 8: Removing the hearing instrument
Hold the earpiece between your thumb and index finger.
Gently work the earpiece into its proper position by adjusting
it until it is firmly seated in your ear. Then lift the hearing
instrument over the top of your ear and adjust it to fit behind
your ear (Fig. 7).
Inserting and removing hearing
instruments with LifeTube or S-Life Tube
Hold the LifeTip between your thumb and index finger.
Gently work the LifeTip into its proper position in the ear
canal by adjusting it until it is firmly seated. Then lift the
hearing instrument over the top of your ear and adjust it
to fit behind your ear. Finally, place the retention strand
into the bottom of the ‘bowl’’ of your ear (Fig. 9).
Fig. 7: Inserting the hearing instrument
14
GETTING STARTED
GETTING STARTED
15
LifeTube
LifeTip
Retention Strand
Operating Your Hearing
Instrument–Optional Features
Refer to the feature card included with this manual to
determine the optional features your hearing instrument
is equipped with. Optional features are listed on the left
column of the feature card, see below (Fig. 11):
HEARING
INSTRUMENT
Use the
type of
battery
shown
below
Fig. 9: Inserting the hearing instrument
FEATURE
CARD
Microphones
Earhook
Volume control
wheel
To remove the instrument, gently pull the LifeTip out of
your ear and carefully lift the hearing instrument off your
ear. Do not pull or tug on the LifeTube to remove the Tip or
instrument, or the LifeTube may become damaged (Fig. 10).
Battery
compartment
door
Optional
Features
OPTIONAL FEATURES
Volume control
Learning volume control
Program button
Directional microphone
Telecoil
AutoPhone®
Audio input
Battery compartment door lock
ePocket® remote control
Audio
input
PROGRAMMABLE
FEATURES
e2e wireless®
Push button on/off
Power on delay
Low battery indicator
Volume control
alert tones
Program change
alert tones
PROGRAMS
Program number
Listening environment
1
2
3
4
Refer to the BTE User Manual for information on
Optional Features and Programmable Features.
Fig. 11: FEATURE CARD
Optional features section circled
Remote Control
You may have received an optional remote control with your
hearing instrument. They can be used to change the memory
and volume of your hearing system.
Fig. 10: Removing the hearing instrument
16
GETTING STARTED
For further information refer to the remote control
instruction manual.
OPERATING YOUR HEARING INSTRUMENT-OPTIONAL FEATURES
17
Tek®/miniTek™ Wireless Enhancement
You may have received the optional Tek or miniTek™ (Fig. 12
and 12.1) Wireless Enhancement with your hearing
instrument. Tek Connect can be used to change the program
and volume of your hearing system. In addition, other
adjustments can also be made to sound quality.
Program
Buttons
P1
Volume down
2
• Rotate the volume control down
to decrease the volume.
Rocker switch
• Press up to increase the volume.
MICRORIC TEK
P3
Volume control
• Rotate the volume control up to
increase the volume.
P2
P4
P5
Volume up
• Press down to decrease the volume.
Fig. 13: Volume Control
Fig. 12: Tek Connect remote control
You may hear soft beeps each time you change the volume
and a three beep warning when the volume limit has been
reached. These tones can be enabled or disabled by your
Audiologist or Hearing Care Provider.
You may have received an optional remote control with your
hearing instrument. Refer to the remote control user guide.
Fig. 12.1: miniTek remote control
For detailed information and instructions refer to the Tek or
miniTek instruction manual or ask your Audiologist or Hearing
Care Provider.
Changing the volume
Your Siemens hearing instrument is fully automatic.
However, it may be equipped with a volume control for
manual adjustment.
18
OPERATING YOUR HEARING INSTRUMENT-OPTIONAL FEATURES
Learning volume preference feature
(if applicable)
You hearing instrument may have a learning volume control.
The learning volume preference feature retains information
on when and how you adjust the volume on your Siemens
hearing instruments programmed for manual adjustment.
Over time, your hearing system will automatically adjust to
that preferred volume in each listening program. For more
information about this feature, speak with your Audiologist
or Hearing Care Provider.
OPERATING YOUR HEARING INSTRUMENT-OPTIONAL FEATURES
19
SoundLearning® feature (if applicable)
SoundLearning allows all the functionality of the learning
volume control preference feature above and also retains your
sound quality preferences independently for loud and soft
sounds. For more information about this feature, speak to
your Audiologist or Hearing Care Provider.
Changing the program
Your Siemens hearing instrument may have up to 5
memories, also called hearing programs. Each program
is different and designed to help you hear better in specific
listening situations. Four of the five programs are selected
with the program button of your hearing instrument. The
fifth memory is activated automatically when an audio shoe
is attached to the hearing instrument (refer to the “Audio
Input” section, page 23). For Siemens Explorer® and Motion®,
when an audio shoe is attached all 5 programs can be
accessed via the program button.
When initially turned on (after the battery compartment door
is closed), the microphone is ON and ready for general use.
The default is Program 1. Your Audiologist or Hearing Care
Provider will provide you with the number of programs most
appropriate for your needs. Each time you press the program
button on the instrument, the instrument changes to the next
program. The program change may be confirmed by alerting
tones or beeps that correlate to the program you are in. That
means if you select Program 3, then the hearing instrument
beeps 3 times (Fig. 14).
20
OPERATING YOUR HEARING INSTRUMENT-OPTIONAL FEATURES
Via push button
• Press the push button to
switch to the next program.
Fig. 14: Changing the Program
Via remote control
• Refer to the remote control user guide.
Your Audiologist or Hearing Care Provider may list your
personal programs on the feature card (Fig. 15).
HEARING
INSTRUMENT
Use the
type of
battery
shown
below
FEATURE
CARD
Microphones
Earhook
Volume control
wheel
Battery
compartment
door
OPTIONAL FEATURES
Volume control
Learning volume control
Program button
Directional microphone
Telecoil
AutoPhone®
Audio input
Battery compartment door lock
ePocket® remote control
Audio
input
PROGRAMMABLE
FEATURES
e2e wireless®
Push button on/off
Power on delay
Low battery indicator
Volume control
alert tones
Program change
alert tones
PROGRAMS
Programs
Program number
Listening environment
1
2
3
4
Refer to the BTE User Manual for information on
Optional Features and Programmable Features.
Fig. 15: FEATURE CARD
Program information section highlighted
The optional remote control can also be used to change
the program.
OPERATING YOUR HEARING INSTRUMENT-OPTIONAL FEATURES
21
Directional microphone system
AutoPhone®
According to your hearing needs, your Siemens hearing
instrument may be adjusted to focus on sounds in front of
you (directional mode) for when you are having a face-to-face
conversation in a noisy environment. The hearing system may
also be adjusted for when you are in more quiet environments
and want to hear the sounds around you (omnidirectional).
Your Audiologist or Hearing Care Provider may program the
operation of the directional microphone system to function
automatically or in conjunction with the program button or
remote control based on your particular hearing requirements.
The AutoPhone option allows the telecoil to automatically
engage when a “hearing aid compatible” telephone handset
is brought close to the hearing instrument.
Telecoil
Your Siemens hearing instrument may be equipped with a
T-coil (telecoil) for telephone use. It may be programmed to
work in a specific listening program in conjunction with the
program button. In the T-coil mode, place the telephone
receiver close to your hearing instrument for best reception.
By trying various positions of the telephone receiver, you
will discover what works best for you. Your Audiologist or
Hearing Care Provider can advise you on the proper use of
the T-coil.
Note: In order for the telecoil to function properly, your telephone must be “hearing aid compatible”. Check your telephone’s
instruction manual to find out whether your phone has
this capability.
To operate, bring the telephone handset close to the hearing
instrument. The telecoil will automatically engage to the
presence of the electromagnetic signal from the telephone.
When you are finished speaking on the phone, move the
handset away from the hearing instrument and the
microphone mode will re-establish itself.
AutoPhone magnet accessory
There is an AutoPhone magnet accessory available for your
telephone that can be used with the AutoPhone feature of
your hearing instrument. Ask your Audiologist or Hearing Care
Provider about this accessory and if it is appropriate for your
individual hearing care needs.
You must use the original magnet provided with your hearing
instrument. Using other magnets may cause irreversible
damage to the electronics of your hearing instrument.
Note : When magnets are properly cared for, they are safe to use
and can last a lifetime. However, the following guidelines
should be followed while using these magnets.
• Magnets can pose risks to electronics and magnetic storage
media when placed in close proximity.
• Be careful not to place magnets near computers, color
monitors, television sets, floppy disks, video/audio tape,
and other electronic equipment.
22
OPERATING YOUR HEARING INSTRUMENT-OPTIONAL FEATURES
OPERATING YOUR HEARING INSTRUMENT-OPTIONAL FEATURES
23
•Magnets may interfere with the operation of life support systems, such as pacemakers, magnetic valves, etc.
• Make certain to maintain a distance of at least 4 inches
between the magnet and the area of your support system.
• Keep magnets out of the reach of children or pets.
• If accidentally swallowed, seek medical attention.
Audio input
Your Siemens hearing instruments may be equipped with
audio input capability. This enables you to connect your
hearing instruments to other audio sources such as an FM
system, tape recorder, television, or infrared system. It can
be useful for adults in difficult listening situations and for
children in classrooms. Because the sound is coming directly
from the sound source to the hearing instrument, the signal is
clearer and unaffected by poor room acoustics. Ask your
Audiologist or Hearing Care Provider if this feature may be
appropriate for your needs.
There are two methods for attaching and removing the
audio input shoe. Refer to the next page for the method
you should follow.
ATTACHMENT METHOD 1:
Attaching and removing the audio input shoe (Fig. 16):
1. Using the fingernail of your thumb or index finger, open
the battery compartment door to the first catch.
2. Using your fingernail, lift up the audio input flap,
exposing the gold contacts.
3. Close the battery compartment door.
4. Place the gold contacts of the audio input shoe on the
gold contacts under the audio input flap on the BTE.
5. Gently push the audio input shoe into place by pressing
the audio input shoe toward the underside of the hearing instrument until it snaps into place.
Note: When controlling your Siemens hearing instruments with an
audio input shoe attached to one or both hearing instruments,
the memory button on the remote control or on the instruments
will not change programs. It can be used to select the audio
mode only (audio input only, microphone only, or mixed mode)
if programmed accordingly by your Audiologist or Hearing Care
Provider. The volume can be changed using the volume control
wheel or the remote control.
WARNING
Risk of injuries caused by electric shock!
Connect audio input only to devices conform to
IEC 60065 (IEC-Standard for audio, video and
other electronic devices).
Fig. 16: Method 1-Attaching the audio shoe
24
OPERATING YOUR HEARING INSTRUMENT-OPTIONAL FEATURES
OPERATING YOUR HEARING INSTRUMENT-OPTIONAL FEATURES
25
To remove the audio input shoe, hold the BTE with one hand
and the audio shoe with the other hand. Gently pull the audio
shoe off, guiding it from the underside towards the gold
contacts. Close the audio input flap.
ATTACHMENT METHOD 2:
Attaching and removing the audio input shoe (Fig. 17):
To attach an audio input shoe, open the battery compartment
to the first catch.
1. Hook the audio input shoe in from the front.
2. Gently press it into place until the audio shoe presses
against the underside of the hearing instrument.
3. The audio input shoe is now in place.
To remove the audio input shoe, press it toward the front of
the hearing instrument and gently unhook it.
Battery compartment door lock
Your Siemens hearing instruments may be equipped with a
lock that prevents the unintentional opening of the battery
compartment. This feature is located on the inner side of the
battery compartment door. To lock the battery compartment,
open the compartment door to the first catch. Push the slide
toward the right. To unlock the battery compartment for
opening, open the door to the first catch and push the slide
to the left (Fig. 18).
Your Audiologist or Hearing Care Provider can instruct you on
the use of this feature, if required.
Fig. 17: Method 2-Attaching the audio input shoe
Note: When controlling your Siemens hearing instruments with
an audio input shoe attached to one or both hearing
instruments, the memory button on the remote control
or on the instruments will not change programs. It can
be used to select the audio mode only (audio input only,
microphone only, or mixed mode) if programmed accordingly
by your Audiologist or Hearing Care Provider (not applicable for Motion and Siemens Explorer). The volume can be changed using the volume control wheel or the remote control.
26
OPERATING YOUR HEARING INSTRUMENT-OPTIONAL FEATURES
Locked
Unlocked
Fig. 18: Battery compartment door lock
OPERATING YOUR HEARING INSTRUMENT-OPTIONAL FEATURES
27
The EXPLORER® 500 P is equipped with a different battery
compartment lock (Fig. 19). Use a small screw driver to lock
and unlock the battery compartment door.
To Lock
• Push the small slide to the right. The battery
compartment is now locked.
To Unlock
• Push the small slide to the left. The battery
compartment is now unlocked.
Unlocked
Locked
Fig. 19: EXPLORER® 500 P compartment door,
locked, unlocked
Ask your Audiologist and Hearing Care Provider if you
need assistance.
28
OPERATING YOUR HEARING INSTRUMENT-OPTIONAL FEATURES
Wireless functionality (if applicable)
Your hearing instrument may be equipped with wireless
functionality. This provides synchronization between
two hearing instruments. If you change the program or
volume on one instrument, the other is automatically
changed. In addition, wireless technology automatically
adjusts the system to change both hearing instruments
simultaneously to adapt to different listening situations.
The wireless functionality also enables use of an optional
remote control.
Note: The performance of the e2e® wireless 2.0 could be temporarily affected when in close proximity to electromagnetic noise sources, such as a computer monitor or television. Move away from the noise source if you experience difficulty.
Technical information for e2e 2.0 wireless function:
Operating frequency : Fc = 3.28 MHz; Maxium field strength: –7 dB
µA/m at 10m meters.
Changes or modifications not expressly approved by the party
responsible for compliance could void the users authority to operate
the equipment.
This Class B digital apparatus complies with Part 15 of FCC Rules.
Operation is subject to the following two conditions: (1) this device
may not cause interference,and (2) this device must accept any
interference, including interference that may cause undesired
operation of the device. FCC: SGI-WL002BTE
OPERATING YOUR HEARING INSTRUMENT-PROGRAMMABLE FEATURES
29
This equipment has been tested and found to comply with the
limits for a Class B digital device, pursuant to Part 15 of the
FCC Rules.
These limits are designed to provide reasonable protection
against harmful interference in a residential installation. This
equipment generates, uses and can radiate radio frequency
energy and, if not installed and used in accordance with
the instructions, may cause harmful interference to radio
communications. However, there is no guarantee that
interference will not occur in a particular installation. If
this equipment does cause harmful interference to radio
or television reception, which can be determined by
turning the equipment off and on, the user is encouraged
to try to correct the interference by one or more of the
following measures:
Your Siemens hearing instruments may be programmed to
allow you to turn them on and off using the program button.
To turn the instrument off using the program button, press
and hold the button for 3–5 seconds. To turn it back on, press
and hold the program button for 3–5 seconds. Please note
that after having turned the hearing instrument off using the
program button, you must wait approximately 10 seconds for
the system to reset before turning it back on again by using
the program button.
Power on delay
• Reorient or relocate the receiving antenna.
Your hearing instruments may be equipped with an advanced
power-on delay feature. This feature delays sound from
entering your hearing instruments when they are first
turned on so that you may insert the instruments into your
ears without experiencing unpleasant feedback (whistling).
• Increase the separation between the equipment
and receiver.
Low battery indicator
• Connect the equipment into an outlet on a circuit different from that to which the receiver is connected.
• Consult the dealer or an experienced radio/TV technician
for help.
30
Push button on/off
OPERATING YOUR HEARING INSTRUMENT-PROGRAMMABLE FEATURES
Your hearing instrument may be programmed to inform you
when the battery should be replaced for best performance.
You may hear an intermittent series of beeps and/or
experience low amplification power or volume. Change
the battery immediately if either of these should occur.
OPERATING YOUR HEARING INSTRUMENT-PROGRAMMABLE FEATURES
31
Volume control alert tones
Your hearing instrument may be programmed to inform you
of changes to volume. You may hear soft beeps each time
you change the volume and a three beep warning when
the volume limit has been reached. Once the maximum or
minimum volume has been reached, further changes in that
direction will have no effect.
Program change alert tones
Your hearing instrument may be programmed to inform you
of changes to the program. The program change may be
confirmed by alert tones or beeps that correlate to the
program you are in. That means if you select Program 3,
the hearing instrument will beep 3 times.
Listening Tips
• Give yourself time to become accustomed to your new
hearing instruments. During this period, you may prefer
to wear your hearing instruments for only a portion
of the day, and then gradually increase your usage
throughout your normal routine each day.
• You may find that a quiet environment is more comfortable in the beginning of the adjustment period. Gradually
introduce new listening environments as your ears
become accustomed to hearing instrument amplification.
• If you are a new hearing instrument user, be aware that there are sounds, both pleasant and unpleasant, that you may not have heard in a long time.
• Ask the people with whom you are conversing to attract
your attention before speaking to you. If you don’t
understand what someone has said, ask the speaker
to slow down or say it in another way, but not to shout.
• In noisy or difficult environments, you may find it easier to understand speech by facing the speaker. Focus on reading lips and observing facial expressions and body language.
Be aware that in some situations, it may be too noisy to
understand what is being said.
32
OPERATING YOUR HEARING INSTRUMENT-PROGRAMMABLE FEATURES
LISTENING TIPS
33
• Encourage one person to speak at a time when you are
engaging in group conversation.
• Listen to radio and television programs as you
normally would.
• Experiment finding the best place to sit for optimum
hearing in public places like the theater, school auditoriums, religious services, etc. If possible, choose a seat that is far away from any source of distracting noise, such as a fan or an open window, and where you have a good view of
the person speaking.
Maintenance and Care
Hearing instruments should be cleaned daily. You can wipe
them with a tissue or a soft cloth. Do not use water, alcohol,
benzene, or any other liquid or household cleaning agent to
clean your instruments as it may cause damage to them.
Always store your hearing instruments (and earpieces,
LifeTube, or LifeTip) inside the case. A soft carrying pouch
is also included for your convenience when traveling.
Remove the batteries to prevent damage from corrosion when
storing hearing instruments for an extended period of time.
Store the instruments in a dry area, preferably at room
temperature. If you perspire heavily or live in an area of
high humidity, you may find it beneficial to use a DRI-AID™
kit when the instruments are not in use. This product can be
purchased from your Audiologist or Hearing Care Provider.
Note: The charger can be used instead of the DRI-AID kit. Refer to
the Maintenance and Care section of the charger instruction manual for further information.
CAUTION
Never immerse your hearing instruments in water!
Note: Your hearing instrument is sensitive to extreme heat, high
humidity, strong magnetic fields (>0.1T), X-rays and
mechanical stress.
34
LISTENING TIPS
MAINTENANCE AND CARE
35
• Do not expose your hearing instrument to extreme
temperature or high humidity.
• Do not leave it in direct sunlight.
Performance Checklist
Problem
• Do not wear it in the shower or when you apply makeup, perfume, aftershave, hairspray or suntan lotion.
• Do not wear your hearing instruments when you are
exposed to short-waves, a strong magnetic field, a
high frequency field or X-rays.
• Do not place your hearing instruments in a
microwave oven.
*Aquaris™ Instruments Recommendations
Aquaris instruments achieved International Protection Rating
(IP57) per the International Electrotechnical Commission
(IEC) 60529 Standard. Your instrument can be completely
submerged in water up to 3 feet for 30 minutes with no
damage to instrument, and dust will not interfere with the
operation of the device.
Special recommendations for water activities:
• When you are swimming, use an earhook with a
custom-made, unvented, soft ear mold.
• Remove hearing instruments before diving and playing
water sports that cause your hearing instruments to be
constantly immersed in water.
36
MAINTENANCE AND CARE
Sound is
weak
Instrument
emits
whistling
sound
Sound is
distorted
Instrument
does not
work
Cause
Possible Solution
Weak or dead battery
Insert new battery
Volume too low
Clean instrument, earpiece,
or change LifeTip
Earpiece or LifeTip clogged
with wax or debris
Clean instrument, earpiece
or change LifeTip
Microphone clogged
Wipe hearing instrument
with cloth
Improper seating in ear
Try reinserting earpiece or
LifeTip until it fits securely
Volume too high
Lower the volume
Clogged with wax or
excessive wax in ears
Clean earpiece or replace LifeTip
OR contact your Audiologist or
Hearing Care Provider
Volume too high
Lower the volume
Weak battery
Replace battery
Instrument not turned on
Turn instrument on
Battery compartment
not completely closed
Gently close the battery
compartment completely
Dead battery
Replace battery
Battery polarity reversed
Make sure battery is
inserted correctly
Power-on delay is active
Wait 15 seconds and
check again
If the solutions in this checklist do not address a particular
issue you are having with your hearing instruments,
consult your Audiologist or Hearing Care Provider.
PERFORMANCE CHECKLIST
37
Health Considerations
Important Notices
If soreness or skin irritation develops, discontinue wearing your
hearing instrument, and bring the instrument and
earpiece to your Audiologist or Hearing Care Provider.
Minor fit adjustments or earpiece modification can often
correct this condition. If soreness persists, discontinue
wearing the hearing instrument and see your physician.
If excessive earwax accumulates when wearing your
hearing instruments, consult your Audiologist or Hearing
Care Provider.
Children with hearing loss
In addition to seeing a physician for a medical evaluation,
a child with a hearing loss should be directed to an
Audiologist, since hearing loss may cause problems in
language development and the educational and social
growth of a child.
An Audiologist is qualified by training and experience to
assist in the evaluation and rehabilitation of a child with
a hearing loss.
Important notice for prospective
hearing instrument wearers
Good health practice requires that a person with a hearing
loss have a medical evaluation by a licensed physician
(preferably a physician who specializes in diseases of
the ear) before purchasing hearing instruments. Licensed
physicians who specialize in diseases of the ear are often
referred to as Otolaryngologists, Otologists, or
Otorhinolaryngologists.
The purpose of a medical evaluation is to assure that all
medically treatable conditions that may affect hearing are
identified and treated before hearing instruments are
purchased.
38
HEALTH CONSIDERATIONS
IMPORTANT NOTICES
39
Following the medical evaluation, the physician will give you
a written statement that your hearing loss has been medically
evaluated and that you may be considered a candidate for
hearing instruments.
The physician will refer you to an Audiologist or Hearing Care
Provider, as appropriate, for a hearing instrument evaluation.
The Audiologist or Hearing Care Provider will conduct a
hearing instrument evaluation to assess your ability to hear
with and without hearing instruments. The hearing instrument
evaluation will enable the Audiologist or Hearing Care Provider
to select and fit hearing instruments for your individual needs.
If you have reservations about your ability to adapt to
amplification, you should inquire about the availability of a
trial-rental or purchase-option program. Many Audiologists
or Hearing Care Providers now offer programs that permit
you to wear a hearing instrument for a period of time for a
nominal fee after which you may decide if you want to
purchase the hearing instrument.
Only those fully informed adults who have either obtained
medical evaluation from a licensed physician or signed
a waiver statement declining the medical evaluation for
religious or personal beliefs that preclude consultation with
a physician may purchase hearing instruments. The exercise
of such a waiver is not in your best health interest and its use is
strongly discouraged.
40
IMPORTANT NOTICES
Warning to Audiologists or
Hearing Care Providers
An Audiologist or Hearing Care Provider should advise a
prospective hearing instrument user to consult promptly
with a licensed physician (preferably an ear specialist) before
dispensing a hearing instrument if the Audiologist or Hearing
Care Provider determines through inquiry, actual observation,
or review of any other available information concerning the
prospective user that the prospective user has any of the
following conditions:
• Visible congenital or traumatic deformity of the ear.
• Acute or chronic dizziness.
• History of active drainage from the ear within the previous
90 days.
• History of sudden or rapidly progressive hearing loss within the previous 90 days.
• Unilateral hearing loss of sudden or recent onset within
the previous 90 days.
•Audiometric air-bone gap equal to or greater than
15 decibels (dB) at 500 Hertz (Hz), 1000 Hz, and 2000 Hz.
• Visible evidence of significant cerumen accumulation or
a foreign body in the ear canal.
• Pain or discomfort in the ear.
IMPORTANT NOTICES
41
Special care should be exercised in selecting and fitting
a hearing instrument whose maximum sound pressure
level exceeds 132 decibels (dB), because there may be
risk of impairing the remaining hearing of the hearing
instrument user.
Warranty and Service
A hearing instrument will not restore normal hearing and
will not prevent or improve a hearing impairment resulting
from organic conditions.
Your Siemens BTE hearing instrument, with the exception
of the battery, is covered by a comprehensive warranty. All
covered instrument parts received for warranty service at
an authorized Siemens Service Center will be repaired or
replaced with new or reconditioned components, without
charge, to meet the performance specifications for that model.
The use of hearing instruments is only part of hearing
rehabilitation and may need to be supplemented by auditory
training and instructions in lip reading. Consistent use of
amplification is recommended. In most cases, infrequent use
of hearing instruments does not permit the wearer to attain
the full benefit of amplification.
This warranty does not cover malfunctions due to unusual
wear and tear or mistreatment of the instrument such as
physical shock, excessive wax build-up, or tampering with the
instrument, any of which voids all warranties. Your Audiologist
or Hearing Care Provider may charge a service fee for
processing warranty service.
Warranty service must only be performed by an authorized
Siemens Service Center. Service performed by unauthorized
service depots voids this warranty and repairs so necessitated
will be done on a parts and labor cost basis.
Please refer to the warranty card included with your hearing
instruments for warranty period effective dates.
Your Siemens BTE hearing instruments may have additional
loss and damage coverage. Please consult your Audiologist or
Hearing Care Provider to determine if this is applicable to your
hearing instruments.
42
IMPORTANT NOTICES
WARRANTY AND SERVICE
43
Procedure
In case of malfunction or loss, take your Siemens hearing
instrument and/or proof of purchase to the Audiologist or
Hearing Care Provider from whom the unit was purchased.
If factory service or replacement is needed, your Audiologist
or Hearing Care Provider will forward the unit to an authorized
Siemens Service Center.
Extended warranty programs
Siemens offers extended warranty and service programs for
your hearing instruments. Please consult with your Audiologist
or Hearing Care Provider for more details on these programs.
IMPORTANT
This warranty gives you specific legal rights and you may
have other rights which may vary from location to location.
For more information, contact your local Department of
Consumer Affairs.
Guide d’utilisation des
aides auditives de type
contour d’oreille
44
IMPORTANT NOTICES
Information in this brochure is subject
to change without notice.
Copyright © 2011 Siemens Hearing
Instruments, Inc. All rights reserved.
Les renseignements contenus dans le
présent guide peuvent faire l’objet de
modifications sans préavis.
Tous droits réservés © 2011 Siemens
Hearing Instruments, Inc.
Legal Manufacturer in Canada
Siemens Hearing Instruments Inc.
320 Pinebush Road
Cambridge, ON, N1T 1Z6
www.siemens.ca/hearing
Siemens Appareils auditifs inc.
320 Pinebush Road
Cambridge (Ontario) N1T 1Z6
www.siemens.ca/hearing
Legal Manufacturer
Siemens Audiologische Technik GmbH
Gebberstrasse 125
91058 Erlangen
Germany
Global Business Unit
Siemens Audiologische Technik GmbH
Gebberstrasse 125
91058 Erlangen
Germany
Phone: +49 9131 308 0
Global Siemens Headquarters
Siemens AG
Wittelsbacherplatz 2
80333 Muenchen
Germany
Global Siemens
Healthcare Headquarters
Siemens AG
Healthcare Sector
Henkestrasse 127
91058 Erlangen
Germany
Phone: +49 9131 84 0
www.siemens.com/healthcare
www.siemens.com/hearing
10295007 4/11 2.0 LC 0K
SHI/11100-10