1
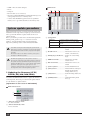
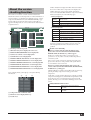
PM1D System Software Update Guide
Special Notices
• The software and this Update Guide are the exclusive
copyrights of Yamaha Corporation.
• The Software License Agreement for this software is included
at the end of this guide. Be sure to read the agreement
carefully before installing the software.
• Copying of the software or reproduction of this Update Guide
in whole or in part by any means is expressly forbidden
without the written consent of the manufacturer.
• Yamaha makes no representations or warranties with regard
to the use of the software and documentation and cannot be
held responsible for the results of the use of this Update Guide
and the software.
• The screen displays as illustrated in this Update Guide are for
instructional purposes, and may appear somewhat different
from the screens which appear on your computer.
• Visit the following Yamaha website for information about
future updates of application and system software and any
changes in specifications and functions.
http://www.yamahaproaudio.com/
• Specifications and descriptions in this Update Guide are for
information purposes only. Yamaha Corp. reserves the right
to change or modify specifications at any time without prior
notice. Since specifications may not be the same in every
locale, please check with your Yamaha dealer.
• The company names and product names in this Update Guide
are the trademarks or registered trademarks of their respective
companies.
Contents
Before you use the PM1D system ....................... 1
System Requirements.......................................... 1
System update procedure ...................................
1. Updating the firmware
(CS1D/DSP1D(-EX)/AI8/AO8/DIO8)...................
2. Updating the CS1D screen software.......................
3. Initializing the memory...........................................
2
2
4
4
Before you use the PM1D
system
PM1D system contains software that allows the CS1D/DSP1D(EX)/AI8/AO8/DIO8 (subsequently referred to as “the
components”) to operate independently. Thus, all software must
be updated to the same version to ensure consistency. If you fail
to perform this step, the CS1D’s version checking function will
detect the inconsistency, and the system will not start up
correctly.
Once you have updated the entire system to the same version,
subsequent updates are not necessary. However if you add a new
unit or update, you must once again update the entire system.
• After updating the system, you must execute
INITIALIZE ALL MEMORIES. If you fail to perform the
initialization, operation is not guaranteed.
System Requirements
The following system is required in order to perform the update.
• An IBM PC/AT compatible computer with a Pentium II
233 MHz processor and 64 MB of memory or better.
(Pentium II 350 MHz and 128 MB of memory is
recommended.)
NOTE:
• Depending on your hardware or OS, system requirements may be
greater than listed above.
• If you are using a notebook computer, system requirements may
be greater than listed above as the minimum. Also,
communication may become unstable due to the power
management settings in the Windows Control Panel, or due to
power management settings specific to notebook CPUs (e.g.,
SpeedStep (Intel Corporation), PowerNow! (AMD Corporation),
or LongRun (Transmeta Corporation)). Please disable these
power management settings and use your computer with its power
supply adaptor connected.
About the version checking function.................. 5
ATTENTION
SOFTWARE LICENSE AGREEMENT ...................... 6
• Windows 95 (OSR2 or later), Windows 98 (including Second
Edition), Windows Me, Windows NT 4.0 (Service Pack 6a or
later), Windows 2000, or Windows XP Home Edition/
Professional
• Display capability of 800 x 600 pixels (SVGA, High Color) or
better
PM1D System Software Update Guide
1
•
•
•
•
•
10 MB or more free hard disk space
Mouse
Serial port
RS-232C cable (cross-connected)
One ATA-compliant PCMCIA Type II PC Flash Storage card
(subsequently referred to as “memory card”)
• A device with a PCMCIA Type II card slot (A system that
enables you to copy downloaded files to the memory card)
Main screen
3
7
8
5
4
9
6
J
System update procedure
When updating the system, you must perform the update and
installation for all components. Using the procedure described
below, perform the firmware update and the CS1D screen
software update.
Before you start the procedure below, download the update file
named “pm1d_system***.zip (“***” stands for a version
number)” from the Yamaha website and expand the file.
http://www.yamahaproaudio.com/downloads/index.html
Scene data etc. that you created using this system must be
backed up on a memory card before you perform the update.
The internal data will be lost when you perform the update
procedure.
For details on how to save data to a memory card, refer to
the Reference Manual (Software).
K
L
C [Setup] menu
Serial Port
select the computer’s serial port to use
Connection Point
select the serial port to use on the PM1D
system
Fonts
change the display font
D Target select menu ...................specify the component to be
written
E Overall version .........................indicates the version to be
written (overall version)
F Writing target check boxes ......check boxes select writing
target
Do NOT turn off the power to the system or connect or
disconnect the cables during the update operation. Otherwise,
the software licensing information may be deleted if you are
updating the PM1D Version 2 system software. If the update
operation is interrupted, turn off the power to each
component, wait at least five seconds, turn on the power to
the components, then restart the update operation.
1. Updating the firmware (CS1D/
DSP1D(-EX)/AI8/AO8/DIO8)
You will use the PM1DLOAD software to update the firmware of
each component. The basic procedure and the update method
for each firmware is explained below.
G ROM version field ....................indicates the currentlywritten version
H File version field .......................indicates the version to be
written
I [GetVer.] button .......................obtains the ROM version
J [Write] button ..........................initiates firmware writing for
all items checked in the
writing check boxes 6
K [ALL] button .............................check all writing check boxes
6
L [CLEAR] button........................uncheck all writing check
boxes 6
[Explanation of each screen in PM1DLOAD]
Mode Select screen
1
2
A “Write via serial port” mode
You must select this.
B “Write board directly” mode
Do not select this.
2
PM1D System Software Update Guide
1-2 Before you perform the update, you must exit all
[Using PM1DLOAD]
1-1 Depending on the target that is being updated,
the firmware is sent over the following routes
from the computer (PC). Connect an RS-232C
cable (cross connected) or a D-Sub half-pitch 68pin cable to provide the appropriate route, and
turn on the power.
• CS1D update
other software and memory-resident programs.
1-3 Open the LOADER folder in the pm1d_system***
folder (“***” stands for a version number) that
you have already downloaded and expanded,
then double-click the PM1DLOAD.exe file.
1-4 Start up PM1DLOAD, and when the mode select
screen appears, select Host I/F 1 and click OK.
CS1D
NOTE: The update cannot be performed if you select Card Direct 2
in the Mode Select screen.
PC
RS-232C
1-5 When the PM1DLOAD update software starts,
select the serial port of your computer in the
Serial Port field of the [Setup] menu 3.
You can choose from ports COM1–COM9.
• DSP1D-EX/DSP1D update
DSP1D-EX/
DSP1D
PC
1-6 In the Connection Point field of the [Setup] menu
3, specify the destination component that you
RS-232C
connected to the computer in step 1-1.
This setting is ignored in the case of the DIO8 (Direct), and
need not be set.
• AI8/AO8 update
DSP1D-EX/
DSP1D
PC
1-7 From the target select menu 4, select the
AI8/AO8
RS-232C
D-Sub 68pin
1
2
3
4
5
6
7
components that you want to update.
Select [DIO8 (Direct)] if you plan to update the DIO8 by
connecting it directly to the computer.
8
• DIO8 update (via DSP1D)
1-8 Click the [GetVer.] button 9. The current
DSP1D-EX/
DSP1D
PC
DIO8
RS-232C
D-Sub 68pin
I/O UNIT ID
PORT B SELECTOR
5-8
1-4
POWER
ON/ OFF
NOTE:
• If the firmware has been erased, the version will not be displayed.
You must add a check mark in this case as well.
• In some cases, the version of the AO8 cannot be obtained from
port B, but if you have made connections and settings in
accordance with the restrictions given earlier, you will be able to
write the update.
• DIO8 (Direct) update
PC
DIO8
RS-232C
firmware version for each component will be
displayed. Compare the ROM version field 7 and
File version field 8 of the list, and add a check
mark for all lines that have different versions.
I/O UNIT ID
PORT B SELECTOR
5-8
1-4
POWER
ON/ OFF
• Scene data etc. that you created using this system must be
backed up to a memory card before you perform the
update. Power-off all speaker amps, set all output
volumes to the minimum position, and do not input any
audio signals.
• If any components not shown above and not related to
the update are connected, turn off their power.
• When updating the AI8/AO8, you must observe the
restrictions listed below. If you fail to observe these, it
may be impossible to perform the update.
– The port connected to the 68-pin cable used for the
update must match the port selected by the select
switch of the unit.
– If the firmware is blank (the 7-segment display of the
AI8/AO8 indicates 88), make sure that the above
condition is met, and then turn on the power.
However, you must do this for each unit immediately
before updating it.
• When updating the DIO8 via the DSP1D, you must
observe the following restriction. If you fail to observe
this, it may be impossible to perform the update.
– Connect OUTPUT A of the DIO8 to one of the
INPUT ports of the DSP1D.
1-9 Click the [Write] button J. Updating of the items
you checked in step 1-8 will begin.
Once you initiate the writing process even once, the screen
of the CS1D will indicate “If loading is completed, Please
re-start.”
NOTE: When updating the AI8/AO8 or DIO8 via the DSP1D, the
restrictions listed in 1-1 may mean that some units cannot be
updated. (In this case, a message will inform you that a unit was
skipped.)
1-10 When the update is completed, turn the power of
the updated components off and then on once
again.
1-11 Click the [GetVer.] button 9. Verify that the ROM
version field 7 and the File version field 8 are
now the same for each updated item.
If the ROM version cannot be obtained, or if the versions
do not match, the update was not successful. Please repeat
the procedure from step 1-8.
1-12 Repeat steps 1-1–1-11 until all components have
been updated.
PM1D System Software Update Guide
3
2. Updating the CS1D screen software
3. Initializing the memory
To update the CS1D screen software, you will use one memory
card, and copy the downloaded file via the memory card into the
CS1D. Before you perform this procedure, you must complete
the firmware update described in the preceding section.
Be sure to initialize the memory after you update the firmware
and CS1D screen software.
2-1 You will need to provide a commercially-available
3-2 Turn on the power to the PW1D.
After the opening screen appears on the
CS1D’s LCD, press and hold down the left
and right switches located below the track
pad in the data entry block until the CS1D
displays the following screen.
memory card and a system that is able to read this
card (e.g., a notebook computer that has a
PCMCIA Type II slot).
Turn off the power of the CS1D.
2-2 Insert the FAT16-formatted memory card into
3-1 Turn off the power of the PW1D power supply.
your computer.
For details on how to format the card, refer to the manual
of your computer or card.
2-3 Open the CS1DAPP folder in the pm1d_system***
folder (“***” stands for a version number) that
you have already downloaded and expanded,
then choose [Select all] from the [Edit] menu.
Then choose [Copy] from the [Edit] menu.
2-4 From “My Computer,” open the drive of the
3-3 Use the track pad and the left/right switches to
memory card you inserted.
select “INITIALIZE ALL MEMORIES.”
The corresponding display shown below will appear.
2-5 From the [Edit] menu, choose [Paste].
2-6 When the copy operation has been completed,
remove the memory card.
For details on removing the card, refer to the manual of
your computer or memory card.
2-7 Insert the memory card into the CS1D’s PC ATA
STORAGE CARD slot A or B, and turn on the
power of the CS1D.
The normal start-up title screen will not appear, and the
CS1D will be in update mode.
2-8 When “START?” appears in the screen, use the
track pad to click the OK button.
If you click the CANCEL button at this time, the CS1D will
stop operating. Remove the card, and restart the CS1D.
2-9 When the screen indicates “COPY OK,” remove
the card and restart the CS1D and all other
components.
Make sure that the CS1D does not display a version check
popup message (see page 5) on the LCD.
“INITIALIZE ALL MEMORIES”: All memory will be
initialized. All parameters that can be stored in memory
will return to their factory-set condition.
3-4 Use the left/right switches on the track pad to
select OK.
After initialization occurs, the system will restart.
The update operation is now complete.
NOTE: If the operation fails, the CS1D displays a popup message
indicating that the version check operation failed. In this case, make
sure that all settings and connections are correct, then restart the
firmware update.
• Insert only one memory card in the PC ATA STORAGE
CARD slot. If you simultaneously insert another card
into the other vacant slot, the update may not occur
correctly.
• If you updated the entire system, you must execute
INITIALIZE ALL MEMORIES. Operation cannot be
guaranteed if you fail to initialize the memories.
4
PM1D System Software Update Guide
About the version
checking function
The CS1D screen software contains a function that checks
whether the software of all components is a valid combination of
versions. If there is a combination of different versions, or if any
component has malfunctioned, the VERSION CHECK popup
window will appear when the CS1D starts up. This will not
appear if all components are correct. This version check function
is explained below.
2
1
3
4
5
6
7
9
8
J
K
Of these fields, lines displayed in white characters indicate
the version of that entire component. Lines displayed in
smaller characters of gray provide details on firmware
versions of individual CPUs within the component. Of these,
fields M and N may be of the following types.
• Field M display list
x.xx
(numeric)
Firmware version
NO REPLY
CPU within the component does not respond
--------
Board not installed in the DSP1D(-EX)
DIFF.
Board is incorrectly inserted in the DSP1D(-EX)
• Field N display list
OK
Normal
----
Not connected (normal)
NG
Illegal firmware version within the component or
no response from CPU within the component
OLD
Old version
NEW
New version
DIFF
Illegal combination of versions
The above test results are summarized, and a message is
shown in 1. If this popup window appears, refer to the
following explanation and resolve the reason for the
problem.
A
B
C
D
E
F
G
H
I
J
K
Checking result message field
OK button (may not be displayed in some cases)
PM1D SYSTEM SOFTWARE version display field
CS1D screen software version display field
CS1D firmware version display field
ENGINE A DSP1D(-EX) firmware version display field
ENGINE A INPUT UNIT firmware version display field
ENGINE A OUTPUT UNIT firmware version display field
ENGINE B DSP1D(-EX) firmware version display field
ENGINE B INPUT UNIT firmware version display field
ENGINE B OUTPUT UNIT firmware version display field
Version display fields 4 through K convey the following
information.
L
M
N
[Results other than OK]
If there is a problem with other than the firmware that
operates the controls of the CS1D and the INPUT UNIT /
OUTPUT UNIT, the OK button 2 will not appear.
In this case, it will be impossible to perform any screen
operations or use any of the controls, and thus impossible to
control the system.
Since correct operation cannot be guaranteed in such a state,
please remove the cause of the problem. The system will not
recover until the cause is removed.
If there is a problem with the firmware that operates the
controls of the CS1D and the INPUT UNIT / OUTPUT UNIT,
the OK button 2 will appear.
Click the OK button, and the system will forcibly be started up,
ignoring the faulty component or faulty portion of the
component.
At this time, a popup window will appear to inform you which
component is being ignored, and the following limitations will
apply. However, the correctly functioning components will
operate, allowing you to control the remaining portions of the
system.
INPUT/OUTPUT UNIT section
INPUT UNIT not OK
Only that unit is muted, and will not be
controllable
OUTPUT UNIT not OK
Only that unit is muted, and will not be
controllable
L Component name or firmware name
M Firmware version display field for L
N Result of test
PM1D System Software Update Guide
5
CONSOLE section
INPUT01-12 not OK
INPUT block (CS1D lower left) inoperable
INPUT13-24 not OK
INPUT block (CS1D upper left) inoperable
INPUT25-36 not OK
INPUT block (CS1D lower right) inoperable
INPUT37-48 not OK
INPUT block (CS1D upper right) inoperable
INSEL not OK
SELECTED INPUT CHANNEL block
inoperable
MAS1 not OK
MIX OUTPUT / DCA GROUP block inoperable
MAS2 not OK
MIX OUTPUT / DCA GROUP block inoperable
OUTSEL not OK
SELECTED OUTPUT CHANNEL block,
SCENE MEMORY block, MASTER block, LCD
FUNCTION ACCESS block, USER DEFINE
block, STEREO OUTPUT block, Data entry
block (except for track pad and left/right
switches) inoperable
METER not OK
METER BRIDGE block will not function
The system will recover from these limitations when you remove
the cause of the problem and turn on the power of the CS1D
once again.
NOTE:
• These problems can normally be solved by executing the system
update. However, if problems remain after this is done, please
contact Yamaha service.
• If there is a problem with a unit, please check whether there is a
faulty connection for the D-Sub half-pitch 68-pin cable. The unit
will not function correctly if a pin is bent or not inserted.
6
PM1D System Software Update Guide
ATTENTION SOFTWARE
LICENSE AGREEMENT
PLEASE READ THIS SOFTWARE LICENSE AGREEMENT
(“AGREEMENT”) CAREFULLY BEFORE USING THIS SOFTWARE.
YOU ARE ONLY PERMITTED TO USE THIS SOFTWARE PURSUANT
TO THE TERMS AND CONDITIONS OF THIS AGREEMENT. THIS
AGREEMENT IS BETWEEN YOU (AS AN INDIVIDUAL OR LEGAL
ENTITY) AND YAMAHA CORPORATION (“YAMAHA”).
BY DOWNLOADING, INSTALLING, COPYING, OR OTHERWISE
USING THIS SOFTWARE YOU ARE AGREEING TO BE BOUND BY
THE TERMS OF THIS LICENSE. IF YOU DO NOT AGREE WITH
THE TERMS, DO NOT DOWNLOAD, INSTALL, COPY, OR
OTHERWISE USE THIS SOFTWARE. IF YOU HAVE DOWNLOADED
OR INSTALLED THE SOFTWARE AND DO NOT AGREE TO THE
TERMS, PROMPTLY DELETE THE SOFTWARE.
1. GRANT OF LICENSE AND COPYRIGHT
Yamaha hereby grants you the right to use one copy of the software
program(s) and data (“SOFTWARE”) accompanying this Agreement.
The term SOFTWARE shall encompass any updates to the
accompanying software and data. The SOFTWARE is owned by Yamaha
and/or Yamaha’s licensor(s), and is protected by relevant copyright laws
and all applicable treaty provisions. While you are entitled to claim
ownership of the data created with the use of SOFTWARE, the
SOFTWARE will continue to be protected under relevant copyrights.
• You may use the SOFTWARE on a single computer.
• You may make one copy of the SOFTWARE in machine-readable
form for backup purposes only, if the SOFTWARE is on media where
such backup copy is permitted. On the backup copy, you must
reproduce Yamaha's copyright notice and any other proprietary
legends that were on the original copy of the SOFTWARE.
2. RESTRICTIONS
• You may not engage in reverse engineering, disassembly,
decompilation or otherwise deriving a source code form of the
SOFTWARE by any method whatsoever.
• You may not reproduce, modify, change, rent, lease, or distribute the
SOFTWARE in whole or in part, or create derivative works of the
SOFTWARE.
• You may not use the SOFTWARE to distribute illegal data or data that
violates public policy.
• You may not initiate services based on the use of the SOFTWARE
without permission by Yamaha Corporation.
3. TERMINATION
This Agreement becomes effective on the day that you receive the
SOFTWARE and remains effective until terminated. If any copyright law
or provisions of this Agreement is violated, the Agreement shall terminate
automatically and immediately without notice from Yamaha. Upon such
termination, you must immediately destroy the licensed SOFTWARE, any
accompanying written documents and all copies thereof.
4. DISCLAIMER OF WARRANTY ON SOFTWARE
5. LIMITATION OF LIABILITY
YAMAHA’S ENTIRE OBLIGATION HEREUNDER SHALL BE TO
PERMIT USE OF THE SOFTWARE UNDER THE TERMS HEREOF.
IN NO EVENT SHALL YAMAHA BE LIABLE TO YOU OR ANY
OTHER PERSON FOR ANY DAMAGES, INCLUDING, WITHOUT
LIMITATION, ANY DIRECT, INDIRECT, INCIDENTAL OR
CONSEQUENTIAL DAMAGES, EXPENSES, LOST PROFITS, LOST
DATA OR OTHER DAMAGES ARISING OUT OF THE USE, MISUSE
OR INABILITY TO USE THE SOFTWARE, EVEN IF YAMAHA OR AN
AUTHORIZED DEALER HAS BEEN ADVISED OF THE POSSIBILITY
OF SUCH DAMAGES. In no event shall Yamaha's total liability to you
for all damages, losses and causes of action (whether in contract, tort or
otherwise) exceed the amount paid for the SOFTWARE.
6. THIRD PARTY SOFTWARE
Third party software and data (“THIRD PARTY SOFTWARE”) may be
attached to the SOFTWARE. If, in the written materials or the electronic
data accompanying the Software, Yamaha identifies any software and
data as THIRD PARTY SOFTWARE, you acknowledge and agree that
you must abide by the provisions of any Agreement provided with the
THIRD PARTY SOFTWARE and that the party providing the THIRD
PARTY SOFTWARE is responsible for any warranty or liability related
to or arising from the THIRD PARTY SOFTWARE. Yamaha is not
responsible in any way for the THIRD PARTY SOFTWARE or your use
thereof.
• Yamaha provides no express warranties as to the THIRD PARTY
SOFTWARE. IN ADDITION, YAMAHA EXPRESSLY DISCLAIMS
ALL IMPLIED WARRANTIES, INCLUDING BUT NOT LIMITED
TO THE IMPLIED WARRANTIES OF MERCHANTABILITY AND
FITNESS FOR A PARTICULAR PURPOSE, as to the THIRD PARTY
SOFTWARE.
• Yamaha shall not provide you with any service or maintenance as to
the THIRD PARTY SOFTWARE.
• Yamaha is not liable to you or any other person for any damages,
including, without limitation, any direct, indirect, incidental or
consequential damages, expenses, lost profits, lost data or other
damages arising out of the use, misuse or inability to use the THIRD
PARTY SOFTWARE.
7. GENERAL
This Agreement shall be interpreted according to and governed by
Japanese law without reference to principles of conflict of laws. Any
dispute or procedure shall be heard before the Tokyo District Court in
Japan. If for any reason a court of competent jurisdiction finds any
portion of this Agreement to be unenforceable, the remainder of this
Agreement shall continue in full force and effect.
8. COMPLETE AGREEMENT
This Agreement constitutes the entire agreement between the parties
with respect to use of the SOFTWARE and any accompanying written
materials and supersedes all prior or contemporaneous understandings
or agreements, written or oral, regarding the subject matter of this
Agreement. No amendment or revision of this Agreement will be
binding unless in writing and signed by a fully authorized representative
of Yamaha.
You expressly acknowledge and agree that use of the SOFTWARE is at
your sole risk. The SOFTWARE and related documentation are provided
“AS IS” and without warranty of any kind. NOTWITHSTANDING ANY
OTHER PROVISION OF THIS AGREEMENT, YAMAHA EXPRESSLY
DISCLAIMS ALL WARRANTIES AS TO THE SOFTWARE, EXPRESS,
AND IMPLIED, INCLUDING BUT NOT LIMITED TO THE IMPLIED
WARRANTIES OF MERCHANTABILITY, FITNESS FOR A
PARTICULAR PURPOSE AND NON-INFRINGEMENT OF THIRD
PARTY RIGHTS. SPECIFICALLY, BUT WITHOUT LIMITING THE
FOREGOING, YAMAHA DOES NOT WARRANT THAT THE
SOFTWARE WILL MEET YOUR REQUIREMENTS, THAT THE
OPERATION OF THE SOFTWARE WILL BE UNINTERRUPTED OR
ERROR-FREE, OR THAT DEFECTS IN THE SOFTWARE WILL BE
CORRECTED.
PM1D System Software Update Guide
7
Yamaha Manual Library
http://www.yamaha.co.jp/manual/
Yamaha Pro Audio global web site:
http://www.yamahaproaudio.com/
U.R.G., Pro Audio & Digital Musical Instrument Division, Yamaha Corporation
© 2006 Yamaha Corporation