1
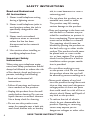
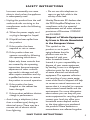
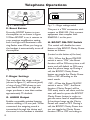
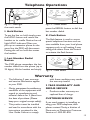
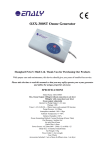
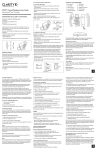
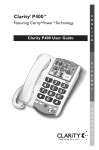
Clarity P300
®
TM
Featuring Clarity® Power™ Technology
Clarity P300 User Guide
E
N
G
L
I
S
H
E
S
P
A
~
N
O
L
a Division of Plantronics, Inc.
F
R
A
N
Ç
A
I
S
TABLE OF CONTENTS
SAFETY INSTRUCTIONS.............................................................4
PACKAGE CHECKLIST.................................................................6
FEATURES IDENTIFICATION.....................................................7
INSTALLATION..............................................................................8
A. Desk mounting.....................................................................8
B. Wall mounting.....................................................................8
OPERATING YOUR CLARITY® P300TM PHONE................. 10
A. Photo Directory Set Up ................................................ 10
B. Programming Photo Directory......................................10
C. Memory Dialing................................................................ 10
D. Clarity® PowerTM Control.............................................. 10
E. Boost Button..................................................................... 11
F. Ringer Volume .................................................................. 11
G. AUDIO Output................................................................ 11
H. BOOST ON/OFF Switch................................................ 11
I. Hold Button...................................................................... 12
J. Last Number Redial Button........................................... 12
K. Flash Button ..................................................................... 12
WARRANTY................................................................................. 12
SAFETY INSTRUCTIONS
Read and Understand
All Instructions
tub, in a wet basement or near a
swimming pool.
1. Never install telephone wiring
during a lightning storm.
• Do not place this product on an
unstable cart, stand or table.
The product may fall, causing
serious damage to the product.
2. Never install telephone jacks in wet locations unless the jack is specifically designed for wet
locations.
3. Never touch uninsulated
telephone wires or terminals
unless the line has been
disconnected at the network interface.
4. Use caution when installing or modifying telephone lines.
Important Safety
Instructions
When using your telephone equipment, basic safety precautions should
always be followed to reduce the risk
of fire, electric shock and injury to
persons, including the following:
• Read and understand all
instructions.
• Follow all warnings and instruc-
tions marked on the product.
• Unplug this product from the wall outlet before cleaning. Do not use liquid cleaners or aerosol cleaners. Use a damp cloth for cleaning.
• Do not use this product near
water, for example, near a bath tub, wash bowl, kitchen sink, or laundry 4
• Slots and openings in the base unit and the back or bottom are pro-
vided for ventilation, to protect it from overheating. These openings must not be blocked or covered. The openings should never be blocked by placing the product on the bed, sofa, rug or other similar surface. This product should never be placed near or over a radia-
tor or heat register. This product should not be placed in a built-in installation unless proper ventila-
tion is provided.
• Do not allow anything to rest on the power cord. Do not locate this product where the cord will be abused by persons walking on it.
• Never push objects of any kind into this product through base unit
slots as they may touch dangerous
voltage points or short out parts
that could result in a risk of fire or
electric shock. Never spill liquid of any kind on the product.
• To reduce the risk of electric
shock, do not disassemble this
product. Opening or removing
covers may expose you to
dangerous voltages or other risks.
SAVE THESE INSTRUCTIONS
SAFETY INSTRUCTIONS
Incorrect reassembly can cause
electric shock when the appliance is subsequently used.
• Do not use this telephone to
report a gas leak while in the vicinity of the leak.
• Unplug this product from the wall outlet and refer servicing to the manufacturer under the following conditions:
Hearby, Plantronics BV declares that
the P300 Amplified Telephone is in
compliance with the essential
requirements and all other relevant
provisions of Directives 1999/5/EC
and 93/42/EEC.
A. When the power supply cord or plug is damaged or frayed.
B. If liquid has been spilled into
the product.
C. If the product has been
exposed to rain or water.
D. If the product does not
operate normally by following the operating instructions.
Adjust only those controls that are covered by the operating instructions because improper adjustment of other controls may result in damage and will often require extensive work by a qualified technician to restore the product to normal operation.
E. If the product has been
dropped or the cabinet has
been damaged.
F. If the product exhibits a distinct change in performance.
• Avoid using a telephone (other
than a cordless type) during an
electrical storm. There may be a
remote risk of electric shock
from lightning.
Disposal of Waste Equipment
by Users in Private Households
in the European Union.
This symbol on the
product or on its packaging indicates that this
product must not be
disposed of with your
other household waste.
Instead, it is your responsibility to
dispose of your waste equipment
by handing it over to a designated
collection point for the recycling
of waste electrical and electronic
equipment. The separate collection
and recycling of your waste equipment at the time of disposal will help
to conserve natural resources and
ensure that it is recycled in a manner
that protects human health and the
environment. For more information
about where you can drop off your
waste equipment for recycling, please
contact your local city office, your
household waste disposal service
or the shop where you purchased
the product.Where batteries or
accumulators are collected together
SAVE THESE INSTRUCTIONS
5
SAFETY INSTRUCTIONS
with waste electrical and electronic
equipment on the basis of Directive
2012/19/EC, batteries or accumulators shall be removed from the collected waste electrical and electronic
equipment.
To view the Declaration of Conformity
for this product please see
www.plantronics.com/documentation
Class I medical device
When the Amplified Indicator (14) is
illuminated, the volume may be very
loud and in excess of 118dB (decibels).
This mode is intended specifically for
hearing impaired users.
6
Package Checklist
Your package includes all of the items shown here. 1
2
5
8
0
G
H
I
3
9
#
W
X
YZ
T
U
V
P
Q
RS
PROG
D
E
F
M
N
O
J
K
L
7
HOLD
P300™
A
B
C
FLASH
Short Line Cord
REDIAL
BOOST
RINGER
PITCH
Handset
LO
HI
CLARITY
POWER
Base Unit
Picture cutting
Guía para
guidecortar
las fotos y
etiquetas
Telephone Line Cords
P300
User Guide
Handset Coil Cord
Phone Base Plate
User Guide
Fig. 1 – Package Contents
7
Features
Ringer volume control switch
Audio output
Photo memory buttons
1
2
5
8
0
3
A
B
C
G
H
I
9
#
W
X
YZ
T
U
V
P
Q
RS
PROG
FLASH
Big button keypad
D
E
F
M
N
O
J
K
L
7
HOLD
P300™
FLASH button
REDIAL button
BOOST button
CLARITY POWER control
REDIAL
BOOST
RINGER
PITCH
LO
HI
HOLD button
Ringer tone switch
PROG programming button
Fig. 2 – Features of the P300 phone
8
CLARITY
POWER
Bright ring flasher (lamp)
Bright ring flasher (LED)
BOOST ON indicator
HOLD indicator light
Installation
Please refer to safety instructions for
important product safety information
prior to installation or use of the
product.
Follow the steps below to connect
and install your P300 telephone.
A. Desk Mounting
1. Connect telephone line cord to
telephone as shown in figure 3.
3. Connect handset cord to the
telephone as shown below.
4. Lift the handset and listen for a
dial tone.
$
5. Your P300 is ready to use.
4
1
4
1
Fig. 4 – Handset hook change
B. Wall Mounting
1. Pull the handset hook out and
reverse its position so that the
hook points up and will hold the
handset when you hang up as shown
in figure 4.
2. Insert the tabs of the phone base
into the slots in the lower position
of the base. Push in and down firmly
until it snaps into place as shown
in figure 5.
3. Using the short modular cord,
mount the phone as shown in
figure 6.
4. Connect the handset cord to the
telephone as shown in figure 3.
Fig. 3 – Connections and installation
5. Lift the handset and listen for a
dial tone.
6. Your P300 phone is ready for use.
9
Installation
- OFF
- ON
BOOST
MANUAL
AUTO
Fig. 5 – Phone base installation for
wall mounting
C. Battery Installation
An optional 9 volt battery may be
installed to brighten the visual ringer.
To open battery compartment, use
a pen to press down as indicated in
figure 7A.
DISCONNECT LINE CORD BEFORE
REPLACING BATTERY
10
Fig. 6 – Wall mounting installation
Insert 9V battery into compartment
in base of phone
Slide-out battery
compartment lid
to access battery
compartment
Battery
compartment
Press here to
open battery
compartment
Fig. 7A – Battery installation
Telephone Operations
The P300 phone is designed to
help you communicate easily.
There are many convenient, easyto-use features.
B. Programming The
Photo Directory
A. Photo Directory Set Up
2. Enter a phone number as you
would dial it.
You can program up to nine photodial memory buttons with the numbers you dial most frequently. As
these numbers change, it is easy to
change the photos and numbers in
the phone’s memory. If you prefer,
you can write the names and/or telephone numbers into the directory’s
nine spaces.
1. Select the photos you wish to use.
Use the photo template as a guide
to cut your photos to fit the photo
frames.
2. Insert photos or written names
into memory button frames.
3. Place the clear plastic overlay over
your photos and insert the tabs into
the slots.
1. Lift the handset and press the
PROG button.
3. Press PROG again and then
press the corresponding memory
button to store this number. Hang
up immediately.
4. The number is now stored into
memory. The memory button in the
lower right corner of the frame can
be programmed for emergencies.
C. Memory Dialing
Pick up the handset and simply press
the photo directory button to dial
the programmed phone number.
D. Clarity® PowerTM Control
Clarity Power increases the incoming voice up to 26 decibels (dB). The
graduated scale indicates the loudness of the volume setting. Clarity
Power is turned on by pressing the
BOOST button as described in the
next section.
Bank
1
4
G
H
I
P300™
2
5
A
B
C
J
K
L
3
6
D
E
F
M
N
O
Fig. 7B – Photo directory template
Fig. 8 – Emergency memory button
11
Telephone Operations
FLASH
RINGER
PITCH
BOOST
CLARITY
POWER
Fig. 9 – Boost button
E. Boost Button
Press the BOOST button to turn
the amplifier on as shown in figure
9. When BOOST is on, it returns to
your previous amplification setting
and a red light will illuminate in the
ring flasher area. When you hang up
the handset, it automatically turns off
the amplifier.
RINGER
AUDIO
Off Lo Hi
Output
Fig. 11 – Ringer settings switch
This port is a TNV connection with
respect to EN41003. Only connect
equipment that complies with
EN60950-1 to this port.
H. BOOST ON/OFF Switch
 This switch will disable the reset
feature of the BOOST Clarity Power
button as follows:
(Located on the bottom of the base)
RINGER
PITCH
Fig. 10 – Boost flasher
F. Ringer Settings
You may adjust the ringer volume
(shown in figure 11) and tone (pitch)
of ring of your P300 phone to suit
your needs. When set on high, the
ringer produces a tone that reaches
approximately 75 decibels.
G. AUDIO Output
Enables compatible assistive listening
devices utilizing a 3.5 mm jack. When
connected, the outgoing sound is
transmitted through the device and
the sound on the handset is disabled.
12
 ON – When the Boost ON/OFF
switch is set to “ON”, the Boost
function will be ON every time a call
starts, and will default to ON every
time the phone hangs up. During a
call, the BOOST Clarity Power
button can toggle the Clarity Power
ON or OFF according to the
user’s needs.
 OFF – When the Boost ON/OFF
switch is set to “OFF”, the Boost
function (Clarity Power) will be
OFF every time a call starts, and the
user will need to press the BOOST
Clarity Power button in order to
gain the extra level of amplification.  If the phone hangs up, the Clarity
Power will reset to OFF.  During a
call, the BOOST Clarity Power button can toggle the Clarity Power
function ON or OFF according to
Telephone Operations
FLASH
BOOST
FLASH
CLARITY
POWER
Fig. 12 – Hold light
the user’s needs.
RINGER
PITCH
Fig. 13 – Redial button
press the REDIAL button to dial the
last number dialed.
I. Hold Button
To put the line on hold, simply press
the HOLD button and return the
handset to its cradle. Notice the red
light HOLD indicator. When you
pick up an extension phone on the
same line, the P300 will disconnect.
Putting the call on hold also mutes
the handset.
K. Flash Button
The flash feature is used to access
special telephone functions and services available from your local phone
company, such as call waiting, 3-way
calling and others. Press this button
to activate the flash feature.
J. Last Number Redial
Button
FLASH
The P300 phone remembers the last
number dialed from the phone (up to
32 digits). Lift the handset and simply
RINGER
PITCH
BOOST
CLARITY
POWER
Fig. 14 – Flash button
Warranty
•
The following 2 year warranty
and service information applies
to your P300.
•
Clarity guarantees the satisfactory
condition of the equipment with
regard to manufacturing and
material defects for 2 years from
the date of purchase. (Please
keep your original receipt safely).
•
BOOST
This product must be installed
and used in accordance with the
instructions contained in the
User Guide. Failure to comply
with these conditions may render
the warranty invalid.
2 YEAR WARRANTY AND
REPAIR SERVICE
•
Products under warranty are
replaced free of charge.
CUSTOMER SERVICE
If you need support in installing or
using your P300 telephone, then
please contact Clarity, a division of
Plantronics at Plantronics Customer
Service at 1-800-551-896.
13
Clarity, a Division of Plantronics, Inc.
South Point Building C
Scorpius 140
2132 LR Hoofddorp
Netherlands
1-800-426-3738
www.clarityproducts.com
©2015 Clarity, a Division of Plantronics, Inc. All Rights Reserved.
Clarity, the amplification device, Clarity and the amplification device
combined, Clarity Power and P300 are trademarks or registered
trademarks of Plantronics, Inc.
Rev. B (2-15)