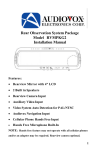
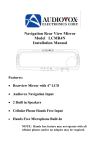
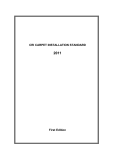
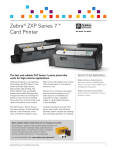
1
Rear Observation System Package
Model RVMPKG1
Installation Manual
Features:
•
Rearview Mirror with 4” LCD
•
2 Built in Speakers
•
Rearview Camera Input
•
Auxiliary Video Input
•
Video System Auto Detection for PAL/NTSC
•
Cellular Phone Hands Free Input
•
Hands Free Microphone Built-In
NOTE: Hands free feature may not operate with all
cellular phones and/or an adapter may be required.
Rearview camera optional.
1
TABLE OF CONTENTS
Cautions!
Preface
3
4
WARNING:................................................................................... 4
Backing up vehicle ........................................................................ 4
Packing list
4
1. Installation Instructions
5
2. Install the mobile phone hands free seat
6
3. Signal Inputs
7
SW1 and SW2:
8
Specifications
9
General
Maintenance
Troubleshooting
9
9
10
2
Cautions!
The product is intended to assist in safe driving and to allow the driver to
have a broader rearview while the vehicle is in reverse. You, as the driver,
are solely responsible for the safe operation of your vehicle and the safety
of your passengers according to the country and their local traffic
regulations. Do not use any features of this system to the extent it distracts
you from safe driving. Your first priority while driving should always be
the safe operation of your vehicle. Audiovox Electronics Corporation
cannot accept any responsibility whatsoever for accidents resulting from
failure to observe these precautions or safety instructions.
1.
This product utilizes high voltage. Any unauthorized modifications
or damage to the products may result in electrical shock. Handle
all components with care. Inspect regularly for damage to
components and cabling.
2.
You shall be responsible to ensure that the installation of this
product does not void or affect the vehicle manufacturer’s
warranty. Audiovox Electronics Corporation, or its branches are
not liable in full or in part for improper installation resulting in
loss or damage to your property, or for voiding all or part of the
vehicle manufacturer’s warranty.
3.
Do not apply excessive force to any of the components contained
within this kit. Excessive force used before, during or after
installation that results in a damaged or non-functional part shall
void all warranties.
4.
Please follow the procedure from this installation manual.
Improper installation or modification of this product shall void
all warranties.
3
Preface
There is a blind spot that exists at the back of a vehicle while the vehicle is
in reverse. Equipped with a camera, this electronic rearview mirror
ensures safety by providing the driver with a clear and wide image of the
area behind the vehicle while it is in reverse.
WARNING:
Backing up vehicle
Do not back up vehicle while watching the mirror/monitor screen. Always
look in the direction of vehicle motion. Use the mirror/monitor as an aid
in safety confirmation. The distance looks different in the monitor. The
actual distance is shorter than it looks in the monitor. The range of image
is limited. Beware of blind spots.
Packing list
The Rear Observation System Package Model RVMPKG1 consists of the
following items:
1. Rear View Mirror
2. Camera Cable
3. Control Box
4. Mobile Phone Hands Free Cable Plug
5. Mobile Phone Adhesive Magnetic Seat
6. Fastening Belts
7. Wire Clips
8. Adhesive Foam Backing
4
1. Installation Instructions
(1) Mount the mirror/monitor onto the existing rearview mirror.
a) Stick two adhesive foam backings on to the back of mirror in the two
small rectangle indents.
b) Take the two seven inch belts and slide them into the slots on the top rear
of the mirror with grooved side of the belt facing down..
Figure 1
c) Take the buckles and slide them into the lower slots on the rear of the
mirror with the buckle facing down toward the seven-inch strap.
Figure 2
NOTE: The large opened rectangle on the buckle will face away from the
seven-inch strap.
d) Mount the new rearview mirror/monitor onto the existing one. Add the
rearview mirror onto the existing mirror from one side with one fixed
belt. Then fasten the other belt on the other side of the mirror. To
prevent the RVMPKG1 from falling off, tighten the belts until secure
to the factory rearview mirror on both sides.
e)
Figure 3
Cut off excess part of 7-inch straps.
(2) Connect the control box monitor cable to the rearview mirror/monitor
cable. Route the monitor cable behind the headliner of the
5
windshield then down the A pillar behind the plastic shroud to the
under dash area.
(3) Connect the 5 wires in the following manner.
a)
Red wire - 12 volt constant (positive)
b)
Black wire - Chassis ground (negative)
c)
Blue wire - 12-volt ignition (12 volt with ignition on)
d)
Green wire - Reverse light switch (12 volt when vehicle is in reverse)
e)
Yellow wire – Parking brake light switch (Negative when parking brake on)
WARNING: Observe polarity when connecting the cables. The cable must
not be reversed or modified.
2. Install the mobile phone hands free seat
(1)
Select a suitable and convenient location for the mobile phone. Clean
the selected location
(2)
Tear off the adhesive tape on the back of the hands free seat. Press
seat tightly on to the selected surface for 30 seconds till the two
surfaces are tightly glued.
NOTE: Make sure the two surfaces are glued tightly!
(3)
Clean a place on the back of the cell phone, keeping it dry. Remove
the adhesive tape of the rounded metal sheet and stick it to the
selected place on the back of the cell phone.
NOTE: Do not attempt to move the phone within 24 hours after gluing.
CAUTION: The rounded metal sheet can only be glued once, so be sure it is
at the right place!
Figure 4
6
3. Signal Inputs
The signal input connections for the system include:
(1) Rear Camera: By connecting rear camera with control box plug, users
can see the rearview camera image when the car is in reverse.
(2) Hands Free Jack: Put the hands free plug (3.5mm) into hands free jack
and put the other side of plug into the headphone jack of the mobile phone. (If
necessary, try a compatible adapter).
(3) Video In, Video Out, Audio In, Audio Out, Audio/Video Input and
Output Plugs (3.5mm) are located in the control box. By connecting video
and audio signals with these plugs, the user can enjoy watching
video, only while the parking brake is on.
Figure 5
7
4. Controls and Indicators
Figure 6
Figure 6 illustrates the controls and indicators of the RVMPKG1 rear view mirror:
A: Rearview mirror
B: 4” LCD panel
C: Hands free Microphone
D: Brightness Control
E: Power indicator (Red when power is on)
F: Volume Control Knob
G: Switch 1 (see below)
H: Switch 2 (see below)
J: 2-position Switch for hands free microphone Sensitivity High/Low Select
K: Speakers
SW1 and SW2:
1.
2.
Reversing:
SW1: No Function
LCD automatically turns on
SW2: No Function
Rearview camera image appears on the mirror
Vehicle Going Forward:
SW1: Not enabled when vehicle is going in a forward direction.
SW2: When pressed and held, the rear camera image appears on the mirror.
When released, the LCD will turn off. The mirror will return to its normal
appearance.
8
3.
Vehicle Parked:
SW1: Used to turn the LCD on/off when using the DVD/VCR player, provided
the parking brake is engaged.
SW2: When pressed and held, the rear camera image appears on the mirror.
When released the LCD will turn off. The mirror will return back to its normal
appearance.
Specifications
General
Power Supply
12VDC
Power Consumption
<12W
Current Draw
Video Input
<500 mA
1Vp -p@ 75 Impedance
Audio Input
<=1V
Audio Power Output
Operating Temperature Range
0.5W × 2 (16O)
-10? to 60?
Overall Dimension
11W×3.75H×1.25D inch
Display System
Screen
4” TFT Color LCD
Brightness
250 nit
Contrast ratio
Viewing Angle
150:1
Top-10°, Bottom 30°, Left 45°,
Right 45°
Resolution
Video Format
480×234
PAL/NTSC auto detect
Display Format
4:3
Maintenance
Your rearview mirror requires little care, however to maintain it in optimum condition
follow the procedures below:
1.
Keep your system away from excessive moisture, ext reme heat or cold and
magnetic fields.
2.
Keep liquids away from the display.
3.
Do not place external devices or other objects on the top of the mirror.
9
Occasionally clean the surface of the mirror with a soft cloth moistened with water or
window cleaner.
Troubleshooting
Table 1 Rearview Mirror
Symptoms
The ON/OFF signal light <E> is not
on after the car is started?
No video signal appears while
reversing the car?
Solutions
1. Check the installation-wiring diagram.
2. Ensure that the parallel red and black line
from the control box is connected
properly.
3. Check for 12 volts on the blue wire while
Ign on.
1. Check the LCD Contrast (Brightness)
control knob whether the contrast knob is
set too low.
2. Check the rearview Camera lens.
3. Check the rearview Camera wiring and
connection.
4. Check the cable from the rearview mirror
is connected to the control box.
5.
Check out the wire connection (to find out
whether the system’s reverse wire cable is
connected to the reverse switch gear of the
Video image is not sharp enough??
1.
car)
Clean the lens of the camera.
Table 2 Hands Free Phone
Symptoms
Solutions
When the Hands Free Phone
1. Check the volume control knob
Function is not working?
whether the volume is set too low.
2. Check to see if the hands free cable
plug to the phone hand set input
jacket is properly connected.
3. Check whether the mobile phone
hands free cable plug is properly
connected to the control box.
10
Figure 7
11
© 2003 Audiovox Electronics Corp., 150 Marcus Blvd., Hauppauge, N.Y. 11788
128-6653
12