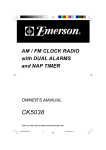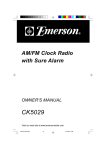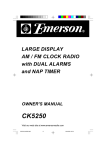
1
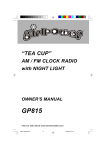
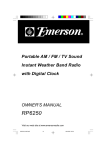
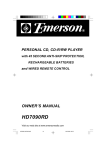
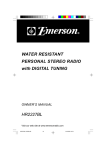
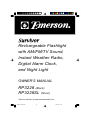
Rechargeable Flashlight
with AM/FM/TV Sound,
Instant Weather Radio,
Digital Alarm Clock,
and Night Light
OWNER'S MANUAL
RP3228 (Black)
RP3228SL (Silver)
Visit our web site at www.emersonradio.com
RP3228_030205.p65
23
2/3/2005, 10:33
CAUT I ON
TO PREVENT FIRE OR SHOCK HAZARD, DO NOT USE THIS PLUG WITH AN
EXTENSION CORD, RECEPTACLE OR OTHER OUTLET UNLESS THE BLADES
CAN BE FULLY INSERTED TO PREVENT BLADE EXPOSURE. TO PREVENT FIRE
OR SHOCK HAZARD, DO NOT EXPOSE THIS APPLIANCE TO RAIN OR MOISTURE.
C AU T I O N
RISK OF ELECTRIC SHOCK
DO NOT OPEN
The lightning flash with arrowhead symbol, within an equilateral triangle is intended to
alert the user to the presence
of uninsulated ‘dangerous voltage’
within the product’s enclosure
that may be of sufficient
magnitude to constitute a risk
of electric shock to persons.
WARNING: TO REDUCE THE
RISK OF ELECTRIC SHOCK
DO NOT REMOVE COVER
(OR BACK), NO USER
SERVICEABLE PARTS INSIDE
REFER SERVICING TO
QUALIFIED SERVICE
PERSONNEL.
!
The exclamation point within
an equilateral triangle is intended to alert the user to
the presence of important
operating and maintenance
(ser vi ci ng) instr ucti ons in
the liter ature accompanying the appl iance.
IMPORTANT SAFETY INSTRUCTIONS
1.)
2.)
3.)
4.)
5.)
6.)
7.)
8.)
9.)
10.)
11.)
12.)
13.)
14.)
15.)
16.)
17.)
18.)
Read these instructions.
Keep these instructions.
Heed all warnings.
Follow all instructions.
Do not use this apparatus near water.
Clean only with dry cloth.
Do not block any ventilation openings. Install in accordance with the manufacturer’s
instructions.
Do not install near any heat sources such as radiators, heat registers, stoves, or other
apparatus (including amplifiers) that produce heat.
Do not defeat the safety purpose of the polarized or grounding-type plug. A polarized plug has
two blades with one wider than the other. A grounding type plug has two blades and a third
grounding prong. The wide blade or the third prong is provided for your safety. If the provided
plug does not fit into your outlet, consult an electrician for replacement of the obsolete outlet.
Protect the power cord from being walked on or pinched particularly at plugs, convenience
receptacles, and the point where they exit from the apparatus.
Only use attachments / accessories specified by the manufacturer.
Unplug this apparatus during lightning storms or when unused for long periods of time.
Refer all servicing to qualified service personnel. Servicing is required when the apparatus
has been damaged in any way, such as power-supply cord or plug is damaged, liquid has
been spilled or objects have fallen into the apparatus, the apparatus has been exposed to rain
or moisture, does not operate normally, or has been dropped.
This appliance shall not be exposed to dripping or splashing water and no object filled with
liquids such as vases shall be placed on the apparatus.
Do not overload wall outlet. Use only power source as indicated.
Use replacement parts as specified by the manufacturer.
The product may be mounted to a wall only if recommended by the manufacturer.
Upon completion of any service or repairs to this product, ask the service technician to
perform safety checks.
1
RP3228_030205.p65
1
4/3/2005, 17:41
IMPORTANT!
CONNECT THIS UNIT TO AN AC OUTLET
FOR 24 HOURS TO FULLY CHARGE THE
BATTERIES BEFORE FIRST USE
Thank You… … … … … …
For purchasing this Emerson multi-function rechargeable flashlight/radio
combination. This unique device is designed for connection directly to your
household AC outlet, and it includes a built-in rechargeable Ni-Cad battery pack
so that it is always ready to use in case of a power failure. Not only does it provide
you with an emergency light source but it also has a built-in radio that receives AM
and FM broadcasts, the sound from VHF TV channels 2-13, plus continuous U.S.
Government weather information for your geographic area, 24 hours a day, at the
touch of a button. There’s even a built-in digital alarm clock with lighted liquid
crystal display, and a night light that switches ‘On’and ‘Off’automatically according
to you room light conditions.
Our engineers have included many useful features in this Emerson
flashlight radio combination. Please be sure to read this owner’s manual completely
and carefully, to make sure you fully understand the operation of this product, and
that you get the maximum benefit from all the features we have included.
We have taken great care to insure that this product was in perfect working order
when it left our factory. After reading this manual, if you have any difficulty with the
operation of this product, please do not return it to the dealer or retail store. Please
contact the Emerson Customer Service Hotline, toll free, at 1-800-898-9020.
The hours of operation are 8:00 AM to 5:00 PM (Central Time) Monday through
Friday. One of our service technicians will try to correct the problem for you. If that
is not possible you will be advised how to obtain repair service or a replacement
unit.
Once again, thanks for purchasing this Emerson Audio Product.
Model No: RP3228/RP3228SL
Serial No:
2
RP3228_030205.p65
2
2/3/2005, 10:32
IMPORTANT NOTES
electric heaters, on top of other stereo
• Operate controls and switches as
equipment that radiates too much
described in the manual.
• Avoid installing this unit in places
heat, places lacking ventilation or
exposed to direct sunlight or close to
dusty areas, places subject to constant
heat radiating appliances such as
vibration and/or humid or moist areas.
NOTE: The manufacturer is not responsible for any radio or TV interference
caused by unauthorized modifications to this equipment. Such modifications
could void the User's authority to operate the equipment.
FCC INFORMATION
This equipment has been tested and found to comply with the limits for a Class B
digital device, pursuant to Part 15 of the FCC Rules. These limits are designed to
provide reasonable protection against harmful interference in a residential
installation. This equipment generates, uses, and can radiate radio frequency energy
and, if not installed and used in accordance with the instructions, may cause harmful
interference to radio communications. However, there is no guarantee that
interference will not occur in a particular installation. If this equipment does cause
harmful interference to radio or television reception, which can be determined by
turning the equipment off and on, the user is encouraged to try to correct the
interference by one or more of the following measures:
• Reorient or relocate the receiving antenna.
• Increase the separation between the equipment and receiver.
• Connect the equipment into an outlet on a circuit different from that to which
the receiver is connected.
• Consult the dealer or an experienced radio/TV technician for help.
This device complies with Part 15 of the FCC Rules. Operation is subject to the
following two conditions:
(1) This device may not cause harmful interference, and
(2) This device must accept any interference received, including interference
that may cause undesired operation.
3
RP3228_030205.p65
3
2/3/2005, 10:32
PREPARATION FOR USE
IMPORTANT!
This flashlight/radio has built in rechargeable Ni-Cd batteries. The
batteries were fully charged when they were installed in the unit at our
factory. However, when not connected to an AC outlet the batteries will
slowly discharge even though the unit is not being used. We suggest
that you connect this unit to your AC outlet and allow it to charge for 24
hours, or at least over-night, before you use it.
When the built in batteries are fully charged you can expect approximately
5 hours of flashlight operation, or 7 hours of radio operation at medium
volume level. Of course if you are using the flashlight and the radio
simultaneously the operating time of each function will be reduced.
Connecting To An AC Outlet
Before using this unit for the first time it should be connected to a “live” AC outlet
and allowed to charge for 24 hours. We suggest that you do not connect this unit to
an AC outlet that is connected to a wall switch. To insure that the unit is always fully
charged and ready to use it should be connected to an AC outlet that is always
“live”.
For faster charging time make sure that the flashlight switch is set to the ‘OFF’
position and that the radio On/OFF-VOLUME control is also in the ‘OFF’position.
Turn this control fully counter-clockwise until a ‘click’is heard to insure that it is off.
FRONT VIEW
TOP VIEW
ON
OFF
4
RP3228_030205.p65
4
2/3/2005, 10:32
To connect this unit to your AC outlet unfold the built-in AC plug located on the
bottom cabinet as shown and connect to your outlet.
ON
Note: This device has a polarized plug and can only be
connected to a normal polarized residential/household
polarized outlet with the wider slot on the left side. This
is a safety feature.
When properly connected to the outlet the flashlight will
be facing upward toward the ceiling and the nightlight
will be facing downward toward the floor.
5
RP3228_030205.p65
5
2/3/2005, 10:32
Power Source
This device is designed to operate on normal 120V 60Hz AC power only. Do not
attempt to operate the radio on any other power source. You could cause damage
to the device that is not covered by your warranty.
If the plug will not fit, you may have an older non-polarized AC outlet. Do not defeat
the safety feature by trying to file the wider blade, or replacing the plug. Contact an
electrician to replace your outdated outlet.
AC Plug
AC Outlet
6
RP3228_030205.p65
6
2/3/2005, 10:32
LOCATION OF CONTROLS AND INDICATORS
FRONT PANEL
7
LEFT SIDE PANEL
8
12
13
14
7
6
6
5
4
WB
3
2
15
9
10
16
11
3
22
2
17
1
18
EARPHONE
20
19
21
1.) Speaker.
TOP PANEL
2.) Flashlight Red Cover.
3.) TUNING Control.
ON
4.) Clock SET Button.
5.) LCD Clock.
6.) NIGHT LIGHT.
12
2
7.) WEATHER Band Button.
14
13
8.) Telescopic Antenna.
8
(FM/TV/Weather Bands)
7
9.) Clock MODE Button.
6
10.) Back LIGHT Button.
11.) VOLUME Control.
12.) Function Selector Switch.
11
3
Power On/OFF Switch.
17.) Band Selector Switch.
(AM-FM/TV 1-TV 2)
(ON/FLASH/OFF/AUTO)
13.) Carrying Handle.
18.) EARPHONE Jack.
14.) CDS Sensor.
19.) Rechargeable Battery ompartment.
(Bottom Cabinet)
15.) WB FINE TUNING Control.
20.) AC Polarized Plug. (Unfolded)
16.) Dial Pointer.
21.) Torch.
7
RP3228_030205.p65
7
2/3/2005, 10:32
OPERATING INSTRUCTIONS
Flashlight Operation
The flashlight has 3 operating modes:
ON – When the flashlight control switch is set to the ‘ON’position, the light is “on’
constantly.
FLASH – When the flashlight control switch is set to the ‘FLASH’position the light
flashes on and off continuously.
AUTO – When the flashlight control switch is set to the ‘AUTO’position and the
unit is connected to the AC outlet, the flashlight will turn ‘On’automatically if the AC
power is interrupted, either by a power failure, or by disconnecting the unit from
the wall outlet.
The flashlight control switch should always be set to either the ‘OFF’position or
the ‘AUTO’position while the flashlight is connected to the AC outlet for recharging.
If required you can also use the built in red lens cover so that the flashlight can be
used an emergency flasher. Lift the red lens cover from its storage position as
shown and swing it over the front of the flashlight lens.
CLOSE THE RED
LENS COVER
OPEN THE RED LENS COVER
After use, swing the red lens cover back to its storage position and press down on
the cover until you hear a ‘click’and the cover is locked in place.
8
RP3228_030205.p65
8
2/3/2005, 10:32
Night Light
This unit includes a built-in Night Light with automatic light sensor that turns the
Night Light on and off automatically when needed.
To prevent unnecessary battery drain, the Night Light only operates when
the unit is connected to the AC outlet.
9
RP3228_030205.p65
9
2/3/2005, 10:32
Radio Operation
1.) Turn on the radio by rotating the VOLUME control clockwise.
2.) Slide the Band Selector switch to select the desired band (AM, FM/TV 1 or
TV 2).
• Select AM to tune AM radio stations.
• Select FM/TV 1 to tune FM radio stations and TV channels 2 through 6.
• Select TV 2 to tune TV channels 7 through 13.
3.) Tune the desired station by rotating the TUNING control.
4.) Adjust the VOLUME control as desired.
5.) To turn the unit off, rotate the VOLUME control counterclockwise until a click
sound is heard.
Weather Band Operation
This radio receives continuous U.S. Government Weather Broadcasts from the
National Oceanic and Atmospheric Administration (NOAA), part of the Department
of Commerce. This National Weather Radio service includes more than 750
transmitters covering all 50 states and adjacent coastal waters, Puerto Rico, the U.
S. Virgin Islands, and the U.S. Pacific Territories. The weather broadcasts are
transmitted on seven separate bands from 162.400 MHz to 162.550 MHz.
To hear the weather reports, press the WEATHER button on the top cabinet at any
time. If you were listening to another band the radio will automatically switch to the
weather band.
The volume level is fixed at optimum listening level on Instant Weather operation.
In order to increase or decrease the volume level, turn the VOLUME Control.
Note: Since the National Weather Radio transmitters operate at much lower
power than commercial radio stations, the volume on the weather band
will be lower than for AM/FM or TV bands. This is normal and not an
indication of any trouble with your unit. Adjust the VOLUME when listening
to the Weather Band if necessary.
10
RP3228_030205.p65
10
2/3/2005, 10:32
If you do not hear the weather reports when you press the WEATHER button, very
slowly rotate the WB FINE TUNING control on the left side cabinet of the radio
until you are receiving the frequency of the National Weather Radio transmitter that
is broadcasting in your area. You only need to do this one time, unless you move to
a different area. In that case you might have to adjust the WB FINE TUNING
control again.
11
RP3228_030205.p65
11
2/3/2005, 10:33
Antenna Information
AM – This unit has a built-in ferrite rod antenna, which eliminates the need for an
external antenna, and provides adequate reception in most areas. If reception is
weak, turn the unit to improve reception.
FM, TV, WEATHER BAND – The telescopic antenna on the right side of the unit is
for these bands only. If reception is weak, adjust the length of the antenna.
Note:
The FM Antenna should be fully retracted (lowered) when the unit is connected
to your AC outlet for recharging.
12
RP3228_030205.p65
12
2/3/2005, 10:33
Clock Operation
Setting The Date And Time
Note: The month and date are displayed numerically (MM/DD).
For example, February 28 th is displayed as “2 28”.
1.) Press the MODE button four times. The Month
display appears.
2.) Press the SET button repeatedly to advance the display to the correct month.
3.) Press the MODE button again. The Day display
appears.
4.) Press the SET button repeatedly to advance the display to the correct day.
5.) Press the MODE button again. The Hour
display appears together with either the “A”
(AM), “P” (PM), or “H” (24 Hour format)
indicator.
6.) Press the SET button repeatedly to advance the display to the correct hour,
AM “A” or PM “P”.
7.) Press the MODE button again. The Minutes
display appears.
8.) Press the SET button repeatedly to advance the display to the correct minute.
9.) Press the MODE button once more, then press
the SET button. The clock begins to run.
13
RP3228_030205.p65
13
2/3/2005, 10:33
Setting The Alarm Time
1.) Press the MODE button twice. The AL indicator
appears. The Hour digit flashes.
2.) Press the SET button repeatedly to advance the display to the correct hour,
AM “A” or PM “P”.
3.) Press the MODE button again. The Minutes
display flashes.
4.) Press the SET button repeatedly to advance the display to the correct minute.
5.) Press the MODE button again. The Alarm time
is set, and the display returns to current time.
6.) To check the set Alarm time, press the SET
button once. The display shows the Alarm time
for approx. 5 seconds then returns to current
time.
14
RP3228_030205.p65
14
2/3/2005, 10:33
To Activate The Alarm Time
1.) Press the MODE button once. The AL indicator
appears. The Alarm time flashes.
2.) Press the SET button until the
indicator
appears.
3.) Press the MODE button repeatedly to return to current time.
4.) When the Alarm time reached, the buzzer
sounds for 30 seconds and then stops.
5.) To stop the Alarm sooner, press the MODE button.
Snooze Alarm
When the alarm turns ‘On’, you may temporary stop the buzzer sound
within 30 seconds.
1.) P r e s s t h e S E T b u t t o n o n c e , t h e
indicator will flash.
2.) After 5 mintues, the buzzer will come on
again.
15
RP3228_030205.p65
15
2/3/2005, 10:33
To Activate The Hourly Chime
1.) Press the MODE button once. The AL indicator
appears. The Alarm time flashes.
2.) Press the SET button until the
indicator
appears.
3.) Press the MODE button repeatedly to return
to current time.
4.) During “:00” second of every hour, a “BEEP” sound will be heard.
16
RP3228_030205.p65
16
2/3/2005, 10:33
To Activate The Alarm Time And Hourly Chime
1.) Press the MODE button once. The AL indicator
appears. The Alarm time flashes.
2.) Press the SET button once, the
indicator
appears. Alarm time is activated.
3.) Press the SET button once more, both
and
indicators appear.
Both Alarm time and Hourly Chime are
activated.
4.) Press the MODE button repeatedly to return
to current time.
17
RP3228_030205.p65
17
2/3/2005, 10:33
To Deactivate The Alarm Time And Hourly Chime
1.) Press the MODE button once. The AL indicator
appears. The Alarm time flashes.
2.) Press the SET button once, the
indicator
disappears.
Alarm time is deactivated but Hourly Chime is
still activated.
3.) Press the SET button once more, the
indicator disappears.
Hourly Chime is also deactivated.
4.) Press the MODE button repeatedly to return
to current time.
Clock Display Lighting
To see the time in low-light conditions, press the LIGHT button. The display lighting
will turn on for a few seconds and then shut off automatically.
Earphone Jack
For private listening, an EARPHONE jack is located on the left side of the radio.
Plug in the earphone (not included) and adjust the volume to a comfortable level.
The internal speaker is disconnected when the earphone is plugged into the radio.
18
RP3228_030205.p65
18
2/3/2005, 10:33
Replacing the Rechargable Ni-Cd battery pack
If after recharging, the battery power is still weak, replace the 4.8V 320mAH
rechargeable battery pack.
1.) Turn the unit on its side and use
a small screwdriver to remove
2
the screws securing the battery
1
compartment cover.
2.) Remove the compartment cover
by sliding it in the direction of
“arrow”.
3.) Unplug the rechargeable battery
pack connector from the socket
4
and lift the pack out of the
compartment.
4.) Connect the new battery pack’s plug into the socket and place the battery
pack into the compartment.
Note:
The replacement Ni-Cd rechargeable battery packs are available from the Emerson
Customer Service Department. Please call 1-800-898-9020 and specify that you
need the replacement battery pack for model number RP3228 rechargeable
flashlight/radio. The part number is “AAA320F4M57”.
Caution: The supplied battery pack plug has the red wire toward the EARPHONE
jack when inserted correctly. To ensure proper polarity, only use the supplied or
recommended replacement battery pack.
5.) Replace the compartment cover and secured with the two screws.
19
RP3228_030205.p65
19
2/3/2005, 10:33
CARE AND MAINTENANCE
Caution:
Ni-Cd battery must be disposed of properly.
Call 1-800-822-8837 for recycling information.
Do not dispose of battery pack in fire.
Be sure to recharge new battery pack before using.
There are no user serviceable parts inside this radio. Please refer all service
problems to a qualified service facility.
If the cabinet becomes dusty, wipe the exterior with a soft dust cloth only. Never
use dusting sprays or polishes on the cabinet.
If the cabinet becomes dirty or smudged with fingerprints it may be wiped with a
soft cloth that has been slightly dampened with a mild soap and water solution.
Always disconnect the power cord from the AC outlet before cleaning, and never
allow any liquid to get inside the cabinet.
Bulb Replacement
The flashlight and nightlight in this unit use LEDs (Light Emitting Diodes)
instead of incandescent bulbs. These LEDs should last for the full useable
life of the product and they are not consumer replaceable.
TO FIND THE LOCATION AND PHONE NUMBER
OF Y OUR NEA RES T SERVI CE CE NT ER
PERMITTED TO PERFORM WARRANTY...
SERVICE
CALL TOLL FREE: 1-800-695-0098
FOR ADDITIONAL SET-UP OR OPERATING ASSISTANCE
PLEASE CALL:
1-800-898-9020
FOR CUSTOMER SERVICE, PLEASE WRITE TO:
Emerson Radio Corp.
Consumer Affairs Dept.
1901 Diplomat Drive,
Farmers Branch, TX 75234.
20
RP3228_030205.p65
20
2/3/2005, 10:33
LIMITED WARRANTY
Emerson Radio Corp. warrants manufacturing defects in original material, including
original parts and workmanship, under normal use and conditions, for a period of
ninety (90) days from the date of original purchase in the U.S. With your dated
proof of purchase, we will provide repair service at no charge for labor and parts
at an authorized Depot Repair Facility, or replace the product in our discretion.
For repair or replacement, pack your unit in a padded box, enclose your check or
money order payable to Emerson Radio Corp. in the amount of $5.00 (not required
by California residents) to cover shipping and handling costs, and enclose a copy
of your proof of purchase. Send your unit to:
Emerson Radio Corp.
1901 Diplomat Drive,
Farmers Branch, TX 75234.
This warranty does not cover damage from negligence, misuse, abuse, accident,
failure to follow operating instructions, commercial use, rental, repairs by an
unauthorized facility, or products purchased, used, serviced or damaged outside
of the United States.
THIS WARRANTY GIVES YOU SPECIFIC LEGAL RIGHTS, AND YOU MAY
ALSO HAVE OTHER RIGHTS WHICH VARY FROM STATE TO STATE.
AU898H
21
RP3228_030205.p65
21
2/3/2005, 10:33
EMERSON
Part No. 16-2971
503-02
RP3228_030205.p65
Printed in China
22
2/3/2005, 10:33