1
MCS2000 II & III-C fold-out-NEW 03/11/98 15:59 Page 6
MCS 2000 II & III
User Guide
Bedienungsanleitung
Guide d'utilisation
Herjdjlcndj lkz gjkmpjdfntkz
Manual del usuario
MCS2000 II & III-C fold-out-NEW 03/11/98 15:59 Page 1
A
B
A
B
C
,,,,
,,,,
,,,,
,,,,
,,,,
,,,,
,,,,
D
F
"2"
G
C
D
"3"
1
2
3
4
5
6
7
8
9
*
0
#
G
"E" 1
6
H/L
11
Page
7
Phon
12
8
Scan
13
4
9
5
10
Zone
2
3
Home
"I"
1
6
11
Call
2
7
12
Sel
3
8
13
Menu
4
9
Opt
5
10
S
MCS2000 II & III-C fold-out-NEW 03/11/98 15:59 Page 2
GB
This multilingual user guide is spiral bound. Motorola has chosen this design for your convenience, allowing you
to tear out the languages you do not need without ruining the book.
D
Dieses mehrsprachige Benutzerhandbuch ist spiralgebunden. Wir haben diese Ausführung gewählt, damit Sie die
Sprachen, die Sie nicht benötigen, entfernen können, ohne das Buch zu beschädigen.
F
La reliure spiralée de ce guide multilingue est spécialement utilisée pour vous permettre de retirer les langues
dont vous n'avez pas besoin sans abîmer le manuel.
RUS
E
"nj vyjujzpsxyjt herjdjlcndj crhtgktyj cgbhfkm/. Abhvf Motorola ds,hfkf 'nj jajhvktybt lkz
dfituj elj,cndf> xnj gjpdjkztn dfv bpdktxm ytye;yst zpsrb> yt gjdhtlbd ryb;re.
Este manual plurilingüe del usuario está encuadernado con espiral. Motorola ha escogido este diseño para su
comodidad, ya que le permite arrancar las páginas de los idiomas que no necesite sin estropear el libro.
MCS2000 2&3-C UG GBBook Page 1 tirsdag 3. november 1998 14:58
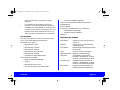
MCS 2000 Models II & III
User Guide
page
General Information . . . . . . . . . . . . . . . . . . . . . . . . . 2
Functions of the Buttons . . . . . . . . . . . . . . . . . . . . . 2
Audio Signals . . . . . . . . . . . . . . . . . . . . . . . . . . . . . . 3
General operation . . . . . . . . . . . . . . . . . . . . . . . . . . 3
Radio ON/OFF and Volume Control . . . . . . . . . . 3
Function Selection . . . . . . . . . . . . . . . . . . . . . . . . . . 4
Function Button Selection . . . . . . . . . . . . . . . . . . 4
Menu Selection . . . . . . . . . . . . . . . . . . . . . . . . . . 4
Adjust Display Intensity . . . . . . . . . . . . . . . . . . . . 5
Tones On/off . . . . . . . . . . . . . . . . . . . . . . . . . . . . 5
Zone and Mode Selection . . . . . . . . . . . . . . . . . . 5
Outgoing Calls . . . . . . . . . . . . . . . . . . . . . . . . . . . . . 5
Scanning . . . . . . . . . . . . . . . . . . . . . . . . . . . . . . . . . 6
Turning Scanning On/Off . . . . . . . . . . . . . . . . . . . 6
Viewing a Scan List . . . . . . . . . . . . . . . . . . . . . . . 7
Changing Scan Lists . . . . . . . . . . . . . . . . . . . . . . 7
Telephone Interconnect . . . . . . . . . . . . . . . . . . . . . . 7
Receiving a Telephone Call . . . . . . . . . . . . . . . . . 7
Sending a Telephone Call . . . . . . . . . . . . . . . . . . 8
Keypad Selection (List/Buffered Dialing) . . . . . . . 8
Private Call . . . . . . . . . . . . . . . . . . . . . . . . . . . . . . . . 9
Receiving a Private Call . . . . . . . . . . . . . . . . . . . . 9
Sending a Private Call (trunking only) . . . . . . . . . 9
Caller ID . . . . . . . . . . . . . . . . . . . . . . . . . . . . . . . . . 10
Mode Preset Buttons . . . . . . . . . . . . . . . . . . . . . . . 10
Mode Recall . . . . . . . . . . . . . . . . . . . . . . . . . . . . . . 10
Automatic Power-Off . . . . . . . . . . . . . . . . . . . . . . . 11
SmartZone/AMSS Functions . . . . . . . . . . . . . . . . . 11
Site Search & Site Lock . . . . . . . . . . . . . . . . . . . 11
Emergency Operation . . . . . . . . . . . . . . . . . . . . . . 11
External Alarm . . . . . . . . . . . . . . . . . . . . . . . . . . . . 12
MCS 2000 Models II & III
English
Handset Operation . . . . . . . . . . . . . . . . . . . . . . . . .
Car Radio Mute . . . . . . . . . . . . . . . . . . . . . . . . . . . .
Failsoft. . . . . . . . . . . . . . . . . . . . . . . . . . . . . . . . . . .
Conventional Functions . . . . . . . . . . . . . . . . . . . . .
Repeater/Direct . . . . . . . . . . . . . . . . . . . . . . . . .
Monitor . . . . . . . . . . . . . . . . . . . . . . . . . . . . . . .
User-Selectable Private Line (PL) . . . . . . . . . . .
Stat Alert (MDC-1200/Star Signalling) Features . . .
PTT ID and Emergency . . . . . . . . . . . . . . . . . . .
Selective Calls . . . . . . . . . . . . . . . . . . . . . . . . . .
Group IDs and Wildcard Entry . . . . . . . . . . . . .
Telephone Interconnect . . . . . . . . . . . . . . . . . .
Status/Message . . . . . . . . . . . . . . . . . . . . . . . .
MDC Repeater Access (RAC) . . . . . . . . . . . . . .
Trunking Functions . . . . . . . . . . . . . . . . . . . . . . . . .
Sending a Call Alert Page . . . . . . . . . . . . . . . . .
Receiving a Call Alert . . . . . . . . . . . . . . . . . . . .
Reprogram Request . . . . . . . . . . . . . . . . . . . . .
One Touch Button Functions . . . . . . . . . . . . . .
Out of Range . . . . . . . . . . . . . . . . . . . . . . . . . . .
Secure Operation . . . . . . . . . . . . . . . . . . . . . . . . . .
Secure Keyload and Erase . . . . . . . . . . . . . . . .
Data Operation . . . . . . . . . . . . . . . . . . . . . . . . . . . .
Radio Care . . . . . . . . . . . . . . . . . . . . . . . . . . . . . . .
Safety Information. . . . . . . . . . . . . . . . . . . . . . . . . .
Caution: Vehicles Equipped With Air Bags . . . .
Accessories. . . . . . . . . . . . . . . . . . . . . . . . . . . . . . .
Menu Overview . . . . . . . . . . . . . . . . . . . . . . . . . . . .
Computer Software Copyrights . . . . . . . . . . . . . . .
12
12
12
13
13
13
13
13
13
14
14
14
15
15
15
15
15
16
16
16
16
17
17
18
18
18
19
19
20
Warning: When installing or removing the
mobile radio from the vehicle, the radio must be
switched off or damage to the radio may occur.
68P81083C10-C
page 1
MCS2000 2&3-C UG GBBook Page 2 tirsdag 3. november 1998 14:58
English
MCS 2000 Models II & III
General Information
With the MCS 2000 you have chosen an excellent
mobile radio. The Motorola warranty for quality guarantees the high standard of Motorola products. Your
MCS 2000 radio has left our factory only after extensive tests.
This user guide describes the way a standard
radio works. Since standard operation may be
changed by programming - both concerning
the Functions which the radio includes and the
Buttons used to activate them - the way your
radio operates may differ from what is
described here.
The radio display prompts may be programmed into the radio in one of a number of
different languages. English is the default language and is used to describe the displays in
this user guide.
For further information, contact the person in
charge of your radio system or your local service representative.
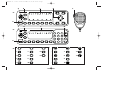
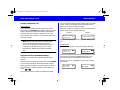
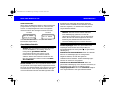
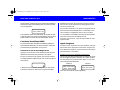
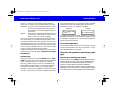
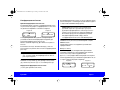
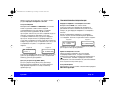
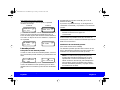
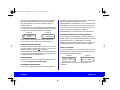
Functions of the Buttons
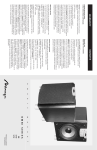
Numbers in brackets refer to the illustrations on the
fold out page.
page 2
68P81083C10-C
Depending on the keypad ordered with your radio,
refer to either “E” or “I” for the description of the buttons:
(A)
Radio ON/OFF and Volume control
(B)
Three-color indicator
Green, flashing: incoming call or Call Alert Page
Red, continuous: radio transmits in clear and
secure
Orange, continuous: system/channel busy or
incoming clear call (secure operation).
Orange, flashing: incoming secure call (secure
operation).
(C)
Display with symbols and one line (model II) or
two lines (model III) of 14 characters.
(D)
Mode selector
(F)
Transmit key (PTT)
Push to talk, release to listen.
(G) Microphone connector
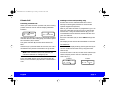
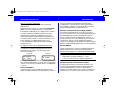
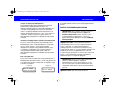
(1)
Zone select
(2)
Monitor, press button to listen for activity (conventional operation) or
Search (AMSS/SmartZone operation)
(3)
HOME
(4)
Secure on/off (secure operation)
(5)
Emergency
(6)
External alarm
(7)
Telephone interconnect
(8)
Scan
(9)
Menu
MCS2000 2&3-C UG GBBook Page 3 tirsdag 3. november 1998 14:58
(10)
(11)
(12)
(13)
Option
Page
Private call
Select
Out of range (repeated, trunking)
Keypad entry accepted
Radio self-test failed/ Key entry not
accepted/Time out timer warning/
System reject
Audio Signals
High tone
Ringing tone
Low tone
Call alert acknowledgement
Function/Channel/Hardware error,
tone continues until valid operation or
radio turned off.
Busy (repeated four times)
Keyfail (secure operation)
Automatic call back (trunking)
PTT pressed in clear mode (secure
operation)
Call alert sent
Call alert received (repeated every
five seconds)
Call initiated (Enhanced Private Call)
Selective call received (Private Call II)
Incoming private call (repeated for 20
seconds)
Phone initiate/Receive
General operation
Radio ON/OFF and Volume Control
Turn the radio on by pressing the on/off button (A).
The radio then carries out a self-test.
Adjust the volume to a comfortable listening level by
turning the on/off button (A).
Emergency activate
Emergency acknowledgement
Emergency exit
Note: If equipped, your radio may be programmed with ignition sense enabled.
Failsoft (repeated every 10 seconds
trunking)
MCS 2000 Models II & III
English
68P81083C10-C
page 3
MCS2000 2&3-C UG GBBook Page 4 tirsdag 3. november 1998 14:58
English
MCS 2000 Models II & III
page 4
68P81083C10-C
Depending on programming, if the ignition is turned
off, the radio will:
• turn off
• inhibit transmit capability, or
• inhibit the use of the PTT button.
Contact your system operator for further information.
Turn the radio off by pressing the on/off button (A)
again.
Function Button Selection
For direct access to a feature, depress the desired
function button.
A triangle in the display points to the function button
used.
If the function requires additional input, use the mode
selector (D) to display your choices, and press the
select button (13).
Note: If the radio sounds the error tone and displays an error message, please contact the person in charge of your radio system or your local
service representative.
Note: Function buttons are usually active.
Pressing a function button will exit the current
feature and start the selected feature.
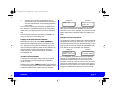
Function Selection
Functions programmed into the radio can be selected
in two different ways:
1
Directly via a pre-programmed, dedicated button, or
2
Indirectly via the radio MENU.
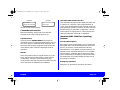
Menu Selection
Features may be accessed indirectly through the radio
menu.
1
Press the menu button (9) to enter menu selection.
2
Use the mode selector (D) to display the desired
function.
3
Press the select button (13). The radio will leave
menu mode and enter the selected feature, or
enter a sub-menu.
MCS2000 2&3-C UG GBBook Page 5 tirsdag 3. november 1998 14:58
If additional input is required, use the selector (D) to
select the desired function. Press the select button
(13).
A list of potential menu functions is found in the back
of this user guide (page 19).
Adjust Display Intensity
Select the menu DISP INTENSITY. Press the select
button (13). The display intensity may then be
adjusted to one of four levels: high, medium, low or
very low, using the selector (D).
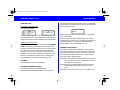
Tones On/off
The tones heard every time a key is pressed may be
turned off or on through the menus.
Select the menu TONES. Press the select button (13).
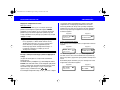
The display then shows the present state e.g.
model III
TONES ON
model II
TONES ON
Use the mode selector (D) to toggle between “tones
off” and “tones on”. Press the select button (13) when
the desired state is in the display.
MCS 2000 Models II & III
English
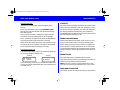
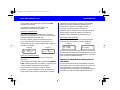
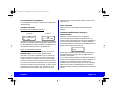
Zone and Mode Selection
A mode is a channel or talkgroup and all its related
features. A zone is a grouping of modes that can be
selected by pressing the zone button (1). Then use the
mode selector (D) to display the desired zone e.g.
ELECTRIC CO
NORTH DIVISION
ELECTRIC NORTH
where the model III display has the zone name in line one
and the channel/talkgroup name in line two. For model II
the zone name is followed by the channel/talkgroup
name. The zone name flashes until you press the select
button (13) to choose it. Then use the mode selector (D)
until the desired talkgroup/channel is displayed, e.g.
ELECTRIC CO
SOUTH DIVISION
ELECTRIC SOUTH
Outgoing Calls
When you have selected zone and mode, you are
ready to transmit.
Lift the microphone out of its holder and press the
PTT (F) while talking, release it while listening. Speak
in a normal tone of voice, keeping a distance of 5 -10
cm (2-4”) from the microphone. While transmitting the
red indicator (B) will light.
68P81083C10-C
page 5
MCS2000 2&3-C UG GBBook Page 6 tirsdag 3. november 1998 14:58
English
MCS 2000 Models II & III
Conventional only:
If the orange indicator is lit, the channel is busy. Wait
for the orange indicator to turn off before transmitting.
Trunking only:
If the busy tone sounds, release the PTT (F) and wait
for the automatic call back tone. When this tone is
heard, press the PTT (F) within 3 seconds to transmit.
If your radio is equipped with a time out timer, a warning tone will sound a few seconds before the call is
terminated.
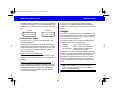
Scanning
Scan allows the user to monitor more than one channel or talkgroup (including the selected channel or
talkgroup) at a time for activity.
Channels within a scan list may be assigned priority
levels as follows:
Priority 1: Most important
Priority 2: Second most important
Non-Priority: Normal scan list member without
priority
In scan the radio will listen to the channel/talkgroup
with the highest priority. If a channel/talkgroup with a
higher priority becomes active while the radio is listen-
page 6
68P81083C10-C
ing to a lower priority member, the radio will switch to
the higher priority channel/talkgroup.
Note: If the user is involved in a conversation,
he will not be interrupted by any normal priority
calls.
Turning Scanning On/Off
The scanning feature may be turned on via the Scan
button (8) or via a menu as previously described.
For as long as “scan on” is selected, the scan icon
( ) will be on and the radio will scan for activity in the
channels/talkgroups that are defined in the scan lists
of the present mode.
Note: If a mode is pre-programmed with autoscanning, the radio scans automatically whenever this mode is selected and scan cannot be
turned off.
MCS2000 2&3-C UG GBBook Page 7 tirsdag 3. november 1998 14:58
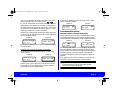
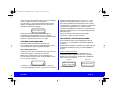
Viewing a Scan List
Select the menu VIEW LISTS as previously described,
then use the mode selector (D) to display the menu
SCAN. Press select (13).
The dot in the scan icon
flashes if the mode is
priority 1, lights continuously
if the mode is priority 2 or the icon
lights continuously to indicate a
normal priority mode. The programming icon
will
be on while the list is viewed.
Use the mode selector (D) to view the next member.
The function is left by pressing the HOME button (3).
Press the select button again to make the mode priority 2 (the scan icon
lights continuously).
Press the select button a third time to make it a priority 1 mode (the dot in the scan icon
flashes).
Pressing the select button again makes the mode
non-member (mode not included in the list).
Changing Scan Lists
If a scan list is user programmable, it may be changed
by the user (members added or deleted).
Select the menu PROGRAM LISTS as previously
described, then use the mode selector (D) until SCAN
is displayed and press the select button (13) or
Press and hold the scan button (8) until the key press
accepted tone is heard. The programming icon
and the triangle in the display flash.
Use the mode selector (D) to select the desired mode.
Press the select button (13) if the scan icon
is not
in the display, to include the mode as a normal priority
member.
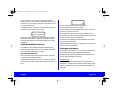
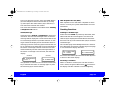
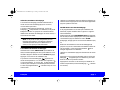
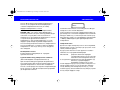
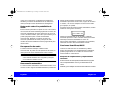
Receiving a Telephone Call
When your radio receives a telephone call, a telephone ringing tone sounds and the display alternates
between
MCS 2000 Models II & III
English
Telephone Interconnect
Telephone interconnect is used when the radio is
required to operate in a radio system connected to a
public or private telephone system.
model III
PHONE CALL
SOUTH DIVISION
model II
PHONE CALL
and the home display. The green indicator (B) and the
call received icon
flash.
Press the phone button (7) to answer the call.
Press the HOME button (3) or the menu button (9)
when the conversation is over.
68P81083C10-C
page 7
MCS2000 2&3-C UG GBBook Page 8 tirsdag 3. november 1998 14:58
English
MCS 2000 Models II & III
Sending a Telephone Call
List Selection
Press the menu button (9) and operate the mode
selector (D) until PHONE is displayed. Press the select
button (13) and use the mode selector (D) until the
desired name and number is displayed. Press the
select button (13) or the PTT (F). The radio then transmits the number.
Note: If your radio has been so programmed,
you can press the phone button for quick
access to the telephone interconnect function.
Using the mode selector (D), you can scroll
between last dialled call and phone number
lists.
Keypad Selection (List/Buffered Dialing)
(model III or model II with optional keypad microphone)
Press the phone button (7) or select the menu PHONE
as previously described. Enter the desired number
directly from the keypad. If you are placing a call to a
local extension number requiring a pause before it,
press ✱
# .
If an incorrect phone number is entered, the digits
page 8
68P81083C10-C
may be erased using the mode selector (D) to the left/
down. Continue using the mode selector (D) to the
left/down to erase the entire number.
When the number is complete, press the select button
(13) or the PTT (F) to transmit the call.
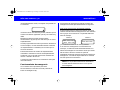
model III
PLEASE WAIT
555-1212
model II
PLEASE WAIT
will be in the display, while the system is setting up the
call.
Trunking only:
If the PHONE system is busy, the display will show
PHONE BUSY
555-1212
PHONE BUSY
and your call will be placed when the system is available, unless you press the HOME button (3) or the
menu button (9) to quit telephone Interconnect.
If phone access is unavailable to your radio, the display shows
NO PHONE
555-1212
NO PHONE
MCS2000 2&3-C UG GBBook Page 9 tirsdag 3. november 1998 14:58
Private Call
Receiving a Private Call
When your radio receives a private call, the incoming
private call tone sounds and the display alternates
between
CALL RECEIVED
ID: 2000
CALL RECEIVED
and the home display. Line two in the model III display
indicates the ID of the calling party, for model II press
the call button (12) to view it.
The green indicator (B) and the call received icon
flash.
If the PTT (F) is pressed within 20 seconds, the call is
answered and a private conversation can go ahead.
Note: If the call button (12) is not pressed, the
call will be initiated as a talkgroup call.
Press the HOME button (3) (or the menu button (9)
twice) or the call button (12) when the conversation is
over.
MCS 2000 Models II & III
English
Sending a Private Call (trunking only)
Private calls can be selected either from a list or
directly via the keypad (model III or model II with
optional keypad microphone).
Note: If your radio has been so programmed, you can
press the call button for quick access to the Private
Call function. Using the mode selector (D), you can
scroll between last received ID, Private Call lists and
your own radio ID.
Press the call button (12) or select CALL through the
menus.
The display shows the last ID transmitted or received.
List Selection:
Transmit to the displayed ID by pressing the PTT (F) or
choose another ID from the list by using the mode
selector (D).
To view the radio's own ID, use the mode selector (D)
until the display shows “MY ID:” followed by the
radio's ID, e.g.:
model III
MY RADIO USER
ID: 741317
model II
MY ID: 741317
68P81083C10-C
page 9
MCS2000 2&3-C UG GBBook Page 10 tirsdag 3. november 1998 14:58
English
MCS 2000 Models II & III
page 10
68P81083C10-C
Keypad Selection:
(model III or model II with optional keypad microphone)
Press the call button (12) or select PRIVATE CALL
through the menus and enter the desired ID directly
from the keypad.
If an incorrect number is entered the digits may be
erased by using the mode selector (D) to the left/
down. Continue using the mode (D) to the left/down to
erase the entire ID. Then enter the correct ID.
When the ID has been selected in one of the two ways
described above, the private call may be transmitted
to the displayed ID by pressing the PTT (F).
Enhanced Private Call
If an Enhanced Private Call is not answered within 20
seconds the display changes into
model III
NO ANSWER
ID: 700001
model II
NO ANSWER
Press the PTT (F) to leave your ID with the called radio
so that you will be called back later. The call alert sent
tone will sound.
Caller ID
The radio will momentarily display the ID or alias name
of the radio that initiated a call. If an emergency call is
received in trunked operation, the radio will alternate
the display between the talkgroup, the emergency
received display and the ID (or alias name) of the radio
that initiated the emergency call.
Mode Preset Buttons
Mode preset buttons will allow quick access to commonly used modes. Press and hold a mode preset
button until a good-key tone is heard to program the
button for the currently selected mode. A short press
of a mode preset button will cause the radio to immediately change to the mode programmed for that button.
Mode Recall
The radio will always remember the last mode
selected. Pressing mode recall will cause the radio to
switch to the previously selected mode.
Note: The “last” mode must be selected for a minimum of 5 seconds to be retained as the “last” mode.
Automatic Power-Off
“Automatic power off” will power off your radio when
MCS2000 2&3-C UG GBBook Page 11 tirsdag 3. november 1998 14:58
no user actions occur during a pre-programmed
length of time. A user action is defined as the press of
a button, turn of a knob or the use of any radio accessory (e.g. footswitch).
2 minutes prior to automatic power-off, the radio will
generate a continuous low tone and
AUTO POWER OFF
will flash on the display. Any user action will immediately cause the radio to cease the automatic poweroff tones and display and return the radio to normal
operation.
SmartZone/AMSS Functions
In SmartZone and AMSS (Automatic Multiple Site
Select) operation the two functions mentioned below
may be programmed into your radio:
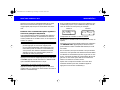
Site Search & Site Lock
Press the site search/monitor button (2) to show the
current site and signal strength.
Additionally a bar display is used to reflect the signal
strength level for the current site ranging from 0 to 3
bars:
MCS 2000 Models II & III
English
3 bars indicate a very strong signal and
no bar indicates a very weak signal.
Press and hold the site search button (2) to force the
radio to scan for a new site.
If the optional “wide-area roaming” function is programmed the radio will automatically switch sites as it
moves through your coverage area.
Automatic site switching may be disabled by activating the site lock function.
Please contact the person in charge of your radio system for further information.
Emergency Operation
If emergency is enabled on your system the function is
invoked by pressing the emergency button (5).
Emergency is exited by pressing the emergency button for approximately 2 seconds.
Trunking only:
Your radio may be programmed to indicate that an
emergency call has been received from another member of your talkgroup. The display will then alternate
between
68P81083C10-C
page 11
MCS2000 2&3-C UG GBBook Page 12 tirsdag 3. november 1998 14:58
English
MCS 2000 Models II & III
EMER RECEIVED
SOUTH DIVISION
page 12
68P81083C10-C
Handset Operation
EMER RECEIVED
and mode name of the calling party.
If “emergency with voice to follow” is enabled, the
radio will automatically transmit an emergency alarm.
It transmits audio through the visor microphone for a
pre-defined period of time after pressing the emergency button. Please contact the person in charge of
your radio system for further information.
Note: Automatic transmit via the visor microphone
is possible only with the emergency feature.
External Alarm
Depending on the accessories ordered and installed
with your radio the external alarm function activates
the vehicle horn or lights if you do not respond to a
call (Page, Trunking Private Call, or Trunking Phone
Call) before a pre-programmed time.
Press button (6) or select HORN/LIGHTS via the
menu to turn the external alarm on. “HORN/LIGHTS
ON” alternates on the display to indicate the feature is
active. Turn the alarm off by pressing button (6) again
or via the menu.
To select Handset operation, select HANDSET from
the menu and select HANDSET ON. When HANDSET
ON is selected and the handset is removed from the
Hang up box (HUB) audio will be heard only through
the handset speaker and the radio speaker will be
muted for privacy.
When the handset is placed in the HUB, or when
HANDSET OFF is selected from the menu, audio will
be heard through the radio speaker.
Car Radio Mute
If the car radio mute feature is programmed into your
MCS 2000, your standard car radio will momentarily
mute when your MCS 2000 mobile radio is transmitting or receiving. Please contact the person in charge
of your radio system for further information.
Failsoft
The failsoft feature ensures that a conversation is not
interrupted if the trunked system fails. In this mode
communication will be maintained on an open channel. The failsoft tone will sound every 10 seconds and
the display will alternate between
MCS2000 2&3-C UG GBBook Page 13 tirsdag 3. november 1998 14:58
model III
FAILSOFT
SOUTH DIVISION
model II
FAILSOFT
and the current active display.
Conventional Functions
Before transmitting, always make sure that the
selected mode is free (Orange LED not on).
Repeater/Direct
Select the menu REPEAT/DIRECT as previously
described or press a preprogrammed button. The current mode (direct or repeater) will be displayed. Use
the mode selector (D) to toggle the mode. Press the
select button (13) to select the displayed mode of
operation.
Monitor
Press the monitor button to toggle monitor on or off.
Press and hold the monitor button to enter squelch
configuration. Using the mode selector (D), the
squelch level of the radio may be fine-tuned. Press the
select key when the desired level is attained.
MCS 2000 Models II & III
English
User-Selectable Private Line (PL)
User Selectable Private Line (PL) allows the radio user
to select a PL code from a pre-programmed list of
codes. Press the Multiple Private Line (MPL) button (if
programmed) to view the current PL or press and hold
the MPL button to enter MPL configuration. Use the
mode selector to change the PL code and press the
select key when the desired PL is displayed.
Stat Alert (MDC-1200/Star Signalling)
Features
PTT ID and Emergency
Each radio can be programmed to send a unique digital identification code at the beginning of each transmission, at the end, or both. When the PTT-ID is
programmed to come before voice transmission, you
will hear a tone until the ID transmission is complete.
This ID may be combined with an emergency alarm
that is activated by an emergency button on the radio.
The dispatcher can quickly identify the radio user in
an emergency situation.
Emergency Operation
Emergency is operated as previously described.
68P81083C10-C
page 13
MCS2000 2&3-C UG GBBook Page 14 tirsdag 3. november 1998 14:58
English
MCS 2000 Models II & III
page 14
68P81083C10-C
group ID by entering the selective call or call alert feature and then scroll backward to “group” ID entry with
the mode selector (D).
Selective Calls
Receiving a Selective Call
The radio will display
CALL RECEIVED
ID: 2000
GROUP
CALL RECEIVED
for two seconds upon receiving a Selective Call. You
can enter Selective Call to view the ID of the calling
radio and to respond with a Selective Call (see below).
Sending a Selective Call
Press the call button (12) or select the menu PRIVATE
CALL as previously described. Enter the ID via the
keypad or use the mode selector (D) to scroll to the ID
you wish to call. Press the PTT (F) to transmit the
selective call to this ID. If automatic Selective Call is
disabled, the radio exits Selective Call after the transmission. If automatic Selective Call is enabled, the
radio will remain in Selective Call until you exit.
Call Alert
See trunking section for more details.
Group IDs and Wildcard Entry
(Conventional Page and Selective Call)
With keypad and unlimited calling, you may enter a
will be displayed. You may then enter a 3-digit group
ID to call or page.
Users can enter a wildcard (*) entry to call or page
multiple IDs or groups. The '*' matches all ID digits (09) in that position; i.e. to page all radio IDs 0001
through 0009, enter individual ID 0-0-0-*.
Telephone Interconnect
To make a call through the telephone system in the
conventional mode your radio must send access and
hang-up codes to the system. The access code can
be transmitted in either of two ways, depending on
how your radio is programmed.
Immediate: The radio automatically sends a pre-stored
access code as soon as the telephone interconnect button (7) is pressed.
Delayed: Press the select button (13) or the PTT (F)
and the radio sends the pre-stored access
code.
After the access code is sent, you should get a dial
MCS2000 2&3-C UG GBBook Page 15 tirsdag 3. november 1998 14:58
tone. (If no dial tone sounds, press the HOME button
(3) or the telephone interconnect button (7) to hang
up.) Now press the select button (13) or the PTT (F).
The radio then transmits the number.
The call is then handled as described under “Sending
a Telephone Call” above.
Status/Message
Select the menu STATUS or MESSAGE as previously
described. The last acknowledged status or the first
message will be displayed. Use the mode selector (D)
to scroll through the lists of possible statuses or messages. When the display shows the desired status or
message, press the select key (13) to transmit the status or message. Four beeps will sound to indicate that
the status or message has been received. The radio
will automatically exit the status/message feature. If
the status or message is not received, the radio will
display
model III
model II
NO ACKNOWLEDGE
STATUS 1
NO ACKNOWLEDGE
and generate a continuous tone. Press the select (13)
key to transmit the status or message again or press
the home key (3) to exit the feature.
MCS 2000 Models II & III
English
MDC Repeater Access (RAC)
MDC repeater access will select a repeater for transmission. Consult your system administrator for more
information.
Trunking Functions
Sending a Call Alert Page
Select the menu PAGE as previously described, then
either enter the ID via the keypad or use the mode
selector (D) to display the desired ID from the ID list.
Press the PTT (F) or the select button (13) to send the
Call Alert Page.
The call alert page acknowledgement tone is heard if
the called radio receives the call alert page. If the page
is not received the display will show
NO ACKNOWLEDGE
ID: 700001
NO ACKNOWLEDGE
Press the home button (3) or the menu button (9) twice
to return to the home display.
Receiving a Call Alert
When a call alert is received, the call alert received
tone is heard, the green LED and the
icon flash in
the display until the Call Alert is acknowledged by
68P81083C10-C
page 15
MCS2000 2&3-C UG GBBook Page 16 tirsdag 3. november 1998 14:58
English
MCS 2000 Models II & III
pressing the PTT (F) or pressing and releasing the
monitor button (2).
Status/Message
Operated as previously described under “Conventional Functions”.
Reprogram Request
If dynamic regrouping is programmed into your radio,
the reprogram request function may be selected either
via a pre-programmed button or through a menu. A
reprogram request will send a message to the console
operator requesting that the operator assign the radio
to a new talkgroup. See your system administrator for
further details.
One Touch Button Functions
If this optional feature is programmed in your radio, a
button may be dedicated to sending a pre-programmed status, message, call alert or dialing a preprogrammed phone number. See your system administrator for further details.
Out of Range
If this optional function is programmed into your radio,
it will indicate when you have left your radio coverage
area. The display will alternate between
page 16
68P81083C10-C
model III
OUT OF RANGE
SOUTH DIVISION
model II
OUT OF RANGE
and the current mode and/or the out of range tone will
sound.
Secure Operation
Note: This section applies only if secure operation is
programmed into your radio. This section lists features where differences occur when operating in
secure. For other feature operation see General
Operation above.
Outgoing Calls: When the selected mode is not preprogrammed as either secure-only or clear-only,
secure transmit is turned on/off by pressing the
secure button (4), except for trunking telephone interconnect and private call which are always controlled
by the button. A beep immediately after the PTT is
pressed indicates a clear (non-secure) transmission.
Note: If the secure button is pressed during a transmission, the transmission is aborted, and an alert tone
will sound until the PTT is released. The operation
change will be effective with the next PTT press.
Incoming Calls: When a secure call is received the
orange LED (conventional only) and the secure icon
will flash.
MCS2000 2&3-C UG GBBook Page 17 tirsdag 3. november 1998 14:58
Conventional Functions: In monitor, only calls from
radios with the same encryption key will be heard.
Calls with a different key will be heard as noise.
Trunking Functions: When secure transmit is controlled by the secure button (4), during a talk group or
private call you can only change from clear to secure
operation. During a telephone interconnect or failsoft call you can change from clear to secure operation, or from secure to clear. During an emergency
call NO change is possible.
Secure Keyload and Erase
An encryption key must be loaded from a Key Variable
Loader (KVL) that corresponds to the encryption type
of the radio.
Disconnect the microphone cable from the controlhead and attach the keyloader cable. The display
shows “KEYLOADING”, and normal transmit and
receive is disabled. Refer to the KVL instruction manual for loading procedure.
Note: For some earlier radio models, enter the
keyloading mode by pressing and holding the
secure button (4) until the display changes
showing the secure menu's first item. Scroll to
the “KEYLOAD” choice, and press the select
button. To exit, press the home button.
MCS 2000 Models II & III
English
When the key has been loaded successfully, the radio
will sound one long beep.
To erase a key, press and hold the secure button (4)
until the display changes showing the secure menu's
first item “ERASE KEY”, and press the select button.
When key erase is complete, the display will show
“ERASED”.
Note: If battery power is removed from the radio for
more than 3 days, the radio may lose its encryption
key.
Data Operation
If your radio is programmed for data operation, you
may send and / or receive data messages from a data
terminal. While sending or receiving data, the radio
will display
DATA TRANSFER
DATA TRANSFER
Any button press will cause the radio to interrupt the
data transfer and return the radio to normal operation.
Please contact the person in charge of your radio system for further information.
68P81083C10-C
page 17
MCS2000 2&3-C UG GBBook Page 18 tirsdag 3. november 1998 14:58
English
MCS 2000 Models II & III
Radio Care
• Avoid any physical abuse of the radio.
• The radio exterior should be cleaned with a cloth
dampened with clean water, a mild liquid soap
solution or isopropyl alcohol.
CAUTION
The use of chemicals such as detergents,
alcohol (except isopropyl), aerosol sprays,
and petroleum products may be harmful and
damage the radio housing.
Safety Information
Every radio, when transmitting, radiates energy into
the atmosphere which may, under certain conditions,
cause the generation of a spark.
All users of vehicles fitted with radios should be aware
of the following warnings:
Do not operate radio near
inflammable liquids or in the vicinity of
explosive devices
During normal use, the radio will subject you to radio
energy substantially below the level where any kind of
harm is reported.
To ensure personal safety, please observe the following simple rules:
page 18
68P81083C10-C
• To assure that radio frequency (RF) energy exposure to bystanders external to a vehicle is lower
than that recommended by the adopted standard,
transmit with any mobile radio only when bystanders are at least 60 cm away from a properly
installed externally mounted antenna.
• DO NOT hold the transmit (PTT) key in when not
actually desiring to transmit.
• DO NOT allow children to play with any radio
equipment containing a transmitter.
• DO NOT operate radio while driving. It should also
be noticed that the use of a hand held microphone
while driving could constitute an offense under the
Road Traffic Regulation.
When planning the installation of communication
equipment in a vehicle with one or more air bags:
Caution: Vehicles Equipped With Air Bags
• An air bag inflates with great force. DO NOT place
objects, including communication equipment, in
the area over the air bag or in the air bag deployment area. If the communication equipment is
improperly installed and the air bag inflates, this
could cause serious injury.
• Installation of vehicle communication equipment
should be performed by a professional installer/
technician qualified in the requirements for such
MCS2000 2&3-C UG GBBook Page 19 tirsdag 3. november 1998 14:58
installations. An air bag’s size, shape and deployment area can vary by vehicle make, model and
front compartment configuration (e.g., bench seat
vs. bucket seats).
• Contact the vehicle manufacturer’s corporate
headquarters, if necessary, for specific air bag
information for the vehicle make, model and front
compartment configuration involved in your communication equipment installation.
Accessories
Please contact you local Motorola representative for
further information about the accessories listed
below:
Microphone Options:
•
Palm Microphones
•
Keypad Microphones
•
Noise Cancelling Microphones
•
Visor Microphone
•
Desk Microphones
•
Telephone Style Handsets
Mounting Accessories:
•
Tilt Mount Bracket
•
Key Lock
•
Direct Trunnion Mount
•
Base Tray with Loudspeaker
MCS 2000 Models II & III
English
•
Remote Mount Option
A Variety of External Loudspeakers (low/high power)
A Variety of Cable kits
Desk (Control Station) Accessories:
•
Power Supplies
•
External Emergency Foot-switch
Antennas
Menu Overview
Zone Select:
Select a Zone (same as button - 1)
Channel: Select a channel (Same as mode selector D)
Scan Select:
Scan ON or OFF (Same as button - 8)
Tones: Keypad entry tones ON or OFF
Display intensity:
Adjust display backlight
View lists:View a Scan, Telephone, Private Call, or Call
Alert List
Program lists:
Program a Scan, Telephone, Private Call, or
Call Alert List
Horn/Lights:
Turn External Alarm (Horn/Lights) ON or OFF
(Same as button - 6)
68P81083C10-C
page 19
MCS2000 2&3-C UG GBBook Page 20 tirsdag 3. november 1998 14:58
English
MCS 2000 Models II & III
High/Low power:
Set the radio to High or Low Power level(s)
TX (Transmit) inhibit:
Turn the transmitter ON or OFF
Private Call:
Select Private Call feature. (Same as button
- 12)
Page:
Select the Call Alert Feature. (Same as button - 11)
Phone: Select a Phone feature. (Same as button - 7)
Status: Select and send a pre-programmed status
from a list
Message:Select and send a pre-programmed message from a list
Handset: Select handset mode of operation
Trunking
Reprogram Request:
Request Dynamic Regrouping program
change
Wide-Area Trunking
Site Lock/Unlock:
Disables or enables automatic site switching
Conventional Only
Repeater or Direct:
Enables repeater access or talkaround
capability
page 20
68P81083C10-C
Computer Software Copyrights
The products described in this manual may include copyrighted computer programmes
stored in semiconductor memories or other media. Laws in the United States and other
countries preserve for Motorola/Europe and Motorola Inc. certain exclusive rights for copyrighted computer programmes, including the right to copy or reproduce in any form the
copyrighted computer programme. Accordingly, any copyrighted computer programmes
contained in the products described in this manual may not be copied or reproduced in
any manner without the express written permission of the holders of the rights. Furthermore, the purchase of these products shall not be deemed to grant either directly or by
implication, estoppel, or otherwise, any licence under the copyrights, patents, or patent
applications of the holders of the rights, except for the normal non-exclusive royalty free
licence to use that arises by operation of law in the sale of the product.
MCS2000 2&3-C UG GBBook Page 1 tirsdag 3. november 1998 14:58
MCS 2000 Modelle II & III
Bedienungsanleitung
Seite
Allgemeines . . . . . . . . . . . . . . . . . . . . . . . . . . . . . . . . . . 2
Tastenfunktionen . . . . . . . . . . . . . . . . . . . . . . . . . . . . . . 2
Akustische Signale . . . . . . . . . . . . . . . . . . . . . . . . . . . . . 3
Allgemeine Bedienungshinweise . . . . . . . . . . . . . . . . . . 4
Ein-/Ausschalter und Lautstärkeregler . . . . . . . . . . . 4
Wahl der Funktionen . . . . . . . . . . . . . . . . . . . . . . . . . . . 4
Wahl über Funktionstasten . . . . . . . . . . . . . . . . . . . . 4
Wahl über Menüs . . . . . . . . . . . . . . . . . . . . . . . . . . . 4
Verstellen der Anzeigestärke . . . . . . . . . . . . . . . . . . 5
Töne Ein/Aus . . . . . . . . . . . . . . . . . . . . . . . . . . . . . . 5
Zonen- und Moduswahl . . . . . . . . . . . . . . . . . . . . . . 5
Aussenden von Rufen . . . . . . . . . . . . . . . . . . . . . . . . . . 6
Kanalabfrage . . . . . . . . . . . . . . . . . . . . . . . . . . . . . . . . . 6
Ein-/Ausschalten der Kanalabfrage . . . . . . . . . . . . . 6
Anzeigen einer Abfrageliste . . . . . . . . . . . . . . . . . . . 7
Ändern von Abfragelisten . . . . . . . . . . . . . . . . . . . . . 7
Telefonüberleitung . . . . . . . . . . . . . . . . . . . . . . . . . . . . . 7
Empfangen eines Telefonanrufs . . . . . . . . . . . . . . . . 8
Senden eines Telefonanrufs . . . . . . . . . . . . . . . . . . . 8
Tastaturwahl (Listen/Pufferwahl) . . . . . . . . . . . . . . . 8
Privatruf . . . . . . . . . . . . . . . . . . . . . . . . . . . . . . . . . . . . . 9
Empfangen eines Privatrufs . . . . . . . . . . . . . . . . . . . 9
Aussenden eines Privatrufs (nur Bündelfunk) . . . . . . 9
Anrufer-Kennung. . . . . . . . . . . . . . . . . . . . . . . . . . . . . . 11
Modusvoreinstellungstasten . . . . . . . . . . . . . . . . . . . . . 11
Modusspeicher . . . . . . . . . . . . . . . . . . . . . . . . . . . . . . . 11
Automatische Abschaltung . . . . . . . . . . . . . . . . . . . . . . 11
SmartZone/AMSS-Funktionen . . . . . . . . . . . . . . . . . . . 12
Standortsuche und Standortsperre . . . . . . . . . . . . 12
MCS 2000 Modelle II & III
Deutsch
Notrufbetrieb . . . . . . . . . . . . . . . . . . . . . . . . . . . . . . . . . 12
Externer Alarm . . . . . . . . . . . . . . . . . . . . . . . . . . . . . . . 13
Handhörerbetrieb . . . . . . . . . . . . . . . . . . . . . . . . . . . . . 13
Autoradio stumm . . . . . . . . . . . . . . . . . . . . . . . . . . . . . 13
Beschränkte Betriebsfähigkeit . . . . . . . . . . . . . . . . . . . 13
Standardfunktionen . . . . . . . . . . . . . . . . . . . . . . . . . . . 14
Verstärker/Rundspruch . . . . . . . . . . . . . . . . . . . . . . 14
Monitor . . . . . . . . . . . . . . . . . . . . . . . . . . . . . . . . . . 14
Benutzerdefinierbare Privatleitung (PL) . . . . . . . . . . 14
Stat Alert (MDC - 1200/Star Signalgabe) . . . . . . . . . . . 14
PTT-Kennung und Notruf . . . . . . . . . . . . . . . . . . . . . 14
Selektivruf . . . . . . . . . . . . . . . . . . . . . . . . . . . . . . . . 15
Eingabe von Gruppenkennungen und
Universalzeichen . . . . . . . . . . . . . . . . . . . . . . . . . . . 15
Telefonüberleitung . . . . . . . . . . . . . . . . . . . . . . . . . . 16
Status/Nachricht . . . . . . . . . . . . . . . . . . . . . . . . . . . 16
MDC-Verstärkerzugriff (RAC) . . . . . . . . . . . . . . . . . . 16
Bündelfunk . . . . . . . . . . . . . . . . . . . . . . . . . . . . . . . . . . 17
Senden eines Personensuchrufs . . . . . . . . . . . . . . . 17
Empfang eines Suchrufs . . . . . . . . . . . . . . . . . . . . . 17
Neuprogrammieranforderung . . . . . . . . . . . . . . . . . 17
Eintastenfunktionen . . . . . . . . . . . . . . . . . . . . . . . . . 17
Außer Reichweite . . . . . . . . . . . . . . . . . . . . . . . . . . . 18
Geschützter Betrieb . . . . . . . . . . . . . . . . . . . . . . . . . . . 18
Chiffrierschlüssel laden und löschen . . . . . . . . . . . . 19
Datenbetrieb . . . . . . . . . . . . . . . . . . . . . . . . . . . . . . . . . 20
Handhabung des Geräts . . . . . . . . . . . . . . . . . . . . . . . . 20
Sicherheitshinweise . . . . . . . . . . . . . . . . . . . . . . . . . . . 20
Achtung: Fahrzeuge mit Airbag . . . . . . . . . . . . . . . . 21
Zubehör . . . . . . . . . . . . . . . . . . . . . . . . . . . . . . . . . . . . . 21
Menü-Übersicht . . . . . . . . . . . . . . . . . . . . . . . . . . . . . . 21
Urheberrechtsschutz für Software-Programme . . . . . . 22
68P81083C10-C
Seite 1
MCS2000 2&3-C UG GBBook Page 2 tirsdag 3. november 1998 14:58
Deutsch
MCS 2000 Modelle II & III
Warnung: Vor einem Ein- oder Ausbau muß das
Gerät unbedingt ausgeschaltet werden, damit
das Funkgerät nicht beschädigt wird.
Allgemeines
Mit dem MCS 2000 verfügen Sie über ein
hervorragendes Mobilfunkgerät, dessen Handhabung
und erstklassige Leistungsdaten mit der bewährten
Qualität und Zuverlässigkeit von Motorola
einhergehen. Das Gerät hat das Herstellerwerk erst
nach umfangreichen Tests verlassen.
Diese Bedienungsanleitung beschreibt die
Wirkungsweise eines standardmäßigen
Gerätes. Weil die Bedienung jedoch von der
Programmierung des Gerätes abhängig ist,
kann die Handhabung Ihres Gerätes - sowohl
im Hinblick auf die Funktionen als auch auf die
Tasten für den Abruf dieser Funktionen - von
der hier beschriebenen Prozedur abweichen.
Die Meldungen im Display des Funkgeräts
können - je nach Programmierung - in
verschiedenen Sprachen angezeigt werden.
Werkseitig ist Englisch voreingestellt, und die
englischen Meldungen werden auch in dieser
Seite 2
68P81083C10-C
Bedienungsanleitung verwendet.
Bei Fragen wenden Sie sich bitte an Ihren
Systemverwalter oder an den örtlichen
Motorola-Kundendienst.
Tastenfunktionen
Die Zahlen zwischen Klammern beziehen sich auf die
Abbildungen auf der Ausklappseite.
Je nach mitgelieferter Tastatur gilt für die
Tastenbeschreibung entweder „E“ oder „I“:
(A)
Ein/Ausschalter und Lautstärkeregler
(B)
Dreifarbige Anzeige
Grünes Blinklicht: Anruf oder Personensuchruf
Rotes Dauerlicht: Gerät sendet in
ungeschütztem oder geschütztem Betrieb
Oranges Dauerlicht: System/Kanal besetzt
oder eingehender ungeschützter Ruf
(geschützter Betrieb)
Oranges Blinklicht: eingehender geschützter
Ruf (geschützter Betrieb)
(C)
Anzeigefeld mit Symbolen und einer Zeile
(Modell II) oder zwei Zeilen (Modell III) zu je 14
Zeichen
(D)
Moduswahlschalter
(F)
Sendetaste (PTT) Zum Sprechen drücken, zum
MCS2000 2&3-C UG GBBook Page 3 tirsdag 3. november 1998 14:58
(G)
(1)
(2)
(3)
(4)
(5)
(6)
(7)
(8)
(9)
(10)
(11)
(12)
(13)
Empfangen loslassen
Mikrofonanschluß
Zonenauswahl
Monitor, zum Abhören von Aktivitäten Taste
drücken (Standardbetrieb) oder
Suche (AMSS/Smart-Zone-Betrieb)
HOME-Taste
Schützen ein/aus (geschützter Betrieb)
Notruftaste
Externer Alarm
Telefonüberleitung
Kanalabfrage
Menü
Option
Suchruf
Privatruf
Selekt-Taste
Akustische Signale
Hoher Ton
Freiton
Tiefer Ton
Personensuchruf ausgesandt
Personensuchruf-Bestätigung
Besetzt (wird viermal wiederholt)
Automatischer Rückruf (Bündelfunk)
Personensuchruf empfangen (wird alle
5 Sekunden wiederholt)
Selektivruf ausgesandt (verbesserter
MCS 2000 Modelle II & III
Deutsch
Privatruf)
Selektivruf ausgesandt (Privatruf II)
Eingehender Selektivruf (wird 20
Sekunden lang wiederholt)
Telefonruf ausgelöst/Empfang
Notruf aktiviert
Notrufbestätigung
Notrufende
Beschränkte Betriebsfähigkeit (wird
alle 10 Sekunden wiederholt,
Bündelfunk)
Außer Reichweite (wiederholt,
Bündelfunk)
Tastatureingabe angenommen
Selbsttest nicht erfolgreich/
Tastatureingabe nicht akzeptiert/
Zeitablaufwarnung/
Systemverweigerung
Funktions-, Kanal- oder Gerätefehler.
Das Signal verstummt erst, wenn das
Gerät korrekt bedient oder
ausgeschaltet wird.
Fehlerhafter Code (geschützter
Betrieb)
PTT gedrückt im ungeschützten
Modus (geschützter Betrieb)
68P81083C10-C
Seite 3
MCS2000 2&3-C UG GBBook Page 4 tirsdag 3. november 1998 14:58
Deutsch
MCS 2000 Modelle II & III
Seite 4
68P81083C10-C
Allgemeine Bedienungshinweise
Wahl der Funktionen
Ein-/Ausschalter und Lautstärkeregler
Das Funkgerät durch Drücken des Ein/Ausschalters
(A) einschalten. Das Gerät führt daraufhin einen
Selbsttest durch.
Stellen Sie durch Drehen des Lautstärkereglers (A)
eine angenehme Wiedergabelautstärke ein.
Die für das Funkgerät programmierten Funktionen
lassen sich auf zwei verschiedene Arten aufrufen:
1
Direkt über eine vorprogrammierte
Funktionstaste, oder
2
indirekt über das MENÜ.
Hinweis: Ihr Funkgerät kann bei
entsprechender Ausrüstung mit der Zündung
gekoppelt programmiert werden.
Je nach Programmierung wird beim Ausschalten der
Zündung:
• das Gerät abgeschaltet
• die Sendefähigkeit unterdrückt, oder
• die Benutzung der PTT-Taste unterdrückt.
Weitere Informationen erhalten Sie bei Ihrem
Systemverwalter.
Zum Ausschalten des Funkgerätes wieder den Ein-/
Ausschalter (A) drücken.
Hinweis: Wenn das Funkgerät einen Fehlerton
und eine Fehlermeldung abgibt, sollten Sie
Ihren Systemverwalter oder den MotorolaKundendienst verständigen.
Wahl über Funktionstasten
Zum direkten Zugriff auf eine Funktion drücken Sie die
entsprechende Funktionstaste.
Ein Dreieck im Anzeigefeld zeigt auf die verwendete
Funktionstaste.
Wenn die Funktion eine zusätzliche Eingabe erfordert,
bewegen Sie den Moduswahlschalter (D), bis Ihre
Wahl im Anzeigefeld erscheint, und drücken Sie die
Selekt-Taste (13).
Hinweis: Die Funktionstasten sind meistens
aktiv. Durch Drücken einer Funktionstaste wird
die aktuelle Funktion abgebrochen und die
ausgewählte Funktion gestartet.
Wahl über Menüs
Funktionen lassen sich indirekt durch das FunkgerätMenü aufrufen.
MCS2000 2&3-C UG GBBook Page 5 tirsdag 3. november 1998 14:58
1
Wählen Sie das Menü durch Drücken der
Menü-Taste (9).
2
Die Auswahl erfolgt durch den
Moduswahlschalter (D) zur gewünschten
Funktion.
3
Drücken Sie die Selekt-Taste (13). Das
Funkgerät verläßt dann den Menü-Modus und
tritt in die gewählte Funktion ein, oder zeigt ein
Untermenü an.
Falls eine zusätzliche Eingabe erforderlich ist,
verwenden Sie den Moduswahlschalter (D), um die
gewünschte Funktion zu wählen. Drücken Sie die
Selekt-Taste (13).
Eine Liste möglicher Menü-Funktionen finden Sie
weiter hinten in diesem Benutzerhandbuch (Seite 21).
Verstellen der Anzeigestärke
Wählen Sie wie oben beschrieben das Menü DISP
INTENSITY (Anzeigestärke) aus. Drücken Sie die
Selekt-Taste (13). Jetzt kann die Anzeigestärke mit
Hilfe des Wahlschalters (D) auf eine von vier
Helligkeitsstufen eingestellt werden: hell, mittel,
dunkel oder sehr dunkel.
Töne Ein/Aus
Die Tastatureingabetöne können über die Menüs einoder ausgeschaltet werden.
Wählen Sie das Menü TONES (Töne) wie oben
beschrieben. Drücken Sie die Selekt-Taste (13). Die
MCS 2000 Modelle II & III
Deutsch
Anzeige zeigt dann den aktuellen Status, z. B.
Modell III
TONES ON
Modell II
TONES ON
Mit dem Moduswahlschalter (D) können Sie zwischen
„TONES OFF“ (Töne Aus) und „TONES ON“ (Töne Ein)
hin- und herschalten. Drücken Sie die Selekt-Taste
(13), wenn der gewünschte Status angezeigt wird.
Zonen- und Moduswahl
Ein Modus ist ein Kanal oder eine Gesprächsgruppe
mit allen zugehörigen Funktionen. Eine Zone ist eine
Modusgruppe, die sich über die Zonen-Taste (1)
wählen läßt. Verwenden Sie dann den
Moduswahlschalter (D), um die gewünschte Zone
anzuzeigen, z. B.:
Modell III
Modell II
ELECTRIC CO
NORTH DIVISION
ELECTRIC NORTH
wobei das Modell III die Zone in der ersten Zeile und
den Kanal/die Gesprächsgruppe in der zweiten Zeile
angibt. Beim Modell II wird der Kanal/die
Gesprächsgruppe direkt hinter der Zone angezeigt. Der
Name der Zone blinkt, bis Sie die Auswahl durch
Drücken der Taste (13) bestätigen. Dann bewegen Sie
den Moduswahlschalter (D), bis die gewünschte
68P81083C10-C
Seite 5
MCS2000 2&3-C UG GBBook Page 6 tirsdag 3. november 1998 14:58
Deutsch
MCS 2000 Modelle II & III
Seite 6
68P81083C10-C
Gesprächsgruppe/der gewünschte Kanal angezeigt
wird, z. B.:
Modell III
Modell II
ELECTRIC CO
SOUTH DIVISION
ELECTRIC SOUTH
Aussenden von Rufen
Wenn Sie Zone und Modus gewählt haben, können Sie
senden.
Nehmen Sie das Mikrofon aus der Halterung. Drücken
Sie, während Sie sprechen, die Sendetaste (PTT) (F)
und lassen Sie sie zum Empfangen los. Sprechen Sie
mit normaler Stimmlage aus einem Abstand von 5 - 10
cm ins Mikrofon. Während des Sendens leuchtet die
rote Anzeige (B).
Nur Standardbetrieb:
Bei orangem Dauerlicht ist der Kanal besetzt. Warten
Sie, bis das orange Licht erloschen ist, bevor Sie mit
dem Senden beginnen.
Nur Bündelfunk:
Wenn das Besetztzeichen ertönt, die PTT-Taste (F)
loslassen und auf den automatischen Rückrufton
warten. Wenn dieser Ton hörbar ist, die PTT-Taste (F)
innerhalb von 3 Sekunden drücken, um zu senden.
Wenn Ihr Funkgerät mit einer Sendezeitbegrenzung
ausgestattet ist, ertönt einige Sekunden vor Ablauf der
Sendezeit ein Warnsignal.
Kanalabfrage
Die Abfragefunktion gestattet es dem Benutzer,
mehrere Kanäle oder Gesprächsgruppen (einschließlich
des ausgewählten Kanals bzw. der ausgewählten
Gesprächsgruppe) gleichzeitig zu überwachen.
Den in einer Abfrageliste zusammengefaßten Kanälen
können Prioritätsebenen zugeordnet werden:
Priorität 1:
Sehr wichtig
Priorität 2:
Wichtig
Keine Priorität: Normaler Kanaleintrag ohne
Priorität
Bei der Kanalabfrage überwacht das Funkgerät den
Kanal/die Gesprächsgruppe mit der höchsten Priorität.
Wird ein Kanal/eine Gesprächsgruppe aktiv, während
das Funkgerät auf einen Kanal/eine Gesprächsgruppe
mit niedrigerer Priorität eingestellt ist, schaltet das
Funkgerät automatisch auf den Kanal/die
Gesprächsgruppe mit höherer Priorität um.
Hinweis: Wenn der Benutzer ein Gespräch führt,
wird er durch Rufe normaler Priorität nicht
unterbrochen.
Ein-/Ausschalten der Kanalabfrage
Die Abfragefunktion läßt sich mit Hilfe der
Abfragetaste (8) oder, wie vorher beschrieben, über
ein Menü einschalten.
Solange die Kanalabfrage gewählt ist, erscheint das
MCS2000 2&3-C UG GBBook Page 7 tirsdag 3. november 1998 14:58
Abfragesymbol ( ) im Anzeigefeld, und das
Funkgerät sucht nach Aktivitäten in den Kanälen/
Gesprächsgruppen, die in den Abfragelisten des
aktuellen Modus definiert sind.
Hinweis: Wenn das Funkgerät mit einer
automatischen Abfrage programmiert ist, sucht
es automatisch immer, wenn dieser Modus
gewählt ist. Die Abfrage läßt sich in diesem Fall
nicht ausschalten.
Anzeigen einer Abfrageliste
Wählen Sie wie weiter oben beschrieben das Menü
VIEW LISTS (Listen anzeigen) aus. Bewegen Sie
anschließend den Moduswahlschalter (D), bis das
Menü SCAN (Abfrage) im Anzeigefeld erscheint, und
drücken Sie die Selekt-Taste (13).
Das Abfragesymbol erscheint mit einem blinkenden
Punkt
, wenn der Modus Priorität 1 hat, mit dem
dauerhaft leuchtenden Punkt
, wenn der Modus
Priorität 2 hat, und
leuchtet bei normaler Priorität
dauerhaft ohne Punkt. Das Programmiersymbol
ist
sichtbar, solange die Liste angezeigt wird.
Bewegen Sie den Moduswahlschalter (D), um den
nächsten Eintrag anzuzeigen. Wenn Sie alle Einträge
überprüft haben, können Sie die Funktion durch
Drücken der HOME-Taste (3) verlassen.
MCS 2000 Modelle II & III
Deutsch
Ändern von Abfragelisten
Benutzerprogrammierbare Abfragelisten können
durch den Benutzer geändert werden (Hinzufügen
oder Löschen von Einträgen).
Wählen Sie wie weiter oben beschrieben das Menü
PROGRAM LISTS (Listen programmieren). Bewegen
Sie danach den Moduswahlschalter (D), bis SCAN
(Abfrage) angezeigt wird, und drücken Sie die SelektTaste (13), oder halten Sie die Abfragetaste (8)
gedrückt, bis der Tastenbestätigungston hörbar ist.
Das Programmiersymbol
und das Dreieck im
Anzeigefeld blinken.
Bewegen Sie den Moduswahlschalter (D), um den
gewünschten Modus auszuwählen.
Drücken Sie die Selekt-Taste (13), wenn das
Abfragesymbol
nicht angezeigt wird, um den
Modus mit normaler Priorität hinzuzufügen.
Drücken Sie die Taste nochmals, um dem Modus
Priorität 2 zuzuweisen (das Abfragesymbol
leuchtet dauerhaft).
Drücken Sie die Taste ein drittes Mal, um dem Modus
Priorität 1 zuzuweisen (das Abfragesymbol erscheint
mit einem blinkenden Punkt
).
Eine nochmalige Betätigung der Taste löscht den
Modus aus der Liste.
Telefonüberleitung
Die Telefonüberleitung wird benutzt, wenn das
Funkgerät in einem Funksystem verwendet werden
68P81083C10-C
Seite 7
MCS2000 2&3-C UG GBBook Page 8 tirsdag 3. november 1998 14:58
Deutsch
MCS 2000 Modelle II & III
Seite 8
68P81083C10-C
soll, das an ein öffentliches oder privates Telefonnetz
angeschlossen ist.
Empfangen eines Telefonanrufs
Wenn Ihr Funkgerät einen Telefonruf empfängt, ertönt
ein Rufsignal, und das Anzeigefeld wechselt zwischen
Modell III
PHONE CALL
SOUTH DIVISION
Modell II
PHONE CALL
und der vorherigen Anzeige. Die grüne Anzeige (B)
und das Symbol für einen empfangenen Anruf
blinken.
Drücken Sie die Telefontaste (7), um den Anruf zu
beantworten.
Drücken Sie die HOME-Taste (3) oder die Menü-Taste
(9), wenn das Gespräch beendet ist.
Senden eines Telefonanrufs
Listenwahl
Drücken Sie die Menütaste (9) und bewegen Sie den
Moduswahlschalter (D), bis PHONE (Telefon)
erscheint. Drücken Sie die Selekt-Taste (13), und
bewegen Sie den Moduswahlschalter (D), bis der
gewünschte Name und die gewünschte Nummer
erscheinen. Drücken Sie die Selekt-Taste (13) oder die
PTT-Taste (F). Das Funkgerät sendet dann die
Nummer aus.
Hinweis: Wenn Ihr Funkgerät entsprechend
programmiert ist, können Sie durch Drücken
der Telefon-Taste direkt auf die
Telefonüberleitungsfunktion zugreifen. Mit dem
Moduswahlschalter (D) können Sie die zuletzt
gewählte Rufnummer anzeigen und durch die
Telefonnummernlisten blättern.
Tastaturwahl (Listen/Pufferwahl)
(Modell III oder Modell II mit zusätzlichem
Tastaturmikrofon)
Drücken Sie die Telefontaste (7), oder wählen Sie das
Menü PHONE (Telefon), wie vorher beschrieben.
Geben Sie danach die gewünschte Nummer direkt über
die Tastatur ein. Bei einem Anruf einer Nebenstelle, die
eine Pause vor der Nummer der Nebenstelle erfordert,
drücken Sie ✱
# .
Bis die Nummer vollständig gewählt ist, können Sie das
zuletzt eingegebene Zeichen löschen, indem Sie den
Moduswahlschalter (D) nach links/unten bewegen.
Wenn Sie den Moduswahlschalter (D) weiter nach links/
unten bewegen, wird die gesamte Nummer gelöscht.
Wenn die Nummer vollständig gewählt ist, drücken
Sie die Selekt-Taste (13) oder die PTT-Taste (F), um
den Ruf auszusenden. Während das System die
MCS2000 2&3-C UG GBBook Page 9 tirsdag 3. november 1998 14:58
Verbindung herstellt erscheint die folgende Anzeige:
Modell III
PLEASE WAIT
555-1212
Modell II
PLEASE WAIT
Nur Bündelfunk:
Wenn das Telefonsystem besetzt ist, erscheint
Modell III
Modell II
PHONE BUSY
555-1212
PHONE BUSY
und die Verbindung wird hergestellt, wenn das System
frei ist, es sei denn, Sie drücken die HOME-Taste (3)
oder die Menü-Taste (9), um die Telefonüberleitung zu
verlassen.
Wenn Ihr Funkgerät keinen Telefonzugang hat,
erscheint die folgende Anzeige:
Modell III
NO PHONE
555-1212
Modell III
CALL RECEIVED
ID: 2000
Modell II
CALL RECEIVED
und der vorherigen Anzeige. Beim Modell III erscheint
in Zeile 2 der Anzeige automatisch die Kennung des
Anrufers. Beim Modell II müssen Sie die Ruftaste (12)
drücken, um die Kennung anzuzeigen.
Die grüne Anzeige (B) und das Symbol für einen
empfangenen Ruf blinken.
Wenn Sie die PTT-Taste (F) innerhalb von 20
Sekunden drücken, wird der Anruf beantwortet, und
Sie können ein privates Gespräch führen.
Hinweis: Wenn Sie die Ruftaste (12) nicht
drücken, wird der Ruf als Gesprächsgruppenruf
gesendet.
Modell II
NO PHONE
Privatruf
Empfangen eines Privatrufs
Wenn Ihr Funkgerät einen Privatruf empfängt, ertönt
das Signal für einen eingehenden Privatruf und die
MCS 2000 Modelle II & III
Deutsch
Anzeige wechselt zwischen
Drücken Sie die HOME-Taste (3) (oder zweimal die
Menü-Taste (9)) bzw. die Ruftaste (12), wenn das
Gespräch beendet ist.
Aussenden eines Privatrufs (nur Bündelfunk)
Privatrufe können entweder aus einer Liste oder direkt
über die Tastatur (Modell III oder Modell II mit einem
zusätzlichen Tastaturmikrofon) gewählt werden.
68P81083C10-C
Seite 9
MCS2000 2&3-C UG GBBook Page 10 tirsdag 3. november 1998 14:58
Deutsch
MCS 2000 Modelle II & III
Seite 10
68P81083C10-C
Hinweis: Wenn Ihr Funkgerät entsprechend
programmiert ist, können Sie mit Hilfe der
Ruftaste direkt auf die Privatruffunktion
zugreifen. Mit dem Moduswahlschalter (D)
können Sie sich zwischen der zuletzt
empfangenen Kennung, den Privatruflisten und
Ihrer eigenen Kennung hin- und herbewegen.
Drücken Sie die Ruftaste (12) oder wählen Sie CALL
(Ruf) über die Menüs.
Die Anzeige zeigt die zuletzt gesendete oder
empfangene Kennung.
Listenwahl:
Senden Sie die angezeigte Kennung durch Drücken
der PTT-Taste (F) aus oder wählen Sie mit dem
Moduswahlschalter (D) eine andere Kennung aus der
Liste.
Um die eigene Kennung Ihres Funkgerätes
anzuzeigen, bewegen Sie den Moduswahlschalter (D),
bis die Anzeige „MY ID“ (meine Kennung) gefolgt von
der Kennung des Funkgerätes erscheint, z. B.
Modell III
MY RADIO USER
ID: 741317
Modell II
MY ID: 741317
Tastaturwahl:
(Modell III oder Modell II mit zusätzlichem
Tastaturmikrofon)
Drücken Sie die Ruftaste (12), oder wählen Sie
PRIVATE CALL (Privatruf) aus den Menüs, und geben
Sie die gewünschte Kennung direkt an der Tastatur
ein.
Bis die Kennung vollständig gewählt ist, können Sie
die letzte Nummer löschen, indem Sie den
Moduswahlschalter (D) nach links/unten bewegen.
Um die gesamte Kennung zu löschen, bewegen Sie
den Moduswahlschalter (D) weiter nach links/unten.
Geben Sie danach die korrekte Kennung ein.
Nachdem die Kennung auf eine der beiden oben
beschriebenen Arten gewählt wurde, kann der Ruf
durch Drücken der PTT-Taste (F) ausgesendet werden.
Verbesserter Privatruf
Wenn ein „Verbesserter Privatruf“ nicht innerhalb von
20 Sekunden beantwortet wird, wechselt die Anzeige
über zu
Modell III
NO ANSWER
ID: 700001
Modell II
NO ANSWER
Drücken Sie die PTT-Taste (F), um Ihre Kennung bei
MCS2000 2&3-C UG GBBook Page 11 tirsdag 3. november 1998 14:58
dem angerufenen Funkgerät zu hinterlassen, so daß
Sie später zurückgerufen werden können. Der
Rufaussendesignalton ist hörbar.
Anrufer-Kennung
Die Kennung oder der Alias-Name des Teilnehmers,
der einen Ruf ausgesendet hat, wird kurzzeitig auf
dem Display des Funkgeräts angezeigt. Wenn das
Funkgerät einen Notruf in Bündelfunkbetrieb
empfängt, erscheinen auf seinem Display
wechselweise die Gesprächsgruppe, die NotrufEmpfangsanzeige und die Kennung (oder der AliasName) des Teilnehmers, der den Notruf ausgelöst hat.
Modusvoreinstellungstasten
Über die Modusvoreinstellungstasten kann der
Benutzer rasch und mühelos auf häufig benötigte
Modi zugreifen. Zum Programmieren einer Taste mit
dem momentan ausgewählten Modus halten Sie die
gewünschte Taste gedrückt, bis Sie einen
Bestätigungston hören. Durch kurzes Drücken einer
Modusvoreinstellungstaste können Sie das Funkgerät
direkt auf den für diese Taste programmierten Modus
einstellen.
Modusspeicher
Funkgerät gespeichert. Durch Drücken der
Modusspeichertaste können Sie das Funkgerät in den
vorher ausgewählten Modus versetzen.
Hinweis: Eine Moduseinstellung muß
mindestens fünf Sekunden lang aktiv sein,
damit sie als „zuletzt eingestellter Modus“
gespeichert wird.
Automatische Abschaltung
Die „automatische Abschaltung“ bewirkt, daß Ihr
Funkgerät ausgeschaltet wird, wenn es über einen
voreingestellten Zeitraum hinweg keine
Benutzeraktivität erkennt. Als Benutzeraktivität gilt
jede Betätigung einer Taste, eines Drehknopfs oder
eines Zubehörschalters (z. B. des Fußschalters).
Zwei Minuten, bevor das Funkgerät automatisch
abgeschaltet wird, ist ein anhaltender, tiefer Ton zu
hören, und die Anzeige
AUTO POWER OFF
blinkt im Display. Jede Benutzeraktivität bewirkt, daß
der Warnton sofort verstummt und im Display wieder
die normalen Betriebsanzeigen erscheinen.
Der jeweils zuletzt eingestellte Modus bleibt im
MCS 2000 Modelle II & III
Deutsch
68P81083C10-C
Seite 11
MCS2000 2&3-C UG GBBook Page 12 tirsdag 3. november 1998 14:58
Deutsch
MCS 2000 Modelle II & III
SmartZone/AMSS-Funktionen
Im SmartZone- und AMSS (Automatic Multiple Site
Select)-Betrieb können die beiden unten aufgeführten
Funktionen in Ihr Funkgerät programmiert werden:
Standortsuche und Standortsperre
Drücken Sie den Taste Standort/Monitor (2), um den
aktuellen Standort und die Signalstärke anzuzeigen.
Darüber hinaus wird die Signalstärke des derzeitigen
Standorts mit einer aus 0 bis 3 Segmenten
bestehenden Balkenanzeige dargestellt.
3 Balken zeigen ein sehr starkes Signal an, kein
Balken bedeutet ein sehr schwaches Signal.
Drücken und halten Sie die Taste Standort/Monitor (2),
wenn das Funkgerät einen neuen Standort suchen
soll.
Wenn die zusätzliche „Weitwander“-Funktion
programmiert ist, wechselt das Funkgerät
automatisch die Standorte, während es sich durch
Ihren Sende- und Empfangsbereich bewegt.
Die automatische Standortumschaltung kann durch
Aktivieren der Standort-Sperrfunktion (die entweder
über die Menüs oder eine Funktionstaste gewählt
Seite 12
68P81083C10-C
wird), ausgeschaltet werden.
Weitere Informationen erhalten Sie bei Ihrem
Systemverwalter.
Notrufbetrieb
Wenn der Notrufbetrieb bei Ihrem System
eingeschaltet ist, kann die Funktion durch Drücken
der Notruftaste (5) aufgerufen werden.
Der Notrufbetrieb wird ausgeschaltet, indem die
Notruftaste ca. 2 Sekunden lange gedrückt gehalten
wird.
Nur Bündelfunk:
Ihr Funkgerät kann so programmiert werden, daß es
anzeigt, wenn es einen Notruf von einem Teilnehmer
Ihrer Gesprächsgruppe erhalten hat. Die Anzeige
wechselt dann zwischen:
Modell III
EMER RECEIVED
SOUTH DIVISION
Modell II
EMER RECEIVED
und der Modusbezeichnung des Anrufers.
Ist „Notruf mit Sprachübertragung“ aktiviert, so
sendet das Funkgerät nach Drücken der Notruftaste
automatisch über einen voreingestellten Zeitraum
hinweg einen Notruf. Die Sprachübertragung erfolgt
über das Mikrofon an der Sonnenblende. Weitere
MCS2000 2&3-C UG GBBook Page 13 tirsdag 3. november 1998 14:58
Informationen erhalten Sie bei Ihrem Systemverwalter.
Hinweis: Die automatische Sprachübertragung
über das Mikrofon an der Sonnenblende ist nur
bei Funkgeräten möglich, die mit der NotrufFunktion ausgestattet sind.
Externer Alarm
Je nachdem, mit welchem Zubehör Ihr Funkgerät
ausgestattet ist, aktiviert die externe Alarmfunktion die
Fahrzeughupe oder die Scheinwerfer, wenn Sie einen
Ruf nicht innerhalb eines programmierten Zeitraumes
beantworten (Personensuchruf, Bündelfunk-Privatruf,
Bündelfunk-Telefonruf).
Drücken Sie die Taste für den externen Alarm (6), oder
wählen Sie HORN/LIGHTS (externer Alarm) über die
Menüs, um den externen Alarm einzuschalten. Die
Anzeige wechselt, um anzuzeigen, daß die Funktion
aktiviert ist. Um den externen Alarm abzuschalten,
betätigen Sie die Taste (6) erneut, oder verwenden Sie
das Menü.
Handhörerbetrieb
Zur Aktivierung des Handhörerbetriebs wählen Sie
zunächst HANDSET (Handhörer) im Menü, und rufen
MCS 2000 Modelle II & III
Deutsch
Sie die Option HANDSET ON (Handhörer ein) auf.
Nachdem HANDSET ON aktiviert und der Handhörer
von der Halterung genommen wurde, erfolgt die
Tonausgabe ausschließlich über den Handhörer; der
Lautsprecher des Funkgerätes wird aus Gründen der
Diskretion stummgeschaltet.
Durch Zurücklegen des Handhörers in die Halterung
oder Anwählen des Menüpunktes HANDSET OFF
(Handhörer aus) wird der Lautsprecher Ihres
Funkgerätes erneut aktiviert.
Autoradio stumm
Wenn eine Programmierung für das Leistungsmerkmal
Autoradio stumm in Ihrem MCS 2000 vorhanden ist,
wird Ihr herkömmliches Autoradio augenblicklich
stummgeschaltet, sobald Ihr MCS 2000 Mobilgerät
auf Sendung bzw. Empfang geht. Weitere
Informationen erhalten Sie bei Ihrem Systemverwalter.
Beschränkte Betriebsfähigkeit
(Failsoft)
Diese Funktion gewährleistet, daß ein Gespräch bei
einem Ausfall des Bündelsystems nicht unterbrochen,
sondern die Verbindung auf einem offenen Kanal
aufrechterhalten wird. Das Signal für beschränkte
Betriebsfähigkeit ertönt alle 10 Sekunden, und die
68P81083C10-C
Seite 13
MCS2000 2&3-C UG GBBook Page 14 tirsdag 3. november 1998 14:58
Deutsch
MCS 2000 Modelle II & III
Seite 14
68P81083C10-C
Anzeige wechselt zwischen
Modell III
FAILSOFT
SOUTH DIVISION
Modell II
FAILSOFT
und der aktuellen aktiven Anzeige.
Standardfunktionen
Überzeugen Sie sich vor dem Senden davon, daß der
ausgewählte Modus verfügbar ist (orange Leuchte
aus).
Verstärker/Rundspruch
Wählen Sie wie weiter oben beschrieben das Menü
REPEATER/DIRECT aus, oder drücken Sie die mit
dieser Funktion programmierte Taste. Der aktuelle
Modus (Verstärker oder Rundspruch) wird angezeigt.
Mit Hilfe des Moduswahlschalters (D) können Sie
zwischen den beiden Betriebsarten umschalten.
Drücken Sie die Selekt-Taste (13), um den auf der
Anzeige dargestellten Modus auszuwählen.
Monitor
Drücken Sie die Monitor-Taste, um die Konfiguration
der Geräuschunterdrückung aufzurufen. Die
Geräuschunterdrückung des Funkgeräts kann mit
Hilfe des Moduswahlschalters (D) abgestimmt
werden. Drücken Sie die Selekt-Taste, wenn die
gewünschte Geräuschunterdrückung eingestellt ist.
Benutzerdefinierbare Privatleitung (PL)
Mit Hilfe der benutzerdefinierbaren Privatleitung (PL)
kann der Benutzer des Funkgeräts einen PL-Code in
einer vorprogrammierten Codeliste auswählen. Um
den aktuellen PL-Code anzuzeigen, drücken Sie die
MPL-Taste (falls programmiert) oder halten Sie die
MPL-Taste gedrückt, um die MPL-Konfigurationsfunktion aufzurufen (MPL - Mehrere Privatleitungen).
Mit Hilfe des Moduswahlschalters (D) können Sie auf
einen anderen PL-Code umschalten; drücken Sie die
Selekt-Taste, sobald der gewünschte PL-Code
angezeigt wird.
Stat Alert (MDC - 1200/Star Signalgabe)
PTT-Kennung und Notruf
Jedes Funkgerät kann so programmiert werden, daß
es am Anfang und/oder am Ende einer Übertragung
eine eindeutige digitale Kennung übermittelt. Ist die
Übermittlung der PTT-Kennung vor der
Sprachübertragung programmiert, so hören Sie einen
Ton, bis die Übermittlung der Kennung abgeschlossen
ist. Diese Kennung kann mit einem Notruf kombiniert
werden, der durch eine Notruf-Taste auf dem
Funkgerät aktiviert wird. Der Dispatcher kann den
Benutzer des Funkgeräts schnell identifizieren und
nahezu umgehend klare Angaben über kritische
Situationen empfangen.
MCS2000 2&3-C UG GBBook Page 15 tirsdag 3. november 1998 14:58
Notrufbetrieb
Der Notrufbetrieb wird wie oben beschrieben
aufgerufen.
das Funkgerät den Selektivruf-Modus nach Ende der
Übertragung. Ist der automatische Selektivruf
eingeschaltet, so bleibt das Funkgerät im SelektivrufModus, bis Sie diesen Modus beenden.
Selektivruf
Empfangen eines Selektivrufs
Nach dem Empfang eines Selektivrufs wird zwei
Sekunden lang folgende Meldung angezeigt:
Modell III
CALL RECEIVED
ID: 2000
Modell II
CALL RECEIVED
Sie können jetzt in den Selektivruf-Modus wechseln,
um die Kennung des anrufenden Funkgeräts
anzuzeigen und mit einem Selektivruf zu antworten
(siehe unten).
Senden eines Selektivrufs
Drücken Sie die Ruftaste (12), oder wählen Sie wie
oben beschrieben das Menü PRIVATE CALL aus.
Geben Sie die Kennung über die Tastatur ein, oder
verwenden Sie den Moduswahlschalter (D), um die
gewünschte Kennung für den Selektivruf
auszuwählen. Drücken Sie die Sendetaste (F), um den
Selektivruf an diese Kennung zu senden. Wenn der
automatische Selektivruf ausgeschaltet ist, beendet
MCS 2000 Modelle II & III
Deutsch
Akustische Personensuchrufmeldung
Eine ausführlichere Beschreibung dieser Funktion
finden Sie im Abschnitt Bündelfunk.
Eingabe von Gruppenkennungen und
Universalzeichen
(Konventioneller Suchruf und Selektivruf)
Bei unbeschränktem Betrieb können Sie über die
Tastatur eine Gruppenkennung eingeben, indem Sie
die Funktionen Selektivruf oder Suchruf auswählen
und dann mit dem Moduswahlschalter (D) zur Anzeige
„Group“ zurückblättern, um die Kennung einzugeben.
GROUP
erscheint in der Anzeige. Jetzt können Sie eine
dreistellige Gruppenkennung für einen Ruf oder
Suchruf eingeben.
Um mehrere Kennungen oder Gruppen zu rufen oder
zu suchen, kann der Benutzer Universalzeichen (*)
eingeben. Das Zeichen '*' dient dabei als Platzhalter
68P81083C10-C
Seite 15
MCS2000 2&3-C UG GBBook Page 16 tirsdag 3. november 1998 14:58
Deutsch
MCS 2000 Modelle II & III
für die Ziffern 0-9 an der jeweiligen Position. Um z. B.
einen Suchruf an alle Funkgeräte mit den Kennungen
von 0001 bis 0009 zu senden, muß die Kennung
0-0-0-* eingegeben werden.
Telefonüberleitung
Um im Standardbetrieb einen Anruf durch das
Telefonsystem machen zu können, muß Ihr Funkgerät
Zugangs- und Abwahlkennungen an das System
übermitteln. Je nach Programmierung Ihres
Funkgeräts kann die Zugangskennung auf zweierlei
Weise übermittelt werden.
Sofort:
Das Funkgerät sendet automatisch eine
gespeicherte Zugangskennung, nachdem
die Taste Telefonüberleitung (7) gedrückt
wurde.
Verzögert: Drücken Sie die Selekt-Taste (13) oder die
PTT-Taste (F), damit das Funkgerät die
gespeicherte Zugangskennung
übermittelt.
Nach der Übermittlung der Zugangskennung müßten
Sie ein Freizeichen hören. (Wenn kein Freizeichen
ertönt, drücken Sie die HOME-Taste (3) oder die Taste
Telefonüberleitung (7), um aufzulegen). Anschließend
drücken Sie die Selekt-Taste (13) oder die PTT-Taste
(F). Das Funkgerät übermittelt dann die Nummer.
Der Anruf wird dann wie im Abschnitt Senden eines
Telefonanrufs beschrieben abgewickelt.
Seite 16
68P81083C10-C
Status/Nachricht
Wählen Sie wie weiter oben beschrieben das Menü
STATUS oder MESSAGE (Nachricht) aus. Die letzte
bestätigte Statusmeldung oder die erste Nachricht
wird angezeigt. Bewegen Sie den Moduswahlschalter
(D), um einzelne Einträge der Statusmeldungs- oder
Nachrichtenlisten im Anzeigefeld einzusehen.
Erscheint die gewünschte Statusmeldung oder die
gewünschte Nachricht im Anzeigefeld, so drücken Sie
die Selekt-Taste (13), um die Statusmeldung oder die
Nachricht zu senden. Das Funkgerät gibt vier Töne
aus, wenn die Statusmeldung oder die Nachricht
erfolgreich abgesetzt worden ist. Anschließend verläßt
das Funkgerät automatisch die Funktion Status/
Nachricht. Werden Statusmeldung oder Nachricht
nicht erfolgreich abgesetzt, so erscheint im
Anzeigefeld
Modell III
Modell II
NO ACKNOWLEDGE
STATUS 1
NO ACKNOWLEDGE
und das Funkgerät gibt einen Dauerton aus. Drücken
Sie die Selekt-Taste (13), um die Statusmeldung oder
die Nachricht erneut zu übertragen, oder drücken Sie
die HOME-Taste (3), um die Funktion abzubrechen.
MDC-Verstärkerzugriff (RAC)
Der MDC-Verstärkerzugriff wählt einen Verstärker für
MCS2000 2&3-C UG GBBook Page 17 tirsdag 3. november 1998 14:58
die Übertragung aus. Weitere Informationen erhalten
Sie bei Ihrem Systemverwalter.
Bündelfunk
Senden eines Personensuchrufs
Wählen Sie wie weiter oben beschrieben das Menü
PAGE (Suchruf) aus. Geben Sie anschließend die
Kennung über die Tastatur ein, oder benutzen Sie den
Moduswahlschalter (D), um die gewünschte Kennung
aus der Liste auszuwählen. Drücken Sie die PTT-Taste
(F) oder die Selekt-Taste (13), um den
Personensuchruf auszusenden.
Der Suchruf-Quittungston ist hörbar, wenn das
angerufene Funkgerät den Suchruf empfängt. Wenn
der Suchruf nicht empfangen wird, erscheint im
Anzeigefeld
Modell III
Modell II
NO ACKNOWLEDGE
ID: 700001
NO ACKNOWLEDGE
Drücken Sie die HOME-Taste (3) oder die Menü-Taste
(9) zweimal, um zur vorherigen Anzeige
zurückzukehren.
Empfang eines Suchrufs
Wenn ein Suchruf empfangen wird, ertönt das
MCS 2000 Modelle II & III
Deutsch
akustische Suchrufsignal, und im Anzeigefeld blinken
die grüne LED und das Symbol
, bis der Suchruf
durch Drücken der PTT-Taste (F) oder durch eine
kurze Betätigung der Monitor-Taste (2) bestätigt wird.
Status/Nachricht
Bedienung erfolgt wie oben unter
Standardfunktionen beschrieben.
Neuprogrammieranforderung
Wenn Ihr Funkgerät für dynamische Umgruppierung
programmiert ist, läßt sich die Neuprogrammieranforderung entweder über eine vorprogrammierte
Taste oder über ein Menü wählen. Eine Neuprogrammieranforderung sendet eine Nachricht an den
Systemverwalter mit der Bitte, das Funkgerät einer
neuen Gesprächsgruppe zuzuordnen. Weitere
Informationen erhalten Sie bei Ihrem Systemverwalter.
Eintastenfunktionen
Falls Ihr Funkgerät für diese optionale Funktion
programmiert ist, kann jede Taste so belegt werden,
daß sie eine Statusmeldung, eine Nachricht oder
einen Rufalarm sendet bzw. eine Telefonnummer
wählt. Weitere Informationen erhalten Sie bei Ihrem
Systemverwalter.
68P81083C10-C
Seite 17
MCS2000 2&3-C UG GBBook Page 18 tirsdag 3. november 1998 14:58
Deutsch
MCS 2000 Modelle II & III
Seite 18
68P81083C10-C
Außer Reichweite
Wenn diese zusätzliche Funktion in Ihrem Funkgerät
programmiert ist, zeigt es Ihnen an, wenn Sie den
Sende- und Empfangsbereich Ihres Funkgerätes
verlassen haben. Die Anzeige wechselt zwischen
Modell III
OUT OF RANGE
SOUTH DIVISION
Modell II
OUT OF RANGE
und dem aktuellen Modus, und/oder das AußerReichweite-Signal ertönt.
Geschützter Betrieb
Hinweis: Die Informationen in diesem Abschnitt
sind für Sie nur dann von Belang, wenn Ihr
Funkgerät für geschützten Betrieb
programmiert wurde. Hier werden nur die
Unterschiede zum ungeschützten Betrieb
erläutert. Weitere Informationen entnehmen Sie
bitte den jeweiligen Punkten im Abschnitt Wahl
der Funktionen.
Anrufe senden: Wenn der ausgewählte Modus nicht
als geschützt oder ungeschützt programmiert wurde,
kann der geschützte Betrieb durch Drücken der Taste
Schützen (4) ein- bzw. ausgestellt werden. Dies gilt
nicht für Telefonanrufe über Fernleitungsnetze oder
Privatrufe, die stets über diese Taste gesteuert
werden. Ertönt unmittelbar nach Drücken der PTTTaste ein Signalton, so arbeitet das Funkgerät in
ungeschütztem Betrieb.
Hinweis: Wird die Taste Schützen während
einer Übertragung gedrückt, so wird die
Übertragung unterbrochen, und ein Warnsignal
ertönt, bis die PTT-Taste losgelassen wird. Die
Änderung der Betriebsart wird erst mit der
nächsten Betätigung der PTT-Taste wirksam.
Anrufe empfangen: Wenn ein geschützter Anruf
empfangen wird, blinken die orange LED (nur
Standardbetrieb) und das Symbol
für geschützte
Übertragung.
Funktionen bei Standardbetrieb: Über den Monitor
können nur Übertragungen von Funkgeräten
mitgehört werden, die mit dem gleichen
Chiffrierschlüssel arbeiten. Andere Übertragungen
werden als Geräusch ausgegeben.
Funktionen bei Bündelfunkbetrieb: Wenn die
geschützte Übertragung durch die Taste Schützen (4)
eingestellt wurde, können Sie während eines
Gruppengespräches oder eines Privatrufs lediglich
vom ungeschützten in den geschützten Betrieb
MCS2000 2&3-C UG GBBook Page 19 tirsdag 3. november 1998 14:58
umschalten. Während einer Verbindung zu einem
Telefonsystem oder bei beschränkter
Betriebsfähigkeit (Failsoft) können Sie vom
ungeschützten in den geschützten Betrieb
umschalten. Während eines Notrufs ist KEINE
Umschaltung möglich.
Chiffrierschlüssel laden und löschen
Mit Hilfe eines Chiffrierschlüsselladers (KVL) muß ein
zum Gerätetyp passender Chiffrierschlüssel in das
Funkgerät geladen werden.
Entfernen Sie das Mikrofonkabel vom Bedienteil, und
schließen Sie das Kabel des Chiffrierschlüsselladers
an. Im Display erscheint die Anzeige „KEYLOADING“
(Chiffrierschlüssel laden). Die normalen Sende- und
Empfangsfunktionen sind deaktiviert. Weitere
Informationen entnehmen Sie bitte dem Handbuch für
den Chiffrierschlüssellader.
MCS 2000 Modelle II & III
Deutsch
Hinweis: Um ältere Modelle für das Laden von
Chiffrierschlüsseln vorzubereiten, müssen Sie
die Taste Schützen (4) gedrückt halten, bis die
erste Option des Menüs „Schützen“ im
Anzeigefeld erscheint. Blättern Sie durch die
Optionen des Menüs, bis „KEYLOAD“
(Chiffrierschlüssel laden) im Anzeigefeld
erscheint, und drücken Sie die Selekt-Taste.
Um das Menü wieder zu verlassen, drücken Sie
die HOME-Taste.
Wenn der Chiffrierschlüssel erfolgreich geladen
wurde, gibt das Funkgerät einen langen Signalton aus.
Um einen Chiffrierschlüssel zu löschen, drücken Sie
die Taste „Schützen“ (4), und halten sie gedrückt, bis
die erste Option „ERASE KEY“ (Chiffrierschlüssel
löschen) des Menüs „Schützen“ im Anzeigefeld
erscheint. Drücken Sie dann die Selekt-Taste. Wenn
der Chiffrierschlüssel gelöscht wurde, erscheint
„ERASED“ (Gelöscht) im Anzeigefeld.
68P81083C10-C
Seite 19
MCS2000 2&3-C UG GBBook Page 20 tirsdag 3. november 1998 14:58
Deutsch
MCS 2000 Modelle II & III
Seite 20
68P81083C10-C
Hinweis: Ist das Funkgerät für einen Zeitraum
von mehr als drei Tagen nicht an die
Netzspannung angeschlossen, so kann der
Chiffrierschlüssel möglicherweise aus dem
Speicher gelöscht sein.
Sicherheitshinweise
Datenbetrieb
Wenn Ihr Funkgerät für Datenbetrieb programmiert ist,
können Sie Datennachrichten an ein Datenterminal
senden und/oder solche empfangen. Während des
Sendens oder Empfangs erscheinen folgende
Meldungen in der Anzeige:
Modell III
DATA TRANSFER
Modell II
DATA TRANSFER
Durch Drücken einer beliebigen Taste wird die
Datenübermittlung abgebrochen, und das Funkgerät
kehrt zum Normalbetrieb zurück. Weitere
Informationen erhalten Sie bei Ihrem Systemverwalter.
Handhabung des Geräts
•
•
einem milden Spülmittel oder Isopropylalkohol.
VORSICHT
Der Gebrauch von Lösungsmitteln, Alkohol
(mit Ausnahme von Isopropylalkohol),
Aerosol-Sprays oder Benzin kann die
Oberfläche des Geräts beschädigen.
Behandeln Sie das Gerät vorsichtig.
Das Gehäuse sollte mit einem feuchten Tuch
gereinigt werden, entweder mit klarem Wasser,
Jedes Funkgerät strahlt Energie ab. Diese kann unter
speziellen Umständen zu Funkenbildung führen.
Alle Fahrzeugfunkbenutzer sollten grundsätzlich
folgende Warnhinweise beachten:
Funkgerät nicht in der Nähe brennbarer oder
explosiver Stoffe benutzen
Bei vorschriftsmäßiger Verwendung liegt die vom
Gerät ausgehende Strahlung weit unterhalb des
Pegels, der eine Gefährdung darstellen könnte.
Um ihre persönliche Sicherheit zu gewährleisten,
beachten Sie bitte die folgenden Regeln:
• Damit die abgegebene Strahlungsenergie an
umstehende Personen unterhalb der
Empfehlungen der maßgeblichen Norm liegt,
sollten Sie ihr Funkgerät nur dann benutzen, wenn
der Abstand dieser Personen zu einer
ordnungsgemäß installierten Antenne mindestens
60 cm beträgt.
MCS2000 2&3-C UG GBBook Page 21 tirsdag 3. november 1998 14:58
•
NIEMALS die Sendetaste drücken, wenn nicht
tatsächlich gesendet werden soll.
• NIEMALS darf Kindern erlaubt werden, mit einem
Funkgerät zu spielen.
• NIEMALS während der Fahrt das Funkgerät
bedienen (Verstoß gegen die
Straßenverkehrsordnung).
Vorbereitung des Einbaus von Funkgeräten in Fahrzeuge
mit einem oder mehreren Airbags:
Achtung: Fahrzeuge mit Airbag
•
•
•
Ein Airbag entfaltet sich mit großer Wucht. Achten
Sie darauf, KEINE Objekte, wie z. B. auch
Funkgeräte oder Zubehör, über dem Airbag oder
innerhalb des Raumes zu montieren, den der
Airbag zur Entfaltung benötigt. Der unsachgemäße
Einbau von Funkgeräten kann bei der Auslösung
des Airbags zu schweren Verletzungen führen.
Lassen Sie den Einbau des Funkgeräts von einem
qualifizierten Techniker vornehmen. Größe und
Form des Airbags und sein Platzbedarf beim
Entfalten sind abhängig von Fahrzeugtyp, Modell
und Gestaltung des vorderen Teils der
Fahrgastzelle (z. B. Einzelsitze oder Sitzbank).
Falls Sie nicht genau wissen, an welcher Stelle Sie
das Funkgerät einbauen können, ohne die
Funktion des Airbags zu beeinträchtigen, setzen
Sie sich mit dem Fahrzeughersteller in Verbindung,
und erfragen Sie dort alle erforderlichen
Informationen.
MCS 2000 Modelle II & III
Deutsch
Zubehör
Weitere Informationen über das unten aufgeführte
Zubehör erhalten Sie bei Ihrem Motorola-Händler.
Mikrofone:
• Handmikrofone
• Tastaturmikrofone
• Geräuschgedämpfte Mikrofone
• Blendenmikrofone
• Schreibtischmikrofone
• Telefonartiger Handhörer
Montagezubehör:
• Haltebügel für Kippmontage
• Sperrschloß
• Halterung für Direktmontage
• Basisplatte mit Lautsprecher
• Abgesetzte Montage
Viele externe Lautsprecher (niedrige/hohe Leistung)
Viele verschiedene Kabelsätze
Schreibtisch (Kontrollstation)-Zubehör:
• Netzgeräte
• Fußschalter für externen Alarm
Antennen
Menü-Übersicht
Zone Select:
Channel:
Auswählen einer Zone (entspricht
Taste 1)
Auswählen eines Kanals (entspricht
68P81083C10-C
Seite 21
MCS2000 2&3-C UG GBBook Page 22 tirsdag 3. november 1998 14:58
Deutsch
MCS 2000 Modelle II & III
Moduswahlschalter D)
Kanalabfrage EIN /AUS (entspricht
Taste 8)
Tones:
EIN- oder AUSschalten der
Tastaturtöne
Display Intensity: Einstellen der Helligkeit der
Hintergrundbeleuchtung.
View Lists:
Anzeigen einer Abfrage-, Telefon-,
Privatruf- oder Suchruf-Liste
Program Lists:
Programmieren einer Abfrage-,
Telefon-, Privatruf- oder Suchruf-Liste
Horn/Lights:
EIN- oder AUSschalten des externen
Alarms (entspricht Taste 6)
High/Low Power: Einstellen der Sendeleistung des
Funkgerätes auf hohe oder niedrige
Leistung
Tx(Transmit) Inhibit: EIN- und AUSschalten des Senders.
Private Call:
Aktivieren der Privatruffunktion
(entspricht Taste 12)
Page:
Auswählen der Suchruffunktion
(entspricht Taste 11)
Phone:
Auswählen einer Telefonfunktion.
(entspricht Taste 7)
Status:
Auswählen und Senden einer
vorprogrammierten Statusmeldung
aus einer Liste.
Message:
Auswählen und Senden einer
vorprogrammierten Nachricht aus
einer Liste.
Seite 22
68P81083C10-C
Handset:
Scan Select:
Auswählen des Betriebsmodus des
Handhörers.
Bündelfunktion
Reprogram Request:
Anfordern einer dynamischen
Gruppenumprogrammierung
Fernbündelfunk
Site Lock/Unlock:
EIN- und AUSschalten der automatischen Standortumschaltung.
Nur konventionell
Repeater oder Direct:
Aktivieren des Zugangs zum
Verstärker oder zur Rundspruchfunktion.
Urheberrechtsschutz für SoftwareProgramme
Die in diesem Handbuch beschriebenen Erzeugnisse der Firma Motorola können in
Halbleiter- oder anderen Speichern urheberrechtlich geschützte Rechnerprogramme
enthalten. Die entsprechenden Gesetze der Bundesrepublik Deutschland, der USA und
anderer Länder sichern die alleinigen und ausschließlichen Rechte der Firma Motorola an
solchen Programmen, insbesondere das alleinige Recht, diese Programme zu
vervielfältigen oder anderweitig zu kopieren. Die Vervielfältigung oder anderweitige
Reproduktion dieser Programme oder Teile derselben ohne die ausdrückliche schriftliche
Einwilligung der Firma Motorola ist daher untersagt und kann strafrechtlich verfolgt
werden. Darüber hinaus schließt der Erwerb von Erzeugnissen der Firma Motorola in
keiner Weise und unter keinen Umständen eine Lizenz oder Teilhaberschaft an den
Urheberrechten, Patenten oder Patentanmeldungen der Firma Motorola dar. Erlaubt ist
ausschließlich der zweckmäßige Gebrauch der Geräte, wie er sich aus dem gesetzlichen
Nutzungsrecht, folgend aus dem Erwerb solcher Geräte, ergibt.
MCS2000 2&3-C UG GBBook Page 1 tirsdag 3. november 1998 14:58
MCS 2000 modèles II & III
Guide d'utilisation
page
Généralités . . . . . . . . . . . . . . . . . . . . . . . . . . . . . . . . . . 2
Fonctions des boutons et touches . . . . . . . . . . . . . . . . 2
Tonalités . . . . . . . . . . . . . . . . . . . . . . . . . . . . . . . . . . . . 3
Mode d'emploi général . . . . . . . . . . . . . . . . . . . . . . . . . 4
Mise en marche et arrêt du poste,
et réglage du volume . . . . . . . . . . . . . . . . . . . . . . . . 4
Sélection d'une fonction . . . . . . . . . . . . . . . . . . . . . . . . 4
Sélection à l'aide des touches de fonction . . . . . . . 4
Sélection à l'aide du menu . . . . . . . . . . . . . . . . . . . 4
Réglage de la luminosité de l'afficheur . . . . . . . . . . 5
Touches sonores/muettes . . . . . . . . . . . . . . . . . . . 5
Sélection de zone et de mode . . . . . . . . . . . . . . . . 5
Emission d'un appel . . . . . . . . . . . . . . . . . . . . . . . . . . . 6
Balayage . . . . . . . . . . . . . . . . . . . . . . . . . . . . . . . . . . . . 6
Sélection/annulation du balayage . . . . . . . . . . . . . . 7
Consultation d'une liste de balayage . . . . . . . . . . . 7
Modification d'une liste de balayage . . . . . . . . . . . 7
Connexion à un réseau téléphonique . . . . . . . . . . . . . . 8
Réception d'un appel téléphonique . . . . . . . . . . . . 8
Emission d'un appel téléphonique . . . . . . . . . . . . . 8
Composition du numéro à l'aide du clavier . . . . . . 8
Communication privée . . . . . . . . . . . . . . . . . . . . . . . . . 9
Réception d'une communication privée . . . . . . . . . 9
Emission d'une communication privée . . . . . . . . . 10
Identification (ID) de l'appelant . . . . . . . . . . . . . . . . . . 11
Boutons de mode prédéfinis . . . . . . . . . . . . . . . . . . . . 11
Mode Rappel . . . . . . . . . . . . . . . . . . . . . . . . . . . . . . . 11
Mise hors tension automatique . . . . . . . . . . . . . . . . . . 11
Fonctions SmartZone/AMSS . . . . . . . . . . . . . . . . . . . 12
MCS 2000 modèles II & III
Français
Recherche de site et Verrouillage de site . . . . . . . .12
Appel d'urgence . . . . . . . . . . . . . . . . . . . . . . . . . . . . .12
Alarme extérieure . . . . . . . . . . . . . . . . . . . . . . . . . . . . .13
Utilisation du combiné . . . . . . . . . . . . . . . . . . . . . . . . .13
Blocage du poste du véhicule . . . . . . . . . . . . . . . . . . .13
Mode dégradé . . . . . . . . . . . . . . . . . . . . . . . . . . . . . . .13
Fonctions conventionnelles . . . . . . . . . . . . . . . . . . . . .14
Relais/Direct . . . . . . . . . . . . . . . . . . . . . . . . . . . . . .14
Ecoute . . . . . . . . . . . . . . . . . . . . . . . . . . . . . . . . . .14
Code TCS (Tonalité Continue Sub-audible) sélectionnable par l’utilisateur . . . . . . . . . . . . . . . . . . . . . . . .14
Caractéristiques Stat Alert (MDC-1200/Star signal) . .14
Identification PTT et Urgence . . . . . . . . . . . . . . . . .14
Appels sélectifs . . . . . . . . . . . . . . . . . . . . . . . . . . .15
Identités de groupe et accès Wildcard . . . . . . . . .15
Connexion à un réseau téléphonique . . . . . . . . . .15
Etat/Message . . . . . . . . . . . . . . . . . . . . . . . . . . . . .16
Accès Relais MDC (RAC) . . . . . . . . . . . . . . . . . . . .16
Fonctions de système à ressources partagées . . . . . .16
Emission d’un avertissement d'appel . . . . . . . . . .16
Réception d’un avis d'appel . . . . . . . . . . . . . . . . .17
Demande de réaffectation . . . . . . . . . . . . . . . . . . .17
Fonctions des touches programmées . . . . . . . . . .17
Indication de perte de couverture radio . . . . . . . . .17
Fonctionnement en mode crypté . . . . . . . . . . . . . . . .18
Chargement et effacement de la clé de cryptage .18
Echange de données . . . . . . . . . . . . . . . . . . . . . . . . . .19
Conseils d'entretien . . . . . . . . . . . . . . . . . . . . . . . . . . .19
Précautions d'utilisation . . . . . . . . . . . . . . . . . . . . . . .20
Avertissement : Véhicules équipés d'un ou
de plusieurs coussins gonflables de sécurité . . . .20
Accessoires . . . . . . . . . . . . . . . . . . . . . . . . . . . . . . . . .21
Structure des menus . . . . . . . . . . . . . . . . . . . . . . . . . .21
Copyrights applicables aux logiciels informatiques . .22
68P81083C10-C
page 1
MCS2000 2&3-C UG GBBook Page 2 tirsdag 3. november 1998 14:58
Français
MCS 2000 modèles II & III
page 2
68P81083C10-C
Fonctions des boutons et touches
Attention : lors de son installation à bord du
véhicule ou de son retrait, le mobile doit être
éteint, afin d'éviter de l'endommager.
Généralités
En choisissant un mobile MCS 2000, vous avez fait un
choix excellent. Le système d'Assurance Qualité de
MOTOROLA garantit le haut niveau de performances
des produits MOTOROLA. Votre mobile MCS 2000 n'a
quitté notre usine qu'après des essais complets.
Ce guide d'utilisation décrit la façon dont un poste
standard fonctionne. Comme la programmation
peut modifier les fonctions du poste et les boutons
ou touches qui servent à les activer, il se peut que
votre poste ne fonctionne pas tout à fait comme
décrit.
Les messages qui s'afficheront sur le poste peuvent être programmés dans l'une des langues possibles. La langue d'affichage par défaut est
l'anglais. Les libellés d'affichage décrits dans le présent manuel sont les libellés anglais.
En cas de doute, contactez la personne responsable de votre système radio ou le SAV local.
Les chiffres et lettres entre parenthèses renvoient aux
illustrations de la page dépliable.
Référez-vous au tableau “E” ou “I” selon le type de clavier commandé avec votre poste.
(A) Marche-arrêt et réglage de volume
(B) Témoin lumineux tricolore
Vert, clignotant : réception d'un appel ou avertissement d'appel
Rouge, fixe : poste en émission (en clair et en
mode crypté)
Orange, fixe : système ou canal occupé ou appel
en clair entrant (fonctionnement en mode crypté)
Orange, clignotant : appel crypté entrant (fonctionnement en mode crypté)
(C) Afficheur avec pictogrammes et une ligne
(modèle II) ou deux lignes (modèle III) de 14
caractères
(D) Commutateur
(F) Bouton d'alternat
Appuyez pour parler, relâchez pour écouter
(G) Connecteur de microphone
(1) Sélection de zone
(2) Ecoute, appuyez sur la touche pour écouter les
communication (fonctionnement conventionnel)
ou
Recherche (fonctionnement en mode AMSS/
SmartZone)
MCS2000 2&3-C UG GBBook Page 3 tirsdag 3. november 1998 14:58
(3) Touche d'échappement (HOME)
(4) Activation-désactivation du mode crypté
(fonctionnement en mode crypté)
(5) Bouton d'urgence
(6) Alarme extérieure
(7) Connexion à un réseau téléphonique
(8) Balayage
(9) Menu
(10) Option
(11) Avertissement d'appel
(12) Appel privé
(13) Validation
Tonalités
Tonalité aiguë
Sonnerie
Tonalité grave
Emission d'un avertissement d'appel
Accusé de réception d'un avertissement d'appel
Occupé (répété quatre fois)
Rappel automatique (système à ressources partagées)
Réception d'un avertissement d'appel
(répété toutes les cinq secondes)
Emission d'un appel sélectif (communication privée améliorée)
Emission d'un appel sélectif (communication privée II)
MCS 2000 modèles II & III
Français
Réception d'un appel sélectif (répété
durant 20 secondes)
Emission/réception d'un appel téléphonique
Emission d'un appel d'urgence
Accusé de réception d'un appel
d'urgence
Abandon du mode d'urgence
Mode dégradé (répété toutes les 10
secondes, (système à ressources partagées)
Perte de couverture radio (répété, système à ressources partagées)
Entrée clavier acceptée
Echec de l'autotest du poste/Entrée
clavier non acceptée/Limite de temps
d'émission autorisée/ Refus du système
Erreur de fonction ou de canal ou
défaut matériel: la tonalité persiste
jusqu'à ce que l'erreur soit corrigée ou
que le poste soit éteint.
Erreur de cryptophonie (Keyfail, fonctionnement en mode crypté)
Alternat activé en mode clair (fonctionnement en mode crypté)
68P81083C10-C
page 3
MCS2000 2&3-C UG GBBook Page 4 tirsdag 3. november 1998 14:58
Français
page 4
68P81083C10-C
MCS 2000 modèles II & III
Mode d'emploi général
Sélection d'une fonction
Mise en marche et arrêt du poste, et réglage du
volume
Pour allumer le poste, appuyez sur le bouton marchearrêt (A). Le poste effectue alors un autotest.
Réglez le volume pour une écoute confortable en
tournant le bouton marche-arrêt (A).
Les fonctions programmées sur le poste peuvent être
sélectionnées de deux manières :
1
directement, à l'aide des touches de fonction
affectées, pré-programmées, ou
2
indirectement, à l'aide du MENU du poste.
Note : S'il est équipé pour cela, le poste peut être
programmé pour détecter la mise du contact.
Selon la programmation, lorsqu'on coupe le contact
du véhicule :
•
le poste s'éteint
•
la possibilité de passage en émission est inhibée
•
le bouton d'alternat est sans effet
Pour plus de précisions, contactez l'opérateur de
votre système.
Pour éteindre le poste, appuyez de nouveau sur le
bouton marche-arrêt (A).
Note : Si le poste fait entendre la tonalité
d'erreur et affiche un message d'erreur, contactez la personne responsable de votre système
radio ou le SAV local.
Sélection à l'aide des touches de fonction
Pour accéder directement à une fonction, appuyez sur
la touche de fonction souhaitée. Un triangle sur l'afficheur indique la touche de fonction utilisée. Si la fonction requiert d'autres précisions, utilisez le
commutateur (D) pour faire apparaître votre choix,
puis appuyez sur la touche de validation (13).
Note : les touches de fonction sont généralement actives. L'appui sur l’une de ces touches
met fin à l'opération en cours et lance l'opération sélectionnée.
Sélection à l'aide du menu
Le menu du poste permet d'accéder indirectement
aux fonctions.
1
Appelez le menu en appuyant sur la touche de
menu (9).
2
Choisissez la fonction souhaitée à l'aide du
commutateur (D).
MCS2000 2&3-C UG GBBook Page 5 tirsdag 3. november 1998 14:58
3
Appuyez sur la touche de validation (13). Le
poste quitte alors le mode de menu et active la
fonction sélectionnée, ou bien fait apparaître un
sous-menu.
Si la fonction requiert des précisions complémentaires, utilisez le commutateur (D) pour faire apparaître
votre choix, puis appuyez sur la touche de validation
(13).
Vous trouverez la liste des fonctions potentielles du
menu au dos de ce guide (page 21).
Réglage de la luminosité de l'afficheur
Sélectionnez l'option de menu DISP INTENSITY
(luminosité de l'afficheur) selon la procédure ci-dessus. Appuyez sur la touche de validation (13). Il est
alors possible de régler la luminosité de l'afficheur en
sélectionnant l'un des quatre niveaux proposés :
haute, moyenne, basse ou très basse, à l'aide du
commutateur (D).
Touches sonores/muettes
L'émission d'une tonalité chaque fois qu'on appuie
sur une touche peut être supprimée ou rétablie à
l'aide du menu.
Sélectionnez le menu TONES (tonalités) comme décrit
ci-dessus et appuyez sur la touche de validation (13).
L'afficheur indique alors l'état actuel, par exemple :
MCS 2000 modèles II & III
Français
modèle III
TONES ON
modèle II
TONES ON
Utilisez le commutateur (D) pour passer de “TONES
OFF” (touches muettes) à “TONES ON” (touches
sonores) ou vice-versa. Appuyez sur la touche de validation (13) lorsque l'afficheur indique le réglage souhaité.
Sélection de zone et de mode
Un mode est un canal ou groupe de communication et
l'ensemble des fonctions associées. Une zone est un
ensemble de modes pouvant être sélectionné à l'aide
de la touche de zone (1). Utilisez le commutateur (D)
pour afficher la zone souhaitée, par exemple :
modèle III
modèle II
ELECTRIC CO
NORTH DIVISION
ELECTRIC NORTH
Ici, sur l'afficheur du modèle III le nom de zone est
indiqué sur la première ligne et le nom de canal/
groupe de communication sur la seconde. Sur le
modèle II, le nom de zone est suivi du nom de canal/
groupe de communication. Le nom de zone clignote
jusqu'à ce que l'on appuie sur la touche de sélection
(13) pour le sélectionner. Appuyez sur la touche de
68P81083C10-C
page 5
MCS2000 2&3-C UG GBBook Page 6 tirsdag 3. november 1998 14:58
Français
page 6
68P81083C10-C
MCS 2000 modèles II & III
validation (13) pour sélectionner la zone puis utilisez le
commutateur (D) jusqu'à ce que l'afficheur indique le
canal/groupe de communication souhaité, par exemple :
modèle III
modèle II
ELECTRIC CO
SOUTH DIVISION
ELECTRIC SOUTH
Emission d'un appel
Quand la zone et le mode sont sélectionnés, vous
êtes prêt à émettre.
Décrochez le microphone et appuyez sur le bouton
d'alternat (F) pour parler ou relâchez-le pour écouter.
Parlez d'une voix normale, à une distance de 5 à 10
cm du microphone. Pendant l'émission, le témoin
rouge (B) est allumé.
Mode conventionnel uniquement :
Si le témoin orange est allumé, le canal est occupé.
Attendez que ce témoin soit éteint pour commencer à
émettre.
Système à ressources partagées uniquement :
Si vous entendez la tonalité d'occupation, lâchez le
bouton d'alternat (F) et attendez la tonalité de rappel
automatique. Quand vous entendez cette tonalité,
appuyez sur le bouton d'alternat (F) dans les trois
secondes pour émettre.
Si votre poste est équipé d'un limiteur de temps
d'émission, une tonalité d'avertissement est émise
quelques secondes avant la coupure de la communication.
Balayage
La fonction de balayage permet de surveiller le trafic
radio simultanément sur plusieurs canaux ou groupes
de communication (y compris sur le canal ou groupe
de communication sélectionné).
Les canaux figurant dans une liste de balayage peuvent être classés par ordre de priorité :
Priorité 1 :
canal le plus important.
Priorité 2 :
2ème canal le plus important.
Non prioritaire : entrée normale de la liste de
balayage, sans priorité.
En balayage, le poste écoutera le canal ou le groupe
de communication correspondant à la priorité 1. Si un
canal ou un groupe de communication de priorité
supérieure est activé alors que le poste est calé sur
une entrée de priorité inférieure, celui-ci passe au
canal ou groupe de communication de priorité supérieure.
Note : Quand l'utilisateur est en communication, il n'est pas interrompu par les communications de priorité normale.
MCS2000 2&3-C UG GBBook Page 7 tirsdag 3. november 1998 14:58
Sélection/annulation du balayage
La fonction de balayage peut être sélectionnée à
l'aide de la touche de balayage (8) ou du menu,
comme décrit plus haut.
Lorsque le balayage est sélectionné, l'icône de
balayage ( ) est présente sur l'afficheur, et le poste
balaye les canaux ou groupes de communications
définis dans les listes de balayage du mode actuel, à
la recherche d'activité.
Note : Si le poste est pré-programmé pour le
balayage automatique, le balayage s'effectue
automatiquement lorsqu'on sélectionne ce
mode, et il ne peut pas être désactivé.
Consultation d'une liste de balayage
Sélectionnez le menu VIEW LISTS (consultation de
liste) comme expliqué plus haut, puis utilisez le commutateur (D) pour afficher le menu SCAN (balayage).
Appuyez sur la touche de validation (13).
Le point de l'icône de balayage
clignote si le
mode est de priorité 1, ou s'éclaire sans clignoter
s'il est de priorité 2, ou l'icône
s'éclaire de façon
continue pour indiquer un mode de priorité normale.
L'icône de programmation
s'éclaire lorsqu'on consulte la liste.
MCS 2000 modèles II & III
Français
Utilisez le commutateur (D) pour afficher l'élément suivant de la liste. Appuyez sur la touche d'échappement
(3) pour quitter la fonction.
Modification d'une liste de balayage
Si la programmation d'une liste par l'utilisateur est
autorisée, il peut modifier celle-ci (ajout ou suppression d'éléments).
Sélectionnez le menu PROGRAM LISTS (programmation de liste) comme expliqué plus haut, puis utilisez le
commutateur (D) pour afficher le menu SCAN
(balayage), et appuyez sur la touche de validation (13)
ou
Enfoncez et maintenez la touche de balayage (8)
jusqu'à ce que vous entendiez la tonalité d'entrée clavier acceptée. L'icône de programmation
et le
triangle clignotent sur l'afficheur.
Utilisez le commutateur (D) pour sélectionner le mode
désiré.
Appuyez sur la touche de validation (13) si l'icône de
balayage
n'apparaît pas sur l'afficheur, pour attribuer au mode une priorité normale.
Appuyez de nouveau sur la touche pour attribuer au
mode une priorité 2 (l'icône de balayage
s'allume
en continu).
68P81083C10-C
page 7
MCS2000 2&3-C UG GBBook Page 8 tirsdag 3. november 1998 14:58
Français
page 8
68P81083C10-C
MCS 2000 modèles II & III
Appuyez une troisième fois sur la touche pour attribuer au mode une priorité 1 (le point de l'icône de
balayage
clignote).
Si vous appuyez sur la touche encore une fois, le
mode est retiré de la liste.
Connexion à un réseau téléphonique
La connexion à un réseau téléphonique permet d'utiliser le poste dans un système radio connecté à un
réseau téléphonique public ou privé.
Réception d'un appel téléphonique
Quand votre poste reçoit un appel téléphonique, une
sonnerie de téléphone se fait entendre, et l'afficheur
indique alternativement
modèle III
PHONE CALL
SOUTH DIVISION
modèle II
Emission d'un appel téléphonique
Composition du numéro à l'aide d'une liste
Appuyez sur la touche de menu (9), puis utilisez le
commutateur (D) jusqu'à ce que l'afficheur indique
PHONE (téléphone). Appuyez sur la touche de sélection (13) puis utilisez le commutateur (D) jusqu'à ce
que l'afficheur indique le nom et le numéro souhaités.
Appuyez sur la touche de validation (13) ou le bouton
d'alternat (F). Le poste compose alors ce numéro.
Note : Si votre poste est programmé pour cela,
vous pouvez appuyer sur la touche de téléphone pour accéder rapidement à la fonction
de connexion au réseau téléphonique. Le commutateur (D) permet d'afficher le dernier
numéro appelé et les listes de numéros de téléphone.
PHONE CALL
et l'affichage précédent. Le témoin vert (B) et l'icône
de réception d'appel
clignotent.
Appuyez sur la touche de téléphone (7) pour prendre
la communication.
Appuyez sur la touche d'échappement (3) ou la touche de menu (9) lorsque la communication est terminée.
Composition du numéro à l'aide du clavier (liste/
numérotation différée)
(modèle III ou modèle II avec microphone à clavier, en
option)
Appuyez sur la touche de téléphone (7) ou sélectionnez le menu PHONE comme expliqué plus haut, puis
entrez le numéro souhaité directement, à l'aide du cla-
MCS2000 2&3-C UG GBBook Page 9 tirsdag 3. november 1998 14:58
vier. Si vous émettez un appel nécessitant une pause
avant le numéro de poste, appuyez sur ✱
# .
En cas de composition d'un numéro erroné, il est possible d'effacer les chiffres en tournant le commutateur
de mode (D) vers la gauche ou vers le bas. Continuez
de tourner le commutateur (D) vers la gauche ou vers
le bas pour effacer le numéro tout entier.
Quand vous avez entré le numéro tout entier, appuyez
sur la touche de validation (13) ou le bouton d'alternat
(F) pour émettre l'appel.
modèle III
modèle II
PLEASE WAIT
555-1212
PLEASE WAIT
apparaît sur l'afficheur tandis que le système établit la
communication.
Système à ressources partagées uniquement :
Si l'accès au réseau téléphonique est occupé, l'afficheur indique
modèle III
PHONE BUSY
555-1212
modèle II
PHONE BUSY
et l’appel sera émis dès que le système deviendra disponible, sauf si vous appuyez sur la touche d'échappement (3), ou la touche de menu (9) pour quitter la
connexion au réseau téléphonique.
MCS 2000 modèles II & III
Français
Si l'accès au téléphone n'est pas autorisé sur votre
poste, l'afficheur indique :
modèle III
NO PHONE
555-1212
modèle II
NO PHONE
Communication privée
Réception d'une communication privée
Quand votre poste reçoit une communication privée,
la tonalité de réception d'une communication privée
se fait entendre, et l'afficheur indique alternativement
modèle III
CALL RECEIVED
ID: 2000
modèle II
CALL RECEIVED
et l'affichage précédent. Sur le modèle III, la seconde
ligne de l'afficheur indique l'identité du demandeur.
Sur le modèle II, if faut d'abord appuyer sur le bouton
d'appel (12) pour pouvoir visualiser cette identité.
Le témoin vert (B) et l'icône de réception d'appel clignotent.
Si on appuie sur le bouton d'alternat (F) dans les 20
secondes, une communication privée s'établit.
Note : Si vous n'appuyez pas sur la touche
d'appel privé (12), l’appel sera traité comme
une communication de groupe.
68P81083C10-C
page 9
MCS2000 2&3-C UG GBBook Page 10 tirsdag 3. november 1998 14:58
Français
page 10
68P81083C10-C
MCS 2000 modèles II & III
Appuyez sur la touche d'échappement (3) (ou deux
fois sur la touche de menu (9)) ou sur la touche
d'appel privé (12) lorsque la conversation est terminée.
Emission d'une communication privée (système à
ressources partagées uniquement)
Les communications privées peuvent être sélectionnées à partir d'une liste, ou directement à l'aide du
clavier (modèle III ou modèle II avec un microphone à
clavier, en option).
Note : Si votre poste est ainsi programmé, vous
pouvez appuyer sur la touche d'appel privé
pour accéder rapidement à la fonction de communication privée. A l'aide du commutateur (D),
vous pouvez alors afficher l'identité du dernier
appelant, la liste de communication privée ou
l'identité de votre propre poste.
Appuyez sur la touche d'appel privé (12) ou sélectionnez CALL (appel) à l'aide des menus. L'afficheur indique la dernière identité émise ou reçue.
Composition du numéro à l'aide d'une liste :
Appelez le numéro affiché en appuyant sur le bouton
d'alternat (F), ou choisissez un autre numéro de la liste à
l'aide du commutateur (D).
Pour connaître le numéro de votre poste, utilisez le commutateur (D) jusqu'à ce que l'afficheur indique “MY ID:”
suivi du numéro de votre poste, par exemple :
modèle III
MY RADIO USER
ID: 741317
modèle II
MY ID: 741317
Composition du numéro à l'aide du clavier :
(modèle III ou modèle II avec microphone à clavier, en
option)
Appuyez sur la touche d'appel privé (12) ou sélectionnez PRIVATE CALL (appel privé) à l'aide du menu,
puis entrez le numéro souhaité directement, à l'aide
du clavier.
En cas d’erreur, tant que le numéro n'est pas entièrement saisi, il est possible d'en effacer le dernier chiffre
en utilisant le commutateur (D) vers la gauche ou vers
le bas. Continuez d’utiliser le commutateur (D) vers la
gauche ou vers le bas pour effacer le numéro tout
entier. Puis entrez le numéro correct.
Après avoir composé le numéro d'une des deux
manières décrites plus haut, émettez l’appel en
appuyant sur le bouton d'alternat (F).
MCS2000 2&3-C UG GBBook Page 11 tirsdag 3. november 1998 14:58
Appel privé amélioré
Si l’appel privé amélioré ne reçoit pas de réponse
dans les 20 secondes, l'afficheur indique
modèle III
NO ANSWER
ID: 700001
modèle II
NO ANSWER
Appuyez sur le bouton d'alternat (F) pour communiquer votre numéro au poste appelé pour qu'on vous
rappelle plus tard. La tonalité d'émission d'avertissement d'appel se fait entendre.
Identification (ID) de l'appelant
Le poste affiche momentanément le numéro d’identification (ID) ou le nom du poste qui a lancé un appel. Si
un appel d’urgence est reçu dans un système à ressources partagées, l’afficheur du poste indique alternativement le groupe de conversation, le signal
d’appel d’urgence et l’identification (ID) ou le nom du
poste qui a lancé l’appel d’urgence.
Boutons de mode prédéfinis
Les boutons de mode prédéfinis permettent d’activer
rapidement les modes les plus fréquemment utilisés.
Maintenez le bouton de mode prédéfini enfoncé
jusqu’à ce que la tonalité de clavier valide retentisse
pour que le mode sélectionné soit programmé sur le
bouton. Si vous appuyez brièvement sur un bouton de
mode prédéfini, le poste activera immédiatement le
mode programmé sur ce bouton.
Mode Rappel
Le poste mémorise toujours le dernier mode sélectionné. Appuyez sur le mode Rappel pour passer
immédiatement au mode précédemment sélectionné.
Note: Le “dernier” mode doit être actif pendant au
moins cinq secondes pour qu’il soit mémorisé et
défini comme “dernier” mode.
Mise hors tension automatique
La fonction “Mise hors tension automatique” éteint le
poste si l’utilisateur ne commande aucune action pendant une période prédéfinie. Une action est l’appui sur
une touche, la rotation d’un bouton ou l’utilisation
d’un accessoire (par exemple, la pédale d’urgence).
MCS 2000 modèles II & III
Français
68P81083C10-C
page 11
MCS2000 2&3-C UG GBBook Page 12 tirsdag 3. november 1998 14:58
Français
page 12
68P81083C10-C
MCS 2000 modèles II & III
Deux minutes avant la mise hors tension automatique,
le poste produit une tonalité grave et continue et affiche en clignotant :
AUTO POWER OFF
A la première action de l’utilisateur, la tonalité et l’affichage de mise hors tension automatique cessent et le
poste revient au mode de fonctionnement normal.
Fonctions SmartZone/AMSS
En fonctionnement SmartZone et AMSS (Sélection
Automatique MultiSite), les deux fonctions suivantes
peuvent être programmées sur le poste :
Recherche de site et Verrouillage de site
Appuyez sur le bouton de recherche/écoute (2) pour
afficher le site actuel et la puissance du signal.
En plus, la puissance du signal, pour le site courant,
est représentée à l’afficheur par une courbe de zéro à
trois barres :
Maintenez le bouton de recherche/ écoute (2) enfoncé
pour forcer le poste à effectuer un balayage de recherche d'un nouveau site.
Si la fonction “itinérance” en option est programmée, le
poste assurera automatiquement la commutation d'un
site à l'autre en se déplaçant dans la zone couverte.
La commutation automatique de site peut être neutralisée par la fonction de verrouillage de site.
Pour plus de précisions, voyez le responsable de votre
système radio.
Appel d'urgence
Si cette fonction est prévue sur votre système, elle peut
être actionnée en appuyant sur le bouton d'urgence (5).
Pour désactiver l'urgence, enfoncez le bouton d'urgence
pendant environ 2 secondes.
Système à ressources partagées uniquement :
Votre poste peut être programmé pour indiquer la réception d'un appel d'urgence émanant d'un autre membre
de votre groupe de communication. Dans ce cas, l'afficheur indique alternativement
modèle III
L’affichage de trois barres correspond à un signal très
puissant et l’absence de barre à un signal très faible.
EMER RECEIVED
SOUTH DIVISION
modèle II
EMER RECEIVED
et le nom de mode du poste appellant.
MCS2000 2&3-C UG GBBook Page 13 tirsdag 3. november 1998 14:58
Si la fonction “urgence avec émission d'une communication vocale” est activée, le poste émettra automatiquement une alarme. Il émettra en BF via le
microphone du viseur pendant une période prédéterminée après l'appui sur le bouton d'urgence. Pour
plus de précisions, voyez le responsable de votre système radio.
Note : l'émission automatique via le microphone de pare-soleil n'est possible qu'avec la
fonction d'urgence.
Utilisation du combiné
Pour activer la fonction combiné, sélectionnez l’option
HANDSET dans le menu, puis HANDSET ON. Une
fois HANDSET ON sélectionné et le combiné décroché de son boîtier, la voix ne pourra être entendue
qu’au travers du haut-parleur du combiné, celui du
poste étant bloqué, afin de garantir la discrétion de
l’écoute.
Une fois le combiné raccroché, ou après sélection de
l’option HANDSET OFF du menu, la voix passera à
nouveau par le haut-parleur de la radio.
Blocage du poste du véhicule
Alarme extérieure
Selon les accessoires commandés et montés avec
votre poste, la fonction d'alarme extérieure actionne
l'avertisseur ou les feux de votre véhicule si vous ne
répondez pas à un appel (Avertissement d'appel,
Communication privée en ressources partagées, ou
communication téléphonique en ressources partagées) dans un délai pré-programmé.
Appuyez sur la touche (6) ou sélectionnez HORN/
LIGHTS dans le menu pour activer l'alarme extérieure.
L'afficheur indique alternativement que la fonction est
activée. Appuyez de nouveau sur la touche (6) pour
désactiver la fonction ou coupez la fonction depuis le
menu.
MCS 2000 modèles II & III
Français
Si la fonction d’inhibition de la radio du véhicule a été
programmée sur votre poste MCS 2000, la radio standard de votre véhicule sera momentanément bloquée
dès que votre poste mobile MCS 2000 sera en émission ou en réception. Pour plus de précisions, voyez
le responsable de votre système radio.
Mode dégradé
La fonction de mode dégradé (Failsoft) permet de ne
pas interrompre une communication en cas de
défaillance du système radio. Dans ce mode, la communication est maintenue sur un canal ouvert. La
tonalité de mode dégradé retentit alors toutes les 10
secondes, et l'afficheur indique alternativement
68P81083C10-C
page 13
MCS2000 2&3-C UG GBBook Page 14 tirsdag 3. november 1998 14:58
Français
page 14
68P81083C10-C
MCS 2000 modèles II & III
modèle III
FAILSOFT
SOUTH DIVISION
modèle II
FAILSOFT
et l'affichage actif à ce moment.
Fonctions conventionnelles
Avant d'émettre, vérifiez toujours que le mode sélectionné est libre (diode orange éteinte).
Relais/Direct
Sélectionnez l'option de menu REPEAT/DIRECT
(relais/direct) selon la procédure décrite précédemment, ou appuyez sur une touche pré-programmée.
Le mode courant (direct ou relais) s'affiche alors. Utilisez le commutateur (D) pour passer d'un mode à
l'autre. Appuyez sur la touche de validation (13) pour
sélectionner le mode de fonctionnement affiché.
Ecoute
Appuyez sur le bouton d'écoute pour activer ou
désactiver ce mode.
Appuyez et maintenez enfoncé le bouton d'écoute
pour définir la configuration de silencieux. A l'aide du
commutateur (D), il est possible de régler avec précision le niveau de silencieux du poste. Appuyez sur la
touche de sélection lorsque le niveau souhaité est
atteint.
Code TCS (Tonalité Continue Sub-audible) sélectionnable par l’utilisateur
La fonction TCS (Tonalité Continue Sub-audible) permet à l’utilisateur du poste de sélectionner un code
TCS dans une liste de codes préprogrammée. Si la touche MPL (ligne privée multiple) a été programmée à
cet effet, activez-la pour afficher le code TCS en cours
ou maintenez-la enfoncée pour accéder à la configuration correspondante. Le commutateur permet de
modifier le code TCS. Pour cela, vous devez maintenir
la touche de sélection enfoncée dès que le code TCS
choisi s’affiche.
Caractéristiques Stat Alert (MDC-1200/
Star signal)
Identification PTT et Urgence
Chaque poste peut être programmé de façon à émettre
un code d'identification numérique unique au début de
chaque transmission, à la fin, ou à la fois au début et à
la fin. Lorsque la fonction Identification PTT a été programmée pour un envoi avant le message vocal, une
tonalité est émise tant que cette identification n'a pas
été transmise. Cette identification peut être combinée à
une alarme d'urgence qui est activée par un bouton
d'urgence situé sur le poste. L'agent d'opérations peut
rapidement identifier l'utilisateur du poste et être averti
quasi-instantanément de toute situation critique.
MCS2000 2&3-C UG GBBook Page 15 tirsdag 3. november 1998 14:58
Fonctionnement d'urgence
Le mode d'urgence fonctionne conformément à la
procédure décrite précédemment.
Call Alert (avertissement d'appel)
Voir la section décrivant l'utilisation en ressources
partagées.
Appels sélectifs
Identités de groupe et accès Wildcard
(Recherche conventionnelle et Appel sélectif)
Avec clavier et appels illimités, il est possible de saisir
une identité de groupe en accédant à la fonction l’appel
sélectif ou d'avertissement d'appel, puis en remontant
jusqu'à l'identité “groupe” à l'aide du commutateur de
mode (D).
Réception d'un appel sélectif
Le poste affichera :
modèle III
CALL RECEIVED
ID: 2000
modèle II
CALL RECEIVED
pendant deux secondes après réception de tout appel
sélectif. Pour visualiser l'identité du poste appelant et
répondre à un appel sélectif, accédez à l'Appel sélectif
(voir ci-dessous).
Envoi d'un appel sélectif
Appuyez sur le bouton d'appel (12) ou sélectionnez le
menu PRIVATE CALL décrit plus haut. Saisissez l'identité au clavier ou utilisez le commutateur de mode (D)
pour faire défiler les identités jusqu'au correspondant à
appeler. Appuyez sur le bouton d'alternat (F) pour
émettre l’appel sélectif vers l'identité choisie. Si la fonction d'appel sélectif automatique est désactivée, le
poste sortira de cette fonction à l'issue de l'émission.
Si elle est activée, il restera sous cette fonction jusqu'à
ce que vous en sortiez.
MCS 2000 modèles II & III
Français
GROUP
s'affichera alors. Vous pouvez maintenant saisir une
identité de groupe à 3 chiffres pour appeler ou faire une
recherche.
Il est également possible d'introduire une entrée wildcard (*) pour appeler ou rechercher plusieurs identités
ou groupes. L'astérisque (*) correspond à tout chiffre
d'identification (0 à 9) situé à cet emplacement. Ainsi,
pour rechercher tous les postes de 0001 à 0009, taper
0-0-0-*.
Connexion à un réseau téléphonique
Pour passer un appel via le réseau téléphonique selon
la méthode conventionnelle, il faut que le poste puisse
transmettre des codes d'accès et de raccrochage au
68P81083C10-C
page 15
MCS2000 2&3-C UG GBBook Page 16 tirsdag 3. november 1998 14:58
Français
page 16
68P81083C10-C
MCS 2000 modèles II & III
réseau. Le code d'accès peut être envoyé dans les
deux sens, en fonction de la programmation du poste.
Immédiat : le poste envoie automatiquement un code
d'accès pré-enregistré dès que la touche
de connexion à un réseau téléphonique (7)
est activée.
Différé :
appuyez sur la touche de validation (13) ou
sur le bouton d'alternat (F). Le poste envoie
alors le code d'accès pré-enregistré.
Une fois le code d'accès transmis, la tonalité d'invitation à numéroter est normalement émise. (Dans le cas
où aucune tonalité n'est émise, appuyez sur la touche
d'échappement (3) ou sur la touche de connexion à un
réseau téléphonique (7) pour raccrocher). Puis appuyez
sur la touche de validation (13) ou sur le bouton d'alternat (F). Le poste transmet alors le numéro.
L’appel est ensuite traité conformément à la procédure
décrite plus haut dans la rubrique Emission d'un appel
téléphonique.
Etat/Message
Sélectionnez l'option de menu STATUS (état) ou MESSAGE (message) selon la procédure décrite précédemment. Le dernier état pris en compte ou le premier
message s'affiche alors. A l'aide du commutateur (D),
faites défiler la liste des états ou messages proposés.
Lorsque l'écran affiche l'état ou le message désiré,
appuyez sur la touche de validation (13) pour transmettre celui-ci. Quatre bips sont émis, indiquant que l'état
ou le message a été reçu. Le poste sort alors automatiquement de la fonction état/message. Si l'état ou le
message n'est pas reçu, l'afficheur indique
modèle III
modèle II
NO ACKNOWLEDGE
STATUS 1
NO ACKNOWLEDGE
et génère une tonalité continue. Appuyez sur la touche
de validation (13) pour transmettre de nouveau l'état ou
le message, ou appuyez sur la touche d'échappement
(3) pour sortir de la fonction.
Accès Relais MDC (RAC)
L’Accès Relais MDC sélectionne un relais pour permettre au poste d’émettre. Pour plus de précisions, voyez
votre administrateur de système.
Fonctions de système à ressources partagées
Emission d’un avertissement d'appel
Sélectionnez le menu PAGE (avertissement d'appel)
comme décrit plus haut, puis entrez l'identité au clavier ou utilisez le commutateur (D) pour afficher le
numéro souhaité, tiré de la liste des identités.
Appuyez sur le bouton d'alternat (F) ou la touche de
validation (13) pour envoyer un avertissement d'appel.
La tonalité d'accusé de réception de l'avertissement
MCS2000 2&3-C UG GBBook Page 17 tirsdag 3. november 1998 14:58
d'appel se fait entendre si le poste appelé a bien reçu
l'avertissement d'appel. S'il n'a pas reçu l'avertissement d'appel, l'afficheur indique
modèle III
modèle II
NO ACKNOWLEDGE
ID: 700001
NO ACKNOWLEDGE
Appuyez deux fois sur la touche d'échappement (3) ou
la touche de menu (9) pour revenir à l'affichage précédent.
Réception d’un avis d'appel
Lorsqu'un avis d'appel est reçu, la tonalité d'avis
d'appel retentit, la diode verte et l'icône
clignotent
sur l'afficheur, jusqu'à ce que l'avis d'appel soit pris en
compte par appui sur le bouton d'alternat (F) ou appui
et relâchement du bouton d'écoute (2).
Etat/Message
Fonctionne comme indiqué dans la description des
Fonctions Conventionnelles.
de communication. Pour plus de précisions, voyez
votre administrateur de système.
Fonctions des touches programmées
Il est possible, par programmation, de réserver certaines touches à l'émission d'un état, d'un message ou
d'un avis d'appel pré-programmé ou à la composition
d'un numéro de téléphone pré-programmé. Pour plus
de précisions, voyez votre administrateur de système.
Indication de perte de couverture radio
Si cette fonction en option est programmée sur votre
poste, elle vous avertit lorsque vous quittez votre zone
de couverture radio. L'afficheur indique alternativement
modèle III
OUT OF RANGE
SOUTH DIVISION
modèle II
OUT OF RANGE
et le mode actuel, et/ou la tonalité “perte de couverture radio” se fait entendre.
Demande de réaffectation
Si votre poste est programmé pour le regroupement
dynamique, la fonction de demande de réaffectation
peut être sélectionnée à l'aide d'une touche pré-programmée ou d'un menu. Une demande de réaffectation
envoie un message à l'opérateur de la console, lui
demandant d'assigner le poste à un nouveau groupe
MCS 2000 modèles II & III
Français
68P81083C10-C
page 17
MCS2000 2&3-C UG GBBook Page 18 tirsdag 3. november 1998 14:58
Français
MCS 2000 modèles II & III
Fonctionnement en mode crypté
Note : cette section s'applique uniquement si
le fonctionnement en mode crypté est programmé dans le poste. Seules sont mentionnées les différences par rapport au
fonctionnement en mode non-crypté. Reportezvous aux rubriques correspondantes de la section Généralités ci-après.
Appels sortants : lorsque le mode sélectionné n'est
pas pré-programmé comme fonctionnement en
crypté uniquement ou fonctionnement en clair uniquement, le mode de transmission cryptée est activé ou
désactivé en appuyant sur la touche d'activation/
désactivation correspondante (4), en dehors des
appels établis par connexion au réseau téléphonique
et des communications privées qui sont toujours
commandés par cette touche. L'émission d'un bip
immédiatement après l'appui sur le bouton d'alternat
indique une transmission en clair (pas en mode
crypté).
Note : si la touche d'activation/désactivation du
mode crypté est activé au cours d'une transmission, celle-ci est interrompue, et une tonalité
d'avertissement est émise jusqu'à ce que le
bouton d'alternat soit relâché. Le changement
page 18
68P81083C10-C
de mode sera effectif à la prochaine activation
du bouton d'alternat.
Appels entrants : lorsqu'un appel entrant est reçu, la
diode orange (mode conventionnel uniquement) et
l'icône de mode crypté
clignotent.
Fonctions conventionnelles : en écoute, seuls les
appels provenant des postes disposant de la même
clé de cryptage pourront être interceptés. Les appels
cryptés avec une clé différente seront perçus comme
du bruit.
Fonctions système à ressources partagées :
lorsqu'une émission en mode crypté est commandée
par la touche d'activation/désactivation de ce mode
(4), au cours d'un appel de groupe de communication ou d'une communication privée, il est uniquement possible de passer d'un fonctionnement en clair
à un fonctionnement en mode crypté. Au cours d'un
appel établi par connexion à un réseau téléphonique ou d'un appel en mode dégradé il est possible
de passer du mode de transmission en clair à celui en
mode crypté, ou du mode crypté au mode clair. Au
cours d'un appel d'urgence AUCUN changement
n'est possible.
Chargement et effacement de la clé de cryptage
Une clé de cryptage doit être chargée depuis un chargeur de variables de clé (KVL - Key Variable Loader) correspondant au type de cryptage de la radio.
MCS2000 2&3-C UG GBBook Page 19 tirsdag 3. november 1998 14:58
Sur le casque, débranchez le câble du microphone et
branchez le câble du chargeur de clés. L'afficheur
indique “KEYLOADING” (chargement en cours) et les
fonctions d'émission et de réception sont désactivées. Reportez-vous au manuel d'utilisation du KVL
pour plus de détails sur la procédure de chargement.
Note : sur certains modèles de poste plus
anciens, il faut définir le mode chargement de clé
en maintenant la touche d'activation/désactivation du mode crypté (4) enfoncée jusqu'à ce que
l'afficheur présente la première option du menu
de fonctionnement en mode crypté. Faites défiler les options jusqu'à “KEYLOAD” et appuyez
sur la touche de validation. Pour sortir de la
fonction, appuyez sur la touche d'échappement.
Une fois la clé correctement chargée, le poste émet
un long bip.
Pour effacer une clé, maintenez la touche d'activation/
désactivation du mode crypté (4) enfoncée jusqu'à ce
que l'afficheur présente la première option du menu
de fonctionnement en mode crypté, “ERASE KEY”
(effacer la clé) et appuyez sur la touche de validation.
Une fois l'effacement correctement exécuté, l'afficheur indique “ERASED” (effacée).
Note : si la batterie d'alimentation reste
MCS 2000 modèles II & III
Français
absente du poste pendant plus de 3 jours,
celui-ci peut perdre sa clé de cryptage.
Echange de données
Si votre poste est programmé pour cela, vous pouvez
émettre et/ou recevoir des messages de données vers
et depuis un terminal de données. En émission, ou en
réception, l’afficheur indiquera :
modèle III
DATA TRANSFER
modèle II
DATA TRANSFER
Il suffira alors d’appuyer sur une touche quelconque
pour interrompre le transfert de données et remettre le
poste en mode de fonctionnement normal. Pour plus
de précisions, voyez le responsable de votre système
radio.
Conseils d'entretien
•
•
Manipuler le poste avec un minimum de soin.
Nettoyer les surfaces extérieures du poste avec
un chiffon légèrement humidifié avec de l'eau
propre, une solution savonneuse douce ou de
l'alcool isopropylique.
Attention
Certains produits chimiques tels que des
détergents, alcools (à l'exception de l'alcool
68P81083C10-C
page 19
MCS2000 2&3-C UG GBBook Page 20 tirsdag 3. november 1998 14:58
Français
page 20
68P81083C10-C
MCS 2000 modèles II & III
isopropylique), aérosols ou produits pétroliers peuvent détériorer le boîtier du poste.
Précautions d'utilisation
Chaque poste, quand il émet, rayonne dans l’atmosphère de l’énergie, qui peut dans certaines conditions
causer la production d’une étincelle.
Tous les utilisateurs de véhicules équipés d’émetteursrécepteurs devraient suivre la recommandation suivante :
Ne pas utiliser votre émetteur-récepteur à
proximité de liquides inflammables
ou d’engins explosifs
En fonctionnement normal, le poste expose l’utilisateur
à un rayonnement électromagnétique nettement inférieur au seuil dangereux.
Pour assurer votre sécurité, observez cependant les
règles suivantes :
•
Le taux d’exposition aux hautes fréquences des
personnes se trouvant à proximité du véhicule
doit rester inférieur à celui recommandé par la
norme applicable : ne pas mettre les postes
radio mobiles en émission lorsque des personnes se trouvent à moins de 60 cm de l’antenne
extérieure, celle-ci devant par ailleurs être correctement installée.
•
•
Ne pas rester en émission sans nécessité
Ne pas laisser un enfant jouer avec un équipement radio contenant un émetteur
•
Ne pas manipuler la radio en conduisant. Il faut
noter que l'utilisation d'un microphone en conduisant constitue une infraction au code de la
route dans certains pays.
Si vous prévoyez d'installer un système de communication dans un véhicule équipé d'un ou de plusieurs
coussins gonflables de sécurité :
Avertissement : Véhicules équipés d'un ou de plusieurs coussins gonflables de sécurité
•
•
Le gonflage d'un coussin gonflable de sécurité
est un phénomène très violent. Afin d'éviter tout
accident, NE PAS PLACER D'OBJETS, y compris des équipements de communication, dans
les zones situées au-dessus ou dans son espace
de déploiement. Le gonflage du coussin de
sécurité en présence d'équipements de communication mal installés peut être très dangereux.
Le matériel de communication pour véhicule doit
toujours être installé par un installateur ou technicien professionnel qualifié pour ce type d'installation. Les taille, forme et volume de déploiement
du coussin gonflable de sécurité varient selon la
marque, le modèle et la configuration de la partie
MCS2000 2&3-C UG GBBook Page 21 tirsdag 3. november 1998 14:58
•
avant du véhicule (ex : banquette ou sièges
baquets).
Pour obtenir des informations précises sur
l'influence du coussin gonflable de sécurité sur
l'installation de votre matériel de communication
en fonction de la marque, du modèle et de la configuration de la partie avant du véhicule, il convient de s'adresser directement au constructeur.
Accessoires
Pour plus de précisions sur les accessoires ci-dessous, voyez votre représentant Motorola:
Microphones en option :
• Microphones à main
• Microphones à clavier
• Microphones antibruit
• Microphones de pare-soleil
• Microphones de table
• Combinés de type téléphonique
Accessoires de montage :
• Etrier de montage orientable
• Antivol
• Montage direct sur pivot
• Console de bureau avec haut-parleur
MCS 2000 modèles II & III
Français
• Option d’installation déportée
Gamme de haut-parleurs extérieurs (puissance
réduite/élevée)
Kits de câblage
Accessoires de table (poste de commande) :
• Alimentations électriques
• Pédale d'alarme extérieure
Antennes
Structure des menus
Zone Select:
Sélection d'une zone (comme la
touche 1)
Channel:
Sélection d'un canal (comme le
commutateur D)
Scan Select:
Marche/arrêt du balayage (comme
la touche 8)
Tones:
Touches sonores ou muettes
Display Intensity: Réglage du rétroéclairage.
View Lists:
Consultation d'une liste de
balayage, de téléphone, d'appel
privé ou d'avertissement d'appel
Program Lists:
Programmation d'une liste de
balayage, de téléphone, d'appel
privé ou d'avertissement d'appel
Horn/Lights:
Activation ou désactivation de
l'alarme extérieure (avertisseur/
68P81083C10-C
page 21
MCS2000 2&3-C UG GBBook Page 22 tirsdag 3. november 1998 14:58
Français
MCS 2000 modèles II & III
feux) (comme la touche 6)
High/Low Power: Sélection de la puissance faible ou
élevée du poste
Tx (Transmit) Inhibit: Inhibition de la possibilité d'émission
Private Call:
Sélection de la fonction d'appel
privé (comme la touche 12)
Page:
Sélection de la fonction d'avertissement d'appel (comme la touche
11)
Phone:
Sélection d'une fonction téléphonique (comme la touche 7)
Status:
Sélection et émission un code
d'état d'une liste préprogrammée
Message:
Sélection et émission d'un message d'une liste pré-programmée
Handset:
pour activer le mode de fonctionnement avec combiné.
Réseau à ressources partagées
Reprogram Request:
Demande de réaffectation dynamique à un groupe
Réseau à ressources partagées à large couverture
Site Lock/Unlock:
Interdit ou permet la commutation
page 22
68P81083C10-C
automatique de site
Conventionnel uniquement
Repeater ou Direct:
Permet de communiquer soit via
un relais (repeater), soit en direct
sans passer par un relais.
Copyrights applicables aux logiciels informatiques
Les produits décrits dans le présent manuel peuvent comprendre des programmes
Motorola/Europe et Motorola Inc. protégés par un copyright, stockés dans des mémoires
à semiconducteurs ou autres supports. La législation des Etats Unis et d’autres pays
réserve à Motorola/Europe et à Motorola Inc. certains droits exclusifs concernant les programmes ainsi protégés, notamment le droit de reproduire sous une forme quelconque les
dits programmes. En conséquence, toute reproduction des programmes Motorola/Europe
et Motorola Inc. contenus dans les produits décrits dans le présent manuel est interdite
sans le consentement écrit de Motorola. En outre, l’acquisition de ces produits ne confère
en aucun cas, directement ou indirectement, une licence autre que la licence normale non
exclusive d’usage qui découle de la vente du produit.
MCS2000 2&3-C UG GBBook Page 1 tirsdag 3. november 1998 14:58
MCS 2000 vjltkb II & III
Herjdjlcndj lkz gjkmpjdfntkz
cnh.
J,obt cdtltybz . . . . . . . . . . . . . . . . . . . . . . . . . . . . . . . . . . . . . . 2
Aeyrwbb ryjgjr . . . . . . . . . . . . . . . . . . . . . . . . . . . . . . . . . . . . . . . 2
Pderjdst cbuyfks . . . . . . . . . . . . . . . . . . . . . . . . . . . . . . . . . . . . . 3
J,ofz 'rcgkefnfwbz . . . . . . . . . . . . . . . . . . . . . . . . . . . . . . . . . . 4
Drk.#dsrk. hfwbb b htuekbhjdrf uhjvrjcnb . . . . . . . . . . . . . 4
Ds,jh aeyrwbb . . . . . . . . . . . . . . . . . . . . . . . . . . . . . . . . . . . . . . . 4
Ryjgjxysq ds,jh aeyrwbb . . . . . . . . . . . . . . . . . . . . . . . . . . 4
Ds,jh bp vty/ . . . . . . . . . . . . . . . . . . . . . . . . . . . . . . . . . . . . 4
Htuekbhjdrf zhrjcnb lbcgktz . . . . . . . . . . . . . . . . . . . . . . . 5
Drk/xtybt#dsrk/xtybt pderjds[ cbuyfkjd . . . . . . . . . . . . 5
Ds,jh pjys b ht;bvf . . . . . . . . . . . . . . . . . . . . . . . . . . . . . . 5
Bc[jlzobt dspjds . . . . . . . . . . . . . . . . . . . . . . . . . . . . . . . . . . . . 5
Crfybhjdfybt . . . . . . . . . . . . . . . . . . . . . . . . . . . . . . . . . . . . . . . . 6
Drk/xtybt b dsrk/xtybt crfybhjdfybz . . . . . . . . . . . . . . 6
Ghjcvjnh cgbcrf crfybhjdfybz . . . . . . . . . . . . . . . . . . . . . . 7
Bpvtytybt cgbcrf crfybhjdfybz . . . . . . . . . . . . . . . . . . . . . 7
Ntktajyyfz cdzpm . . . . . . . . . . . . . . . . . . . . . . . . . . . . . . . . . . . . . 7
Ghbtv ntktajyyjuj dspjdf . . . . . . . . . . . . . . . . . . . . . . . . . 7
Gthtlfxf ntktajyyjuj dspjdf . . . . . . . . . . . . . . . . . . . . . . 8
Ds,jh c gjvjom/ rkfdbfnehs !Cgbcjr#<eathysq yf,jh@ . 8
Rjyabltywbfkmysq dspjd . . . . . . . . . . . . . . . . . . . . . . . . . . . . . . 9
Ghbtv rjyabltywbfkmyjuj dspjdf . . . . . . . . . . . . . . . . . . . 9
Gthtlfxf rjyabltywbfkmyjuj dspjdf . . . . . . . . . . . . . . . . 9
BY dspsdf/otuj . . . . . . . . . . . . . . . . . . . . . . . . . . . . . . . . . . . . . 10
Ryjgrb> yfpyfxtyyst lkz ds,jhf ht;bvf . . . . . . . . . . . . . . . . 10
Dspjd ht;bvf . . . . . . . . . . . . . . . . . . . . . . . . . . . . . . . . . . . . . . . 10
Fdnjvfnbxtcrjt dsrk/xtybt gbnfybz . . . . . . . . . . . . . . . . . . . 10
Aeyrwbb SMARTZONE/AMSS . . . . . . . . . . . . . . . . . . . . . . . . . . . 11
Gjbcr b abrcfwbz cfqnf . . . . . . . . . . . . . . . . . . . . . . . . . . . 11
Fdfhbqyst !'rcnhtyyst@ dspjds . . . . . . . . . . . . . . . . . . . . . . . 11
MCS 2000 vjltkb II & III
Heccrbq
Dytiyzz nhtdjuf . . . . . . . . . . . . . . . . . . . . . . . . . . . . . . . . . . . .
Hf,jnf `nhe,rb$ . . . . . . . . . . . . . . . . . . . . . . . . . . . . . . . . . . . .
Dsrk/xtybt pderf fdnjvj,bkmyjuj ghbtvybrf . . . . . . . . . . .
Fvjhnbpfwbz jnrfpjd . . . . . . . . . . . . . . . . . . . . . . . . . . . . . . . .
J,sxyst aeyrwbb . . . . . . . . . . . . . . . . . . . . . . . . . . . . . . . . . . .
Htnhfyckznjh#Ghzvfz cdzpm . . . . . . . . . . . . . . . . . . . . . . .
Vjybnjh . . . . . . . . . . . . . . . . . . . . . . . . . . . . . . . . . . . . . . . .
Ds,bhftvfz gjkmpjdfntktv rjyabltywbfkmyfz
kbybz !RK@ . . . . . . . . . . . . . . . . . . . . . . . . . . . . . . . . . . . . . .
Aeyrwbb jgjdtotybz j dspjdt (MDC-1200/Star Signalling@ . .
Gjcskrf BY ghb yf;bvt HNN b 'rcnhtyyjuj cbuyfkf . . .
Bp,bhfntkmyst dspjds . . . . . . . . . . . . . . . . . . . . . . . . . . .
Uheggjdst BY b ddjl eybdthcfkmyjuj
cbvdjkf . . . . . . . . . . . . . . . . . . . . . . . . . . . . . . . . . . . . . . . .
Ntktajyyfz cdzpm . . . . . . . . . . . . . . . . . . . . . . . . . . . . . . . .
Cnfnec#Cjj,otybt . . . . . . . . . . . . . . . . . . . . . . . . . . . . . . . .
Ljcneg r htnhfyckznjhe MDC !RAC@. . . . . . . . . . . . . . . . . .
Nhfyrbyujdst aeyrwbb hfwbb . . . . . . . . . . . . . . . . . . . . . . . . .
Gthtlfxf gtql;byuf `jgjdtotybt j dspjdt$ . . . . . . . . .
Ghbtv jgjdtotybz j dspjdt. . . . . . . . . . . . . . . . . . . . . . . .
Pfghjc yf gthtghjuhfvvbhjdfybt . . . . . . . . . . . . . . . . . . .
Aeyrwbb> frnbdbhe/obtcz jlybv rfcfybtv ryjgrb . . . .
Dyt pjys ltqcndbz . . . . . . . . . . . . . . . . . . . . . . . . . . . . . . .
Hf,jnf d ht;bvt rjlbhjdfybz . . . . . . . . . . . . . . . . . . . . . . . . .
Pfuheprf b cnbhfybt ibahjdfkmyjuj rk/xf . . . . . . . . . .
Hf,jnf c lfyysvb . . . . . . . . . . . . . . . . . . . . . . . . . . . . . . . . . . .
E[jl pf hfwbtq . . . . . . . . . . . . . . . . . . . . . . . . . . . . . . . . . . . . . .
Nt[ybrf ,tpjgfcyjcnb . . . . . . . . . . . . . . . . . . . . . . . . . . . . . . . .
Ghtljcntht;tybt% fdnjvj,bkb> j,jheljdfyyst
yfledysvb gjleirfvb ,tpjgfcyjcnb . . . . . . . . . . . . . . . .
Ghbyflkt;yjcnb . . . . . . . . . . . . . . . . . . . . . . . . . . . . . . . . . . . .
J,pjh vty/ . . . . . . . . . . . . . . . . . . . . . . . . . . . . . . . . . . . . . . . . .
Fdnjhcrbt ghfdf yf ghjuhfvvyjt j,tcgtxtybt . . . . . . . . . . .
68P81083C10-C
Cnh. 1
12
12
12
12
13
13
13
13
13
13
13
14
14
15
15
15
15
15
16
16
16
16
17
17
18
18
18
19
19
20
MCS2000 2&3-C UG GBBook Page 2 tirsdag 3. november 1998 14:58
Heccrbq
Cnh. 2
MCS 2000 vjltkb II & III
68P81083C10-C
AEYRWBB RYJGJR
Dybvfybt% Ghb ecnfyjdrt b bpdktxtybb hfwbb
bp fdnjvj,bkz> jyf ljk;yf ,snm dsrk/xtyf>
byfxt hfwbz vj;tn ,snm gjdht;ltyf.
J<OBT CDTLTYBZ
Ds,hfd MCS 2000 ds ghbj,htkb ghtrhfcye/
gjhnfnbdye/ hfwb/. Ufhfynbz rfxtcndf abhvs Motorola
j,eckfdkbdftn dscjrbt cnfylfhns ghjlerwbb. Hfwbz
MCS 2000 ghjikf rjvgktrcysq rjynhjkm rfxtcndf.
Lfyyjt herjdjlcndj lkz gjkmpjdfntkz
jgbcsdftn hf,jne cnfylfhnyjq hfwbb.
Gjcrjkmre cnfylfhnyst jgthfwbb vjuen ,snm
gthtghjuhfvvbhjdfys — 'nj rfcftncz rfr
aeyrwbq hfwbb> nfr b ryjgjr> frnbdbhe/ob[
lfyyst aeyrwbb> — hf,jnf dfitq hfwbb vj;tn
jnkbxfnmcz jn jgbcfybq yfcnjzotuj
Herjdjlcndf.
Cjj,otybz lbcgktz hfwbb vj;yj
pfghjuhfvvbhjdfnm yf jlby bp ytcrjkmrb[
zpsrjd. Fyukbqcrbq zpsr ecnfyjdkty gj
evjkxfyb/ b bcgjkmpetncz lkz jgbcfybz
gjrfpfybq lbcgktz d lfyyjv herjdjlcndt lkz
gjkmpjdfntkz.
D ckexft ytzcyjcntq cdz;bntcm c rehfnjhjv
dfitq hflbjcbcntvs bkb c vtcnysv
ghtlcnfdbntktv gj j,cke;bdfyb/.
Yjvthf d crj,rf[ cjjndtncnde/n bkk/cnhfwbzv yf
hfcrkflsdf/otqcz cnhfybwt.
D pfdbcbvjcnb jn rkfdbfnehs> ecnfyjdktyyjq yf dfitq
hfwbb> lkz jgbcfybz aeyrwbq ryjgjr bcgjkmpetncz
dfhbfyn "E" bkb "I".
(A)
Dsrk/xfntkm b htuekznjh uhjvrjcnb hfwbb
(B)
Nht[wdtnysq bylbrfnjh%
Ptktysq vbuf/obq% gjcnegftn dspjd bkb gtql;
Call Alert
Rhfcysq ytghthsdysq% hfwbz gthtlftn d
jnrhsnjv b ibahjdfyyjv ht;bvf[.
Jhfy;tdsq ytghthsdysq% cbcntvf#rfyfk
pfyzns bkb gjcnegftn dspjd !ibahjdfyyfz
cdzpm@
Jhfy;tdsq vbuf/obq% gjcnegftn ibahjdfyysq
dspjd !d ibahjdfyyjv ht;bvt@
(C)
Lbcgktq c cbvdjkfvb b jlyf cnhjrf c 14 pyfrfvb
!vjltkm II) bkb ldt cnhjrb c 14 pyfrfvb !vjltkm
III)
(D)
Ctktrnjh ht;bvf
(F)
Rkfdbif HNN — !ghbtv#gthtlfxf@%
Yf;fd> ujdjhbnt& jngecnbd — ckeifqnt
(G)
Hfp(tv vbrhjajyf
(1)
Ds,jh pjys
(2)
Vjybnjh. Ghb yf;fnbb bltn vjybnjhbyu
frnbdyjcnb 'abhf !j,sxysq ht;bv@ bkb
Gjbcr !jgthfwbz d ht;bvt AMSS/SmartZone@
(3)
Ryjgrf HOME — bc[jlyjt gjkj;tybt
MCS2000 2&3-C UG GBBook Page 3 tirsdag 3. november 1998 14:58
(4)
(5)
!6@
!7@
!8@
!9@
!10@
!11@
!12@
!13@
Rjyabltywbfkmysq ht;bv drk.#dsrk.
Fdfhbqyfz ryjgrf
Dytiyzz nhtdjuf
Ntktajyyfz cdzpm
Crfybhjdfybt
Vty/
Dfhbfyn
Gtql;th
Rjyabltywbfkmysq dspjd
Ds,jh
D[jlzobq bp,bhfntkmysq dspjd
!gjdnjhztncz d ntxtybt 20 ctreyl@
Drk/xtybt ntktajyf#Ghbtv
Frnbdfwbz fdfhbqyjuj dspjdf
Gjlndth;ltybt fdfhbqyjuj dspjdf
Ltfrnbdfwbz fdfhbqyjuj dspjdf
Fvjhnbpfwbz jnrfpjd !gjdnjhztncz
rf;lst 10 ctreyl> nhfyr. cdzpm@
PDERJDST CBUYFKS
Dyt lbfgfpjyf ltqcndbz !gjdn.> nhfyr.@
Dscjrbq njy
Pdjyjr njy
Ybprbq njy
Jgjdtotybt j dspjdt gjckfyj
Lfyyst> ddtltyyst c rkfdbfnehs>
ghbyzns
Jgjdtotybt j dspjdt gjlndth;ltyj
Pfyznj !gjdnjhztncz xtnsht hfpf@
Fdn. j,hfnysq dspjd !nhfyrbyujdfz
cdzpm@
Jgjdtotybt j dspjdt gjkextyj
!gjdn. rf;lst 5 ctr.@
Bybwbfwbz dspjdf
!ecjdthitycndjdfyysq rjyabltyw.
dspjd@
Bp,bhfntkmysq dspjd ghbyzn
!Rjyabltywbfkmysq dspjd II@
MCS 2000 vjltkb II & III
Heccrbq
Hfwbz yt ghjikf cfvjntcnbhjdfybz#
Lfyyst c rkfdbfnehs yt ghbyzns#
Ghtleght;ltybt nfqvthf j,
bcntxtybb dhtvtyb#Jnrfp cbcntvs
Jib,rf aeyrwbb#Rfyfkf#Fggfhfnehs&
cbuyfk pdexbn lj dsgjkytybz
rjhhtrnyjuj ltqcndbz bkb dsrk/
xtybz hfwbb
C,jq rkfdbib !ibahjdfyysq ht;bv@
Rkfdbif HNN yf;fnf d ht;bvt
jnrhsnjq gthtlfxb !ghb
ibahjdfyyjv ht;bvt @
68P81083C10-C
Cnh. 3
MCS2000 2&3-C UG GBBook Page 4 tirsdag 3. november 1998 14:58
Heccrbq
Cnh. 4
MCS 2000 vjltkb II & III
68P81083C10-C
J<OFZ "RCGKEFNFWBZ
DS<JH AEYRWBB
Drk.#dsrk. hfwbb b htuekbhjdrf uhjvrjcnb
Aeyrwbb> pfghjuhfvvbhjdfyyst d hfwbb> vjuen ,snm
ds,hfys ldevz hfpkbxysvb cgjcj,fvb
1.
Ghzvj> c gjvjom/ pfghjuhfvvbhjdfyyjq ryjgrb>
bkb
2.
Rjcdtyyj> c gjvjom/ VTY? hfwbb.
Drk/xbnt hfwb/ yf;fnbtv ryjgrb !F@. Ghjqltn
cfvjntcnbhjdfybt hfwbb.
Ds,thbnt ye;ye/ uhjvrjcnm> dhfofz ryjgre drk.#dsrk.
!F@.
Ryjgjxysq ds,jh aeyrwbb
Ghbvtxfybt. Dfif hfwbz vj;tn bvtnm
chtlcndf aeyrwbjyfkmyjq cdzpb c cbcntvjq
pf;bufybz.
D 'njv ckexft hfwbz vj;tn ,snm pfghjuhfvvbhjdfyf yf
cktle/oe/ htfrwb/ yf dsrk/xtybt pf;bufybz%
¤ dsrk/xtybt bkb
¤ ,kjrbhjdfybt gthtlfxb bkb
¤ ,kjrbhjdfybt bcgjkmpjdfybz rkfdbib HNN.
Lkz gjkextybz ljgjkybntkmyjq byajhvfwbb cdz;bntcm
c jgthfnjhjv dfitq cbcntvs.
Dsrk/xbnt hfwb/ yf;fnbtv ryjgrb drk.#dsrk. !F@.
Ghbvtxfybt. Tckb hfwbz gjlftn pderjdjq
cbuyfk jib,rb b yf lbcgktt gjzdkztncz
cjj,otybt j, jib,rt> cdz;bntcm c rehfnjhjv
dfitq hflbjcbcntvs bkb c vtcnysv
ghtlcnfdbntktv gj j,cke;bdfyb/.
Lkz ghzvjuj ljcnegf r rfrjq–kb,j aeyrwbb yf;vbnt
ye;ye/ ryjgre. Dthibyf nhteujkmybrf yf lbcgktt
,eltn erfpsdfnm yf ryjgre> rjnjhe/ ds yf;fkb. Tckb
aeyrwbz nht,etn ljgjkybntkmyjuj ddjlf lfyys[>
bcgjkmpeqnt ctktrnjh ht;bvf (D) lkz dsdjlf
ds,hfyyjuj dfhbfynf yf lbcgktq b yf;vbnt ryjgre
ds,jhf !13@.
Ghbvtxfybt. Aeyrwbjyfkmyst ryjgrb j,sxyj
frnbdbhjdfys. Yf;fnbt nfrjq ryjgrb ghbdjlbn r
ds[jle bp ntreotq aeyrwbb b frnbdfwbb
ds,hfyyjq aeyrwbb.
Ds,jh bp vty/
Aeyrwbb vjuen ,snm frnbdbhjdfys rjcdtyyj> c gjvjom/
vty/ hfwbb.
1
Yf;vbnt ryjgre vty/ !9@ lkz gjkextybz
djpvj;yjcnb ds,jhf.
2
C gjvjom/ ctktrnjhf ht;bvf !D@ dsdtlbnt yf
lbcgktq ye;ye/ aeyrwb/.
3
Yf;vbnt ryjgre ds,jhf !13@. Hfwbz ds[jlbn bp
MCS2000 2&3-C UG GBBook Page 5 tirsdag 3. november 1998 14:58
ht;bvf vty/ b d[jlbn d ht;bv ds,hfyyjq
aeyrwbb bkb ce,vty/.
Tckb ytj,[jlbvj ddtcnb ljgjkybntkmyst lfyyst>
bcgjkmpeqnt ctktrnjh ds,jhf ht;bvf (D) lkz dsdjlf yf
lbcgktq ye;yjuj rjvgjytynf b yf;vbnt ryjgre ds,jhf
!13@.
Cgbcjr djpvj;ys[ aeyrwbq vty/ ghbdtlty d rjywt
yfcnjzotuj Herjdjlcndf (cnh. 19).
Htuekbhjdrf zhrjcnb lbcgktz
Ds,thbnt gjpbwb/ vty/% DISP INTENSITY. Yf;vbnt
ryjgre ds,jhf !13@. Htuekbhjdrf zhrjcnb lbcgktz
ghjbpdjlbncz yf;fnbtv ryjgrb ctktrnjhf ht;bvf (D)
gentv ds,jhf jlyjuj bp xtnsht[ ehjdytq% byntycbdyjuj>
chtlytuj> ybprjuj bkb jxtym ybprjuj.
Drk/xtybt#dsrk/xtybt pderjds[ cbuyfkjd
Pderjdst cbuyfks> cjghjdj;lf/obt rf;ljt yf;fnbt
ryjgrb> vjuen ,snm drk/xtys bkb dsrk/xtys ghb
gjvjob vty/.
Ds,thbnt gjpbwb/ vty/ TONES. Yf;vbnt ryjgre
ds,jhf !13@. Lbcgktq gjrfpsdftn ntreott cjcnjzybt%
vjltkm III
TONES ON
vjltkm II
jnj,hf;tybb nht,etvjuj cjcnjzybz.
DS<JH PJYS B HT:BVF
Ht;bv ghtlcnfdkztn cj,jq rfyfk bkb hfpujdjhye/
uhegge b dct ghbceobt bv aeyrwbb. Pjyf ghtlcnfdkztn
cj,jq uheggbhjdre ht;bvjd> rjnjhst ds,bhf/ncz
ryjgrjq pjys !1@. Yf;fnbtv ryjgrb ctktrnjhf ht;bvf
(D) dsdtlbnt yf lbcgktq nht,etve/ pjye> yfghbvth%
vjltkm III
vjltkm II
ELECTRIC CO
NORTH DIVISION
ELECTRIC NORTH
D ckexft vjltkb III d gthdjq cnhjrt cnjbn yfpdfybt
pjys> f dj dnjhjq cnhjrt - yfpdfybt hfpujdjhyjq
uheggs#rfyfkf. D ckexft vjltkb II gjckt yfpdfybz pjys
bltn yfpdfybt rfyfkf#hfpujdjhyjq uheggs. Yfpdfybt
pjys ,eltn vbufnm lj nt[ gjh> gjrf Ds yt ds,thbnt pjye
c gjvjom/ ryjgrb !13@. Yf;fnbtv ryjgrb ctktrnjhf
ht;bvf !D@ dsdtlbnt yf lbcgktq nht,etvsq
rfyfk#hfpujdjhye/ uhegge> yfghbvth%
vjltkm III
vjltkm II
ELECTRIC CO
SOUTH DIVISION
ELECTRIC SOUTH
TONES ON
BC{JLZOBT DSPJDS
Gthtrk/xtybt TONES OFF !Pder dsrk/xty@# TONES ON
!drk/xty@> b n.l. ghjbpdjlbncz yf;fnbtv ryjgrb
ctktrnjhf ht;bvf (D). Yf;vbnt ryjgre ds,jhf !13@ ghb
MCS 2000 vjltkb II & III
Heccrbq
Ghjbpdtlz ds,jh pjys b ht;bvf> Ds vj;tnt yfxfnm
gthtlfxe. Bpdktrbnt vbrhjajy bp lth;fntkz>
yf;vfqnt rkfdbie gthtlfxb !HNN (F)@> rjulf ujdjhbnt>
68P81083C10-C
Cnh. 5
MCS2000 2&3-C UG GBBook Page 6 tirsdag 3. november 1998 14:58
Heccrbq
MCS 2000 vjltkb II & III
jngecrfqnt tt> rjulf ckeiftnt. Ujdjhbnt rfr j,sxyj>
lth;f vbrhjajy yf hfccnjzybb 5–10 cv. Ghb gthtlfxt
pfujhftncz rhfcysq bylbrfnjh !D@.
Njkmrj lkz j,sxyjuj dspjdf%
Tckb pfujhtkcz jhfy;tdsq bylbrfnjh> rfyfk pfyzn.
Gjlj;lbnt gthtlfdfnm> gjrf jy yt dsrk/xbncz.
Njkmrj lkz nhfyrbyujdjuj dspjdf %
Tckb cksity cbuyfk `pfyznj$> jngecnbnt HNN (F) b
;lbnt cbuyfkf fdnjvfnbxtcrjuj j,hfnyjuj dspjdf.
Ecksifd tuj> yf;vbnt HNN (F) yt gjplytt xtv xthtp 3
ctreyls lkz gthtlfxb.
Tckb Dfif hfwbz cyf,;tyf nfqvthjv> pf ytcrjkmrj
ctreyl lj ghtrhfotybz gthtlfxb ghjpdexbn
ghtleghtlbntkmysq cbuyfk.
CRFYBHJDFYBT
Crfybhjdfybt gjpdjkztn gjkmpjdfntk/ jlyjdhtvtyyj
cktlbnm pf frnbdyjcnm/ ,jktt xtv jlyjuj rfyfkf bkb
hfpujdjhyjq uheggs !drk/xfz b ds,hfyysq
rfyfk#uhegge@.
Rfyfkfv> d[jlzobv d cgbcrb crfybhjdfybz> vjuen ,snm
ghbcdjtys hfpkbxyst ehjdyb ghbjhbntnf.
Ghbjhbntn 1 — yfb,jktt df;ysq
Ghbjhbntn 2 — cktle/obq gj df;yjcnb
Ytghbjhbntnyst rfyfks — hzljdjq rjvgjytyn
cgbcrf crfybhjdfybz
Dj dhtvz crfybhjdfybz hfwbz ghjckeibdftn
rfyfk#hfpujdjhye/ uhegge c dscibv ghbjhbntnjv. Tckb
Cnh. 6
68P81083C10-C
rfyfk#hfpujdjhyfz uheggf c ,jktt dscjrbv
ghbjhbntnjv cnfyjdbncz frnbdyjq> rjulf hfwbz
ghjckeibdftn rjvgjytyn c ,jktt ybprbv ghbjhbntnjv>
hfwbz gthtrk/xbncz yf ghjckeibdfybt
rfyfkf#hfpujdjhyjq uheggs c ,jktt dscjrbv
ghbjhbntnjv.
Ghbvtxfybt. Tckb gjkmpjdfntkm dtltn
hfpujdjh> nj jy yt ghthsdftncz ghb dspjdf[ d
ht;bvt j,sxyjuj ghbjhbntnf.
Drk/xtybt b dsrk/xtybt crfybhjdfybz
Aeyrwbz crfybhjdfybz vj;tn ,snm drk/xtyf c
gjvjom/ ryjgrb crfybhjdfybz !8@ bkb gjchtlcndjv
vty/> rfr jgbcfyj dsit.
D ntxtybt dctuj dhtvtyb> gjrf crfybhjdfybt drk/xtyj
SCAN ON> cbvdjk ht;bvf crfybhjdfybz !
@ ,eltn
cdtnbnmcz yf lbcgktt> b hfwbz ,eltn crfybhjdfnm
rfyfks# uheggs gj cgbcrfv crfybhjdfybz ntreotuj
ht;bvf d gjbcrf[ frnbdyjcnb.
Ghbvtxfybt. Tckb ht;bv pfghjuhfvvbhjdfy
pfhfytt yf fdnjcrfybhjdfybt> hfwbz crfybhetn
fdnjvfnbxtcrb ghb ds,jht lfyyjuj ht;bvf> b
aeyrwbz crfybhjdfybz yt vj;tn ,snm jnrk/
xtyf.
MCS2000 2&3-C UG GBBook Page 7 tirsdag 3. november 1998 14:58
Ghjcvjnh cgbcrf crfybhjdfybz
Ds,thbnt gj vty/ gjpbwb/ VIEW LISTS> rfr jgbcfyj
dsit> f pfntv bcgjkmpeqnt ctktrnjh ht;bvf !D@ lkz
dsdjlf yf lbcgktq vty/ SCAN. Yf;vbnt ryjgre
ds,jhf !13@.
Njxrf djpkt cbvdjkf crfybhjdfybz vbuftn
d
ckexft ghbjhbntnf 1&
cdtnbncz ytghthsdyj d
ckexft ghbjhbntnf 2> bkb ;t cbvdjk
cdtnbncz
ytghthsdyj d ckexft j,sxyjuj ghbjhbntnf. Cbvdjk
ghjuhfvvbhjdfybz
dscdtxbdftncz dj dhtvz
ghjcvjnhf cgbcrf. Bcgjkmpeqnt ctktrnjh ht;bvf (D)
lkz ghjcvjnhf cktle/otuj cgbcrf. Aeyrwbz
ltfrnbdbhetncz yf;fnbtv ryjgrb HOME !3@.
ht;bvf d rfxtcndt rjvgjytynf j,sxyjuj ghbjhbntnf.
Dyjdm yf;vbnt ryjgre lkz drk/xtybz 'njuj ht;bvf d
rfxtcndt rjvgjytynf ghbjhbntnf 2 !cbvdjk
crfybhjdfybz
ujhbn ytghthsdyj@.
Yf;vbnt ryjgre d nhtnbq hfp lkz drk/xtybz 'njuj
ht;bvf d rfxtcndt rjvgjytynf ghbjhbntnf 1 !njxrf
cbvdjkf
vbuftn@. Tckb yf;fnm ryjgre ds,jhf tot
hfp> 'nj ghbdtltn r elfktyb/ ht;bvf !bcrk/xtyb/ tuj
bp cgbcrf@.
NTKTAJYYFZ CDZPM
Ntktajyyfz cdzpm djpvj;yf> rjulf hfwbz hf,jnftn d
cjcnfdt cbcntvs> bvt/otq ljcneg r xfcnyjq bkb
j,otcndtyyjq ntktajyyjq ctnb.
Bpvtytybt cgbcrjd crfybhjdfybz
Cgbcjr crfybhjdfybz vj;tn ,snm pfghjuhfvvbhjdfy b
bpvtyty gjkmpjdfntktv !hfcibhty bkb cjrhfoty@.
Ds,thbnt vty/ PROGRAM LISTS> rfr jgbcfyj dsit>
pfntv gjkmpeqntcm ctktrnjhjv ht;bvf (D) lj gjzdktybz
yflgbcb SCAN> gjckt xtuj yf;vbnt ryjgre ds,jhf !13@>
bkb yf;vbnt b elth;bdfqnt ryjgre crfybhjdfybz !8@ lj
nt[ gjh> gjrf yt ecksibnt cbuyfk gjlndth;ltybz.
Cbvdjk ghjuhfvvbhjdfybz
b nhteujkmybr yf
lbcgktt ,elen vbufnm.
C gjvjom/ ctktrnjhf ht;bvf (D) ds,thbnt nht,etvsq
ht;bv.
Yf;vbnt ryjgre ds,jhf !13@> tckb cbvdjk
crfybhjdfybz
yt dscdtxty> lkz drk/xtybz 'njuj
MCS 2000 vjltkb II & III
Heccrbq
Ghbtv ntktajyyjuj dspjdf
Rjulf Dfif hfwbz gjkexftn ntktajyysq dspjd>
hfplftncz pdjyjr b yf lbcgktt gjgthtvtyyj
gjzdkztncz yflgbcm%
vjltkm III
PHONE CALL
SOUTH DIVISION
vjltkm II
PHONE CALL
b bc[jlyjt cjcnjzybt lbcgktz. Ptktysq bylbrfnjh !D@ b
cbvdjk gjkextyyjuj dspjdf vbuf/n.
Yf;vbnt ntktajyye/ ryjgre !7@ lkz jndtnf yf dspjd.
Yf;vbnt ryjgre HOME (3) bkb ryjgre vty/ !9@ ghb
jrjyxfybb hfpujdjhf.
68P81083C10-C
Cnh. 7
MCS2000 2&3-C UG GBBook Page 8 tirsdag 3. november 1998 14:58
Heccrbq
Cnh. 8
MCS 2000 vjltkb II & III
Gthtlfxf ntktajyyjuj dspjdf
Ds,jh gj cgbcre
Yf;vbnt ryjgre vty/ !9@ b c gjvjom/ ctktrnjhf
ht;bvf (D) dsdtlbnt yf lbcgktq yflgbcm PHONE.
Yf;vbnt ryjgre ds,jhf !13@ b c gjvjom/ ctktrnjhf
ht;bvf (D) ecnfyjdbnt yf lbcgktt ye;ysq rjl bkb
yjvth. Yf;vbnt ryjgre ds,jhf !13@ bkb HNN (F). Hfwbz
gthtlfcn yjvth.
68P81083C10-C
c gjvjom/ ctktrnjhf ht;bvf (D) !dktdj# dybp@. Lkz
cnbhfybz dctuj yjvthf ghjljk;fqnt bcgjkmpjdfnm
ctktrnjh ht;bvf (D). Rjulf yf,jh yjvthf pfdthity>
yf;vbnt ryjgre ds,jhf !13@ bkb HNN (F) lkz gthtlfxb
dspjdf. D ghjwtcct ghj[j;ltybz dspjdf yf lbcgktt
gjzdbncz yflgbcm%
vjltkm III
PLEASE WAIT
555-1212
vjltkm II
PLEASE WAIT
Ghbvtxfybt. Tckb hfwbz pfghjuhfvvbhjdfyf
yf 'ne aeyrwb/> nj Ds vj;tnt yf;fnm ryjgre
ntktajyf lkz ,scnhjuj ljcnegf r ntktajyyjq
cdzpb. Bcgjkmpez ctktrnjh ht;bvf (D)> Ds
vj;tnt ghjrhexbdfnm ntktajyyst yjvthf - jn
gjcktlytuj yf,hfyyjuj yjvthf lj cbcrjd
ntktajyys[ yjvthjd.
Ds,jh c gjvjom/ rkfdbfnehs !Cgbcjr# <eathysq
yf,jh@
!vjltkm III bkb vjltkm II c jgwbjyysv rkfdbiysv
vbrhjajyjv@.
Yf;vbnt ryjgre ntktajyf !7@> bkb ds,thbnt vty/
PHONE> rfr jgbcfyj dsit> pfntv ddtlbnt nht,etvsq
yjvth c rkfdbfnehs. Tckb Ds dspsdftnt lj,fdjxysq
vtcnysq yjvth> lkz yf,jhf rjnjhjuj ytj,[jlbvj
cltkfnm gfepe> yf;vbnt ryjgrb ✱
# .
Tckb ddtlty ytdthysq yjvth> tuj wbahs vj;yj cnthtnm
Njkmrj nhfyrbyujdfz cdzpm%
Tckb ntktajyyfz cbcntvf pfyznf> yf lbcgktt gjzdbncz
yflgbcm%
vjltkm III
vjltkm II
PHONE BUSY
555-1212
PHONE BUSY
b Dfi dspjd ,eltn dsgjkyty ghb jcdj,j;ltybb
cbcntvs> tckb njkmrj ds yt yf;vtnt ryjgre HOME !3@
bkb ryjgre vty/ !9@ lkz ds[jlf bp ht;bvf ntktajyyjq
cdzpb.
Tckb Dfif hfwbz yt bvttn ljcnegf r ntktajyyjq ctnb>
yf lbcgktt gjzdkztncz yflgbcm%
vjltkm III
NO PHONE
555-1212
vjltkm II
NO PHONE
MCS2000 2&3-C UG GBBook Page 9 tirsdag 3. november 1998 14:58
Rjyabltywbfkmysq dspjd
Rjyabltywbfkmyst dspjds vjuen ,snm ds,hfys bkb bp
cgbcrf> bkb ghzvj c rkfdbfnehs !vjltkm III bkb vjltkm II
c jgwbjyysv rkfdbiysv vbrhjajyjv@.
Ghbtv rjyabltywbfkmyjuj dspjdf
Rjulf Dfif hfwbz gjkexftn rjyabltywbfkmysq dspjd>
pdexbn cbuyfk d[jlzotuj rjyabltywbfkmyjuj dspjdf b
yf lbcgktt gjgthtvtyyj gjzdkz/ncz yflgbcm%
vjltkm III
CALL RECEIVED
ID: 2000
vjltkm II
CALL RECEIVED
b bc[jlysq lbcgktq. D vjltkb III dj dnjhjq cnhjrt
erfpsdftncz BY dspsdf/otq hfwbb. D vjltkb II lkz
dspjdf BY yf;vbnt ryjgre dspjdf !12@.
Vbuf/n ptktysq bylbrfnjh !D@ b cbvdjk gjkextyyjuj
dspjdf.
Tckb yf;fnm HNN (F) d ntxtybt 20 ctreyl> jndtn yf
dspjd ,eltn gjkexty b vj;yj yfxfnm rjyabltywbfkmyq
hfpujdjh.
Ghbvtxfybt. Tckb yt yf;fnm ryjgre dspjdf
!12@> nj dspjd ,eltn rkfccbabwbhjdfy rfr dspjd
hfpujdjhyjq uheggs.
Yf;vbnt ryjgre HOME !3@ !bkb ldf;ls ryjgre vty/
!9@@> bkb ryjgre dspjdf !12@ gj jrjyxfybb hfpujdjhf.
Gthtlfxf rjyabltywbfkmyjuj dspjdf
Ghbvtxfybt. Tckb hfwbz pfghjuhfvvbhjdfyf
ljk;ysv j,hfpjv> nj lkz ,scnhjuj ljcnegf r
aeyrwbb rjyabltywbfkmyjuj dspjdf ljcnfnjxyj
yf;fnm ryjgre. Bcgjkmpez ctktrnjh ht;bvf (D)>
Ds vj;tnt ghjrhenbnm gjcktlybq gjkextyysq
BY !bltynbabrfwbjyysq yjvth@> cgbcrb
rjyabltywbfkmys[ dspjdjd b BY Dfitq hfwbb.
Yf;vbnt ryjgre dspjdf (12) bkb ds,thbnt gjpbwb/
CALL bp vty/.
Yf lbcgktt gjzdbncz gjcktlybq gjkextyysq bkb
gthtlfyysq BY.
Ds,jh gj cgbcre
Yfxybnt gthtlfxe yf dsdtltyysq yf lbcgktq BY
yf;fnbtv rkfdbib HNN bkb ds,thbnt lheujq BY bp
cgbcrf> bcgjkmpez ctktrnjh ht;bvjd (D).
Lkz njuj> xnj,s edbltnm BY cdjtq hfwbb> bcgjkmpeqnt
ctktrnjh ht;bvf (D) lj gjzdktybz yf lbcgktt MY ID> pf
rjnjhsv cktletn BY hfwbb> yfghbvth%
vjltkm III
MY RADIO USER
ID: 741317
vjltkm II
MY ID: 741317
!njkmrj lkz nhfyrbyujdjq cdzpb@
MCS 2000 vjltkb II & III
Heccrbq
68P81083C10-C
Cnh. 9
MCS2000 2&3-C UG GBBook Page 10 tirsdag 3. november 1998 14:58
Heccrbq
Cnh. 10
MCS 2000 vjltkb II & III
68P81083C10-C
Ds,jh c gjvjom/ rkfdbfnehs%
!vjltkm III bkb vjltkm II c jgwbjyysv rkfdbiysv
vbrhjajyjv@.
Yf;vbnt ryjgre dspjdf !12@> bkb ds,thbnt PRIVATE
CALL bp vty/ b ddtlbnt BY ghzvj c rkfdbfnehs.
Tckb ddtlty ytdthysq BY> tuj wbahs vj;yj cnthtnm c
gjvjom/ ctktrnjhf ht;bvf (D) !dktdj# dybp@. Lkz
cnbhfybz dctuj yjvthf ghjljk;fqnt bcgjkmpjdfnm
ctktrnjh ht;bvf (D). Pfntv ddtlbnt ghfdbkmysq BY.
Gjckt ds,jhf BY jlybv bp jgbcfyys[ dsit cgjcj,jd
vj;yj gthtlfnm rjyabltywbfkmysq dspjd yf
djcghjbpdjlbvsq yf lbcgktt BY gentv yf;;bvf
rkfdbib HNN (F).
Ecjdthitycndjdfyysq rjyabltywbfkmysq dspjd%
Tckb d ntxtybt 20 ctreyl jndtn yf
ecjdthitycndjdfyysq rjyabltywbfkmysq dspjd
(Enhanced Private Call) yt gjkexty> yf lbcgktt
gjzdkztncz yflgbcm
vjltkm III
NO ANSWER
ID: 700001
dspjdf d nhfyrbyujdjv ht;bvt yf lbcgktt ,elen
gjgthtvtyyj djcghjbpdjlbnmcz% hfpujdjhyfz uheggf>
pyfr ghbtvf 'rcnhtyyjuj dspjdf b BY !bkb byjt bvz@
hfwbb> bybwbbhjdfditq 'rcnhtyysq dspjd.
Ryjgrb> yfpyfxtyyst lkz ds,jhf ht;bvf
Ryjgrb ds,jhf ht;bvf lf/n djpvj;yjcnm ,scnhjuj
ljcnegf r yfb,jktt xfcnj bcgjkmpetvsv ht;bvfv. Lkz
ghjuhfvvbhjdfybz ryjgrb yf ds,hfyysq d lfyysq
vjvtyn ht;bv yf;vbnt b elth;bdfqnt yf;fnjq 'ne
ryjgre lj nt[ gjh> gjrf yt ecksibnt pderjdjq cbuyfk
`ghfdbkmyjq ryjgrb$. Rhfnrjdhtvtyysq yf;bv yf
nfre/ ryjgre ghbdtltn r ytvtlktyyjve gthtrk/xtyb/
hfwbb yf pfghjuhfvvbhjdfyysq lkz 'njq ryjgrb ht;bv.
Dspjd ht;bvf
Hfwbz dctulf [hfybn d gfvznb gjcktlybq ds,hfyysq
ht;bv. Yf;bv yf ryjgre (Mode Recall) ghbdtltn r
gthtrk/xtyb/ hfwbb yf gjcktlybq ds,hfyysq ht;bv.
vjltkm II
NO ANSWER
Yf;vbnt rkfdbie HNN (F) lkz njuj> xnj,s jcnfdbnm dfi
BY d gfvznb hfwbb dfituj f,jytynf lkz gjcktle/otuj
j,hfnyjuj dspjdf. Ds ecksibnt cbuyfk> jgjdtof/obq
j dspjdt.
BY dspsdf/otuj
Hfwbz vuyjdtyyj djcghjbpdtltn BY bkb byjt bvz
hfwbb> bybwbbhjdfditq dspjd. Ghb ghbtvt 'rcnhtyyjuj
Ghbvtxfybt. Ht;bv ljk;ty jcnfdfnmcz
ds,hfyysv d ntxtybt yt vtytt 5 c> xnj,s
jcnfnmcz d gfvznb rfr "gjcktlybq ds,hfyysq".
Fdnjvfnbxtcrjt dsrk/xtybt gbnfybz
"nf aeyrwbz j,tcgtxbn dsrk/xtybt gbnfybz> tckb
gjkmpjdfntkm yt ghtlghbybvftn ybrfrb[ ltqcndbq d
ntxtybt ghtldfhbntkmyj pflfyyjuj ghjvt;enrf
dhtvtyb. Gjl "ltqcndbzvb gjkmpjdfntkz" gjybvf/ncz
yf;bvs ryjgjr> gjdjhjns hextr bkb bcgjkmpjdfybt
MCS2000 2&3-C UG GBBook Page 11 tirsdag 3. november 1998 14:58
rfrb[-kb,j ljgjkybntkmys[ hflbjecnhjqcnd !yfghbvth>
yj;yjuj gthtrk/xfntkz@. Pf 2 vbyens lj
fdnjvfnbxtcrjuj dsrk/xtybz gbnfybz hfwbz yfxytn
dslfdfnm ytghthsdysq ybprbq pderjdjq cbuyfk b yf
lbcgktt yfxytn vbufnm yflgbcm%
AUTO POWER OFF
Rfrbt-kb,j ltqcndbz gjkmpjdfntkz ghbdtlen r
ytvtlktyyjve ghtrhfotyb/ pderjdjuj cbuyfkf b
djcghjbpdtltybz yf lbcgktt erfpfyyjq yflgbcb> hfwbz
dthytncz d yjhvfkmyjt hf,jxtt cjcnjzybt.
Yf;vbnt b elth;bdfqnt ryjgre !2@ lkz njuj> xnj,s
hfwbz yfxfkf crfybhjdfybt d gjbcrf[ yjdjuj cfqnf.
Tckb pfghjuhfvvbhjdfyf aeyrwbz (wide area roaming)
!gentitcndbt gj j,ibhyjq pjyt@ !dfhbfyn@> hfwbz ,eltn
fdnjvfnbxtcrb gthtrk/xfnmcz c cfqnf yf cfqn d
ghjwtcct ghjldb;tybz gj j[dfxtyyjve cdzpm/ hfqjye.
Aeyrwbz fdnjvfnbxtcrjuj gjbcrf ltfrnbdbhetncz ghb
abrcfwbb cfqnf.
Lkz gjkextybz ljgjkybntkmyjq byajhvfwbb
j,hfnbntcm r rehfnjhe dfitq cbcntvs.
FDFHBQYST ! "RCNHTYYST@ DSPJDS
D ht;bvt SmartZone/AMSS !Fdnjvfnbxtcrbq
vyjujrhfnysq ds,jh cfqnf@ d Dfitq hfwbb vjuen ,snm
pfghjuhfvvbhjdfys ldt cktle/obt aeyrwbb.
Tckb d dfitq cbcntvt pfghjuhfvvbhjdfyf lfyyfz
aeyrwbz> nj jyf frnbdbhetncz yf;fnbtv fdfhbqyjq
ryjgrb !5@.
Lkz ds[jlf bp fdfhbqyjuj ht;bvf ytj,[jlbvj yf;fnm b
elth;bdfnm fdfhbqye/ ryjgre d ntxtybt ghbvthyj 2
ctreyl.
Gjbcr b abrcfwbz cfqnf
Yf;vbnt ryjgre gjbcrf cfqnf#vjybnjhf !2@ lkz dspjdf
yf lbcgktq ntreotuj cfqnf b ehjdyz cbuyfkf .
Btvtncz ljgjkybntkmysq cnjk,xfnsq bylbrfnjh
ehjdyz cbuyfkf ntreotuj cfqnf> gjrfpsdf/obq jn 0 lj
3-[ cnjk,xfns[ ctuvtynjd%
Njkmrj nhfyrbyujdfz cdzpm
Dfif hfwbz vj;tn ,snm pfghjuhfvvbhjdfyf yf
bylbrfwb/ ghbtvf fdfhbqyjuj dspjdf jn f,jytynf
Dfitq hfpujdjhyjq uheggs. Yf lbcgktt gjgthtvtyyj
,elen gjzdkznmcz yflgbcb%
AEYRWBB SMARTZONE/AMSS
vjltkm III
EMER RECEIVED
SOUTH DIVISION
3 ctuvtynf cjjndtncnde/n jxtym cbkmyjve cbuyfke> f
jncencndbt bylbrfwbb ujdjhbn j, jxtym ckf,jv cbuyfkt.
MCS 2000 vjltkb II & III
Heccrbq
vjltkm II
EMER RECEIVED
b bvz dspsdf/otuj.
68P81083C10-C
Cnh. 11
MCS2000 2&3-C UG GBBook Page 12 tirsdag 3. november 1998 14:58
Heccrbq
Cnh. 12
MCS 2000 vjltkb II & III
Tckb frnbdbhjdfyf aeyrwbz `'rcnhtyysq dspjd c
gjcktle/obv htxtdsv cjj,otybtv$> nj hfwbz ,eltn
fdnjvfnbxtcrb gthtlfdfnm 'rcnhtyysq nhtdj;ysq
cbuyfk. Pderjdjq cbuyfk ,eltn gthtlfdfnmcz xthtp
ecnfyjdktyysq yf rjpshmrt vbrhjajy d ntxtybt
pflfyyjuj gthbjlf dhtvtyb c vjvtynf yf;bvf yf
'rcnhtyye/ ryjgre. Lkz gjkextybz ,jktt gjlhj,yjq
byajhvfwbb> cdz;bntcm c rehfnjhjv D fitq cbcntvs.
Ghbvtxfybt. Fdnjvfnbxtcrfz gthtlfxf xthtp
vbrhjajy yf rjpshmrt djpvj;yf njkmrj ghb
yfkbxbb 'rcnhtyyjq aeyrwbb.
DYTIYZZ NHTDJUF
D pfdbcbvjcnb jn pfrfpfyys[ b ecnfyjdktyys[ dvtcnt c
Dfitq hfwbtq ghbyflkt;yjcntq> dytiyzz nhtdjuf
frnbdbhetn pderjdjq cbuyfk bkb afhs fdnjvj,bkz>
tckb Ds yt htfubhetnt yf dspjd !gtql;> nhfyrbyujdsq
rjyabltywbfkmysq dspjd bkb nhfyrbyujdsq
ntktajyysq dspjd@ d ntxtybt ghtldfhbntkmyj
pflfyyjuj dhtvtyb.
Yf;vbnt ryjgre !6@ bkb ds,thbnt HORN /LIGHTS c
gjvjom/ vty/ lkz drk/xtybz dytiytuj cbuyfkf
nhtdjub. Yf lbcgktt ,eltn vbufnm yflgbcm “HORN/
LIGHTS ON”> cdbltntkmcnde/ofz j njv> xnj 'nf
aeyrwbz frnbdbhjdfyf. Gentv yf;bvf ryjgrb !6@ bkb c
gjvjom/ vty/ jnrk/xbnt nhtdjue.
Hf,jnf `nhe,rb$
Lkz ds,jhf ht;bvf hf,jns nhe,rb ds,thbnt geyrn
68P81083C10-C
vty/ HANDSET b ds,thbnt HANDSET ON. Rjulf
ds,hfyfj HANDSET ON b nhe,rf cyznf c lth;fntkz>
pder ,eltn cksity njkmrj bp lbyfvbrf nhe,rb> f
lbyfvbr hfwbb ,eltn dsrk/xty> xnj,s j,tcgtxbnm
rjyabltywbfkmyjcnm hfpujdjhf.
Tckb nhe,rf yf[jlbncz d lth;fntkt bkb tckb d vty/
,skf ds,hfyf jgwbz HANDSET OFF> nj pder ,eltn
bc[jlbnm bp lbyfvbrf hfwbb.
Dsrk/xtybt pderf fdnjvj,bkmyjuj ghbtvybrf
Tckb d Dfitq MCS 2000 pfghjuhfvvbhjdfyf aeyrwbz
evtymitybz uhjvrjcnb fdnjvj,bkmyjuj
hflbjghbtvybrf> nj yf dhtvz ghbtvf bkb gthtlfxb
vj,bkmyjq hfwbtq MCS 2000 uhjvrjcnm Dfituj
hflbjghbtvybrf ,eltn evtymityf. Lkz gjkextybz
ljgjkybntkmyjq byajhvfwbb j,hfnbntcm r rehfnjhe
Dfitq cbcntvs.
Fvjhnbpfwbz jnrfpjd
"nf aeyrwbz j,tcgtxbdftn ytghthsdyjcnm cdzpb ghb
c,jt d hf,jnt nhfyrbyujdjq cbcntvs. D 'njv ht;bvt
cdzpm gjllth;bdftncz yf jnrhsnjv rfyfkt. Cbuyfk
ht;bvf fvjhnbpfwbb jnrfpjd> ,eltn pdexfnm rf;lst 10
ctreyl> f yf lbcgktt ,eltn gjgthtvtyyj gjzdkznmcz%
vjltkm III
FAILSOFT
SOUTH DIVISION
b ntreobq frnbdysq lbcgktq.
vjltkm II
FAILSOFT
MCS2000 2&3-C UG GBBook Page 13 tirsdag 3. november 1998 14:58
J,sxyst aeyrwbb
Gthtl gthtlfxtq e,tlbntcm> xnj ds,hfyysq ht;bv
cdj,jlty !jhfy;tdsq bylbrfnjh yt ujhbn@.
Htnhfyckznjh#Ghzvfz cdzpm
Ds,thbnt d vty/ REPEAT/DIRECT> rfr jgbcfyj dsit>
bkb yf;vbnt pfhfytt pfghjuhfvvbhjdfyye/ ryjgre. Yf
lbcgktt gjzdbncz ntreobq ht;bv !ghzvfz cdzpm bkb
htnhfyckzwbz@. Bcgjkmpeqnt ctktrnjh ht;bvf (D) lkz
gthtrk/xtybz ht;bvf. Yf;vbnt ryjgre ds,jhf !13@
lkz frnbdfwbb dsdtltyyjuj yf lbcgktq ht;bvf.
Vjybnjh
Yf;vbnt ryjgre vjybnjhf lkz tuj drk/xtybz bkb
dsrk/xtybz.
Yf;vbnt b elth;bdfqnt ryjgre vjybnjhf lkz d[jlf d
ht;bv ,tcievyjq yfcnhjqrb. Bcgjkmpez ctktrnjh
ht;bvf (D)> Ds vj;tnt d 'njv ht;bvt ghjbpdtcnb
njyre/ yfcnhjqre hfwbb. Yf;vbnt ryjgre ds,jhf ghb
ljcnb;tybb nht,etvjuj ehjdyz.
elth;bdfqnt yf;fnjq ryjgre MPL. C gjvjom/
ctktrnjhf ht;bvf vj;yj bpvtyznm rjl RK. Rjulf yf
lbcgktt gjzdbncz ye;ysq rjl> yf;vbnt ryjgre ds,jhf.
Aeyrwbb jgjdtotybz j dspjdt (MDC-1200/Star
Signalling@
Gjcskrf BY ghb yf;bvt HNN b 'rcnhtyyjuj cbuyfkf
Hfwbz vj;tn ,snm pfghjuhfvbhjdfyf nfrbv j,hfpjv>
xnj,s gthtlfdfnm eybrfkmysq BY d yfxfkt b#bkb rjywt
gthtlfxb. Rjulf gthtlfxf bltynbabrfwbjyyjuj rjlf
HNN pfghjuhfvvbhjdfyf gthtl htxtdjq gthtlfxtq> ds
cksibnt pderjdjq cbuyfk lj jrjyxfybz gthtlfxb BY.
Gjcktlybq vj;tn ,snm crjv,bybhjdfy c 'rcnhtyysv
nhtdj;ysv cbuyfkjv> gjlfdftvsv 'rcnhtyyjq ryjgrjq.
Lbcgtnxth vj;tn ,scnhj jgjpyfnm gjkmpjdfntkz>
yf[jlzotujcz d rhbnbxtcrjq cbnefwbb.
Hf,jnf d 'rcnhtyyjv ht;bvt
D cjjndtncndbb c dsitghbdtltyysv jgbcfybtv.
Bp,bhfntkmyst dspjds
Ds,bhftvfz gjkmpjdfntktv rjyabltywbfkmyfz
kbybz !RK@
C gjvjom/ 'njq aeyrwbb gjkmpjdfntkm hfwbb vj;tn
ds,hfnm rjl RK bp ghtldfhbntkmyj
pfghjuhfvvbhjdfyyjuj cgbcrf. Yf;vbnt ryjgre
"Rjyabltywbfkmyst kbybb" MPL !tckb jyf
pfghjuhfvvbhjdfyf@ lkz dspjdf yf lbcgktq ntreotq
RK> lkz ddjlf rjyabuehfwbb MPL yf;vbnt b
MCS 2000 vjltkb II & III
Heccrbq
Ghbtv bp,bhfntkmyjuj dspjdf
Yf lbcgktt hfwbb ,eltn jnj,hf;fnmcz
vjltkm III
CALL RECEIVED
ID: 2000
vjltkm II
CALL RECEIVED
d ntxtybt lde[ ctreyl gjckt ghbtvf bp,bhfntkmyjuj
68P81083C10-C
Cnh. 13
MCS2000 2&3-C UG GBBook Page 14 tirsdag 3. november 1998 14:58
Heccrbq
Cnh. 14
MCS 2000 vjltkb II & III
dspjdf. Ds vj;tnt djqnb d ht;bv bp,bhfntkmyjuj
dspjdf> enj,s edbltnm BY dspsdf/otq hfwbb b
jndtnbnm bp,bhfntkmysv dspjdjv !cv. yb;t@.
Gthtlfxf bp,bhfntkmyjuj dspjdf
Yf;vbnt ryjgre dspjdf !12@ bkb ds,thbnt vty/
PRIVATE CALL> rfr jgbcfyj dsit. Ddtlbnt BY c
rkfdbfnehs bkb bcgjkmpeqnt ctktrnjh ht;bvf (D) lkz
gjbcrf BY> rjnjhjve Ds [jnbnt gjckfnm dspjd.
Yf;vbnt HNN (F) lkz gthtlfxb bp,bhfntkmyjuj dspjdf
'njve BY. Tckb aeyrbz fdnjvfnbxtcrjuj
bp,bhfntkmyjuj dspjdf ltfrnbdbhjdfyf> nj gjckt
gthtlfxb hfwbz dsqltn bp ht;bvf bp,bhfntkmyjuj
dspjdf. Tckb aeyrwbz fdnjvfnbxtcrjuj bp,bhfntkmyjuj
dspjdf frnbdbhjdfyf> nj hfwbz jcnfytncz d ht;bvt
bp,bhfntkmyjuj dspjdf lj nt[ gjh> gjrf yt ,eltn bp
ytuj dsdtltyf.
Jgjdtotybt j dspjdt
<jktt gjlhj,ye/ byajhvfwb/ cv. d hfpltkt
nhfyrbyujdjq cdzpb.
Uheggjdst BY b ddjl eybdthcfkmyjuj cbvdjkf
!J,sxysq gtql;byu b bp,bhfntkmysq dspjd@
Ghb gjvjob rkfdbfnehs b aeyrwbb ytjuhfybxtyyjuj
dspjdf Ds vj;tnt ddtcnb uheggjdjq BY gentv ddjlf
aeyrwbb bp,bhfntkmyjuj dspjdf bkb jgjdtotybz j
dspjdt> f pfntv ghjrhenrb d j,hfnyjv yfghfdktybb lkz
ddjlf øuheggjdjujø BY ghb gjvjob ctktrnjhf ht;bvf
(D). Yf lbcgktt gjzdbncz%
68P81083C10-C
GROUP
Pfntv Ds vj;tnt ddtcnb 3-pyfxysq uheggjdjq BY lkz
ntktajyyjuj dspjdf bkb gtql;byuf.
Gjkmpjdfntkb vjuen ddjlbnm eybdthcfkmysq cbvdjk !*@
lkz ntktajyyjuj dspjdf bkb gtql;byuf ytcrjkmrb[ BY
bkb uhegg. Cbvdjk !*@ cjjndtncndetn dctv pyfrfv ! 0-9 @
BY d lfyyjq gjpbwbb> n.t. lkz gtql;byuf dct[ BY hfwbb
jn 0001 lj 0009 ddtlbnt jlby bltynbabrfwbjyysq
yjvth 0-0-0-*.
Ntktajyyfz cdzpm
Lkz dspjdf xthtp ntktajyye/ ctnm d j,sxyjv ht;bvt>
hfwbz ljk;yf gjckfnm d cbcntve rjls ljcnegf b jnrk/
xtybz !`dtifybz nhe,rb$@.
Rjl ljcnegf vj;tn ,snm gjckfy ldevz cgjcj,fvb> d
pfdbcbvjcnb jn ghjuhfvvs Dfitq hfwbb.
Vuyjdtyysq%
hfwbz fdnjvfnbxtcrb gthtlftn
pfkj;tyysq d gfvznm rjl ljcnegf ghb
yf;fnbb ryjgrb ntktajyyjq cdzpb !7@.
C pfgfplsdfybtv% yf;vbnt ryjgre ds,jhf ht;bvjd !13@
bkb HNN (F)> b hfwbz gthtlfcn
[hfyzobqcz d gfvznb rjl ljcnegf.
Gjckt gthtlfxb rjlf ljcnegf ljk;ty gjcktljdfnm njy
yf,jhf yjvthf. !Tckb 'njuj yt ghjbc[jlbn> yf;vbnt
ryjgre HOME !3@ bkb ntktajyye/ ryjgre !7@> xnj,s
gjdtcbnm nhe,re. Cyjdf yf;vbnt ryjgre ds,jhf !13@ bkb
HNN (F). Hfwbz gthtlfcn yjvth.
MCS2000 2&3-C UG GBBook Page 15 tirsdag 3. november 1998 14:58
J,hf,jnrf dspjdf ghjbc[jlbn> rfr jgbcfyj dsit d
hfpltkt Gthtlfxf ntktajyyjuj dspjdf.
NHFYRBYUJDST AEYRWBB HFWBB
Gthtlfxf gtql;byuf `jgjdtotybt j dspjdt$
Cnfnec#Cjj,otybt
Ds,thbnt vty/ STATUS bkb MESSAGE> rfr jgbcfyj
dsit. Yf lbcgktt gjzdbncz bkb gjcktlybq
gjlndth;ltyysq cnfnec bkb gthdjt cjj,otybt.
Bcgjkmpez ctktrnjh ht;bvjd (D)> Ds vj;tnt
ghjcvjnhtnm cgbcrb cnfnecjd bkb cjj,otybq. Rjulf yf
lbcgktt jnj,hf;ftncz nht,etvsq cnfnec bkb
cjj,otybt> yf;vbnt ryjgre !13@ lkz tuj gthtlfxb.
Ghjpdexfn xtnsht cbuyfkf> gjlndth;lf/obt> xnj
cnfnec bkb cjj,otybt gjkextys. Hfwbz fdnjvfnbxtcrb
dsqltn bp aeyrwbb cnfnec# cjj,otybt. Tckb cnfnec bkb
cjj,otybt yt gjkextys> nj yf lbcgktt gjzdbncz
yflgbcm%
vjltkm III
vjltkm II
NO ACKNOWLEDGE
STATUS 1
NO ACKNOWLEDGE
Ds,thbnt vty/ PAGE> rfr jgbcfyj dsit.
Gjkmpezcm ctktrnjhjv ht;bvjd (D)> dsdtlbnt yf
lbcgktq BY f,jytynf. Yf;vbnt HNN (F) bkb ryjgre
ds,jhf !13@ lkz gthtlfxb gtql;byuf `jgjdtotybt j
dspjdt$.
Cbuyfk gjldth;ltybz gtql;byuf `jgjdtotybt j
dspjdt$ pdexbn> tckb dspsdftvfz hfwbz ghbybvftn
'njn gtql;byu. Tckb ytn> yf lbcgktt gjzdbncz yflgbcm%
vjltkm III
vjltkm II
NO ACKNOWLEDGE
ID: 700001
NO ACKNOWLEDGE
Yf;vbnt ryjgre HOME !3@ bkb ldf;ls ryjgre vty/ !9@
lkz djpdhfnf r bc[jlyjve lbcgkt/.
Ghbtv jgjdtotybz j dspjdt
Ljcneg r htnhfyckznjhe MDC !RAC@
Ghb gjkextybb jgjdtotybz j dspjdt cksity
gjlndth;lf/obq cbuyfk> pfujhftncz ptktysq
bylbrfnjh b yf lbcgktt gjzdkztncz vbuf/obq cbvdjk
> jyb bcxtpyen> tckb Ds gjlndthlbnt gjkextybt
jgjdtotybz j dspjdt yf;fnbtv HNN (F) bkb yt yf;vtnt
b yt jngecnbnt ryjgre vjybnjhf !2@.
Ljcneg r htnhfyckznjhe MDC !RAC@ lftn ds,jh
htnhfyckznjhf lkz gthtlfxb. Pf ,jktt gjlhj,yjq
byajhvfwbtq j,hfnbntcm r cdjtve cbcntvyjve
flvbybcnhfnjhe.
Cnfnec#Cjj,otybt
Bycnherwbb gj bcgjkmpjdfyb/ jgbcfys dsit d hfpltkt
J,sxyst aeyrwbb.
b ghjpdexbn ytghthsdysq cbuyfk. Yf;vbnt ryjgre !13@
lkz gjdnjhyjq gthtlfxb cnfnecf bkb cjj,otybz bkb
HOME !3@ lkz ds[jlf bp ht;bvf.
MCS 2000 vjltkb II & III
Heccrbq
68P81083C10-C
Cnh. 15
MCS2000 2&3-C UG GBBook Page 16 tirsdag 3. november 1998 14:58
Heccrbq
Cnh. 16
MCS 2000 vjltkb II & III
68P81083C10-C
Pfghjc yf gthtghjuhfvvbhjdfybt
Tckb d Dfitq hfwbb pfghjuhfvvbhjdfyf aeyrwbz
lbyfvbxtcrjq gthtuheggbhjdrb> pfghjc yf
gthtghjuhfvvbhjdfybt 'njq aeyrwbb bybwbbhetncz c
gjvjom/ pfghjuhfvvbhjdfyyjq ryjgrb bkb vty/.
Pfghjc yf gthtghjuhfvvbhjdfybt yfghfdkztncz yf
gfytkm eghfdktybz jgthfnjhf> c ntv> xnj,s jgthfnjh
`dsltkbk$ hfwbb yjde/ hfpujdjhye/ uhegge. Pf
byajhvfwbtq j,hfofqntcm r flvbybcnhfnjhe dfitq
cbcntvs.
Aeyrwbb> frnbdbhe/obtcz jlybv rfcfybtv ryjgrb
Tckb 'nf jgwbjyyfz aeyrwbz pfghjuhfvvbhjdfyf d
Dfitq hfwbb> vj;yj pfghjuhfvvbhjdfnm rfre/-kb,j
ryjgre nfrbv j,hfpjv> xnj,s ghb tt yf;bvt
gthtlfdfkcz pfhfytt pfghjuhfvvbhjdfyysq cnfnec>
cjj,otybt> jgjdtotybt j dspjdt bkb yf,bhfkcz
pfghjuhfvvbhjdfyysq ntktajyysq yjvth. Pf
byajhvfwbtq j,hfofqntcm r flvbybcnhfnjhe dfitq
cbcntvs.
Dyt pjys ltqcndbz
Tckb nfrfz jgwbjyyfz aeyrwbz pfghjuhfvvbhjdfyf d
Dfitq hfwbb> lbcgktq gjrf;tn> xnj Ds yf[jlbntcm dyt
pjys ltqcndbz cbcntvs. Yf lbcgktt gjjxthtlyj ,elen
gjzdkznmcz yflgbcb%
vjltkm III
OUT OF RANGE
SOUTH DIVISION
vjltkm II
OUT OF RANGE
b ntreobq ht;bv> b#bkb pdexfnm ghtleghtlbntkmysq
cbuyfk.
HF<JNF D HT:BVT RJLBHJDFYBZ
Ghbvtxfybt. "njn hfpltk jnyjcbncz njkmrj r
hfwbzv> pfghjuhfvvbhjdfyysv yf hf,jne d
ht;bvt rjlbhjdfybz. Pltcm jgbcfys njkmrj
jnkbxbz ht;bvf rjlbhjdfybz jn j,sxyjuj.
Lheubt bycnherwbb ghbdtltys d hfpltkt J,ofz
'rcgkefnfwbz.
Gthtlfxf dspjdf. Tckb ds,hfyysq ht;bv yt
pfghjuhfvvbhjdfy rfr njkmrj rjlbhjdfyysq bkb
njkmrj jnrhsnsq> nj rjlbhjdfyyfz gthtlfxf
frnbdbhetncz bkb jnrk/xftncz yf;fnbtv ryjgrb
rjlbhjdfyyjq cdzpb !4@> pf bcrk/xtybtv nhfyrbyujdjq
ntktajyyjq cdzpb b rjyabltywbfkmyjuj dspjdf>
rjnjhst dctulf eghfdkz/ncz 'njq ryjgrjq. Pderjdjq
cbuyfk> cjghjdj;lf/obq yf;fnbt rkfdbib HNN>
cdbltntkmcndetn j, jnrhsnjq gthtlfxt.
Ghbvtxfybt. Tckb ryjgrf rjlbhjdfybz cdzpb
yf;fnf dj dhtvz gthtlfxb> gthtlfxf
ghtrhfoftncz b pdexbn cbuyfk nhtdjub> lj nt[
gjh> gjrf yt ,eltn jngeotyf rkfdbif HNN. Ghb
cktle/otv yf;fnbb HNN ghjbc[jlbn bpvtytybt
hf,jns.
Ghbtv dspjdf. Ghb gjkextybb dspjdf d
MCS2000 2&3-C UG GBBook Page 17 tirsdag 3. november 1998 14:58
ibahjdfyyjv ht;bvt ,elen vbufnm jhfy;tdsq
bylbrfnjh !njkmrj j,sxyfz cdzpm@ b cbvdjk
rjlbhjdfyyjq cdzpb .
J,sxyst aeyrwbb. D vjybnjhyjv ht;bvt ,elen
gjcnegfnm dspjds njkmrj nt[ hfwbq> rjnjhst
pfibahjdfys jlybv rk/xjv. Dspjds d lheujv rk/xt
ytjnkbxbvs jn ievjd rfyfkf cdzpb.
Nhfyrbyujdst aeyrwbb. Rjulf rjlbhjdfyyfz
gthtlfxf rjynhjkbhetncz ryjgrjq rjlbhjdfyyjq cdzpb
!4@> d [jlt cdzpb c hfpujdjhyjq uheggjq bkb d ghjwtcct
rjyabltywbfkmyjuj hfpujdjhf Ds vj;tnt bpvtybnm
ht;bv njkmrj c jnrhsnjuj yf rjlbhjdfyysq. D ht;bvt
ntktajyyjq cdzpb bkb dspjdf c fvjhnbpfwbtq
jnrfpjd vj;yj bpvtybnm ht;bv c jnrhsnjuj yf
rjlbhjdfyysq b yfj,jhjn. D fdfhbqyjv ht;bvt
bpvtytybz ytdjpvj;ys.
Pfuheprf b cnbhfybt ibahjdfkmyjuj rk/xf
Ibahjdfkmysq rk/x vj;tn ,snm pfuhe;ty c gjvjom/
pfuhepxbrf ibahjdfkmyjuj rk/xf (KVL)> cjjndtncnde/
otuj nbge rjlbhjdfybz hfwbb.
Jncjtlbybnt rf,tkm vbrhjajyf jn eghfdkz/otq
ujkjdrb b ghbcjtlbybnt rf,tkm pfuhepxbrf rk/xf. Yf
lbcgktt gjzdbncz yflgbcm KEYLOADING> ghb 'njv
aeyrwbb ghbtvf#gthtlfxb ,kjrbhe/ncz. Ghjwtlehf
pfuheprb jgbcfyf d herjdjlcndt gj KVL.
Ghbvtxfybt. D ytrjnjhs[ ,jktt hfyyb[
vjltkz[ ghjwtcc pfuheprb rk/xf nht,etn
yf;fnbz b elth;fybz ryjgrb rjlbhjdfyyjq
MCS 2000 vjltkb II & III
Heccrbq
cdzpb !4@> lj gjzdktybz yf lbcgktt gthdjq
gjpbwbb vty/ rjlbhjdfyyjq cdzpb. Ghjrhenbnt
vty/ lj gjpbwbb KEYLOAD b yf;vbnt ryjgre
ds,jhf. Lkz ds[jlf yf;vbnt ryjgre HOME.
Ghb ecgtiyjq pfuheprt rk/xf gjcktletn jlby lkbyysq
pderjdjq cbuyfk.
Lkz cnbhfybz rk/xf yf;vbnt b elth;bdfqnt ryjgre !4@
lj gjzdktybz yf lbcgktt rjlbhjdfyyjq cdzpb yflgbcb%
ERASE KEY> pfntv yf;vbnt ryjgre ds,jhf. Rjulf
cnbhfybt pfdthityj> yf lbgktt gjzdbncz yflgbcm%
ERASED.
Ghbvtxfybt. Tckb bcnjxybr gbnfybz
jncjtlbyty jn hfwbb ,jktt nht[ lytq>
ibahjdfkmysq rk/x vj;tn ,snm enhfxty.
Hf,jnf c lfyysvb
Tckb Dfif hfwbz pfghjuhfvvbhjdfyf yf hf,jne c
lfyysvb> Ds vj;tnt gjcskfnm b#bkb gjkexfnm lfyyst c
nthvbyfkf lfyys[. Dj dhtvz ghbtvf bkb gthtlfxb
lfyys[ yf lbcgktt hfwbb jnj,hf;ftncz%
DATA TRANSFER
DATA TRANSFER
Yf;fnbt yf k/,e/ ryjgre ghthdtn gthtlfxe lfyys[ b
dthytn hfwb/ r ht;bve yjhvfkmyjq hf,jns. Lkz
gjkextybz ,jktt njxyjq byajhvfwbb j,hfnbntcm r
rehfnjhe Dfitq cbcntvs.
68P81083C10-C
Cnh. 17
MCS2000 2&3-C UG GBBook Page 18 tirsdag 3. november 1998 14:58
Heccrbq
Cnh. 18
MCS 2000 vjltkb II & III
E{JL PF HFWBTQ
¤
¤
Ghtlj[hfyzqnt hfwb/ jn abpbxtcrb[
gjdht;ltybq.
Rjhgec hfwbb cktletn jxbofnm dkf;yjq nrfym/>
cvjxtyyjq xbcnjq djljq> c vzurbv vj/obv
chtlcndjv bkb bpjghjgbkjdsv cgbhnjv.
Ghtleght;ltybt%
bcgjkmpjdfybt ltnthutynjd> cgbhnjd
!rhjvt bpjghjgbkjdjuj@> f'hjpjktq b
ytantghjlernjd vj;tn cnfnm ghbxbyjq
gjdht;ltybz rjhgecf hfwbb.
NT{YBRF <TPJGFCYJCNB
K/,fz hfwbz ghb gthtlfxt bpkexftn d fnvjcathe
'ythub/> rjnjhfz d jghtltktyys[ eckjdbz[ vj;tn
dspdfnm bcrhtybt. Dct gjkmpjdfntkb hfwbq ljk;ys
cj,k/lfnm cktle/obt nht,jdfybz%
Yt drk/xfqnt hfwb/ d,kbpb
djcgkfvtyz/ob[cz ;blrjcntq bkb
dphsdjjgfcys[ ecnhjqcnd.
68P81083C10-C
yf[jlbnmcz dj dhtvz gthtlfxb yf hfccnjzybb yt
vtytt 60 cv jn ecnfyjdktyyjq ljk;ysv j,hfpjv
dytiytq fyntyys.
¤
YT yf;bvfqnt rkfdbie HNN> tckb Ds yt
yfvthtys dtcnb gthtlfxe.
¤
YT gjpdjkzqnt ltnzv buhfnm c hfwbtq>
erjvgktrnjdfyyjq gthtlfnxbrjv.
¤
YT gjkmpeqntcm hfwbtq ghb dj;ltybb
fdnjvj,bkz. Tckb Ds lth;bnt vbrhjajy d hert
dj dhtvz ldb;tybz> ds yfheiftnt ghfdbkf
ljhj;yjuj ldb;tybz.
Ghb yfvthtybb ecnfyjdbnm j,jheljdfybt cdzpb d
fdnjvj,bkt c jlyjq bkb ytcrjkmrbvb yfledysvb
gjleirfvb ,tpjgfcyjcnb%
Ghtljcntht;tybt% fdnjvj,bkb>
j,jheljdfyyst yfledysvb gjleirfvb
,tpjgfcyjcnb
•
D yjhvfkmys[ eckjdbz[ hfwbz bpkexftn 'ythub/>
ehjdtym rjnjhjq yb;t k/,juj ljgecnbvjuj ehjdyz.
Lkz kbxyjq ,tpjgfcyjcnb cj,k/lfqnt cktle/obt
ghjcnst ghfdbkf%
¤
Ytufubdyjt djpltqcndbt yf xtkjdtrf
hflbjxfcnjnyjq pythubb yt ljk;yj ghtdsifnm
ehjdtym> htrjvtyljdfyysq ghbyznsv
cnfylfhnjv. Xnj,s j,tcgtxbnm pnj eckjdbt> k/
,st gbwf> cnjzobt djpkt fdnjvj,bkz> ljk;ys
•
Gjleirf ,tpjgfcyjcnb yfledftncz c ,jkmijq
cbkjq. YT HFPVTOFQNT rfrbt-kb,j
ghtlvtns> drk/xfz j,jheljdfybt cdzpb> d pjyt
yfl gjleirjq ,tpjgfcyjcnb bkb d pjyt
hfpdthnsdfybz pnjq gjleirb. D ckexft
ytghfdbkmyjq ecnfyjdrb j,heljdfybz cdzpb
yfledfybt gjleirb ,tpjgfcyjcnb vj;tn dspdfnm
cthmtpye/ nhfdve.
Ecnfyjdrf j,jheljdfybz cdzpb d fdnjvj,bkt
ljk;yf ghjbpdjlbnmcz ghjatccbjyfkjv cgtwbfkbcnjv gj ecnfyjdrt# nt[ybrjv> bvt/obv
cjjndtncnde/oe/ rdfkbabrfwb/. Hfpvth>
ajhvf b pjyf hfpdthnsdfybz gjleirb
MCS2000 2&3-C UG GBBook Page 19 tirsdag 3. november 1998 14:58
•
,tpjgfcyjcnb vjuen vtyznmcz d pfdbcbvjcnb jn
vfhrb> vjltkb b rjyabuehfwbb gthtlytq xfcyb
fdnjvj,bkz !yfghbvth> vyjujvtcnyjt
ythfpltkmyjt cbltymt bkb rjditj,hfpyst
cbltymz@.
ghb ytj,[jlbvjcnb j,hfofqntcm d inf,-rdfhnbhe
abhvs-bpujnjdbntkz fdnjvj,bkz pf rjyrhtnyjq
byajhvfwbtq j gjleirt ,tpjgfcyjnb lkz njq
vfhrb> vjltkb b rjyabuehfwbb gthtlytq xfcnb
fdnjvj,bkz> d rjnjhjv Ds ghjbpdjlbnt
ecnfyjdre j,jheljdfybz cdzpb.
GHBYFLKT:YJCNB
Ghjcbv cdzpfnmcz c vtcnysv ghtlcnfdbntktv abhvs
Motorola lkz gjkextybz byajhvfwbb j
ghbyflkt;yjcnz[> gthtxbcktyys[ d yb;tcktle/otv
cgbcrt%
Dfhbfyns vbrhjajyjd%
¤ Hexyst vbrhjajys
¤ Vbrhjajys c rkfdbfnehjq
¤ Ievjgjlfdkz/obt vbrhjajys
¤ Vbrhjajys c rhtgktybtv yf rjpshmrt
fdnjvj,bkz
¤ Yfcnjkmyst vbrhjajys
¤ Ntktajyyst nhe,rb
Ecnfyjdjxyst ghbyflkt;yjcnb%
¤ Rhjyintqy lkz yfrkjyyjuj rhtgktybz
¤ Pfvjr c rk/xjv
¤ Ghzvjt wfgajdjt rhtgktybt
MCS 2000 vjltkb II & III
Heccrbq
¤ Gjlcnfdrf c htghjlernjhjv
¤ Dfhbfyn lkz lbcnfywbjyyjuj rhtgktybz
Hfpyjj,hfpyst htghjlernjhs !dscjr.#ybpr. vjoyjcnb@.
Hfpyjj,hfpyst yf,jhs rf,tktq.
Yfcnjkmyst !cnfywbjyyst@ ghbyflkt;yjcnb%
¤ Bcnjxybrb gbnfybz
¤ Dytiybq fdfhbqysq yj;yjq dsrk/xfntkm
Fyntyys.
J<PJH VTY?
Zone Select:
Channel%
!Pjyf@% ds,jh pjys !nj ;t> xnj ryjgrf 1@.
!Rfyfk@% ds,jh rfyfkf !nj ;t> xnj
ryjgrf ctktrnjhf ht;bvjd — D).
Scan Select:
!Crfybhjdfybt@% crfybhjdfybt
drk.#dsrk. ! ryjgrf 8@.
Tones:
!Njys@% pderjdst cbuyfks drk.#dsrk.
ghb ddjlt lfyys[ c rkfdbfnehs.
Display Intensity: !Zhrjcnm lbcgktz@% htuekbhjdrf
zhrjcnb lbcgktz.
View Lists:
!J,pjh@% j,pjh cgbcrjd crfybhjdfybz>
ntktajyys[ yjvthjd>
rjyabltywbfkmys[ dspjdjd> bkb
gtql;byuf`jgjdtotybt j dspjdt$.
Program Lists:
!Cgbcrb ghjuhfvv@% ghjuhfvvbhjdfybt
cgbcrjd crfybhjdfybz> ntktajyys[
yjvthjd> rjyabltywbfkmys[
dspjdjd> bkb gtql;byuf `jgjdtotybt
j dspjdt$.
68P81083C10-C
Cnh. 19
MCS2000 2&3-C UG GBBook Page 20 tirsdag 3. november 1998 14:58
Heccrbq
Cnh. 20
MCS 2000 vjltkb II & III
Horn/Lights:
!Fdnjvj,bkmysq cbuyfk#Juyb@% drk.#
dsrk. dytiytq nhtdjub !nj ;t> xnj
ryjgrf 6@.
High/Low Power: Ybprbq#dscjrbq ehjdyb vjoyjcnb
Tx(Transmit )Inhibit:Drk.#dsrk. gthtlfnxbrf
Private Call:
!Rjyabltywbfkmysq dspjd@% ds,jh
aeyrwbb rjyabltywbfkmyjuj dspjdf
!bkb ryjgrf 12@.
Page:
Ds,jh aeyrwbb `jgjdtotybt j
dspjdt$ !nj ;t> xnj ryjgrf 11@.
Phone:
ds,jh aeyrwbb ntktajyf !bkb ryjgrf
7@.
Status:
Ds,jh b gthtlfxf pfhfytt
pfghjuhfvvbhjdfyyjuj cnfnecf bp
cgbcrf.
Message:
Ds,jh b gthtlfxf pfhfytt
pfghjuhfvvbhjdfyyjuj cjj,otybz bp
cgbcrf.
Handset:
Ds,jh ht;bvf hf,jns nhe,rb.
Nhfyrbyujdfz cdzpm
Reprogram Request:
!Pfghjc yf gthtghjuhfvvbhjdfybt@%
Pfghjc yf gthtghjuhfvvbhjdfybt
aeyrwbb lbyfvbxtcrjq
gthtuheggbhjdrb.
68P81083C10-C
Nhfyrbyujdfz cdzpm ibhjrjuj lbfgfpjyf
Site Lock/Unlock:
Frnbdbhetn bkb ltfrnbdbhetn
aeyrwb/ abrcfwbb# hfcabrcfwbb
cfqnf.
Njkmrj j,sxyfz cdzpm
Repeater or Direct:
!Htnhfyckzwbz bkb ghzvfz gthtlfxf@
J,tcgtxbdftn cdzpm xthtp
htnhfyckznjh bkb yfghzve/.
FDNJHCRBT GHFDF YF GHJUHFVVYJT
J<TCGTXTYBT
Ghjlerwbz> jgbcfyyfz d yfcnjzotv herjdjlcndt> vj;tn drk/xfnm pfobotyyst
fdnjhcrbvb ghfdfvb rjvgm/nthyst ghjuhfvvs> [hfyzobtcz d gjkeghjdjlybrjdjq
gfvznb bkb yf lheub[ yjcbntkz[. Pfrjys Cjtlbytyys[ Infnjd b lheub[ cnhfy
pfobof/n bcrk/xbntkmyst ghfdf abhvs Motorola/Europe b Motorola Inc., drk/xfz
ghfdj yf rjgbhjdfybt b htghjlewbhjdfybt d k/,jq ajhvt. <tp gbcmvtyyjuj
hfphtitybz dkfltkmwf ghjuhfvvyfz ghjlerwbz> egjvzyenfz d yfcnjzotv
Herjdjlcndt> yt vj;tn rjgbhjdfnmcz !bkb htghjlewbhjdfnmcz@ rfrbv-kb,j lheubv
cgjcj,jv. <jktt njuj> afrn tt ghjlf;b yt ghtlgjkfuftn cktle/otuj%
ghtljcnfdktybz kbwtypbq yf 'nb ghfdf> gthtlfxb ghfd yf gfntyns bkb ghfd yf
bcgjkmpjdfybt gfntynjd. Bcrk/xtybt cjcnfdkztn kbim j,sxyjt> yt'rck/pbdyjt
ghfdj yf tt bcgjkmpjdfybt. Gjl j,sxysv !yt'rcrk/pbdysv@ ghfdjv
gjlhfpevtdftncz ghfdj yf bcgjkmpjdfybt> dsntrf/ott> cjukfcyj pfrjye> bp afrnf
ghjlf;b yfcnjzotq gfhjlerwbb.
MCS2000 2&3-C UG GBBook Page 1 tirsdag 3. november 1998 14:58
MCS 2000 modelos II y III
Manual del usuario
Página
Información general . . . . . . . . . . . . . . . . . . . . . . . . . . . . . . . 2
Funciones de los botones . . . . . . . . . . . . . . . . . . . . . . . . . . 2
Señales de audio . . . . . . . . . . . . . . . . . . . . . . . . . . . . . . . . . 3
Funcionamiento general . . . . . . . . . . . . . . . . . . . . . . . . . . . 4
Conexión/desconexión de la radio y control de
volumen . . . . . . . . . . . . . . . . . . . . . . . . . . . . . . . . . . . . . 4
Selección de función . . . . . . . . . . . . . . . . . . . . . . . . . . . . . . 4
Selección mediante botón de función . . . . . . . . . . . . . . 4
Selección mediante menú . . . . . . . . . . . . . . . . . . . . . . . 4
Ajuste de la intensidad de la pantalla . . . . . . . . . . . . . . 5
Conexión/desconexión de tonos . . . . . . . . . . . . . . . . . . 5
Selección de modo y zona . . . . . . . . . . . . . . . . . . . . . . 5
Llamadas salientes . . . . . . . . . . . . . . . . . . . . . . . . . . . . . . . 6
Exploración de canales . . . . . . . . . . . . . . . . . . . . . . . . . . . . 6
Conexión/desconexión de exploración de canales . . . . 6
Visualización de una lista de exploración de canales . . 7
Cambio de las listas de exploración de canales . . . . . . 7
Interconexión telefónica . . . . . . . . . . . . . . . . . . . . . . . . . . . 7
Recepción de una llamada telefónica . . . . . . . . . . . . . . 8
Realización de una llamada telefónica . . . . . . . . . . . . . 8
Selección mediante teclado (marcación por lista o
memoria intermedia) . . . . . . . . . . . . . . . . . . . . . . . . . . . 8
Llamada privada . . . . . . . . . . . . . . . . . . . . . . . . . . . . . . . . . 9
Recepción de una llamada privada . . . . . . . . . . . . . . . . 9
Realización de una llamada privada . . . . . . . . . . . . . . 10
Número de identificación de la persona que llama . . . . . . 10
Botones de selección predefinida de modo . . . . . . . . . . . 11
Recuperación de modo . . . . . . . . . . . . . . . . . . . . . . . . . . . 11
Desconexión automática . . . . . . . . . . . . . . . . . . . . . . . . . . 11
Funciones SmartZone/AMSS . . . . . . . . . . . . . . . . . . . . . . 11
MCS 2000 modelos II y III
Español
Búsqueda de emplazamiento y emplazamiento
enclavado . . . . . . . . . . . . . . . . . . . . . . . . . . . . . . . . . . . 11
Funcionamiento de emergencia . . . . . . . . . . . . . . . . . . . . 12
Alarma externa . . . . . . . . . . . . . . . . . . . . . . . . . . . . . . . . . 13
Funcionamiento con microteléfono . . . . . . . . . . . . . . . . . 13
Silenciamiento de la radio del vehículo . . . . . . . . . . . . . . . 13
“Failsoft” (fallo activo) . . . . . . . . . . . . . . . . . . . . . . . . . . . . 13
Funciones convencionales . . . . . . . . . . . . . . . . . . . . . . . . 14
Repetidor/Directa . . . . . . . . . . . . . . . . . . . . . . . . . . . . 14
Monitor . . . . . . . . . . . . . . . . . . . . . . . . . . . . . . . . . . . . 14
Línea privada (PL) seleccionable por el usuario . . . . . 14
Funciones Stat Alert (MDC-1200/Star Signalling) . . . . . . . 14
Número de identificación de PTT y emergencia . . . . . 14
Llamadas selectivas . . . . . . . . . . . . . . . . . . . . . . . . . . 15
Entrada de identificaciones de grupo y
metacaracteres . . . . . . . . . . . . . . . . . . . . . . . . . . . . . . 15
Interconexión telefónica . . . . . . . . . . . . . . . . . . . . . . . 16
Estado/Mensaje . . . . . . . . . . . . . . . . . . . . . . . . . . . . . . 16
Acceso al repetidor MDC (RAC). . . . . . . . . . . . . . . . . . 16
Funciones del sistema trunking . . . . . . . . . . . . . . . . . . . . 16
Envío de llamadas de aviso . . . . . . . . . . . . . . . . . . . . . 16
Recepción de llamadas de aviso . . . . . . . . . . . . . . . . . 17
Solicitud de reprogramación . . . . . . . . . . . . . . . . . . . . 17
Funciones de botones de una sola pulsación . . . . . . . 17
Fuera de cobertura . . . . . . . . . . . . . . . . . . . . . . . . . . . 17
Funcionamiento de seguridad . . . . . . . . . . . . . . . . . . . . . 18
Carga y borrado de claves de seguridad . . . . . . . . . . 18
Funcionamiento con datos . . . . . . . . . . . . . . . . . . . . . . . . 19
Cuidado del radioteléfono . . . . . . . . . . . . . . . . . . . . . . . . . 19
Información de seguridad . . . . . . . . . . . . . . . . . . . . . . . . . 20
Precaución: Vehículos equipados con air-bag. . . . . . . 20
Accesorios . . . . . . . . . . . . . . . . . . . . . . . . . . . . . . . . . . . . 21
Resumen del menú . . . . . . . . . . . . . . . . . . . . . . . . . . . . . . 21
Derechos de patente del software informático . . . . . . . . . 22
68P81083C10-C
Página 1
MCS2000 2&3-C UG GBBook Page 2 tirsdag 3. november 1998 14:58
Español
MCS 2000 modelos II y III
Página 2
68P81083C10-C
Funciones de los botones
Nota: Para evitarle posibles daños, la radio debe
estar apagada siempre al instalarla en el
vehículo y al desmontarla del mismo.
Información general
Con la MCS 2000 ha escogido una excelente radio
móvil. La garantía de calidad de Motorola le garantiza
el alto nivel de calidad de sus productos. Su radio
MCS 2000 ha salido de nuestra fabrica sólo tras
superar pruebas exhaustivas.
Esta guía del usuario explica el modo de
funcionamiento de una radio estándar. Dado
que este funcionamiento estándar puede
modificarse mediante programación -tanto en lo
que concierne a las funciones que incluye la
radio como los botones empleados para
activarlas- la forma en que funcione una radio en
particular puede diferir ligeramente de lo que se
describe aquí.
Puede escoger entre varios idiomas para las
indicaciones de la pantalla de la radio. El
idioma por defecto es el inglés, y es el que se
emplea para describir las pantallas en el
presente manual.
Para más información, póngase en contacto con
el responsable del sistema de la radio o con su
servicio local de postventa.
Los números entre paréntesis se refieren a las figuras
que aparecen en la solapa.
Según el teclado que haya adquirido con su radio,
consulte la figura “E” o “I” para más información
sobre los botones:
(A)
Conexión/desconexión de la radio y control
de volumen
(B)
Indicador de tres colores
Verde, parpadeante: llamada entrante o llamada
de aviso
Rojo, continuo: la radio transmite de forma clara
y segura
Naranja, continuo: sistema/canal ocupado o
llamada clara entrante (funcionamiento de
seguridad)
Naranja, parpadeante: llamada de seguridad
entrante (funcionamiento de seguridad)
(C)
Pantalla con iconos y una línea (modelo II) o dos
líneas (modelo III) de 14 caracteres
(D)
Selector de modo
(F)
Pulsador de trasmisión (PTT)
Pulsar para transmitir, soltar para escuchar.
(G)
Conector del micrófono
(1)
Selección de zona
(2)
Monitor, pulsar botón para escuchar actividad
(actividad de conversación) o
Búsqueda (funcionamiento AMSS/SmartZone)
MCS2000 2&3-C UG GBBook Page 3 tirsdag 3. november 1998 14:58
(3)
(4)
(5)
(6)
(7)
(8)
(9)
(10)
(11)
(12)
(13)
Botón de pantalla inicial (HOME)
Activación/desactivación de seguridad
(funcionamiento de seguridad)
Botón de emergencia
Alarma externa
Interconexión telefónica
Exploración de canales
Menú
Opción
Aviso
Llamada privada
Selección
Señales de audio
Tono alto
Tono de llamada
Llamada selectiva entrante (se repite
durante 20 segundos)
Iniciar teléfono/recibir
Activación de emergencia
Reconocimiento de emergencia
Salida de emergencia
“Failsoft” (se repite cada 10
segundos, funciones trunking)
Fuera de cobertura (repetida,
funciones trunking)
Entrada desde el teclado aceptada
Tono bajo
Aviso de llamada enviada
Reconocimiento de aviso de llamada
Ocupado (se repite cuatro veces)
Fallo en la autocomprobación de la
radio/No aceptada entrada desde el
teclado/Aviso de fin del temporizador/
Rechazo del sistema
Rellamada automática (sistema
trunking)
Error de función/canal/hardware, el
tono continúa hasta el funcionamiento
correcto o la desconexión de la radio.
Aviso de llamada recibida (se repite
cada cinco segundos)
Fallo de clave (funcionamiento de
seguridad)
Llamada iniciada (llamada privada
mejorada)
PTT pulsado en modo claro
(funcionamiento de seguridad)
Llamada selectiva recibida (llamada
privada II)
MCS 2000 modelos II y III
Español
68P81083C10-C
Página 3
MCS2000 2&3-C UG GBBook Page 4 tirsdag 3. november 1998 14:58
Español
MCS 2000 modelos II y III
Funcionamiento general
Conexión/desconexión de la radio y control de
volumen
Encienda la radio pulsando el botón de conexión/
desconexión (A). La radio realizará una
autocomprobación.
Ajuste el volumen al nivel de escucha adecuado
girando el botón de conexión/desconexión (A).
Nota: Si está equipada para ello, su radio puede
programarse con la detección del encendido
activada.
Según la programación, si el encendido está
desconectado, la radio
• se apagará,
• impedirá la capacidad de transmisión, o
• impedirá la utilización del pulsador PTT.
Póngase en contacto con el operador del sistema para
más información.
Apague la radio volviendo a pulsar el botón de
conexión/desconexión (A).
Nota: si la radio emite un tono de error y
muestra un mensaje de error, póngase en
contacto con el responsable del sistema de
radio o con su servicio de postventa.
Página 4
68P81083C10-C
Selección de función
Las funciones programadas en la radio pueden
seleccionarse de dos formas diferentes:
1
Directamente mediante un botón específico
preprogramado, o
2
Indirectamente mediante el MENÚ de la radio.
Selección mediante botón de función
Para acceder directamente a una función, pulse el
botón de la función deseada.
Un triángulo que aparece en pantalla apuntará al botón
de función utilizado.
Si la función requiere la introducción adicional de
datos, haga uso del selector (D) para ver las opciones,
y pulse el botón de selección (13).
Nota: Los botones de función normalmente
están activos. Al pulsar un botón de función, se
sale de la función actual y se inicia la función
seleccionada.
Selección mediante menú
Se puede acceder a las funciones indirectamente a
través del menú de la radio.
1
Pulse el botón de menú (9) para acceder a la
selección de menú.
MCS2000 2&3-C UG GBBook Page 5 tirsdag 3. november 1998 14:58
2
Utilice el selector (D) para ver la función
deseada.
3
Pulse el botón de selección (13). La radio saldrá
del modo de menú y entrará en la función
seleccionada, o bien en un submenú.
Si se precisa una introducción adicional de datos,
utilice el selector (D) para seleccionar la función
deseada. Pulse el botón de selección (13).
En la parte posterior de este manual encontrará una
lista de las posibles funciones del menú (página 21).
Ajuste de la intensidad de la pantalla
Seleccione el menú DISP INTENSITY (Intensidad de la
pantalla) como se describe anteriormente. Pulse el
botón de selección (13). La intensidad de la pantalla se
puede ajustar a uno de los cuatro niveles: alto, medio,
bajo o muy bajo, por medio del selector (D).
Conexión/desconexión de tonos
Los tonos oídos cada vez que se pulse un botón
pueden activarse o descactivarse mediante los menús.
Seleccione el menú TONES (Tonos) tal y como se ha
explicado anteriormente. Pulse el botón de selección
(13). La pantalla mostrará el estado actual:
modelo III
TONES ON
MCS 2000 modelos II y III
Español
modelo II
TONES ON
Utilice el selector de modo (D) para conmutar entre
“TONES ON” (tonos activados) o “TONES OFF” (tonos
desactivados). Pulse el botón de selección (13) cuando
aparezca en pantalla la opción deseada.
Selección de modo y zona
Por modo se entiende un canal o grupo de
conversación y todas las funciones relacionadas con el
mismo. Una zona es una agrupación de modos que
pueden seleccionarse mediante el botón de zona (1).
Deberá utilizar el selector de modo (D) para que
aparezca en pantalla la zona deseada, por ejemplo:
modelo III
modelo II
ELECTRIC CO
NORTH DIVISION
ELECTRIC NORTH
en donde la pantalla del modelo III lleva el nombre de la
zona en la línea 1 y el nombre del canal/grupo de
conversación en la línea 2. En el modelo II el nombre de
la zona va seguido por el nombre del canal/grupo de
conversación. El nombre de la zona parpadea hasta
que se pulsa el botón de selección (13) para elegirla. A
continuación, utilice el selector (D) hasta que aparezca
el canal/grupo de conversación deseado:
modelo III
modelo II
ELECTRIC CO
SOUTH DIVISION
ELECTRIC SOUTH
68P81083C10-C
Página 5
MCS2000 2&3-C UG GBBook Page 6 tirsdag 3. november 1998 14:58
Español
MCS 2000 modelos II y III
Llamadas salientes
Cuando haya seleccionado la zona y el modo, estará
listo para transmitir.
Saque el micrófono de su soporte y pulse el pulsador
PTT (F) para hablar, y suéltelo para escuchar. Hable en
un tono de voz normal, manteniéndose a una distancia
de 5-10 cm del micrófono. Mientras esté transmitiendo,
el indicador luminoso rojo (B) permanecerá encendido.
Sólo modo convencional:
Si el indicador naranja está encendido, significa que el
canal está ocupado. Espere a que se apague el
indicador naranja antes de transmitir.
Sólo modo trunking:
Si suena el tono de ocupado, suelte el pulsador PTT (F)
y espere el tono de rellamada automática. Cuando oiga
este tono, presione el pulsador PTT (F) durante tres
segundos para transmitir.
Si su radio está equipada con temporizador, sonará un
tono de aviso unos segundos antes de finalizar la
llamada.
Exploración de canales
Esta función permite al usuario controlar la actividad de
más de un canal o grupo de conversación (incluido el
canal o grupo de conversación seleccionado) a un
mismo tiempo en busca de actividad.
Se pueden asignar niveles de prioridad a los canales
Página 6
68P81083C10-C
que se encuentren dentro de una lista de exploración
de la forma siguiente:
Prioridad 1: La más importante
Prioridad 2: La segunda más importante
Sin prioridad: Miembro normal de la lista de
exploración sin prioridad.
Durante la exploración de canales, la radio pasará a
escuchar el canal/grupo de conversación con la
prioridad más alta. Si se activa un canal/grupo de
conversación con una prioridad más alta cuando la
radio está escuchando a un miembro de menor
prioridad, la radio pasará al canal/grupo de
conversación de más alta prioridad.
Nota: Si el usuario está participando en una
conversación, no será interrumpido por ninguna
llamada de prioridad normal.
Conexión/desconexión de exploración de canales
La función de exploración de canales puede activarse
mediante el botón de exploración de canales (8) o
mediante un menú como se ha explicado
anteriormente.
Durante todo el tiempo en que esté seleccionada la
activación de la exploración, el icono de exploración
( ) aparecerá en pantalla, y la radio realizará la
exploración de actividad en los canales/grupos de
conversación que estén especificados en las listas
actuales de exploración.
MCS2000 2&3-C UG GBBook Page 7 tirsdag 3. november 1998 14:58
Nota: Si la radio está preprogramada para
exploración automática, la radio buscará
automáticamente siempre que se seleccione
este modo y no se podrá desactivar la
exploración.
Visualizacion de una lista de exploración de
canales
Seleccione el menú VIEW LISTS (Ver listas) como se
ha explicado anteriormente, y a continuación use el
selector (D) para ver el menú SCAN (Exploración de
canales). Pulse el botón de selección (13).
Parpadeará el punto del icono de exploración
si
el modo es de prioridad 1, lucirá ininterrumpidamente
si es de prioridad 2, o lucirá ininterrumpidamente
el icono
para indicar un modo de prioridad normal.
El icono de programación
estará activado
mientras se esté consultando la lista.
Use el selector (D) para ver el siguiente miembro. Se
sale de la función pulsando el botón de pantalla inicial
(3).
Cambio de las listas de exploración de canales
Si la lista de exploración puede programarla el
usuario, éste podrá cambiar los datos de las mismas
(añadir o borrar miembros).
MCS 2000 modelos II y III
Español
Seleccione el menú PROGRAM LISTS (Programar
listas) como se ha explicado anteriormente, y a
continuación use el selector (D) hasta que aparezca
SCAN (Exploración de canales), y pulse el botón de
selección (13) o
Mantenga pulsado el botón de exploración de canales
(8) hasta oír el tono de pulsación de botón aceptada.
Parpadearán el triángulo y el icono de programación
en la pantalla.
Utilice el selector de modo (D) para seleccionar el
modo deseado.
Pulse el botón de selección (13) si el icono de
exploración de canales
no aparece en la pantalla
para incluir el modo como miembro de prioridad
normal.
Vuelva a pulsar el botón para convertir el modo en
prioridad 2 (el icono de exploración de canales
estará iluminado ininterrumpidamente).
Pulse el botón de selección una tercera vez para
convertir el modo en prioridad 1 (parpadeará el punto
del icono de exploración de canales
).
Al pulsar el botón de selección una vez más, el modo
ya no será de miembro y no se incluirá en la lista.
Interconexión telefónica
Se utiliza la interconexión telefónica cuando es preciso
que la radio funcione en un sistema radiotelefónico
conectado a un sistema telefónico público o privado.
68P81083C10-C
Página 7
MCS2000 2&3-C UG GBBook Page 8 tirsdag 3. november 1998 14:58
Español
MCS 2000 modelos II y III
Página 8
68P81083C10-C
Recepción de una llamada telefónica
Cuando su radio reciba una llamada telefónica, sonará
un tono de llamada telefónica y el panel alternará entre
modelo III
PHONE CALL
SOUTH DIVISION
modelo II
PHONE CALL
y la pantalla inicial. Parpadearán el indicador verde (B)
y el icono de llamada recibida
.
Pulse el botón del teléfono (7) para responder a la
llamada.
Pulse el botón de pantalla inicial (3) o el botón de menú
(9) cuando finalice la conversación.
Realización de una llamada telefónica
Selección mediante lista
Pulse el botón de menú (9) y utilice el selector (D) hasta
que aparezca PHONE (Teléfono). Pulse el botón de
selección (13) y use el selector (D) hasta que aparezca
el número y nombre deseados. Pulse el botón de
selección (13) o el pulsador PTT (F). La radio transmitirá
el numero.
Nota: si la radio ha sido programada para ello,
puede pulsar el botón de teléfono para acceder
rápidamente a la función de interconexión
telefónica. Al usar el selector (D), podrá visualizar
la última llamada marcada y las listas de
números de teléfono.
Selección mediante teclado (marcación por lista o
memoria intermedia)
(modelo III o modelo II con micrófono de teclado
opcional)
Pulse el botón de teléfono (7) o seleccione el menú
PHONE (Teléfono) como se explicó anteriormente, y a
continuación introduzca el numero deseado
directamente mediante el teclado. Si desea llamar a
un numero de extensión local que requiera una pausa
previa, pulse ✱
# .
Si se marca un número de teléfono incorrecto, podrán
borrarse los dígitos con el selector de modo (D) hacia
la izquierda o hacia abajo. Continúe usando el
selector (D) hacia la izquierda o hacia abajo para
borrar todo el numero.
Cuando el numero esté completo, pulse el botón de
selección (13) o el pulsador PTT (F) para transmitir la
llamada.
El mensaje
modelo III
modelo II
PLEASE WAIT
555-1212
PLEASE WAIT
aparecerá en pantalla mientras el sistema realiza la
llamada.
MCS2000 2&3-C UG GBBook Page 9 tirsdag 3. november 1998 14:58
Sólo modo de funciones trunking:
Si el sistema telefónico está ocupado, la pantalla
mostrará el mensaje
modelo III
PHONE BUSY
555-1212
modelo II
PHONE BUSY
y su llamada se realizará cuando el sistema esté libre, a
menos que pulse el botón de pantalla inicial (3) o el
botón de menú (9) para salir de Interconexión telefónica.
Si la radio no dispone de acceso telefónico, aparecerá
en la pantalla
NO PHONE
555-1212
NO PHONE
Llamada privada
Recepción de una llamada privada
Cuando su radio reciba una llamada privada, sonará el
tono de llamada privada entrante y la pantalla alternará
entre
CALL RECEIVED
ID: 2000
CALL RECEIVED
y la pantalla inicial. En la pantalla del modelo III, la línea
2 indica la identificación del que llama; para ver dicha
identificación en el modelo II, pulse el botón de llamada
(12).
MCS 2000 modelos II y III
Español
Parpadearán el indicador verde (B) y el icono de
llamada recibida
.
Si presiona el pulsador PTT (F), en 20 segundos se
contestará a la llamada y se pasará a la conversación
privada.
Nota: Si no pulsa el botón de llamada (12), la
llamada se iniciará como grupo de
conversación.
Pulse el botón de pantalla inicial (3) (o el botón de
menú (9) dos veces) o el botón de llamada (12) cuando
finalice la conversación.
Realización de una llamada privada
(sólo modo de funciones trunking)
Las llamadas privadas pueden seleccionarse de una
lista o directamente mediante el teclado (modelo III o
modelo II con micrófono de teclado opcional).
Nota: Si su radio ha sido programada para ello,
puede pulsar el botón de llamada para acceder
rápidamente a la función de llamada privada. Al
utilizar el selector de modo (D), podrá desplazarse
entre el último número de identificación recibido,
las listas de llamadas privadas y su propio número
de identificación de radio.
68P81083C10-C
Página 9
MCS2000 2&3-C UG GBBook Page 10 tirsdag 3. november 1998 14:58
Español
MCS 2000 modelos II y III
Página 10
68P81083C10-C
Pulse el botón de llamada (12) o seleccione CALL
(Llamar) en los menús.
La pantalla mostrará el último número de
identificación transmitido o recibido.
Selección mediante lista:
Transmita el número de identificación visualizado
presionando el pulsador PTT (F) o escoja otro código
de la lista utilizando el selector (D).
Para ver el propio número de identificación de la
radio, utilice el selector hasta que aparezca en la
pantalla “MY ID:” (Mi código:) seguido del código de
la radio, por ejemplo:
modelo III
MY RADIO USER
ID: 741317
modelo II
MY ID: 741317
Selección mediante teclado:
(modelo III o modelo II con micrófono de teclado
opcional)
Pulse el botón de llamada (12) o seleccione PRIVATE
CALL (Llamada privada) en los menús, e introduzca el
código deseado directamente en el teclado.
Si se introduce un número incorrecto, pueden
borrarse los dígitos mediante el uso del selector de
modo (D) hacia la izquierda o hacia abajo. Continúe
utilizando el modo (D) a la izquierda o hacia abajo
para borrar todo el número de identificación. A
continuación, introduzca el código correcto.
Cuando haya seleccionado el número de
identificación de una de las dos maneras expuestas
anteriormente, podrá transmitirse al número de
identificación presionando el pulsador PTT (F).
Llamada privada mejorada
Si no se contesta a una llamada privada mejorada
transcurridos 20 segundos, el panel cambiará a
modelo III
NO ANSWER
ID: 700001
modelo II
NO ANSWER
Presione el pulsador PTT (F) para dejar su número de
identificación a la radio a la que desea llamar para que
ésta le devuelva la llamada posteriormente. Sonará el
tono de aviso de llamada enviada.
Número de identificación de la persona
que llama
La radio mostrará de forma momentánea el número
de identificación o el nombre del alias de la radio que
inició la llamada. Si se recibe una llamada de
emergencia en funcionamiento de sistema trunking, la
pantalla de la radio mostrará alternativamente el
MCS2000 2&3-C UG GBBook Page 11 tirsdag 3. november 1998 14:58
grupo de conversación, la llamada de emergencia
recibida y el número de identificación (o alias) de la
radio que haya iniciado la llamada de emergencia.
Botones de selección predefinida de
modo
Estos botones permiten un rápido acceso a los modos
de uso más frecuente. Mantenga pulsado un botón de
selección predefinido de modo hasta que se escuche
un tono de botón válido, que indica que el botón ya se
puede programar para el modo actualmente
seleccionado. Bastará con pulsar un botón de
selección predefinida de modo para que la radio
cambie de forma inmediata al modo programado para
dicho botón.
tiempo anteriormente programado. Se considera
actividad la pulsación de un botón, el giro de un botón
o mando, o el uso de cualquier accesorio de la radio
(por ejemplo, un pedal).
2 minutos antes de la desconexión automática, la radio
emitirá un tono grave continuo y
AUTO POWER OFF
aparecerá parpadeando en la pantalla. Cualquier
actividad que lleve a cabo el usuario hará que la radio
interrumpa de forma inmediata los tonos de
desconexión automática y el parpadeo de la pantalla,
volviendo al modo de funcionamiento normal.
Recuperación de modo
Funciones SmartZone/AMSS
La radio memoriza siempre el último modo
seleccionado. Si pulsa en la recuperación de modo, la
radio pasará al modo anteriormente seleccionado.
Cuando la radio funcione en SmartZone y AMSS
(Selección automática de emplazamientos múltiples),
podrán programarse en su radio las dos funciones
mencionadas a continuación:
Nota: El “último” modo debe seleccionarse
como mínimo durante cinco segundos para que
se considere el “último” modo.
Desconexión automática
La “desconexión automática” desactivará la radio si no
se lleva a cabo ninguna actividad durante el período de
MCS 2000 modelos II y III
Español
Búsqueda de emplazamiento y emplazamiento
enclavado
Pulse el botón de búsqueda/monitorización (2) para
ver el emplazamiento actual y la intensidad de la
señal.
Además, para reflejar el nivel de intensidad de la señal
68P81083C10-C
Página 11
MCS2000 2&3-C UG GBBook Page 12 tirsdag 3. november 1998 14:58
Español
MCS 2000 modelos II y III
del emplazamiento actual, se emplea una pantalla de
0 a 3 barras:
3 barras indican una señal muy fuerte, mientras que la
ausencia de barras significará que hay una señal muy
débil.
Mantenga pulsado el botón de búsqueda/
monitorización (2) para que la radio busque un nuevo
emplazamiento.
Si está programada la función opcional de “itinerancia
en área amplia”, la radio automáticamente cambiará
de emplazamientos a medida que se mueva por su
zona de cobertura.
Puede desactivarse el cambio de emplazamiento
automático activando la función de emplazamiento
enclavado, que se puede seleccionar mediante los
menús o el botón de función.
Consulte al responsable de su sistema de radio para
más información.
Funcionamiento de emergencia
Si su sistema está capacitado para este
funcionamiento, la función se activa pulsando el
botón de emergencia (5).
Página 12
68P81083C10-C
Se desactiva la emergencia pulsando el botón de
emergencia durante aproximadamente 2 segundos.
Sólo modo de funciones del sistema trunking:
Puede programarse su radio para indicar que se ha
recibido una llamada de emergencia de otro miembro
de su grupo de conversación. La pantalla alternará
entre el mensaje
modelo III
EMER RECEIVED
SOUTH DIVISION
modelo II
EMER RECEIVED
y el nombre del modo de la radio que llama.
Si se activa la “emergencia con transmisión de
mensaje”, la radio transmite automáticamente una
alarma de emergencia. Transmite el audio por medio
del micrófono del visor durante un período
predefinido de tiempo después de pulsar el botón de
emergencia. Consulte al responsable de su sistema
de radio para más información.
Nota: Sólo es posible la transmisión automática
a través del micrófono del visor con la opción
de emergencia.
MCS2000 2&3-C UG GBBook Page 13 tirsdag 3. november 1998 14:58
Alarma externa
Según los accesorios adquiridos e instalados en su
radio, la función de alarma externa activa el claxon o
las luces del vehículo si no se responde a una llamada
(aviso, llamada privada de sistema trunking, o llamada
telefónica de sistema trunking) antes de un tiempo
preprogramado.
Pulse el botón (6) o seleccione HORN/LIGHTS
(Claxon/luces) a través del menú para activar la
alarma externa. “HORN/LIGHTS ON” (“Claxon/ luces
conectados”) se alternará en la pantalla para indicar
que se ha activado la función. Apague la alarma
pulsando el botón (6) de nuevo o bien a través del
menú.
Funcionamiento con microteléfono
Para seleccionar el funcionamiento con microteléfono,
seleccione HANDSET (Microteléfono) del menú y
después HANDSET ON (Microteléfono activado). Al
seleccionar HANDSET ON, se descuelga el
microteléfono de su soporte (HUB) y se oirá el audio
sólo a través del altavoz del microteléfono, mientras
que el altavoz de la radio permanecerá silenciado
asegurando así la confidencialidad.
Cuando se vuelve a colocar el microteléfono en su
soporte, o cuando se selecciona HANDSET OFF
MCS 2000 modelos II y III
Español
(Microteléfono desactivado) en el menú, el audio
volverá a oírse a través del altavoz de la radio.
Silenciamiento de la radio del vehículo
Si se ha programado previamente en la radio
MCS 2000 la opción de silenciamiento de la radio del
vehículo, la radio del vehículo quedará silenciada
momentáneamente mientras la radio móvil MCS 2000
esté transmitiendo o recibiendo. Consulte al
responsable de su sistema de radio para más
información.
“Failsoft” (fallo activo)
La función “Failsoft” (fallo activo) garantiza la no
interrupción de una conversación si falla el sistema
trunking. En este modo la comunicación se
mantendrá en un canal abierto. Sonará el tono de
“failsoft” (fallo activo) cada 10 segundos y la pantalla
alternará entre el mensaje
modelo III
FAILSOFT
SOUTH DIVISION
modelo II
FAILSOFT
y el estado activo actual.
68P81083C10-C
Página 13
MCS2000 2&3-C UG GBBook Page 14 tirsdag 3. november 1998 14:58
Español
MCS 2000 modelos II y III
Funciones convencionales
Antes de transmitir, compruebe siempre que el modo
seleccionado esté libre (indicador luminoso naranja
apagado).
Repetidor/Directa
Seleccione el menú REPEAT/DIRECT (Repetir/
Directa) como se indicó anteriormente o pulse un
botón previamente programado. Se visualizará el
modo actual (directa o por repetidor). Utilice el
selector de modo (D) para cambiar de modo. Pulse el
botón de selección (13) para seleccionar el modo de
funcionamiento que aparece en la pantalla.
Monitor
Pulse el botón del monitor para activar o desactivar el
monitor.
Mantenga pulsado el botón del monitor para
introducir configuraciones squelch (silenciamiento).
Para realizar un ajuste fino del nivel de squelch
(silenciamiento) de la radio, puede utilizarse el
selector de modo (D). Pulse el botón de selección
cuando obtenga el nivel de squelch (silenciamiento)
deseado.
Línea privada (PL) seleccionable por el usuario
La línea privada (PL) seleccionable por el usuario
Página 14
68P81083C10-C
permite al usuario de la radio la selección de un
código de línea privada (PL) de una lista
preprogramada de códigos.Pulse el botón de línea
privada múltiple (MPL), en caso de que lo tenga
programado, para ver la línea privada (PL) actual, o
mantenga pulsado el botón MPL para entrar en la
configuración de MPL. Haga uso del selector de
modo para cambiar el código PL y pulse la tecla de
selección cuando aparezca el PL deseado.
Funciones Stat Alert (MDC-1200/Star
Signalling)
Número de identificación de PTT y emergencia
Cada radio puede programarse para que envíe un
código de identificación exclusivo al principio de cada
transmisión, el final de la misma o en ambos
momentos. Si se programa el número de
identificación de PTT para que se emita antes de la
transmisión de voz, oirá un tono hasta que se haya
completado la transmisión del número de
identificación, el cual puede combinarse con una
alarma de emergencia que se activa mediante un
botón de emergencia de la radio. El distribuidor puede
identificar rápidamente al usuario de la radio y recibir
también una indicación casi instantánea de las
situaciones críticas.
MCS2000 2&3-C UG GBBook Page 15 tirsdag 3. november 1998 14:58
Funcionamiento de emergencia
Las emergencias se llevan a cabo como se describía
anteriormente.
Llamadas selectivas
Recepción de una llamada selectiva
La radio mostrará en pantalla
modelo III
CALL RECEIVED
ID: 2000
modelo II
CALL RECEIVED
durante dos segundos después de recibir una llamada
selectiva. Se puede entrar en la llamada selectiva para
ver la identidad de la radio que llama y responder con
una llamada selectiva (véase a continuación).
Envío de una llamada selectiva
Pulse el botón de llamada (12) o seleccione el menú
PRIVATE CALL como se explicó anteriormente.
Introduzca el número de identificación por medio del
teclado o emplee el selector de modo (D) para llegar
hasta el número de identificación al que desee llamar.
Presione el pulsador PTT (F) para transmitir la llamada
selectiva a este número de identificación. Si la llamada
selectiva automática está desactivada, la radio sale de
la llamada selectiva después de la transmisión. Si la
llamada selectiva automática está activada, la radio
MCS 2000 modelos II y III
Español
permanecerá en dicha llamada selectiva hasta que se
salga de ella.
Aviso de llamada
Véase la sección de sistemas trunking para más
detalles.
Entrada de identificaciones de grupo y
metacaracteres
(Llamada convencional de aviso y selectiva)
Con el teclado y las llamadas sin limitaciones, se
puede marcar una identificación de grupo empleando
la opción de llamada selectiva o aviso de llamada, y
luego retrocediendo a la entrada de identificadores de
grupo con el selector de modo (D)
GROUP
aparecerá en pantalla. Se puede entonces introducir
una identificación de grupo de tres dígitos para la
llamada o búsqueda.
Los usuarios pueden emplear un metacarácter (*) para
llamar o buscar identificaciones o grupos múltiples. El
asterisco (*) es válido para todos los dígitos de
identificación (de 0 a 9) en esa posición; por ejemplo,
para buscar todos los identificadores de las radios
0001 hasta 0009, introduzca el identificador individual
0-0-0-*.
68P81083C10-C
Página 15
MCS2000 2&3-C UG GBBook Page 16 tirsdag 3. november 1998 14:58
Español
MCS 2000 modelos II y III
Interconexión telefónica
Para realizar una llamada por medio del sistema
telefónico en el modo convencional, su radio debe
enviar códigos de acceso y de desconexión al
sistema. El código de acceso puede transmitirse de
cualquiera de las dos maneras, dependiendo de la
forma en que esté programada su radio.
Inmediato: La radio envía automáticamente un código
de acceso previamente almacenado al pulsar el
botón de interconexión (7).
Demorado: Pulse el botón de selección (13) o el
pulsador PTT (F) y la radio enviará el código de
acceso previamente almacenado.
Después de enviar el código de acceso, debe oír el
tono de llamada (si no suena este tono, pulse el botón
de pantalla inicial (3) o el botón de interconexión
telefónica (7) para colgar). Ahora, pulse el botón de
selección (13) o el pulsador PTT (F). La radio transmite
entonces el número.
La llamada se completa en lo sucesivo como se
describe en la sección anterior Envío de una llamada
telefónica.
Estado/Mensaje
Seleccione el menú STATUS (Estado) o MESSAGE
(Mensaje) como se indica anteriormente. En la
pantalla aparece el último estado confirmado o el
primer mensaje. Utilice el selector de modo (D) para
Página 16
68P81083C10-C
desplazarse por la lista de posibles estados o
mensajes. Cuando la pantalla muestre el estado o
mensaje deseado, pulse el botón de selección (13)
para transmitir dicho estado o mensaje. Sonarán
cuatro pitidos para indicar que el estado o mensaje ha
sido recibido. La radio sale automáticamente de la
función de estado/mensaje. Si el estado o mensaje no
ha sido recibido, la radio muestra
modelo III
modelo II
NO ACKNOWLEDGE
STATUS 1
NO ACKNOWLEDGE
y genera un tono continuo. Pulse el botón de
selección (13) para transmitir de nuevo el estado o
mensaje, o pulse el botón de pantalla inicial (3) para
salir de la función.
Acceso al repetidor MDC (RAC)
Mediante el acceso al repetidor MDC se selecciona
un repetidor para la transmisión. Consulte al
administrador de su sistema para más información.
Funciones del sistema trunking
Envío de llamadas de aviso
Seleccione el menú PAGE (Aviso) como se ha
explicado anteriormente, y a continuación introduzca
el número de identificación por medio del teclado, o
MCS2000 2&3-C UG GBBook Page 17 tirsdag 3. november 1998 14:58
bien utilice el selector (D) para ver el código deseado
de la lista de identificaciones. Presione el pulsador
PTT (F) o el botón de selección (13) para enviar la
llamada de aviso.
Se oirá el tono de reconocimiento de llamada de aviso
si la radio a la que se está llamando recibe la llamada
de aviso. Si no la recibe, aparecerá en pantalla
modelo III
modelo II
NO ACKNOWLEDGE
ID: 700001
NO ACKNOWLEDGE
Pulse el botón de pantalla inicial (3) o el botón de
menú (9) dos veces para volver a dicha posición.
Recepción llamadas de aviso
Cuando se recibe una llamada de aviso, se escucha el
tono de recepción de llamada de aviso, y el indicador
luminoso verde y el icono
se iluminan
intermitentemente hasta que se reconoce la llamada
de aviso presionando el pulsador PTT (F), o pulsando
y soltando el botón del monitor (2).
Estado/Mensaje
Se funciona con él como se explicó anteriormente en
la sección Funciones convencionales
Solicitud de reprogramación
Si su radio está programada para el reagrupamiento
MCS 2000 modelos II y III
Español
dinámico, podrá seleccionarse la función de solicitud
de reprogramacion mediante un botón
preprogramado o mediante un menú. La solicitud de
reprogramación enviará un mensaje al operador de
consola en el que le solicita que asigne la radio a un
nuevo grupo de conversación. Consulte al
administrador de su sistema para más información.
Funciones de botones de una sola pulsación
Si se programa correctamente, se puede dedicar un
botón al envío de un estado preprogramado, mensaje
y llamada de aviso, o a la llamada a un número
telefónico preprogramado. Póngase en contacto con
el administrador de su sistema para más detalles.
Fuera de cobertura
Si está programada en su radio esta función opcional,
indicará que ha salido de la zona de cobertura de su
radio. La pantalla alternará entre
modelo III
OUT OF RANGE
SOUTH DIVISION
modelo II
OUT OF RANGE
y el modo actual, sonando el tono de fuera de
cobertura.
68P81083C10-C
Página 17
MCS2000 2&3-C UG GBBook Page 18 tirsdag 3. november 1998 14:58
Español
MCS 2000 modelos II y III
Funcionamiento de seguridad
Nota: Esta sección sólo es aplicable si se ha
programado en su radio el modo de
funcionamiento de seguridad. En esta
sección sólo se indican las diferencias que se
producen en el funcionamiento de seguridad.
Consulte las secciones correspondientes en
Funcionamiento general.
Llamadas salientes: Si el modo seleccionado no se
programa previamente como sólo de seguridad o sólo
de claridad, la transmisión de seguridad se activa o
desactiva pulsando el botón de seguridad (4), excepto
para la interconexión telefónica del sistema trunking y
para llamadas privadas que se controlen siempre con
el botón. Un pitido que suene inmediatamente
después de presionarse el pulsador PTT indica una
transmisión clara (no de seguridad).
Nota: Si se pulsa el botón de seguridad durante
una transmisión, dicha transmisión se
interrumpe y suena un tono de aviso hasta que
se suelte el pulsador PTT. El cambio de modo
de funcionamiento entra en vigor la siguiente
vez que se presione el pulsador PTT.
Página 18
68P81083C10-C
Llamadas entrantes: Cuando se recibe una llamada
de seguridad, el indicador luminoso naranja (sólo
convencional) y el icono de seguridad
se iluminan
intermitentemente.
Funciones convencionales: En el monitor sólo se
oyen las llamadas procedentes de radios con la
misma clave de encriptación. Las llamadas de radios
con una clave diferente se oyen como ruido.
Funciones de sistema trunking: Cuando la
transmisión de seguridad se controla mediante el
botón de seguridad (4), durante un grupo de llamada
o una llamada privada sólo es posible cambiar de
modo de claridad a modo de seguridad. Durante una
llamada “Failsoft” (fallo activo) o de interconexión
telefónica es posible cambiar de funcionamiento de
claridad a funcionamiento de seguridad, y al revés.
Durante una llamada de emergencia NO es posible
ningún cambio.
Carga y borrado de claves de seguridad
Para cargar una clave de encriptación, es necesario
utilizar un cargador de variables de claves (KVL) que
corresponda al tipo de encriptación de la radio.
Desconecte el cable del micrófono de la cabeza de
control y conéctelo al cable del cargador de claves. La
pantalla muestra “KEYLOADING” (Cargando claves),
MCS2000 2&3-C UG GBBook Page 19 tirsdag 3. november 1998 14:58
y se desactivan la transmisión y recepción normales.
Si desea más información sobre el procedimiento de
carga, consulte el manual de instrucciones del KVL.
Nota: En algunas radios de modelos antiguos,
podrá pasar al modo de carga de claves
manteniendo pulsado el botón de seguridad (4)
hasta que la pantalla cambie y muestre la
primera opción del menú de seguridad.
Desplácese hasta la opción “KEYLOAD” (Carga
de claves) y pulse el botón de selección. Para
salir, pulse de nuevo el botón de pantalla inicial.
Una vez completada satisfactoriamente la carga de la
clave, la radio emite un pitido largo.
Para borrar una clave, mantenga pulsado el botón de
seguridad (4) hasta que cambie la pantalla y muestre
la primera opción del menú de seguridad “ERASE
KEY” (Borrar clave), y pulse el botón de selección.
Una vez completado el borrado, la pantalla muestra
“ERASED” (Borrado).
Nota: Si se retira la batería de la radio durante
más de tres días, la radio pierde su clave de
encriptación.
MCS 2000 modelos II y III
Español
Funcionamiento con datos
Si se ha programado la radio para funcionamiento con
datos, se podrán enviar o recibir mensajes de datos
desde un terminal de datos. Mientras se estén
enviando o recibiendo datos la radio, la pantalla
mostrará
modelo III
DATA TRANSFER
modelo II
DATA TRANSFER
La pulsación de cualquier botón hará que la radio
interrumpa la transferencia de datos y devolverá la
radio a su funcionamiento normal. Póngase en
contacto con el administrador de su sistema para más
detalles.
Cuidado del radioteléfono
•
•
Haga un uso correcto de la radio.
Limpie la parte exterior del radioteléfono utilizando
un paño humedecido con agua, una solución
suave de jabón líquido o alcohol isopropílico.
PRECAUCIÓN
Debido al efecto negativo de diversas
sustancias de limpieza, se debe tener especial
cuidado en la selección de las mismas. Se
recomienda utilizar un jabón suave de
lavavajillas.
68P81083C10-C
Página 19
MCS2000 2&3-C UG GBBook Page 20 tirsdag 3. november 1998 14:58
Español
MCS 2000 modelos II y III
Página 20
68P81083C10-C
Información de seguridad
•
Cualquier equipo de radio, cuando transmite, radia
energía en la atmósfera, que puede, en ciertas
condiciones, provocar la generación de chispas.
Todos los usuarios de vehículos con equipos de radio
deben tener en cuenta las siguientes advertencias:
No utilice la radio cerca de
liquidos inflamables o en las proximidades
de elementos explosivos
Durante el uso normal, esta radio producirá energía
radioeléctrica a un nivel sustancialmente inferior al
que pudiera producir daños.
Rogamos siga estas reglas para mantener su propia
seguridad:
•
Para asegurar que la exposición a la energía de
radiofrecuencia (RF) de las personas que se
encuentren próximas a un vehículo sea inferior a la
recomendada por la norma adoptada, solamente
se deberá transmitir con cualquier radio móvil
cuando las personas estén como mínimo a 60 cm
de una antena de transmisión montada
externamente e instalada de forma correcta.
•
NO mantenga el pulsador de transmisión (PTT)
pulsado si no desea transmitir.
•
NO permita que los niños jueguen con ningún
equipo de radio que contenga un transmisor.
Precaución: Vehículos equipados con air-bag
•
El air-bag se infla con gran fuerza. NO sitúe
objetos, ni siquiera de comunicaciones en la zona
situada encima del air-bag o en la zona de
despliegue del mismo. Si el equipo de
comunicaciones está instalado de forma
incorrecta y el air-bag se infla, se pueden originar
daños graves.
•
La instalación del equipo de comunicaciones del
vehículo debe ser realizada por un instalador o
técnico con experiencia en los requisitos de tales
instalaciones. El tamaño, forma y zona de
despliegue del air-bag puede variar según la
marca, modelo y configuración del compartimento
frontal del vehículo (por ejemplo, asientos corridos
frente a asientos individuales).
•
Si es necesario, póngase en contacto con las
oficinas centrales del fabricante del vehículo para
obtener información específica del air-bag
correspondiente a la marca, modelo y
configuración del compartimento frontal del
NO utilice la radio mientras conduce. Tenga en
cuenta que el uso del micrófono de mano mientras
conduce puede constituir una infracción de las
normas de tráfico.
Tenga en cuenta lo siguiente al planificar la instalación
de equipos de comunicaciones en vehículos dotados
de uno o más air-bags:
MCS2000 2&3-C UG GBBook Page 21 tirsdag 3. november 1998 14:58
vehículo en que se va a realizar la instalación del
equipo de comunicaciones.
Accesorios
Consulte con su distribuidor de Motorola para más
información sobre los accesorios que se exponen a
continuación:
Opciones de micrófono:
• Micrófonos manuales
• Micrófonos para teclado
• Micrófonos supresores de ruido
• Micrófono de visor
• Micrófonos de mesa
• Microteléfono tipo telefónico
Accesorios de montaje:
• Soporte de montaje con inclinación
• Cierre con llave
• Montaje giratorio directo
• Bandeja básica con altavoz
• Opción de montaje remoto
Diversos altavoces exteriores (alta/baja potencia)
Diversos juegos de cables
Accesorios de mesa (estación de control):
• Fuentes de alimentación
• Interruptor de pie de emergencia externa
Antenas
MCS 2000 modelos II y III
Español
Resumen del menú
Zone Select:
Selecciona una zona (igual que el
botón - 1)
Channel:
Selecciona un canal (igual que el
selector - D)
Scan Select:
Exploración de canales activada o
desactivada (igual que el botón - 8)
Tones:
Tonos de entradas desde el teclado
conectados o desconectados
Display Intensity: Ajustar iluminación de la pantalla
View Lists:
Ver lista de exploración de canales,
teléfono, llamada privada o aviso de
llamada
Program Lists:
Programar lista de exploración de
canales, teléfono, llamada privada o
llamada de aviso
Horn/Lights:
Conectar o desconectar la alarma
externa (claxon/luces) (igual que el
botón - 6)
High/Low Power: Ajusta los niveles de potencia alto o
bajo
Tx(Transmit)Inhibit: Conecta o desconecta el transmisor
Private Call:
Selecciona la función de llamada
privada (igual que el botón - 12)
Page:
Selecciona la función de llamada de
aviso (igual que el botón - 11)
68P81083C10-C
Página 21
MCS2000 2&3-C UG GBBook Page 22 tirsdag 3. november 1998 14:58
Español
MCS 2000 modelos II y III
Phone:
Status:
Message:
Handset:
Selecciona una opción telefónica
(igual que el botón - 7)
Selecciona y envía el estado
preprogramado de una lista
Selecciona y envía un mensaje
preprogramado de una lista
Seleccione el modo de
funcionamiento del auricular
Funciones de sistema trunking
Reprogram Request:
Solicita el cambio del programa de
reagrupamiento dinámico
Funciones de sistema trunking de gran cobertura
Site Lock/Unlock:
Desactiva o activa el cambio
automático de emplazamiento
Sólo convencional
Repeater o Direct:
Activa el acceso al repetidor o la
capacidad de habla-escucha.
Página 22
68P81083C10-C
Derechos de patente de software
informático
Los productos descritos en este manual pueden incluir programas informáticos
patentados, almacenados en memorias de semiconductores u otros medios. Las leyes de
los Estados Unidos y otros países protegen determinados derechos exclusivos de
Motorola Europa y Motorola Inc. sobre programas informáticos patentados, incluyendo el
derecho de copia o reproducción en cualquier formato. De igual forma, ningún programa
patentado contenido en los productos descritos en este manual podrá copiarse ni
reproducirse en manera alguna sin el consentimiento expreso por escrito de los
propietarios de las patentes. Por otra parte, la compra de estos productos no significa la
concesión, directa ni implícita, por doctrina de los propios actos, ni ningún otro tipo, de
ninguna licencia contenida en los derechos, patentes o aplicaciones con patente de los
propietarios de los derechos, exceptuando la licencia normal de uso, libre de derechos,
no exclusiva, propia de la venta del producto de acuerdo con la legislación vigente.
MCS2000 II & III-C fold-out-NEW 03/11/98 15:59 Page 5
68P81083C10-C
GB
D
F
RUS
E