1
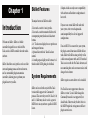
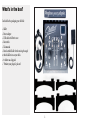
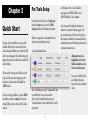
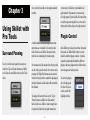
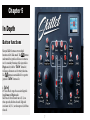
Legal Notices
This guide is copyright ©2013 Schapiro Audio,
LLC, with all rights reserved. Under copyright
laws, this guide may not be duplicated in whole
or in part without the written consent of Schapiro Audio, LLC.
Skillet is a registered trademark of Schapiro
Audio, LLC. Pro Tools, Avid, Command|8,
ICON, EuCon, and Euphonix are trademarks or
registered trademarks of Digidesign and/or Avid
Technology, Inc. Dolby Atmos is a trademark or
registered trademark of Dolby Laborities, Inc.
All other trademarks are the property of their
respective owners.
Product features, specifications, availability,
and system requirements are subject to change
without notice.
The information in this document is subject to
change without notice and does not represent
a commitment on the part of Schapiro Audio,
LLC.
Schapiro Audio, LLC is not responsible for
special, incidental, or consequential damages,
including lost profits, downtime, goodwill, damage or replacement of equipment and property
and cost of recovering reprogramming, or
reproducing any program or data stored in or
used with Schapiro Audio, LLC products.
Schapiro Audio, LLC
1-(855)-751-5538
information@schapiroaudio.com
Special thanks to Dane Davis, Paul Hackner,
Caron Weidner, Csaba Wagner, Aaron Morgan,
Ceri Thomas, Richard Thompson, and Tina
Pratt. (And Mom and Dad.)
This equipment has been type tested and found to comply with the limits for a class B digital device, pursuant to Part
15 of the FCC Rules. These limits are designed to provide reasonable protection against harmful interference in a residential installation. This equipment generates, uses, and can radiate radio frequency energy and, if not installed and
used in accordance with the instruction manual, may cause harmful interference to radio communications. However,
there is no guarantee that interference will not occur in a particular installation. If this equipment does cause interference to radio or television equipment reception, which can be determined by turning the equipment off and on, the
user is encouraged to try to correct the interference by any combination of the following measures:
• Relocate or reorient the receiving antenna
• Increase the separation between the equipment and the receiver
• Plug the equipment into an outlet on a circuit different from that to which the receiver is connected
If necessary, you can consult a dealer or experienced radio/television technician for additional assistance.
PLEASE NOTE: only equipment certified to comply with Class B (computer input/output devices, terminals, printers,
etc.) should be attached to this equipment, and it must have shielded interface cables in order to comply with the
Class B FCC limits on RF emissions.
WARNING: changes or modifications to this unit not expressly approved by the party responsible for compliance
could void the user’s authority to operate the equipment.
Table of Contents
Chapter 1: Introduction
1
Chapter 2: Quick Start
3
Chapter 3: Using Skillet with Pro Tools
4
Chapter 4: Skillet as a MIDI controller
6
Chapter 5: In Depth
7
Chapter 6: Settings
11
Chapter 7: Troubleshooting
13
Chapter 1
Introduction
Welcome to Skillet. Skillet is a flexible
controller designed for use with Avid Pro
Tools, and as a MIDI controller for other audio
software.
Skillet’s dual three-axis joysticks can be used for
surround panning mono and stereo elements,
and as customizable plugin automation
controllers, allowing you to perform your
plugins however you like.
Skillet Features
The major features of Skillet include:
• Two touch-sensitive 3-axis joysticks.
• Two touch-sensitive motorized faders with
accompanying rotary knobs and solo/mute
buttons.
• 2.8” Touchscreen display for user preferences
and transport buttons.
• Optional footswitch for Touch Lockout
control.
• 12 multi-purpose highly tactile buttons, 8 of
which include LED lighting for feedback.
System Requirements
Skillet can be used with any Avid Pro Tools
version which supports the Command 8
protocol. This currently covers Pro Tools 9, 10,
and 11. Skillet may also be used as a generic
MIDI device in any software capable of MIDI
Learn.
1
Schapiro Audio can only assure compatibility
with software and hardware configurations it
has tested.
If you are not certain Skillet will work with
your system, visit www.schapiroaudio.
com/compatability for a list of supported
configurations.
If an Avid ICON is connected to your system,
the plugin-control functions of Skillet will not
work. Skillet will still function perfectly well as
a dual surround panner with an ICON attached.
This is an issue with the Pro Tools software, and
not something that can be overcome unless Avid
changes their software.
Skillet requires no extra drivers to be installed.
Pro Tools does not support more than one
Skillet at a time. Use of a Skillet alongside a
Command|8 console is not supported, but
should work. However only the first device in
the MIDI Peripherals settings menu will have
plugin control access.
What’s in the box?
Included in the packaging you will find:
• Skillet
• Power adapter
• USB cable with Ferrite core
• Footswitch
• This manual
• Four slottable Skillet feet for raising the angle
at which Skillet sits on your desk
• 8 rubber non-slip pads
• “Perform your plugins” placard
2
Chapter 2
Quick Start
To begin, if you would like to use one of the
slottable Skillet feet that are included, slot it
into the bottom of Skillet now. Attach the USB
cable to your computer. Next, attach the power
adapter, footswitch, and then the included USB
cable to Skillet.
When you first start up your Skillet, you will
be greeted by a one-time setup page on the
touchscreen. Choose from “Pro Tools” or
“MIDI” modes.
If you are setting up Skillet as a generic MIDI
controller, continue to Chapter 4. If you are
setting Skillet up for use with Avid Pro Tools,
read on.
Pro Tools Setup
Launch Pro Tools, then select “Peripherals...”
from the Setup menu. Select the ‘MIDI
Peripherals’ tab in the Peripherals window.
Skillet is recognized as a Command8 device,
and two Surround Panner devices.
Setup should look like this:
Slot #1 should have a type of “Command 8”, and
uses Skillet Port 1 to receive and send.
Slots #2 and #3 should both have types of
“Surround Panner” and use Skillet Ports 2 and 3
respectively.
3
On Windows, Ports 2 and 3 of Skillet
may appear as ‘MIDIIN2(Skillet)’ and
‘MIDIIN3(Skillet).’ This is normal.
After closing the Peripherals window, you
should see a number of things happen. The
top 8 audio tracks in Pro Tools will be given a
blue border, and Skillet’s two motorized faders
should jump to match the fader position on the
two topmost audio tracks.
Although 8 tracks are
highlighted in Pro Tools,
Skillet only addresses the
first two of those tracks.
You can use Skillet’s ‘Bank’
and ‘Nudge’ buttons to
focus the faders on different
tracks.
Chapter 3
Using Skillet with
Pro Tools
Surround Panning
To select a track to be panned, you may use
either the ‘Up’ and ‘Down’ buttons on Skillet,
or click on the small fader icon in a Pro Tools
track:
Once selected, you will see the output outlined
in white:
stereo track, it will always stay linked to the
right channel. If you move to a mono track,
the ‘right panned’ joystick will still control that
track, but upon moving back to a stereo track
that joystick will re-align to the right channel.
Plugin Control
A white outline around an output means that
more than one ‘controller’ is focused on that
fader. In the case of Skillet, this means both
joysticks are controlling the tracks output.
For a mono track, this means that either joystick
can be used to pan the track. For a stereo track,
pressing the ‘Right Pan’ button on one joystick
will cause that joystick to control the panning of
the right channel, and the other will control the
left channel.
To change the focused track, use the ‘Up’ or
‘Down’ buttons on Skillet, or click another
track’s fader icon. Skillet is smart enough that
if a joystick is linked to the right channel of a
4
Each Skillet joystick can be in either Surround
Pan mode, or ‘Skillet Mode’ where it can be
linked to arbitrary plugin controls. Joysticks
cannot be independently linked to different
plugins, only one plugin may be addressed at a
time using one or both joysticks.
To control a plugin,
select the plugin in
the ‘Inserts’ list on
a track, and it will
highlight in blue:
Next, you should notice a new zone in the
toolbar above your plugin:
Click the ‘Learn’ button, which will turn red.
You’ll also notice that the two rotary knobs on
Skillet will be given a red underlighting. This
signifies that Skillet’s two faders are now in
plugin-focus mode. In plugin-focus mode, the
faders no longer control track volumes, and
instead are mappable to plugin parameters.
The joysticks do not automatically drop into
plugin-focus mode. Each joystick may be
independently swapped into plugin-focus mode
by pressing their respective ‘Skillet’ button,
which will turn white.
To link plug-ins manually:
When a plugin is in “Learn” mode, you can
assign Skillet’s Faders and Joystick axes (if
they are in plugin mode) to arbitrary plugin
parameters.
• Select the parameter you wish to map to from
the menu.
• Touch a fader, or press one of a joystick’s axislink buttons.
Some plugins may allow you to merely click
on the parameter’s associated knob in the
GUI display, however not all plugins have this
functionality. You can tell if the plugin has this
ability by clicking on a parameter, and seeing if
the menu next to the red Learn button changes
to reflect the control you’ve selected.
When finished mapping your controls the way
you like them, press the ‘Learn’ button again
(it will turn back to dark grey). Skillet can now
control your plugin.
To unlink a control from a fader or joystick
axis:
If so, you can touch one of Skillet’s faders, or
press one of a joystick’s axis-link buttons, to link
the control.
• Press the ‘Learn’ button.
• Instead of selecting a parameter to map to,
leave the menu set to ‘No Control’
• Touch the fader, or press the Axis link button,
of the control you wish to unlink.
• Press the ‘Learn’ button again.
Avoid actually touching the joystick while a
plugin is in learn mode! This can inadvertently
cause multiple joystick axes to be controlling the
same parameter, which will cause unexpected
and erratic behaviour.
To drop Skillet out of plugin mode, press one of
the rotary knobs. Skillet’s joysticks, if they are in
plugin mode, will drop back to surround panner
mode, and the faders will again control track
volume.
5
Chapter 4
Skillet as a MIDI
Controller
As of this writing, Skillet has two modes for
MIDI control, Low-res (7-bit) and High-res (14bit). High-res mode follows the MIDI spec, in
that any CC# has it’s Least Significant Bit (LSB)
32 CC#’s ‘above’ the current setting. Using two
CC#’s in this way will give you 14-bit resolution.
However, not all software will recognize that
this is occuring, and may act erratically. In this
case, it’s recommended to use the Low-res mode
for MIDI.
If this is your first time setting up Skillet, press
the ‘Setup Skillet’ button on the touchscreen,
followed by ‘MIDI.’
If you’ve previously set Skillet to Pro Tools
mode, press the yellow up-arrow from the main
Transport buttons screen, followed by ‘MIDI.’
By default, Skillet in MIDI mode uses CC#’s 9
through 16 as follows:
CC# 9: CC# 10: CC# 11:
CC# 12:
CC# 13: CC# 14:
CC# 15:
CC# 16:
Left Joystick X Axis
Left Joystick Y Axis
Left Joystick Z Axis
Right Joystick X Axis
Right Joystick Y Axis
Right Joystick Z Axis
Left Fader
Right Fader
CC# 41: CC# 42: CC# 43:
CC# 44:
CC# 45: CC# 46:
CC# 47:
CC# 48:
Left Joystick X Axis (LSB)
Left Joystick Y Axis (LSB)
Left Joystick Z Axis (LSB)
Right Joystick X Axis (LSB)
Right Joystick Y Axis (LSB)
Right Joystick Z Axis (LSB)
Left Fader (LSB)
Right Fader (LSB)
6
To change the CC#’s Skillet outputs, press the
yellow right-arrow from the Transport Buttons
screen, which will take you to the settings menu.
From here, you can choose to change the ‘MIDI
CC Offset.’ This will allow you to move the
previous list of MIDI controls in banks of 8. IE,
choosing an Offset of 17, will have Left Joystick
X Axis be on MIDI CC# 17, Y Axis on #18, and
so on.
One you move past a CC Offset of 32, Skillet
drops into Low-Res mode, and the LSB
information is dropped.
If you’re uncertain what an LSB is, it’s probably
safest to put Skillet into a Low-Res mode.
Essentially, MIDI is a 7-bit protocol, which means
that numbers carried on it as data can have
values of 0-127. Using two CC#’s, each with a
value of 0-127, allows us to have 14-bit numbers.
Though all of Skillet’s controls are 10-bit, that
extra 3 bits allows for a range of 0-1023, an eightfold increase in resolution.
Chapter 5
In Depth
Button functions
Many of Skillet’s buttons serve multiple
functions in Pro Tools mode. The Shift buttons
underneath the joysticks will cause a button to
use it’s secondary function, while a joystick in
Plugin mode (with the “Skillet” button lit)
will cause a button to use it’s tertiary function.
The Shift button is unavailable if it’s respective
joystick’s “Skillet” button is lit.
1: [Skillet]
Pro Tools Mode: swaps the associated joystick
from Panner to Plugin mode.
MIDI mode: left side sends note 4 (E -2) on
when pressed, off when released. Right side
sends note 14 (D -1) on when pressed, off when
released.
7
2: Up / Left / [Y-Axis]
Pro Tools Mode: When the associated joystick
is in Panner mode, moves the joystick’s focus
up one track. If Shift is held, moves focus
‘left’ and on to a Send, if one is available. If the
joystick is in Plugin mode, this button is used
for linking the Y axis to a plugin parameter.
MIDI mode: sends a vlue of the same controller
as the Y axis, for MIDI learn.
3: Down/ Right / [Z-Axis]
Pro Tools Mode: When the associated joystick
is in Panner mode, moves the joystick’s focus
down one track. If Shift is held, moves focus
‘Right’ through the Sends. If the joystick is in
Plugin mode, this button is used for linking the
Z axis to a plugin parameter.
MIDI mode: sends a value of the same controller
as the Z axis, for MIDI learn.
4: Shift / [X-Axis]
Pro Tools Mode: When the associated joystick
is in Panner mode, holding Shift will use a
button’s subfunction, such as Nudge Up, Nudge
Down, etc. If the associated joystick is in
Plugin mode, this button is used for linking the
joystick’s X axis to a parameter.
MIDI mode: sends a value of the same controller
as the X axis, for MIDI learn. Do note that in
Plugin mode the Shift function is superceded
by the X-Axis link function and cannot be used.
5: Joysticks
Two independent 3-axis, touch sensitive
joysticks. Note that the touch sensitive areas are
the areas covered by the rubber grip tape. The
top of the joysticks is not touch sensitive.
Pro Tools Mode: The [Skillet] button will
make each joystick swap between acting as a
Surround Panner ([Skillet] button is unlit), or
as a customizable plugin controller ([Skillet]
button is lit), allowing for control of 3 plugin
parameters per joystick.
MIDI mode: sends CC# data as discussed in
Chapter 4.
8
6: Window / Bank Up/Nudge Up
Pro Tools Mode: In Panner mode, displays or
hides the associated track’s pop up display.
If Shift is held, will Nudge (1 track, left side
button) or Bank (8 tracks, right side button) the
two faders up. In Plugin mode, displays or hides
the plugin’s window.
MIDI mode: left side sends note 6 (F# -2) on
when pressed, off when released. Right side
sends note 16 (E -1) on when pressed, off when
released.
7: Right Pan/ Bank Down/Nudge Down
Pro Tools Mode: In Panner mode, if toggled on
(flashing), the associated joystick will attach to
the right-side of a stereo track. Has no effect on
mono tracks, but can safely be left active - when
you switch to a stereo track, it will link to the
right-side again. If Shift is held, will Bank or
Nudge tracks down.
MIDI mode: left side sends note 5 (F -2) on
when pressed, off when released. Right side
sends note 15 (D# -1) on when pressed, off
when released.
8: Faders
Two 100mm motorized touch sensitive faders.
Pro Tools Mode: If either joystick is in Plugin
mode, these will become two more plugin
parameter controllers. If both joysticks are in
Panner mode, but the rotary knobs (11) are
underlit with red, the faders are still pluginfocused. Pressing the rotary in will cause the
faders to go back to their default state, which
is as track volume controllers - the first two
associated tracks with a colored border.
MIDI mode: these send CC# data, and the
motors can be controlled by sending the same
CC# data back to Skillet.
9: Solo
Pro Tools Mode: Solos the associated track,
unless Skillet is plugin-focused (red rotaries).
When Skillet is plugin-focused, does nothing.
MIDI mode: left side sends note 8 (G#-2) on
when pressed, off when released. Right side
sends note 18 (F# -1) on when pressed, off when
released.
10: Mute
Pro Tools Mode: Mutes the associated track,
unless Skillet is plugin-focused (red rotaries).
When Skillet is plugin-focused, does nothing.
MIDI mode: left side sends note 7 (G -2) on
when pressed, off when released. Right side
sends note 17 (F -1) on when pressed, off when
released.
11: Rotaries
Pro Tools Mode: In normal operation, the rotary
knobs control the stereo/front panning of an
associated track. Clicking a rotary (they have
an internal button) will cause that track to be
selected/deselected. When a joystick is sent
into Plugin mode, or a plugin’s ‘learn’ button is
clicked, these will underlight in red to denote
that Skillet is plugin-focused.
MIDI mode: these send CC# information as
offsets - since they rotate continuously, rotating
clockwise will send a value of 65, and rotating
counter clockwise will send a value of 63. The
left rotary button sends note 80 (G# 4) and the
right rotary button sends note 81 (A4).
9
12: Touchscreen
Pro Tools Mode: The touchscreen displays
transport buttons (play/stop/rec/etc). If Pluginfocused, it shows a radar display, showing the
current physical joystick position in white, and
the plugin parameters’ positions in green. The
radar display will also show the currently linked
plugin parameters.
MIDI mode: the transport buttons send notes, as
explained on the next page.
The yellow buttons along the bottom of the
screen are for navigation between menus. From
the Transport or Radar displays, pressing the
right-arrow will take you to the settings pages,
while the up-arrow will allow you to change
Skillet’s base mode (from Pro Tools to MIDI
mode, or vice versa.) More modes are planned
for future firmware updates!
The touchscreen is also used to set up user
preferences for Skillet’s operation. See Chapter
6 for more details.
MIDI Mode
In MIDI mode, the Mute, Solo, Skillet, Right
Pan, Window, rotary, and touchscreen buttons
send MIDI Note messages from Skillet Port 1:
Mute (left):
Mute (right):
Solo (left):
Solo (right):
Skillet (left):
Skillet (right):
Right Pan (left):
Right Pan (right):
Window (left):
Window (right):
Rotary (left):
Rotary (right):
Play:
Stop:
Record:
RTZ:
Rewind:
FForward:
note 7 (G -2)
note 17 (F -1)
note 8 (G# -2)
note 18 (F# -1)
note 4 (E -2)
note 14 (D -1)
note 5 (F -2)
note 15 (D# -1)
note 6 (F# -2)
note 16 (E -1)
note 80 (G# 4)
note 81 (A 4)
note 31 (G 0)
note 32 (G# 0)
note 33 (A 0)
note 34 (A# 0)
note 35 (B 0)
note 36 (C 1)
The X-Axis, Y-Axis, and Z-Axis buttons will
send value 64 on their associated joystick CC#,
useful for linking a joystick axis to a MIDI
Learn object in a virtual instrument. In highresolution mode, these buttons will send values
on both the MSB and LSB controller numbers.
Sending a CC# value to Skillet Port 1,
corresponding to one of the faders’ current
CC#’s, will move the fader correspondingly.
Similarly, sending a MIDI Note message with
velocity 127 to Skillet that corresponds with
the Mute, Solo, Right Pan, or Skillet buttons,
will turn the LED for that button on. A MIDI
Note message with velocity 0 will turn the
corresponding button’s LED off.
Skillet ports 2 and 3 are not used in MIDI mode.
10
Chapter 6
Settings
Settings for each mode are accessed by pressing
the yellow right arrow button at the bottom
of the transport screen. Some modes contain
multiple settings pages. To return to the
transport screen, press the yellow left arrow
button.
Pro Tools Mode
Screen Dim Timer:
This setting will determine how long the screen
will wait to go into low-brightness mode.
Touching the screen again will bring it back to
full brightness.
Surround Panner Link:
When panners are ‘linked,’ hitting Skillet’s Up
or Down buttons on either side of Skillet will
cause BOTH panners to track up/track down
(or left/right). By default this setting is ON.
When turned OFF, each panner may be focused
to seperate tracks.
Joystick Damping:
Defaults to Medium. When OFF, Joysticks
send their raw values. Often in Pro Tools, this
can make it difficult to get to the corners of
the Surround Panner window - left front, right
front, left rear, etc - so three different levels of
‘damping’ may be chosen. Damping brings the
‘edges’ of the value range closer towards the
center, causing them to be easier to reach.
Surround Panner Z Control:
Allows for selecting which parameter the Z
(twist) axis of the joystick affects in surround
panner mode. This defaults to OFF, and has
options for Front Divergence, Rear Divergence,
Front/Rear Divergence, Combined (All)
Divergences, Center %, and LFE amount.
11
Surround Panner Z Mode:
By default, the Center point of the Z axis is 50%,
however in many instances this is unwanted.
Options include Center = 0% (twist clockwise to
raise the parameter, twisting counter-clockwise
past the center does nothing, parameter
rests at minimum) and Center = 100% (twist
counter clockwise to lower the parameter,
twisting clockwise past the center does nothing.
Parameter rests at ‘maximum’).
Skillet Glide Time:
In Plugin mode, Skillet can glide the current
playback values to your new input, beginning
from the moment you touch a joystick. Choose
how long that ramp lasts, or turn it off, here.
Glide time defaults to 150ms.
Atmos: Invert X
Defaults to ON. Due to a bug in Pro Tools, some
versions will inadvertently invert the X axis
(left is right, right is left, cats are dogs) in Dolby
Atmos. This setting allows for re-inverting the
X axis automatically, when an Atmos plugin is
recognized as linked.
Atmos Z Axis Center = 0
Similar in concept to the Surround Panner Z
Mode setting on the previous page, this allows
you to set the Z axis’ center point in Atmos
plugins. Defaults to 0%, twist clockwise to raise
the parameter.
Factory Reset:
Allows for reseting Skillet to factory conditions,
removing all user-created settings and returning
them to defaults.
Vegas:
Causes all lights and motors to randomly flash
and move, useful for testing if an LED or motor
has failed and requires repair. Press again to
turn off.
LED Test:
Lights all LEDs. Press again to return to normal.
Restart Skillet:
Reboots Skillet.
MIDI Mode
Screen Dim Timer:
This setting will determine how long the screen
will wait to go into low-brightness mode.
Touching the screen again will bring it back to
full brightness.
MIDI CC Offset:
Skillet uses 8 MIDI CC #’s in a bank. By default,
it uses controllers 9 through 16 (see Chapter
4 for more details as to how it arranges these
CC’s). This setting allows you to change which
set of 8 CC#’s Skillet is using. CC#’s 1-8 are
available, but are often used for things such as
the Mod Wheel and Portamento Time, so to
avoid inadvertent and unexpected controls CC’s
9-16 are the default. The first four MIDI CC
banks that Skillet uses are ‘High Resolution’ in
that extra bit depth is included in CC’s exactly
32 CC’s above the base CC for that controller.
(IE, CC 41 contains the high resolution data for
CC 9).
12
Joystick Damping:
Defaults to Medium. When OFF, Joysticks
send their raw values. Often in Pro Tools, this
can make it difficult to get to the corners of
the Surround Panner window - left front, right
front, left rear, etc - so three different levels of
‘damping’ may be chosen. Damping brings the
‘edges’ of the value range closer towards the
center, causing them to be easier to reach.
Factory Reset:
Allows for reseting Skillet to factory conditions,
removing all user-created settings and returning
them to defaults.
Vegas:
Causes all lights and motors to randomly flash
and move, useful for testing if an LED or a
motor has failed and requires repair. Press again
to turn off.
LED Test:
Lights all LEDs. Press again to return to normal.
Chapter 7
Troubleshooting
General
Skillet isn’t responding!
• Use the “Restart Skillet” option in the Settings
menu.
• If that doesn’t work, try reloading the latest
firmware.
My faders won’t move!
• Make sure that the power adapter was
connected BEFORE you connected the USB
cable. Alternatively, connect the power adapter
and choose the “Recalibrate Faders” option in
the Settings menu.
Pro Tools
Skillet isn’t controlling Pro Tools the way
I expect/Pro Tools is telling me it’s not
connected.
• Make sure Skillet is in Pro Tools mode.
• Try using the “Reboot Skillet” option in the
Settings menu.
• Make sure that Skillet Port 1 is the first item in
the MIDI Peripherals list, and that it is set as a
Command 8 device.
• If you’ve got a EuCON device attached, or if
you’ve just added a EuCON device to Pro Tools
via the Peripherals menu, you will have to quit
and relaunch Pro Tools. If you’ve deactivated
EuCON, and then reactivated it, you will
need to relaunch Pro Tools before Skillet is
recognized.
• If you’ve got an ICON, Pro Control, Digi
002/003, or other Ethernet peripheral attached,
Skillet may only function in surround panner
mode.
13
Skillet seems to be working, but won’t focus
on a plugin/Skillet is in Skillet/Plugin-focus
mode, but won’t control the plugin!
• Try pressing a rotary button to back out of
Skillet mode, and then either press a “Skillet”
button, or press the “Learn” button on your
plugin, followed by another press of the “Learn”
button to deactivate Learn mode.
• If “Learning” doesn’t make Skillet lock into
plugin-focus mode, there’s a few things to check:
• Do you have an ICON family ethernet
controller connected? Skillet only functions
in Surround Panner mode when an ICON
device is connected to Pro Tools.
• Did you disable and then reenable
EUCON? Or, was EUCON disabled when
Pro Tools was launched, and you recently
enabled it? If so, quitting and relaunching Pro
Tools should solve the issue.
• Lastly, make sure that Skillet Port 1 is the
first item in the MIDI Peripherals list, and
that it is set as a Command 8 device.
MIDI
My DAW/VI/MIDI plugin is acting strangely,
such as parameters quickly oscillating
between full-on and full-off values.
• Most likely, your software isn’t MIDI-learning
the High Resolution MIDI information
correctly. Set the MIDI CC# Offset setting to a
‘low-res’ mode, or manually set the controller
for the parameter manually in your software.
Skillet is sending CC# information from the
buttons, or the faders/joysticks are sending
seemingly random CC# information!
• Make certain that you are in MIDI mode,
and not Pro Tools mode. You can reset this by
hitting the yellow up arrow from the transport
screen on the touchscreen.
14
Skillet contains software covered under the following
licenses:
Software License Agreement (BSD License)
Copyright (c) 2012, Adafruit Industries. All rights reserved.
Redistribution and use in source and binary forms, with
or without modification, are permitted provided that the
following conditions are met:
1. Redistributions of source code must retain the above
copyright notice, this list of conditions and the following
disclaimer.
2. Redistributions in binary form must reproduce the
above copyright notice, this list of conditions and the
following disclaimer in the documentation and/or other
materials provided with the distribution.
3. Neither the name of the copyright holders nor the
names of its contributors may be used to endorse or promote products derived from this software without specific
prior written permission.
THIS SOFTWARE IS PROVIDED BY THE COPYRIGHT HOLDERS ‘’AS IS’’ AND ANY EXPRESS OR
IMPLIED WARRANTIES, INCLUDING, BUT NOT
LIMITED TO, THE IMPLIED WARRANTIES OF MERCHANTABILITY AND FITNESS FOR A PARTICULAR
PURPOSE ARE DISCLAIMED. IN NO EVENT SHALL
THE COPYRIGHT HOLDER BE LIABLE FOR ANY
DIRECT, INDIRECT, INCIDENTAL, SPECIAL, EXEMPLARY, OR CONSEQUENTIAL DAMAGES (INCLUDING, BUT NOT LIMITED TO, PROCUREMENT OF
SUBSTITUTE GOODS OR SERVICES; LOSS OF USE,
DATA, OR PROFITS; OR BUSINESS INTERRUPTION)
HOWEVER CAUSED AND ON ANY THEORY OF
LIABILITY, WHETHER IN CONTRACT, STRICT LIABILITY, OR TORT (INCLUDING NEGLIGENCE OR
OTHERWISE) ARISING IN ANY WAY OUT OF THE
USE OF THIS SOFTWARE, EVEN IF ADVISED OF
THE POSSIBILITY OF SUCH DAMAGE.