1
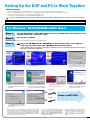
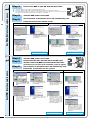
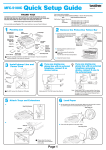
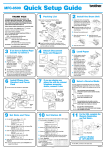
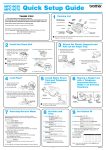
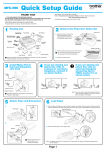
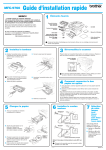
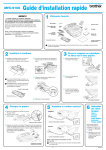
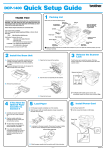
Quick Setup Guide
DCP-1000
THANK YOU!
CONGRATULATIONS ON PURCHASING THE ULTIMATE
BROTHER MACHINE.
WE ARE SURE YOU WILL BE THRILLED WITH THE
CONVENIENT WAY YOUR NEW MACHINE PERFORMS SO MANY
TASKS WITH DAZZLING RESULTS!
Follow these simple instructions in numerical order.
For more details, press Reports and
your Owner’s Manual.
on your machine or see
If you cannot solve a problem:
Refer to Frequently Asked Questions (FAQs) on Brother World
Wide Web;
URL:
http://solutions.brother.com
Call Brother Customer Service at:
USA:
In Canada:
2
1-800-284-4329 (9AM-5PM EST)
1-800-284-3238 (TTY service for the
hearing impaired)
1-877-BROTHER (8AM-8PM EST)
1-514-685-6464 (in Montreal)
1
Packing List
Power Cord
Filter Core for
USB Cable
To prevent damage to the drum, do not
expose it to light for longer than a few
minutes.
Do NOT remove the clear plastic starter
sheet-this will be ejected while the DCP is
warming up.
Accessory
Order Form
Paper
Support
Filter Core for
Bi-directional
IEEE 1284
Owner’s Manual
CD-ROM
Warranty
Registration
(For USA Only)
Drum Unit Assembly
With Free Starter
Toner Cartridge
(Up to 1000 pages)
Quick Setup Guide
Keep the packing materials for possible future transport. If you do not pack the machine properly, it may
void your warranty.
3
Install the Drum Unit
A. Unpack the drum unit assembly, and gently
rock it from side to side five or six times to
distribute the toner evenly inside the cartridge.
Software
License
Agreement
Cable Tie
B. Open the scanner cover of the machine by
pulling the lever toward you and lifting the
cover.
Attach the Plastic Supports
and Pull out the Paper Tray
A. Attach the plastic paper
support to the
multi-purpose sheet feeder.
B. Pull out the paper tray and
the extension.
C. Holding the drum unit by its handles, insert it
into the DCP.
(For legal paper)
Starter Sheet
C. If your paper size is A4 or
Letter, unfold the paper
stopper by pulling it toward
you.
D. Close the scanner cover.
4
(For A4/Letter paper)
5
Load Paper
Install Power Cord
A. Adjust the guides to the position for the paper
size you are using.
B. Fan the paper well.
Press and slide
C. Push down the paper lever. Load the paper
(with the lever down). Make sure the print side
is toward the DCP and the paper level is
stacked below the paper mark. The feeder can
hold up to 200 sheets of paper, or up to 10
envelopes.
Turn the power switch OFF.
Load the paper
with the lever down
–1–
Do Not connect the Parallel or USB Cable.
version B
Setting Up the DCP and PC to Work Together
Before You begin
•
You must set up the hardware and install the driver before you can use your DCP as a printer and scanner with your application.
•
Please see the README.WRI file in the root directory of the CD-ROM for last-minute important installation and troubleshooting information.
•
Please purchase the appropriate interface cable you intend to use (Parallel or USB).
•
If you have any problem for installation, visit us at: http://solutions.brother.com
Use only a shielded parallel interface cable that is IEEE 1284-compliant and/or a USB cable that is no longer than 6 feet long (1.8 meters).
Follow the instructions in this guide for your operating system and interface.
For Windows® 95/98/98SE/Me/2000 Users
Step 1.
Turn the DCP power switch OFF and disconnect your DCP from your computer if you
already connected an interface cable.
Step 2.
Turn on your computer.
For Windows® 2000 Professional, you must be logged on as the Administrator.
Step 3.
Insert the CD-ROM into the CD-ROM drive. If the model name screen appears,
click on your model name. The CD-ROM main menu will appear.
(If this window does not appear, use Windows® Explorer to run the setup. exe program from the root
directory of the Brother CD-ROM.)
1.
Click Install Software.
2.
Click Multi-Function Link® Pro Suite
in Main Application. *1
3.
Click Install.
4.
The InstallShield Wizard Setup
window will appear briefly, followed by
the PaperPort® Setup window. Click
Yes.
5.
When the PaperPort® Setup window
displays your Name and Company,
either change or accept them, and then
click Next.
6.
When the Choose Destination Location
window displays the path where the
PaperPort® files will be installed, either
change or accept, and then click Next.
7.
When Register Today screen appears,
click Next. This is registration for Paper
Port®. Follow the instructions.
8.
When the Brother MFL Pro Suite
Installation window appears, click
Next to begin installing the MultiFunction Link® Pro Suite. *2
For Parallel
123456789012345678901
123456789012345678901
123456789012345678901
123456789012345678901
123456789012345678901
123456789012345678901
123456789012345678901
1234567890123456789012345678901212345678901234567890123456789012
123456789012345678901
1234567890123456789012345678901212345678901234567890123456789012
123456789012345678901
1234567890123456789012345678901212345678901234567890123456789012
123456789012345678901
1234567890123456789012345678901212345678901234567890123456789012
123456789012345678901
1234567890123456789012345678901212345678901234567890123456789012
123456789012345678901
1234567890123456789012345678901212345678901234567890123456789012
123456789012345678901
1234567890123456789012345678901212345678901234567890123456789012
123456789012345678901
123456789012345678901
1234567890123456789012345678901212345678901234567890123456789012
1234567890123456789012345678901212345678901234567890123456789012
123456789012345678901
1234567890123456789012345678901212345678901234567890123456789012
123456789012345678901
1234567890123456789012345678901212345678901234567890123456789012
123456789012345678901
1234567890123456789012345678901212345678901234567890123456789012
123456789012345678901
1234567890123456789012345678901212345678901234567890123456789012
123456789012345678901
1234567890123456789012345678901212345678901234567890123456789012
123456789012345678901
1234567890123456789012345678901212345678901234567890123456789012
123456789012345678901
1234567890123456789012345678901212345678901234567890123456789012
123456789012345678901
1234567890123456789012345678901212345678901234567890123456789012
123456789012345678901
1234567890123456789012345678901212345678901234567890123456789012
123456789012345678901
1234567890123456789012345678901212345678901234567890123456789012
123456789012345678901
1234567890123456789012345678901212345678901234567890123456789012
123456789012345678901
1234567890123456789012345678901212345678901234567890123456789012
123456789012345678901
1234567890123456789012345678901212345678901234567890123456789012
123456789012345678901
1234567890123456789012345678901212345678901234567890123456789012
123456789012345678901
1234567890123456789012345678901212345678901234567890123456789012
123456789012345678901
1234567890123456789012345678901212345678901234567890123456789012
123456789012345678901
1234567890123456789012345678901212345678901234567890123456789012
123456789012345678901
123456789012345678901
123456789012345678901
123456789012345678901
123456789012345678901
123456789012345678901
123456789012345678901
Please see NEXT PAGE
For USB
9.
When the Setup Type window appears,
select Standard, and then click Next.
The application files will be copied to
your computer.
10. The Connect Cable window will appear.
*1 Multi-Function Link® Pro Suite includes Printer Driver, Scanner Driver, *2 If an error message appears during the installation *3 Even if you select NO, later you will be able to
ScanSoft™ PaperPort®, ScanSoft™Text Bridge® software, Remote Setup and
process, or you have previously installed MFL Pro
launch the Brother Control Center to use the
True Type fonts. PaperPort® is a document management application for
Suite, you will first have to uninstall it. From the
Scan key. See AutoLoad the Brother Control
Start menu, select Programs, Brother, Brother
viewing scanned documents. ScanSoft™ TextBridge®, which is integrated
Center , Chapter 8 in the On-Line
into PaperPort®, is an OCR application that converts an image into text and
Documentation (Owner’s Manual) on the CDMFL Pro Suite, Uninstall, and then follow the
inserts it into your default word processor.
ROM.
instructions on the screen.
–2–
For USB interface cable users
For Parallel interface cable users
123456789012345678
123456789012345678
123456789012345678
123456789012345678
123456789012345678
123456789012345678
123456789012345678
123456789012345678
123456789012345678
123456789012345678
123456789012345678
123456789012345678
123456789012345678
123456789012345678
123456789012345678
123456789012345678
123456789012345678
123456789012345678
123456789012345678
123456789012345678
123456789012345678
123456789012345678
123456789012345678
123456789012345678
123456789012345678
123456789012345678
123456789012345678
123456789012345678
123456789012345678
123456789012345678
123456789012345678
123456789012345678
123456789012345678
123456789012345678
123456789012345678
123456789012345678
123456789012345678
123456789012345678
123456789012345678
123456789012345678
123456789012345678
123456789012345678
123456789012345678
123456789012345678
123456789012345678
123456789012345678
123456789012345678
123456789012345678
123456789012345678
123456789012345678
123456789012345678
123456789012345678
123456789012345678
123456789012345678
123456789012345678
123456789012345678
123456789012345678
123456789012345678
123456789012345678
123456789012345678
123456789012345678
123456789012345678
123456789012345678
123456789012345678
123456789012345678
123456789012345678
123456789012345678
123456789012345678
123456789012345678
123456789012345678
123456789012345678
123456789012345678
123456789012345678
123456789012345678
123456789012345678
123456789012345678
123456789012345678
123456789012345678
123456789012345678
123456789012345678
123456789012345678
123456789012345678
123456789012345678
123456789012345678
123456789012345678
123456789012345678
123456789012345678
123456789012345678
123456789012345678
123456789012345678
123456789012345678
123456789012345678
123456789012345678
123456789012345678
123456789012345678
123456789012345678
123456789012345678
123456789012345678
123456789012345678
123456789012345678
123456789012345678
123456789012345678
123456789012345678
123456789012345678
123456789012345678
123456789012345678
123456789012345678
123456789012345678
123456789012345678
123456789012345678
123456789012345678
123456789012345678
123456789012345678
123456789012345678
123456789012345678
123456789012345678
123456789012345678
123456789012345678
123456789012345678
123456789012345678
123456789012345678
123456789012345678
123456789012345678
123456789012345678
123456789012345678
123456789012345678
123456789012345678
123456789012345678
123456789012345678
123456789012345678
123456789012345678
123456789012345678
123456789012345678
123456789012345678
123456789012345678
123456789012345678
123456789012345678
123456789012345678
123456789012345678
123456789012345678
123456789012345678
123456789012345678
123456789012345678
123456789012345678
123456789012345678
123456789012345678
123456789012345678
123456789012345678
123456789012345678
123456789012345678
123456789012345678
123456789012345678
123456789012345678
123456789012345678
123456789012345678
123456789012345678
123456789012345678
123456789012345678
123456789012345678
123456789012345678
123456789012345678
123456789012345678
123456789012345678
123456789012345678
123456789012345678
123456789012345678
123456789012345678
123456789012345678
123456789012345678
123456789012345678
123456789012345678
123456789012345678
123456789012345678
123456789012345678
123456789012345678
123456789012345678
123456789012345678
123456789012345678
123456789012345678
123456789012345678
123456789012345678
123456789012345678
123456789012345678
123456789012345678
123456789012345678
123456789012345678
123456789012345678
123456789012345678
123456789012345678
123456789012345678
123456789012345678
123456789012345678
123456789012345678
123456789012345678
123456789012345678
123456789012345678
123456789012345678
123456789012345678
123456789012345678
123456789012345678
123456789012345678
123456789012345678
123456789012345678
123456789012345678
123456789012345678
123456789012345678
123456789012345678
123456789012345678
123456789012345678
123456789012345678
123456789012345678
123456789012345678
123456789012345678
123456789012345678
123456789012345678
123456789012345678
123456789012345678
123456789012345678
123456789012345678
123456789012345678
123456789012345678
123456789012345678
123456789012345678
123456789012345678
123456789012345678
123456789012345678
123456789012345678
123456789012345678
123456789012345678
123456789012345678
123456789012345678
123456789012345678
123456789012345678
123456789012345678
123456789012345678
123456789012345678
123456789012345678
123456789012345678
123456789012345678
123456789012345678
123456789012345678
123456789012345678
123456789012345678
123456789012345678
123456789012345678
123456789012345678
123456789012345678
123456789012345678
123456789012345678
123456789012345678
123456789012345678
123456789012345678
123456789012345678
123456789012345678
123456789012345678
123456789012345678
123456789012345678
123456789012345678
123456789012345678
123456789012345678
123456789012345678
123456789012345678
123456789012345678
123456789012345678
123456789012345678
123456789012345678
123456789012345678
123456789012345678
123456789012345678
123456789012345678
123456789012345678
123456789012345678
123456789012345678
123456789012345678
123456789012345678
123456789012345678
123456789012345678
123456789012345678
123456789012345678
123456789012345678
123456789012345678
123456789012345678
123456789012345678
123456789012345678
123456789012345678
123456789012345678
123456789012345678
123456789012345678
123456789012345678
123456789012345678
123456789012345678
123456789012345678
123456789012345678
123456789012345678
123456789012345678
123456789012345678
123456789012345678
123456789012345678
123456789012345678
123456789012345678
123456789012345678
123456789012345678
123456789012345678
123456789012345678
123456789012345678
123456789012345678
123456789012345678
123456789012345678
123456789012345678
123456789012345678
123456789012345678
123456789012345678
123456789012345678
123456789012345678
123456789012345678
123456789012345678
123456789012345678
123456789012345678
123456789012345678
123456789012345678
123456789012345678
123456789012345678
123456789012345678
123456789012345678
123456789012345678
123456789012345678
123456789012345678
123456789012345678
123456789012345678
Step 4.
A.
B.
C.
Connect the DCP to your PC with Parallel Cable.
Connect the Filter Core and Cable Tie to the parallel interface cable.
Connect the parallel interface cable to the parallel interface port of the DCP and secure the wire clips.
Connect the interface cable to the printer port of the computer and secure it with the two screws. For the location of
your computer’s parallel printer port, see the User’s Guide for your computer.
Step 5.
Turn the DCP power switch ON.
Step 6.
The installation of the Brother driver will automatically start.
Follow the instructions on the screen.
( For Windows® 95/98/98SE/Me Users )
1.
In the Connect Cable window,
click Next.
3.
Click Yes to have the Control
Center loaded each time
Windows ® is star ted. The
Control Center will appear as an
icon in the task tray. If you click
No the Scan key on the DCP will
be disabled. *3
2.
( For Windows® 2000 Professional User )
When the above screen appears,
click Finish and wait as the PC
restarts Windows® and continues
the installation.
1.
In the Connect Cable window,
click Next.
2.
When the above screen appears,
Click Finish and wait as the PC
restarts Windows® and continues
the installation.
3.
When the Digital Signature Not
Found dialog boxes appear, click
Yes to install the driver.
4.
Click Yes to have the Control
Center loaded each time Windows®
is started. The Control Center will
appear as an icon in the task tray.
If you click No the Scan key on the
DCP will be disabled. *3
The Brother Printer and Scanner drivers have been
installed and the installation is now complete.
The Brother Printer and Scanner drivers have been
installed and the installation is now complete.
Step 4.
Turn the DCP power switch ON.
Step 5.
Connect the Filter Core and Cable Tie to the USB cable,
and then connect the DCP to your PC with the USB cable.
(It will take a few seconds for the installation screen to appear.)
Step 6.
The installation of the Brother driver will automatically start.
Follow the instructions on the screen.
( For Windows® 98/98SE/Me Users )
( For Windows® 2000 Users )
1.
In the Add Printer Wizard
window, select BRUSB: USB
Printer Port, and then click
Next.
2.
Accept the default Printer
name by selecting Yes, and
then click Next.
3.
Select Yes (recommended),
and then click Finish. A test
page will be printed so you can
check the print quality.
1.
When the Digital Signature Not
Found dialog boxes appear, click
Yes to install the driver.
4.
If the test page is printed
correctly, click Yes.
If you click No, follow the
prompts on the screen to
correct the problem.
5.
Select Yes to restart your
computer, and then click
Finish.
6.
Click Yes to have the Control
Center loaded each time
Windows ® is star ted. The
Control Center will appear as
an icon in the task tray. If you
click No the Scan key on the
DCP will be disabled. *3
2.
Select Finish to restart your
computer.
3.
Click Yes to have the Control
Center loaded each time
Windows® is started. The Control
Center will appear as an icon in
the task tray. If you click No the
Scan key on the DCP will be
disabled. *3
The Brother Printer and Scanner drivers have been
installed and the installation is now complete.
–3–
The Brother Printer and Scanner drivers have been
installed and the installation is now complete.
For Windows NT® Workstation Version 4.0 Users
Step 1.
Check that your computer is
turned ON.
Step 3.
Turn the DCP power switch ON.
Step 4.
Insert the CD-ROM into the CD-ROM
drive. Then, follow the instructions
on the screen.
You must be logged on as the Administrator.
Step 2.
A.
B.
C.
Connect the DCP to your PC
with the Parallel Cable.
(Same step as for Windows® 95/98/98SE/Me/2000 Users Step 3. , 1 to 9)
10. Select Yes to restart your computer, and
Connect the Filter Core and Cable Tie to the parallel interface cable.
Connect the parallel interface cable to the parallel interface port of the DCP and
secure the wire clips.
Connect the interface cable to the printer port of the computer and secure it with
the two screws. For the location of your computer’s parallel printer port, see the
User’s Guide for your computer.
then click Finish.
11. Click
Yes to have the Control Center
loaded each time Windows is started.
The Control Center will appear as an
icon in the task bar. If you click No, the
Scan key on the DCP will be disabled.*3
The Brother Printer and Scanner drivers have been
installed and the installation is now complete.
For Apple® Macintosh®
Step 1.
QuickDraw® Driver for OS 8.6/9.0/9.0.4/9.1 Users
Make sure your DCP power switch
is turned OFF and your Macintosh
is turned ON.
Step 5.
Connect the MFC to your Macintosh
with the USB cable, and then turn
the DCP
power switch
ON.
Step 6.
Select the Printer.
Make sure you do NOT connect your DCP to your Macintosh
Step 2.
Insert the CD-ROM into your
CD-ROM drive.
Installing MFL Pro Driver
1.
Step 3.
Step 4.
When the window appears, double-click
MFL-PRO Suite Driver Installer to
install the printer and scanner drivers.
After the installation is completed, the
screen prompts you to restart your
Macintosh.
1.
2.
Restart your Macintosh so it can
recognize the new driver.
Step 7.
Connect the Filter Core and
Cable Tie to the USB cable.
From the Apple menu, open the Chooser.
Click to highlight the printer driver icon
you installed. On the right side of the
Chooser, select the printer to which you
want to print. Close the Chooser.
Install Paper Port.
1.
2.
Double-click the PaperPort®5.5 Installer. *1
Follow the instructions on the screen.
The Brother Printer and Scanner drivers have been
installed and the installation is now complete.
What is included on the CD-ROM
Windows
You can get a variety of
information from this
CD-ROM
(For Windows®)
Install Software
You can install printer and scanner drivers and the various utility
items.
On-Line Registration
You will be pointed to a directory on the Brother Product Registration Web
page.
On-Line Documentation
View the Owner’s Manual and other documentation.
Brother Support
Get all contact you need if you have to get in touch with our
Customer Service, or Brother Authorized Service Center.
Help
Helpful hints.
Macintosh
You can get a variety of
information from this
CD-ROM
(For Macintosh®)
–4–
MFL Pro Driver Installer
You can install the printer and scanner drivers and the various
utility items.
PaperPort 5.5 Installer
You can install a document management application used to view
scanned documents.
ReadMe!
You can get important information and troubleshooting tips.
Documents
View the Owner’s Manual and other documentations.