1
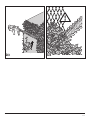
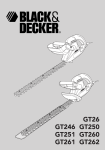
B
1
D3
D4
5
CORDLESS HEDGETRIMMER
BHT518
CONGRATULATIONS!
You have chosen a Black & Decker tool. Our aim
is to provide quality tools at an affordable price.
We hope that you will enjoy using this tool for
many years.
EC DECLARATION OF CONFORMITY
BHT518
Black & Decker declares that
these tools conform to:
98/37/EC, EN 60745
2000/14/EC, hedge trimmer, 1300
min-1, Annex V
Level of sound pressure, according to EN 60745:
Sound pressure (LpA) 91 dB(A), uncertainty (K) 4 dB(A)
Acoustic power (LwA) 95 dB(A), uncertainty (K) 4 dB(A)
Guaranteed acoustic power (LwA) 94 dB(A)
Vibration total values (triax vector sum) according
to EN60745:
Vibration emmission value (ah ) 1.1m/s2
uncertainty (K) 1.5m/s2
INTENDED USE
Your Black & Decker hedgetrimmer BHT518 has
been designed for trimming hedges, shrubs and
brambles. This tool is intended for consumer use
only.
Your Black & Decker charger has been designed
for charging Black & Decker batteries of the type
supplied with this tool.
SAFETY INSTRUCTIONS
Warning symbols
The following symbols are used in this manual:
Denotes risk of personal injury, loss
of life or damage to the tool in case of
non-observance of the instructions in
this manual.
Denotes risk of electric shock.
Read the manual prior to operation.
Fire hazard.
Colin Wills
Director of Engineering
BDCI, 4/F, 2 Dai Wang Street
Tai Po Industrial Estate
Tai Po NT, Hong Kong
1-7-2003
6
Know your tool
Warning! Carefully observe the
instructions in this manual to reduce
the risk of personal injury or material
damage.
Read all of this manual carefully
before operating the tool.
Before operating the tool, make sure
that you know how to switch the tool
off in an emergency.
Retain this manual for future reference.
General
1. Consider work area environment
Do not expose the tool to rain. Do not use the
tool in damp or wet conditions. Keep the work
area well lit. Do not use the tool where there is
a risk of causing fire or explosion, i.e. in the
presence of flammable liquids and gases. Keep
the work area free from debris and obstacles.
2. Keep children away
Do not allow children, visitors or animals to
come near the work area or to touch the tool.
3. Store idle tools
When not in use, tools and batteries should be
stored in a dry place, out of reach of children.
4. Dress properly
Do not wear loose clothing or jewellery, as these
can be caught in moving parts. Preferably wear
working gloves and non-slip footwear when
working outdoors. Wear protective hair covering
to keep long hair out of the way.
5. Personal protection
Wear safety goggles and a face or dust mask
whenever the operations may produce dust or
flying particles. Wear ear protection whenever
the sound level seems uncomfortable.
6. Do not overreach
Keep proper footing and balance at all times.
7. Stay alert
Watch what you are doing. Use common sense.
Do not operate the tool when you are tired.
8. Use appropriate tool
The intended use is described in this instruction
manual. Do not force small tools or attachments
to do the job of a heavy-duty tool. The tool will
do the job better and safer at the rate for which
it was intended. The use of any accessory or
attachment or performance of any operation
with this tool other than those recommended
in this instruction manual may present a risk of
personal injury. Do not force the tool.
9. Maintain tools with care
Keep cutting tools sharp and clean for better
and safer performance. Follow the instructions
for maintenance and changing accessories.
Keep handles and switches dry, clean and free
from oil and grease.
10.Check for damaged parts
Before using the tool, carefully check it for
damage to ensure that it will operate properly
and perform its intended function. Check for
misalignment and seizure of moving parts,
breakage of parts and any other conditions
that may affect its operation. Have any defective parts repaired or replaced by an authorised
repair agent. Do not use the tool if any part is
defective. Never attempt any repairs yourself.
11.Remove the battery
Remove the battery when the tool is not in use,
before changing any parts of the tool, accessories or attachments and before servicing.
12.Avoid unintentional starting
Do not carry the tool with a finger on the on/off
switch.
13.Do not abuse cord
Never carry the charger by its cord or pull it to
disconnect from the socket. Keep the cord away
from heat, oil and sharp edges.
Additional safety instructions for batteries and
chargers
Batteries
Never attempt to open for any reason.
Do not expose to water.
Do not store in locations where the temperature
may exceed 40 °C.
Charge only at ambient temperatures between
4 °C and 40 °C.
Charge only using the charger provided with the
tool (see technical data).
Before charging, make sure that the battery is
dry and clean.
Use only the correct type of battery for the tool
(see technical data).
When disposing of batteries, follow the
instructions given in the section “Protecting
the environment”.
Under extreme conditions, battery leakage may
occur. When you notice liquid on the battery,
proceed as follows:
Carefully wipe the liquid off using a cloth. Avoid
skin contact.
7
In case of skin or eye contact, follow
the instructions below.
The battery fluid, a 25-30% solution of
potassium hydroxide, can be harmful. In
case of skin contact, immediately rinse
with water. Neutralise with a mild acid
such as lemon juice or vinegar. In case
of eye contact, rinse abundantly with
clean water for at least 10 minutes.
Consult a physician.
Fire hazard! Avoid short-circuiting the
contacts of a detached battery (e.g.
when storing the battery in a toolbox).
Do not incinerate the battery.
Do not attempt to charge damaged
batteries.
Chargers
Use your Black & Decker charger only to charge
batteries of the type supplied with your tool.
Other batteries could burst, causing personal
injury and damage.
Never attempt to charge non-rechargeable
batteries.
Have defective cords replaced immediately.
Do not expose to water.
Do not open the charger.
Do not probe the charger.
Intended for indoor use only.
Additional safety instructions for hedgetrimmers
Wear safety goggles when operating
this tool.
Wear gloves when operating this tool.
Do not expose the tool to rain or high
humidity.
8
Do not carry the tool with your hands on the
front handle switch or the trigger switch unless
the battery has been removed.
If you have not used a hedgetrimmer before,
preferably seek practical instruction by an
experienced user in addition to studying this
manual.
Never touch the blades while the tool is running.
Never attempt to force the blades to come to a
standstill.
Do not put the tool down until the blades have
come to a complete standstill.
Regularly check the blades for damage and
wear. Do not use the tool when the blades are
damaged.
Take care to avoid hard objects (e.g. metal wire,
railings) when trimming. Should you
accidentally hit any such object, immediately
switch the tool off and check for any damage.
Should the tool start to vibrate abnormally,
immediately switch it off and check for any
damage.
If the tool stalls, immediately switch it off.
Remove the battery before attempting to
remove any obstructions.
After use, place the blade sheath supplied
over the blades. Store the tool, making sure
that the blade is not exposed.
Always ensure that all guards are fitted when
using the tool. Never attempt to use an
incomplete tool or a tool with unauthorised
modifications.
Never allow children to use the tool.
Be aware of falling debris when cutting the
higher sides of a hedge.
While operating the machine always be sure of
a safe and secure operating position especially
when using steps or a ladder.
Additional safety instructions for Australia and
New Zealand
This appliance is not intended for use by
young or infirm persons without supervision.
Children must be supervised to ensure they do
not play with the appliance.
If the supply cord is damaged, it must be
replaced by the manufacturer or an authorised
Black & Decker Service Centre in order to avoid
a hazard.
ELECTRICAL SAFETY
Your charger has been designed for a specific
mains voltage. Always check that the mains
voltage corresponds to the voltage on the rating
plate.
Your charger is double insulated in
accordance with EN 60335; therefore no
earth wire is required.
Never use a light socket.
CARTON CONTENTS
The carton contains:
1 Cordless hedgetrimmer
1 Battery
1 Charger
1 Blade sheath
1 Instruction manual
Carefully unpack all parts.
OVERVIEW (fig. A)
1. Front handle switch
2. Trigger switch
3. Lock-off button
4. Ventilation slots
5. Guard
6. Battery
7. Charger
8. Charging indicator
9. End of charge indicator
10. Blade sheath
ASSEMBLY
Before assembly, remove the battery
from the tool.
Fitting and removing the battery (fig. B)
To fit the battery (6), line it up with the
receptacle on the tool.
Slide the battery into the receptacle and push
until the battery snaps into place.
To remove the battery, push the release
button (11) while at the same time pulling the
battery out of the receptacle.
USE
Let the tool work at its own pace.
Do not overload.
Charging the battery (fig. A)
The battery needs to be charged before first use
and whenever it fails to produce sufficient power
on jobs that were easily done before.
When charging the battery for the first time, or
after prolonged storage, it will only accept an
80% charge.
After several charge and discharge cycles, the
battery will attain full capacity. The battery may
become warm while charging; this is normal and
does not indicate a problem.
Do not charge the battery at ambient
temperatures below 4 °C or above 40 °C.
Recommended charging temperature:
approx. 24 °C.
To charge the battery (6), remove it from the
tool and insert it into the charger (7).
The battery will only fit into the charger in one
way. Do not force. Be sure that the battery is
fully seated in the charger.
Plug in the charger.
3 hour charger
The battery will be fully charged in approx. 3
hours. It can be removed at any time or left in
the connected charger indefinitely.
1 hour charger
Check if the red charging indicator (8) lights
up. If the green end of charge indicator (9)
lights up now instead, the battery is too hot and
cannot be charged. If this happens, remove
the battery from the charger, let the battery
cool down for approx. 1 hour and re-insert it.
9
After approx. 1 hour of charging, the red
charging indicator (8) will stop lighting and the
green end of charge indicator (9) will light up.
The battery is now fully charged.
Remove the battery from the charger.
Switching on and off (fig. C)
For your safety, this tool is equipped with a
lock-off switching system. This system prevents
starting the tool inadvertently. Only allow
operate the tool while holding it with both hands.
Switching on
Grip the front handle (1) with one hand.
Push the lock-off button (3) forward using your
thumb, then squeeze the trigger switch (2) with
other hand.
Release the lock-off button.
Switching off
Release the trigger switch (2).
Never attempt to lock a switch in the on
position.
Hints for optimum use
Slightly tilt the tool (up to 15° relative to the
line of cut) so that the blade tips point slightly
towards the hedge (fig. D1). This will cause the
blades to cut more effectively.
Start by trimming the top of the hedge. Hold the
tool at the desired angle and move it steadily
along the line of cut (fig. D2). The double-sided
blade allows you to cut in either direction.
In order to obtain a very straight cut, stretch a
piece of string along the length of the hedge
at the desired height. Use the string (12) as a
guideline, cutting just above it (fig. D2).
In order to obtain flat sides, cut upwards with
the growth (fig. D3). Younger stems move
outwards when the blade cuts downwards,
causing shallow patches in the hedge.
Take care to avoid any foreign objects.
Especially avoid hard objects such as metal
wire and railings, as these could damage the
blades (fig. D4).
Regularly oil the blades.
10
Consider purchasing a spare battery to extend
the running time of this tool. The catalogue
number of the battery is found in the technical
data chart below.
MAINTENANCE
Your Black & Decker tool has been designed to
operate over a long period of time with a
minimum of maintenance. Continuous satisfactory operation depends upon proper tool care
and regular cleaning.
Your charger does not require any maintenance
apart from regular cleaning.
Before performing any maintenance
on the tool, remove the battery from
the tool.
Unplug the charger before cleaning it.
After use, carefully clean the blades.
After cleaning, apply a film of light machine oil
to prevent the blades from rusting.
Regularly clean the ventilation slots in your tool
and charger using a soft brush or dry cloth.
Regularly clean the motor housing using a
damp cloth. Do not use any abrasive or
solvent-based cleaner.
PROTECTING THE ENVIRONMENT
Black & Decker provides a facility for
recycling Black & Decker products once
they have reached the end of their working life. This service is provided free of
charge. To take advantage of this service
please return your product to any
authorised repair agent who will collect
them on our behalf.
You can check the location of your nearest
authorised repair agent by contacting your local
Black & Decker office at the address indicated
in this manual. Alternatively, a list of authorised
Black & Decker repair agents and full details of
our after-sales service and contacts are available
on the Internet at: www.2helpU.com.
Technical data
Voltage
Blade strokes (no load)
Blade length
Blade gap
Blade brake time
Weight (without battery)
BHT518
Vdc 18
/min 1,300
cm
50
mm 16
s < 0.5
kg
2.2
Battery
Voltage
Capacity
Weight
Vdc 18
Ah 1.7
kg 0.8
Charger
Input voltage
Charge Time Approx.
Weight
Vac 230
h 1
kg 2.4
GUARANTEE
Black & Decker is confident of the quality of its
products and offers an outstanding guarantee.
This guarantee statement is in addition to and in
no way prejudices your statutory rights.
The guarantee is valid within the territories of the
Member States of the European Union and the
European Free Trade Area.
If a Black & Decker product becomes defective
due to faulty materials, workmanship or lack of
conformity, within 48 months from the date of
purchase, Black & Decker guarantees to replace
defective parts, repair products subjected to fair
wear and tear or replace such products to ensure
minimum inconvenience to the customer unless:
The product has been used for trade,
professional or hire purposes;
The product has been subjected to
misuse or neglect;
The product has sustained damage through
foreign objects, substances or accidents;
Repairs have been attempted by persons
other than authorised repair agents or Black
& Decker service staff.
To claim on the guarantee, you will need to
submit proof of purchase to the seller or an
authorised repair agent. You can check the
location of your nearest authorised repair agent
by contacting your local Black & Decker office at
the address indicated in this manual. Alternatively, a list of authorised Black & Decker repair
agents and full details of our after-sales service
and contacts are available on the Internet at:
www.2helpU.com.
OTHER OUTDOOR TOOLS
Black & Decker has a full range of outdoor
power tools that make life in the garden easy.
If you would like further information on the
following products, please contact our Service
and Information Centre (see the address page
towards the end of this manual) or your local
Black & Decker retailer.
Blade and string trimmers Chainsaws
Cordless shears
Cordless trimsaws
Hedgetrimmers
Lawnmowers
Lawnrakers
Leafbusters
Shredders
Cordless brooms and shrubbers
Not all products are available in all countries.
11
Australia
Black & Decker (Australia) Pty. Ltd.
20 Fletcher Road, Mooroolbark,
Victoria 3138
Australia
Tel. 03-8720 5100
Fax 03-9727 5940
New Zealand
Black & Decker New Zealand
5 Te Apunga Place, Mt Wellington,
Auckland, New Zealand.
Tel. 0800 339 258
Fax 09 259 1122
12 90540478 (AUS)
06/08