1
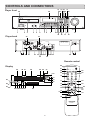
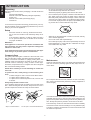
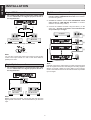
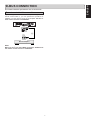
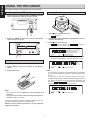
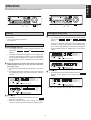
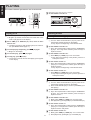
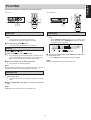
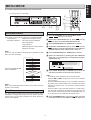
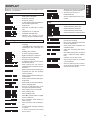
Model CDR631 User Guide
Compact Disc Recorder
R
CLASS 1 LASER PRODUCT
LUOKAN 1 LASERLAITE
KLASS 1 LASERAPPARAT
Recordable
ReWritable
ESPAÑOL
WARRANTY
GARANTÍA
Contact your local Marantz distributors for warranty information.
Consulte a su distribuidor local de Marantz si desea más información
sobre la garantía.
RETAIN YOUR RECEIPT AS PROOF OF PURCHASE
CONSERVE EL RECIBO COMO PRUEBA DE COMPRA
Your receipt is proof of a valuable purchase. Keep it in a safe place
where you can easily find it for filing insurance claims when necessary or when corresponding with Marantz.
Su recibo constituye la prueba de compra. Guárdelo en un lugar
seguro donde pueda hallarlo fácilmente en caso de que lo necesite
para presentar una reclamación de garantía o mantener algún tipo
de correspondencia con Marantz.
IMPORTANT
It is the responsibility of the consumer to establish proof of purchase
when seeking servicing covered by the warranty. Your receipt or invoice is valid as such proof.
IMPORTANTE
Es responsabilidad del consumidor presentar la prueba de compra
siempre que solicite alguna reparación cubierta por la garantía. La
factura o el recibo son documentos válidos como prueba de compra.
U.K. ONLY
This undertaking is in addition to a consumer’s statutory rights and
does not affect those rights in any way.
ITALIANO
FRANÇAIS
GARANZIA
Contattare i distributori Marantz della zona dell’utente per informazioni
sulla garanzia.
GARANTIE
Veuillez contacter les revendeurs Marantz locaux pour de plus amples informations concernant la garantie.
CONSERVARE LA RICEVUTA COME PROVA D’ACQUISTO
La ricevuta comprova un acquisto di valore. Conservarla in un luogo
sicuro e facilmente reperibile per intraprendere dei reclami, ove
necessario, o quando ci si rivolga alla Marantz.
CONSERVER LE TICKET DE CAISSE COMME PREUVE
D’ACHAT
Le ticket de caisse représente la preuve d’un achat de valeur. Le
conserver dans un endroit sûr, où il peut être retrouvé aisément, afin
d’introduire les revendications éventuelles auprès des assurances
ou auprès de Marantz, le cas échéant.
IMPORTANTE
L’utente ha la responsabilità di produrre una prova d’acquisto se vuole
servirsi dell’assistenza coperta da garanzia. La ricevuta o la fattura è
valida in questo senso.
IMPORTANT
Il incombe au consommateur d’établir la preuve de son achat, à l’aide
du ticket de caisse ou de la facture, lors de la demande d’interventions couvertes par la garantie.
PORTUGUÊS
GARANTIA
Para informações sobre a garantia, contacte o concessionário local
Marantz.
DEUTSCH
GARANTIE
GUARDE O TALÃO DE COMPRA COMO PROVA
Wenden Sie sich bezüglich Informationen zur Garantie an Ihren örtlichen Marantz-Händler.
O talão de compra é a prova de ter comprado qualquer coisa de
valor. Guarde-o em lugar seguro, pois pode precisar dele para obter
uma cobertura de seguro ou no âmbito de correspondência com
Marantz.
BEWAHREN SIE ALS KAUFNACHWEIS IHRE KAUFQUITTUNG AUF
Ihre Quittung bzw. Rechnung ist ein Beweis für Ihren wertvollen Kauf.
Bewahren Sie diese an einem sicheren Ort auf, wo Sie sie im Fall
eines Versicherungsschadens oder bei der Korrespondenz mit
Marantz leicht wiederfinden können.
IMPORTANTE
Para obter um serviço coberto pela garantia, o cliente deve apresentar
a prova e a data da compra. O talão ou a factura constituem provas
suficientes.
WICHTIG
SVENSKA
Es liegt in der Verantwortung des Käufers, den Kaufnachweis zu liefern, wenn Garantiereparaturen in Anspruch genommen werden sollen. Ihre Quittung oder Rechnung dient als ein solcher Nachweis.
GARANTI
Kontakta din lokala Marantz-distributör för information om garantin.
NEDERLANDS
SPAR KVITTOT SOM INKÖPSBEVIS
GARANTIE
Neem contact op met de Marantz distributeurs in uw buurt voor informatie over de garantie.
Kvittot är ditt bevis för ett värdefullt inköp. Förvara det på en säker
plats där du lätt kan hitta det för försäkringsfrågor eller korrespondens
med Marantz.
BEWAAR UW REÇU ALS AANKOOPBEWIJS.
VIKTIGT
Uw reçu is het bewijs dat u een waardevol product heeft gekocht.
Berg het veilig op, zodat u het snel terug kunt vinden als u een
verzekeringsclaim moet indienen of voor uw correspondentie met
Marantz.
Kunden ansvarar för att uppvisa inköpsbevis när service begärs som
täcks av garantin. Ditt kvitto eller faktura är ett giltigt inköpsbevis.
BELANGRIJK
De klant is verantwoordelijk voor het tonen van een aankoopbewijs
wanneer het apparaat onder garantie moet worden gerepareerd. Uw
reçu of uw factuur is een geldig aankoopbewijs.
i
ENGLISH
ENGLISH
ENGLISH
CE MARKING
English
The unit is in conforms with the EMC directive and low-voltage directive.
Français
Cet appareil est conforme à la directive EMC et à la directive sur les basses tensions.
Deutsch
Dieses Greät entspricht den EMC-Richtlinien und den Richtlinien für Niederspannungsgeräte.
Nederlands
Dit apparaat voldoet aan de EMC-richtlijn en de richtlijn voor apparatuur met laag voltage.
Español
Esta unidad estáde acuerdo con las EMC y las relacionadas con baja tensión.
Italiano
Quest’ unitá è conforme alle direttiva EMC ed alla direttiva sulle basse tensioni.
Português
Esta unidade está em conformidade com as directivas EMC e as directivas de baixa voltagem.
Svenska
Denna enhet överrensstämmer med EMC direktivet och direktivet för lågspänning.
SI DICHIARA CHE L’APPARECCHIO SINTO-AMPLIFICATORE SR-39 RISPONDE ALLE
PRESCRIZONI DELL’ ART.2 COMMA 1 DEL D.M. 28 AGOSTO 1995 N° 548.
MARANTZ EUROPE B.V.
5600 EINDHOVEN
THE NETHERLANDS
FATTO A EINDHOVEN, IL 1/1/1977
Este aparato lleva elementos antiparasitarios necesarios para cumplir con los limites que se
estableren en el Anexo V del Reglamento sobre Pertubaciones Radioelectricas e
Interferencias aprobado en el Real Decreto 138/1989. (B.O.E. de 9 de Febrero 1989)
WARNINGS FOR LASER RADIATION
CAUTION: INVISIBLE LASER RADIATION WHEN OPEN. DO NOT STARE INTO BEAM.
DANGER:
INVISIBLE LASER RADIATION WHEN OPEN. AVOID DIRECT EXPOSURE TO BEAM.
VARO!:
AVATTAESSA JA SUOJALUKITUS OHITETTAESSA OLET ALTTIINANAKYMÄTTÖMÄALLE
LASERSÄTEILYLLE. ÄLÄ KATSO SÄTEESEEN.
VARNING!: OSYNLIG LASERSTÅLNING NÄR DENNA DEL ÄR ÖPPNAD OCH SPÄRREN ÄR
URKOPPLAD. BETRAKTA EJ STRALEN.
ii
Player front
29
ENGLISH
CONTROLS AND CONNECTIONS
27 25 23 21
26 24 22 20
28
CD RECORDER CDR631
REC MODE
TR.INCR.
RANDOM
REPEAT
DELETE
STORE
CANCL
MENU
IR
FINAL
ERASE
Recordable
ReWritable
TIME
1
2
3
4
5
PROG
TEXT
6
7
8
9
0
INPUT
STANDBY
POWER
HEADPHONE
LEVEL
REC LEVEL/SELECT
0
1
2
3
10
4
PUSH ENTER
5
6
7 8
9
10 11 12
13
15 16
Player back
14
17
19
18
43
44
PUSH
PUSH
HOT(+)
NEUTRIK
NEUTRIK
2
ANALOG
1
PUSH
DIGITAL
MODEL NO.CDR631
GROUND
NEUTRIK
3
COLD(-) IN
R
L
0
+22
0
30
REMOTE
(RC5)
AC IN
IN
IN
EXT.
AES/EBU
R
+22
(REF=+16dBu/0dBFS)
LOOP
OUT
OUT
L
BALANCED
IN
R -TRIM- L
INPUT
SELECT
OUT
SPDIF
31
IN
OUT
(SPDIF)
IN
INT.(IR)
42
32 33 35 36 37 39 40 41
38
34
Remote control
66
Display
TRACK
INCR.
45
46 47
48
49 50
67
51
SCAN
52
68
69
70
53
54
55
65
63
62 61 60 59 58 57
56
PROG.
RANDOM
ABC
DEF
GHI
1
2
3
JKL
MN
OPQ
4
5
6
RST
UVW
XYZ
7
8
9
DISPLAY
71
SPACE
SCROLL
84
0
CD
CDR
78
83
82
81
80
75
76
77
79
MENU/
STORE
CANCEL/
DELETE
ENTER
REMOTE CONTROLLER
RC6050DR
iii
86
85
FUNCTION
72
73
74
64
REPEAT
Foreword
Copyright
This section must be read carefully before any connection is
made to the mains supply.
Recording and playback of some material may require permission. For further information refer to the following:
- Copyright Act 1956
- Dramatic and Musical Performers Act 1958
- Performers Protection Acts 1963 and 1972
- Any subsequent statutory enactments and orders
WARNINGS
Do not expose the equipment to rain or moisture.
Do not remove the cover from the equipment.
Do not insert anything into the equipment through the
ventilation holes.
Do not handle the mains lead with wet hands.
Congratulations on the acquisition of your CD-Recorder. This
CD-Recorder now enables you to record, play and erase your
own audio Compact Discs. Naturally the recorder can also be
used to play all pre-recorded CDs.
CE marking (only EU version)
With the exception of legal restrictions pertaining to copying,
you can now create your own high-quality audio recordings on
CD. The discs used to record must bear the logos shown below.
This product is in conformity with the EMC directive
and low-voltage directive.
Equipment mains working system
There are two types of recordable AUDIO discs:
CD-R(W) discs have a compatibility to play/record on the CDRecorders based on the ORENGE BOOK Part II/III. But the
discs might not be able to be played/recorded properly depending on the combinations of the discs and CD-Recorders.
Your Marantz product complies with the household power and
safety requirements in your area.
“/N1” Version product can be powered by 230 V AC only.
IMPORTANT: (FOR U.K. version only)
This apparatus is fitted with an approved moulded 13 Amp plug.
To change a fuse in this type of plug proceed as follows:
1. Remove fuse cover and fuse.
1
CD Recordable Disc (record once):
Fully recorded and subsequently finalized CD-R discs can be
played on CD players and recorders that are suitable for CD-R
discs. CD-R discs can be recognized by the following logos:
2. Fix new fuse which should be a BS1362 5A, A.S.T.A. or BSI
approved type.
3. Refit the fuse cover.
If the fitted plug is not suitable for your socket outlets, it should
be cut off and an appropriate plug fitted in its place.
If the mains plug contains a fuse, this should have a value of
5A. If a plug without a fuse is used, the fuse at the distribution
board should not be greater than 5A.
Recordable
2
Recordable
CD ReWritable Disc (multiple recording):
Recorded and finalized CD-RW discs can be played on all
CD players and recorders that are suitable for CD-RW discs.
CD-RW discs can be recognized by the following logos:
Note:
The severed plug must be destroyed to avoid a possible shock
hazard should it be inserted into a 13A socket elsewhere.
HOW TO CONNECT A PLUG
ReWritable
The wires in this mains lead are coloured in accordance with
the following core:
ReWritable
Once you start using the recorder, you will discover how easy it
is to ‘make’ your own CDs. Nevertheless, we recommend that
you use an erasable (CD-RW) digital audio disc on your first
attempt, while following the instructions given here.
GREEN–and–YELLOW—”EARTH” (“E”)
BLUE—”NEUTRAL” (“N”)
BROWN—”LIVE” (“L”)
As the colours of the wires in the mains lead of this apparatus
may not correspond with the coloured markings identifying the
terminals in your plug, proceed as follows:
1. The wire which is coloured green-and yellow must be connected to the terminal in the plug which is marked with the
or coloured green or
letter “E” or by the earth symbol
green-and-yellow.
Attention!
2. The wire which is coloured blue must be connected to the
terminal which is marked with the letter “N” or coloured
BLACK.
Note:
3. The wire which is coloured brown must be connected to the
terminal which is marked with the letter “L” or coloured RED.
Before replacing the plug cover, make certain that the cord grip
is clamped over the sheath of the lead — not simply over the
three wires.
Because of laser power differences, some DVD players cannot
play the finalized CD-R(W) discs.
Recordings may only be made for personal use.
It is forbidden to copy material protected by copyright, including computer programs, films, television and audio recordings. This appliance may not be used for applications
of this type.
Some CD players can not play the finalized CD-R(W) discs because of the low reflectivity of such discs.
Read the text carefully and keep the instructions close at hand
so that you can refer to them if necessary.
1
ENGLISH
INTRODUCTION
ENGLISH
INTRODUCTION
Unpacking
First check the contents of the packaging. It should contain the
following:
- CD-Recorder CDR631
- Remote control with batteries packaged separately
- Power cord
- Remote control cable (with orange plugs)
- Instructions
•
Do not use conventional record cleaner for analog records,
as this will adversely affect the disc surface.
Store discs properly by placing them in their disc cases.
•
Do not attach a piece of paper or sticker on the label side of
disc. When a disc has a piece of plastic tape or rental CD
label with paste protruded from the edge or when a disc has
a trace of such a sticky object, do not attempt to play the disc.
If such a disc is played on the CD player, impossibility of taking out the disc or other malfunction may result.
•
Write only on the printed side of a CD-R or CD-RW, and only
with a soft felt-tipped pen.
•
Do not use a disc with a special shape.
If one of these components is missing, please inform your supplier immediately. Save the packaging material it may come in
handy if you move the appliance.
Setup
-
Place the recorder on a strong, vibration-free surface.
Do not use the recorder under extremely damp conditions.
If the recorder is placed in a cabinet, make sure that a
2.5 cm space remains free on all sides of the recorder
for proper ventilation.
Do not attempt to play a disc with a special shape such as a
heart-shaped disc or octagonal disc. Otherwise the equipment malfunction may result.
Attention!
If the appliance is not used or operated in accordance with
the instructions, this may result in exposure to dangerous
radiation or other risks.
Only authorized technicians are allowed to open the appliance casing or to perform repairs or maintenance.
Compact discs
The glossy side shining like a rainbow is the front side of the
disc, and the side on which the label is printed is the back.
Unlike conventional turntables for playing analog discs, the
CDR631 reads the information recorded on the disc from underneath without contacting it using a beam of laser light.
Therefore, the performance of a compact disc will not degrade
like conventional analog records.
Maintenance
Clean the CD-Recorder with a soft, slightly dampened lint-free
cloth. Do not use any cleaning agents as they may have a corrosive effect.
Handle discs carefully so as not to damage or scratch the
front side.
To protect the disc, avoid placing it in the following locations:
- In direct sunlight or near a source of heat like a heater.
- In a place which is damp or dirty.
- In a place which could be exposed to rain, such as near
a window.
Do not expose the CD-Recorder, batteries or CDs to humidity,
rain, sand or excessive heat (caused by heating equipment or
direct sunlight).
Always keep the disc surface clean.
Up to six billion data units are recorded on the front side of the
disc. When cleaning the disc surface, always be sure to use a
special compact disc cleaner and wipe as shown below.
CD RECORDER
CDR631
IR
REC MODE
Recordable
ReWritable
TR.INCR.
RANDOM
DELETE
FINAL
POWER
ERASE
CANCL
REPEAT
STORE
MENU
STANDBY
TIME
HEADPHONE
1
2
3
4
5
PROG
6
7
8
9
0
INPUT
LEVEL
TEXT
0
10
REC LEVEL/SELECT
PUSH ENTER
If the CD-Recorder cannot read CDs correctly use a commonly
available cleaning CD to clean the lens before taking the CD
player to be repaired. Other cleaning methods may destroy the
lens. Always keep the tray closed to avoid dust on the lens.
Wipe in a radial direction.
The lenses may cloud over when the CD-Recorder is suddenly
moved from cold to warm surroundings. It is not possible to play
a CD then. Leave the CD-Recorder in a warm environment until
the moisture evaporates.
Do not wipe in circumferential direction.
2
Controls on the front
(34) AES/EBU-SPDIF switch ... selects AES/EBU or SPDIF connection
(35) DIGITAL (SPDIF) IN ....... connects to the digital coaxial
output of an external CD player
(36) DIGITAL (SPDIF) OUT .... connects to the digital coaxial input of e.g. amplifier or recording
device
(37) DIGITAL (SPDIF)
LOOP OUT .................... connects to the digital coaxial input of e.g. amplifier or recording
device
(38) DIGITAL (SPDIF)
OPT INPUT .................... connects to the digital optical out
put of an external CD player
(39) REMOTE CONTROL SWITCH
(40) REMOTE CONTROL OUT ..... connects to a remote control input on the Marantz amplifier
(41) REMOTE CONTROL IN .... connects to a remote control output on the Marantz amplifier
(42) Connection to mains
(43) DIGITAL (AES/EBU)
BALANCED IN .............. connects to the digital balanced
output of amplifier
(44) BALANCED IN .............. connects to the balanced output
of amplifier (left and right)
(1) POWER .......................... turns the CD-Recorder ON and OFF
(2) STANDBY indicator
(3) Disc tray ........................ records CD-R(W) and plays CD
and CD-R(W)
(4) HEADPHONE ................ socket for headphones
(5) LEVEL ............................. adjust the headphone volume
(6) / .................................... opens/closes disc tray
(7) TIME ............................... selects display information/text
(8) TEXT .............................. activate scrolling of text over the
display (once)
(9) Number keys 0 - 9 ........ selects a track by number
(10) INPUT ............................ selects external input source
(11) PROG ............................. opens/closes program memory
(12) 0 .................................... starts recording, finalizing, erasing
(13) 9 ..................................... stops/clears a program
(14) 2/; .................................. starts play/interrupts play or recording
(15) S ................................ previous track (Play and Program mode)
(16) T ................................ next track (Play and Program
mode)
(17) Q ................................ - searches backward
- cursor control in Menu/Prog. review mode
(18) R ................................ - searches forward
- cursor control in Menu/Prog. review mode
(19) REC LEVEL/SELECT ...... - previous/next track (Play and
Program mode)
- recording level control (recording)
- selects settings (menu on)
PUSH ENTER ................ - plays selected tracks
(push) ............................ - selects settings in Menu mode
- programs track numbers
(20) STORE/MENU ............... - enters Menu mode
- stores Menu settings
(21) REPEAT ......................... repeat play(All, program or track)
(22) RANDOM ....................... plays CD-R(W) or program in
random order
(23) DELETE/CANCEL ......... - deletes tracks from a program
- deletes text in Menu mode
- returns to a higher level in the
menu
(24) ERASE ........................... selects erasing mode
(25) TRACK INCR. (ement) .... increases track numbers during
recording
(26) REC MODE .................... selects recording modes
(27) FINAL ............................. selects finalize mode General
(28) Display .......................... information screen
(29) IR sensor ....................... receives signals from the remote
control.
DISPLAY indications
(45) REM/REC TIME ............. remaining recording time / recording time
(46) TRACK ........................... track number
............................... balance (lights during balance
(47)
adjustment)
(48) TOTAL REM
TRACK TIME ................. total or remaining time of disc or
track
(49) STEP .............................. indicates the number of tracks in
a program
(50) 20 + ................................ disc or program contains more
than 20 tracks
(51) Track Number ............... tracks on a discs or in a program
track in play
(52) PROGRAM .................... flashes during programming/
lights in program mode
(53) RANDOM ALL ............... plays tracks in random order
(54) SCAN ............................. lights up when the first 10 seconds of each track are played.
(55) REPEAT TRACK/ALL ... lights up when a track/ complete
disc (or program) is repeated.
(56) L/R ................................. record/play level bar. Indicates
the audio signal level.
(57) 2 ..................................... lights during play
(58) R (W) .............................. unfinalized CD-R(W) disc inserted
(59) 0 .................................... lights during recording
(60) ; ..................................... pause function active
.......................... optical input I selected for exter(61)
nal recording
.................. analog input selected for external
(62)
recording
........................ analog recording
(63) MANUAL ........................ manual start of external recording
(64) SYNC ............................. automatic or synchronized start
of external recording
........................ digital input I selected for external
(65)
recording
Note:
- When provided on the remote control, you can also use the
corresponding buttons.
- Some buttons are only on the remote control.
Connections at the back
(30) TRIM .............................. adjust the coming input level
(31) INPUT SELECT ............. selects the input BALANCED IN
or ANALOG IN
(32) ANALOG IN ................... connects to the line output of an
amplifier (left and right)
(33) ANALOG OUT ............... connects to the line input of an amplifier (left and right)
3
ENGLISH
CONTROLS AND CONNECTIONS
REMOTE CONTROL
ENGLISH
Remote control commands
(66) STANDBY
................. switches to Standby On/Off
(67) TRACK INCR. (ement) .. increases track numbers during
recording
(68) SCAN ............................. plays the first 10 seconds of each
track
(69) REPEAT ......................... repeat play(All, program or track)
(70) Number/alphabet keys 0 - 9 .. - selects a track by number
- selects character for text input
(71) DISPLAY ........................ selects display information/text
(72) CDR ............................... selects CD-Recorder
(73) 2 ..................................... starts CD-R(W) play
(74) S ................................ previous track (Play and Program mode)
(75) Q ................................ - searches backward
- cursor control in Menu/Prog. review mode
(76) ; ..................................... interrupts CD-R(W) play/recording
(77) MENU/STORE ............... - enters Menu mode
- stores Menu settings
(78) ENTER ........................... - selects settings in Menu mode
- programs track numbers
- starts playback of selected
track
(79) CANCEL/DELETE ......... - deletes tracks from a program
- deletes text in Menu mode
- returns to a higher level in the
menu
(80) R ................................ - searches forward
- cursor control in Menu/Prog. review mode
(81) 9 ..................................... stops CD-R(W) and clears a program
(82) T ................................ next track (Play and Program
mode)
(83) CD .................................. selects CD player
(84) SCROLL ........................ activates scrolling of text over the
display
(85) PROG. (ram) .................. opens/closes program memory
(86) RANDOM ....................... plays CD-R(W) or program in
random order
4
The numbers between parentheses refer to the fold-out.
This CD-Recorder can be used to record directly or through a
(pre-) amplifier from any digital or analog audio source.
In addition, the appliance can be used as a regular CD player.
Read how to connect the CD-Recorder based on the
possibilities your other audio equipment offers.
Please refer to the operating instructions for your other audio
equipment first.
Unbalanced analog connections
1
For recording and playing, connect the CD-Recorder to
preamp or another equipment based on the diagram below:
CD RECORDER CDR631
REC MODE
TR.INCR.
RANDOM
REPEAT
DELETE
STORE
CANCL
MENU
IR
FINAL
ERASE
Recordable
ReWritable
POWER
TIME
1
2
3
4
5
PROG
TEXT
6
7
8
9
0
INPUT
STANDBY
HEADPHONE
LEVEL
REC LEVEL/SELECT
0
10
PUSH ENTER
The following options are available:
ANALOG
IN
OUT
L
-
Balanced analog connections
-
Unbalanced analog connections
-
Digital AES/EBU connections
-
Digital SPDIF connections
3
ANALOG
ANALOG
L
-
Digital Optical connections
-
Digital cascade connections
L
R
L
R
I NPUT
For recording, connect the analog balanced cable from
the CD-Recorder to a source based on the diagram below:
2
TR.INCR.
RANDOM
REPEAT
DELETE
STORE
CANCL
MENU
ERASE
OUTPUT
Preamp
Select INPUT SELECT switch (31) to ANALOG L/R
(RCA).
3
COLD(-) IN
IR
FINAL
R
I NPUT
CD RECORDER CDR631
REC MODE
L
R
O UTPUT
CD, MD or DAT
Balanced analog connections
1
4
R
R
Recordable
OUT
L
ReWritable
TIME
1
2
3
4
5
PROG
TEXT
6
7
8
9
0
INPUT
HEADPHONE
LEVEL
REC LEVEL/SELECT
0
10
L
BALANCED
IN
R -TRIM- L
STANDBY
POWER
PUSH ENTER
0
ANALOG
R
0
R
+22
INPUT
SELECT
Note:
L
BALANCED
IN
Never use the PHONO input.
2
1
Digital AES/EBU connections
BALANCED
OUT
1
R
+22
(REF=+16dBu/0dBFS)
L
For recording, connect the balanced cable from the CDRecorder to a source based on the diagram below:
Preamp, CD or DAT
CD RECORDER CDR631
REC MODE
TR.INCR.
RANDOM
REPEAT
DELETE
STORE
CANCL
MENU
IR
FINAL
ERASE
Recordable
ReWritable
POWER
TIME
1
2
3
4
5
PROG
TEXT
6
7
8
9
0
INPUT
STANDBY
HEADPHONE
LEVEL
REC LEVEL/SELECT
0
2
10
PUSH ENTER
DIGITAL
Select INPUT SELECT switch (31) to BALANCED IN.
3
COLD(-) IN
R
AES/EBU
L
BALANCED
IN
R -TRIM- L
0
+22
IN
OUT
L
0
5
R
+22
INPUT
SELECT
(REF=+16dBu/0dBFS)
DIGITAL
When this CD-Recorder is shipped, it is already set to
+16dBu/0dBFS at the MAX-REC-LEVEL. If you want to
change the level, rotate TRIM control (30) to adjust input
level for both L and R.
COLD(-) IN
R
+22
CD, MD or DAT
OUT
L
0
R
+22
(REF=+16dBu/0dBFS)
2
L
BALANCED
IN
R -TRIM- L
0
OUTPUT
Select AES/EBU SPDIF switch (34) to AES/EBU.
NEUTRIK
INPUT
SELECT
LOOP
OUT
IN
AES/EBU
SPDIF
5
IN
OUT
(SPDIF)
ENGLISH
INSTALLATION
ENGLISH
INSTALLATION
Digital cascade connections
Digital SPDIF connections
1
For recording and playing, connect the coaxial cables
from the CD-Recorder to a digital equipment based on
the diagram below:
1
For cascade recording, connect a CD player from the digital out socket to CDR DIGITAL IN socket on the CDR631
recorder using able 9.
2
Connect the CDR631 recorder from CDR DIGITAL LOOP
OUT socket to CDR DIGITAL IN socket on another
CDR631 recorder using cable 0.
3
Connect the CDR631 recorder using the cable ! in the
same way. Cascade connections of this CD-Recorder
are possible up to 5 stages.
CD RECORDER CDR631
REC MODE
TR.INCR.
RANDOM
REPEAT
DELETE
STORE
CANCL
MENU
IR
ERASE
FINAL
Recordable
ReWritable
TIME
1
2
3
4
5
PROG
TEXT
6
7
8
9
0
INPUT
STANDBY
POWER
HEADPHONE
LEVEL
REC LEVEL/SELECT
0
10
PUSH ENTER
DIGITAL
LOOP
OUT
6
7
IN
OUT
DIGITTAL
DIGITTAL
CD player
DIGITTAL
INPUT
INPUT
INP UT
OU T P U T
OUTPUT
9
OUT P UT
DIGITTAL
CD RECORDER CDR631
REC MODE
TR.INCR.
RANDOM
REPEAT
DELETE
STORE
CANCL
MENU
LOOP
OUT
IR
CD, MD or DAT
MD or DAT
FINAL
ERASE
Recordable
ReWritable
TIME
1
2
3
4
5
PROG
TEXT
6
7
8
9
0
INPUT
STANDBY
POWER
HEADPHONE
LEVEL
REC LEVEL/SELECT
0
2
10
PUSH ENTER
IN
AES/EBU-SPDIF switch (34) selects SPDIF.
OUT
0
DIGITTAL
CD RECORDER CDR631
REC MODE
LOOP
OUT
TR.INCR.
RANDOM
REPEAT
DELETE
STORE
CANCL
MENU
LOOP
OUT
IR
FINAL
ERASE
Recordable
ReWritable
IN
TIME
1
2
3
4
5
PROG
TEXT
6
7
8
9
0
INPUT
STANDBY
POWER
HEADPHONE
LEVEL
REC LEVEL/SELECT
0
10
PUSH ENTER
AES/EBU
IN
SPDIF
Note:
!
DIGITTAL
CD RECORDER CDR631
REC MODE
TR.INCR.
RANDOM
REPEAT
DELETE
STORE
CANCL
MENU
LOOP
OUT
IR
FINAL
You can also connect the LOOP OUT socket on this CD-Recorder to the input sockets of a CD or DAT when DIGITAL
(SPDIF) IN is used.
ReWritable
POWER
REC MODE
FINAL
1
2
3
4
5
PROG
6
7
8
9
0
INPUT
TR.INCR.
ERASE
RANDOM
REPEAT
DELETE
STORE
CANCL
MENU
REC LEVEL/SELECT
10
PUSH ENTER
DIGITAL
OUT
IN
9
8
INPUT
OUTPUT
MD or DAT
4
5
PROG
9
0
INPUT
10
PUSH ENTER
OUT
Cascade connection is useful when you make a several copies
from an original source since the being the recording signal is
directly go through LOOP OUT from INPUT on this CD-Recorder. Cascade connections of this CD-Recorder are possible
up to 5 stages.
STANDBY
0
3
8
Note:
ReWritable
TIME
2
7
IN
Recordable
TEXT
1
6
LEVEL
5 CDR631s max.
CD RECORDER CDR631
LEVEL
HEADPHONE
REC LEVEL/SELECT
IR
HEADPHONE
TIME
TEXT
STANDBY
0
For recording and playing, connect the fiber-optic cable
from the CD-Recorder to a digital equipment based on
the diagram below.
POWER
ERASE
Recordable
Digital Optical connections
1
OUT
IN
OUT
(SPDIF)
INPUT
OU TP U T
CD, MD or DAT
Note:
Before connection the cables, remove the dust caps from the
digital optical connections. We recommend that you save the
caps.
6
ENGLISH
D-BUS CONNECTION
The numbers between parentheses refer to the fold-out.
Remote control cable connections
By connecting CDR631 to the Marantz amplifier using a D-BUS
remote control cable @, you can operate the operations of
CDR631 from the remote control of the amplifier. Set the remote control selector to ‘EXTERNAL’.
CD RECORDER CDR631
REC MODE
TR.INCR.
RANDOM
REPEAT
DELETE
STORE
CANCL
MENU
IR
FINAL
ERASE
Recordable
ReWritable
TIME
1
2
3
4
5
PROG
TEXT
6
7
8
9
0
INPUT
STANDBY
POWER
HEADPHONE
LEVEL
REC LEVEL/SELECT
0
10
PUSH ENTER
REMOTE
CONTROL
IN
EXT.
OUT
INT.(IR)
@
REMOTE
CONTROL
IN
OUT
Marantz Amplifier
Amplifier
Marantz
Note:
When you don’t use the D-BUS connection, ALWAYS set
the remote control selector to ‘INTERNAL’.
7
ENGLISH
USING THE RECORDER
The numbers between parentheses refer to the fold-out.
Inserting discs
Switching ON and OFF
1
Plug the power cord supplied into the MAINS connector
on the CD-Recorder, then into a mains socket.
MODEL NO.CDR631
MADE IN JAPAN
AC IN
IN
OUT
1
Press / (6) to open the disc tray.
➔
lights up.
2
Insert a CD, CD-R or CD-RW in the appropriate recess in
the tray, label side up.
3
Press / (6) to close the tray.
➔
lights up, followed by
and the display will show the type of disc you inserted.
q
2
Press the POWER (1) button on the front of the CD-Recorder to turn it on or off.
CD RECORDER CDR631
IR
Recordable
ReWritable
POWER
STANDBY
HEADPHONE
LEVEL
0
10
w
•
•
If a CD-R(W) is finalized it will show CD on the display.
If CD-text is available the TITLE/ARTIST will scroll by.
Using the remote control
1
Open the battery compartment cover.
2
Insert 2 batteries (AA, LR-6 or UM-3; as supplied) as
shown.
3
Replace the cover.
Note:
- For recording it is important that the blank disc is completely
free from dust particles or scratches. (see Compact Discs
page 2).
- If you insert a blank or partly-recorded CD-R(W) or
unfinalized CD-R(W), the CD-Recorder will calibrate the disc
for optimum recording. During this process the display will
and then the number of audio
first show
tracks. Calibration can take up to 30 seconds.
Note:
- We recommend you use 2 batteries of the same type and
condition.
- Always point the remote control directly towards the recorder and make sure there.
-
This remote control can switch “STANDBY ON/OFF” but cannot switch “POWER ON/OFF” the CD-Recorder.
Batteries contain chemical substances, so they should be
disposed of properly.
8
The numbers between parentheses refer to the fold-out.
Recording modes
Remarks about recording
You will soon discover how easy it is to make your own CDs.
Nevertheless, it is advisable to use a CD-RW disc for your first
try.
Your recorder offers several recording modes.
-
- to make a synchronised recording of the
complete disc or a program simply by starting the source.
•
If the disc is a CD-RW and is already finalized you must
unfinalize it first.
-
- to make a synchronised recording of a
single track simply by starting the source.
•
The recording procedure is the same for CD-Rs and CDRWs.
-
- to manually start a recording simply by
pressing the 0 (RECORD) key.
•
If the disc already contains recordings, the CD-Recorder will
automatically search for the end of the last track, so that recording can start from there.
-
- to make a synchronised recording of the complete disc or a program simply by starting the source. Finalizing will be done automatically.
•
There must be at least 7 seconds of recording time left
on the disc, otherwise you will not be able to enter record
then lights up.
standby mode.
•
A maximum of 99 tracks can be recorded on a disc. Minimum
allowable track length is 4 seconds.
•
Recordings from DAT or DCC players will not always stop
automatically.
•
SRS (Sample Rate Conversion)
This CD-Recorder can perform Sample Rate Conversion on
the incoming signal, it is capable of handling sources, hating
from 12 kHz up to 56 kHz.
If non 44.1 kHz (± 100 PPM) source was connected, this CDRecorder will automatically switch to SRC function.
Some remarks on recording:
-
When Auto track is on (default setting), track numbers will
automatically be increased during recording.
-
By programming tracks first, a compilation can be recorded.
-
If a finalized CD recordable disc is inserted in the CD-Recorder,
will be displayed. Recording is
not possible.
-
If a finalized CD rewritable disc is inserted in the CD-Recorder,
and
will be displayed when the REC MODE (26) is pressed. If PUSH ENTER (19) is pressed, the disc will be unfinalized.
-
This CD-Recorder can record about 17 seconds of a pause
time If you record a track including more than 17-secondspause time by digital recording, the pause time will be recorded the different length of time from original. However,
the entire track time will not be changed and be able to listen
to the music as same as original.
-
When you copy a special disc such as HDCD or DTS, you
have to
• set the sampling frequency at 44.1kHz.
• use the digital connection.
• set the digital rec-volume of the CD-Recorder at 0 dB.
When you copy the tracks from a DAT recorded by different
sampling frequencies, noise might be recorded in the disc.
Please set a sampling frequency for every track in a DAT.
Important:
If you want to play the recorded CD-R disc on any regular
CD player, it must first be finalized. (See FINALIZING/
UNFINALIZING.)
Finalized CD-RW discs play only on CD-RW compatible CD
players.
Recording from CD-changers should always be started in
,
or
the
mode.
-
Warning:
No more recording possible after finalizing CD-R disc!
9
ENGLISH
RECORDING
ENGLISH
RECORDING
The numbers between parentheses refer to the fold-out.
ABC
DEF
GHI
1
2
3
JKL
MN
OPQ
4
5
6
RST
UVW
7
8
DISPLAY
CD RECORDER CDR631
REC MODE
TR.INCR.
RANDOM
REPEAT
DELETE
STORE
CANCL
MENU
SPACE
XYZ
9
SCROLL
0
IR
FINAL
ERASE
FUNCTION
CDR
CD
Recordable
ReWritable
POWER
TIME
1
2
3
4
5
PROG
TEXT
6
7
8
9
0
INPUT
y
STANDBY
HEADPHONE
LEVEL
REC LEVEL/SELECT
0
10
PUSH ENTER
er
y
MENU/
STORE
CANCEL/
DELETE
ENTER
5 To start recording, press PLAY on the selected source.
CD-SYNC
➔ The CD-Recorder automatically starts to record. The recording time left appears on the display.
The CD-SYNC feature enables you to make fast and easy recordings of a CD. Track increments are automatically detected
from the source material. Track increments cannot be added
manually. In analog source material a silence of 2.7 seconds or
more is automatically detected as a track increment.
•
•
1 Make sure the disc is absolutely free of scratches and
•
dust particles.
If, however, you start the source during a track, CDSYNC recording starts at the beginning of the next track
or after 2.7 seconds of silence in analog recordings.
To check the elapsed recording time, press TIME (7) or
DISPLAY (71). (This can also be done during recording)
The recorder stops automatically.
6 To stop recording manually, press 9 (13, 81).
2 Connect the cable from an external CD player to the CDRecorder. (see INSTALLATION from page 5 to 7.)
•
3 Press INPUT (10) repeatedly until the selected source,
appears on the display (depending on the digital connection used):
,
or
lights up and
,
➔
or
appears on the display.
•
If 9 (13, 81) was pressed within 3 seconds after pressing
PLAY on the selected source, no recording will take
place.
To interrupt recording, press 2/; (14) or ; (76).
To resume, press 0 (12) on the CD-Recorder.
After recording the display will show
eral seconds.
for sev-
Note:
- Recordings from DAT, DCC or analog sources will only stop
after 20 seconds silence.
- MAKE CD is a recording mode for auto finalized after synchronized recording. It takes about 1 minute to start auto finalizing after finish recording the last track. (WAIT appears
on the display.)
- The recorded sound might be distorted when you adjust the
recording level to set above 0dB for digital recording and 12dB for analog recording. The default setting of recvolume
for digital is 0dB and analog is -12dB when this CD-Recorder
is shipped.
4 With the CD-Recorder stopped, press REC MODE (26).
once: to select ‘
’
twice: to select ‘
’
four times: to select ‘
’ (When ANALOG was selected, this menu dose not appear on the display.
and
start to flash.
➔
Important:
If you want to play the recorded CD-R disc on any regular
CD player, it must first be finalized. See finalizing discs.
Finalized CD-RW discs play only on CD-RW compatible CD
players.
•
If
rect.
or
flashes, the digital connection is incor-
Note:
You can adjust the recording level by rotating the REC LEVEL/
SELECT (19).
DIGITAL RECORDING : +6dB ~ –63dB
ANALOG RECORDING : 0dB ~ –63dB
10
ENGLISH
RECORDING
The numbers between parentheses refer to the fold-out.
ABC
DEF
GHI
1
2
3
JKL
MN
OPQ
4
5
6
RST
UVW
7
8
DISPLAY
CD RECORDER CDR631
REC MODE
TR.INCR.
RANDOM
REPEAT
DELETE
STORE
CANCL
MENU
SPACE
XYZ
9
SCROLL
0
IR
FINAL
ERASE
FUNCTION
CD
CDR
Recordable
ReWritable
POWER
TIME
1
2
3
4
5
PROG
TEXT
6
7
8
9
0
INPUT
u
STANDBY
HEADPHONE
LEVEL
REC LEVEL/SELECT
0
10
PUSH ENTER
er y u
CANCEL/
DELETE
ENTER
times to enter the Manual Record standby mode.
➔ MANUAL starts to flash and the display shows
.
About AUTO TRACK and AUTO STOP
•
MENU/
STORE
4 With the recorder stopped, press REC MODE (26) three
Manual start recording
•
t
AUTO TRACK is a function to increment track numbers
either manually or automatically.
AUTO TRACK ON : track number will be automatically incremented according to
the source. (See the table on
page 19.)
AUTO TRACK OFF : track number can be manually
incremented by pressing TR.
INCR. (25) or TRACK INCR. (67).
When AUTO TRACK is ON, you can also set AUTO
STOP function.
AUTO STOP ON : the recording will be stopped automatically. (See the Table on page
20.)
AUTO STOP OFF : the recording has to be stopped
manually.
•
If
or
flashes, the digital connection is incorrect.
5 Set the optimal recording level on the CD-Recorder.
1. Play the source first to set the optimal recording level on
the CD-Recorder.
2. Rotate the REC LEVEL/SELCT (19) key until, on the
Record/Play Level bar, all the blue segments are alight,
but the red segments do not light continuously during
the loudest passages.
DIGITAL RECORDING : +6dB ~ –63dB
ANALOG RECORDING: 0dB ~ –63dB
3. Stop the source.
• To record a 3-second silence at the start of a track,
press 2/; (14) or ; (76) on the CD-Recorder before
starting the source.
Note:
AUTO STOP function is only activated when Manual start recording (REC MANUAL mode) is used.
1 Make sure the disc is absolutely free of scratches and
dust particles.
6 To start recording, press 0 (12) on the CD-Recorder and
immediately start the source (from Stop-mode).
The track number and recording time left appear on the display.
• If 9 (13, 81) was pressed within 3 seconds after 0
(12), no recording will take place.
• To check the elapsed recording time, press TIME (7)
or DISPLAY (71). (This can also be done during the
recording.)
2 Connect the cable from an external CD player to the CDRecorder. (see INSTALLATION page 5 and 6.)
3 Press INPUT (10) repeatedly until the selected external
source appears on the display (depending on the connection used):
➔
,
or
lights up and
,
or
appears on the display.
7 To stop recording, press 9 (13, 81).
• To interrupt recording, press 2/; (14) or ; (76).
After recording the display will show
eral seconds.
for sev-
Note:
The recorded sound might be distorted when you adjust the
recording level to set above 0dB for digital recording and -12dB
for analog recording. The default setting of recvolume for digital
is 0dB and analog is -12dB when this CD-Recorder is shipped.
Important:
If you want to play the recorded CD-R disc on any regular
CD player, it must first be finalized. See finalizing discs.
Finalized CD-RW discs play only on CD-RW compatible CD
players.
11
ENGLISH
FINALIZING/UNFINALIZING
The numbers between parentheses refer to the fold-out.
REC MODE
FINAL
TIME
1
2
3
4
5
PROG
TEXT
6
7
8
9
0
INPUT
TR.INCR.
ERASE
RANDOM
REPEAT
DELETE
STORE
CANCL
MENU
REC MODE
FINAL
TIME
1
2
3
4
5
PROG
TEXT
6
7
8
9
0
INPUT
EVEL
TR.INCR.
ERASE
RANDOM
REPEAT
DELETE
STORE
CANCL
MENU
REC LEVEL/SELECT
0
REC LEVEL/SELECT
10
PUSH ENTER
PUSH ENTER
we
q
Finalizing CD-R & CD-RW discs
q
w
Unfinalizing CD-RW discs
Finalizing is a simple procedure, necessary to:
For CD-RW discs only.
-
be able to play the recorded CD-R(W) disc on a CD
PLAYER.
-
avoid further unwanted recordings on a disc.
If you want to make more recordings (or erasures of tracks) on
a finalized disc you must unfinalize it first. The Table of Contents (TOC) will be removed.
-
avoid erasure of tracks on a CD-RW.
1 With the CD-Recorder stopped, press REC MODE (26)
or ERASE (24).
➔
the display.
Auto finalizing
Auto finalizing is possible when using the
ing function.
record-
and
will appear on
Manual finalizing
1 Make sure the disc (in the CD-Recorder) is absolutely
free of scratches and dust particles.
2 With the recorder stopped press FINAL (27).
➔ The display shows
.
and
2 Press PUSH ENTER (19).
➔ The disc will now be unfinalized and can be recorded on
again.
3 Press 0 (12).
➔
Note:
and the approximate finalization time
appears on the display.
The display counts down through the finalization.
On completion, the total number of tracks and the total
time recorded appears on the display.
For CD-R(W), CD-R(W) changes to CD on display.
- Unfinalizing will take approximately 1.5 minutes.
- When unfinalizing a CD-RW disc with text on it available, this
text will be transferred to the CD-Recorder memory. It may
occur that the text memory is full. The message
/
will be displayed.
You will now have to erase text, stored for other discs, or
finalize another disc in order to obtain memory space.
Finalizing will take at least 2 - 4 minutes.
Note:
During finalization, the CD-Recorder accepts no operating
commands.
12
ENGLISH
ERASING
The numbers between parentheses refer to the fold-out.
REC MODE
FINAL
TIME
1
2
3
4
5
PROG
TEXT
6
7
8
9
0
INPUT
TR.INCR.
ERASE
RANDOM
REPEAT
DELETE
STORE
CANCL
MENU
REC MODE
FINAL
TIME
1
2
3
4
5
PROG
TEXT
6
7
8
9
0
INPUT
TR.INCR.
ERASE
RANDOM
REPEAT
DELETE
STORE
CANCL
MENU
REC LEVEL/SELECT
REC LEVEL/SELECT
0
PUSH ENTER
PUSH ENTER
e
q
w
w
Erasing
Erasing the entire disc
For unfinalized CD-RW discs only.
You can erase:
- one or more tracks from the end,
-
1 Press ERASE (24) twice.
➔ The display shows the number of tracks and their total
playing time.
and
light up.
the entire disc.
•
Erasing one or more tracks from the end
1 Press ERASE (24) once.
➔ The display shows the number of tracks and their total
playing time.
and
lights up.
•
q
If the disc is finalized, CD appears on the display after
inserting a CD-RW in the recorder. The recorder will ask
you to confirm unfinalizing first. Confirm by pressing the
PUSH ENTER (19) key or ENTER (78) on the remote
control.
If the disc is finalized, CD appears on the display after
inserting a CD-RW in the recorder. The recorder will ask
you to confirm unfinalizing first. Confirm by pressing the
PUSH ENTER (19) key or ENTER (78) on the remote
control.
2 Select the track(s) you wish to erase by turning the REC
LEVEL/SELECT (19) key to the left and confirm by
pressing this key.
➔ The selected track numbers start blinking on the track
bar.
➔ The display shows the remaining number of tracks and
the remaining playing time after erasing the selected
track(s).
2 Press 0 (12).
➔ The display shows the total countdown time and
appears on the display. The complete disc will be
erased.
Erasure of a complete disc may take up to 15 seconds.
3 Press 0 (12).
➔ The display shows the total countdown time and
appears on the display.
➔ After the selected track(s) have erased, the display
shows the remaining tracks and their total playing time.
13
ENGLISH
PLAYING
The numbers between parentheses refer to the fold-out.
EX: Selecting a track when CD play is stopped
SCAN
REC MODE
FINAL
TIME
1
2
3
4
5
PROG
TEXT
6
7
8
9
0
INPUT
TR.INCR.
ERASE
RANDOM
REPEAT
DELETE
STORE
CANCL
MENU
q
r
REC LEVEL/SELECT
PUSH ENTER
w
t qer
t
e
REPEAT
PROG.
RANDOM
ABC
DEF
GHI
1
2
3
JKL
MN
OPQ
4
5
6
RST
UVW
7
8
DISPLAY
SPACE
1 On the CDR631 recorder <i>.
XYZ
9
REC MODE
SCROLL
TR.INCR.
0
RANDOM
REPEAT
DELETE
STORE
CANCL
MENU
FUNCTION
FINAL
ERASE
CD
CDR
TIME
1
2
3
4
5
PROG
TEXT
6
7
8
9
0
INPUT
REC LEVEL/SELECT
MENU/
STORE
PUSH ENTER
CANCEL/
DELETE
ENTER
w
REMOTE CONTROLLER
RC6050DR
qw
Selecting a track
Playing a CD
1 Press 2/;; (14) to start CD play.
Selecting a track during play
➔ 2 lights up and the track number and track time of the
track in play appear on the display.
1 On the CDR631 recorder <i>.
1 Turn the REC LEVEL/SELECT (19) key until the re-
2 Press TIME (7) or DISPLAY (71) once, twice or three
quired track number appears on the display.
➔ Play skips to the beginning of the selected track.
times to see:
➔ remaining track time, total remaining time, text information (see MENU MODE page 17).
2 On the CDR631 recorder <ii>.
1 Key in the required track number using the NUMERICAL
3 To interrupt play temporarily, press 2/;; (14) again.
(9) keys. For 2-digit track numbers, press the keys in
rapid succession.
➔ ; lights on the display.
4 To continue play, press 2/;; (14) again.
3 On the CDR631 recorder <iii>.
1 Press S (15) or T (16) one or more times.
5 To stop play, press 9 (13, 81).
➔ Play skip to the begining of the present, previous or
subsequent tracks.
➔ The number of tracks and the total playing time appear
on the display.
4 On the remote control <i>.
1 Key in the required track number using the NUMERICAL
(70) keys. For 2-digit track numbers, press the keys in
rapid succession.
➔ Play skips to the beginning of the selected track.
5 On the remote control <ii>.
1 Press S (74) or T (82) one or more times.
➔ Play skips to the beginning of the present, previous or
subsequent tracks.
Selecting a track when CD play is stopped
1 On the CDR631 recorder <i>.
q Turn the REC LEVEL/SELECT (19) key until the required track number appears on the display.
w Press PUSH ENTER (19) to confirm or press 2/; (14) to
start playing.
2 On the CDR631 recorder <ii>.
q Key in the required track number using the NUMERICAL
(9) keys. For 2-digit track numbers, press the keys in
rapid succession.
3 On the CDR631 recorder <iii>.
q Briefly press S (15) or T (16) one more times.
w Start playback by pressing 2/; (14) or PUSH/ENTER (19).
4 On the remote control <i>.
q Key in the required track number using the NUMERICAL
(70) keys. For 2-digit track numbers, press the keys in
rapid succession. Play starts.
5 On the remote control <ii>.
14
q Briefly press S (74) or T (82) one or more times.
w Start playback by pressing 2 (73) or ENTER (78).
ENGLISH
PLAYING
The numbers between parentheses refer to the fold-out.
EX: Search
EX: Repeat play
ABC
DEF
GHI
1
2
3
MN
OPQ
4
5
6
RST
JKL
UVW
XYZ
7
8
DISPLAY
REC MODE
FINAL
TIME
TEXT
1
6
2
7
3
8
4
9
5
0
TR.INCR.
ERASE
RANDOM
REPEAT
DELETE
STORE
CANCL
MENU
SPACE
TRACK
INCR.
SCAN
9
q
w
SCROLL
0
FUNCTION
REC MODE
CD
CDR
PROG
INPUT
q
FINAL
TIME
1
2
3
4
5
PROG
TEXT
6
7
8
9
0
INPUT
TR.INCR.
ERASE
RANDOM
REPEAT
DELETE
STORE
CANCL
MENU
REPEAT
PROG.
RANDOM
ABC
DEF
GHI
1
2
3
MN
OPQ
4
5
6
RST
UVW
XYZ
7
JKL
8
9
DISPLAY
SPACE
SCROLL
0
REC LEVEL/SELECT
PUSH ENTER
FUNCTION
REC LEVEL/SELECT
0
w
PUSH ENTER
w
MENU/
STORE
CD
CDR
CANCEL/
DELETE
ENTER
w qw
qw
REMOTE CONTROLLER
RC6050DR
MENU/
STORE
CANCEL/
DELETE
ENTER
REMOTE CONTROLLER
RC6050DR
Scan play
Repeat play
1 Press REPEAT (21, 69) one or more times during CD
1 To start scan play, press SCAN (68) on the remote con-
play.
➔ When REPEAT TRACK lights up, the current track
plays repeatedly. When REPEAT ALL lights up, the disc
or program plays repeatedly.
trol.
- It plays the first 10 seconds of each track.
- It automatically stops after playing all tracks.
2 To stop playing, press 9 (13, 81).
-
The SCAN level disappears from the display.
Search
1 Press 2/;; (14) or 2 (73).
2 Hold down Q (17, 75) or R (18, 80).
2 To return to normal play, press REPEAT (21, 69) one or
➔ The player first searches backwards or forwards at 10
times normal speed with sound at low volume, then
goes to 50 times normal speed with sound muted.
more times until:
➔ The REPEAT label disappears from the display.
Note:
3 Release the button at the desired passage.
Repeat is also cleared if you open the disc tray.
➔ Play starts at the desired passage.
Note:
During Random, Repeat Track or Programmed play, search is
restricted to within the track being played at the time.
Random play
1 Press RANDOM (22, 86) before or during CD play to
start random play.
➔ The tracks on the CD (or program if set) play in random
order.
2 Press RANDOM (22, 86) again to return to normal CD
play.
Note:
RANDOM is also cleared if you open the disc tray.
15
ENGLISH
PROGRAMMING
The numbers between parentheses refer to the fold-out.
Clearing a program
Programmed play
•
You can program up to 99 tracks to play in any desired sequence.
•
Tracks can be programmed more than once, but each time
counts as a track. (step)
1 Press 9 (13, 81) if necessary to stop programmed play.
2 Press 9 (13, 81) again to clear the program.
➔ PROGRAM disappears from the display.
•
Programming for playback
The program is also cleared if you open the disc tray.
Erasing a track from a program
1 Press PROG (11, 85) on the remote control to enter Program mode.
➔ PROGRAM flashes and
appears on the display.
1 In Stop mode press PROG (11, 85) to enter Program
mode.
2 Use Q (17, 75) or R (18, 80) to select the track from
which to delete.
➔ The track number and program step will be shown on
the display.
3 Press DELETE/CANCEL (23, 79) to erase the track from
the program.
➔ The remaining program steps and the remaining playing
time of the program will be displayed.
2 Select the required track numbers by turning the REC
LEVEL/SELECT (19) key left or right and store by pressing
PUSH ENTER (19).
or:
Key in a track number with the NUMBER (9, 70). For 2digit numbers, press the keys in rapid succession and store
by pressing PUSH/ENTER (19) on ENTER (78).
➔ The track will be stored in the program.
➔ The track number, total program time and the number of
programmed tracks (steps) are displayed.
3 Repeat step 2 for all tracks to be programmed.
4 Press 9 (13, 81) or PROG (11, 85) to end programming.
➔ PROGRAM lights continuously.
5 Press 2/;; (14) or 2 (73) to start programmed play.
16
The numbers between parentheses refer to the fold-out.
EX: Storing names of Text settings
y
CD RECORDER CDR631
REC MODE
TR.INCR.
RANDOM
REPEAT
DELETE
STORE
CANCL
MENU
IR
FINAL
ERASE
wr
ReWritable
POWER
1
2
3
4
5
PROG
TEXT
6
7
8
9
0
INPUT
GHI
3
MN
OPQ
4
5
6
RST
UVW
7
8
DISPLAY
SPACE
XYZ
9
SCROLL
0
CDR
CD
STANDBY
HEADPHONE
LEVEL
qi
REC LEVEL/SELECT
0
10
PUSH ENTER
wr
qi
et
yu
e
t
u
MENU/
STORE
CANCEL/
DELETE
ENTER
Storing names
About MENU MODE
1 Press STORE/MENU (20, 77) to enter Menu mode.
MENU MODE can set up more sophisticated setting for making
CDs. There are two kinds of submenus in the MENU MODE.
• Text submenus ............. adding and erasing the CD text
•
DEF
2
JKL
FUNCTION
Recordable
TIME
ABC
1
appears on the display.
2 Rotate REC LEVEL/SELECT (19) or press S (15, 74),
Recording submenus ... Auto track increment ON/OFF
T (16, 82) to select the TEXT EDIT submenus.
... Auto stop ON/OFF
3 Press PUSH ENTER (19) or ENTER (78) to confirm.
... Copy protaction
4 Rotate REC LEVEL/SELECT (19) or press S (15, 74),
... Adjusting right-left-volume balance
during the recording
T (16, 82) to select the required option in the submenu:
CD Artist, CD Title, Track 1 Artist, Track 1 Title, etc.
Note:
5 Press PUSH ENTER (19) or ENTER (78) to confirm.
TEXT can only be edited for finalized discs. (finalized CD-RW
discs must be unfinalized)
6 Select the characters by rotating the REC LEVEL/SELECT (19) or by pressing the corresponding numeric/
alphabet key (70).
TEXT EDIT
TEXT ERASE
TEXT VIEW
Structure of MENU MODE
in the STOPMODE
AUTO TRACK
AUTO TRACK
ON/OFF
7 Press PUSH ENTER (19) or ENTER (78) to store the
OFF
characters and move to the next cursor position.
ON
Note:
AUTO STOP
- A maximum of 60 characters can be stored per item.
- With the Q (17) R (18) keys you can move to a required
cursor position.
- With the CANCEL/DELETE (23, 79) you can delete a character.
- By pressing the PUSH ENTER (19) or ENTER (78) without
selecting a character first, you can insert a space between
characters.
- When an artist’s name has been stored for a certain track,
the name will automatically be copied for the next track. The
name can be confirmed by pressing STORE/MENU (20, 77)
or a new name can be entered as described above.
COPY
Note:
When AUTO TRACK increment is OFF, AUTO STOP does not
appears on the display.
Text Submenus
The TEXT submenus allows you to enter text information on the
CD-R(W); for example the CD titles, the artist names, the track
names and so on. During the playback, the TEXT will be appeared on the display.
8 Press STORE/MENU (20, 77) to store a name you have
entered and return to the submenu or 9 (20, 81) to exit.
17
ENGLISH
MENU MODE
ENGLISH
MENU MODE
The numbers between parentheses refer to the fold-out.
Erasing names
About TEXT
1 Stay in the stop mode. (No Operation)
The input text data is saved in the text memory until the disc is
finalized. Therefore, the data is not written in the CD-R(W) disc
before finalizing the disc.
2 Press STORE/MENU (20, 77) on the deck or the remote
control to enter Menu mode.
3 Rotate REC LEVEL/SELECT (19) or press S (15, 74),
PO
T (16, 82) to select the submenu TEXT ERASE.
appears on the display.
CLA
SSI
C
JAZ
Z2
PS
4 Press PUSH ENTER (19) or ENTER (78) on the remote
control to confirm.
5 Rotate REC LEVEL/SELECT (19) or press S (15, 74),
T (16, 82) to select the required option in the
submenu: All Text, CD Title, CD Artist, Track 1 Title,
Track 1 Artist, etc.
6 Press PUSH ENTER (19) or ENTER (78) to confirm.
JAZZ 2
The display will ask you to reconfirm your selection.
7 Press PUSH ENTER (19) or ENTER (78) to reconfirm.
CLASSIC
POPS
Finalizing the disc transfers the text data from the text memory
to the disc.
8 Press STORE/MENU (20, 77) to return to the submenu
or 9 (13, 81) to exit.
PO
CLA
SSI
C
PS
JAZ
Z2
JAZZ 2
Unfinalizing the disc transfers the text data from the disc to the
text memory.
T
MY
PO
CLA
PS
BES
SSI
C
ReWritable
MY BEST
When the text memory is full,
appears on the
display and you cannot add more text data.
In this case, you need to make more space in text memory. You
can either finalize one or more disc(s) to transfer the text data
to each disc, or erase (part of) the text data in the text memory.
Note:
When the text memory is full depends on the amount of the
input text data per disc and the number of discs.
Typically the text memory can store for 50 discs of the text data
consisting of 60 characters of an artist name or title for 20
tracks.
18
The numbers between parentheses refer to the fold-out.
3 Rotate REC LEVEL/SELECT (19) or press S (15, 74),
Text Memory Review/Erase Text Memory
T (16, 82) to select the AUTO TRACK submenu.
appears on the display.
The input text data of the disc is once saved in the text memory
until finalizing the disc. When the text memory is full,
will appear on the display and unable to add
more text data. If you want to add more text data, you have to
finalize the text data for each disc in order to obtain memory
space or erase the entire memory following the operation below.
4 Press PUSH ENTER (19) or ENTER (78) to confirm.
5 Select Auto track
or
by rotating REC LEVEL/
SELECT (19) or press S (15, 74), T (16, 82).
1 Stay in the stop mode. (No Operation)
2 Press STORE/MENU (20, 77) on the deck or the remote
control to enter Menu mode.
3 Rotate REC LEVEL/SELECT (19) or press S (15, 74),
T (16, 82) to select the TEXT VIEW submenu.
appears on the display.
6 Press PUSH ENTER (19) or ENTER (78) to confirm.
•
When
is selected, track numbers will be automatically incremented during recording.
When
is selected, you can number the recorded tracks
yourself by press TR.INCR. (25) or TRACK INCR (67).
4 Press PUSH ENTER (19) or ENTER (78) to confirm.
•
5 Rotate RECLEVEL/SELECT (19) or press S (15, 74),
T (16, 82) to select the disc you wish to erase.
7 Press STORE/MENU (20, 77) to store settings and return to the submenu or 9 (13) to exit.
AUTO TRACK
ON
Source
CD/MD
(with user data)
6 Press PUSH ENTER (19) or ENTER (78) to confirm.
DAT/DCC
appears on the display.
(with user data)
Unknow
Track increment based on user data of in
cominng siganl
Track increment based on user data of in
cominng siganl
(no user data)
Track increment after silence gap of 2.7
seconds on incominng siganl
Analog
Track increment after silence gap of 2.7
seconds on incominng siganl
No source
None
(no lock)
7 Press the PUSH ENTER (19) or ENTER (78) to confirm
the erasure of the text for that particular disc.
Note:
8 Press STORE/MENU (20, 77) to return to the submenu
- Auto track is a function to switch increasing the track numbers either automatically or manually. When Auto track is
ON, there are two ways to activate the function.
- If a digital source has track information (Q-subcode) such as
CD or MD, the track transition is automatically increased according to track information of the digital source.
- If an audio source is analog or digital without track information, silence gap is detected. When length of silence gap is
more than 2.7 seconds, the auto track function is automatically activated at the point of 2.7 seconds just before A (- 35
dB) is detected. (See following figure below.)
or 9 (13, 81) to exit.
Note:
- If there are no discs in the memory, the message
appears on the display.
/
may also appear when
unfinalizing a CD-RW disc for which text was stored (see
‘UNFINALIZING CD-RW discs’ page 12.). The same
action(s) should be taken in order to obtain memory space.
Recording submenus
•
When Auto Track is ON, track numbers will automatically be
increase during the recording, also able to set Auto stop ON/
OFF.
•
You can adjust the right and left volume balance during the
recording.
Audio source signal
Silence gap
A (-35 dB)
B (-55 dB)
2.7 sec
Auto track increment
B is DETECTED
A is DETECTED
1 Stay in the stop mode. (No Operation)
Track X
2 Press STORE/MENU (20, 77) on the deck or the remote
control to enter Menu mode.
19
Track X+1
ENGLISH
MENU MODE
ENGLISH
MENU MODE
The numbers between parentheses refer to the fold-out.
5 Select Copy
,
, or
by rotating REC LEVEL/
SELECT (19) or press S (15, 74), T (16, 82).
Copy protection OFF:
makes this recording ‘copy permitted.’ Unlimited copies
can be made by a Consumer CD-Recorder.
Copy protection ON:
makes this recording ‘copy protected.’ One ‘Home Copy
of protected Original’ can be made from this recording;
this copy (HCO) cannot be reproduced by a Consumer
CD-Recorder.
Auto stop
Note:
Set Auto track increment ON, otherwise AUTO TRACK does
not show on the display.
1 Set stop mode.
2 Press STORE/MENU (20, 77) on the deck or the remote
control to enter Menu mode.
Home Copy of Original:
3 Rotate REC LEVEL/SELECT (19) or press S (15, 74),
make this recording a ‘Home Copy of protected Original’
(HCO) straight away. NO copy can be made from this
recording by a Consumer CD-Recorder.
T (16, 82) to select the AUTO STOP submenus.
appears on the display.
4 Press PUSH/ENTER (19) or ENTER (78) to confirm.
5 Select Auto stop
or
by rotating REC LEVEL/
SELECT (19) or press S (15, 74), T (16, 82).
AUTO STOP ON : fully automatic stop.
AUTO STOP OFF : only manual stop during the recording.
6 Press PUSH/ENTER (19) or ENTER (78) to confirm.
7 Press STORE/MENU (20, 77) to store setting and return
to the submenu, or press 9 (13, 81) to exit.
Note:
- Since this CD-recorder is a professional CD-Recorder, all
CDs can be copied even with HCO.
- Making an analog copy is always possible from the recorded
CD-R(W) disc even selected either OFF, ON or HCO.
6 Press PUSH/ENTER (19) or ENTER (78) on the remote
control to confirm.
7 Press STORE/MENU (20, 77) to store setting and return
to the submenu, or press 9 (13, 81) to exit.
Balance (Only active in Record/Standby mode)
AUTO STOP
CD/MD
(with user data)
DAT/DCC
1 Press STORE/MENU (20, 77) to enter Menu mode.
ON
Source
2 Rotate REC LEVEL/SELECT (19) or press S (15, 74),
Stop after 3 seconds of user DATA of stop
pattern detected on the incoming source signal
T (16, 82) to select the SET BALANCE submenu.
appears on the display.
Stop after 20 seconds of silence
(with user data)
Unknow
Stop after 20 seconds of silence
(no user data available)
Analog
No source
Stop after 20 seconds of silence
3 Press PUSH ENTER (19) or ENTER (78) to confirm.
Stop after 3 seconds of unlock
(no lock)
➔
and
appear on the display.
4 Adjust the recording balance by turning the REC
Copy protection
LEVEL/SELECT (19) or press S (15, 74), T (16, 82).
1 Set stop mode.
5 Press PUSH ENTER (19) or ENTER (78) to confirm.
2 Press STORE/MENU (20, 77) to enter Menu mode.
6 Press STORE/MENU (20, 77) to store settings.
3 Rotate REC LEVEL/SELECT (19) or press S (15, 74),
Note:
T (16, 82) to select the Copy submenus.
appears on the display.
The balance setting will not be stored.
4 Press PUSH/ENTER (19) or ENTER (78) to confirm.
20
Messages, as listed and explained here, may appear on the
display for your guidance.
.................. when trying to record on a finalized
CD-R(W) or a prerecorded CD
................. when trying to record on a
General
finalized CD-RW
......................... reading disc information
.............. when a professional source is connected
................................. during tray opening
............................... during tray closing
Play
......................... no disc inserted, disc unreadable or
disc inserted upside down
......................... program mode selected
................... program full
.............. will be followed by album title
.............. insert disc or insert disc in correct
way
.............. will be followed by track title
........... will be followed by artist name
................. inserted disc is no audio CD
........... will be followed by track artist name
.............. unfinalized CD-R(W) disc
................ indicates the amount of text
memory used for unfinalized discs
Others
.............. when the recorder enters a data
track during recording
Recording
........... laser power calibration performed
96 times, finalize disc
................................. - when 9 STOP is pressed during
recording
........... during laser power calibration for
unfinalized discs
- when 9 STOP is pressed during
recording the first 4 seconds of a
track
........... during disc recovering after power
failure
............................ updating disc contents
................... OPC failure during OPC procedure
(OPC = Optimum Power Calibration)
.................... no more recording possible
.................... digital coaxial input 1 selected
......................... digital optical input selected
........... recording error in menu mode
........................... analog input selected
................. when trying to record on or finalize
a recovered disc
........... no digital recording can be made of
the external source
.............. when text memory is full. To add a
........... when opening the tray with an
unfinalized disc inserted (in the CDRecorder)
CD to the list, first finalize or erase
another disc from the list.
......................... Start of synchronised recording of a
complete disc and Auto Finalize
function selected
.............. Start of synchronised recording of a
complete disc
........... Start of synchronised recording of a
single track
................ manual start of recording selected
............................ level is being adjusted
........... time left on CD-R(W) disc is not
enough for proposed recording
.............. when erasing one or more tracks
................. when erasing a disc
.............. when finalizing a disc
.............. when 0 is pressed while no digital
source is detected
.............. time countdown when erasing a
track or a disc
................. time countdown when finalizing a
disc
........... to start manual recording, finalizing
or erasing
........... to start synchronised recording
from a source
21
ENGLISH
DISPLAY
ENGLISH
DISPLAY
OTHER INFORMATIONS
The numbers between parentheses refer to the fold-out.
Menu messages
Fixing problems
................... when attempting to edit text for a
disc which has no tracks
If you think your CD-Recorder is defective, it is wise to read this
list first. Maybe you forgot a simple step.
................... when entering Text Edit mode
.................... when editing or erasing an artist
name
Warning!
Under no circumstances should you attempt to repair the
CD-recorder yourself as this will invalidate the guarantee.
...................... when editing or erasing a title
............... when editing or erasing an artist
name per track
No power
•
................. when editing or erasing a title per
track
................. when entering Text Erase mode
•
•
...................... when entering All Text mode
...................... when confirmation for erasing has
to be given with ENTER key
ensure that the POWER ON/OFF (1) button is on: the
CD-Recorder is in standby mode, press any button to
activate it
ensure that the power cord is plugged in correctly
switch the recorder OFF and then immediately back ON
Auto track does not work
........... when confirmation for erasing has
to be given with ENTER key
•
•
........... when waiting for confirmation when
erasing a disc
•
................... when selecting text review per
unfinalized disc in memory
•
........... when REVIEW is selected while no
text is in memory
check if auto track is selected
check if there are 2.7 seconds silence in between the
tracks (analog recording only)
check if the source is consumer source with the digital
output according to IEC audio standard
source is DVD disc (no track information)
No sound
•
•
............... when selecting auto track increment ON or OFF
...................................... Auto Track increment on
check the audio connections
if using an amplifier, try using a different source
Amplifier sound is distorted
.................................... Auto Track increment off
•
.............. when selecting BALANCE
check that the CD-Recorder analog output is not connected to the amplifier PHONE input.
......................... no text stored for disc
Play will not start
•
•
•
ensure that the label of the CD is facing up
clean the disc
check that the disc is not defective by trying another disc
Remote control does not work
•
•
•
•
point the remote control directly at the CD-Recorder
check the batteries and replace if necessary
select the right source first
set the remote control selector to ‘INTERNAL’
Will not record
•
•
•
•
•
•
clean the disc
check if CD-R(W) is an unfinalized disc
check that the disc is recordable and replace if necessary
)
the disc is not an audio disc (
wrong input source chosen.
text memory full (
/
).
When a CD-RW has to be unfinalized for recording.
Erase text for other disc(s) or finalize other disc(s) to
obtain memory space.
Recording is distorted
•
make sure the recording level was not too high
20 second pause between recordings
•
22
see ‘RECORDING’ CD SYNC
ENGLISH
OTHER INFORMATIONS
The numbers between parentheses refer to the fold-out.
Player does not react
•
use the POWER ON/OFF (1) button on the front of the
Player to switch it off and back on
•
a power failure has occurred during recording the CDRecorder is attempting to repair the disc
If
then appears on the display, the disc
cannot be recorded further, and cannot be finalised. But
it can still be played on the CD-Recorder or another CDRecorder.
on a CD-R(W) disc, the track being recorded is lost, but
further recording and finalisation can still be done
on display
•
•
23
324mm (12-13/16") 5.5 mm (1/4")
Cautions of Installation
- Install the player horizontally (or within 10 degrees of level).
Too much inclination may result in damage to the player.
- Secure the player at four parts when installing it in a 19-inch
rack. (see also figure 3)
434 mm (17-1/16")
10 10
REPEAT
RANDOM
REC MODE
TR.INCR.
STORE
DELETE
MENU
CANCL
10
ERASE
FINAL
CDR631
CD RECORDER
IR
1
ReWritable
6
7
8
88 mm
(3-7/16")
10.5 mm(7/16")
TEXT
LEVEL
HEADPHONE
STANDBY
POWER
0
10
483 mm (19'')
CD RECORDER CDR631
REC MODE
TR.INCR.
RANDOM
REPEAT
DELETE
STORE
CANCL
MENU
IR
FINAL
ERASE
Recordable
ReWritable
TIME
1
2
3
4
5
PROG
TEXT
6
7
8
9
0
INPUT
STANDBY
POWER
HEADPHONE
LEVEL
REC LEVEL/SELECT
0
10
PUSH ENTER
TECHNICAL SPECIFICATIONS
GENERAL
System ....................................................................................................................... Compact disc digital audio
Number of channels ............................................................................................................................. 2 (stereo)
Applicable discs .......................................................................... CD,CD-R (digital audio),CD-RW (digital audio)
Power Requirement ...................................................................................................... AC 100 - 240 V 50/60 Hz
Power Consumption .................................................................................................................................... 19 W
Operating Temperature
Dimension (MAX)
Width .............................................................................................................................. 19 inches (483 mm)
Height .................................................................................................................... 3-15/16 inches (100 mm)
Depth ..................................................................................................................... 13-7/16 inches (340 mm)
Weight ................................................................................................................................. 10.4 lbs (4.7 Kg)
AUDIO
Frequency Response .................................................................................................................... 20 Hz - 20 kHz
Playback S/N ........................................................................................................................................... 108 dB
Playback Dynamic Range .......................................................................................................................... 95 dB
Payback Total Harmonic Distortion ............................................................................................................ 92 dB
Analog Recording S/N ................................................................................................................................ 96 dB
Analog Recording Dynamic Range ............................................................................................................ 92 dB
Analog Recording Total Harmonic Distortion ............................................................................................. 88 dB
Analog Line Output Voltage .................................................................................................................. 2.0 Vrms
Digital Coaxial Output ................................................................................................................. 0.5 V (p-p)/75 Ω
Digital Optical Output .............................................................................................................................. -20dBm
Headphone ........................................................................................................................ 0 - 5 Vrms/ 8 - 2000
Recording values for line input
Digital Coaxial Input (automatic sample rate conversion) ............................................ 32/44.1 (11 kHz - 56 kHz)
Digital Optical Input (automatic sample rate conversion) ............................................. 32/44.1 (11 kHz - 56 kHz)
Digital XLR Input (automatic sample rate conversion) ................................................. 32/44.1 (11 kHz - 56 kHz)
Analog Input Sensitivity (Unbalanced) .................................................................................... 500 mVrms/50 k
(Balanced) ................................................................................ 0 dBu to + 22 dBu/50 k
(default setting : +16dBu/50 k )
ACCESSORIES
Remote Control Unit RC6050DR ....................................................................................................................... 1
AA-size batteries ................................................................................................................................................ 2
AC power cord ................................................................................................................................................... 1
Specifications subject to change without prior notice.
2
PROG
5
4
3
2
TIME
Recordable
100 mm
(3-15/16'')
ENGLISH
EXTERNAL DIMENSIONS
9
0
CT
LEVEL/SELE
REC
ENTER
PUSH
INPUT
10
Rergarding addresses for your local Marantz dealers,
please visit us on the web at
http://www.marantz.com.
R
Printed in Japan
is a registered trademark.
00/03 387K851310 (MITi)