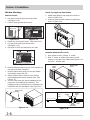
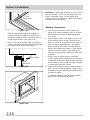
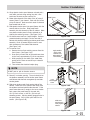
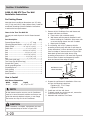
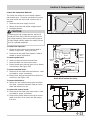
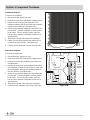
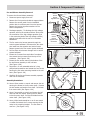
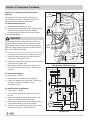
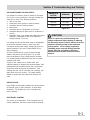
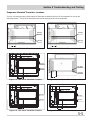
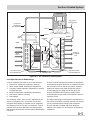
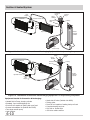
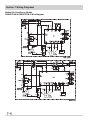
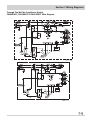
1
All About
Servicing
2007-2009
Room Air Conditioners
™
Electrolux Major Appliances; North America
250 Bobby Jones Expwy
Augusta, GA 30907
Publication #5995546446
December 2009
Section 1 Basic Information
Safe Servicing Practices
Avoid personal injury and/or property damage by observing important Safe Servicing Practices.
Following are some limited examples of safe practices:
1.
DO NOT attempt a product repair if you have any doubts as to your ability to complete the repair in a safe and
satisfactory manner.
2.
Always Use The Correct Replacement Parts as indicated in the parts documentation. Substitutions may defeat
compliance with Safety Standards Set For Home Appliances.
3.
Before servicing or moving an appliance:
•
Remove power cord from the electrical outlet, trip circuit breaker to the OFF position, or remove fuse.
4. Never interfere with the proper operation of any safety device.
5.
Use ONLY REPLACEMENT PARTS CATALOGED FOR THIS APPLIANCE. Substitutions may defeat compliance with
Safety Standards Set For Home Appliances.
6.
GROUNDING: The standard color coding for safety ground wires is GREEN, or GREEN with YELLOW STRIPES.
Ground leads are not to be used as current carrying conductors. It is EXTREMELY important that the service
technician reestablish all safety grounds prior to completion of service. Failure to do so will create a hazard.
7. Prior to returning the product to service, ensure that:
•
All electrical connections are correct and secure.
•
All electrical leads are properly dressed and secured away from sharp edges, high-temperature components,
and moving parts.
•
All non-insulated electrical terminals, connectors, heaters, etc. are adequately spaced away from all metal
parts and panels.
•
All safety grounds (both internal and external) are correctly and securely connected.
•
All panels are properly and securely reassembled.
© 2009 Electrolux Home Products, Inc.
1-1
Section 1 Basic Information
This Manual has been prepared to provide Electrolux Service Personnel with Operation and Service Information for
Frigidaire Room Air Conditioners.
Table of Contents
Section 1 Basic Information
Safe Servicing Practices ...........................................
Table of Contents ....................................................
Warnings ................................................................
Electrical Warning ...................................................
Overview of Models .................................................
Features & Benefits .................................................
Accessories .............................................................
How to Choose a Room Air Conditioner.....................
Model Dimensions ...................................................
Electrical Connections ..............................................
Product Specification
Mini Air Conditioners ...........................................
Mini Compact Air Conditioners...............................
Compact Air Conditioners......................................
Median Air Conditioners ........................................
Heavy Duty Air Conditioners .................................
Through The Wall Air Conditioners ........................
Slider / Casement Air Conditioners ........................
Model Number Coding ..........................................
Serial Number Coding ...........................................
Room Air Conditioner Warranty .............................
Normal Sounds .......................................................
Cleaning .................................................................
Winter Storage ........................................................
Section 2 Operation
Models FAA, FAC and FAX Room Air
Conditioner Installation Instructions .........................
How to Install .........................................................
If AC Unit is Blocked by Storm Window .....................
Removing AC Unit From Window ..............................
Installation Instructions For Heavy Duty
(FAS Models) and Median (FAM Models) AC Units ......
Window Mounting ...................................................
Thru-The-Wall Installation .......................................
Masonry Construction ..............................................
Installation Instructions For Slider Casement AC Units
Meeting Electrical Requirements ...............................
Preparing for Installation .........................................
Installing Unit in a Sliding Window............................
Alternate Window Jamb Applications.........................
Installing the Unit in a Casement Window .................
8,000-12,000 BTU Thru-The-Wall
Installation Instructions ...........................................
For Existing Sleeve ..................................................
How to Install .........................................................
Installation Steps - 16” And 17-1⁄2” Deep .................
Installation Steps - 22” Deep....................................
Trim Frame Assembly ..............................................
1-2
1-1
1-2
1-4
1-5
1-6
1-7
1-8
1-9
1-10
1-11
1-12
1-12
1-14
1-16
1-17
1-18
1-22
1-23
1-24
1-25
1-26
1-26
1-26
2-1
2-1
2-3
2-3
2-4
2-6
2-8
2-10
2-11
2-11
2-12
2-13
2-16
2-17
2-20
2-20
2-20
2-21
2-21
2-22
Section 3 Troubleshooting and Testing
Electronic Control Operating Instructions ..................
Remote Controls .....................................................
Description of Control Panel Buttons For
Basic Electronic Control ...........................................
Description of Control Panel Buttons for Median
and Heavy Duty Models FAM, FAS and FAZ Series .....
Heat Mode (Available On Some Models Only) ............
Fault Codes.............................................................
Description of Control Panel Buttons for
Thru-The-Wall Model FAH Series ..............................
Heat Mode (Available On Some Models Only) ............
Fault Codes.............................................................
Description of Control Panel Buttons Electronic
Control for Slider/Casement Model FAK Series ...........
Exhaust Control.......................................................
Fault Codes.............................................................
Description of Control Panel Buttons for Compact
and Mini Models FAA, FAC and FAX...........................
Fault Codes.............................................................
Operation Of Current Device (All Models) ..................
Section 4 Component Teardown
Warnings, Cautions and Notes..................................
Model FAM (Medium Duty) and Model FAS
(Heavy Duty) Series
Filter And Front Panel Assembly ............................
Cabinet Wrapper/Sleeve .......................................
User Interface ......................................................
User Interface Circuit Board ..................................
Blower Scroll Front Cover......................................
Left Bulkhead Partition .........................................
Left Bulkhead Partition (Heater Equipped Models) ..
Power Cord..........................................................
Accessing the Control Board..................................
Fan Motor Capacitor .............................................
Transformer ........................................................
Terminal Block .....................................................
Ionizer ................................................................
Power Cord And Fan Motor Capacitor Removal
(Heater Equipped Models) ....................................
Capacitor (Heater Equipped Models) ......................
3-1
3-1
3-2
3-4
3-4
3-4
3-5
3-5
3-5
3-6
3-6
3-6
3-7
3-7
3-8
4-1
4-2
4-2
4-3
4-3
4-3
4-4
4-5
4-5
4-6
4-6
4-6
4-6
4-6
4-7
4-7
Thermistor (Heater Equipped Models) ............... 4-7
Transformer (Heater Equipped Models).............. 4-7
Heater ............................................................. 4-8
Compressor Capacitor ........................................ 4-9
Condenser Fan Cover ........................................ 4-9
Removing Condenser Fan and Blower Assembly .. 4-10
Blower Housing ................................................. 4-11
Section 1 Basic Information
Section 4 Component Teardown
Blower Wheel....................................................
Right Bulkhead Partition ....................................
Condenser Fan Blade and Shroud .......................
Fan Motor .........................................................
Compressor ......................................................
Condenser ........................................................
Evaporator ........................................................
Model FAZ (Medium Duty) Series
Filter And Front Panel Assembly .........................
Cabinet Wrapper/Sleeve ....................................
Control Box Cover .............................................
User Interface ...................................................
Control Box Removal and Components ..............
Power Cord .......................................................
Capacitor ..........................................................
Fan Motor Capacitor ..........................................
Transformer ......................................................
Control Board....................................................
Thermistor ........................................................
Blower Cover and Condenser Cover ....................
Top Scroll Cover and Duct Thermistor ................
Front Scroll Cover And Heater Assembly .............
Blower Wheel....................................................
Condenser Fan Blade and Shroud .......................
Drain Valve .......................................................
Front Partition and Rear Scroll Housing ...............
Condenser Fan Motor ........................................
Condenser ........................................................
Evaporator ........................................................
Compressor ......................................................
Model FAH (Thru the Wall) Series
Filter And Front Panel Assembly .........................
Cabinet Wrapper/Sleeve ....................................
User Interface ...................................................
Control Box Components ...................................
Control Box Components
(Heater Equipped Models)..................................
Front Blower Housing And Heater Assembly
Removal (Heater Equipped Models) ....................
Top Condenser Fan Cover ..................................
Condenser Fan Shroud With
Fan and Blower Assembly ..................................
Fan And Blower Assembly Breakdown .................
Condenser Fan Blade and Shroud .......................
Fan Motor .........................................................
Compressor ......................................................
Condenser ........................................................
Evaporator ........................................................
Model FAK (Slider/Casement) Series
Filter And Front Panel Assembly .........................
Cabinet Wrapper/Sleeve ....................................
User Interface ...................................................
Air Vent Lever and Door ....................................
4-11
4-11
4-12
4-12
4-12
4-13
4-13
4-14
4-14
4-14
4-15
4-15
4-15
4-16
4-16
4-16
4-16
4-17
4-17
4-17
4-18
4-19
4-19
4-19
4-20
4-20
4-21
4-21
4-21
4-22
4-22
4-22
4-23
4-24
4-25
4-26
4-26
4-26
4-27
4-27
4-27
4-28
4-28
Control Box Cover .............................................
Control Box Components ...................................
Control Box Removal .........................................
Accessing the Condenser Fan and Blower
Assembly and Compressor .................................
Removing Sealed System Components
Compressor ......................................................
Condenser ........................................................
Evaporator ........................................................
Model FAC (Compact) Series
Filter And Front Panel Assembly .........................
User Interface ...................................................
Cabinet Wrapper/Sleeve ....................................
Control Panel ....................................................
Power Cord, Capacitor and Anion Generator ........
Evaporator Thermistor .......................................
Control System Bulkhead ...................................
Styrofoam Blower Compartment .........................
Fan and Blower Assembly ..................................
Fan and Blower Assembly Breakdown .................
Condenser ........................................................
Evaporator ........................................................
Compressor ......................................................
Model FAA (Compact) Series
Filter And Front Panel Assembly .........................
User Interface ...................................................
Cabinet Wrapper/Sleeve ....................................
Control Panel ....................................................
Power Cord, Capacitor and Anion Generator ........
Evaporator Thermistor .......................................
Control System Bulkhead ...................................
Styrofoam Blower Compartment .........................
Fan and Blower Assembly ..................................
Fan and Blower Assembly Breakdown .................
Condenser ........................................................
Evaporator ........................................................
Compressor ......................................................
Section 5 Troubleshooting and Testing
Air Conditioner Voltage Limits ...............................
Troubleshooting Procedures ..................................
Evaporator Mounted Thermistor Locations .............
Fan Blade Spacing ................................................
4-30
4-30
4-31
4-32
4-33
4-34
4-34
4-35
4-35
4-36
4-36
4-37
4-38
4-38
4-38
4-39
4-39
4-40
4-40
4-41
4-42
4-42
4-43
4-43
4-44
4-45
4-45
4-45
4-46
4-46
4-47
4-47
4-48
5-1
5-2
5-5
5-6
4-29
4-29
4-29
4-30
1-3
Section 1 Basic Information
Section 6 Sealed System
Important Warnings and Notes ................................
Service Diagnostic Tips ............................................
Definitions
Recovery .............................................................
Recycling .............................................................
Reclaim ...............................................................
Soldering ................................................................
Safety Warnings ......................................................
Compressor Testing .............................................
Charging Sealed Systems ......................................
Basic Components ...................................................
Refrigerant Cycle .....................................................
Low/High Side Leak or Undercharge .........................
Testing for Refrigerant Leaks ...................................
Compressor Oil Contamination .................................
Refrigerant Vapor Pressures .....................................
Installing a New Compressor ....................................
Evaporator and Suction Line Replacement.................
Condenser Replacement ..........................................
Final Leak Test ........................................................
Air Conditioner Air Temperatures ..............................
Line Voltage............................................................
To Flush The System ...............................................
To Use Dry Nitrogen To Flush The System .............
To Use Refrigerant To Flush The System ...............
Equipment Needed for Evacuation & Recharging ....
Installing Evacuation and Recharging
Equipment For Reciprocating Compressors ................
Installing Evacuation and Recharging
Equipment For Rotary Compressors ..........................
Evacuating System ..................................................
Charging The System ..............................................
Preparing The Charging Cylinder ...........................
Vacuum Pump Maintenance .....................................
6-1
6-2
6-2
6-2
6-2
6-3
6-3
6-3
6-3
6-4
6-4
6-5
6-6
6-6
6-6
6-7
6-8
6-8
6-8
6-8
6-8
6-9
6-9
6-9
6-10
6-11
6-11
6-11
6-12
6-12
6-13
Section 7 Wiring Diagrams
Mini Air Conditioner Models
FAX052P7A & FAX054P7A Wire Diagram ...................
7-1
Mini Compact Air Conditioner Models
FAA055P7A, FAA062P7A, FAA065P7A, FAA082P7A,
FAA084P7A & FAA086P7A
Compact Air Conditioner Models
FAC102P1A, FAC105P1A, FAC106P1A, FAC122P1A,
FAC125P1A & FAC126P1A
Wire Diagram..........................................................
7-2
Compact Air Conditioner Models
FAC104P1A, FAC107P1A, FAC124P1A & FAC127P1A
Median Air Conditioner Models
FAM156R1A & FAM186R2A-1 Wire Diagram ..............
7-3
Median Air Conditioner Models
FAM157R1A & FAM187R2A-1 Wire Diagram ..............
7-4
Median Air Conditioner Models
FAM18ER2A-1 Wire Diagram ....................................
7-5
Heavy Duty Air Conditioner Models
FAS226R2A, FAS256R2A, FAS257R2A, FAS296R2A &
FAS297R2A Wire Diagram ........................................
7-6
Heavy Duty Air Conditioner Models
FAS25ER2A Wire Diagram ........................................
7-7
Through The Wall Air Conditioners Models
FAH086R1T, FAH106R1T, FAH106R2T & FAH126R2T
Wire Diagram..........................................................
7-8
Through The Wall Air Conditioner Models
FAH08ER1T, FAH10ER2T & FAH12ER2T Wire Diagram
7-9
Through The Wall Air Conditioners Model
FAH146R2T & FAH14ER2T Wire Diagram .................. 7-10
Slider/Casement Air Conditioners Model
FAK085R7V, FAK104R1V, FAK105R7V & FAK124R1V
Wire Diagram.......................................................... 7-11
1-4
Section 1 Basic Information
WARNING
Room Air Conditioners manufactured after August 1st, 2004 are equipped with a new industry
regulated power cord with either of the following in the plug-head or in line:
LCDI: Leakage Current Detection Interrupter
AFCI: Arc-Fault Circuit Interrupter.
All Frigidaire products have an LCDI located in the plug head or in-line.
WARNING
This service manual is intended for use by persons having electrical and mechanical training and a
level of knowledge of these subjects generally considered acceptable in the appliance repair trade.
Electrolux home products cannot be responsible, nor assume any liability, for injury or damage of
any kind arising from the use of this manual.
WARNING
The power supply cord contains a current device that senses damage to the power cord. To test your
power supply cord do the following:
1. Plug in the Air Conditioner.
2. The power supply cord will have TWO buttons on the plug head. Press the TEST button. You will
notice a click as the RESET button pops out.
3. Press the RESET button. Again you will notice a click as the button engages.
4. The power supply cord is now supplying electricity to the unit. (On some products this is also
indicated by a light on the plug head).
Notes
1. Do not use this device to turn the unit on or off.
2. Always make sure the RESET button is pushed in for correct operation.
3. The power supply cord must be replaced if it fails to reset when either the TEST button is pushed, or
it cannot be reset. A new one can be obtained from the product manufacturer.
4. If power supply cord is damaged, it CANNOT be repaired, it MUST be replaced by one obtained from
the product manufacturer.
Plug in &
Press RESET
RESET
TEST
NOTE: Some plugs have the
buttons on the side.
1-5
Section 1 Basic Information
Read all instructions before using this air conditioner.
WARNING
Do not store or use gasoline or other flammable vapors and liquids in the vicinity of this or any other
appliance. Read product labels for flammability and other warnings.
WARNING
To reduce the risk of fire, electrical shock, or injury to persons when using your air conditioner, follow
basic precautions, including the following:
1. Be sure the electrical service is adequate for the model you have chosen. This information can
be found on the serial plate, which is located either on the side of the cabinet or behind the grille.
2. If the air conditioner is to be installed in a window, you will probably want to clean both sides of
the glass first. If the window is a triple-track type with a screen panel included, remove the screen
completely before installation.
3. Be sure the air conditioner has been securely and correctly installed according to the separate
installation instructions provided with the unit.
4. Save this manual and the installation instructions for possible future use in removing or reinstalling
this unit.
WARNING
Electrical Information
The electrical rating of the room air conditioner is
stated on the serial plate. Refer to the rating when
checking the electrical requirements.
1. Be sure the air conditioner is properly grounded.
To minimize shock and fire hazards, proper
grounding is important. The power cord is
equipped with a three-prong grounding plug for
protection against shock hazards.
2. The air conditioner is to be used in a properly
grounded wall receptacle. If the wall receptacle
is to be used is not adequately grounded or
protected by a time delay fuse or circuit breaker,
have a qualified electrician install the proper
receptacle.
3. Do not run air conditioner with outside
protective cover in place. This could result in
mechanical damage within the air conditioner.
4. When handling the air conditioner, be careful
to avoid cuts from sharp metal fins on front and
rear coils.
5. Do not use an extension cord or an adapter plug.
1-6
WARNING Avoid fire hazard or
electric shock. Do not use an extension
cord or an adaptor plug. Do not remove
any prong from the power cord.
Grounding type
wall receptacle
Do not, under
any circumstances,
cut, remove,
or bypass the
grounding prong.
Power supply cord with
3-prong grounding plug
and current detection
device.
Section 1 Basic Information
MODELS
Mini
FAX Series
• 5,000 BTU cooling capacity
• Rotary fan control on base model
• Units with electronic controls including remote
available
• Cools 150 sq. ft. rooms
• 2-way air direction control
• Slide-out filter access
• Pleated quick mount window kit included for easy
installation.
Mini Compact
FAA Series
• 5,200 to 8,000 BTU cooling capacity
• Rotary fan 3-speed control on base models
• Units with full-function electronic controls available
• Some models have a full function remote control w/
remote thermostat
• Multi-Step fan speeds on electronic models
• Cools room sizes from 165 to 350 sq. ft.
• 8-way air direction control
• Tilt-out filter access
• Clean air ionizer available on some models
• ENERGY STAR®models available
• Pleated quick mount window kit included for easy
installation.
Compact
FAC Series
• 10,000 to 12,000 BTU cooling capacity
• Rotary fan 3-speed control on base models
• Units with full-function electronic controls available
• Some models have a full function remote control w/
remote thermostat
• Multi-Step fan speeds on electronic models
• Cools room sizes from 500 to 640 sq. ft.
• 8-way air direction control
• Tilt-out filter access
• Clean air ionizer available on some models
• ENERGY STAR®models available
• Pleated quick mount window kit included for easy
installation
• FAC109S1A available with environment friendly
refrigerant R410A.
1-7
Through-The-Wall
FAH Series
• 8,000 to 14,000 BTU cooling capacity
• 4,200 to 10,600 BTU heating capacity available on
select heat and cool models
• 3 fan speeds
• Units with full-function electronic controls available.
• Temperature sensing remote control with thermostat
on select models
• Cools or heats room sizes from 350 to 640 sq. ft.
• 4-way air direction control
• Fits all existing wall sleeves. New wall sleeves
available.
• Optional window mounting kit available
• Available in 115V or 230/208V
• ENERGY STAR® models available
• Universal trim kit covers space between the sleeve
and unit.
Slider Casement / Slide Out
FAK Series & FAZ Series
• 8,000 to 12,000 BTU cooling capacity
• Some FAZ Series have heat and cooling capacity
• 3 fan speeds
• Units have full-function electronic controls with
remote
• Cools room sizes from 350 to 640 sq. ft.
• 4-way air direction control
• Easy mount window kit
• Optional high window kit available
• 3 models available
• ENERGY STAR® model available.
Section 1 Basic Information
Median
FAM Series
• 15,100 to 18,500 BTU cooling capacity
• 16,000 BTU heating capacity available on select heat
and cool models
• Rotary fan 3-speed control available on base model
• Units with full-function electronic controls available.
Temperature sensing remote control with thermostat
on select models
• Multi-Step fan speeds
• Cools room sizes from 900 to 1,170 sq. ft.
• Multi-directional air control
• Tilt-out filter access
• Clean air ionizer available
• 3 models available
• ENERGY STAR® models available
• Pleated quick mount window kit included for clean
installation
• Slide-out chassis
Heavy Duty
FAS Series
• 22,000 to 28,500 BTU cooling capacity
• 16,000 BTU heating capacity available on select heat
and cool model
• Rotary fan 3-speed control available on base model
• Units with full-function electronic controls available.
Temperature sensing remote control with thermostat
on select models
• Multi-Step fan speeds
• Cools room sizes from 1,435 to 1,960 sq. ft.
• Multi-directional air control
• Tilt-out filter access
• Clean air ionizer available
• 4 models available
• ENERGY STAR® models available
• Pleated quick mount window kit included for
clean installation
• Slide-out chassis
1-8
Features & Benefits
Electronic Controls
Set the room temperature at the preferred comfort level.
Electronic controls and convenient temperature readout
ensures the unit is set at the precise comfort level you
require. All electronic models maintain the temperature to
be within 2 degrees of the set temperature.
Anti-Microbial Filter & Clean Air Purification
Enjoy a cool, comfortable room with air cleaned by a
patented clean air anti-microbial filter, which reduces bacteria, odors and other particles. The clean air purification
also improves air quality above standard filter methods
resulting in relief for allergy and respiratory ailment
sufferers. Look for models with the clean air ionizer for
improved air filtration performance.
Multi-Speed Fan
Cool down a room at the rate you decide. Auto Temp
adjusts the fan speed up or down until the room reaches
the desired temperature. A multi-speed fan allows you to
choose from 3 speeds.
Sleep Mode
Provides worry-free operation and energy savings while
you sleep. 30 minutes after you set this mode, temperature increases two degrees. After 30 minutes more,
it goes up another two, then holds for 7 hours before
returning to the original temperature.
Energy Saver
Energy Saver mode cycles the fan and compressor until
the room temperature increases above the set temperature, then returns to normal operation until the set
temperature in the room is again reached.
Full Function Remote
The patented Temperature-Sensing Remote offers an
added level of comfort and control by offering temperature monitoring by the remote control itself or at the air
conditioner. Take room temperature up or down a notch,
right from your favorite armchair. This convenient remote
offers precise temperature selection from a distance.
Look for models with Remote Thermostat that allow the
unit to sense temperature where it is important,
where you are at with the remote control.
Section 1 Basic Information
Accessories
Through The Wall Builder Sleeve
Attractive Architectural Grille (EA109T)
Heavy-duty, heavy-gauge, anodized aluminum rear grille
kit has easy indoor installation and can be ordered for all
through-the-wall models.
Through-The-Wall Builder Sleeve (EA108T) All-weather,
galvanized steel with internal support for security.
Includes a weather-tight seal, adjustable mounting
brackets and aluminum rear grille.
Universal Large A/C Support Bracket (AC-160)
Supports standard 12,000 BTU - 24,000 BTU
A/C units weighing up to 160 lbs. Provides window unit
security and has easy indoor installation.
Universal Small A/C Support Bracket (AC-080)
Supports standard 5,000 BTU - 10,000 BTU A/C units
weighing up to 80 lbs.
Universal Antimicrobial Cut-To-Fit Filter
(5304437663)
Washable, reusable filter resists bacteria, mold and fungus growth, removes common particulates and lasts six
times longer than standard foam filters
Model
EA108T
Dimensions
Cabinet Height
Cabinet Width
Cabinet Depth
Carton Height
Carton Width
Carton Depth
Unit Weight
Shipping Weight
15-1/4"
25-1/2"
17-1/2"
17-1/8"
27-1/6"
18-8/9"
25 Lbs.
30 Lbs.
A/C Weather Seal (5304426311)
Foam compresses to seal window unit or sash, reducing vibration, outside noises, dust, insects, cold drafts in
winter and warm air during summer.
Through-The-Wall Window Mounting Kit
(EA102T)
Adapts Frigidaire® Through-The-Wall models for 28” to 41” wide, 17-1/2” minimum high windows.
Specially treated quick-mount side panels resist UV-ray deterioration. Includes rear grille.
Chassis
Model Prefix
Mini
Mini Compact
Compact
Slide-Out
Median
Heavy Duty
Sliders
Thru the Walls (TTW)
FAX
FAA
FAC
FAZ
FAM
FAS
FAK
FAH
Window Mount
Yes
Yes
Yes
Yes
Yes
Yes
Yes
Note 1
Thru Wall Mounting
No
No
No
Note
Note
Note
Note
Note
2
2
2
3
4
Thru-the-Wall Sleeve
No
No
No
No
No
No
No
Yes
NOTE
Note
Note
Note
Note
1:
2:
3:
4:
Requires optional window kit not included.
Mounts in unit shell - Wall thickness limited - see Installation Instructions.
Not intended to be wall mounted.
Should be installed in TTW sleeve if wall mounted
1-9
Section 1 Basic Information
How to Choose a Room Air Conditioner
Compared to large capacity central units, room air conditioners have several advantages. The initial cost of a room air
conditioning unit is significantly lower that the cost of central air. Because room air conditioners are designed for
cooling small spaces, operating costs are reduced. And, room air conditioners can provide personalized temperature
and humidity controls that central systems cannot.
Calculating Cooling Capacity
Cooling capacity is the critical factor in properly selecting a room air conditioner. Cooling capacity is measured in British Thermal Units (BTUs) and typical models will range in capacity from 5,000 BTUs to 28,500 BTUs. Choosing an
undersized unit will overwork the unit and it will not cool properly. Choosing an oversized unit will cost more to buy
and operate and it will not dehumidify properly. Your dealer can help you to calculate capacity. Be prepared to provide
specific information on:
•
•
•
•
•
•
Room dimensions
A simple floor plan to show the location of doors and north-facing windows
The number of people it will serve
Sources of heat such as lamps, TV and appliances
An explanation of what’s above the intended room
Your insulation provisions
Cooling Capacity by Room Size
Measure the length and width of the area to be cooled. Multiply the length by the width to determine square footage
or square meters. Locate the room size in the chart below to select the appropriate BTUs. Then use the product information to select the unit for your room.
Room Size
BTU
Sq. Feet.
Sq. Meters
150
165
216
350
425
500
640
900
1,110
1,170
1,435
1,672
1,960
14
15
20
33
39
46
60
84
103
109
133
154
182
Up to 5,000
5,200
6,000
8,000
9,000
10,000
14,000
15,100
18,000
18,500
22,000
25,000
28,500
NOTE
When cooling rooms with uninsulated ceilings, great rooms, or southern or western sun exposures – step up to the
next BTU size or consult your sales professional.
1-10
Section 1 Basic Information
Model Dimensions
The drawings below and the slider casement illustration on the next page are for referencing the product specification
charts on pages 1-13 thru 1-23.
Median
Mini
(E)
(E) 23"/36"
(D)
(D) 13"
(A)
(A) 11¾”
(B)
(B) 15½”
(C)
(F)
(C) 12"
Heavy Duty
Mini Compact
(E) 23"/ 36"
(D) 14"
(E)
(D)
(A) 12½”
(A)
(B) 18½”
(B)
(C) 14"
(15½”)
(C)
(F)
Thru the Wall
Compact
(E) 23"/ 36"
(A)
(D) 14¼”
(A) 14"
(B)
(B) 19"
(C) 19¾”)
(21¼”)
(C)
(D)
1-11
Section 1 Basic Information
Slider/Casement
(E) 15½”
Filler Panel
(D) 21½"/ 40"
(A) 20¼”
(F) 8½”
(B) 14¼”
(C) 23"
(24½”)
Electrical Connections
The Mini (FAX), Mini Compact (FAA), Compact (FAC) and
Slider/Casement (FAK) Series of air conditioners all use a
NEMA (A) type plug.
The Heavy Duty (FAS) Series of air conditioners use
NEMA (B), (C), or (D) type plugs depending on model.
* Plug Type (NEMA)
* Plug Type (NEMA)
(B)
6-15P
(A)
5-15P
The Median (FAM) Series of air conditioners use NEMA
(A), (B), or (D) type plugs depending on model.
1-12
(B)
6-15P
(D)
6-30P
The Thru-The-Wall (FAH) Series of air conditioners use
NEMA (A) or (B) type plugs depending on model.
* Plug Type (NEMA)
* Plug Type (NEMA)
(A)
5-15P
(C)
6-20P
(D)
6-30P
(A)
5-15P
(B)
6-15P
Section 1 Basic Information
Product Specification - Mini Air Conditioners
Mini Compact
FAX052P7A
Frigidaire
No
FAX054P7A
Frigidaire
No
FAA055P7A
Frigidaire
Yes
FAA062P7A
Frigidaire
No
5,000
5,000
5,200
6,000
0.8
150
9.7
0.8
150
9.7
1.1
165
11.0
1.3
216
9.7
115
5.2
115
5.2
115
4.9
115
6.0
515
515
475
620
6’
LCDI (A)
6’
LCDI (A)
6’
LCDI (A)
6’
LCDI (A)
Controls
Fan Speeds (Cool/Fan/Heat)
Low Voltage Start-Up
Auto Cool Function
Energy Save
Sleep Mode
Filter Check
24 Hour On/Off Timer
Remote Control
Mechanical
2/2/•
•
•
•
•
•
No
Electronic
3/3/•
•
•
•
•
•
No
Electronic
3/3/•
•
•
•
•
•
Full-Function
Mechanical
3/3/•
•
•
•
•
•
No
Air CFM (High/Med/Low)
Air Direction Control
Fresh Air/Exhaust Vent/Closed
Filter Type
Filter Access
Slide-Out Chassis
Cabinet Louvers
Rear Grill
Window Mounting Kit
150-110
2-Way
No/No/Yes
Antimicrobial Mesh
Slide-Out
•
•
•
Pleated Quick Mount
150-110
2-Way
No/No/Yes
Antimicrobial Mesh
Slide-Out
•
•
•
Pleated Quick Mount
180 /162/150
8-Way
No/No/Yes
Clean Air Ionizer
Tilt-Out
•
•
•
Pleated Quick Mount
174/156/144
8-Way
No/No/Yes
Antimicrobial Mesh
Tilt-Out
•
•
•
Pleated Quick Mount
11-3/4”
15-1/2”
12”
13”
23”/36”
•
15”
18-1/16”
15-1/2”
40 Lbs.
45 Lbs.
27081-9
11-3/4”
15-1/2”
12”
13”
23”/36”
•
15”
18-1/16”
15-1/2”
40 Lbs.
45 Lbs.
27082-6
12-1/2”
18-1/2”
14” (15-1/2”)
14”
23”/36”
•
14-3/4”
21-3/4”
18-1/4”
48 Lbs.
55 Lbs.
27084-0
12-1/2”
18-1/2”
14” (15-1/2”)
14”
23”/36”
•
14-3/4”
21-3/4”
18-1/4”
49 Lbs.
56 Lbs.
27087-1
Model
Series
ENERGY STAR®
Performance
BTU (Cool)
BTU (Heat)
Dehumidification (Pints/Hour)
Cool Area (Sq. Ft.)
EER
Electrical
Volts
Amps (Cool)
Amps (Heat)
Watts (Cool)
Watts (Heat)
Length of Power Cord
Plug Type (NEMA)*
Features
Dimensions
A-Cabinet Height
B-Cabinet Width
C-Cabinet Depth (with Front)
D-Window Height (Min.)
E-Window Width (Min./Max.)
F-Max. Wall Thickness
Carton Height
Carton Width
Carton Depth
Unit Weight
Shipping Weight
UPC (0-12505)
NOTE: All the models available in the Series may not be listed in the chart above.
1-13
Section 1 Basic Information
Product Specification - Mini Compact Air Conditioners
FAA065P7A
Frigidaire
Yes
FAA082P7A
Frigidaire
No
FAA084P7A
Frigidaire
No
FAA086P7A
Frigidaire
Yes
6,000
8,000
8,000
8,000
1.3
216
10.7
1.7
350
9.8
1.7
350
9.8
1.7
350
10.8
115
5.5
115
115
115
560
7.5
815
7.5
815
7.1
740
6’
LCDI (A)
6’
LCDI (A)
6’
LCDI (A)
6’
LCDI (A)
Controls
Fan Speeds (Cool/Fan/Heat)
Low Voltage Start-Up
Auto Cool Function
Energy Save
Sleep Mode
Filter Check
24 Hour On/Off Timer
Remote Control
Electronic
3/3/•
•
•
•
•
•
Full Function
Mechanical
3/3/•
•
•
•
•
•
No
Electronic
3/3/•
•
•
•
•
•
Full-Function
Air CFM (High/Med/Low)
Air Direction Control
Fresh Air/Exhaust Vent/Closed
Filter Type
Filter Access
Slide-Out Chassis
Cabinet Louvers
Rear Grill
Window Mounting Kit
174/156/144
8-Way
No/No/Yes
Clean Air Ionizer
Tilt-Out
•
•
•
Pleated Quick Mount
225/204/186
8-Way
No/No/Yes
Antimicrobial Mesh
Tilt-Out
•
•
•
Pleated Quick Mount
225/204/186
8-Way
No/No/Yes
Antimicrobial Mesh
Tilt-Out
•
•
•
Pleated Quick Mount
Electronic
3/3/•
•
•
•
•
•
Full-Function
& Remote T’Stat
240/216/198
8-Way
No/No/Yes
Clean Air Ionizer
Tilt-Out
•
•
•
Pleated Quick Mount
12-1/2”
18-1/2”
14” (15-1/2”)
14”
23”/36”
•
14-3/4”
21-3/4”
18-1/4”
49 Lbs.
56 Lbs.
27090-1
12-1/2”
18-1/2”
14” (15-1/2”)
14”
23”/36”
•
14-3/4”
21-3/4”
18-1/4”
53 Lbs.
60 Lbs.
27092-5
12-1/2”
18-1/2”
14” (15-1/2”)
14”
23”/36”
•
14-3/4”
21-3/4”
18-1/4”
53 Lbs.
60 Lbs.
27094-9
12-1/2”
18-1/2”
14” (15-1/2”)
14”
23”/36”
•
14-3/4”
21-3/4”
18-1/4”
54 Lbs.
61 Lbs.
27096-3
Model
Series
ENERGY STAR®
Performance
BTU (Cool)
BTU (Heat)
Dehumidification (Pints/Hour)
Cool Area (Sq. Ft.)
EER
Electrical
Volts
Amps (Cool)
Amps (Heat)
Watts (Cool)
Watts (Heat)
Length of Power Cord
Plug Type (NEMA)*
Features
Dimensions
A-Cabinet Height
B-Cabinet Width
C-Cabinet Depth (with Front)
D-Window Height (Min.)
E-Window Width (Min./Max.)
F-Max. Wall Thickness
Carton Height
Carton Width
Carton Depth
Unit Weight
Shipping Weight
UPC (0-12505)
NOTE: All the models available in the Series may not be listed in the chart above.
1-14
Section 1 Basic Information
Product Specification - Compact Air Conditioners
Model
Series
ENERGY STAR®
FAC102P1A
Frigidaire
No
FAC104P1A
Frigidaire
No
FAC106P1A
Frigidaire
Yes
FAC122P1A
Frigidaire
No
10,000
10,000
10,000
12,000
2.7
500
9.8
2.7
500
9.8
3.0
500
10.8
3.8
640
9.8
115
10.2
115
10.2
115
9.7
115
11.6
1,020
1,020
925
1,220
6’
LCDI (A)
6’
LCDI (A)
6’
LCDI (A)
6’
LCDI (A)
Mechanical
3/3/•
•
•
•
•
•
No
Electronic
3/3/•
•
•
•
•
•
Full-Function
Performance
BTU (Cool)
BTU (Heat)
Dehumidification (Pints/Hour)
Cool Area (Sq. Ft.)
EER
Electrical
Volts
Amps (Cool)
Amps (Heat)
Watts (Cool)
Watts (Heat)
Length of Power Cord
Plug Type (NEMA)*
Features
Electronic
3/3/•
•
•
•
•
•
Full-Function
& Remote T’Stat
Air CFM (High/Med/Low)
318/294/270
318/294/270
288/264/240
Air Direction Control
8-Way
8-Way
8-Way
Fresh Air/Exhaust Vent/Closed Yes/Yes/Yes
Yes/Yes/Yes
Yes/Yes/Yes
Filter Type
Antimicrobial Mesh
Antimicrobial Mesh
Clean Air Ionizer
Filter Access
Tilt-Out
Tilt-Out
Tilt-Out
Slide-Out Chassis
•
•
•
Cabinet Louvers
•
•
•
Rear Grill
•
•
•
Window Mounting Kit
Pleated Quick Mount Pleated Quick Mount Pleated Quick Mount
Controls
Fan Speeds (Cool/Fan/Heat)
Low Voltage Start-Up
Auto Cool Function
Energy Save
Sleep Mode
Filter Check
24 Hour On/Off Timer
Remote Control
Mechanical
3/3/•
•
•
•
•
•
No
288/264/240
8-Way
Yes/Yes/Yes
Antimicrobial Mesh
Tilt-Out
•
•
•
Pleated Quick Mount
Dimensions
A-Cabinet Height
B-Cabinet Width
C-Cabinet Depth (with Front)
D-Window Height (Min.)
E-Window Width (Min./Max.)
F-Max. Wall Thickness
Carton Height
Carton Width
Carton Depth
Unit Weight
Shipping Weight
UPC (0-12505)
14”
19”
19-3/4” (21-1/4”)
14-1/4”
23”/36”
•
16-3/4”
22-1/4”
23-1/4”
68 Lbs.
76 Lbs.
27097-0
14”
19”
19-3/4” (21-1/4”)
14-1/4”
23”/36”
•
16-3/4”
22-1/4”
23-1/4”
70 Lbs.
78 Lbs.
27098-7
NOTE: All the models available in the Series may not be listed in the chart above.
14”
19”
19-3/4” (21-1/4”)
14-1/4”
23”/36”
•
16-3/4”
22-1/4”
23-1/4”
73 Lbs.
81 Lbs.
27100-7
14”
19”
19-3/4” (21-1/4”)
14-1/4”
23”/36”
•
16-3/4”
22-1/4”
23-1/4”
75 Lbs.
83 Lbs.
27101-4
1-15
Section 1 Basic Information
Product Specification - Compact Air Conditioners
Model
Series
ENERGY STAR®
FAC124P1A
Frigidaire
No
FAC126P1A
Frigidaire
Yes
12,000
12,000
3.8
640
9.8
3.8
640
10.8
115
10.2
115
10.2
1,020
1,020
6’
LCDI (A)
6’
LCDI (A)
Performance
BTU (Cool)
BTU (Heat)
Dehumidification (Pints/Hour)
Cool Area (Sq. Ft.)
EER
Electrical
Volts
Amps (Cool)
Amps (Heat)
Watts (Cool)
Watts (Heat)
Length of Power Cord
Plug Type (NEMA)*
Features
Electronic
3/3/•
•
•
•
•
•
Full-Function
Electronic
3/3/•
•
•
•
•
•
Full-Function
& Remote T’Stat
288/264/240
Air CFM (High/Med/Low)
288/264/240
8-Way
Air Direction Control
8-Way
Fresh Air/Exhaust Vent/Closed Yes/Yes/Yes
Yes/Yes/Yes
Antimicrobial Mesh
Filter Type
Clean Air Ionizer
Tilt-Out
Filter Access
Tilt-Out
•
Slide-Out Chassis
•
•
Cabinet Louvers
•
•
Rear Grill
•
Pleated Quick Mount Pleated Quick Mount
Window Mounting Kit
Controls
Fan Speeds (Cool/Fan/Heat)
Low Voltage Start-Up
Auto Cool Function
Energy Save
Sleep Mode
Filter Check
24 Hour On/Off Timer
Remote Control
Dimensions
A-Cabinet Height
B-Cabinet Width
C-Cabinet Depth (with Front)
D-Window Height (Min.)
E-Window Width (Min./Max.)
F-Max. Wall Thickness
Carton Height
Carton Width
Carton Depth
Unit Weight
Shipping Weight
UPC (0-12505)
14”
19”
19-3/4” (21-1/4”)
14-1/4”
23”/36”
•
16-3/4”
22-1/4”
23-1/4”
75 Lbs.
83 Lbs.
27102-1
14”
19”
19-3/4” (21-1/4”)
14-1/4”
23”/36”
•
16-3/4”
22-1/4”
23-1/4”
80 Lbs.
88 Lbs.
27104-5
NOTE: All the models available in the Series may not be listed in the chart above.
1-16
Section 1 Basic Information
Product Specification - Median Air Conditioners
Model
Series
ENERGY STAR®
FAM156R1A
Frigidaire
Yes
FAM186R2A
Frigidaire
Yes
FAM18ER2A
Frigidaire
No
15,100
18,500/18,200
3.8
900
10.7
5.5
1,170
10.7
18,500/18,200
16,000/13,000
5.5
1,170
9.7
115
12.0
230/208
7.9/8.6
1,410
1,730/1,700
4’
LCDI (A)
4’
LCDI (B)
230/208
8.4/9.2
22.2/20.0
1,900/1,880
4,900/4,000
4’
LCDI (D)
Electronic
3/3/•
•
•
•
•
•
Full-Function
& Remote T’Stat
450/400/350
Multi-Directional
Yes/Yes/Yes
Clean Air Ionizer
Tilt-Out
•
•
•
Pleated Quick Mount
Electronic
3/3/3
•
•
•
•
•
•
Full-Function
with Heat
430/390/350
Multi-Directional
Yes/Yes/Yes
Antimicrobial Mesh
Tilt-Out
•
•
•
Pleated Quick Mount
17-3/4”
23-5/8”
24” (25-3/8”)
18-1/2”
26-1/2”/40-1/2”
8”
19-3/4”
26-1/16”
30-1/4”
122 Lbs.
142 Lbs.
27185-4
17-3/4”
23-5/8”
24” (25-3/8”)
18-1/2”
26-1/2”/40-1/2”
8”
19-3/4”
26-1/16”
30-1/4”
123 Lbs.
143 Lbs.
27184-7
Performance
BTU (Cool)
BTU (Heat)
Dehumidification (Pints/Hour)
Cool Area (Sq. Ft.)
EER
Electrical
Volts
Amps (Cool)
Amps (Heat)
Watts (Cool)
Watts (Heat)
Length of Power Cord
Plug Type (NEMA)*
Features
Electronic
3/3/•
•
•
•
•
•
Full-Function
& Remote T’Stat
Air CFM (High/Med/Low)
425/400/375
Air Direction Control
Multi-Directional
Fresh Air/Exhaust Vent/Closed Yes/Yes/Yes
Filter Type
Clean Air Ionizer
Filter Access
Tilt-Out
Slide-Out Chassis
•
Cabinet Louvers
•
Rear Grill
•
Window Mounting Kit
Pleated Quick Mount
Controls
Fan Speeds (Cool/Fan/Heat)
Low Voltage Start-Up
Auto Cool Function
Energy Save
Sleep Mode
Filter Check
24 Hour On/Off Timer
Remote Control
Dimensions
A-Cabinet Height
B-Cabinet Width
C-Cabinet Depth (with Front)
D-Window Height (Min.)
E-Window Width (Min./Max.)
F-Max. Wall Thickness
Carton Height
Carton Width
Carton Depth
Unit Weight
Shipping Weight
UPC (0-12505)
17-3/4”
23-5/8”
24” (25-3/8”)
18-1/2”
26-1/2”/40-1/2”
8”
19-3/4”
26-1/16”
30-1/4”
111 Lbs.
131 Lbs.
27182-3
NOTE: All the models available in the Series may not be listed in the chart above.
1-17
Section 1 Basic Information
Product Specification - Heavy Duty Air Conditioners
Model
Series
ENERGY STAR®
FAS226R2A
Frigidaire
Yes
FAS256R2A
Frigidaire
Yes
FAS25ER2A
Frigidaire
No
FAS296R2A
Frigidaire
No
22,000/21,600
25,000/24,700
28,500/28,000
7.2
1,435
9.4
8.0
1,672
9.4
25,000/24,700
16,000/13,000
8.0
1,672
9.4
230/208
10.8/11.3
230/208
12.0/13.0
230/208
15.5/16.6
2,340/2,300
2,660/2,630
4’
LCDI (B)
4’
LCDI (B)
230/208
12.0/13.0
22.5/20.0
2,660/2,630
4,900/4,000
4’
LCDI (D)
Electronic
3/3/•
•
•
•
•
•
Full-Function
& Remote T’Stat
492/421/350
Multi-Directional
Yes/Yes/Yes
Clean Air Ionizer
Tilt-Out
•
•
•
Pleated Quick Mount
Electronic
3/3/3
•
•
•
•
•
•
Full-Function
with Heat
492/421/350
Multi-Directional
Yes/Yes/Yes
Antimicrobial Mesh
Tilt-Out
•
•
•
Pleated Quick Mount
Electronic
3/3/3
•
•
•
•
•
•
Full-Function
& Remote T’Stat
500/437/375
Multi-Directional
Yes/Yes/Yes
Clean Air Ionizer
Tilt-Out
•
•
•
Pleated Quick Mount
18-5/8”
26-1/2”
25” (26-1/2”)
19”
31”/42”
10”
20-1/4”
29-1/2”
31-1/4”
142 Lbs.
162 Lbs.
27188-5
18-5/8”
26-1/2”
25” (26-1/2”)
19”
31”/42”
10”
21-1/4”
29-1/2”
31-1/4”
145 Lbs.
165 Lbs.
27190-8
18-5/8”
26-1/2”
25” (26-1/2”)
19”
31”/42”
10”
21-1/4”
29-1/2”
31-1/4”
161 Lbs.
181 Lbs.
27191-5
Performance
BTU (Cool)
BTU (Heat)
Dehumidification (Pints/Hour)
Cool Area (Sq. Ft.)
EER
9.5
1,960
8.5
Electrical
Volts
Amps (Cool)
Amps (Heat)
Watts (Cool)
Watts (Heat)
Length of Power Cord
Plug Type (NEMA)*
3,365/3,300
4’
LCDI (D)
Features
Electronic
3/3/•
•
•
•
•
•
Full Function
& Remote T’Stat
Air CFM (High/Med/Low)
500/425/350
Air Direction Control
Multi-Directional
Fresh Air/Exhaust Vent/Closed Yes/Yes/Yes
Filter Type
Clean Air Ionizer
Filter Access
Tilt-Out
Slide-Out Chassis
•
Cabinet Louvers
•
Rear Grill
•
Window Mounting Kit
Pleated Quick Mount
Controls
Fan Speeds (Cool/Fan/Heat)
Low Voltage Start-Up
Auto Cool Function
Energy Save
Sleep Mode
Filter Check
24 Hour On/Off Timer
Remote Control
Dimensions
A-Cabinet Height
B-Cabinet Width
C-Cabinet Depth (with Front)
D-Window Height (Min.)
E-Window Width (Min./Max.)
F-Max. Wall Thickness
Carton Height
Carton Width
Carton Depth
Unit Weight
Shipping Weight
UPC (0-12505)
18-5/8”
26-1/2”
25” (26-1/2”)
19”
31”/42”
10”
20-1/4”
29-1/2”
31-1/4”
136 Lbs.
151 Lbs.
27187-8
NOTE: All the models available in the Series may not be listed in the chart above.
1-18
Section 1 Basic Information
Product Specification - Through The Wall Air Conditioners
Model
Series
ENERGY STAR®
FAH086S1T
Frigidaire
Yes
FAH08ES1T
Frigidaire
No
FAH08ER1T
Frigidaire
No
FAH106S1T
Frigidaire
Yes
8,000
8,000
4,200
1.8
350
9.4
8,000
4,200
1.8
350
9.4
10,000
115
7.4
11.5
850
1,250
5.9’
LCDI (A)
115
7.6
12.3
850
1,250
4.4’
LCDI (A)
115
9.9
Electronic
3/3/3
•
•
•
•
•
•
Full-Function
with Heat
250/230/205
4-Way
No/No/Yes
Antimicrobial Mesh
Slide-Out
•
•
•
Electronic
3/3/3
•
•
•
•
•
•
Full-Function
Universal Trim Kit
250/230/205
4-Way
No/No/Yes
Antimicrobial Mesh
Slide-Out
•
•
•
Electronic
3/3/•
•
•
•
•
•
Full-Function
Remote T’Stat
258/224/185
4-Way
No/No/Yes
Antimicrobial Mesh
Slide-Out
•
•
•
Universal Trim Kit
Universal Trim Kit
14-1/2”
24”
19” (20-1/2”)
18”
17”
27”
28”
76 Lbs.
101 Lbs.
27198-4
14-1/2”
24”
19” (20-1/2”)
18”
17”
27”
28”
76 Lbs.
86 Lbs.
27306-3
Performance
BTU (Cool)
BTU (Heat)
Dehumidification (Pints/Hour)
Cool Area (Sq. Ft.)
EER
1.8
350
9.4
2.6
500
9.4
Electrical
Volts
Amps (Cool)
Amps (Heat)
Watts (Cool)
Watts (Heat)
Length of Power Cord
Plug Type (NEMA)*
115
7.4
850
5.9’
LCDI (A)
1,065
5.9’
LCDI (A)
Features
Electronic
3/3/•
•
•
•
•
•
Full-Function
Remote T’Stat
Air CFM (High/Med/Low)
250/230/205
Air Direction Control
4-Way
Fresh Air/Exhaust Vent/Closed No/No/Yes
Filter Type
Antimicrobial Mesh
Filter Access
Slide-Out
Slide-Out Chassis
•
Cabinet Louvers
•
Rear Grill
•
Window Mounting Kit
Universal Trim Kit
Controls
Fan Speeds (Cool/Fan/Heat)
Low Voltage Start-Up
Auto Cool Function
Energy Save
Sleep Mode
Filter Check
24 Hour On/Off Timer
Remote Control
Dimensions
A-Cabinet Height
B-Cabinet Width
C-Cabinet Depth (with Front)
D-Window Height (Min.)
Carton Height
Carton Width
Carton Depth
Unit Weight
Shipping Weight
UPC (0-12505)
14-1/2”
24”
19” (20-1/2”)
18”
17”
27”
28”
69 Lbs.
79 Lbs.
27305-6
14-1/2”
24”
19” (20-1/2”)
18”
17”
27”
28”
75 Lbs.
85 Lbs.
27310-0
NOTE: All the models available in the Series may not be listed in the chart above.
1-19
Section 1 Basic Information
Product Specification - Through The Wall Air Conditioners
Model
Series
ENERGY STAR®
FAH106S2T
Frigidaire
Yes
FAH10ES2T
Frigidaire
No
FAH10ER2T
Frigidaire
No
FAH126S2T
Frigidaire
No
10,000/9,800
10,000/9,800
10,000/8,600
2.8
500
9.4
10,000/9,800
10,000/8,600
2.8
500
9.4
12,000/11,700
230/208
4.9/5.3
15.5/14.2
1,065/1,045
3,450/2,800
5.9’
LCDI (B)
230/208
4.8/5.1
15.3/14.0
1,065/1,045
3,450/2,800
4.4’
LCDI (B)
230/208
5.9/6.6
Electronic
3/3/3
•
•
•
•
•
•
Full-Function
with Heat
252/221/185
4-Way
No/No/Yes
Antimicrobial Mesh
Slide-Out
•
•
•
Electronic
3/3/3
•
•
•
•
•
•
Full-Function
with Heat
252/221/185
4-Way
No/No/Yes
Antimicrobial Mesh
Slide-Out
•
•
•
Electronic
3/3/•
•
•
•
•
•
Full-Function
Remote T’Stat
264/230/195
4-Way
No/No/Yes
Antimicrobial Mesh
Slide-Out
•
•
•
Universal Trim Kit
Universal Trim Kit
14-1/2”
24”
19” (20-1/2”)
18”
17”
27”
28”
87 Lbs.
108 Lbs.
27199-1
14-1/2”
24”
19” (20-1/2”)
18”
17”
27”
28”
80 Lbs.
90 Lbs.
27308-7
Performance
BTU (Cool)
BTU (Heat)
Dehumidification (Pints/Hour)
Cool Area (Sq. Ft.)
EER
2.8
500
9.4
3.5
640
9.0
Electrical
Volts
Amps (Cool)
Amps (Heat)
Watts (Cool)
Watts (Heat)
Length of Power Cord
Plug Type (NEMA)*
230/208
4.9/5.3
1,060/1,045
5.9’
LCDI (B)
1,335/1,300
5.9’
LCDI (B)
Features
Electronic
3/3/•
•
•
•
•
•
Full-Function
Remote T’Stat
Air CFM (High/Med/Low)
252/221/185
Air Direction Control
4-Way
Fresh Air/Exhaust Vent/Closed No/No/Yes
Filter Type
Antimicrobial Mesh
Filter Access
Slide-Out
Slide-Out Chassis
•
Cabinet Louvers
•
Rear Grill
•
Window Mounting Kit
Universal Trim Kit
Controls
Fan Speeds (Cool/Fan/Heat)
Low Voltage Start-Up
Auto Cool Function
Energy Save
Sleep Mode
Filter Check
24 Hour On/Off Timer
Remote Control
Universal Trim Kit
Dimensions
A-Cabinet Height
B-Cabinet Width
C-Cabinet Depth (with Front)
D-Window Height (Min.)
Carton Height
Carton Width
Carton Depth
Unit Weight
Shipping Weight
UPC (0-12505)
14-1/2”
24”
19” (20-1/2”)
18”
17”
27”
28”
78 Lbs.
88 Lbs.
27307-0
14-1/2”
24”
19” (20-1/2”)
18”
17”
27”
28”
84 Lbs.
94 Lbs.
27311-7
NOTE: All the models available in the Series may not be listed in the chart above.
1-20
Section 1 Basic Information
Product Specification - Through The Wall Air Conditioners
Model
Series
ENERGY STAR®
FAH126R2T
Frigidaire
No
FAH12ES2T
Frigidaire
No
FAH12ER2T
Frigidaire
No
FAH146S2T
Frigidaire
No
12,000/11,700
12,000/11,700
10,000/8,600
3.5
640
9.0
12,000/11,700
10,000/8,600
3.5
640
9.0
14,000/13,600
230/208
5.9/6.6
15.6/14.3
1,335/1,300
3,450/2,800
5.9’
LCDI (B)
230/208
6.0/6.5
16.0/14.5
1,335/1,300
3,450/2,800
4.4’
LCDI (B)
230/208
7.0/7.9
Electronic
3/3/3
•
•
•
•
•
•
Full-Function
with Heat
264/230/195
4-Way
No/No/Yes
Antimicrobial Mesh
Slide-Out
•
•
•
Electronic
3/3/3
•
•
•
•
•
•
Full-Function
with Heat
264/230/195
4-Way
No/No/Yes
Antimicrobial Mesh
Slide-Out
•
•
•
Electronic
3/3/•
•
•
•
•
•
Full-Function &
Remote T’Stat
312/255/195
4-Way
No/No/Yes
Antimicrobial Mesh
Slide-Out
•
•
•
Universal Trim Kit
Universal Trim Kit
Universal Trim Kit
Universal Trim Kit
14-1/2”
24”
19” (20-1/2”)
18”
17”
27”
28”
86 Lbs.
108 Lbs.
27196-0
Page 7-2
14-1/2”
24”
19” (20-1/2”)
18”
17”
27”
28”
87 Lbs.
97 Lbs.
27312-4
14-1/2”
24”
19” (20-1/2”)
18”
17”
27”
28”
91 Lbs.
112 Lbs.
27200-4
14-1/2”
24”
19” (20-1/2”)
18”
17”
27”
28”
92 Lbs.
102 Lbs.
27309-4
Page 7-2
Page 7-2
Performance
BTU (Cool)
BTU (Heat)
Dehumidification (Pints/Hour)
Cool Area (Sq. Ft.)
EER
3.5
640
9.0
4.3
640
9.0
Electrical
Volts
Amps (Cool)
Amps (Heat)
Watts (Cool)
Watts (Heat)
Length of Power Cord
Plug Type (NEMA)*
230/208
6.0/6.7
1,335/1,300
4.4’
LCDI (B)
1,550/1,520
5.9’
LCDI (B)
Features
Controls
Fan Speeds (Cool/Fan/Heat)
Low Voltage Start-Up
Auto Cool Function
Energy Save
Sleep Mode
Filter Check
24 Hour On/Off Timer
Remote Control
Electronic
3/3/•
•
•
•
•
•
Full-Function
Remote T’Stat
Air CFM (High/Med/Low)
264/230/195
Air Direction Control
4-Way
Fresh Air/Exhaust Vent/Closed No/No/Yes
Filter Type
Antimicrobial Mesh
Filter Access
Slide-Out
Slide-Out Chassis
•
Cabinet Louvers
•
Rear Grill
•
Window Mounting Kit
Dimensions
A-Cabinet Height
B-Cabinet Width
C-Cabinet Depth (with Front)
D-Window Height (Min.)
Carton Height
Carton Width
Carton Depth
Unit Weight
Shipping Weight
UPC (0-12505)
Wring Diagram
NOTE: All the models available in the Series may not be listed in the chart above.
Page 7-2
1-21
Section 1 Basic Information
Product Specification - Through The Wall Air Conditioners
Model
Series
ENERGY STAR®
FAH146R2T
Frigidaire
No
FAH14ER2T
Frigidaire
No
14,000/13,600
14,000/13,600
10,600/8,600
4.3
640
9.0
Performance
BTU (Cool)
BTU (Heat)
Dehumidification (Pints/Hour)
Cool Area (Sq. Ft.)
EER
4.3
640
9.0
Electrical
Volts
Amps (Cool)
Amps (Heat)
Watts (Cool)
Watts (Heat)
Length of Power Cord
Plug Type (NEMA)*
230/208
8.1/8.7
1,550/1,520
5.9’
LCDI (B)
230/208
8.1/8.7
15.2/13.8
1,550/1,520
3,450/2,800
5.9’
LCDI (B)
Features
Electronic
3/3/•
•
•
•
•
•
Full-Function &
Remote T’Stat
Air CFM (High/Med/Low)
312/255/195
Air Direction Control
4-Way
Fresh Air/Exhaust Vent/Closed No/No/Yes
Filter Type
Antimicrobial Mesh
Filter Access
Slide-Out
Slide-Out Chassis
•
Cabinet Louvers
•
Rear Grill
•
Window Mounting Kit
Universal Trim Kit
Dimensions
Electronic
3/3/3
•
•
•
•
•
•
Full-Function
with Heat
312/255/195
4-Way
No/No/Yes
Antimicrobial Mesh
Slide-Out
•
•
•
A-Cabinet Height
B-Cabinet Width
C-Cabinet Depth (with Front)
D-Window Height (Min.)
Carton Height
Carton Width
Carton Depth
Unit Weight
Shipping Weight
UPC (0-12505)
14-1/2”
24”
22” (23-1/2”)**
18”
17-3/4”
26-3/4”
28-1/2”
109 Lbs.
124 Lbs.
27201-1
Controls
Fan Speeds (Cool/Fan/Heat)
Low Voltage Start-Up
Auto Cool Function
Energy Save
Sleep Mode
Filter Check
24 Hour On/Off Timer
Remote Control
**Protrudes 3” more from
the wall than other models.
14-1/2”
24”
22” (23-1/2”)**
18”
17-5/8”
26-3/4”
28-1/2”
109 Lbs.
124 Lbs.
27197-7
Universal Trim Kit
**Protrudes 3” more from the wall than other
models.
NOTE: All the models available in the Series may not be listed in the chart above.
1-22
Section 1 Basic Information
Product Specification - Slider / Casement Air Conditioners
FAK085R7V
Frigidaire
Yes
FAK104R1V
Frigidaire
No
FAK124R1V
Frigidaire
No
8,000
3.0
350
10.5
10,000
3.4
500
9.5
12,000
3.6
640
9.5
115
7.2
760
6’
LCDI (A)
115
10.0
1,050
6’
LCDI (A)
115
12.0
1,260
6-1/2’
LCDI (A)
Controls
Fan Speeds (Cool/Fan/Heat)
Low Voltage Start-Up
Auto Cool Function
Energy Save
Sleep Mode
Filter Check
24 Hour On/Off Timer
Remote Control
Electronic
3/3/•
•
•
•
•
•
Full-Function
Electronic
3/3/•
•
•
•
•
•
Full-Function
Electronic
3/3/•
•
•
•
•
•
Full-Function
Air CFM (High/Med/Low)
Air Direction Control
Fresh Air/Exhaust Vent/Closed
Filter Type
Filter Access
Cabinet Louvers
Window Mounting Kit
380/270/160
4-Way
No/No/Yes
Antimicrobial Mesh
Slide-Out
•
Easy Mount/High
485/355/205
4-Way
No/No/Yes
Antimicrobial Mesh
Slide-Out
•
Easy Mount/High
500/350/205
4-Way
No/No/Yes
Antimicrobial Mesh
Slide-Out
•
Easy Mount/High
17-3/4”
23-5/8”
24” (25-3/8”)
18-1/2”
26-1/2”/40-1/2”
8”
19-3/4”
26-1/16”
30-1/4”
111 Lbs.
131 Lbs.
27182-3
17-3/4”
23-5/8”
24” (25-3/8”)
18-1/2”
26-1/2”/40-1/2”
8”
19-3/4”
26-1/16”
30-1/4”
122 Lbs.
142 Lbs.
27185-4
17-3/4”
23-5/8”
24” (25-3/8”)
18-1/2”
26-1/2”/40-1/2”
8”
19-3/4”
26-1/16”
30-1/4”
123 Lbs.
143 Lbs.
27184-7
Model
Series
ENERGY STAR®
Performance
BTU (Cool)
Dehumidification (Pints/Hour)
Cool Area (Sq. Ft.)
EER
Electrical
Volts
Amps (Cool)
Watts (Cool)
Length of Power Cord
Plug Type (NEMA)*
Features
Dimensions
A-Cabinet Height
B-Cabinet Width
C-Cabinet Depth (with Front)
D-Window Height (Min.)
E-Window Width (Min./Max.)
F-Max. Wall Thickness
Carton Height
Carton Width
Carton Depth
Unit Weight
Shipping Weight
UPC (0-12505)
NOTE: All the models available in the Series may not be listed in the chart above.
1-23
Section 1 Basic Information
Model Number Coding
First Letter = Brand:
Second Letter = Product:
Third Letter = Chassis Type:
F – Frigidaire
W – White
Westinghouse
G – Gibson
P - Philco
A - Air Conditioner.
D - Dehumidifier
X–
A–
B–
C–
S–
H–
K–
P–
L–
K–
Z–
OPP 5
MS2
Vista/Low Profile
COM2
Heavy Duty
Thru-The-Wall / Builder line
Slider Casement
Portable
Dehumidifier (Frigidaire)
Dehumidifier (Lowe’s)
SLO3 & Custom Models for PR, International Etc
For Dehums usually refers to Customer Chanel
2 (xx) - BTU Capacity
3 - Feature Specifications:
05
06
07
08
09
10
12
15
18
22
25
29
0 - Mechanical Controls - Non Energy Star – 2 or 3 Speed, (Models Usually sold
Customer Specific)
1 - Mechanical Controls - Non Energy Star – Single Speed
2 - Mechanical Controls - Non Energy Star – 2 or 3 Speed
3 - Mechanical Controls - Energy Star – 3 Speed
4 - Electronic Controls - Non Energy Star
5 - Electronic Controls - Energy Star, with Ionizer
6 - Electronic Controls - Energy Star, with Ionizer & Remote Sensing Thermostat,
(Except FAS296 which is Non Energy Star)
7 - Electronic Controls - Energy Star, with Designer Fronts, (Models Usually sold
Customer Specific)
E - Electronic Controls with Heater
H - Electronic Controls with Heater
–
–
–
–
–
–
–
–
–
–
–
–
5,000 series
6,000 series
7,000 series
8,000 series
9,000 series
10,000 series
12,000 series
15,000 series
18,000 series
22,000 series
25,000 series
28,500 series
4 - Refrigeration Design
For Model Year
N = 2004
P = 2005
Q = 2006
R = 2007
S = 2008
T = 2009
U = 2010 etc
1-24
5 - Electrical Type:
6 - Kit Type:
1 - Voltage (115V above
7.5 amps)
2 - Voltage (230V)
7 - Voltage (115V below
7.5 amps)
T – Trim Kit with TTW
A – Window Kit with most models
B – Low Profile Kit
C – Puerto Rico Kit (If Any)
V – Vertical Window kit for Slider
Casement
Z – Portable Exhaust Kit
Section 1 Basic Information
Serial Number Coding
7
Manufacturer Location
Product Identification
Year Produced
Week Produced
Position Produced
Dehumidifiers
Air Cleaner
1-25
Section 1 Basic Information
Room Air Conditioner Warranty
This appliance is warranted by Electrolux. Electrolux has authorized Frigidaire Consumer Services and their authorized servicers to perform
service under this warranty. Electrolux authorizes no one else to change or add to any of these obligations under this warranty. Any obligations for service and parts under this warranty must be performed by Frigidaire Consumer Services or an authorized Frigidaire servicer.
WARRANTY
PERIOD
FULL ONE-YEAR
WARRANTY
One year from
original purchase
date.
LIMITED 2-5
YEAR
WARRANTY
(Sealed System)
Second through fifth
years from original
purchase date.
FRIGIDAIRE, THROUGH ITS AUTHORIZED
SERVICERS, WILL:
Pay all costs for repairing or replacing parts of
this appliance which prove to be defective in
materials or workmanship.
THE CONSUMER WILL BE
RESPONSIBLE FOR:
Costs of service calls that are listed under
NORMAL RESPONSIBILITIES OFTHE
CONSUMER.*
Diagnostic costs and any removal,
Repair or replace any parts in the Sealed Refrigeration
System (compressor, condenser, evaporator and tubing) transportation and reinstallation costs
which are required because of service.
proves to be defective in materials or workmanship.
Costs for labor, parts and transportation
other than with respect to the Sealed
Refrigeration System.
*NORMAL RESPONSIBILITIES OF THE CONSUMER
This warranty applies only to products in ordinary household use, and the consumer is responsible for the items listed below.
1.
Proper use of the appliance in accordance with instructions provided with the product.
2.
Proper installation by an authorized servicer in accordance with instructions provided with the appliance and in accordance with all
3.
Proper connection to a grounded power supply of sufficient voltage, replacement of blown fuses, repair of loose connections or defects
local plumbing, electrical and/or gas codes.
in house wiring.
4.
Expenses for making the appliance accessible for servicing, such as removal of trim, cupboards, shelves, etc., which are not a part of
the appliance when it was shipped from the factory.
5.
Damages to finish after installation.
6.
Damage to unit after removal from packaging carton.
EXCLUSIONS - This warranty does not cover the following:
1.
CONSEQUENTIAL OR INCIDENTAL DAMAGES SUCH AS PROPERTY DAMAGE AND INCIDENTAL EXPENSES RESULTING FROM ANY
BREACH OF THIS WRITTEN OR ANY IMPLIED WARRANTY.
Note: Some states do not allow the exclusion or limitation of incidental or consequential damages, so this limitation or
exclusion may not apply to you.
2.
Service calls which do not involve malfunction or defects in workmanship or material, or for appliances not in ordinary household use.
The consumer shall pay for such service calls.
3.
Damages caused by services performed by persons other than authorized Frigidaire servicers; use of parts other than Frigidaire
Genuine Renewal Parts; obtained from persons other than such servicers; or external causes such as abuse, misuse, inadequate power
supply or acts of God.
4.
Products with original serial numbers that have been removed or altered and cannot be readily determined.
IF YOU NEED SERVICE Keep your bill of sale, delivery slip, or some other appropriate payment record. The date on the bill establishes the
warranty period should service be required. If service is performed, it is in your best interest to obtain and keep all receipts. This written
warranty gives you specific legal rights. You may also have other rights that vary from state to state. Service under this warranty must be
obtained by following these steps, in order:
1. Contact Frigidaire Consumer Services or an authorized Frigidaire servicer.
2. If there is a question as to where to obtain service, contact our Consumer Relations Department at:
Frigidaire Company
CANADA
P.O. Box 212378
Electrolux Canada Group
Augusta, GA 30917
6150 McLaughlin Road
800-444-4944
Mississauga, Ontario L5R 4C2
1-866-213-9397
Product features or specifications as described or illustrated are subject to change without notice. All warranties are made by
Electrolux. This warranty applies only in the 50 states of the U.S.A., Puerto Rico and Canada.
FOR SERVICE CALL 1-800-444-4944
1-26
Section 1 Basic Information
Normal Sounds
High Pitched Chatter
Today's high efficient
compressors may have a high
pitched chatter during the
cooling cycle.
Sound of Rushing Air
At the front of the unit, you
may hear the sound of
rushing air being moved by
the fan.
Gurgle/Hiss
“Gurgling or hissing” noise may be heard due
to refrigerant passing through evaporation
during normal operation.
V ibration
Unit may vibrate and
make noise because of
poor wall or window
construction or incorrect
installation.
Pinging or Swishing
Droplets of water hitting
condenser during normal
operation may cause
“pinging or swishing”
sounds.
Cleaning
Clean your air conditioner occasionally to keep it looking new. Be sure to unplug the unit before cleaning to prevent
shock or fire hazards.
Air Filter Cleaning
The air filter should be checked at least once a month to see if cleaning is necessary. Trapped particles in the filter can
build up and cause an accumulation of frost on the cooling coils.
1. Grasp the filter by the center and pull up and out.
2. Wash the filter using liquid dishwashing detergent and warm water. Rinse filter thoroughly. Gently shake excess
water from the filter. Be sure filter is thoroughly dry before replacing.
3. Or, instead of washing you may vacuum the filter clean.
Cabinet Cleaning
1. Be sure to unplug the air conditioner to prevent shock or fire hazard. The cabinet and front may be dusted with
an oil-free cloth or washed with a cloth dampened in a solution of warm water and mild liquid dishwashing
detergent. Rinse thoroughly and wipe dry.
2. Never use harsh cleaners, wax or polish on the cabinet front.
3. Be sure to wring excess water from the cloth before wiping around the controls. Excess water in or around the
controls may cause damage to the air conditioner.
4. Plug in air conditioner.
Winter Storage
If you plan to store the air conditioner for the winter, cover it with plastic or return it to the original carton.
NOTE: To prevent rust or electrical connections from being damaged, store air conditioner in an upright position and a
dry place.
1-27
Section 1 Basic Information
Notes
1-28
Section 2 Installation
Models FAA, FAC and FAX Room Air
Conditioner Installation Instructions
Model FAA, FAC and FAX air conditioners are designed
to install in standard double hung windows with opening
widths of 23 to 36 inches (584 mm to 914 mm)
(See Figure 2-1)
Lower sash must open sufficiently to allow a clear vertical
opening of 14-1/4” inches (356 mm). The FAX series
only requires a 13” (330 mm) vertical opening. Side
louvers and the rear of the RAC unit must have clear air
space to allow enough airflow through the condenser for
heat removal. The rear of the unit must be outdoors, not
inside a building or garage.
Exterior
Wall
Offset
1. Remove air conditioner from carton and place on a
flat surface.
2. Remove top rail from packaging material.
3. Align the hole in the top rail with those in the top of
the unit then secure with the 3/8” screws.
(See Figure 2-2)
NOTE
For safety reasons, all four (4) screws must be securely
fastened.
Screws (4)
Top Rail
23” to 36”
584mm to 914mm
Stool Sill
14-1/4”min.
(337mm)
Interior
Wall
Figure 2-2.
How to Install
Figure 2-1.
Mounting Hardware
Tools Needed
3/4” Screws
Lock Frame
Sash Lock
Phillips Screwdriver
Drill (For pilot holes)
Qnty 7
Qnty 2
Qnty 1
NOTE
Do not use any screws other than those specified here.
CAUTION
When handling unit, be careful to avoid cuts from
sharp metal edges and aluminum fins on front and rear
coils.
Before installing unit, the top rail must be assembled on
the unit.
Top Rail Hardware
Tool Needed
3/8” Screw
Top Rail
Phillips Screwdriver
Qnty 4
Qnty 1
NOTE
Top Rail and Sliding Panels at each side are offset to
provide the proper pitch to the rear of (5/16”). This is
necessary for proper condensed water utilization and
drainage. If you are not using the Side Panels for any
reason, this pitch to the rear must be maintained!
1. Place unit on floor, a bench or table. There is a
left and right window filler panel, be sure to use
the proper panel for each side. When installed, the
flange for securing the panel to the window sill will
be facing into the room.
A. Hold the accordion filler panel in one hand and
gently pull back the center to free the open end.
(See Figure 2-3)
B. Slide the free end (“I” section) of the panel into
the cabinet as shown in Figures 2-4, 2-5 and
2-6. Slide the panel down. Be sure to leave
enough space to slip the top and bottom of the
of the frame into the rails on the cabinet.
2-1
Section 2 Installation
3. Extend the side panels out against the window frame
(See Figure 2-6).
4. Place the frame lock between the frame extensions
and the window sill as shown (See Figure 2-6). Drive
3/4” (19 mm) locking screws through the frame lock
and into the sill (See Figure 2-6).
NOTE
Figure 2-3.
To prevent window sill from splitting, drill 1/8” (3 mm)
pilot holes for screws
Figure 2-4.
Figure 2-6.
C. Once the panel has been installed on the side
of the cabinet, make sure it sits securely inside
the frame channel by making slight adjustments.
Slide the top and bottom ends of the frame into
the top and bottom rails of the cabinet.
5. Drive 1/2” (13 mm) locking screws through frame
holes into window sash (See Figure 2-7).
D. Slide the panel all the way in and repeat on the
other side.
NOTE
If storm window blocks AC, see Figure 2-9.
Figure 2-7.
2. Keep a firm grip on air conditioner, then carefully
place the unit into window opening so the bottom of
the air conditioner frame is against the window sill
(See Figure 2-5). Carefully close the window behind
the top rail of the unit.
6. To secure lower sash in place, attach right angle
sash lock with 3/4” (19 mm) screw as shown
(See Figure 2-8).
7.
Cut foam seal and insert in the space between the
upper and lower sashes.
Bottom Rail
Inside Window Sill
Outside
Figure 2-5.
Figure 2-8.
2-2
Section 2 Installation
If AC Unit is Blocked by Storm Window
Add wood as shown in Figure 2-9, or remove storm
window before air conditioner is installed.
Sash
Storm Window
Frame Or Other
Obstruction
1-1/2”
(38mm)
Board Thickness
As Required For
Proper Pitch
To Rear Along
Entire Sill.
Fasten With
Nails Or Screws.
Figure 2-9.
If storm window frame must remain, be sure the drain
holes or slots are not caulked or painted shut.
Accumulated rain water or condensation must be allowed
to drain out.
Removing AC Unit From Window
1. Turn AC unit off and disconnect power cord.
2. Remove sash seal from between windows, and
unscrew sash lock.
3. Remove screws installed through frame and frame
lock.
4. Close (slide) side panels into frame.
5. Keeping a firm grip on air conditioner; raise sash and
carefully rock air conditioner backward to drain any
condensate water in base of unit. Be careful not to
spill any remaining water while lifting unit from
window. Store parts with air conditioner.
2-3
Section 2 Installation
Installation Instructions
For Heavy Duty (FAS Models) and
Median (FAM Models) Air Conditioners
Tools Required
1.
2.
3.
4.
5.
6.
7.
Window Sash Seal
Safety Lock And
3/4" Long Hex Head Screw
Large flat blade screwdriver
Tape measure
Adjustable wrench or pliers
Pencil
Level
Socket wrenches
Phillips screwdriver
Foam Gasket
Top Angle
Washer Head
Locking Screw
Please read ALL instructions before installing. Two people
are recommended to install this product. If a new
electrical outlet is required, have the outlet installed by
a qualified electrician before installing unit. See #5 in
Preliminary Instructions following.
Frame
Assembly
(Left)
Side Retainer
Seal-bottom
Rail To Unit
Preliminary Instructions
1/2" Long
Screws And
Locknuts
Check dimensions of your unit to determine model type:
Locknut
Heavy duty (FAS) Median (FAM)
Unit Height:
Unit Width:
Min. Window Opening:
Min. Window Width:
Max. Window Width:
18-5/8”
26-1/2”
19”
31”
43”
17-5/8”
23-1/2”
18-1/2”
26-1/2”
40-1/2”
1. Check window opening size. The mounting parts
furnished with this air conditioner are made to install
in a wooden sill double-hung window. The standard
parts are for window dimensions listed above. Open
sash to a minimum of 19” (483mm).
2. Check condition of window. All wood parts of
window must be in good shape and able to firmly
hold the needed screws. If not, make repairs before
installing unit.
3. Check your storm windows. If the storm window
frame does not allow the clearance required, correct
by adding a piece of wood as shown in Figure 2-10,
or by removing storm window while room air
conditioner is being installed.
4. Check for anything that could block airflow.
Check area outside of window for things such as
shrubs, trees, or awnings. Inside, be sure furniture,
drapes, or blinds will not stop proper air flow.
2-4
3/4" Long
Flat Head
Bolt
Frame
Assembly
(Left)
Window Support
Bracket
Sill Angle
Bracket
Figure 2-10.
Hardware (in plastic bag)
Washer Head
Locking Screw
For window panels
Qty.
2
3/4" Long Flat
Head Bolt and
Locknut
Qty.
2 ea.
3/4" Long HexHead Screw
Qty.
3
Sill Angle Bracket
Qty.
2
Safety Lock
Qty.
1
1/2" Long Screw
and locknut
Qty.
4 ea.
Long hex-head
locking screw for
top angle, side
retainer 5/16"
Long
Qty.
10
Figure 2-11.
Section 2 Installation
5. Check the available electrical service. Power
supply must be the same as that shown on the unit
serial nameplate. Power cord is 48” long. Be sure
you have an outlet that is in reach of the power
cord.
All models have a 3-prong service plug to provide
proper service and safe positive grounding. Do not
change plug in any way. Do not use an adapter
plug. If the present wall outlet does not match the
plug, have a qualified electrician make the needed
change.
6. Carefully unpack air conditioner. Remove all
packing material. Protect floor or carpet from
damage. Two people should be used to move and
install unit.
Sash
19" Min
1/2" Min
Storm Window Frame Or
Other Obstruction
Figure 2-12.
Sash
19" Min
1/2" Min
1-1/2"
Min
Storm Window Frame Or
Other Obstruction
Board Thickness As
Required, Along
Entire Stool, Fasten
With Two Nails Or
Screws.
Figure 2-13.
WARNING
Avoid fire hazard or electric shock.
Do not use an extension cord or an adaptor plug.
Do not remove any prong from power cord.
Grounding type wall receptacle.
Do not, under any
circumustances, cut,
remove, or bypass
grounding prong.
Power supply cord
with 3-prong grounding
plug and current detection device.
2-5
Section 2 Installation
Window Mounting
Install Top Angle and Side Bracket
Remove Chassis
1. Attach foam gasket to top angle above holes as
shown in Figure 2-18.
2. Install top angle and side retainers to cabinet as
shown in Figure 2-18.
1. Pull down front grille panel and remove filter.
(See Figure 2-14).
2. Lift front panel upwards and remove.
Pull Away
and Down
Screws
Figure 2-14.
Figure 2-15.
3. Extract the 4 front panel screws. (See Figure 2-15)
4. Pry away front panel from cabinet sides.
(See Figure 2-16)
5. Gently lift front off unit and place to one side.
Tab
Tab
Assemble Window Filler Panels
Tab
Tab
Figure 2-18.
1. Place cabinet on floor, a bench, or a table.
2. Slide “I” section of window filler panel into side
retainer on the side of the cabinet (See Figures 2-19
and 2-20). Do both sides.
Figure 2-16.
6. Remove shipping screws from top of unit and also on
the side by the base if installed.
7. Hold the cabinet while pulling on the base handle,
and carefully remove the unit.
8. Add two foam inserts to holes in top of cabinet
where shipping screws were removed from. (See
Figure 2-17)
9. Your unit may come with internal packaging by the
compressor and condenser fan assembly. This
packaging must be removed prior to installing the air
conditioner back into the cabinet. (See Figure 2-17)
Foam Inserts
Window Filler
Panel
Plastic
Frame
Side Retainer
Figure 2-19.
Top
View
Air Conditioner
Cabinet
"I" Section
Figure 2-17.
2-6
Figure 2-20.
Plastic
Frame
Locking
Screw
Window Hole
Filler Panel
Section 2 Installation
3. Insert top and bottom legs of window filler panel
frame into channel in the to angle and bottom rail.
Do both sides.
4. Insert washer head locking screws (2) into holes in
top leg of filler panel frame. Do not totally tighten.
Allow leg to slide freely. (See Figure 2-20)
Place Cabinet in Window
1. Open window and mark center of window stool.
2. Place cabinet in window with bottom stool angle
firmly seated over window stool as shown. Bring
window down temporarily behind top angle to hold
cabinet in place.
3. Shift cabinet left or right as needed to line up center
of cabinet on center line marked on stool.
4. Fasten cabinet to window stool with 2 screws into
holes. (You may wish to pre-drill pilot holes.)
(See Figures 2-21 & 2-22)
5. Add bottom rail seal over screws to window stool.
Install Support Bracket
1. Hold each support bracket flush against outside of
sill and tight to bottom of cabinet as shown below.
Mark brackets at top level of sill, then remove.
(See Figure 2-23)
2. Assemble sill angle bracket to support brackets at
the marked position, as shown. Hand tighten, but
allow for any changes later. (See Figure 2-24)
3. Install support brackets (with sill angle brackets
attached) to correct hole in bottom of cabinet as
shown. (See Figure 2-25)
4. Tighten all 6 bolts securely.
Mark
Stool
Figure 2-23.
Left
Stool
Angle
Figure 2-21.
1/2" Long Screws
And Locknuts
Locknut
Sill Angle
Bracket
Right
Flat Head Bolt
Bottom
Rail Seal
2 Each Req'd For Each
Support Bracket
Figure 2-24.
3/4" Long HexHead Screw
1/2" long screws
and locknuts
Figure 2-22.
Figure 2-25.
2-7
Section 2 Installation
Thru-The-Wall Installation
Extend Window Filler Panels
1. Carefully raise window to expose filler panel locking
screws. Loosen screws so filler panels slide easily.
2. Extend panels to completely fill window opening.
Tighten locking screws on top. (See Figure 2-26)
3. Close window behind top angle.
Select Wall Location
Consult local building codes prior to installation.
This air conditioner has a slide-out chassis, so that it can
be installed through an outside wall as specified below:
Heavy Duty (FAS)
Max wall thickness:
12”
Median (FAM)
10”
IMPORTANT
Side louvers must never be blocked.
Locking Screws
Figure 2-26.
All parts needed for Thru-The-Wall Installation are
provided, except a wood frame, shims, and 10 wood
screws (#10-1” long minimum).
Select a wall surface that has the 5 conditions below:
Install Window Lock and Sash Seal
1. Trim sash seal to fit window width. Insert into space
between upper and lower sashes.
2. Attach right angle safety lock as shown. (See Figure
2-27)
Safety Lock
1. Does not support major structural loads such as the
frame.
2. Does not have plumbing or wiring inside.
3. Is near existing electrical outlets, or where another
outlet can be installed.
4. Is not blocked and faces the area to be cooled.
5. Allows unblocked airflow from rear sides and end
(outside).
Prepare Wall
3/4" Long HexHead Screw
Figure 2-27.
Install Chassis into Cabinet and Install Front to
Unit
1. Prepare wall in frame construction (including brick
and stucco veneer). Working from inside the room,
find wall stud nearest the center of area where air
conditioner will be installed (by sounding wall, or by
magnetically finding nails).
2. Cut or knock out a hole on each side of center stud.
3. Measure between inside edges of every other stud
as shown. (See Figure 2-28)
1. Lift air conditioner and carefully slide into cabinet
leaving 6” protruding.
CAUTION
DO NOT push on controls or finned coils.
2. Be sure chassis is firmly seated towards rear of
cabinet.
3. Installation of front is the reverse of removal.
3-3/8" Min
(8.6 cm)
Figure 2-28.
2-8
Section 2 Installation
Carefully measure and cut an opening with the following
dimensions depending on your model. (See Figure 2-29)
WIDTH “X” = inside model width plus twice the thickness
of framing material used.
HEIGHT “Y” = inside model height plus twice the
thickness of framing material used.
NOTE
If wall thickness is 8-½ inches or more, add aluminum
flashing over bottom of frame opening to assure no
water can enter area between inner and outer wall.
Heavy Duty (FAS) Median (FAM)
Inside Frame Height: 18-7/8“ (47.9cm) 18” (45.7cm)
Inside Frame Width: 26-3/4“ (67.9cm) 23-7/8“ (60.6cm)
Caulk As
Required
“Y”
Inside
Frame
Height
Inside
Frame
Width
Over
8-1/2"
Aluminum Flashing
Over Bottom Of Frame
Figure 2-31.
“X”
Prepare and Install Cabinet
UP TO
8-1/2"
Figure 2-29.
4. Build a wooden frame with the INSIDE dimensions
of your model listed above. Frame depth should be
the same as wall thickness. Fill in the space from the
opening to the studs with wood spacers, as shown.
5. Nail frame to spacers with front flush to the dry wall.
(See Figure 2-30)
1. Slide chassis from cabinet. Refer back to Step 1 of
Window Mounting.
2. Place cabinet into opening with bottom rail resting
firmly on bottom board of wooden frame.
3. Position cabinet to achieve proper slope for water
removal. (See Figure 2-32)
4. Secure bottom rail to wood frame with two large
wood screws 1” (2.5 cm) long using the two holes
in the bottom of the channel resting on frame.
(See Figure 2-32)
Nail Spacers
To Studs
3/4"plus
Trim Thickness
5/16"
To
3/8"
Level
Level
Figure 2-32.
Figure 2-30.
2-9
Section 2 Installation
1" Long
Wood Screw
OPTIONAL: Caulking and installation of trim on interior
wall may be done. You can buy wood from your local
lumber or hardware supply. On the outside, caulk
openings around top and sides of cabinet, and all sides
of wood sleeve to the opening.
Masonry Construction
Figure 2-33.
Refer to Install Support Bracket for assembly of
support brackets. A wooden strip nailed to the
outside wall should be used in conjunction with sill
support angle brackets. (See Figure 2-34)
5. Screw or nail cabinet wooden frame, using shims if
frame is oversized to eliminate distortion. Remember
to maintain proper slope of air conditioner.
Support Bracket
Wooden Strip
Figure 2-34.
Figure 2-35.
2-10
1. Cut or build a wall opening in the masonry wall
similar to the frame construction (refer to Thru-theWall Installation for a wall thickness greater than
8-½ inches).
2. Secure cabinet in place using masonry nails, or the
correct masonry anchor screws. (Another way to
do this is to build an in-between frame of 2X4’s as
shown in Prepare Wall illustrations - but make it
double framed on either side, and install between
masonry wall opening and cabinet. Frame must be
securely anchored to masonry wall opening) This
way gives very good louver clearance on either side
of cabinet.
3. Install a linted to support masonry wall above
cabinet. Existing holes in cabinet can be used and/
or additional holes can be drilled to fasten cabinet at
various positions. Be sure that side louver clearance
is in accordance with Step 1 above.
4. Install exterior cabinet support brackets as shown in
Step 2 of Thru-the-Wall Installation. Caulk or flash
if needed to provide a weather-tight seal around top
and sides of cabinet.
5. To complete installation, apply wood trim molding
around room side projection of cabinet.
Section 2 Installation
Installation Instructions
For Slider Casement Air Conditioners
These instructions describe installation in a typical wood
framed window with a wood slide-by sash, or installation
in a metal casement window. Modification may be
necessary when installing in windows made differently
than those shown in these instructions.
A high window accessory kit (Part# EA103W) is available
for window heights up to 62” (1575mm).
Meeting Electrical Requirements
Observe all local governing codes and ordinances.
Do not, under any circumstances, remove the power
supply cord grounding prong.
WARNING
ELECTRICAL GROUND IS REQUIRED FOR THIS
APPLIANCE.
DO NOT GROUND TO A GAS LINE.
IF COLD WATER PIPE IS INTERRUPTED BY
PLASTIC, NON-METAL GASKETS, OR OTHER
INSULATING MATERIALS, DO NOT USE FOR
GROUNDING.
CHECK WITH A QUALIFIED ELECTRICIAN IF
THERE IS DOUBT ABOUT THE APPLIANCE BEING
PROPERLY GROUNDED.
DO NOT MODIFY THE POWER SUPPLY PLUG. IF
THE POWER SUPPLY OUTLET IS WRONG, HAVE
ONE INSTALLED BY A QUALIFIED ELECTRICIAN.
DO NOT HAVE A FUSE IN THE NEUTRAL OR
GROUNDING CIRCUIT. A FUSE IN THE NEUTRAL
OR GROUND CIRCUIT COULD RESULT IN
ELECTRICAL SHOCK.
DO NOT USE AN EXTENSION CORD WITH THIS
APPLIANCE.
FAILURE TO FOLLOW THESE INSTRUCTIONS
COULD RESULT IN ELECTRICAL SHOCK, SERIOUS
INJURY OR DEATH.
Receptacle Wiring
Receptacle wiring should be a minimum or 14 gauge.
Use copper wire only. If a mating 3-prong groundingtype wall receptacle is not available, it is the responsibility
of the consumer to have a properly grounded 3-prong
wall receptacle installed by a qualified electrician.
Electrical Requirements
A 115 volt (103.5V minimum, 126.5V maximum), 60
Hertz, AC only, 15 ampere fused electrical supply is
required. A time delay fuse or time delay circuit
breaker is also required. A separate circuit, serving
only this appliance, MUST be provided by the customer.
Recommended Grounding Method
For your personal safety, this appliance must be
grounded. The air conditioner includes a power supply
cord with a 3-prong grounding plug.
To minimize possible electrical shock hazard:
1. Cord must be plugged into a mating 3-prong
grounding-type wall receptacle,
2. Must be grounded in accordance with National
Electrical Code (ANSI/NFPA 70- latest version) and
3. All local codes and ordinances must be followed.
NOTE
If codes permit, and a separate grounding wire is
used, it is recommended that a qualified electrician
determine that the grounding path is adequate and not
interrupted by plastic, non-metallic gaskets, or other
insulating materials.
2-11
Section 2 Installation
Preparing for Installation
Installation Tips
For wood-frame casement windows:
It may be necessary to construct a frame, using at least
1-inch thick wood, with a 15-1/2-inch wide opening.
For brick or cement building construction:
It may be necessary to put a wood stool strip under AC,
for mounting purposes.
Tools Required
1.
2.
3.
4.
5.
6.
7.
8.
Flat-head screwdriver
Phillips-head screwdriver
Carpenter’s level
Tape measure
Fine tooth saw
Electric or hand drill
Knife and scissors
Pencil
A. Make sure you have all the necessary parts.
Installation kit contents:
1.
Platform (1)
2.
Support brace (1)
3.
Adjustment bolt (1)
4.
Hex flange nut - 1/4” (1)
5.
Track seal (1)
6.
Side channel seal (1)
7.
Foam seal strip/Sash seal
8.
Safety bracket (1)
9-11. Screw - #10 x 2-½ flat-head (2), OR
Screw - #10 x 1-3/4” pan-head (2), OR
Screw - #10 x 1” pan-head (2)
12.
Screw - #8 x 3/4” pan head (6)
13.
Screw - #8 x 3/4” self-threading (7)
14.
Window locking bracket (1)
15.
Plastic window panel (1)
16.
Side channel (2)
17.
Screw - #8 x 3/8” truss head (6)
18.
Panel frame/seal assembly (1)
WARNING
FAILURE TO ADHERE TO THE FOLLOWING
PRECAUTIONS COULD RESULT IN PERSONAL
INJURY AND PRODUCT DAMAGE.
BECAUSE THIS UNIT WEIGHS ABOUT 88 TO 105
POUNDS, IT IS RECOMMENDED THAT 2 PEOPLE
INSTALL THE AC UNIT, AND THAT YOU BOTH
USE PROPER LIFTING TECHNIQUES. INSPECT
THE CONDITION OF THE WINDOW WHERE UNIT
WILL BE INSTALLED. BE SURE IT WILL SUPPORT
THE WEIGHT OF THE UNIT.
THIS APPLIANCE MUST BE INSTALLED
ACCORDING TO ALL APPLICABLE CODES AND
ORDINANCES.
HANDLE AC UNIT WITH CARE. AVOID SHARP
METAL FINS ON FRONT AND REAR COILS.
MAKE SURE YOUR AC DOES NOT FALL DURING
INSTALLATION.
3
1
9,10,11
2
8
13
12
17
5
4
16
14
15
18
DO NOT USE WATER COLLECTED IN THE UNIT
FOR DRINKING PURPOSES. IT IS NOT
SANITARY.
NOTE
Only use screws specified in these instructions.
2-12
7
Figure 2-36.
6
Section 2 Installation
B. Choose a proper sized window.
1. 15-1/2 inches minimum width
2. 16-1/4 inches maximum width (casement windows)
3. 21-1/4 inches minimum height (with window panel
retainer)
4. 20-5/16 inches minimum height (window panel
retainer removed)
5. 39-7/16 inches maximum height
15-1/2”
Minimum
Width
16-1/4”
Maximum
Width
(Casement
Windows)
20-5/16”
Minimum
Height
NOTE
Height measurement must be of a clear opening above
mounting platform. In some cases, due to a variety
of stop and track arrangements, the above dimensions
may vary slightly. If necessary, installation can be
made by alternating window jambs. (See Alternate
Window Jamb Applications.)
39-7/16”
Maximum
Height
C. Choose the proper window location.
Figure 2-37.
Choose a window that allows the cooled air to flow
freely and directly into room(s) you wish to cool.
Remember, it is difficult to move air around corners.
Also, choose a window that is within 6 feet of an
electrical outlet. Do not use an extension cord.
Installing Unit in a Sliding Window
1. Attach support brace to platform as shown. Use
adjustment bolt and hex flange nut to complete
assembly. Choose slot and adjustment bolt hole
locations that will create a 45 degree angle between
platform and support brace. Try assembly in the
window to determine if platform will rest properly,
and allow proper slope (3/16-inch lower on outside).
NOTE
If you are planning to use a siding protection board on
the outside of house, hold board in place when testing
assembly in window.
Platform Assembly
1/4” (6mm)
Hex Flange Nut
8-11/16” inches
Alternate Screw Location
(Depending On The Stool Depth)
Platform Tab
Window Track
Window Seal
2. Measure, and lightly mark a line 8-11/16 inches
from window jamb.
NOTE
If any sash stop protrudes more than 1 inch from the
side window jambs, the 8-11/16-inch measurement
must be increased accordingly. Screen and storm
window frames may also require adjustments to the
measurement.
Center Platform
Assembly On The
Line With Platform
Tab Pressed Against
Window Track
Figure 2-38.
2-13
Section 2 Installation
3. Center platform assembly on the line with inside
platform tab pressed against inside edge of window
track. Using the holes in the platform as a guide,
mark and drill two 9/64-inch diameter holes. Drill
holes in either track or stool.
Apply track seal
to window side of track.
NOTE
Figure 2-39.
Property Damage Hazard - Failure to adhere to the
following precaution could result in damage to window
or air conditioner. Be sure wood stool or window track
is securely attached to the building construction. Use
longer screws in sub-framing if necessary.
4. Peel off protective backing from track seal. Apply
seal to room side of window track. Center of seal
strip should coincide with line marked in Step 2.
The two screw holes drilled in Step 3 should be
directly above seal strip in the inner track.
(See Figure 2-39)
5. Securely attach a siding-protection board to
side of house. (See Figure 2-40)
Inside Wall Of
House
Figure 2-40.
Outside Edge Is 3/16-inch
Lower Than Inside.
NOTE
Siding-protection board should be long enough to span
2 wall studs.
6. Place platform assembly, with platform tab against
inside of window track, and attach it to window
jamb. Use appropriate length screws (Items 9-11 in
Preparing For Installation).
7. Adjust platform assembly so that outside edge is
3/16-inch lower than inside edge (See Figure 2-41).
This ensures proper water drainage from the air
conditioner.
8. Level platform assembly from side-to-side. Also,
make sure window track is level. Use leveling shims
as necessary to ensure unit is level from side-to-side.
9. Measure height of window opening from top of
platform assembly as shown right. Subtract 20-5/8
inches. Mark this measurement on plastic window
panel along the longer side. (See Figure 2-42)
Siding Protection
Board
Put Platform
Tab Against
Inside Of Track.
Figure 2-41.
Measure
distance and
subtract
20-5/8”
Figure 2-42.
2-14
Section 2 Installation
10. Clamp plastic window panel between a board and a
work table, and cut along cutting line with a fine
tooth saw. Remove any burrs with a file.
11. Fasten side channels to the sides of the AC using 3
screws (Item 17) per channel. Start with first screw
at top of channel. Make sure hook ends of channels
face toward back of unit.
12. Slide plastic window panel into panel frame, with the
smooth side to the room. Slide panel frame
assembly into side channels of the AC cabinet. Make
sure plastic window panel is firmly enclosed on all
sides by the retainer grooves. (See Figure 2-43)
13. Cut side channel seal into 2 equal lengths. Remove
protective backing and apply it to the rear side of
cabinet side channels starting just below panel frame
assembly. Pinch off excess length so seal is even
with the bottom of the cabinet side channel.
(See Figure 2-44)
14. To remove front:
a. Remove the two front retaining screws from the
front frame. (See Figure 2-45)
b. Press firmly on each side of the metal case close
to the front, approximately 2/3 of the way down.
c. While pressing on the sides of the metal case,
gently pull the front out and lift up to release it
from the case.
d. Then release the electrical coupler plug.
Panel Frame
Fastening
Side Channels
Plastic Window Panel
Figure 2-43.
Apply Weather
Seal To Side
Channels Just
Below Edge Of
Panel Frame.
Figure 2-44.
NOTE
DO NOT push or pull air direction louvers.
15. Place AC in window opening. The unit should sit on
the platform assembly so that window panel frame
and cabinet side channels are against top and side
window jambs.
16. Slide inner window sash firmly against side of the
cabinet. Make sure not to peel the seal strips from
the window track and cabinet side channels. If the
panel frame does not fit snugly to the inner window
sash, secure the panel frame to the sash with
#8 x 3/4 inch screws, or #8-32 x 3/4 inch selfthreading screws. Use the partially plugged holes in
the panel frame. Drill 1/8-inch pilot holes for the
screws. (See Figure 2-46)
Front
Retaining
Screw
Figure 2-45.
Slide Inner
Window Sash
Firmly Against
Cabinet.
Figure 2-46.
2-15
Section 2 Installation
17. Hook the safety bracket over the base of the unit
and fasten it to the front of the platform assembly.
Use a #8-32 x 3/4-inch self-threading screw.
(See Figure 2-47)
Install Safety Bracket
NOTE
The bracket prevents movement of the air conditioner
(either in or out) after completing the installation.
Safety Bracket
18. Stuff the foam seal strip/sash seal between the
vertical sash and window glass (See Figure 2-48).
19. Use the window locking bracket to lock the inner
window sash to the base of the outer window sash.
Use one #8 x 3/4 inch screw, or #8-32 x 3/4 inch
self-threading screw. (Drill 1/8-inch pilot hole).
20. To replace the front:
First reconnect the coupler plugs, move the exhaust
control positioned through the front to the proper
location. Gently push the front into position on the
cabinet. It should click into place. Then replace the
retaining screws that holds the panel in place. Do
not push or pull the front panel louvers.
Figure 2-47.
Sash Seal
Window
Locking
Bracket
Figure 2-48.
Alternate Window Jamb Applications
To install in windows having no flanges or wood stops
on the top and side jambs, the channels and panel
frame must fit against a mating flange (or 1/16-inch
max. thick angle) attached to the window jambs.
Figure 2-49 illustration A shows this angle installed.
Figure 2-49 illustrations B & C show alternate treatments. On the sash side of the opening, the leading
corner of the inner sash becomes the flange. You can
purchase the angle strip locally.
2-16
Flush
Room
Room
Room
A
B
C
Add Angle To
Wood Stop
Add Wood
As Shown
Add 16- Or 18Gauge Angle
Figure 2-49.
Section 2 Installation
Installing the Unit in a Casement Window
Platform Assembly
NOTE
Open the window the maximum amount to allow for
clearance of the cabinet. The crank handle should
be removed to allow the platform to be fastened to
the jamb. If the window cannot open far enough
(more than 15-1/2 inches) for the cabinet to clear the
window, remove the window entirely by drilling out the
rivets. Bolts can serve as the pivots in the future.
To avoid crank handle and window clearance problems,
the unit can be installed in a stationary sash section.
However, the horizontal mullion and the 2 glass panels
must be removed before installation.
1. Attach support brace to platform as shown. Use
the adjustment bolt and hex flange nut to complete
the assembly. Choose the slot and adjustment bolt
hole locations that will create a 45 degree angle
between the platform and the support brace. Try the
assembly in the window to determine if the platform
will rest properly, and allow the proper slope (3/16inch lower on outside). (See Figure 2-50)
1/4" (6mm) Hex Flange Nut
Figure 2-50.
Equal distance
from both sides
8-11/16”
Apply track seal to the outside
edge of the bottom window jamb.
Figure 2-51.
Track Seal
Screw
NOTE
Window
Jamb
If you are planning to use a siding protection board on
the outside of house, hold board in place when testing
assembly in window.
2. Drill a 9/64-inch diameter pilot hole in the window
jamb an equal distance from each side of the jamb,
and 3/16-inch up from the window sill. If the hole
coincides with the window lever slot in the jamb
bottom, an additional hole will have to be drilled
through the platform edge and the window jamb to
miss this slot.
3. Peel off the protective backing from the track seal,
and stick the seal to the window sill on the outside
of the bottom jamb. (See Figure 2-51)
4. Screw the platform assembly to the window jamb
through the pilot hole you drilled in Step 2. Use
a #8 x 3/4-inch self-threading screw.
(See Figure 2-52)
5. Adjust the platform assembly so that the rear of
the air conditioner will be 3/16-inch lower than the
front. This ensures proper water drainage from the
air conditioner. (See Figure 2-53)
Figure 2-52.
Rear is at least
7/16" lower
than front
Figure 2-53.
NOTE
A projection below the base of the air conditioner will
require the rear of the platform to be 7/16-inch lower
than the front to create the 3/16-inch slant from front
to rear.
2-17
Section 2 Installation
6. Securely attach a siding-protection board to the
side of the house where the platform assembly hit
the house. The siding-protection board should be
long enough to span 2 wall studs. (See Figure 2-54)
7. Measure the height of the window opening from
the top of the platform assembly. Subtract 20-5/8”.
Mark this measurement on the plastic window panel
along the longer side. (See Figure 2-55)
8. Clamp the plastic window panel between a board
and a work table, then cut along the line with a fine
tooth saw. Remove any burrs with a file.
9. Fasten the side channels to the sides of the unit
using three screws (Item 17) per channel. Make
sure hook ends of channels face toward the back of
unit.
10. Slide the plastic window panel into the panel frame
with the smooth side to the outside. Slide the panel
frame assembly into the side channels of the air
conditioner cabinet. Make sure the plastic window
panel is firmly enclosed on all sides by the retainer
grooves. (See Figure 2-56)
11. Cut side channel seal into 2 equal lengths. Remove
the protective backing and apply it to the rear side
of the cabinet side channels, starting just below the
panel frame assembly. Pinch off excess length so
the seal is even with the bottom of the cabinet side
channel. (See Figure 2-57)
Fasten Siding
Protection Board To
The House Siding
Figure 2-54.
Measure
distance
and subtract
20-5/8”
Figure 2-55.
Panel Frame
Plastic Window Panel
Figure 2-56.
Apply Weather
Seal To Side
Channels Just
Below Edge Of
Panel Frame.
Figure 2-57.
2-18
Section 2 Installation
12. To remove front:
1. Remove the two front retaining screws from the
front frame. (See Figure 2-58)
2. Press firmly on each side of the metal case close
to the front approximately 2/3 of the way down.
3. While pressing on the sides of the metal case,
gently pull the front out and lift up to release it
from the case.
4. Disconnect the electrical coupler plug.
NOTE
DO NOT push or pull air direction louvers.
13. Place the air conditioner in the window opening. It
should sit on the platform assembly so that the
window panel frame and the cabinet side channels
are against the top and side window jambs. Side
channels should overlap side window jambs equally.
14. Drill two 9/64-inch diameter pilot holes in the top
window jamb in line with the partially plugged holes
in the panel frame. Secure panel fame to window
jamb with two #8-32 x 3/4-inch self-threading
screws. If additional holding is necessary, two
screws may be used on the sides of panel frame as
well.
15. Drill two screw-clearance holes in the cabinet side
channels (near bottom) and two 9/64-inch diameter
pilot holes in the side window jambs. Secure the
cabinet side channels to the window jambs with two
#8-32 x 3/4-inch self-threading screws. When doing
this, be careful not to twist the side channel seals
with the screws.
Front
Retaining
Screw
Figure 2-58.
Figure 2-59.
NOTE
Inserting screws will prevent the air conditioner from
being pushed into the room.
16. To replace the front:
First reconnect the coupler plugs, move the exhaust
control positioned through the front to the proper
location. Gently push the front into position on the
cabinet. It should click into place. Then replace the
retaining screws that holds the panel in place.
2-19
Section 2 Installation
8,000-12,000 BTU Thru-The-Wall
Installation Instructions
Wall
Sleeve
For Existing Sleeve
Unit
Note that the air conditioner dimensions are: 24” wide,
14-1/2” high, and 18-1/2” deep (without front). Install air
conditioner according to these installation instructions
to achieve the best performance.
Items in the Thru-The-Wall Kit
You may not need all parts in the kit. Discard unused
parts.
Part Description
Qty.
Tapered Spacer Blocks ..................... 17” Long ........ 2
Centering/Support Blocks ...4-½”x 3-½”x 1-½” ......... 2
Plastic Divider ...................⅛” x 4-½”x 14-½” ........ 1
Stuffer Seal .............................1”x 1-½ “x 84” ........ 1
Seal ............................... 1-½”x 1-½”x 26-½” ........ 2
Seal ................................... 1-½”x 1-½”x 14” ........ 2
Seal .................................. 1-½”x ⅜”x 26-½” ........ 2
Seal ...................................... 1-½”x ⅜”x 14” ........ 2
Seal ..........................................1” x ¾”x 14” ........ 1
Trim Frame (side legs) ............................................. 2
Trim Frame (top & bottom legs) ............................... 2
Ground Wire (green) ............................................... 1
Nut for grounding screw .......................................... 1
Grounding Screw ..................................................... 1
Grille (plastic) ......................................................... 1
Nuts (plastic) .......................................................... 4
Screw w/washer ...................................................... 4
How to Install
15-1/4”
16”, 17-1/2” or 22”
NOTE
All wall sleeves used to mount a new Air Conditioner
must be in sound structural condition and have a rear
grille that securely attaches to sleeve, or rear flange
that serves as a stop for the Air Conditioner.
CAUTION
When installation is complete, replacement unit MUST
have a rearward slope as shown in Figure 2-60.
2-20
Front
Rear
Level
Figure 2-60.
2. Remove old Air Conditioner from wall sleeve and
prepare wall sleeve as follows:
a. Clean interior (do not disturb seals).
b. Wall sleeve must be securely fastened in wall
before installing Air Conditioner. Drive more nails
or screws through sleeve into wall if needed.
c. Repair paint if needed.
3. If not existing, drill a 3/16” clearance hole for
grounding screw through left side of wall sleeve in
a clear area about 3 inches maximum (to suit) back
from front edge of sleeve as shown in Figure 2-61.
Next attach ground wire inside sleeve, using
grounding screw and nut. Pull loose end of ground
wire out front of sleeve and temporarily bend it
down and around lower edge of sleeve.
3"
Max.
Wall Sleeve To Unit
Sleeve Grounding
3/16"
Hole
1"
Figure 2-61.
Wall Sleeve Dimensions
Width
Height
Depth
25-1/2”
1/4” to 5/16”
4. Prepare the wall sleeve for installation of the new
unit per the following instructions.
Frigidaire 16”+ 17-1⁄2” Deep
Frigidaire 22” Deep
5. Install new unit into wall sleeve.
6. To attach ground wire to the new unit, remove the
screw from the left side front.
7. Assemble and install the Trim Frame.
Section 2 Installation
Installation Steps - 16” And 17-1⁄2” Deep
1. If wall sleeve does not have a rear grille or louvered
panel, install plastic grille panel from kit. The plastic
grille panel is mounted to the inside of wall sleeve
at the rear flanges. There are (4) plastic nuts in the
flanges of the wall sleeve. If sleeve is missing these
nuts or they are damaged, replacement nuts and
grille mounting screws are supplied with the kit. The
nuts are installed from inside of the sleeve and are
pressed into the square holes of rear flanges. Place
grille against rear flanges and use (4) washer screws
to secure grille to sleeve. (See Figure 2-62)
2. Cut and attach the (1) 1-1⁄2” x 3/8” x 26-1⁄2” long
seal to 25-1⁄2” long. Attach (2) 1-1⁄2” x 3/8” x 14”
long seals as shown. To attach the seals, remove the
backing paper from the seal. Do not touch adhesive.
Press seals firmly in place. (See Figure 2-63)
3. Attach 1” x 3/4” x 14” long seal to the inside of the
grille panel. (See Figure 2-63)
4. Install the new unit into the wall sleeve. Attach the
ground wire to the unit.
5. Install the 1” x 1-1⁄2” x 84” long weather seal
between the wall sleeve and the unit. A flat bladed
screwdriver or putty knife is recommended.
6. Assemble and install the Trim Frame.
Installation Steps - 22” Deep
1. Follow step 1 above.
2. Attach the (2) 4-1⁄2” x 3-1⁄2” x 1-1⁄2” foam blocks
to the inside of the wall sleeve. (See Figure 2-64)
3. Attach 1” x 3/4” x 14” long seal to the inside of the
grille panel. (See Figure 2-64)
4. Cut the 1/8” x 4-1⁄2” x 14-1⁄2” long plastic divider
to 13” long. Slide the plastic divider in the slots of
the (2) foam blocks. (See Figure 2-64)
5. Cut to fit (1) 1-1⁄2” x 1-1⁄2” x 26-1⁄2” long seals as
shown. (See Figure 2-65)
6. Attach (2) 1-1⁄2” x 1-1⁄2” x 14” long seals as
shown. Seals should be flush with front portion of
the 4-1⁄2” x 3-1⁄2” x 1-1⁄2” foam blocks which
holds the plastic divider. (See Figure 2-65)
7. Install the new unit into the wall sleeve. Attach the
ground wire to the unit as shown.
8. Install the 1”x 1-1⁄2” x 84” long weather seal
between the wall sleeve and the unit. A flat bladed
screwdriver or putty knife is recommended.
9. Assemble and install the Trim Frame.
Figure 2-62.
9½”
Step
2
Step
2
Step
3
Figure 2-63.
9½”
Step
2
Step
2
Step
3
Step
4
Figure 2-64.
9½”
Step
5
Step
5
Step
6
Step
6
Figure 2-65.
2-21
Section 2 Installation
Trim Frame Assembly
The purpose of trim frame is to cover space between wall
sleeve and replacement unit cabinet. Each frame is made
of four parts:
1. To assemble trim frame, insert snaps of side legs
into top and bottom legs.
2. To install trim frame to sleeves, slide frame over
cabinet until it is flush with the wall sleeve.
NOTE
Be sure to route the cord through the trim frame
before placing the trim frame on the unit.
Figure 2-66. Trim Kit
2-22
Section 3 Electronic Control
Electronic Control Operating Instructions
Before you begin, thoroughly familiarize yourself with the control panel and remote as shown below and all its
functions. Then follow the symbol for the functions you desire. The unit can be controlled by the touch pad alone or
with the remote.
Remote Controls
The illustration below shows the three remote controls configurations that are used with Frigidaire Room Air
Conditioners.
Light
Turns Unit
On Or Off
Turns Unit
On Or Off
Light
Turns Unit
On Or Off
Light
Temp/Timer
Auto
Temp
Activates
Timer
Auto Temp
Standard
Remote Control
Cool
Energy
Saver
Sleep
Auto
Temp
Star t
Activates Remote
Thermostat
(Some Models)
Sets Fan
Speed
Temp/Timer
Temp/Timer
Sets
Mode
Sets
Mode
Adjusts
Temperature
Or Time
Fan S low er
Sets Fan
Speed
Sets Fan
Speed
Fan Fas ter
Adjusts
Temperature
OrTime
Fan Fas ter
Adjusts
Temperature
Or Time
Fan S low er
Temp/Timer
Sets
Mode
Fan
Only
Timer
Cool
Energy
Saver
Fan
Only
Sleep
Auto
Temp
Timer
Stop
Remote
Sensing
Remote Control
W/Display & Remote
Sensing Button
Activates
Timer
Heat
Heat
Mode
Activates
Timer
Remote Control For
Heat Models
Figure 3-1.
WARNING
Batteries may be AA, AAA or CR2025 depending on the remote supplied with the unit. Do Not Mix Old
And New Batteries. Do Not Mix Alkaline, Standard (Carbon-Zinc) Or Rechargeable (Nichel-Cadmium)
Batteries.
3-1
Section 3 Electronic Control
Description of Control Panel Buttons For
Basic Electronic Control
Before you begin, thoroughly familiarize yourself with
the control panel and remote and all its functions. The
unit can be controlled by the touch pad alone or with the
remote.
ON/OFF BUTTON
Pressing the ON/OFF button will turn the unit on or off.
The display will illuminate all the LED’s , then the current
room temperature will be displayed.
UP/DOWN ARROW BUTTONS
(Temperature and Time)
Press or hold either UP (^) or DOWN (v) button until the
desired temperature is seen on display. This temperature
will be automatically maintained anywhere between
60°F (16°C) and 90°F (32°C) for cooling mode. The
Temperature will be automatically maintained anywhere
between 55°F (13°C) and 80°F (27°C) for heating mode
for models with the heating capability.
For setting time, use the UP (^) or DOWN (v) button to
increase or decrease the time desired.
FAN SPEED BUTTON
Press the FAN SPEED button to choose the desired fan
speed and the LED indicator will illuminate at the fan
speed setting. AUTO fan speed is not available in Fan
Only Mode.
AUTO Fan Speed
The unit must be in Cooling Mode or Energy Saver Mode
for AUTO fan speed to be chosen. Press the FAN SPEED
button to chose from AUTO, HIGH, MED and LOW fan
speeds.
The fan speed will begin in HIGH, then adjust to MED
and LOW as the room temperature conditions change.
For example in cooling, if the room doesn’t get too warm
it will stay at LOW. If the room temperature rises quickly,
such as a door being opened, it will automatically go to
HIGH speed. The fan speeds will adjust back to LOW as
the room returns to the original set temperature.
MODE BUTTON
Press the MODE button to chose from FAN ONLY, ENERGY
SAVER and COOL. The LED light will illuminate next to
the MODE chosen.
3-2
Figure 3-2.
FAN ONLY Mode:
Use this function only when cooling is not desired, such
as for room air circulation. All Fan speeds except AUTO
are available to be chosen. During this function, the
display will show the actual current temperature, not the
set temperature as in the cooling mode.
ENERGY SAVER Mode:
In this mode, the fan will continue to run for 3 minutes
after the compressor shuts off. The fan then cycles on
for 2 minutes at 10 minute intervals until the room
temperature is above the set temperature, at which time
the unit cooling system starts again.
COOL Mode:
In this mode all fan speeds can be chosen. The LED
indicator will illuminate next to the fan speed as it is
selected. Press or hold either UP (^) OR DOWN (v)
button until the desired temperature is seen on display.
This temperature will be automatically maintained
anywhere between 60°F (16°C) and 90°F (32°C) for
cooling mode.
NOTE
The “COOL“ circuit has an automatic 3 minute time
delayed start if the unit is turned off and on quickly.
This prevents overheating of the compressor and
possible circuit breaker tripping. The fan will continue
to run during this time.
Section 3 Electronic Control
TIMER BUTTON
REMOTE SENSING FEATURE (on some models)
For Delay Stop, the unit must be in the ON position.
For Delay Start, the unit must be in the OFF position.
When TIMER Mode is selected the LED will illuminate
above the button.
To adjust timer setting, tap or hold the UP arrow (^) or
DOWN arrow (v) to change the delay time by .5 hour
increments up to 10 hours, then by 1 hour increments
up to 24 hours. The control will count down the timer
remaining until start (8, 7.5, 7, etc.). The Delay Start
mode automatically selects cooling with maximum Fan
Speed. The temperature maintained will be the same
as previously set. To change the set temperature,
press “COOL” then Up or Down arrows until the desired
temperature is indicated on the display. After 5 seconds,
the control will automatically change the display back to
the hours remaining until the unit will start/stop. Turning
the unit “ON” or “OFF” at any time will cancel the Delay
Start/Stop function. The delay Start/Stop feature will
work until the unit either starts or stops. Once this has
happened then the above steps have to be repeated
again.
This feature is activated from the remote control only.
To activate the remote sensing feature, point the remote
control towards the unit and press the remote sensing
start button. The LIGHT on the unit control will pulse
to indicate it received the signal. The LIGHT on the
remote control will pulse each time it sends a signal.
It will continue to send this signal until the feature is
deactivated by pressing the remote sensing stop
button. If the unit does not receive the remote sensing
signal during any 3 minute interval, the unit will keep
indicating the remote sensing mode has ended. The
display on the remote control indicates the temperature
at the remote. The unit display indicates the set
temperature.
CHECK FILTER BUTTON
This feature is a reminder to clean the air filter for more
efficient operation and cooling. The LED indicator will
illuminate after 250 hours of operation. To reset after
cleaning the filter, press the CLEAN FILTER button and
the light will go off.
SLEEP MODE BUTTON
Press the SLEEP Mode button to activate this feature.
The LED will illuminate above the button. In SLEEP Mode
the selected cooling temperature will increase by 2°F 30
minutes after the mode is selected. The temperature
will then increase by another 2°F, after an additional
30 minutes. This new temperature will be maintained
for 7 hours before it returns to the originally selected
temperature. This ends the SLEEP Mode and the unit
will continue to operate as originally programmed. The
SLEEP Mode program can be cancelled at any time during
operation by pressing SLEEP Mode button.
CLEAN AIR BUTTON
FAHRENHEIT /CELSIUS
The control is capable of displaying temperature in
degrees Fahrenheit or degrees Celsius. To convert from
one to the other, press and hold the UP and DOWN
Temperature Selection Buttons at the same time for 3
seconds.
FAULT CODES
If the display reads “ES” or “AS” a sensor has failed.
The “ES” is for the evaporator thermistor and the “AS” is
the ambient thermistor located in the remote control.
Press the CLEAN AIR button to activate this feature. The
LED will illuminate above the button. When this feature
is turned ON, the electronic air purifier is energized to
remove pollen and impurities from the air. To cancel this
feature, press the CLEAN AIR button and the LED will
turn OFF and the electronic air purifier will shut off.
This feature can only be activated at the unit touchpad
only.
3-3
Section 3 Electronic Control
Description of Control Panel Buttons For Electronic Control of Median and Heavy Duty
Models FAM, FAS and FAZ
The control panels for the different models covered in this manual will have many of the same buttons and functions
only the control panel layout will differ.
Unless otherwise noted the button features listed for the Basic Electronic Control will be the same all models.
Heat
Figure 3-3.
HEAT MODE (Available On Some Models Only)
This feature can be used with any combination of FAN SPEEDS, TIMER, or SLEEP MODES. The HEAT LED will be
illuminated above the MODE Button. When in the HEAT Mode, the fan will run continuously while heat is needed. The
temperature will automatically be maintained anywhere between 55°F (13°C) and 80°F (27°C). When the room set
temperature is satisfied, the fan will cycle off and on to circulate and sample the room air.
Fault Codes
If the display reads “AS”, “HS” or “ES” a sensor has failed. The “ES” is for the evaporator thermistor and the “AS” is
the ambient thermistor located in the remote control. A “HS” is for the heat thermistor on heat capable models only.
3-4
Section 3 Electronic Control
Description of Control Panel Buttons For Electronic Control of Thru-The-Wall
Model FAH
The control panels for the different models covered in this manual will have many of the same buttons and functions
only the control panel layout will differ.
Unless otherwise noted, the button features listed for the Basic Electronic Control will be the same all models.
Figure 3-4.
Heat Mode (Available On Some Models Only)
This feature can be used with any combination of FAN SPEEDS, TIMER, or SLEEP MODES. The HEAT LED will be
illuminated above the MODE Button. When in the HEAT Mode, the fan will run continuously while heat is needed. The
temperature will automatically be maintained anywhere between 55°F (13°C) and 80°F (27°C). When the room set
temperature is satisfied, the fan will cycle off and on to circulate and sample the room air.
Fault Codes
If the display reads “AS”, “HS” or “ES” a sensor has failed. The “ES” is for the evaporator thermistor and the “AS” is
the ambient thermistor located in the remote control. A “HS” is for the heat thermistor on heat capable models only.
3-5
Section 3 Electronic Control
Description of Control Panel Buttons For Electronic Control of Slider/Casement
Model FAK
The control panels for the different models covered in this manual will have many of the same buttons and functions
only the control panel layout will differ.
Unless otherwise noted, the button features listed for the Basic Electronic Control will be the same all models.
Figure 3-5.
Exhaust Control
The exhaust control allows the air conditioner to either recirculate inside air (Closed) or exhaust air to the outside
(Open). The Closed position is used when maximum cooling is desired. It may also be used for air circulation without
cooling when the air conditioner is set to any fan position. The Open position removes stale air from the room and
exhausts it to the outside. Fresh air is drawn in through normal passages in the home.
Fault Codes
If the display reads “ES” or “AS” a sensor has failed. The “ES” is for the evaporator thermistor and the “AS” is the
ambient thermistor located in the remote control.
3-6
Section 3 Electronic Control
Description of Control Panel Buttons For Electronic Control of Compact and Mini
Models FAA, FAC and FAX
The control panels for the different models covered in this manual will have many of the same buttons and functions
only the control panel layout will differ.
Unless otherwise noted, the button features listed for the Basic Electronic Control will be the same all models.
Figure 3-6.
Fault Codes
If the display reads “ES” or “AS” a sensor has failed. The “ES” is for the evaporator thermistor and the “AS” is the
ambient thermistor located in the remote control.
3-7
Section 3 Electronic Control
Operation Of Current Device (All Models)
The power supply cord contains a current device that
senses damage to the power cord. To test your power
supply cord do the following:
1. Plug in the Air Conditioner.
2. The power supply cord will have TWO buttons on the
plug head. Press the TEST button. You will notice a
click as the RESET button pops out. (See Figure 3-7)
3. Press the RESET button. Again you will notice a click
as the button engages.
4. The power supply cord is now supplying electricity to
the unit.
Reset
Test
NOTE
Notes about the power supply cord current device:
1. Do not use this device to turn the unit on or off.
2. Always make sure the RESET button is pushed in for
correct operation.
3. The power supply cord must be replaced if it fails to
reset when either the TEST button is pushed, or it
cannot be reset. A new one can be obtained from
the product manufacturer.
4. If power supply cord is damaged, it CANNOT be
repaired. It MUST be replaced by one obtained from
the product manufacturer.
3-8
Figure 3-7.
Section 4 Component Teardown
COMPONENT TEARDOWN
This section explains how to access and remove components from Frigidaire Room Air Conditioners, and has been
arranged in such a way as to simulate which components would need to be removed first in order to gain access
to other components. When following a component removal procedure, it may be necessary to reference another
component removal procedure listed earlier in this section.
IMPORTANT NOTE: Before continuing, please take note of the WARNINGS, CAUTIONS and NOTES below.
WARNING
- IF IT IS NECESSARY TO REMOVE A ROOM AIR CONDITIONER UNIT FROM ITS INSTALLATION,
USE PROPER LIFTING TECHNIQUES AS UNITS ARE HEAVY AND COULD FALL RESULTING IN
SERIOUS INJURY OR DEATH. PULLING A UNIT FROM ITS INSTALLATION SHOULD ONLY BE
PERFORMED BY A TRAINED AUTHORIZED SERVICE TECHNICIAN OR INSTALLER.
- TO AVOID ELECTRIC SHOCK, POWER TO A ROOM AIR CONDITIONER MUST BE DISCONNECTED
WHENEVER ACCESSING AND/OR REMOVING COMPONENTS POWERED BY ELECTRICITY OR
COMPONENTS NEAR OTHER ELECTRICAL COMPONENTS.
- AFTER SERVICE IS COMPLETED, BE SURE ALL SAFETY-GROUNDING CIRCUITS ARE COMPLETE, ALL
ELECTRICAL CONNECTIONS ARE SECURE, AND ALL ACCESS PANELS ARE IN PLACE.
- IF UNIT WAS USED PRIOR TO SERVICE, THE COMPRESSOR ASSEMBLY WILL BE HOT.
WEAR PROTECTIVE GLOVES AND THE APPROPRIATE SAFETY GEAR WHEN WORKING WITH
COMPRESSORS.
CAUTION
To discharge the high voltage capacitor, wait for 60 seconds and then short-circuit the connection of
the high-voltage capacitor (that is the connecting lead of the high-voltage rectifier) against the
chassis with the use of an insulated screwdriver.
CAUTION
-
Metal edges may be sharp. Use caution and wear appropriate safety equipment when servicing
evaporators and condensers to avoid personal injury.
-
If working in the compressor area, remember that compressor and tubing may be hot.
CAUTION
When handling and or replacing a control board it is important that the technician have a wrist ground
strap on and connected to the cabinet or another grounding position to prevent static electricity from
damaging the board.
NOTE
Certain models will be grouped together as the procedure and components are similar with only minor differences.
Due to the number of models within the series, some teardown procedures may vary from the descriptions given in
this section.
4-1
Section 4 Component Teardown
Model FAM (Medium Duty) and Model FAS (Heavy Duty) Series
The FAM and FAS Series are similar in design and components. The illustrations will feature the FAM series
unless otherwise noted.
NOTE
Due to the number of models within the series, some teardown procedures, such as locations and number of
fasteners, and location of electrical system components, may vary from the descriptions given in this section.
Always use the wiring diagram attached to the unit for all electrical connections.
Filter And Front Panel Assembly Removal
1. Disconnect the power supply from unit.
2. Push the vent handle to the vent closed position
(where applicable).
3. Open the front grille panel by using both hands,
grabbing along the sides of the unit and pulling the
top of the front grille panel away from the unit until
the retaining tabs release from the front panel. Tilt
the front grille panel away from the unit.
4. Grasp the filter in the center and pull out of unit.
5. Remove front grille panel by pulling the front grille
panel upwards till the hinges can be pulled out from
the slots at the bottom corners of the unit frame.
6. Extract the four screws securing the front panel to
the unit frame. (See Figure 4-1)
7. Remove the front panel by pulling the front panel
outer edges away from the unit frame until the tabs
are free of the slots. (See Figure 4-2, Arrows show
tab locations) Release the four side tabs first then lift
the front panel upwards until the front panel is free.
Retainer
Figure 4-1.
Screws
Cabinet Wrapper/Sleeve Removal
To
1.
2.
3.
remove the cabinet wrapper/sleeve:
Disconnect the power supply from unit.
Remove the front panel assembly.
At the front of the unit is a handle to pull the air
conditioner assembly from the cabinet wrapper/
sleeve. Pull the assembly straight out until free of
the cabinet wrapper/sleeve.
4-2
Figure 4-2.
Section 4 Component Teardown
User Interface Removal
The user interface is secured with a screw to the unit
frame. The cabinet wrapper/sleeve does not need to be
removed to remove the user interface.
Screw
To
1.
2.
3.
remove the user interface:
Disconnect power supply from unit.
Remove the front panel assembly.
Extract screw securing user interface to unit frame.
(See Figure 4-3)
4. Disconnect the user interface at connector.
User Interface Circuit Board Removal
The user interface is secured with a screw to the unit
frame. The cabinet wrapper/sleeve does not need to be
removed if the user interface wire harness has a quick
disconnect. If wire harness does not have a quick
disconnect, the cabinet wrapper/sleeve will have to be
removed and user interface disconnected at the control
board.
Figure 4-3.
NOTE: The FAS series user interface mounting
screw is located along the left side of the unit.
NOTE: Some FAM models will have two mounting screws securing the user interface to the unit
frame.
To
1.
2.
3.
4.
remove the user interface:
Disconnect power supply from unit.
Remove the front panel assembly.
Extract screw securing user interface to unit frame.
Disconnect the user interface at the connector.
(See Figure 4-4)
5. Extract the four screws securing the user interface
board to the plastic housing.
Electrical
Connection
Blower Scroll Front Cover Removal
The blower scroll front cover is secured with 4 screws
located at the top left and right sides of the unit.
NOTE: Heat equipped models will have two screws at
the top and one screw on each side.
This cover must be removed to access the electrical
components of the unit.
To remove the blower scroll front cover:
1. Disconnect power supply from unit.
2. Remove the front panel assembly. Pull the unit from
the cabinet wrapper/sleeve.
3. Extract the screws securing the blower scroll front
cover to the left and right upper sides of the unit.
(See Figure 4-5)
4. Remove cover from unit.
Screws
Figure 4-4.
Screws
Screws
Front of Unit
Figure 4-5. View from Top of Unit
4-3
Section 4 Component Teardown
Left Bulkhead Partition Removal
The electrical component connections to the control
board are located in the control box located in the upper
left hand corner of the unit. The left bulkhead partition
must be removed first to access all the components in
the control box.
To remove the left bulkhead partition:
1. Disconnect power supply from unit.
2. Remove the front panel assembly. Pull the unit from
the cabinet wrapper/sleeve. Remove the blower
scroll front cover.
3. Pull thermistor from retainer on copper tubing.
4. Remove thermistor from retainer on evaporator.
5. Extract the two screws securing power cord to left
bulkhead partition. (See Figure 4-6)
6. Extract the two screws securing left bulkhead
partition to the evaporator. (See Figure 4-6)
7. Extract screw in the upper right hand corner of left
bulkhead partition. (See Figure 4-6)
8. From left side of unit, extract the screw below the
control box assembly. (See Figure 4-7)
9. To aid in removing the bulkhead, extract the screw
securing the control box to the evaporator mounting
bracket. (See Figure 4-7) Remove thermalmastic
from around ionizer and pull ionizer from slot in
scroll blower housing.
10. Carefully pull the control box and bulkhead towards
the front of the unit to access the screw located
inside the front of the control box that secures the
power cord to the bulkhead, then extract the screw.
11. The bulkhead has a flange that the control box
rests upon. Lift the control box upwards and pull
bulkhead out from under and behind the control box
and over the copper tubings and insulation, then
remove from the unit.
12. Reinstall the screw securing the control box to
the evaporator mounting bracket. This will make
accessing and removing the electrical components in
the control box much easier.
4-4
Ionizer
Screw
Screw
Screws
Screw
Thermistors
Screws
Figure 4-6. View from
Front of Unit
Figure 4-7. View from
Left Side of Unit
NOTE: Some models will not feature an ionizer.
Section 4 Component Teardown
Left Bulkhead Partition (Heater Equipped Models)
The electrical component connections to the control
board are located in the control box located in the upper
left hand corner of the unit. The left bulkhead partition
must be removed first to access all the components in
the control box.
To remove the left bulkhead partition:
1. Disconnect power supply from unit.
2. Remove the front panel assembly. Pull the unit from
the cabinet wrapper/sleeve. Remove the blower
scroll front cover.
3. Pull thermistor from retainer on copper tubing.
4. Remove thermistor from retainer on evaporator.
5. Extract the screws on the left side of the bulkhead
partition. (See Figure 4-8) This will include the screw
securing terminal block to the left bulkhead partition.
6. Extract the screw from behind left bulkhead partition
and the screw securing the left bulkhead partition to
the top of the front partition. (See Figure 4-8)
7. Cut wire harness retaining straps, then pull apart to
allow access to the wire harness connections to the
electrical components.
8. The control board is mounted with a metal bracket
that slides over the top of the left bulkhead partition.
Carefully pull the control board out from inside
the compartment. Disconnect compressor and
condenser fan wire leads from control board,
capacitors and terminal blocks.
9. Disconnect red and white heater wire leads from
capacitor and terminal block.
10. Carefully pull the left bulkhead partition with the
electrical components off of the unit.
Screws
Screws
Screws
Screws
Figure 4-8. FAM Series Heater Equipped Model
Screw
Power Cord
Figure 4-9. FAM Series No Heat
Screw
Control Board
Power Cord Removal
To remove the power cord:
1. Disconnect power supply from unit.
2. Pull the unit from the cabinet wrapper/sleeve.
Remove the blower scroll front cover and left
bulkhead partition. Cut retaining straps securing the
wiring harness in the control box area.
3. Disconnect black wire from side 1 and white wire
from side 2 of terminal block XT1. (See Figure 4-10)
4. Extract the ground screw that secures the power
cord ground wire to the control box. (See Figure 4-9)
5. Cut retaining strap securing the power cord and
thermistor wires together, then remove power cord.
Fan
Motor
Capacitor
Power Cord Entering
Compartment
XT1 Terminal
Block
Screw
Screws
Transformer
Figure 4-10. Control Box FAS Series No Heat
Wires omitted for clarity
4-5
Section 4 Component Teardown
Accessing the Control Board
The control board is secured with a screw to the control
box on the upper left hand side. (See Figure 4-11)
Pulling the control board out from its installation will
make accessing the remaining electrical components
much easier.
Before attempting to pull the control board from its
installation:
1. Disconnect power supply from unit.
2. Remove the thermalmastic from the wire harness
entering the control box.
3. Remove the wire harness from the retainer at the
back of the control box and cut all retaining straps.
4. Remove the power cord.
5. Disconnect the white wire at the top of the control
board at position N (AC-N1). Removing this wire
will allow you to pull the control board out from its
installation.
6. Disconnect wire leads from control board.
Thermistor connections at CN2 and CN3 may be
glued to the control board. Carefully remove glue
before attempting to remove the connectors.
Ionizer in Blower Duct
Screw
Figure 4-11. FAM Series Shown
(Ionizer)
X110
White
Blue
Control Board
For Display
Fuse
XT1 Terminal
Block
Transformer
Ionizer
Fan Motor Capacitor Removal
1. Disconnect power supply from unit.
2. Remove control board.
3. Disconnect wire leads from capacitor terminals.
Label as needed for proper reconnection.
4. Extract the two screws securing the capacitor to the
bottom of the control box. (See Figure 4-12)
CN-4
Ground Screw
Locations
Fan
Motor
Capacitor
Figure 4-12. FAM Series Shown
Wires omitted for clarity.
Transformer Removal
1. Disconnect power supply from unit.
2. Remove control board.
3. Disconnect wire leads leading from transformer
to the control board (X115 and AC-N1 Blue wire).
Label as needed for proper reconnection.
4. Extract the two screws securing the transformer to
the bottom of the control box. (See Figure 4-12)
Terminal Block Removal
1. Disconnect power supply from unit.
2. Remove control board.
3. Disconnect wire leads from terminal block. Label as
needed for proper reconnection.
4. Extract the screw securing the terminal block to the
bottom of the control box. (See Figure 4-12)
4-6
Ionizer Removal
1. Disconnect power supply from unit.
2. Remove control board.
3. Disconnect wire leads leading from ionizer to the
control board (X110). Label as needed for proper
reconnection. (See Figure 4-12)
4. Remove ionizer cable from installation in blower
duct. Feed cable through hole in control box.
5. Extract ground screw from bottom of control box to
free the ground wire leading from the ionizer.
6. Extract the screw securing the ionizer to the bottom
of the control box.
Section 4 Component Teardown
Power Cord And Fan Motor Capacitor Removal
(Heater Equipped Models)
To remove the power cord and fan motor capacitor:
1. Disconnect power supply from unit.
2. Remove the front panel assembly. Pull the unit from
the cabinet wrapper/sleeve. Remove the blower
scroll front cover and left bulkhead partition screws.
Cut retaining straps securing the wiring harness in
the control box area.
3. Discharge capacitor.
CAUTION
To discharge the high voltage capacitor, wait for 60
seconds and then short-circuit the connection of the
high-voltage capacitor (that is the connecting lead of
the high-voltage rectifier) against the chassis with the
use of an insulated screwdriver.
4. Disconnect wire leads from fan motor capacitor.
5. Extract screw that secures the fan motor capacitor
to the bottom of the control box. Remove capacitor.
6. Disconnect power cord wire leads from capacitor and
terminal block.
7. Extract the two screws securing the power cord to
the bottom of the control box. (See Figure 4-13)
8. Extract the ground screw securing the power cord
ground wire to bottom of control box.
9. Cut any retaining straps securing power cord to unit,
then pull power cord from unit.
Transformer
Terminal
Block
Ground
Screw
Capacitor
Screw
Screws
Fan Motor
Capacitor
Screw
Power
Cord
Figure 4-13. FAM Series With Heat
Shown with control board removed.
Ambient Sensor
CN3
CN4
CN7
Evap. Sensor
Daht Sensor
Brown
Blue
White
M
M
Red
H
Black
Fan
L
Yellow
CN6
Yellow
Trans.
P8
CN5
RY7 Comp
4
Blue
3
Red
RY6
4
3
Heater
White
White
Power
Black
Green
Cap.
Blue
Red
Red
Capacitor Removal
4. Follow steps 1-3 above.
5. Disconnect wire leads from capacitor.
6. Extract screw securing the capacitor mounting strap
to bottom of control box and remove from unit.
CN1
CN1
P4
P3
P2
P7
Display
Control
Board
Black
C
S
Blue
R
M
Compressor
Figure 4-14. FAM Series With Heat
Wiring Schematic
Thermistor Removal
Transformer Removal
1. Disconnect power supply from unit.
2. Remove the front panel assembly. Pull the unit from
the cabinet wrapper/sleeve. Remove the blower
scroll front cover and left bulkhead partition screws.
Cut retaining straps securing the wiring harness in
the control box area.
3. Cut any retaining straps securing the thermistors to
other wires or components.
4. Disconnect thermistor wire leads from control board,
then pull from unit. (See Figure 4-14)
The transformer is mounted to the lower section of the
control box compartment. The screws are accessible
only after the left bulkhead partition is re moved with
the electronic components.
1. Disconnect power supply from unit.
2. Remove left bulkhead partition.
3. Disconnect wire leads from transformer at the
control board.
4. Extract the two screws securing transformer to the
bottom of control box. (See Figure 4-13)
4-7
Section 4 Component Teardown
Heater Removal
To remove the heater:
1. Disconnect power supply from unit.
2. Remove the front panel assembly. Pull the unit from
the cabinet wrapper/sleeve. Remove the blower
scroll front cover.
3. Disconnect the heater electrical leads, the red wire
from the control board and the white wire from the
terminal block.
4. Remove the left bulkhead partition with the
electronic components.
5. Extract the two screws from each side of the
evaporator securing heater housing to back of the
evaporator. (See Figure 4-15)
6. Carefully pull the heater housing out from behind
evaporator.
7. Lay the heater and front scroll cover on a flat
surface and extract the two screws securing the
heater assembly to the front scroll cover. (See
Figure 4-12)
8. Slide heater assembly to the left until the metal
legs are free of the retaining slots then pull heater
assembly off of front scroll cover.
NOTE
If the thermal limiter and/or the thermostat are
defective, the entire heater assembly must be replaced.
4-8
Screws
Screws
Figure 4-15. FAM Series With Heat
Screws
Figure 4-16.
Section 4 Component Teardown
Compressor Capacitor Removal
The compressor capacitor is located under a cover
mounted to the back of the scroll blower duct assembly.
To remove the compressor capacitor:
1. Disconnect power supply from unit.
2. Remove the front panel assembly. Pull the unit from
the cabinet wrapper/sleeve.
3. Extract the two screws securing the capacitor cover
to the unit frame. (See Figure 4-17)
4. Discharge capacitor.
Screws
Figure 4-17.
CAUTION
To discharge the high voltage capacitor, wait for 60
seconds and then short-circuit the connection of the
high-voltage capacitor (that is the connecting lead of
the high-voltage rectifier) against the chassis with the
use of an insulated screwdriver.
Screw
5. Disconnect the wire leads from the capacitor.
6. Extract the screw securing the capacitor mounting
strap to the cover. Remove capacitor from unit.
(See Figure 4-18)
Figure 4-18.
Condenser Fan Cover Removal
To remove the condenser fan cover:
1. Disconnect power supply from unit.
2. Remove the front panel assembly. Pull the unit from
the cabinet wrapper/sleeve.
3. Extract the screw from each side of the cover.
(See Figure 4-19)
4. Extract the three screws from the front of the cover
and lift off condenser fan assembly.
Screw
Screw
Screws
Figure 4-19.
4-9
Section 4 Component Teardown
Removing the Condenser Fan and Blower
Assembly
The condenser fan and blower assembly consists of
the blower wheel, condenser fan and shroud, front and
rear blower housing and right bulkhead partition. The
assembly is secured with screws to the evaporator,
condenser and the unit base.
To remove the condenser fan and blower assembly:
1. Disconnect power supply from unit.
2. Remove the front panel assembly. Pull the unit from
the cabinet wrapper/sleeve.
3. Remove the front scroll cover. The wire leads from
the compressor, condenser fan and capacitor must
be disconnected from the control box components.
The control box must then be removed from the
unit.
4. Remove the capacitor cover. Disconnect wire leads
and remove from unit.
5. Cut wire retainers, then route the wire harness leads
so that the condenser fan assembly can be pulled
straight up out from the unit base.
6. Remove condenser fan cover.
7. Extract the two screws from each side securing the
fan assembly to the condenser assembly.
(See Figure 4-20)
8. Extract the two screws from the lower right side
securing the right bulkhead partition to the unit
base. (See Figure 4-20)
9. Extract the two screws from the right front securing
the right bulkhead partition to the evaporator.
(See Figure 4-21)
10. Extract the two screws from the left side securing
the right bulkhead partition to the unit base and the
evaporator.
11. Extract the two screws under the condenser fan
motor securing the assembly to the unit base.
(See Figure 4-20)
12. Pull condenser fan assembly straight up out from the
unit base.
4-10
Screws
Screws
Figure 4-20.
Screws
Figure 4-21.
Section 4 Component Teardown
Blower Housing Removal
Retaining Latch
The blower housing is a two piece styrofoam assembly
that provides an air passage for cold air exiting the unit.
To remove the blower housing:
1. Disconnect power supply from unit.
2. Remove the front panel assembly. Pull the unit from
the cabinet wrapper/sleeve.
3. Remove the condenser fan assembly from the unit.
4. From inside the air duct, pull back on the air vent
handle to release the retaining tab on the vent
linkage. Pull handle from air duct. (See Figure 4-22)
5. The front styrofoam piece may now be separated
from the rear piece.
Figure 4-22.
NOTE
The blower wheel must be removed before the rear
styrofoam piece can pulled from the right bulkhead
partition.
16mm nut
Blower Wheel Removal
To remove the blower wheel:
1. Disconnect power supply from unit.
2. Remove the front panel assembly. Pull the unit from
the cabinet wrapper/sleeve.
3. Remove the condenser fan assembly from the unit.
Remove the front styrofoam section of the air duct.
4. Use a 16mm socket or wrench and remove the nut
securing the blower wheel to the motor shaft. Pull
the lock washer and washer off shaft, then pull
blower wheel off shaft. (See Figure 4-23)
5. The rear section of the styrofoam air duct may now
be removed from the right bulkhead partition.
Figure 4-23.
Screws
Right Bulkhead Partition Removal
To remove the right bulkhead partition:
1. Disconnect power supply from unit.
2. Remove the front panel assembly. Pull the unit from
the cabinet wrapper/sleeve.
3. Remove the condenser fan assembly from the unit.
Remove blower wheel and rear styrofoam section or
air duct.
4. Extract the three screws securing the rear section of
the condenser fan assembly from the right bulkhead
partition. (See Figure 4-24)
Figure 4-24.
4-11
Section 4 Component Teardown
Condenser Fan Blade and Shroud Removal
To remove the condenser fan blade and shroud:
1. Disconnect power supply from unit.
2. Remove the front panel assembly. Pull the unit from
the cabinet wrapper/sleeve.
3. Remove the condenser fan assembly from the unit.
4. Use a 13mm socket or wrench and remove the left
hand thread nut securing the condenser fan blade to
the motor shaft. (See Figure 4-26)
5. Pull the lock washer and washer from the motor
shaft, then pull the fan blade from the motor shaft.
6. With the fan blade removed, the condenser fan
shroud can be removed from the condenser fan
assembly.
13 mm Nut
Figure 4-26.
Fan Motor Removal
To remove the fan motor:
1. Disconnect power supply from unit.
2. Remove the front panel assembly. Pull the unit from
the cabinet wrapper/sleeve.
3. Remove the condenser fan assembly from the unit.
4. Remove the blower wheel and fan blade.
5. Use a 10mm socket or wrench and remove the three
nuts securing the condenser fan motor to the right
partition bulkhead. Lift condenser off mounting
studs. (See Figure 4-27)
Compressor Removal
To remove the fan motor:
1. Disconnect power supply from unit.
2. Remove the front panel assembly. Pull the unit from
the cabinet wrapper/sleeve.
3. Attach an approved self tapping line tap valve to the
process tube. Connect refrigerant recovery system
to tap valve. Turn on recovery system, open the
line tap valve, and allow refrigerant to flow into an
approved tank.
4. Disconnect the compressor inlet line above the
accumulator. Disconnect discharge line one inch
from the outlet.
5. Use a 13mm socket or wrench and remove the 3
nuts securing the compressor to the unit base.
(See Figure 4-28)
6. Remove the compressor electrical components by
using an 8mm socket or wrench and remove the nut
securing the cover to the top of the compressor.
4-12
10mm Nuts
Figure 4-27.
Process Tubes
13 mm
Nuts
Figure 4-28.
Section 4 Component Teardown
Condenser Removal
To remove the condenser:
1.
2.
3.
4.
Disconnect power supply from unit.
Remove the front panel and cabinet wrapper/sleeve.
Remove the condenser fan cover.
Attach an approved self tapping line tap valve to the
process tube. Connect refrigerant recovery system
to tap valve. Turn on recovery system, open the
line tap valve, and allow refrigerant to flow into an
approved tank.
5. Disconnect inlet and outlet lines from condenser.
6. Extract the two screws securing the bottom of the
condenser to the unit base. (See Figure 4-29)
7. Carefully lift the condenser out from the unit base.
Screws
Figure 4-29.
Evaporator Removal
To remove the evaporator:
1.
2.
3.
4.
Disconnect power supply from unit.
Remove the front panel and cabinet wrapper/sleeve.
Remove the fan and blower assembly.
Attach an approved self tapping line tap valve to the
process tube. Connect refrigerant recovery system
to tap valve. Turn on recovery system, open the
line tap valve, and allow refrigerant to flow into an
approved tank.
5. Disconnect inlet and outlet lines from evaporator.
Screws
Figure 4-30.
6. Extract the two screws securing the bottom front of
the evaporator to the unit base. (See Figure 4-30)
7. Carefully lift the evaporator out from the unit base.
4-13
Section 4 Component Teardown
Model FAZ (Medium Duty Slider) Series
The Model FAZ is similar in design and components to the Model FAM and FAS series. The Model FAZ illustrated here
has the heat option.
NOTE
Due to the number of models within the series, some teardown procedures, such as locations and number of
fasteners, and location of electrical system components, may vary from the descriptions given in this section.
Always use the wiring diagram attached to the unit for all electrical connections.
Filter And Front Panel Assembly Removal
1. Disconnect the power supply from unit.
2. Open the front grille panel by using both hands,
grabbing along the sides of the unit and pulling the
top of the front grille panel away from the unit until
the retaining tabs release from the front panel. Tilt
the front grille panel away from the unit.
3. Grasp the filter in the center and pull out of unit.
4. Remove front grille panel by pulling the front grille
panel upwards till the hinges can be pulled out from
the slots at the bottom corners of the unit frame.
5. Extract the screw from each side of unit securing the
front panel to the unit frame. (See Figure 4-32)
6. Remove the front panel by pulling the front panel
outer edges away from the unit frame until the tabs
are free of the slots. (See Figure 4-32, Arrows show
tab locations) Release the side tabs first then lift the
front panel upwards until the front panel is free.
Retainer
Figure 4-31.
Fan
Cabinet Wrapper/Sleeve Removal
To
1.
2.
3.
remove the cabinet wrapper/sleeve:
Disconnect the power supply from unit.
Remove the front panel assembly.
Extract the two shipping screws securing the cabinet
wrapper/sleeve to the unit base.
4. At the front of the unit is a handle to pull the air
conditioner assembly from the cabinet wrapper/
sleeve. Pull the assembly straight out until free of
the cabinet wrapper/sleeve.
Control Box Cover Removal
To remove the control box cover:
1. Disconnect power supply from unit.
2. Remove the front panel assembly and cabinet
wrapper/sleeve.
3. Extract screw securing the cover to the control box.
4. Lift right side of cover slightly upwards then push to
the left to release tab inserted into the control box.
4-14
Screw
Screw
Figure 4-32.
Control Box
Mounting
Screw
Cover
Screw
Figure 4-33.
Section 4 Component Teardown
User Interface Removal
The user interface is secured with 4 retainers that slide
into keyhole slots cut into the face of the control box.
Screws
Keyhole
Slots
To
1.
2.
3.
remove the user interface:
Disconnect power supply from unit.
Remove the front panel assembly.
Remove cabinet wrapper/sleeve then remove control
box cover.
4. Lift user interface straight up until retainers can be
pulled out of keyhole slots in control box.
(See Figure 4-34)
5. Disconnect the user interface at control board.
6. Remove the control board by extracting the 4 screws
from the back of the user interface. Separate the
front and back sections and remove control board.
Retainers
Figure 4-34.
Control Box Removal
The control box is secured to the unit frame with 4
screws, two at the top of the control box, two along
the left edge and one beneath the control box. Screws
securing some of the components within the control box
can only be accessed with the 4 screws removed and the
control box pulled away from the unit.
Screws
To
1.
2.
3.
remove the control box from its installation:
Disconnect power supply from unit.
Remove the front panel assembly.
Remove cabinet wrapper/sleeve, then remove control
box cover.
4. Remove the screw at the top and the three screws
along the left side securing the control box assembly
to the unit frame. (See Figure 4-35)
Power Cord Removal
5. Pull the control box assembly off unit and carefully
rotate the assembly until the power cord screws are
accessible.
6. disconnect the black and white wire leads from the
control board.
7. Extract the two screws securing the power cord to
the control box.
8. Extract the screw securing the power cord ground
wire to control box. Remove power cord from unit.
(See Figure 4-36)
Figure 4-35.
Ground
Screw
Screws
Capacitor
Mounting Screw
Figure 4-36.
4-15
Section 4 Component Teardown
Capacitor Removal
To remove the capacitor:
1. Disconnect power supply from unit.
2. Remove cabinet wrapper/sleeve then remove control
box cover.
3. Extract control box assembly mounting screws, then
pull away and rotate to access capacitor.
CAUTION
Ambient Sensor
CN3
CN4
CN7
Evap. Sensor
Daht Sensor
Brown
Blue
White
M
Red
Black
Fan
To discharge the high voltage capacitor, wait for 60
seconds and then short-circuit the connection of the
high-voltage capacitor (that is the connecting lead of
the high-voltage rectifier) against the chassis with the
use of an insulated screwdriver.
CN1
CN1
P4
P3
H
P2
CN6
P7
P8 P10
P9 P11
CN5
L
Yellow
Display
Control
Board
M
Yellow
Trans.
RY7 Comp
4
N
RY6
4
3
Red
White
Red
Blue
3
Red
Cap.
C
Red
White
4. Discharge capacitor.
5. Disconnect wire leads from capacitor.
6. Extract screw from retainer securing the capacitor to
the control box assembly. Pull capacitor from unit.
(See Figure 4-36)
Power
Black
Transformer Removal
To remove the transformer:
1. Disconnect power supply from unit.
2. Remove cabinet wrapper/sleeve then remove control
box cover.
3. Extract control box assembly mounting screws, then
pull away from unit.
4. Disconnect wire leads from control board leading to
the transformer. (See Figure 4-37)
5. From the underside of the control box assembly,
extract screws securing the transformer to the
control box assembly.
4-16
S
R
M
Compressor
Green
Figure 4-37.
Fan Motor
Capacitor Screw
Fan Motor Capacitor Removal
To remove the capacitor:
1. Disconnect power supply from unit.
2. Remove cabinet wrapper/sleeve then remove control
box cover.
3. Extract control box assembly mounting screws, then
pull away and rotate to access fan motor capacitor.
4. Disconnect wire leads from capacitor.
5. Extract screw securing fan motor capacitor to control
box assembly. (See Figure 4-38)
Blue
Black
Heater
Transformer
Mounting Screws
From Underside of
Control Box
Control Board
Control Board Retainers
Figure 4-38.
Control Board Removal
To remove the control board:
1. Disconnect power supply from unit.
2. Remove cabinet wrapper/sleeve then remove control
box cover.
3. Extract control box assembly mounting screws, then
pull away from unit.
4. Disconnect all wire leads from control board.
5. Release the plastic control board retainers then pull
control board from control box. (See Figure 4-38)
Section 4 Component Teardown
Thermistor Removal
There are three thermistors on units equipped with a
heating element.
To remove the ambient thermistor:
1. Disconnect power supply from unit.
2. Remove cabinet wrapper/sleeve then remove control
box cover.
3. Disconnect thermistor wire leads at control board.
4. Pull thermistor assembly from evaporator.
5. Release the retaining tabs on thermistor assembly,
then pull thermistor out from the retainers.
To remove the evaporator thermistor:
4. Follow steps 1-3 above.
5. Pull thermistor from the tube located on the copper
tubing and remove from unit.
To
4.
5.
6.
remove the heat duct thermistor:
Follow steps 1-3 above.
Remove insulation from top of blower housing.
Pull thermistor assembly from top of blower housing
and remove from unit.
Ambient
Thermistor
Evaporator
Thermistor
Figure 4-39.
Screws
Blower Cover and Condenser Cover Removal
The blower cover and condenser cover have braces that
span the open area above the condenser fan and blower
assembly.
To
1.
2.
3.
remove the blower cover and condenser fan cover:
Disconnect power supply from unit.
Remove cabinet wrapper/sleeve.
Extract the screws securing the braces to the blower
and condenser covers. Remove braces from unit.
(See Figure 4-40)
4. Extract the screws securing the blower and
condenser covers to the unit. Lift covers off unit.
Top Scroll Cover and Duct Thermistor Removal
To remove the top scroll cover and duct thermistor:
1. Disconnect power supply from unit.
2. Remove cabinet wrapper/sleeve and control box
cover.
3. Remove braces and blower cover.
4. Disconnect duct thermistor wire leads from control
board. (See Figure 4-41)
5. Remove insulation covering thermistor wires. Pull
thermistor assembly from top scroll cover. The top
scroll cover may now be removed from the unit.
Figure 4-40.
Duct Thermistor
Top Scroll Cover
Figure 4-41.
4-17
Section 4 Component Teardown
Front Scroll Cover And Heater Assembly Removal
The heater assembly is mounted to the inside of the
front scroll cover. The front scroll cover is then mounted
to the evaporator assembly and to the front bulkhead
partition.
To remove the front scroll cover heater assembly:
1. Disconnect power supply from unit.
2. Remove cabinet wrapper/sleeve then remove control
box.
3. Remove the braces and blower cover, and the top
scroll cover.
4. Disconnect wire leads from control box leading to
the heater assembly.
5. Extract the 4 screws from each side of the
evaporator securing the front scroll cover to the
evaporator and front bulkhead partition.
(See Figure 4-42)
6. Carefully pull evaporator an inch away from the
front scroll cover to allow the front scroll cover to be
pulled from the unit base. Use caution not to kink or
rupture the sealed system tubing.
7. Pull front scroll cover with heater assembly from unit
base.
8. Lay the heater and front scroll cover on a flat
surface and extract the two screws securing the
heater assembly to the front scroll cover.
(See Figure 4-43)
9. Slide heater assembly to the left until the metal
legs are free of the retaining slots then pull heater
assembly off of front scroll cover.
NOTE
If the thermal limiter and/or the thermostat are
defective, the entire heater assembly must be replaced.
4-18
Left Side
Right Side
Screws
Screws
Figure 4-42.
Screws
Figure 4-43.
Section 4 Component Teardown
Blower Wheel Removal
To remove the blower:
1. Disconnect power supply from unit.
2. Remove cabinet wrapper/sleeve then remove control
box.
3. Remove the braces and blower cover, and the top
scroll cover.
4. Disconnect wire leads from control box leading to
the heater assembly, then remove front scroll cover
and heater assembly.
5. Use a 13 mm extended socket to remove the nut
from the blower. (See Figure 4-44)
6. Remove lock washer, washer and blower wheel from
motor shaft.
Blower
Wheel
Lock
Washer
13mm Nut
Washer
Figure 4-44.
Condenser Fan Blade and Shroud Removal
To remove the condenser fan blade and shroud:
1. Disconnect power supply from unit.
2. Remove cabinet wrapper/sleeve, then remove control
box cover.
3. Remove the braces and condenser fan cover.
4. Extract the two screws at the bottom corners
securing the condenser to the unit base tray.
Carefully lift the condenser over the base tray using
care not to kink or rupture the sealed system.
(See Figure 4-45)
5. Use a 10 mm extended socket to remove the left
hand thread nut securing the condenser fan blade to
the fan motor shaft. (See Figure 4-46)
6. Remove lock washer, washer and condenser fan
blade from motor shaft.
7. Extract the two screws from each side of the
condenser securing the condenser fan shroud to
the outer edges of the condenser. Extract the two
screws securing the condenser shroud to the unit
base tray. Remove condenser fan shroud from unit.
(See Figure 4-47)
Screws
Figure 4-45.
10 mm Nut
Left Hand
Thread
Figure 4-46.
Drain Valve Removal
The drain valve is located between the condenser and
the condenser fan shroud.
To remove the drain valve:
1. Disconnect power supply from unit.
2. Remove cabinet wrapper/sleeve, then remove
condenser fan blade and shroud.
3. Extract the two screws securing the drain valve to
the unit base. (See Figure 4-48)
Screws
Screws
Front
Partition
Screw
Figure 4-47.
4-19
Section 4 Component Teardown
Front Partition and Rear Scroll Housing Removal
The front partition must be removed to access the
condenser fan mounting bolts that are located behind
the rear scroll housing.
To remove the front partition and rear scroll housing:
1. Disconnect power supply from unit.
2. Remove cabinet wrapper/sleeve then remove control
box. Disconnect condenser fan motor wire leads
from control board.
3. Remove the braces and blower cover, and the top
scroll cover.
4. Remove front scroll cover and heater assembly.
5. Remove blower, condenser fan blade and condenser
shroud.
6. Extract the screw from each side of the base tray
securing the front partition to the unit base.
7. Extract the five screws securing the front partition to
the unit base. (See Figure 4-49)
8. Lift front partition up slightly then pull front partition
towards the right until free of the sealed system
tubing. Remove from unit.
9. The rear scroll housing can now be pulled from the
front partition.
Drain
Valve
Screws
1 of 2
Shown
Figure 4-48.
Screws
Condenser Fan Motor Removal
To remove the condenser fan motor:
1. Disconnect power supply from unit.
2. Remove cabinet wrapper/sleeve then remove control
box. Disconnect condenser fan motor wire leads
from control board.
3. Remove the braces and blower cover, and the top
scroll cover.
4. Remove front scroll cover and heater assembly.
5. Remove blower, condenser fan blade and condenser
shroud.
6. Remove the front partition and rear scroll housing.
Extract the two screws securing the condenser
mounting bracket to the front partition.
8. Use a 7mm socket or wrench and remove the four
nuts securing the condenser fan motor to the front
partition. Pull condenser fan motor from front
partition. (See Figure 4-50)
Screws
Screws
Figure 4-49.
7mm Nuts
4 Places
7.
4-20
Figure 4-50.
Section 4 Component Teardown
Condenser Removal
To remove the condenser:
1.
2.
3.
4.
Disconnect power supply from unit.
Remove the front panel and cabinet wrapper/sleeve.
Remove the condenser cover.
Attach an approved self tapping line tap valve to the
process tube. Connect refrigerant recovery system
to tap valve. Turn on recovery system, open the
line tap valve, and allow refrigerant to flow into an
approved tank.
5. Disconnect inlet and outlet lines from condenser.
6. Extract the two screws securing the bottom of the
condenser to the unit base. (See Figure 4-51)
7. Carefully lift the condenser out from the unit base.
Screws
Figure 4-51.
Evaporator Removal
To remove the evaporator:
1.
2.
3.
4.
Disconnect power supply from unit.
Remove the front panel and cabinet wrapper/sleeve.
Remove the front scroll and heater assembly.
Attach an approved self tapping line tap valve to the
process tube. Connect refrigerant recovery system
to tap valve. Turn on recovery system, open the
line tap valve, and allow refrigerant to flow into an
approved tank. (See Figure 4-52 and 4-53)
5. Disconnect inlet and outlet lines from evaporator.
6. Carefully lift the evaporator out from the unit base.
Figure 4-52.
Compressor Removal
To remove the fan motor:
1. Disconnect power supply from unit.
2. Remove the front panel assembly. Pull the unit from
the cabinet wrapper/sleeve.
3. Attach an approved self tapping line tap valve to the
process tube. Connect refrigerant recovery system
to tap valve. Turn on recovery system, open the
line tap valve, and allow refrigerant to flow into an
approved tank. (See Figure 4-53)
4. Disconnect the compressor inlet line above the
accumulator. Disconnect discharge line one inch
from the outlet.
5. Use a 13mm socket or wrench and remove the 3
nuts securing the compressor to the unit base.
6. Remove the compressor electrical components by
using an 8mm socket or wrench and remove the nut
securing the cover to the top of the compressor.
Process
Tube
Process
Tube
13mm
Nuts
Figure 4-53.
4-21
Section 4 Component Teardown
Model FAH (Thru the Wall) Series
Temp/Timer
Auto Temp
Hi
Med
Lo
Sleep
Check
Filter
Heat
Cool
Fan
Speed
NOTE
Energy Saver
Fan Only
Temp/Timer
Remote
Sensing
Mode
Timer
Due to the number of models within the series, some
teardown procedures, such as locations and number of
fasteners, and location of electrical system components,
may vary from the descriptions given in this section.
Pull Out
Filter
Always use the wiring diagram attached to the unit for
all electrical connections.
Figure 4-54.
Filter And Front Panel Assembly Removal
1. Disconnect the power supply from unit.
2. Grab filter handle at top center of the front grille.
Pull out, then upwards to remove filter.
(See Figure 4-54)
3. Extract the two screws securing the front panel to
the unit. Screws are visible with the filter removed.
(See Figure 4-55)
4. Using a putty knife, carefully pry out the side and
top retaining clips from the slots cut in the cabinet
wrapper. (See Figure 4-55, Arrows show tab
locations)
5. Pull front panel from front of unit
Temp/Timer
Auto Temp
Hi
Med
Lo
Sleep
Check
Filter
Heat
Fan
Speed
Cool
Energy Saver
Fan Only
Temp/Timer
Remote
Sensing
Mode
Timer
Screws
Figure 4-55.
Screws
Back of Unit
Cabinet Wrapper/Sleeve Removal
To
1.
2.
3.
remove the cabinet wrapper/sleeve:
Disconnect the power supply from unit.
Remove the front panel assembly.
Extract the screws from each side of unit. Extract
the screws securing the fan guard and cabinet
wrapper/sleeve to the back of the unit. Remove fan
guard from back of unit. (See Figure 4-56)
4. Lift cabinet wrapper/sleeve off of the unit.
Right Side
Left Side
Screws
Screws
Figure 4-56.
User Interface Removal
To
1.
2.
3.
4.
remove the user interface:
Disconnect power supply from unit.
Remove the front panel assembly.
Disconnect wire harness at disconnect.
Extract the four screws securing user interface to
front panel. (See Figure 4-57)
5. Remove the user interface board by extracting the 4
screws securing the board to the housing.
(See Figure 4-58)
4-22
Temp/Timer
Auto Temp
Hi
Med
Lo
Sleep
Heat
Fan
Speed
Cool
Energy Saver
Fan Only
Check
Filter
Screw
Temp/Timer
Remote
Sensing
Mode
Timer
Thermistor
Figure 4-57.
Section 4 Component Teardown
Control Box Component Removal
The control box houses the control board, capacitor
and terminal block. The power cord enters the control
box along the left side and is held in position with a
grommet.
Circuit
Board
Screws
1. Disconnect the power supply from unit.
2. Remove front panel and cabinet wrapper/sleeve.
3. Discharge capacitor.
CAUTION
Figure 4-58.
To discharge the high voltage capacitor, wait for 60
seconds and then short-circuit the connection of the
high-voltage capacitor (that is the connecting lead of
the high-voltage rectifier) against the chassis with the
use of an insulated screwdriver.
Control Box Screws
To remove the capacitor:
4. Extract the screw securing the retaining band to
bottom of control box. (See Figure 4-59)
5. Disconnect all wire leads from capacitor. Label as
needed for proper reconnection.
To
6.
7.
8.
remove power cord:
Disconnect white wire from terminal block.
Disconnect black wire from control board.
Extract ground screw securing green wire to bottom
of control box. (See Figure 4-59)
To remove terminal block:
9. Disconnect all wire leads from terminal block. Label
as needed for proper reconnection.
10. Extract screw securing terminal block to bottom of
control box. (See Figure 4-59)
Capacitor
Screw
Ground
Screw
Control
Box
Screws
Terminal Block
Control Box Screws
Control Board
Screw
Figure 4-59.
NOTE: Wires omitted for clarity.
To remove thermistors:
11. Remove any wire retainers securing the thermistor
wire leads. Disconnect thermistor leads at control
board and remove from unit.
To remove the control board:
12. Disconnect all wire leads from control board. Label
as needed for proper reconnection.
13. Compress the plastic retainers securing the control
board to the front of the control box and remove
from unit.
Figure 4-60.
4-23
Section 4 Component Teardown
Control Box Component Removal
(Heater Equipped Models)
The control box houses the control board, fan motor
capacitor, transformer and terminal block. The power
cord enters the control box along the left side and is
held in position with a grommet.
Cover
Screws
Control
Box
Screws
1. Disconnect the power supply from unit.
2. Remove front panel and cabinet wrapper/sleeve.
3. Extract the two screws from the left side and the
screw at the top right rear corner securing the cover
to control box. Remove cover from unit.
(See Figure 4-61)
4. Discharge capacitor.
Figure 4-61.
Ground
Screw
CAUTION
To discharge the high voltage capacitor, wait for 60
seconds and then short-circuit the connection of the
high-voltage capacitor (that is the connecting lead of
the high-voltage rectifier) against the chassis with the
use of an insulated screwdriver.
To remove power cord:
5. Extract the two screws securing the power cord to
the bottom front of the unit tray.
6. Disconnect black wire from terminal block.
7. Disconnect white wire from control board.
8. Extract ground screw securing green wire to the rear
of the control box. (See Figure 4-62)
To remove terminal block:
9. Disconnect wire leads from fan motor capacitor.
10. Extract screw securing fan motor capacitor to right
side wall of control box. (See Figure 4-62)
To remove fan motor capacitor:
11. Disconnect all wire leads from terminal block.
12. Extract screw securing terminal block to bottom of
control box. (See Figure 4-62)
To remove transformer:
13. Disconnect wire leads from transformer at control
board.
14. From rear of control box, extract the screws securing
transformer to control box. (See Figure 4-62)
To remove thermistors:
15. Remove any wire retainers securing the thermistor
wire leads. Disconnect thermistor leads at control
board and remove from unit.
4-24
Screw
Fan Motor
Capacitor
Screws
1 of 2
Shown
Control
Board
Control
Box
Screw
Terminal
Block
Transformer
Figure 4-62.
To remove the control board:
16. Disconnect all wire leads from control board. Label
as needed for proper reconnection.
17. Compress the plastic retainers securing the control
board to the front of the control box and remove
from unit.
Control Box Removal
To
1.
2.
3.
remove the control box:
Disconnect the power supply from unit.
Remove front panel and cabinet wrapper/sleeve.
Remove control box cover.
4. Remove wire ties and disconnect the compressor,
condenser fan motor and electric heater wire leads
from the control box components.
5. Extract the screw from the floor of the control box
securing the assembly to the unit frame. Extract the
screw from the top right corner and the screw from
the lower left rear corner. (See Figure 4-62)
6. Carefully pull control box off of the unit.
Section 4 Component Teardown
Front Blower Housing And Heater Assembly
Removal (Heater Equipped Models)
To remove the front blower housing and heater
assembly:
1. Disconnect the power supply from unit.
2. Remove front panel and cabinet wrapper/sleeve.
3. Remove the control box. Remove wire leads for the
duct thermistor at the control board.
4. Cut insulation to free front blower housing from the
rear section of the blower housing.
5. Carefully pull front blower housing upwards while
feeding the heater wire harness through the access
hole until free of the evaporator.
6. Extract two screws from each side of the evaporator
securing the heater assembly and front scroll cover
to the evaporator flange. (See Figure 4-63)
7. Pull the heater assembly and front scroll cover
upwards until free of evaporator. There may be
insulation glue between the evaporator and front
scroll cover. Be sure to replace the insulation when
reassembling the unit.
8. Lay the heater and front scroll cover on a flat
surface and extract the two screws securing the
heater assembly to the front scroll cover.
(See Figure 4-64)
9. Slide heater assembly to the left until the metal
legs are free of the retaining slots then pull heater
assembly off of front scroll cover.
NOTE
If the thermal limiter and/or the thermostat are
defective, the entire heater assembly must be replaced.
Screws
Left Side
Right Side
Figure 4-63.
Screws
Figure 4-64.
4-25
Section 4 Component Teardown
Top Condenser Fan Cover Removal
1. Disconnect the power supply from unit.
2. Remove front panel and cabinet wrapper/sleeve.
3. Pull condenser fan cover off condenser assembly.
Screw
Condenser Fan Shroud/ Fan and Blower Assembly
Removal
To remove the condenser fan shroud with the fan and
blower assembly:
1. Disconnect the power supply from unit.
2. Remove front panel and cabinet wrapper/sleeve.
3. Pull condenser fan cover off condenser assembly.
4. Disconnect the compressor and condenser fan motor
wire harness connections from the control box
components. Free wire harness from condenser fan
shroud.
5. Extract screw from back side of bulkhead that
secures the condenser fan shroud to the bulkhead.
(See Figure 4-65)
6. Extract the three screws along the left side of the
condenser securing the condenser fan shroud in
position. (See Figure 4-66)
7. Pull the condenser fan shroud with the fan and
blower assembly upwards from the unit base and
remove from unit.
Figure 4-65.
Screws
Figure 4-66.
Fan And Blower Assembly Breakdown
To remove the blower wheel:
1. Disconnect power supply from unit.
2. Remove the front panel assembly. Pull the unit from
the cabinet wrapper/sleeve.
3. Remove the condenser fan assembly from the unit.
Remove the front styrofoam section of the air duct.
4. Use a 16mm socket or wrench and remove the nut
securing the blower wheel to the motor shaft. Pull
the lock washer and washer off shaft, then pull
blower wheel off shaft. (See Figure 4-67)
5. The rear section of the styrofoam air duct may now
be removed from the bulkhead partition.
4-26
Front Blower
Housing
Rear Blower
Housing
Blower
16mm Nut
Figure 4-67.
Section 4 Component Teardown
Condenser Fan Blade and Shroud Removal
To remove the condenser fan blade and shroud:
1. Disconnect power supply from unit.
2. Remove the front panel assembly. Pull the unit from
the cabinet wrapper/sleeve.
3. Remove the condenser fan assembly from the unit.
4. Use a 13 mm socket or wrench and remove the left
hand thread nut securing the condenser fan blade to
the motor shaft. (See Figure 4-68)
5. Pull the lock washer and washer from the motor
shaft, then pull the fan blade from the motor shaft.
6. With the fan blade removed, the condenser fan
shroud can be removed from the condenser fan
assembly.
13 mm Nut
Figure 4-68.
Fan Motor Removal
10mm Nuts
To remove the fan motor:
1. Disconnect power supply from unit.
2. Remove the front panel assembly. Pull the unit from
the cabinet wrapper/sleeve.
3. Remove the condenser fan assembly from the unit.
4. Remove the blower wheel and fan blade.
5. Use a 10 mm socket or wrench and remove the
three nuts securing the condenser fan motor to
the right partition bulkhead. Lift condenser off
mounting studs. (See Figure 4-69)
Figure 4-69.
Compressor Removal
To remove the compressor:
1. Disconnect power supply from unit.
2. Remove the front panel assembly. Pull the unit from
the cabinet wrapper/sleeve.
3. Attach an approved self tapping line tap valve to the
process tube. Connect refrigerant recovery system
to tap valve. Turn on recovery system, open the
line tap valve, and allow refrigerant to flow into an
approved tank. (See Figure 4-70)
4. Disconnect the compressor inlet line above the
accumulator. Disconnect discharge line one inch
from the outlet.
5. Use a 13 mm socket or wrench and remove the 3
nuts securing the compressor to the unit base.
6. Remove the compressor electrical components by
using an 8 mm socket or wrench and remove the nut
securing the cover to the top of the compressor.
Process Tube
13 mm
Nuts
Figure 4-70.
4-27
Section 4 Component Teardown
Condenser Removal
To remove the condenser:
1.
2.
3.
4.
Disconnect power supply from unit.
Remove the front panel and cabinet wrapper/sleeve.
Remove the condenser fan cover.
Attach an approved self tapping line tap valve to the
process tube. Connect refrigerant recovery system
to tap valve. Turn on recovery system, open the
line tap valve, and allow refrigerant to flow into an
approved tank.
5. Disconnect inlet and outlet lines from condenser.
6. Extract the two screws securing the bottom of the
condenser to the unit base. (See Figure 4-71)
7. Carefully lift the condenser out from the unit base.
Screws
Figure 4-71.
Evaporator Removal
To remove the evaporator:
1.
2.
3.
4.
Disconnect power supply from unit.
Remove the front panel and cabinet wrapper/sleeve.
Remove the fan and blower assembly.
Attach an approved self tapping line tap valve to the
process tube. Connect refrigerant recovery system
to tap valve. Turn on recovery system, open the
line tap valve, and allow refrigerant to flow into an
approved tank.
5. Disconnect inlet and outlet lines from evaporator.
6. Extract the two screws securing the bottom front of
the evaporator to the unit base. (See Figure 4-72)
7. Carefully lift the evaporator out from the unit base.
4-28
Screws
Figure 4-72.
Section 4 Component Teardown
Model FAK ( Slider/Casement) Series
NOTE
Open
Closed
Pull Out
Filter
Exhaust
Due to the number of models within the series, some
teardown procedures, such as locations and number of
fasteners, and location of electrical system components,
may vary from the descriptions given in this section.
Always use the wiring diagram attached to the unit for
all electrical connections.
Screws
Filter And Front Panel Assembly Removal
1. Disconnect the power supply from unit.
2. Grab filter handle at top center of the front grille.
Pull out, then upwards to remove filter.
3. Extract the four screws securing the front panel to
the cabinet wrapper/sleeve. (See Figure 4-73)
4. Using a putty knife, carefully pry out the side and
top retaining clips from the slots cut in the cabinet
wrapper. (See Figure 4-73, Arrows show tab
locations)
5. Pull front panel carefully from front of unit until
the user interface connection can be accessed.
Disconnect user interface from wire harness. Front
panel is now free from unit.
Figure 4-73.
Screws
Screws
Cabinet Wrapper/Sleeve Removal
To
1.
2.
3.
remove the cabinet wrapper/sleeve:
Disconnect the power supply from unit.
Remove the front panel assembly.
Extract the screws from each side of unit. Extract
the screws securing the cabinet wrapper/sleeve to
the back of the unit. (See Figure 4-74)
4. Lift the cabinet wrapper/sleeve off of the unit.
Rear View
Side View
Figure 4-74.
Screws
User Interface Removal
To
1.
2.
3.
remove the user interface:
Disconnect power supply from unit.
Remove the front panel assembly.
Extract the six screws securing user interface to front
panel then lift user interface off front panel.
(See Figure 4-75)
Figure 4-75.
4-29
Section 4 Component Teardown
Air Vent Lever and Door Removal
remove the air vent lever and door:
Disconnect the power supply from unit.
Remove front panel and cabinet wrapper/sleeve.
Extract the two screws securing the air vent lever to
the partition. (See Figure 4-76)
4. Release retainer latches and pull air vent lever from
unit.
5. The air vent door is removed by releasing the
retaining latches from the front of the partition and
then pushing the air vent door through the partition
until free from unit. (See Figure 4-76)
Screws
To
1.
2.
3.
Air Vent Lever
Control Box
Cover Screw
Air Vent
Screws
Control Box Cover Removal
1. Disconnect the power supply from unit.
2. Remove front panel and cabinet wrapper/sleeve.
3. Extract the two screws at the front of the unit
securing the control box cover to the control box.
(See Figure 4-76)
4. Extract the screw from the compressor side of the
partition securing the control box cover in place.
(See Figure 4-76)
5. Pull cover from control box.
Control Box Component Removal
Air Vent
Door
Figure 4-76.
Ground Screw
Transformer
Capacitor
Screws
Fan Motor
Capacitor
Power Cord
Screws
CN 3
Screw
P4
P3
P2
Control
Board
Figure 4-77.
CAUTION
To discharge the high voltage capacitor, wait for 60
seconds and then short-circuit the connection of the
high-voltage capacitor (that is the connecting lead of
the high-voltage rectifier) against the chassis with the
use of an insulated screwdriver.
To remove the capacitor:
4. Extract the screws securing the retaining band to
bottom of control box. (See Figure 4-77)
5. Disconnect all wire leads from capacitor. Label as
needed for proper reconnection.
4-30
Figure 4-78.
CN4
The control box houses the control board, capacitor and
terminal block. The power cord enters the control box
along the lower right side and is held in position with a
grommet.
1. Disconnect the power supply from unit.
2. Remove front panel and cabinet wrapper/sleeve.
3. Discharge capacitor.
Air Vent
Retaining
Latches
Control Box
Cover
CN1
Section 4 Component Teardown
To remove power cord:
6. Extract the two screws securing the power cord to
the lower right front of the unit.
7. Cut all retaining straps holding the power cord to the
evaporator.
8. Disconnect white and black wires from control board.
Thermistor
9. Extract ground screw securing green wire to bottom
of control box.
10. Extract the two screws securing the power cord to
the bottom of the control box. Pull power cord from
unit. (See Figure 4-79)
To remove fan motor capacitor:
11. Disconnect all wire leads from fan motor capacitor.
Label as needed for proper reconnection.
12. Extract screw securing fan motor capacitor to bottom
of control box. (See Figure 4-80)
Screws
Figure 4-79.
Ground Screw
To remove transformer:
13. Disconnect all wire leads at the control board leading
to the transformer. Label as needed for proper
reconnection.
14. Extract the two screws securing transformer to
bottom of control box. (See Figure 4-80)
Capacitor
Screws
Fan Motor
Capacitor
Power Cord
Screws
CN 3
Thermistor
connections at
CN2 and CN3
P4
P3
P2
Control
Board
CN4
Screw
To remove the control board:
15. Disconnect all wire leads from control board. Label
as needed for proper reconnection.
16. Compress the plastic retainers securing the control
board to the bottom of the control box and remove
from unit.
To remove the thermistors:
17. Disconnect wire leads from control board.
Thermistor connections at CN2 and CN3 may be
glued to the control board. Carefully remove glue
before attempting to remove the connectors.
(See Figure 4-80)
18. Cut retaining straps securing thermistors to
evaporator.
19. Remove thermistors from the front of the evaporator
and from the tube attached to the evaporator.
Pull wire leds out of control box.
Transformer
CN1
Figure 4-80.
Control Box Removal
To
1.
2.
3.
4.
remove the control box from the unit:
Disconnect the power supply from unit.
Remove front panel and cabinet wrapper/sleeve.
Remove control box cover. Discharge capacitor.
Disconnect wire leads from condenser fan motor and
compressor. Remove wire leads from control box.
5. Extract screws securing power cord from front of
unit.
6. Control box may now be removed with the power
cord attached.
4-31
Section 4 Component Teardown
Accessing the Condenser Fan and Blower
Assembly and Compressor
In order to access the condenser fan and blower
assembly, the condenser and compressor must be
removed from their installation positions. Care must be
taken when moving the condenser so that the copper
tubing is not kinked or ruptured.
1. Disconnect the power supply from unit.
2. Remove front panel and cabinet wrapper/sleeve.
3. Extract the two screws at the lower rear corners
securing the condenser to the unit frame.
(See Figure 4-81)
4. Extract the three screws from each side of the
condenser securing the left and right side condenser
bracket to the condenser. (See Figure 4-81)
5. Lift the condenser upwards to clear the base tray
and rotate condenser slowly towards the right
counter clockwise until screws for the condenser
shroud are accessible.
6. Using a 16 mm socket or wrench, remove the nut
securing condenser fan blade to condenser fan
motor shaft. Remove lock washer and washer, then
pull fan blade from motor shaft. (See Figure 4-82)
7. Extract the two screws securing the condenser
shroud to the unit base. Remove shroud from unit.
8. To remove the condenser blower and fan motor,
the entire sealed system must be removed as an
assembly from the unit base. Begin by removing all
wire harness tiedowns securing the condenser fan
motor and compressor wire harness leads to the unit
partition. Carefully position condenser back onto
the unit base tray. Use care not to deform fins on
condenser with the condenser motor shaft.
9. Use a 13 mm socket or wrench and remove the
three nuts securing the compressor to the mounting
bracket. (See Figure 4-83)
10. Remove the front scroll housing adapter from above
the evaporator. Extract the two screws on each side
of the evaporator securing the mounting bracket to
the unit partition.
Condenser Bracket
Screws
Condenser Screws
Figure 4-81.
16 mm Nut
Screws
Figure 4-82.
13 mm Nuts
2 of 3 shown
CAUTION
It is recommended to have two people remove the
sealed system from the unit base tray.
11. Lift the compressor off the mounting studs then
carefully move the entire sealed system to the left
until free of unit partition.
4-32
Figure 4-83.
Section 4 Component Teardown
12. Remove the blower housing scroll from the front of
the unit. Use a 13 mm socket or wrench to remove
the left hand thread nut from the blower. Remove
lock washer and washer, then pull blower from
motor shaft.
13. Remove scroll housing back plate.
14. From the sides of the base tray remove the screw
securing partition to base tray. (See Figure 4-84)
15. From both sides of partition, extract the screws
securing the condenser fan motor mounting bracket
to partition. Remove partition from base tray.
(See Figure 4-85)
16. Extract screw securing ground screw to condenser
mounting bracket. (See Figure 4-86)
17. Extract the four screws securing the condenser fan
motor to rear of mounting bracket assembly. Pull
condenser fan motor from unit base.
(See Figure 4-86)
Blower Housing
Scroll
Front
Scroll
Housing
Adapter
Evaporator
Mounting Screws
Screw
Figure 4-84.
Removing Sealed System Components
Compressor Removal
To remove the compressor:
1. Disconnect power supply from unit.
2. Remove the front panel assembly. Pull the unit from
the cabinet wrapper/sleeve.
3. Attach an approved self tapping line tap valve to the
process tube. Connect refrigerant recovery system
to tap valve. Turn on recovery system, open the
line tap valve, and allow refrigerant to flow into an
approved tank.
4. Disconnect the compressor inlet line above the
accumulator. Disconnect discharge line one inch
from the outlet.
5. Use a 13 mm socket or wrench and remove the 3
nuts securing the compressor to the unit base.
(See Figure 4-83)
6. Remove the compressor electrical components by
using an 8 mm socket or wrench and remove the nut
securing the cover to the top of the compressor.
Screws
Screws From
Opposite Side
Figure 4-85.
Ground
Screw
Screws
Figure 4-86.
4-33
Section 4 Component Teardown
Condenser Removal
To remove the condenser:
1. Disconnect power supply from unit.
2. Remove the front panel and cabinet wrapper/sleeve.
3. Extract the three screws from each side of the
condenser securing the left and right side condenser
bracket to the condenser. (See Figure 4-81)
4. Attach an approved self tapping line tap valve to the
process tube. Connect refrigerant recovery system
to tap valve. Turn on recovery system, open the
line tap valve, and allow refrigerant to flow into an
approved tank.
5. Disconnect inlet and outlet lines from condenser.
6. Extract the two screws securing the bottom of the
condenser to the unit base. (See Figure 4-87)
7. Carefully lift the condenser out from the unit base.
Evaporator Removal
To remove the evaporator:
1. Disconnect power supply from unit.
2. Remove the front panel and cabinet wrapper/sleeve.
3. Remove the control box assembly with power cord
and thermistors.
4. Remove the front scroll housing adapter from above
the evaporator. Extract the two screws on each side
of the evaporator securing the mounting bracket to
the unit partition. (See Figure 4-88)
5. Attach an approved self tapping line tap valve to the
process tube. Connect refrigerant recovery system
to tap valve. Turn on recovery system, open the
line tap valve, and allow refrigerant to flow into an
approved tank.
6. Disconnect inlet and outlet lines from evaporator.
7. Carefully lift the evaporator out from the unit base.
4-34
Screws
Figure 4-87.
Blower Housing
Scroll
Evaporator
Mounting Screws
Figure 4-88.
Front
Scroll
Housing
Adapter
Section 4 Component Teardown
Model FAC (Compact) Series
Filter And Front Panel Assembly Removal
1. Disconnect the power supply from unit.
2. Push the vent handle back into the air passageway
until free of the front panel assembly.
3. Open the front grille panel by using both hands,
grabbing along the sides of the unit and pulling the
top of the front grille panel away from the unit until
the retaining tabs release from the front panel. Tilt
the front grille panel away from the unit.
4. Grasp the filter in the center and pull out of unit.
5. Pull the front grille panel out from the slots at the
bottom corners of the unit frame.
6. Extract the four screws securing the front panel to
the unit frame. (See Figure 4-89)
7. Remove the front panel by pulling the outer edges
away from the unit frame until the tabs are free of
the slots in the unit frame. (See Figure 4-90 Arrows
show the tab locations) Release the two side tabs
first then lift the front panel upwards until the front
panel is free.
NOTE
Due to the number of models within the series, some
teardown procedures, such as locations and number of
fasteners, and location of electrical system components,
may vary from the descriptions given in this section.
Always use the wiring diagram attached to the unit for
all electrical connections.
Screws
CAUTION
Use caution not to strain wire harness connections.
The user interface and ambient thermistor are still
connected to the wiring harness and can only be
disconnected at the inner control board.
Figure 4-89.
Tab
Tab
8. Turn front panel to access the ionizer cable, using
caution not to strain the wire harness connections.
Remove ionizer cable from the retainers on the back
side of the front panel. (See Figure 4-91)
User Interface Removal
The user interface can be removed from the front panel
by extracting the 3 screws as shown in Figure 4-92,
however, the user interface wiring harness will still be
connected to the control panel. Accessing the control
panel will be covered on page 4-36.
Tab
Tab
Figure 4-90.
Ionizer
To remove the user interface:
1. Disconnect power supply from unit.
2. Follow the steps above for front panel removal.
3. Extract the three screws, then rotate user interface
and push through front panel. Front panel is now
free.
Wire Retainers
Figure 4-91.
4-35
Section 4 Component Teardown
Cabinet Wrapper/Sleeve Removal
The cabinet wrapper/ sleeve is secured to the unit frame
with 10 screws, 4 screws along the lower right side, 4
screws on the lower left side and 2 screws that must be
extracted from the top rear corners of the unit.
Screws
To remove the cabinet wrapper/ sleeve:
1. Disconnect power supply from unit.
2. Remove front panel. The user interface does not
have to be removed from the front panel.
3. Extract the screws from the cabinet wrapper/sleeve,
then pull the left and right bottom edges away from
the unit frame and lift the cabinet wrapper/sleeve off
the unit. (See Figure 4-93)
Figure 4-92.
Control Panel Removal
The control panel is secured to the unit frame with two
retaining tabs that slide into slots along the right side of
the mounting bracket and a screw at the top and bottom
of the control panel mounting bracket.
Screws
Front
Screws
Front
Screws
To remove the control panel:
1. Disconnect power supply from unit.
2. Remove the front panel and cabinet wrapper/sleeve.
3. Extract the screws from front of control panel
assembly. (See Figure 4-94)
4. Lift the control panel assembly upwards to release
the retaining tabs.
5. Pull control panel assembly away from unit frame to
access the wire leads connected to control board.
6. Discharge capacitor.
Left Side
Right Side
Figure 4-93.
CAUTION
To discharge the high voltage capacitor, wait for 60
seconds and then short-circuit the connection of the
high-voltage capacitor (that is the connecting lead of
the high-voltage rectifier) against the chassis with the
use of an insulated screwdriver.
The wire harness connector for the user interface
is glued to the control board connector. Carefully
remove glue with a sharp knife before attempting to
disconnect connector from control board.
8. Disconnect all wire leads connected to control panel.
Label wire leads as needed to identify and for the
reconnecting of wire leads.
9. Use a small pliers to compress the plastic retainers
securing the control board and remove from the
mounting bracket.
Retaining
Tabs
Screws
7.
4-36
Figure 4-94.
Section 4 Component Teardown
Power Cord, Capacitor and Anion Generator
Removal
The power cord is secured to the unit frame with
two P-clamps and screws. The capacitor and anion
generator are secured with a single screw.
Ionizer
Cable
Anion
Generator
Screw
Capacitor
To remove the power cord:
1. Disconnect power supply from unit.
2. Remove the front panel and cabinet wrapper/sleeve.
Remove the control panel from its installation
position but do not disconnect from wire harness.
3. Discharge capacitor.
Capacitor
Mounting Screw
To Fan &
Compressor
Ground Screws
CAUTION
To discharge the high voltage capacitor, wait for 60
seconds and then short-circuit the connection of the
high-voltage capacitor (that is the connecting lead of
the high-voltage rectifier) against the chassis with the
use of an insulated screwdriver.
Screw
Power
Cord
Screws
Figure 4-95.
Not all wires shown for clarity.
CONTROL BOARD
EVAPORATOR SENSOR
CN4
To remove the capacitor:
4. Follow steps 1-3 above.
5. Disconnect the wire leads from the capacitor.
6. Extract the capacitor mounting screw. Remove the
mounting strap and the capacitor is free.
(See Figure 4-95)
AMBIENT SENSOR
CN3
CN1
BLACK
ANION
ANION
Y/G
RED
P5
BLACK
BLUE
P7
WHITE
To remove the anion generator:
4. Follow steps 1-3 above.
5. Cut or remove straps securing the ionizer cable to
the unit.
6. Extract the bottom ground screw and remove the
ground wire lead for the anion generator. (See Figure
4-95)
7. Disconnect the black and white wire leads from the
control board that go to the anion generator.
8. Extract the anion generator mounting screw. Anion
generator is now free. (See Figure 4-95)
CN2
DISPLAY BOARD
4. Extract the two screws securing the power cord
P-clamp at the base of the unit. (See Figure 4-95)
5. Extract the screw securing the P-clamp inside the
compartment. (See Figure 4-95)
6. Extract the top ground screw and remove the ground
wire lead for the power cord. (See Figure 4-95)
7. Disconnect the black and white wire leads of the
power cord from the control board. Power cord is
now free.
To
Control
Board
P4
P8
FAN MOTOR
YELLOW
RED
Y/G
CAPACITOR
P3
P2
P9 BLUE
N.O.
RY6
COM
WHITE
POWER
SUPPLY
GREEN
BLACK
BLACK
BLUE
RED
L
C
S
R
COMP
M
~
Y/G
Figure 4-96.
4-37
Section 4 Component Teardown
Evaporator Thermistor Removal
To remove the evaporator thermistor:
1. Disconnect power supply from unit.
2. Remove the front panel and cabinet wrapper/sleeve.
Remove the control panel from its installation
position but do not disconnect from wire harness.
3. Disconnect thermistor from control board.
4. Remove or cut any retaining straps. Remove
thermistor from retaining bracket. The retaining
bracket is pushed onto the evaporator tubing,
remove by pulling bracket out of evaporator. (See
Figure 4-97)
Control System Bulkhead
The control system bulkhead provides a mounting
area for the electronic control and electrical system
components. Three screws secure the bulkhead to the
unit frame. Two of the screws will be removed as the
cabinet wrapper/sleeve and user interface are removed.
Clip On 4th Pipe
5th Pipe
4th Pipe
160cm
Figure 4-97.
Bulkhead
Screw
To remove the control system bulkhead:
1. Disconnect power supply from unit.
2. Remove the front panel and cabinet wrapper/sleeve.
Remove control panel from its installation position.
3. Discharge capacitor. To discharge the high voltage
capacitor, wait for 60 seconds and then short-circuit
the connection of the high-voltage capacitor (that
is the connecting lead of the high-voltage rectifier)
against the chassis with an insulated screwdriver.
4. Disconnect all electrical leads from control board,
capacitor, power cord and anion generator. Remove
ground wires from bulkhead.
5. Pull wire harness through hole in bulkhead.
6. Extract screw from lower left side of unit frame. Pull
bulkhead from the unit. (See Figure 4-98)
Figure 4-98.
Top Section
Styrofoam Blower Compartment Removal
The styrofoam blower compartment consists of three
parts, with the top two pieces removable to access the
blower wheel. The top two pieces are taped together
and may be removed as an assembly.
To remove the styrofoam blower compartment:
1. Remove the front panel and cabinet wrapper/sleeve.
2. Cut the tape holding the top two styrofoam pieces to
the bottom section of styrofoam.
3. Lift the top two sections out as an assembly and
remove from the unit. (See Figure 4-99)
4-38
Center
Section
Bottom
Section
Figure 4-99.
Section 4 Component Teardown
Fan and Blower Assembly Removal
To remove the fan and blower assembly:
1. Disconnect power supply from unit.
2. Remove the front panel and cabinet wrapper/sleeve.
Remove the control panel from its installation
position but do not disconnect from wire harness.
Remove the top two styrofoam sections of the
blower compartment.
3. Discharge capacitor. To discharge the high voltage
capacitor, wait for 60 seconds and then short-circuit
the connection of the high-voltage capacitor (that
is the connecting lead of the high-voltage rectifier)
against the chassis with the use of an insulated
screwdriver.
4. The fan motor wire harness passes through the
control system bulkhead. Disconnect the fan motor
wire leads from the capacitor and control board.
Remove ground wire from control system bulkhead.
5. Pull fan motor wire harness through hole in control
system bulkhead.
6. Extract the 3 screws from each side of condenser,
then extract the two screws from the top of the
condenser. (See Figure 4-100)
7. Extract the two screws securing the bottom of the
fan and blower assembly to the unit base.
(See Figure 4-100)
8. Use either a 10 mm extended socket of a long
phillips head screwdriver and extract the four screws
securing the fan motor mounting bracket to the unit
base. (See Figure 4-100)
9. Carefully lift the fan and blower assembly upwards
until free of condenser.
Remove
Screws
Repeat
Opposite Side
Screws
Remove
Screws
Repeat
Opposite Side
Of Bracket
Figure 4-100.
16 mm Nut
Right Hand
Thread
Figure 4-101.
13 mm Nut
Left Hand
Thread
Assembly Breakdown
10. Use an 16mm socket or wrench and remove the nut
securing the blower to the fan motor shaft. Remove
the lock washer and washer from shaft. Pull blower
from motor shaft. (See Figure 4-101)
11. Use a 13mm socket or wrench and remove the left
hand nut and lock washer securing the fan blade
to the fan motor shaft. Pull the fan blade from the
motor shaft. (See Figure 4-102)
12. Use a phillips head screwdriver or an 8 mm wrench
or socket and extract the 3 screws securing the fan
motor to the mounting bracket. The fan motor is
now free. (See Figure 4-103)
Figure 4-102.
Remove
Screws
Figure 4-103.
4-39
Section 4 Component Teardown
Condenser Removal
To remove the condenser:
1. Disconnect power supply from unit.
2. Remove the front panel and cabinet wrapper/sleeve.
3. Discharge capacitor. To discharge the high voltage
capacitor, wait for 60 seconds and then short-circuit
the connection of the high-voltage capacitor (that
is the connecting lead of the high-voltage rectifier)
against the chassis with the use of an insulated
screwdriver.
4. Remove the fan and blower assembly.
5. Attach an approved self tapping line tap valve to the
process tube. Connect refrigerant recovery system
to tap valve. Turn on recovery system, open the
line tap valve, and allow refrigerant to flow into an
approved tank.
6. Disconnect inlet and outlet lines from condenser.
7. Using a 3 cornered file, score a groove around
capillary tube as shown. Break capillary tube along
score mark.
8. Extract the two screws securing the bottom of the
condenser to the unit base. (See Figure 4-104)
9. Carefully lift the condenser out from the unit base.
To Compressor
Capillary Tube
Remove Screws
Figure 4-104.
Evaporator Removal
To remove the evaporator:
1. Disconnect power supply from unit.
2. Remove the front panel and cabinet wrapper/sleeve.
3. Discharge capacitor. To discharge the high voltage
capacitor, wait for 60 seconds and then short-circuit
the connection of the high-voltage capacitor (that
is the connecting lead of the high-voltage rectifier)
against the chassis with the use of an insulated
screwdriver.
4. Remove the fan and blower assembly.
5. Attach an approved self tapping line tap valve to the
process tube. Connect refrigerant recovery system
to tap valve. Turn on recovery system, open the
line tap valve, and allow refrigerant to flow into an
approved tank.
6. Disconnect inlet and outlet lines from evaporator.
7.
Extract the two screws securing the bottom front of
the evaporator to the unit base. (See Figure 4-105)
8. Carefully lift the evaporator out from the unit base.
4-40
Remove Screws
Figure 4-105.
Section 4 Component Teardown
Compressor Removal
Condenser
To remove the capillary tube assembly:
1. Disconnect power supply from unit.
2. Remove the front panel and cabinet wrapper/sleeve.
3. Discharge capacitor. To discharge the high voltage
capacitor, wait for 60 seconds and then short-circuit
the connection of the high-voltage capacitor (that
is the connecting lead of the high-voltage rectifier)
against the chassis with the use of an insulated
screwdriver.
4. Disconnect compressor electrical leads from control
board and capacitor. Feed wire leads through access
hole in control panel bulkhead into compressor area.
5. Attach an approved self tapping line tap valve to the
process tube. Connect refrigerant recovery system
to tap valve. Turn on recovery system, open the
line tap valve, and allow refrigerant to flow into an
approved tank.
6. Disconnect the compressor inlet line above the
accumulator. Disconnect discharge line one inch
from the outlet.
7. Use a 13mm socket or wrench and remove the 3
nuts securing the compressor to the unit base.
(See Figure 4-106)
8. Remove the compressor electrical components by
using an 8mm socket or wrench and remove the nut
securing the cover to the top of the compressor.
Evaporator
Compressor
Nuts
Figure 4-106.
4-41
Section 4 Component Teardown
Model FAA (Mini-Compact) Series
Filter And Front Panel Assembly Removal
1. Disconnect the power supply from unit.
2. Push the vent handle to the vent closed position
(where applicable).
3. Open the front grille panel by using both hands,
grabbing along the sides of the unit and pulling the
top of the front grille panel away from the unit until
the retaining tabs release from the front panel. Tilt
the front grille panel away from the unit.
4. Grasp the filter in the center and pull out of unit.
5 . Pull the front grille panel out from the slots at the
bottom corners of the unit frame.
6. Extract the four screws securing the front panel to
the unit frame. (See Figure 4-107)
7. Remove the front panel by pulling the outer edges
away from the unit frame until the tabs are free of
the slots in the unit frame. (See Figure 4-108 Arrows
show the tab locations) Release the two side tabs
first then lift the front panel upwards until the front
panel is free.
NOTE
Due to the number of models within the series, some
teardown procedures, such as locations and number of
fasteners, and location of electrical system components,
may vary from the descriptions given in this section.
Always use the wiring diagram attached to the unit for
all electrical connections.
Screws
CAUTION
Use caution not to strain wire harness connections.
The user interface and ambient thermistor are still
connected to the wiring harness and can only be
disconnected at the inner control board.
Figure 4-107.
Tab
Tab
8. Turn front panel to access the ionizer cable, using
caution not to strain the wire harness connections.
Remove ionizer cable from the retainers on the back
side of the front panel. (See Figure 4-109)
Tab
Tab
User Interface Removal
The user interface can be removed from the front panel
by extracting the 3 screws as shown in Figure 4-110,
however, the user interface wiring harness will still be
connected to the control panel. Accessing the control
panel will be covered on page 4-43.
Figure 4-108.
Ionizer
To remove the user interface:
1. Disconnect power supply from unit.
2. Follow the steps above for front panel removal.
3. Extract the three screws, then turn the user interface
and push through front panel. Front panel is now
free. (See Figure 4-110)
4-42
Wire Retainers
Figure 4-109.
Section 4 Component Teardown
Cabinet Wrapper/Sleeve Removal
The cabinet wrapper/ sleeve is secured to the unit frame
with 3 screws along the lower right side, 4 screws on the
left side and 2 screws that must be extracted from the
top of the unit.
Screws
To remove the cabinet wrapper/ sleeve:
1. Disconnect power supply from unit.
2. Remove front panel. The user interface does not
have to be removed from the front panel.
3. Extract the screws from the cabinet wrapper/sleeve,
then pull the left and right bottom edges away from
the unit frame and lift the cabinet wrapper/sleeve off
the unit. (See Figure 4-111)
Control Panel Removal
The control panel is secured to the unit frame with two
retaining tabs that slide into slots along the right side of
the mounting bracket and a screw at the top and bottom
of the control panel mounting bracket.
Figure 4-110.
Screws
Front
Screws
Front
Screws
To remove the cabinet wrapper/ sleeve:
1. Disconnect power supply from unit.
2. Remove the front panel and cabinet wrapper/sleeve.
3. Extract the screws from front of control panel
mounting bracket. (See Figure 4-112)
4. Lift the control panel assembly upwards to release
the retaining tabs then pull the control panel
assembly away from the unit frame to access the
wire leads connected to the control board.
5. Discharge capacitor.
Left Side
Right Side
Figure 4-111.
CAUTION
To discharge the high voltage capacitor, wait for 60
seconds and then short-circuit the connection of the
high-voltage capacitor (that is the connecting lead of
the high-voltage rectifier) against the chassis with the
use of an insulated screwdriver.
6. The wire harness connector for the user interface
is glued to the control board connector. Carefully
remove glue with a sharp knife before attempting to
disconnect connector from control board.
7. Disconnect all wire leads connected to control panel.
Label wire leads as needed to identify and for the
reconnecting of wire leads.
8. Use a small pliers to compress the plastic retainers
securing the control board and remove from the
mounting bracket.
Retaining
Tabs
Screws
Figure 4-112.
4-43
Section 4 Component Teardown
Power Cord, Capacitor and Anion Generator
Removal
The power cord is secured to the unit frame with
two P-clamps and screws. The capacitor and anion
generator are secured with a single screw.
Ionizer
Cable
Anion
Generator
Screw
Capacitor
To remove the power cord:
1. Disconnect power supply from unit.
2. Remove the front panel and cabinet wrapper/sleeve.
Remove the control panel from its installation
position but do not disconnect from wire harness.
3. Discharge capacitor.
Capacitor
Mounting Screw
To Fan &
Compressor
Ground Screws
CAUTION
To discharge the high voltage capacitor, wait for 60
seconds and then short-circuit the connection of the
high-voltage capacitor (that is the connecting lead of
the high-voltage rectifier) against the chassis with the
use of an insulated screwdriver.
Screw
Power
Cord
Screws
Figure 4-113.
Not all wires shown for clarity.
CONTROL BOARD
EVAPORATOR SENSOR
CN4
To remove the capacitor:
4. Follow steps 1-3 above.
5. Disconnect the wire leads from the capacitor.
6. Extract the capacitor mounting screw. Remove the
mounting strap and the capacitor is free.
(See Figure 4-113)
AMBIENT SENSOR
CN3
CN1
BLACK
ANION
ANION
Y/G
RED
P5
BLACK
BLUE
To remove the anion generator:
4. Follow steps 1-3 above.
5. Cut or remove straps securing the ionizer cable to
the unit.
6. Extract the bottom ground screw and remove the
ground wire lead for the anion generator.
7. Disconnect the black and white wire leads from the
control board that go to the anion generator.
8. Extract the anion generator mounting screw. Anion
generator is now free. (See Figure 4-113)
4-44
CN2
DISPLAY BOARD
4. Extract the two screws securing the power cord
P-clamp at the base of the unit. (See Figure 4-113)
5. Extract the screw securing the P-clamp inside the
compartment. (See Figure 4-113)
6. Extract the top ground screw and remove the ground
wire lead for the power cord.
7. Disconnect the black and white wire leads of the
power cord from the control board. Power cord is
now free.
To
Control
Board
P7
WHITE
P4
P8
FAN MOTOR
YELLOW
RED
Y/G
CAPACITOR
P3
P2
P9 BLUE
N.O.
RY6
COM
WHITE
POWER
SUPPLY
GREEN
BLACK
BLACK
BLUE
RED
L
C
S
R
COMP
M
~
Y/G
Figure 4-114.
Section 4 Component Teardown
Evaporator Thermistor Removal
To remove the evaporator thermistor:
1. Disconnect power supply from unit.
2. Remove the front panel and cabinet wrapper/sleeve.
Remove the control panel from its installation
position but do not disconnect from wire harness.
3. Disconnect thermistor from control board.
4. Remove or cut any retaining straps. Remove
thermistor from retaining bracket. The retaining
bracket is pushed onto the evaporator tubing,
remove by pulling bracket out of evaporator.
(See Figure 4-115)
Control System Bulkhead Removal
The control system bulkhead provides a mounting
area for the electronic control and electrical system
components. Three screws secure the bulkhead to the
unit frame. Two of the screws will be removed as the
cabinet wrapper/sleeve and user interface are removed.
Clip On 4th Pipe
5th Pipe
4th Pipe
160cm
Figure 4-115.
Bulkhead
Screw
To remove the control system bulkhead:
1. Disconnect power supply from unit.
2. Remove the front panel and cabinet wrapper/sleeve.
Remove control panel from its installation position.
3. Discharge capacitor. To discharge the high voltage
capacitor, wait for 60 seconds and then short-circuit
the connection of the high-voltage capacitor (that
is the connecting lead of the high-voltage rectifier)
against the chassis with an insulated screwdriver.
4. Disconnect all electrical leads from control board,
capacitor, power cord and anion generator. Remove
ground wires from bulkhead.
5. Pull wire harness through hole in bulkhead.
6. Extract screw from lower left side of unit frame. Pull
bulkhead from the unit. (See Figure 4-116)
Figure 4-116.
Top Section
Styrofoam Blower Compartment Removal
The styrofoam blower compartment consists of three
parts, with the top two pieces removable to access the
blower wheel. The top two pieces are taped together
and may be removed as an assembly.
To remove the styrofoam blower compartment:
1. Remove the front panel and cabinet wrapper/sleeve.
2. Cut the tape holding the top two styrofoam pieces to
the bottom section of styrofoam.
3. Lift the top two sections out as an assembly and
remove from the unit. (See Figure 4-117)
Center
Section
Bottom
Section
Figure 4-117.
4-45
Section 4 Component Teardown
Fan and Blower Assembly Removal
The fan and blower assembly is removed as an
assembly. Two screws secure the assembly to the
unit base. Three screws along the each side of the
condenser fasten into a metal bar that slides into the fan
and blower assembly.
To remove the fan and blower assembly:
1. Disconnect power supply from unit.
2. Remove the front panel and cabinet wrapper/sleeve.
Remove the control panel from its installation
position but do not disconnect from wire harness.
Remove the top two styrofoam sections of the
blower compartment.
3. Discharge capacitor. To discharge the high voltage
capacitor, wait for 60 seconds and then short-circuit
the connection of the high-voltage capacitor (that
is the connecting lead of the high-voltage rectifier)
against the chassis with the use of an insulated
screwdriver.
4. The fan motor wire harness passes through the
control system bulkhead. Disconnect the fan motor
wire leads from the capacitor and control board.
Remove ground wire from control system bulkhead.
5. Pull fan motor wire harness through hole in control
system bulkhead.
6. Extract the 3 screws from each side of condenser.
(See Figure 4-118)
7. Extract the two screws securing the bottom of the
fan and blower assembly to the unit base.
(See Figure 4-118)
8. Carefully lift the fan and blower assembly upwards
until free of condenser. The metal side brackets may
fall out of the fan and blower assembly as it is lifted
of the unit base.
Remove
Screws
Repeat
Opposite Side
Figure 4-118.
8 mm Nut
Right Hand
Thread
Figure 4-119.
10 mm Nut
Left Hand
Thread
Assembly Breakdown
9. Use an 8mm socket or wrench and remove the nut
securing the blower to the fan motor shaft. Remove
the lock washer and washer from shaft. Pull blower
from motor shaft. (See Figure 4-119)
10. Use a 10mm socket or wrench and remove the left
hand nut and lock washer securing the fan blade
to the fan motor shaft. Pull the fan blade from the
motor shaft. (See Figure 4-120)
11. Extract the 3 Phillips head screws securing the fan
motor to the mounting bracket. The fan motor is
now free. (See Figure 4-121)
Figure 4-120.
Remove
Screws
Figure 4-121.
4-46
Section 4 Component Teardown
Condenser Removal
To remove the condenser:
1. Disconnect power supply from unit.
2. Remove the front panel and cabinet wrapper/sleeve.
3. Discharge capacitor. To discharge the high voltage
capacitor, wait for 60 seconds and then short-circuit
the connection of the high-voltage capacitor (that
is the connecting lead of the high-voltage rectifier)
against the chassis with the use of an insulated
screwdriver.
4. Remove the fan and blower assembly.
5. Attach an approved self tapping line tap valve to the
process tube. Connect refrigerant recovery system
to tap valve. Turn on recovery system, open the
line tap valve, and allow refrigerant to flow into an
approved tank.
6. Disconnect inlet and outlet lines from condenser.
7. Using a 3 cornered file, score a groove around
capillary tube as shown. Break capillary tube along
score mark.
8. Extract the two screws securing the bottom of the
condenser to the unit base. (See Figure 4-122)
9. Carefully lift the condenser out from the unit base.
Evaporator Removal
To Compressor
Capillary Tube
Remove Screws
Figure 4-122.
Condenser
Evaporator
Accumulator
To remove the evaporator:
1. Disconnect power supply from unit.
2. Remove the front panel and cabinet wrapper/sleeve.
3. Discharge capacitor. To discharge the high voltage
capacitor, wait for 60 seconds and then short-circuit
the connection of the high-voltage capacitor (that
is the connecting lead of the high-voltage rectifier)
against the chassis with the use of an insulated
screwdriver.
4. Remove the fan and blower assembly.
5. Attach an approved self tapping line tap valve to the
process tube. Connect refrigerant recovery system
to tap valve. Turn on recovery system, open the
line tap valve, and allow refrigerant to flow into an
approved tank.
6. Disconnect inlet and outlet lines from evaporator.
Figure 4-123.
7.
Extract the two screws securing the bottom front of
the evaporator to the unit base. (See Figure 4-124)
8. Carefully lift the evaporator out from the unit base.
Remove Screws
Figure 4-124.
4-47
Section 4 Component Teardown
NOTE
Condenser
The compressor is not a serviceable component
for Model FAA055P7A.
Evaporator
Compressor Removal
To remove the capillary tube assembly:
1. Disconnect power supply from unit.
2. Remove the front panel and cabinet wrapper/sleeve.
3. Discharge capacitor. To discharge the high voltage
capacitor, wait for 60 seconds and then short-circuit
the connection of the high-voltage capacitor (that
is the connecting lead of the high-voltage rectifier)
against the chassis with the use of an insulated
screwdriver.
4. Disconnect compressor electrical leads from control
board and capacitor. Feed wire leads through access
hole in control panel bulkhead into compressor area.
5. Attach an approved self tapping line tap valve to the
process tube. Connect refrigerant recovery system
to tap valve. Turn on recovery system, open the
line tap valve, and allow refrigerant to flow into an
approved tank.
6. Disconnect the compressor inlet line above the
accumulator. Disconnect discharge line one inch
from the outlet.
7. Use a 13mm socket or wrench and remove the 3
nuts securing the compressor to the unit base.
(See Figure 4-125)
8. Remove the compressor electrical components by
using an 8mm socket or wrench and remove the nut
securing the cover to the top of the compressor.
4-48
Capillary Tube Assembly
Compressor
Nuts
Figure 4-125.
Section 5 Troubleshooting and Testing
AIR CONDITIONER VOLTAGE LIMITS
Low voltage is a common cause of trouble in the operation of any room air conditioner. Improper voltage may
cause one or more of the following problems:
1. Unit will not start.
2. Compressor motor cycling on motor protector.
3. Premature failure of motor protector.
4. Blown fuses.
5. Premature failure of compressor or fan motor.
6. Noticeable dimming of lights when air conditioner is
running.
7. Evaporator icing. Low voltage may reduce fan speed
resulting in inadequate air flow over evaporator,
thereby allowing it to ice up.
Low voltage can also be the direct result of inadequately
wired circuits, extension cords, or loose fuses and
connections to the power supply. Voltage may also be a
general condition in the area (a responsibility of the
power company).
All units will start and run on the minimum voltage
stated in the chart to the left (Figure 5-1), and will
perform satisfactorily if the voltage remains constant.
Low voltage caused by defective wiring will not remain
constant under load.
To test for low voltage, use a reliable meter with
sufficient capacity to measure the required voltage. Take
measurements at the electric power entry point and at
the electric outlet serving the air conditioner. Take
readings with the unit off, while the unit is starting, and
again while the unit is running. The lowest reading
should not drop below the lowest value listed in the
chart.
NAMEPLATE
RATING
MINIMUM
MAXIMUM
115 VA C
103.5 VA C
126.5 VA C
230 V A C
207 V A C
253 V A C
208/230
197.5 VA C
253 V A C
Figure 5-1.
CAUTION
Repair or replace any malfunctioning line
voltage component before testing or replacing
the electronic control. DO NOT assume a service
problem is directly caused by the electronic
control system. A line voltage component
(including power cord and wiring) that has
opened, shorted, grounded or otherwise
malfunctioned, may have created a service
problem.
HIGH VOLTAGE
High voltage can be equally troublesome, causing motors
to overheat, cycle on their protectors, or break down
electrically. This problem can only be solved by the
power company.
ELECTRONIC CONTROL
This control is not repairable. If any component in the
control is defective, the entire control must be replaced.
5-1
Section 5 Troubleshooting and Testing
Troubleshooting Procedures
Symptom
Possible Cause
Fan motor will not run.
1.
2.
3.
4.
5.
6.
7.
8.
9.
Fan motor runs intermittently.
1. Cycle on motor protector.
Fan motor noisy.
1.
2.
3.
4.
Condenser fan blade or evaporator blower wheel.
Loose power clamp or set screw.
Worn bearings.
Grommets (if applicable).
Compressor will not run, but fan motor
runs.
1.
2.
3.
4.
5.
6.
7.
8.
9.
10.
Voltage.
Wiring.
Selector switch.
Temperature control.
Capacitor. (Discharge capacitor before testing.)
Compressor.
Motor protector (external).
Motor protector (internal).
Electronic control (if applicable).
Hard starting.
Compressor cycles on motor protector.
1.
2.
3.
4.
5.
6.
7.
8.
9.
Voltage.
Motor protector (external).
Motor protector (internal).
Fan motor.
Condenser air flow restriction.
Condenser fins damaged.
Capacitor.
Wiring.
Refrigerant system.
No heat.
1.
2.
3.
4.
5.
6.
7.
8.
No power.
Selector switch position.
Temperature control position.
Fan motor.
Heating element.
Selector switch.
Temperature control.
Terminals and connectors.
5-2
No power.
Power supply cord.
Selector switch.
Energy saving switch (if applicable).
Electronic control (if applicable).
Wire disconnected or connection loose.
Capacitor. (Discharge capacitor before testing.)
Defective fan motor windings.
Will not rotate. Fan blade hitting shroud or blower
wheel hitting scroll. (Motor cycles on overload.)
Section 5 Troubleshooting and Testing
Possible Cause
Symptom
Insufficient cooling.
1.
2.
3.
4.
Low capacity.
Air filter.
Exhaust door open.
Unit undersized.
Excessive noise.
1.
2.
3.
4.
5.
Evaporator blower wheel.
Condenser wheel.
Copper tubing.
Compressor internal noise.
Fan motor.
Excessive water or condensation.
1. Unit operating under extremely high humidity conditions.
No cooling.
1. Refrigerant leak.
Unit is cooling but room is not cool.
1. Amps and watts.
2. Sealed refrigeration system.
Wattage decreases slowly until
abnormally low.
1. Undercharged, restricted strainer or plugged restrictor tube.
Wattage decreases immediately
1. No refrigerant.
2. Compressor defective.
Wattage continuously high.
1. Refrigerant overcharge.
Evaporator coil partially frosted.
1. System low on refrigerant.
Evaporator completely iced.
1. Low outside temperature.
Fan motor will not rotate during heat
cycle. (Heat/Cool models only.)
1. Thermostatic drain valve. (Water level control, if applicable.)
Air conditioner will not operate.
1. Wall plug disconnected. Push plug firmly into wall outlet.
2. House fuse blown or circuit breaker tripped. Replace fuse with time delay
type or reset circuit breaker.
3. Control is OFF. Turn Control ON and set to desired FAN or COOL setting.
4. Unit turned off and then on too quickly, wait 3 minutes before compressor will automatically restart.
5. Thermostat set too High. Adjust thermostat to lower number for cooling
Air from unit does not feel cold
enough.
1. Room temperature below 60°F (16°C). Cooling may not occur until room
temperature rises above 60°F (16°C).
2. Temperature sensor touching cold coil, located behind air filter. Pull
sensor away from coil.
3. Reset to a Lower temperature.
4. Compressor shut-off by changing modes. Wait approximately 3 minutes,
and listen for compressor to restart when set in the COOL modes.
5-3
Section 5 Troubleshooting and Testing
Symptom
Possible Cause
Air conditioner cooling, but
room is too warm - ice forming
on cooling coil behind
decorative front.
1. Outdoor temperature below 60°F (16°C). To defrost the coil, set selector to
FAN ONLY Mode.
2. Air filter may be dirty. Clean filter. Refer to Care and Cleaning section. To
defrost, set selector to FAN ONLY Mode.
3. Temperature is set too Low for night-time cooling. To defrost the coil, set to
FAN ONLY Mode. Then, set Temperature to a Higher number.
Air conditioner cooling, but
room is too warm - NO ice
forming on cooling coil
behind decorative front.
1. Dirty air filter - air restricted. Clean air filter.
2. Temperature is set too High. Set temperature to a Lower number.
3. Air directional louvers positioned improperly. Position louvers for better air
distribution.
4. Front of unit is blocked by drapes, blinds, furniture, etc. - restricts air
distribution. Clear blockage in front of unit.
5. Doors, windows, registers, etc. open - cold air escapes. Close doors,
windows, registers, etc.
6. Unit recently turned on in hot room. Allow additional time to remove “stored
heat” from walls, ceiling, floor and furniture.
Air conditioner turns on and
off rapidly.
1. Dirty air filter - air restricted. Clean air filter.
2. Outside temperature extremely hot. Set FAN speed to a faster setting to
bring air past cooling coils more frequently.
Noise when unit is cooling.
1. Air movement sound. This is normal. If too loud, set to a slower FAN setting.
2. Sound of fan hitting water-moisture removal system. This is normal when
humidity is high. Close doors, windows and registers.
3. Window vibration - poor installation. Refer to installation instructions or check
with installer.
Water dripping INSIDE when
unit is cooling.
1. Improper installation. Tilt air conditioner slightly to the outside to allow water
drainage. Refer to installation instructions - check with installer.
Water dripping OUTSIDE when
unit is cooling.
1. Unit removing large quantity of moisture from humid room. This is normal
during excessively humid days.
Room too cold.
1. Setting too low. Increase temperature setting.
2. Remote sensing activated (on some models) and remote control located in
Hot Spot-Relocate remote control or deactivate remote sensing.
Remote sensing deactivating
Prematurely (some models).
1. Remote control not located within range. Place remote control within 20 feet
& 140º Radius of the front of the unit. Remote control obstructed. Remove
obstruction.
5-4
Section 5 Troubleshooting and Testing
Evaporator Mounted Thermistor Locations
If unit is not cooling properly, check location of thermistor mounted to the front of the evaporator for the correct
mounting position. The tip of the thermistor must not be touching the fins of the evaporator.
7th Pipe
5th Pipe
4th Pipe
6th Pipe
4.7”
4.0”
Figure 5-2. FAS Series Thermistor Location
Figure 5-3. FAM Series Thermistor Location
5th Pipe
4th Pipe
4th Pipe
3rd Pipe
5.12”
4.1”
Figure 5-4. FAX Series Thermistor Location
Figure 5-5. FAH Series Thermistor Location
5th Pipe
5th Pipe
4th Pipe
6.3”
Figure 5-6. FAC Series Thermistor Location
4th Pipe
6.3”
Figure 5-7. FAA Series Thermistor Location
5-5
Section 5 Troubleshooting and Testing
6th Pipe
.236
6 mm
.315
8 mm
Figure 5-10. FAC Series Fan Blade Spacing
7th Pipe
1.6”
3.0”
Figure 5-8. FAK Series Thermistor Location
Fan Blade Spacing
Incorrect fan blade spacing may cause improper cooling
and/or heating. Inspect the unit for the proper mounting
of the fan blade and blower mounted on the condenser
motor shaft.
.354
9 mm
.275
7 mm
Figure 5-11. FAK Series Fan Blade Spacing
.430
10.92 mm
.470
11.94 mm
.300”
7.62 mm
.260”
6.6 mm
Figure 5-9. FAH Series Fan Blade Spacing
5-6
Figure 5-12. FAM and FAS Series Fan Blade
Spacing
Section 6 Sealed System
IMPORTANT
The purpose of this service manual is to give the service technician an understanding of the changes in refrigerants
and sealed system service. Persons attempting to use this service manual to make repairs to sealed system
refrigeration systems should have electrical training as well as training in sealed system repairs. The person making
the repairs must know and understand all laws (Local and International) governing handling of all refrigerants. The
technician must be trained in the use of recovery and recycling equipment. Electrolux Home Products, Inc. cannot
be responsible, nor assume any liability, for injury or damage of any kind arising from the use of this manual.
NOTE
Electrolux does not permit the use of recovered refrigerant in the servicing of our products for in-warranty and outof-warranty repairs or for products covered by service contracts. Therefore, only new refrigerant or refrigerant that
has been reclaimed back to new specifications by a refrigerant manufacturer is to be used.
IMPORTANT
Effective July 1, 1992, the United States clean air act governs the disposal of refrigerants such as R-22. Therefore,
when discharging or purging the sealed system use an EPA approved refrigerant recovery system as outlined in
the final rule on the protection of stratospheric ozone and refrigerant recycling, which was published in the Federal
Register May 14, 1993.
IMPORTANT
Safety and CFC Certification
Complying with Section 608 Refrigerant Recycling Rule: http://www.epa.gov/ozone/title6/608/608fact.html#techcert
EPA has established a technician certification program for persons (“technicians”) who perform maintenance, service,
repair, or disposal that could be reasonably expected to release refrigerants into the atmosphere.
The definition of “technician” specifically includes and excludes certain activities as follows:
Any person who performs maintenance, service, or repair that could reasonably be expected to release class I (CFC)
or class II (HCFC) substances from appliances, into the atmosphere. Technician also means any person performing
disposal of appliances, except for small appliances, MVACs, and MVAC-like appliances that, could be reasonably
expected to release class I or class II refrigerants from appliances into the atmosphere.
Small appliance is defined as:
Any of the following products that are fully manufactured, charged, and hermetically sealed in a factory with five
pounds or less of refrigerant: refrigerators and freezers designed for home use, room air conditioners (including
window air conditioners and packaged terminal air conditioners), packaged terminal heat pumps, dehumidifiers,
under-the-counter ice makers, vending machines, and drinking water coolers.
The Agency has developed four types of certification:
1. For servicing small appliances (Type I).
2. For servicing or disposing of high- or very high-pressure appliances, except small appliances and MVACs (Type II).
3. For servicing or disposing of low-pressure appliances (Type III).
4. For servicing all types of equipment (Universal).
Technicians are required to pass an EPA-approved test given by an EPA-approved certifying organization to become
certified under the mandatory program. Section 608 Technician Certification credentials do not expire. Overview of
Issues on EPA Certification Test: http://www.epa.gov/ozone/title6/608/technicians/certoutl.html
R-22 requires training of installation and service personnel in the proper and safe handling of R-22.
Many equipment manufacturers are well aware of the concerns and safety issues of working with R-22 and other
HCFC refrigerants and are requiring installation and service professionals who purchase their R-22 systems to be
R-22 Certified.
6-1
Section 6 Sealed System
Service Diagnostic Tips
A prime requisite on the initial contact is: Always allow the customer to explain the problem. Many times the trouble
can be diagnosed more quickly, based on the customer’s explanation. Most of all, do not jump to
conclusions until you have heard the full story and have evaluated the information obtained from the customer. Then
proceed with your diagnosis.
Before starting a test procedure, connect the product service cord to the power source, through a wattmeter,
combined with a voltmeter. Then make a visual inspection and operational check of the air conditioner to determine
the following:
1. Is the product properly leveled?
2. Is the product located for proper dissipation of heat from the condenser? Check install location.
3. Feel condenser. With compressor in operation, condenser should be hot, with gradual reduction in temperature
from entry to exit of condenser.
4. Is evaporator fan properly located on motor shaft?
5. Is the thermostat sensing element properly positioned?
6. Observe frost pattern on evaporator.
7. Check control setting.
For air-conditioners, check room size, temperature, amount of people, windows, and other factors that increase the
load on the product. After this phase of diagnosis is completed, a thorough operational check should be made of the
refrigeration system.
Definitions
Recovery:
To remove refrigerant in any condition from a system and store it in an external container without necessarily testing
or processing it in any way.
Recycling:
To clean refrigerant for reuse by oil separation and single or multiple passes through devices, such as replaceable
core filter-driers, which reduce moisture, acidity and particulate matter. This term usually applies to procedures
implemented at the field job site or at a local service shop.
Reclaim:
To reprocess refrigerant to new product specifications by means which may include distillation, will require chemical
analysis of the refrigerant to determine that appropriate product specifications are met. This term usually implies the
use of processes or procedures available only at a reprocessing or manufacturing facility.
6-2
Section 6 Sealed System
Safety Warnings
Wear approved safety glasses when working
with or on any pressurized system or equipment.
have an approved dry type fire extinguisher
handy when using any type of gas operated
torch.
Soldering
1. All joints to be soldered must have a proper fit.
Clearance between tubes to be soldered should be
from .001” to .006”. It is not practical to actually
measure this; however, you do not want a dry fit or
loose fit. Tubing joints should overlap about the
distance of their diameter except for restrictor tubes,
which should be inserted 1.25”.
2. Clean all joint areas with fine steel wool or preferably an abrasive cloth, such as grit cloth No. 23 or
Scotch-Brite.
3. Apply a thin film of liquid flux recommended for
silver soldering to surfaces to be joined, and to
surfaces immediately adjacent to joint.
During application of heat, use wet cloths to
prevent heat from conducting to areas other
than the soldered joint. Use a sheet of metal
or torch guard pad as a heat deflector to keep
flame away from inflammable materials and
painted surfaces.
4. Align tubing so no stress is on joint. Do not move
tubing while solder is solidifying or leaks will result.
5. Use a torch of adequate capacity so joint can be
quickly heated with a minimum of heat travel to
other points. Use a good grade of silver solder.
6. Solder connections. Use a good grade of silver
solder. A 45% silver solder is recommended. If
tubing is properly cleaned and fluxed, solder will
flow readily. Use only enough solder to make a
good bond.
7. Allow joint to cool, then wash exterior with water to
remove flux.
Compressor Testing
Whenever testing a compressor, extreme caution
should be used to prevent damaging the terminals. A
compressor with a damaged terminal or a grounded
winding can expel a terminal from its insulated housing
when the compressor is energized. If this happens, a
mixture of refrigerant and oil will be released that could
be ignited by an external heat source (open flame,
heater, etc.). Also, if there is air in the system when this
happens, a spark at the compressor shell could ignite
the refrigerant and oil mixture.
Charging Sealed Systems
Overcharging a refrigeration system with refrigerant can
be dangerous. If the overcharge is sufficient to immerse
the major parts of the motor and compressor in liquid
refrigerant, a situation has been created which, when
followed by a sequence of circumstances can lead to
the compressor shell seam separating.
When a hydraulic block occurs, the compressor is
prevented from starting. This condition is known as
locked rotor. Electric current continues to flow through
the compressor motor windings which become, in effect,
electric resistance heaters. The heat produced begins to
vaporize the excess refrigerant liquid causing a rapid
increase in system pressure. If the compressor
protective devices fail, the pressure within the system
may rise to extremes far in excess of the design limits.
Under these conditions, the weld seam around the
compressor shell can separate with explosive force,
spewing oil and refrigerant vapor which could ignite.
To eliminate this exceedingly rare but potential hazard,
never add refrigerant to a sealed system. If refrigerant is
required, evacuate the existing charge and recharge
with the correct measured amount of the refrigerant
specified for the system.
6-3
Section 6 Sealed System
Basic Components
The basic components of an air conditioner are a
compressor, condenser, evaporator and heat exchanger
(capillary tube and suction line).
Refrigerant Cycle
A typical sealed refrigeration system consists of a cooling
coil (evaporator) located on the room side, a heat
rejection coil (condenser) located outside, and an electric
self-contained motor/compressor to circulate a refrigerant
through the system and develop the necessary pressure
differential to make the system work. Copper tubing,
sized to carry the volume of refrigerant to be circulated,
connects these components in a continuous loop,
evaporator to compressor to condenser then back to the
evaporator. The tube connecting the condenser to the
evaporator also serves as a refrigerant flow control. This
tube (restictor tube) has a very small inside diameter.
The combination of this small diameter and extra length
of this tube restricts the flow of liquid refrigerant,
maintaining the pressure differential necessary for the
function of the refrigeration system. A cone shaped
strainer is placed in the last pass of the condenser to
prevent any foreign material from clogging the restrictor
tube.
Room Air Conditioner Sealed System
Condenser
Compressor
Evaporator
Condenser
Compressor
Filter-Drier
Evaporator
Figure 6-1. Air-Conditioner Sealed System
Lower illustration shows location of added filterdrier after servicing the sealed system.
6-4
The operation of the refrigeration system involves three
basic physical laws:
1. The physical state of a substance (solid, liquid or
gas) is directly related to the heat contained in the
substance.
2. A great amount of heat is required to change the
state of a substance (solid to liquid, liquid to gas,
and visa versa) with no change in its temperature.
3. The temperature at which a substance changes from
liquid to gas and gas to liquid depends upon the
pressure on the substance.
In operation, the compressor lowers the pressure on
the liquid refrigerant in the evaporator to the point at
which the refrigerant will change from a liquid to a gas at
temperatures ranging between 35°F and 50°F. The heat
required for this change of physical state is obtained from
the room air circulated through the evaporator fins. Heat
is absorbed by the refrigerant, not only from the air, but
from moisture in the air as well. The air is cooled and
the moisture condenses on the evaporator fins.
As the refrigerant liquid continues to vaporize, the
pressure in the evaporator tends to rise. However, the
compressor removes vapor at rate which maintains the
desired pressure and temperature in the evaporator.
The compressor discharges the refrigerant gas into the
condenser where the pressure builds up against the
restrictor tube. As the pressure of the gas increases,
so does its temperature. When the temperature of the
gas in the condenser exceeds the temperature of the air
passing through the condenser, heat is transferred from
the gas to the outside air. This loss of heat causes the
refrigerant gas to condense back to a liquid.
The small diameter restrictor tube between the
condenser and the evaporator maintains the pressure
difference created by the compressor, and meters the
liquid refrigerant back to the evaporator. The refrigerant
cycle is now complete and will continue until the
compressor is turned off by the thermostat.
Section 6 Sealed System
Compressor
High pressure
superheated gas
Low pressure
saturated gas
plus absorbed heat
Oil level
Bulkhead
Cooler
drier air
Inside
Outside
Condenser
Fan
Evaporator
Blower Wheel
Fan Motor
Outside air
plus rejected
heat
Warm
moist air
Evaporator
Low pressure liquid
minus absorbed heat
Outside air
at ambient
temperature
Condenser
Restrictor Tube
High pressure liquid
minus absorbed heat
Figure 6-2. Air-Conditioner Sealed System
Low/High Side Leak or Undercharge
A loss of refrigerant can result in any of the following:
1. Excessive or continuous compressor operation.
2. Above normal freezer compartment temperature.
3. A partially frosted evaporator (depending on amount
of refrigerant loss).
4. Below normal freezer compartment temperature.
5. Low suction pressure (vacuum).
6. Low wattage.
If there is reason to believe the system has operated for
a considerable length of time with no refrigerant and the
leak occurred in the low side of the system, excessive
amounts of moisture may have entered the system.
In such cases the two stage service filter-drier part
number 5303918288 and vacuum procedure listed
under Refrigerant Leaks need to be followed to prevent
repetitive service.
The condenser will be “warm to cool”, depending on the
amount of refrigerant lost. In the case of a low side
refrigerant leak resulting in complete loss of refrigerant,
the compressor will run but will not refrigerate. Suction
pressure will drop below atmospheric pressure and air
and moisture will be drawn into the system saturating the
filter-drier.
If a slight undercharge of refrigerant is indicated and no
leak can be found after a thorough leak test, the charge
can be corrected without changing the compressor.
If a high side leak is located and some refrigerant
remains in the system it is not necessary to change the
compressor.
6-5
Section 6 Sealed System
Testing for Refrigerant Leaks
NOTE
The line piercing valve (clamp-on type) should be
used for test purposes only. It must be removed from
system after it has served its purpose.
If the system is diagnosed as short of refrigerant and the
system has not been recently opened, there is
probably a leak in the system. Adding refrigerant
without first locating and repairing the leak or replacing
the component will not permanently correct the difficulty.
The leak must be found. Sufficient refrigerant may have
escaped to make it impossible to leak test effectively.
In such cases, add a ¼” line piercing valve to the
compressor process tube. Add sufficient refrigerant
vapor to increase the pressure to 40 to 50 lb. per sq.
in. Check the low side for leaks. Run the compressor 2
or 3 minutes and check the high side for leaks. Recover
refrigerant using an EPA approved recovery system.
Compressor Oil Contamination
To check for contamination, obtain oil sample from old
compressor.
1. If the oil has burned odor, but no color change
or residue, follow instructions on the next page
“Installing A New Compressor”.
2. If oil has a burned odor and a sugar or gritty feel as
well as showing signs of contamination (dark color),
follow instructions on page 6-9, “To Flush The
System”. Remove as much of contamination as
possible from system before installing new
compressor and filter-drier.
CAUTION
NEVER install a new compressor without first
checking for possible system contamination.
NOTE
It is recommended that system be flushed with dry
Nitrogen. However, if refrigerant is used to flush the
system you must look at the serial plate to see what
type of refrigerant is used in the system. This is the
only refrigerant that can be used to flush the system
and it must be recovered.
6-6
Refrigerant Vapor Pressures
Temp Temp
°F
°C
-40.0
-37.2
-34.4
-31.7
-28.9
-26.1
-23.3
-20.6
-17.8
-15.0
-12.2
-9.4
-6.7
-3.9
-1.1
1.7
4.4
7.2
10.0
12.8
15.6
18.3
21.1
23.9
26.7
29.4
32.2
35.0
37.8
40.6
43.3
46.1
48.9
51.7
54.4
57.2
60.0
62.8
65.6
-40.0
-35.0
-30.0
-25.0
-20.0
-15.0
-10.0
-5.0
0.0
5.0
10.0
15.0
20.0
25.0
30.0
35.0
40.0
45.0
50.0
55.0
60.0
65.0
70.0
75.0
80.0
85.0
90.0
95.0
100.0
105.0
110.0
115.0
120.0
125.0
130.0
135.0
140.0
145.0
150.0
R-22
R407C
Liquid
Pressure
R407C
Vapor
Pressure
R-410A
0.5
2.6
4.9
7.4
10.1
13.2
16.5
20.1
24.0
28.2
32.8
37.7
43.0
48.8
54.9
61.5
68.5
76.0
84.0
92.6
102
111
121
132
144
156
168
182
196
211
226
243
260
278
297
317
337
359
382
3.0
5.4
8.0
10.9
14.1
17.6
21.3
25.4
29.9
34.7
39.9
45.6
51.6
58.2
65.2
72.6
80.7
89.2
98.3
108
118
129
141
153
166
180
195
210
226
243
261
280
300
321
342
365
389
-------
-4.4
-0.6
1.8
4.1
6.6
9.4
12.5
15.9
19.6
23.6
28.0
32.8
38.0
43.6
49.6
56.1
63.1
70.6
78.7
87.3
96.8
106
117
128
140
153
166
181
196
211
229
247
266
286
307
329
353
-------
11.6
14.9
18.5
22.5
26.9
31.7
36.8
42.5
48.6
55.2
62.3
70.0
78.3
87.3
96.8
107
118
130
142
155
170
185
201
217
235
254
274
295
317
340
365
391
418
446
476
507
539
573
608
Figure 6-3.
Section 6 Sealed System
Installing a New Compressor
Replacement of the compressor must be done in a
continuous sequence so the system is exposed to the
atmosphere no longer than necessary.
All replacement compressors are shipped with rubber
plugs in the suction and discharge tubes and contain the
correct oil charge and a holding charge of inert gas.
Before installing the replacement compressor, remove
the discharge plug and check for the pop sound of the
inert gas leaving the compressor.
DO NOT use compressor if you do not hear this
sound.
If the compressor checks OK, reinstall the plug. Do not
remove any of the plugs again until the compressor is in
position and you are ready to braze the lines.
A new compressor which is cold (e.g. after having been
kept in a cold service van) should be left to warm to
the surrounding temperature before the plugs on the
compressor connections are removed. This will help
prevent condensation from forming in the oil and the
compressor. Also, avoid opening the system when any
of the components or lines are cold.
A process tube is connected onto the high-side process
tube where the line splits into capillary tubes. The other
process tube is connected to the tubing prior to entering
the accumulator.
DO NOT OPERATE RECIPROCATING
COMPRESSORS WHEN CHARGING LIQUID
REFRIGERANT INTO SYSTEM THROUGH ITS
PROCESS TUBE.
Follow the numbered sequence for all products:
1. Disconnect electrical supply to unit.
2. Remove all components necessary to access the
compressor assembly in the unit.
3. Attach an approved self tapping line tap valve to the
process tube. Connect refrigerant recovery system
to tap valve. Turn on recovery system, open the
line tap valve, and allow refrigerant to flow into an
approved tank.
4. Remove leads from compressor motor terminals.
5. Remove mounting nuts and washers.
6. After refrigerant is completely recovered, cut suction
and discharge lines as close to compressor as
possible. Leave only enough tubing to pinch off and
seal defective compressor. Plug or tape any open
system tubing to avoid entrance of moisture and air
into system. Remove inoperable compressor and
transfer mounting parts to new compressor.
7. Release holding charge (release slowly to avoid oil
discharge) on new compressor to ensure there is
no leak in seam or tubing. Reinstall rubber plug.
8. Install new compressor in exact same manner as
original compressor.
9. Reform both suction and discharge lines to align with
new compressor. If they are too short, use
additional lengths of tubing. Joints should overlap
0.5” to provide sufficient area for good solder joints.
Clean and mark area where tubing should be cut.
Cut tubing with tubing cutter. Work quickly to avoid
letting moisture and air into system.
10. Solder all connections according to soldering
procedure.
NOTE
If low-side process tube is too short, silver solder four
inch piece of tubing onto process tube at this time.
On R-22 systems, compressor must NOT be left
open to atmosphere for more than 10 minutes to
prevent moisture contamination of oil.
11. Install filter-drier between condenser outlet and the
capillary tube connection.
12. Evacuate and charge system using recommended
procedure described under Evacuating and
Recharging.
13. Reconnect compressor terminal leads in accordance
with unit wiring diagram and reassemble unit.
6-7
Section 6 Sealed System
Evaporator and Suction Line Replacement
Final Leak Test
1. Disconnect electrical supply to unit.
2. Disassemble the product enough to get access to the
compressor (refer to Component Removal Section).
3. Attach an approved self tapping line tap valve to the
process tube. Connect refrigerant recovery system
to tap valve. Turn on recovery system, open the
line tap valve, and allow refrigerant to flow into an
approved tank.
1. With the refrigerator turned OFF leak test all
low-side system components.
2. Turn unit ON and run until the condenser is warm.
Leak test the high-side system components.
4. Remove evaporator from its installation position.
5. Clean suction and capillary lines with abrasive cloth.
Connect lines to replacement evaporator and solder
joints.
6. Install evaporator assembly in air conditioner.
7. Install filter-drier between condenser outlet and the
capillary tube connection.
8. Evacuate and charge system using recommended
procedure described under Evacuating and
Recharging, then reassemble unit.
Condenser Replacement
1. Disconnect electrical supply to unit.
2. Disassemble the product enough to get access to the
compressor (refer to Component Removal Section).
3. Attach an approved self tapping line tap valve to the
process tube. Connect refrigerant recovery system
to tap valve. Turn on recovery system, open the
line tap valve, and allow refrigerant to flow into an
approved tank.
4. After refrigerant is completely recovered, disconnect
inlet and discharge lines from condenser.
5. Remove condenser.
6. Install replacement condenser.
7. Install filter-drier between condenser outlet and the
capillary tube connection.
8. Evacuate and charge system using recommended
procedure described under Evacuating and
Recharging, then reassemble unit.
6-8
Air Conditioner Air Temperatures
Temperatures are affected by frost accumulation on the
evaporator, service load, ambient temperature, percent
of relative humidity, thermostat calibration (cut-in and
cut-out), and by compressor efficiency.
Line Voltage
It is essential to know the line voltage at the product.
A voltage reading should be taken at the instant the
compressor starts, and also while the compressor is
running. Line voltage fluctuation should not exceed 10%
plus or minus, from nominal rating. Low voltage will
cause overheating of the compressor motor windings,
resulting in compressor cycling on thermal overload, or
the compressor may fail to start. Inadequate line wire
size, and overloaded lines, are common reasons for low
voltage at the product.
Section 6 Sealed System
To Flush The System
CAUTION
Use extreme care when using Dry Nitrogen to
flush systems. Pressure in nitrogen cylinder
could be as high as 2000 psi. Nitrogen cylinder
must be equipped with approved pressure
regulator and pressure relief valve. Ensure that
your hoses have adequate ratings for pressure
involved and that all of your equipment is in
good condition. The end of the flushing hose
on this tank regulator must be equipped with
a hand shut-off valve (Robinair No. 40380).
Close hand shut-off valve and adjust nitrogen
regulator to correct pressure before proceeding
with flushing procedure.
To Use Dry Nitrogen To Flush The System:
1. Remove compressor and filter-drier. Connect process
coupling to outlet tube of condenser.
2. Fasten cloth over other end of coil to prevent old oil
from spraying over room.
3. Connect hand shut-off valve on flushing hose to process coupling.
4. Slowly open hand shut-off valve and allow nitrogen
to flow through condenser until discharge is clear.
To Use Refrigerant To Flush The System:
CAUTION
Refrigerant used for flushing must be recovered
into a recovery system. Meter amount of
refrigerant used for flushing with your charging
cylinder. DO NOT OVERFILL THE CYLINDER.
1. Disconnect suction and discharge lines from the
compressor and remove filter-drier. Connect process
coupling to outlet and inlet tube of condenser.
2. Connect hose to outlet process coupling and
charging cylinder. Connect another hose to inlet
coupling and recovery system.
3. Open charging cylinder and allow refrigerant to flow
through condenser until discharge into bag is clear.
NOTE
The line piercing valve (clamp-on type) should be
used for test purposes only. It must be removed from
system after it has served its purpose.
4. Disconnect capillary tube from evaporator. Flush
evaporator in same manner as condenser.
5. Flush cap tube. This is only possible if you have
proper service valve adapter.
6. Reassemble system.
CAUTION
DO NOT exceed 300 Psi.
5. Disconnect cap tube from evaporator. Flush
evaporator in same manner as condenser.
CAUTION
DO NOT exceed 150 Psi.
6. Flush cap tube. This is only possible if you have
proper service valve adapter.
CAUTION
DO NOT exceed 300 Psi.
7.
Reassemble system.
6-9
Section 6 Sealed System
Process
Tube
Adapter
Condenser
Compound
Gauge
Gauge
Manifold
Low Side Process Tube
Hand Shutoff
Valve
Pressure
Gauge
T-Fitting
Compressor
Ev aporator
Heated
Charging
Cylinder
2 Stage
Vacuum Pump
Figure 6-4. Installation of Evacuation and Recharging Equipment For Reciprocating Compressor
Compound
Gauge
Gauge
Manifold
Pressure
Gauge
Condenser
Hand Shutoff
Valve
T-Fitting
Compressor
Ev aporator
Heated
Charging
Cylinder
High Side Process Tube
Process
Tube
Adapter
2 Stage
Vacuum Pump
Figure 6-5. Installation of Evacuation and Recharging Equipment For Reciprocating Compressor
Equipment Needed for Evacuation & Recharging:
•
•
•
•
•
•
Heated Dial-A-Charge charging cylinder
Standard 3-port manifold gauge set
Pinch-off tool capable of making leak proof seal
Process tube adapter kit (Robinair No.12458)
Two stage vacuum pump
Leak detector
6-10
•
•
•
•
•
•
Hand shut-off valve (Robinair No.40380)
Tubing cutter
Pinch-off tool capable of making leak proof seal
Complete brazing torch set
Grit cloth or Scotch-Brite
45% silver solder and flux
Section 6 Sealed System
Installing Evacuation and Recharging
Equipment For Reciprocating Compressors
1. Disconnect electrical supply to unit.
2. Attach an approved self tapping line tap valve to the
process tube. Connect refrigerant recovery system
to tap valve. Turn on recovery system, open the
line tap valve, and allow refrigerant to flow into an
approved tank.
3. If compressor was replaced, install correct sized
process tube adapter on process tube.
If compressor was not replaced, cut process tube
with tubing cutter, leaving as much tube as possible,
but removing the line tap valve installed to remove
the refrigerant. Install the correct sized process tube
adapter.
4. Attach refrigeration service gauge manifold to
system in following order:
a. Low-side (compound gauge) hose to suction
side process tube adapter.
b. High-side (pressure gauge) hose to vacuum pump.
c. Center port manifold hose after hand shut-off
valve to charging cylinder.
Installing Evacuation and Recharging
Equipment For Rotary Compressors
1. Disconnect electrical supply to unit.
2. Attach an approved self tapping line tap valve to the
process tube. Connect refrigerant recovery system
to tap valve. Turn on recovery system, open the
line tap valve, and allow refrigerant to flow into an
approved tank.
3. If compressor was replaced, install correct sized
process tube adapter on process tube.
If compressor was not replaced, cut process tube
with tubing cutter, leaving as much tube as possible,
but removing the line tap valve installed to remove
the refrigerant. Install the correct sized process tube
adapter.
4. Attach refrigeration service gauge manifold to
system in following order:
a. Low-side (compound gauge) hose to high side
process tube adapter.
b. High-side (pressure gauge) hose to vacuum pump.
c. Center port manifold hose after hand shut-off
valve to charging cylinder.
CAUTION
If high vacuum equipment is used, just crack
both manifold valves for a few minutes and
then open slowly for the two full turns
counterclockwise. This will prevent the
compressor oil from foaming and being drawn
into the vacuum pump.
Evacuating System
To achieve the required levels of evacuation, a properly
maintained two stage vacuum pump in good condition is
required. It is absolutely essential to maintain your
vacuum pump according to the manufacturer’s
instructions including required oil changes at the
recommended intervals. Vacuum pump oil should always
be changed after evacuating a contaminated system.
Vacuum pump performance should be checked
periodically with a micron gauge.
1. Make certain that charging cylinder valve, hand
shut-off valve, and manifold gauge valves are closed.
2. Start vacuum pump.
3. Open hand shut-off valve and slowly open both
manifold valves, turning counterclockwise, for two
full rotations.
4. Operate vacuum pump for a minimum of 30
minutes to a minimum of 29.9” (500 micron)
vacuum.
5. Close hand shut-off valve to vacuum pump. Watch
compound gauge for several minutes. If reading
rises, there is a leak in the system, go to step 6. If
no leak is indicated, stop vacuum pump. System is
now ready for charging.
6. If a leak is indicated, stop vacuum pump and
introduce a small charge of refrigerant into system
by cracking valve on bottom of charging cylinder
until system is pressurized to 40 or 50 lbs psi.
7. Leak test low-side. Close compound gauge. Run
compressor for a few minutes and leak test
high-side. When leak is found, recapture refrigerant
using EPA approved recovery system. Repair and go
back to step 1.
6-11
Section 6 Sealed System
Charging The System
CAUTION
Check the serial plate for the correct refrigerant
type. It is extremely important to verify the
type of refrigerant in the system before starting
any sealed system repairs. If a filter-drier has
been added to the system, add .78 ounces of
refrigerant to allow for the additional volume of
the sealed system.
After charging the system with liquid be certain
to wait at least 5 minutes before starting the
compressor to give the refrigerant a chance to
disperse throughout the system. Otherwise the
compressor could be damaged by attempting to
pump excessive quantities of l liquid.
Preparing The Charging Cylinder:
A. Recharging refrigerant tank must have at least
eight (8) ounces more refrigerant than required to
recharge.
B. Plug in cylinder heater and bring pressure up 30
pounds above gauge pressure at ambient
temperature. Do not exceed maximum temperatures.
To Charge System:
WARNING
Do not use an external heat source on cylinder
or exceed maximum gauge pressure on charging
cylinder.
CAUTION
Maintain, but do not exceed, this 30 pound
increase in gauge pressure during system
charging.
1. Make certain that hand shut-off valve to vacuum
pump is closed.
2. Close high-side manifold gauge valve.
3. Set charging cylinder scale to pressure indicated on
cylinder pressure gauge.
6-12
4. Observe refrigerant level in sight glass. Subtract
amount to be charged into system and note shut off
point.
5. Open charging cylinder valve slowly and allow
proper charge to enter system.
6. As soon as refrigerant in sight glass has gone down
to predetermined level, close charging cylinder valve.
WARNING
Disconnect the charging cylinder heater at this
time to prevent the cylinder pressure from
exceeding its maximum limits.
7. Allow system to sit for five minutes.
8. Turn on AC unit to its highest (coldest) setting.
Run unit for a few minutes and monitor system
pressures.
9. When satisfied that the unit is operating correctly,
clamp the high-side process tube with the pinch-off
tool while the unit is still running. Remove line tap
valve. Solder process tube closed.
10. Turn off AC unit. After a few minutes check process
tube for leaks.
Section 6 Sealed System
Vacuum Pump Maintenance
It is absolutely essential to maintain your vacuum pump
according to the manufacturer’s instructions, including
required oil changes at the recommended intervals.
Vacuum pump oil should always be changed after
evacuating a contaminated system. Vacuum pump
performance should be checked periodically with a
micron gauge.
Vacuum pump suppliers may or may not recommend
changing the vacuum pump oil to the same type that’s
in the system being evacuated. Some manufacturers
may recommend a vacuum pump that’s dedicated to
R-22 systems.
Robinair has stated that their current and discontinued
vacuum pump models, using mineral oil currently
specified for use in their vacuum pumps, can be used to
evacuate R-22 systems.
For other brands of vacuum pumps, check with the
manufacturer for restrictions and guidelines when using
with R-22.
If you use a vacuum pump with mineral oil to
evacuate an R-22 system, it is ABSOLUTELY
ESSENTIAL to have a shut-off valve between
pump and your manifold gauge set. The
hand valve must be closed during all times
when vacuum pump is not operating. This
will prevent migration of mineral oil vapor
into R-22 oil systems. If the vacuum pump
should stop during evacuation for any reason,
the hand pump shut-off valve must be closed
immediately.
VACUUM CHART
Vacuum
Inches Hg.
Microns
Boiling Point
of Water °F
28.940
25000
77.9
29.530
10000
52.0
29.832
4600
32.0
29.882
1000
1.0
29.901
500
-11.2
29.915
150
-32.8
29.917
100
-38.2
29.919
50
-49.0
To achieve the required 29.9 inch (500 micron) vacuum,
a properly maintained two-stage vacuum pump in good
condition is required. A two stage pump can reach a
deeper vacuum than a single stage because the exhaust
from the first pumping stage is discharged into the
second pumping stage. This means the second stage
begins pumping at a lower pressure so a lower ultimate
vacuum can be achieved.
Figure 6-6. Two Stage Vacuum Pump
6-13
Section 6 Sealed System
Notes
6-14
Section 7 Wiring Diagrams
Mini Air Conditioner Models
FAX052P7A & FAX054P7A Wire Diagram
7-1
Section 7 Wiring Diagrams
Mini Compact Air Conditioner Models
FAA055P7A, FAA062P7A, FAA065P7A, FAA082P7A, FAA084P7A & FAA086P7A
Compact Air Conditioner Models
FAC102P1A, FAC105P1A, FAC106P1A, FAC122P1A, FAC125P1A & FAC126P1A
Wire Diagram
7-2
Section 7 Wiring Diagrams
Compact Air Conditioner Models
FAC104P1A, FAC107P1A, FAC124P1A & FAC127P1A
Median Air Conditioner Models
FAM156R1A & FAM186R2A-1 Wire Diagram
7-3
Section 7 Wiring Diagrams
Median Air Conditioner Models
FAM157R1A & FAM187R2A-1 Wire Diagram
7-4
Section 7 Wiring Diagrams
Median Air Conditioner Models
FAM18ER2A-1 Wire Diagram
7-5
Section 7 Wiring Diagrams
Heavy Duty Air Conditioner Models
FAS226R2A, FAS256R2A, FAS257R2A, FAS296R2A & FAS297R2A Wire Diagram
7-6
Section 7 Wiring Diagrams
Heavy Duty Air Conditioner Models
FAS25ER2A Wire Diagram
7-7
Section 7 Wiring Diagrams
Through The Wall Air Conditioners Models
FAH086R1T, FAH106R1T, FAH106R2T & FAH126R2T Wire Diagram
63611616
63611091
7-8
Section 7 Wiring Diagrams
Through The Wall Air Conditioner Models
FAH08ER1T, FAH10ER2T & FAH12ER2T Wire Diagram
7-9
Section 7 Wiring Diagrams
Through The Wall Air Conditioners Models
FAH146R2T & FAH14ER2T Wire Diagram
7-10
Section 7 Wiring Diagrams
Slider/Casement Air Conditioners Models
FAK085R7V, FAK104R1V, FAK105R7V & FAK124R1V Wire Diagram
7-11
Section 7 Wiring Diagrams
Notes
7-12