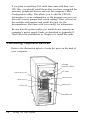
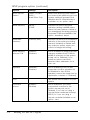
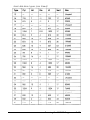
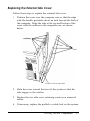
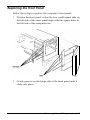
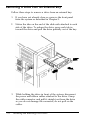
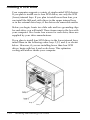
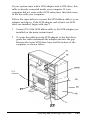
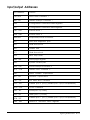
1
EPSON® POWERSPAN
®
User’s Guide
a9
This manual is printed on recycled paper and is 100% recyclable.
FCC COMPLIANCE STATEMENT
FOR AMERICAN USERS
m02184
This equipment has been tested and found to comply with the limits for a class B digital
device, pursuant to Part 15 of the FCC Rules. These limits are designed to provide
reasonable protection against harmful interference in a residential installation. This
equipment generates, uses, and can radiate radio frequency energy and, if not installed
and used in accordance with the instructions, may cause harmful interference to radio and
television reception. However, there is no guarantee that interference will not occur in a
particular installation. If this equipment does cause interference to radio and television
reception, which can be determined by turning the equipment off and on, the user is
encouraged to try to correct the interference by one or more of the following measures:
0 Reorient or relocate the receiving antenna
0 Increase the separation between the equipment and receiver
0 Connect the equipment into an outlet on a circuit different from that to which the
receiver is connected
0 Consult an experienced radio/TV technician for help.
WARNING
The connection of a non-shielded equipment interface cable to this equipment will
invalidate the FCC Certification of this device and may cause interference levels that
exceed the limits established by the FCC for this equipment. It is the responsibility of the
user to obtain and use a shielded equipment interface cable with this device. If this
equipment has more than one interface connector, do not leave cables connected to unused
interfaces.
Changes or modifications not expressly approved by the manufacturer could void the
user’s authority to operate the equipment.
FOR CANADIAN USERS
This digital apparatus does not exceed the Class B limits for radio noise emissions from
digital apparatus as set out in the radio interference regulations of the Canadian
Department of Communications.
Le pr6sent appareil numkrique n’emet pas de bruits radioklectriques depassant les limites
applicables aux appareils numkriques de Classe B prescrites dans le r&glement sur le
brouillage radioelectrique edict6 par le Minist&e des Communications du Canada.
IMPORTANT NOTICE
DISCLAIMER OF WARRANTY
Epson America makes no representations or warranties, either express or implied, by or
with respect to anything in this manual, and shall not be liable for any implied warranties
of merchantability and fitness for a particular purpose or for any indirect, special, or
consequential damages. Some states do not allow the exclusion of incidental or
consequential damages, so this exclusion may not apply to you.
COPYRIGHT NOTICE
All rights reserved. No part of this publication may be reproduced, stored in a retrieval
system, or transmitted, in any form or by any means, electronic, mechanical,
photocopying, recording, or otherwise, without the prior written permission of Epson
America, Inc. No patent liability is assumed with respect to the use of information
contained herein. Nor is any liability assumed for damages resulting from the use of the
information contained herein. Further, this publication and features described herein are
subject to change without notice.
TRADEMARKS
Epson and PowerSpan are registered trademarks of Seiko Epson Corporation.
Epson Connection is a service mark of Epson America, Inc.
The power-on diagnostic error messages and beep codes in Appendix A are copyright
1985-1992, Pheonix Technologies, Ltd.
General notice: Other product names used herein are for identification purposes only and
may be trademarks of their respective owners. Epson disclaims any and all rights in those
marks.
Copyright 0 1993 by Epson America, Inc.
Torrance, California, USA
ii
400234300
Important Safety Instructions
1.
Read all of these instructions and save them for later reference.
2.
Follow all warnings and instructions marked on the computer.
3.
Unplug the computer from the wall outlet before cleaning. Use a
damp cloth for cleaning; do not use liquid or aerosol cleaners.
4.
Do not spill liquid of any kind on the computer.
5. Do not place the computer on an unstable cart, stand, or table.
6.
Slots and openings in the cabinet and the back or bottom are
provided for ventilation; do not block or cover these openings.
Do not place the computer near or over a radiator or heat
register.
7.
Operate the computer using the type of power source indicated
on its label.
8.
If you plan to operate the computer in Germany, observe the
following safety precaution:
To provide adequate short-circuit protection and over-current
protection for this computer, the building installation must
be protected by a 16 Amp circuit breaker.
Beim AnschluB des Computers an die Netzversorgung muB
sichergestellt werden, daB die Gebaudeinstallation mit einem
16 A ijberstromschutzschalter abgesichert ist.
9.
Connect all equipment to properly grounded (earthed) power
outlets. If you are unable to insert the plug into an outlet, contact
your electrician to replace your outlet. Avoid using outlets on
the same circuit as photocopiers or air control systems that
regularly switch on and off.
10. Do not allow the computer’s power cord to become damaged or
frayed.
iii
11. If you use an extension cord with the computer, make sure the
total of the ampere ratings of the devices plugged into the
extension cord does not exceed the ampere rating for the
extension cord. Also, make sure the total of all products plugged
into the wall outlet does not exceed 15 amperes.
12. Do not insert objects of any kind into this product through the
cabinet slots.
13. Except as specifically explained in this User’s Guide, do not
attempt to service the computer yourself. Refer all servicing to
qualified service personnel.
14. Unplug the computer from the wall outlet and refer servicing to
qualified service personnel under the following conditions:
A. When the power cord or plug is damaged.
B. If liquid has entered the computer.
C. If the computer does not operate normally when the operating
instructions are followed. Adjust only those controls that are
covered by the operating instructions. Improper adjustment
of other controls may result in damage and often requires
extensive work by a qualified technician to restore the
computer to normal operation.
D. If the computer has been dropped or the cabinet has been
damaged.
E. If the computer exhibits a distinct change in performance.
iv
Instructions Importantes de S&wit6
1.
Lire completement les instructions qui suivent et les conserver
pour references futures.
2.
Bien suivre tous les avertissements et les instructions indiques sur
l’ordinateur.
3.
Debrancher l’ordinateur de toute sortie murale avant le nettoyage.
Utiliser rm chiffon humide; ne jamais utiliser un nettoyeur
liquide ou une bonbonne aerosol.
4.
Ne jamais renverser un liquide d’aucune sorte sur l’ordinateur.
5.
Ne pas placer l’ordinateur sur un chariot, un support, ou une table
instable.
6.
Les events darts les meubles, a l’arriere et en dessous sont concus
pour l’akration; on ne doit jamais les bloquer. Ne pas placer
l’ordinateur pres d’une source de chaleur directe.
7.
Le fonctionnement de l’ordinateur doit s’effectuer conformement
au type de source d’alimentation indiquee sur l’etiquette.
8.
Lorsqu’on desire utiliser l’ordinateur en Allemagne, on doit
observer les normes securitaires qui suivent:
Afin d’assurer tme protection adequate a l’ordinateur contre
les court-circuits et le survoltage, l’installation de l/edifice
doit comprendre un disjoncteur de 16 amp.
9.
On doit brancher tout l’equipement dans une sortie reliee a la
masse. Lorsqu’il est impossible d’inserer la fiche dans la prise, on
doit retenir les services d’un electricien ou remplacer la prise. Ne
jamais utiliser une prise sur le meme circuit qu’un appareil a
photocopie ou un systeme de controle d’aeration avec
commutation marche-a&t.
10. S’assurer que le cordon d’alimentation de l’ordinateur n’est pas
effrite.
V
11. Dans le cas oti on utilise un cordon de rallonge avec l’ordinateur,
on doit s’assurer que la valeur totale d’amperes branches dans le
cordon n’excede en aucun temps les amperes du cordon de
rallonge. La quantite totale des appareils branches dans la prise
murale ne doit jamais exceder 15 amperes.
12. Ne jamais inserer un objet de quelque sorte que ce soit dans les
cavites de cet appareil.
13. Sauf tel que sp&ifie dans la notice d’utilisation, on ne doit jamais
tenter d’effectuer une reparation de l’ordinateur. On doit referer
le service de cet appareil a un technicien qualifie.
14. Debrancher l’ordinateur de la prise murale et confier le service au
personnel de service qualifib selon les conditions qui suivent:
A. Lorsque le cordon d’alimentation ou la prise sont
endommages.
B. Lorsqu’un liquide s’est infiltre dans l’ordinateur.
C. Lorsque l’ordinateur refuse de fonctionner normalement
mi?me en suivant les instructions. N’ajuster que les
commandes qui sont enumerees dans les instructions de
fonctionnement. Tout ajustement inadequat de tout autre
controle peut provoquer un dommage et souvent necessiter
des reparations elaborees par un technicien qualifie afin de
remettre l’appareil en service.
D. Lorsqu’on a echappe l’ordinateur ou que l’on a endommage le
boitier.
E. Lorsque l’ordinateur demontre un changement note au niveau
de sa performance.
vi
Contents
Software . . . . . . . . . . . . . . . . . . . . . . . . . . . . . . .
How to Use This Manual . . . . . . . . . . . . . . . . . . . . . .
Where to Get Help . . . . . . . . . . . . . . . . . . . . . . . . .
Chapter I
Setting Up Your System
Preparing to Set Up Your System . . . . . . . . . . . . . . . . .
Installation Overview . . . . . . . . . . . . . . . . . . . . . . . .
Setting the Voltage Selector Switch . . . . . . . . . . . . . . . .
Installing Optional Equipment . . . . . . . . . . . . . . . . . .
Connecting Peripheral Devices . . . . . . . . . . . . . . . . . .
Turning On the System . . . . . . . . . . . . . . . . . . . . . . .
Configuring Your System . . . . . . . . . . . . . . . . . . . . .
Equipment Log . . . . . . . . . . . . . . . . . . . . . . . . . . .
Chapter 2
1-1
1-2
1-4
1-5
1-6
1-8
1-10
1-11
Running the SETUP Program
Starting the Program . . . .
Selecting Options . . .
Selecting Settings . . . . . .
Hard Disk Drive Types
Exiting SETUP . . . . .
Chapter 3
2
3
4
. . . . . . . . . . . . . . . . . . . .
. . . . . . . . . . . . . . . . . . . .
. . . . . . . . . . . . . . . . . . . .
. . . . . . . . . . . . . . . . . . . .
. . . . . . . . . . . . . . . . . . . .
2-2
2-3
2-4
2-12
2-14
Running the EISA Configuration Utility
How to Use This Chapter . . . . . . . . . . . . . . . . . . . . . .
The Configuration Process . . . . . . . . . . . . . . . . . . . . .
Using Configuration Files . . . . . . . . . . . . . . . . . . .
Using the Keyboard . . . . . . . . . . . . . . . . . . . . . .
Using a Mouse . . . . . . . . . . . . . . . . . . . . . . . . .
Using On-line Help . . . . . . . . . . . . . . . . . . . . . .
3-3
3-4
3-4
3-5
3-5
3-6
vii
Configuring Your System . . . . . . . . . . . . . . . . . . . . . .
Starting the Program . . . . . . . . . . . . . . . . . . . . . .
Setting the Date and Time . . . . . . . . . . . . . . . . . . .
Performing the Configuration Steps . . . . . . . . . . . . .
Adding or Removing a Board . . . . . . . . . . . . . . . . .
Defining the Configuration Settings . . . . . . . . . . . . .
Using Advanced Configuration Options . . . . . . . . . . .
Using Alternate Configuration Files . . . . . . . . . . . . . . . .
Creating an Alternate SCI File . . . . . . . . . . . . . . . . .
Loading an Alternate SCI File . . . . . . . . . . . . . . . . .
Using Special Modes . . . . . . . . . . . . . . . . . . . . . . . . .
Using the SD Command . . . . . . . . . . . . . . . . . . . .
Using the CF Command . . . . . . . . . . . . . . . . . . . .
Copying the Configuration Files to a Hard Disk . . . . . .
Chapter 4
3-7
3-7
3-8
3-9
3-11
3-11
3-23
3-25
3-25
3-26
3-27
3-27
3-29
3-31
Using Your Computer
Locking the Computer’s Cover . . . . . . . . . . . . . . . . . . .
Locking the Front Panel Door . . . . . . . . . . . . . . . . . . . .
Disabling the Keyboard and Mouse . . . . . . . . . . . . . . . .
Using the Password Features . . . . . . . . . . . . . . . . . . . .
Setting Passwords . . . . . . . . . . . . . . . . . . . . . . . .
Entering Passwords . . . . . . . . . . . . . . . . . . . . . . .
Changing or Deleting Passwords . . . . . . . . . . . . . . .
Locking the Keyboard . . . . . . . . . . . . . . . . . . . . . . . .
Changing the Processor Speed . . . . . . . . . . . . . . . . . . .
Entering Keyboard Commands . . . . . . . . . . . . . . . .
Using the EISA System Utilities . . . . . . . . . . . . . . . .
Controlling the Speaker . . . . . . . . . . . . . . . . . . . . . . .
Controlling the Cache . . . . . . . . . . . . . . . . . . . . . . . .
Using the Security Features . . . . . . . . . . . . . . . . . . . . .
Using Special Configurations . . . . . . . . . . . . . . . . . . . .
Operating Your Computer from a Remote Location . . . . . . .
4-1
4-2
4-4
4-5
4-6
4-8
4-9
4-12
4-13
4-14
4-15
4-16
4-17
4-19
4-20
4-21
Chapter 5
Accessing Internal Components
Special Precautions . . . . . . . . . . . . . . . . . . . . . . . . .
Removing the System Covers . . . . . . . . . . . . . . . . . . .
Removing the External Side Cover . . . . . . . . . . . . .
Removing the Internal Main System Board Cover . . . . .
Replacing the System Covers . . . . . . . . . . . . . . . . . . .
Replacing the Internal Main System Board Cover . . . . .
Replacing the External Side Cover . . . . . . . . . . . . . .
Removing the Front Panel . . . . . . . . . . . . . . . . . . . . .
Replacing the Front Panel . . . . . . . . . . . . . . . . . . . . .
Chapter 6
Installing and Removing Options
Main System Board Map . . . . . . . . . . . . . . . . . . . . . .
Removing the CPU Card . . . . . . . . . . . . . . . . . . . . . .
Installing the CPU Card . . . . . . . . . . . . . . . . . . . . . .
Installing an Option Card . . . . . . . . . . . . . . . . . . . . .
Removing an Option Card . . . . . . . . . . . . . . . . . . . . .
Using the VGA Feature Connector . . . . . . . . . . . . . . . .
Memory Modules . . . . . . . . . . . . . . . . . . . . . . . . . .
Installing Memory Modules . . . . . . . . . . . . . . . . . . . .
Removing Memory Modules . . . . . . . . . . . . . . . . . . .
Setting Main System Board Jumpers . . . . . . . . . . . . . . .
Chapter 7
5-1
5-2
5-3
5-4
5-5
5-5
5-7
5-8
5-9
6-2
6-3
6-4
6-6
6-8
6-9
6-10
6-11
6-13
6-14
Installing and Removing Disk Drives
Using the Correct Drive Bay . . . . . . . . . . . . . . . . . . . .
Installing a Drive in an External Bay . . . . . . . . . . . . . . .
Removing a Drive from an External Bay . . . . . . . . . . . . .
Installing and Removing an IDE Hard Disk Drive . . . . . . .
Removing the IDE Drive Bay Assembly . . . . . . . . . .
Installing an IDE Drive . . . . . . . . . . . . . . . . . . . .
Removing an IDE Drive . . . . . . . . . . . . . . . . . . .
Replacing the IDE Drive Bay Assembly . . . . . . . . . . .
Connecting the IDE Ribbon and Power Cables . . . . . .
Installing a SCSI Drive . . . . . . . . . . . . . . . . . . . . . . .
Installing the SCSI Ribbon and Power Cables . . . . . . .
Removing a SCSI Drive . . . . . . . . . . . . . . . . . . . . . . .
7-2
7-3
7-8
7-9
7-10
7-11
7-12
7-13
7-14
7-18
7-22
7-25
ix
Appendix A Troubleshooting
Identifying Your System . . . . . . . . . . . . . . . . . . . . . . .
Error Messages . . . . . . . . . . . . . . . . . . . . . . . . . . . .
Power-on Diagnostic and Boot Errors . . . . . . . . . . . .
Error Tone Codes . . . . . . . . . . . . . . . . . . . . . . . .
Power or Lock-up Problems . . . . . . . . . . . . . . . . . . . . .
Password Problems . . . . . . . . . . . . . . . . . . . . . . . . . .
Keyboard Problems . . . . . . . . . . . . . . . . . . . . . . . . . .
Monitor Problems . . . . . . . . . . . . . . . . . . . . . . . . . . .
Diskette Problems . . . . . . . . . . . . . . . . . . . . . . . . . .
Diskette Drive Problems . . . . . . . . . . . . . . . . . . . . . . .
Hard Disk Problems . . . . . . . . . . . . . . . . . . . . . . . . .
Software Problems . . . . . . . . . . . . . . . . . . . . . . . . . .
Printer Problems . . . . . . . . . . . . . . . . . . . . . . . . . . .
Option Card Problems . . . . . . . . . . . . . . . . . . . . . . . .
Memory Module Problems . . . . . . . . . . . . . . . . . . . . .
Mouse Problems . . . . . . . . . . . . . . . . . . . . . . . . . . .
SCSI Drive Problems . . . . . . . . . . . . . . . . . . . . . . . . .
A-1
A-2
A-3
A-12
A-14
A-16
A-18
A-18
A-19
A-20
A-21
A-22
A-23
A-23
A-24
A-25
A-25
Appendix B Specifications
Main System Board . . . . . . . . . . . . . . . . . . . . . . . . . .
CPU Card. . . . . . . . . . . . . . . . . . . . . . . . . . . . . . . .
Interfaces . . . . . . . . . . . . . . . . . . . . . . . . . . . . . . . .
Keyboard . . . . . . . . . . . . . . . . . . . . . . . . . . . . . . .
Controllers . . . . . . . . . . . . . . . . . . . . . . . . . . . . . . .
Mass Storage Bays . . . . . . . . . . . . . . . . . . . . . . . . . . .
Physical Characteristics . . . . . . . . . . . . . . . . . . . . . . . .
Environmental Requirements . . . . . . . . . . . . . . . . . . . .
Power Supply . . . . . . . . . . . . . . . . . . . . . . . . . . . . .
Power Source Requirements . . . . . . . . . . . . . . . . . . . . .
System Memory Map . . . . . . . . . . . . . . . . . . . . . . . . .
Input/output Addresses . . . . . . . . . . . . . . . . . . . . . . .
System Interrupts . . . . . . . . . . . . . . . . . . . . . . . . . . .
x
B-1
B-1
B-2
B-2
B-3
B-3
B-3
B-4
B-4
B-6
B-7
B-9
B-11
Glossary
Index
Epson America International
Epson International Marketing Locations
Distributors
xi
The Epson® PowerSpan® computer is a powerful, versatile
system ideally suited for use as a network file server. It
incorporates the latest EISA (Extended Industry Standard
Architecture) technology in a convenient tower design. Its
exceptional features and flexibility enable you to use the most
advanced peripheral devices and software while maintaining
full compatibility with ISA technology. Your system includes:
cl
8MB of RAM on single inline memory modules (SIMMs),
expandable to 128MB using 1MB, 2MB, 4MB, 8MB, 16MB,
or 32MB single- or double-sided SIMMs
cl
Upgradable Intel® 486DX2/66 CPU on a removable card
including 8KB internal and 128KB secondary cache
memory and an integrated math coprocessor
ci
One built-in parallel and two built-in serial interfaces, plus
a built-in VGA controller providing standard VGA
resolutions
cl
IBM® PS/2® compatible mouse port and keyboard port
tl
Eight EISA bus master expansion slots (compatible with
32-bit EISA cards and 8- or 16-bit ISA cards)
cl
IDE hard disk drive interface for two hard disk drives
ci
Diskette drive controller for two diskette drives
ci
Mass storage space for up to nine half-height drives: two
internal bays for IDE hard disk drives or SCSI drives, four
internal bays for SCSI drives, and three externallyaccessible bays for diskette, tape, or CD-ROM drives.
Introduction 1
The built-in interfaces let you connect basic peripheral devices
directly to the computer, leaving the expansion slots for
optional devices such as a SCSI adapter and a networking card.
You can also install a variety of other options, such as diskette
drives, hard disk drives, a tape drive, or a SCSI subsystem.
You can upgrade your system microprocessor by replacing the
removable CPU card with an Intel Pentium® CPU card or by
installing an Intel P24T OverDrive™ processor on the existing
CPU card.
Your computer provides a 32-bit wide EISA bus that supports
64-bit processors by employing advanced bit-interleaving
technology. In addition, the EISA burst mode capability enables
data transfers of up to 66MB of data per second through the
EISA bus.
In addition, your computer offers multiple-level security
features to protect both the hardware and software from
unauthorized user access.
Software
Your system comes with a Reference diskette containing the
EISA Configuration utility and various EISA System Utilities.
These programs allow you to configure your computer and
EISA option cards, as well as customize many system features.
In addition, a SETUP program is provided in your system BIOS
so you can easily configure your computer if you have not
installed any EISA option cards or are operating your system
without a diskette drive.
2
Introduction
How to Use This Manual
This manual explains how to set up, configure, and operate
your computer, as well as how to install optional equipment.
It does not cover your operating system; see your operating
system manual for instructions on installing and using it.
Although you should be sure to follow the steps in Chapters 1,
2, and 3 to set up and configure your system, you do not need
to read everything in this book. See the following chapter
summaries to find the sections you need.
Chapter 1 provides instructions for setting up your system.
Chapter 2 describes how to run the SETUP program to
configure your system when you do not have a diskette drive
or did not install any EISA option cards.
Chapter 3 describes how to run the EISA Configuration utility
to configure your computer when you have installed EISA
option cards.
Chapter 4 provides instructions for certain operating
procedures, such as locking the computer’s cover, using the
password features, and changing the operating speed.
Chapter 5 describes how to remove and replace the system
covers and the front panel to access the internal components.
Chapter 6 describes how to install and remove options.
Chapter 7 describes how to install and remove disk drives.
Appendix A contains troubleshooting tips.
Appendix B gives the technical specifications for the computer.
At the end of the manual, you’ll find a Glossary and an Index.
Introduction 3
Where to Get Help
If you purchased your computer in the United States, Epson
America provides local customer support and service through
a nationwide network of authorized Epson dealers and Service
Centers. Epson also provides support services through the
Epson ConnectionSM at: (800) 922-8911.
Call the Epson Connection for the following:
Technical assistance with the installation, configuration,
and operation of Epson products
Assistance in locating your nearest Authorized Epson
Reseller or Service Center
Sales of ribbons, supplies, parts, documentation, and
accessories for your Epson product
Customer Relations
Epson technical information library fax service-also
available directly by calling the toll number (310) 782-4214
Product literature with technical specifications on our
current and new products
User group locations.
If you purchased your computer outside the United States,
please contact your dealer or the marketing location nearest
you for customer support and service. International marketing
locations are listed at the back of the manual.
If you need help with any software application programs you
are using, see the documentation that came with the programs
for technical support information.
4 Introduction
Chapter 1
Setting Up Your System
This chapter describes how to set up and start using your
computer system for the first time. before you set up your
system, be sure to read the “Important Safety Instructions” at
the beginning of this manual.
Preparing to Set Up Your System
It is important to choose a safe, convenient location for your
system that provides the following:
A flat, hard surface. Place the computer on an anti-static
mat if the surface is carpeted.
Good air circulation. Leave several inches of space around
the computer so air can move freely for proper cooling.
Moderate environmental conditions. Select a cool, dry, area
and protect your computer from humidity, dust, and
smoke. Avoid direct sunlight and other heat sources.
No electromagnetic interference. Do not place your system
too close to any device that generates an electromagnetic
field or creates electrical noise, such as a telephone, air
conditioner, large fan, radio, TV, or large electric motor.
Access to appropriate power sources. Connect all your
equipment to an appropriate source. (See “Power Source
Requirements” in Appendix B for more information. Also
see “Setting the Voltage Selector Switch” on page 1-4 for
information about setting the correct voltage.)
Setting Up Your System
1-1
If the power cord supplied with your system is not compatible
with the AC wall outlet in your region, obtain a suitable power
cord that meets the following criteria:
The power cord must be rated for at least 125% of the
current rating of the AC voltage system. For more
information, refer to Appendix B.
The power cord connector that plugs into the wall outlet
must terminate in a grounding-type male plug designed for
use in your region.
The power cord connector that plugs into your system must
be an IEC type CEE-22 female connector.
The power cord must be less than 4.5 meters (14.76 feet)
long to comply with the system’s safety requirements.
Caution
Do not use or attempt to modify the supplied AC power
cord if it is not the type required for use in your region.
Installation Overview
The following steps offer an overview of the system installation
process. For detailed instructions on performing these steps,
refer to the specified sections.
1.
1-2
Set the voltage selector switch on the back of the computer
to the correct input line voltage. (See page 1-4.)
Setting Up Your System
2.
The keys for the front panel door lock are taped to the inside
of the door. Open the door to remove the keys. (It might be
a little hard to open the door the first time.)
3.
Install any optional equipment you want to add to your
computer, such as disk drives, memory modules, or EISA
option cards. You may not want to install any ISA option
cards yet (unless you will use an ISA card to control your
monitor). See “Installing Optional Equipment,” on page 1-5.
4.
Connect the external devices, such as the monitor, printer,
keyboard, and mouse. See “Connecting Peripheral
Devices,” on page 1-6.
Note
Even if you intend to use this system as a network file
server, you need to connect at least a monitor and a
keyboard to complete the installation. You may remove
them once the installation is complete.
5.
Read “Turning on the System” on page 1-8, before you turn
on the computer.
6.
Read “Configuring Your System” on page 1-10 for
information on the available configuration programs.
7.
If necessary, set the switches or jumpers on any ISA cards
you have not yet installed, and install them in the
computer. See Chapter 6 for instructions.
8.
Connect all of your peripheral devices.
9.
Install your operating system and any other application
programs.
Setting Up Your System
1-3
Setting the Voltage Selector Switch
Your system is powered by a 230 watt power supply. The
power supply voltage is controlled by a voltage selector switch
on the computer’s back panel that may be set to 115 VAC or
230 VAC.
The computer is shipped with the voltage selector switch set to
115 VAC. This setting is appropriate for line source voltages
between 100 and 120 VAC. This is generally the appropriate
setting if you will use the computer in North America or Japan.
If you plan to operate the computer in the United Kingdom or
Europe, you will almost certainly need to reset the voltage
selector switch to 230 VAC. Line source voltages between 200
and 240 VAC are acceptable with the switch set to 230 VAC.
If you need to change the voltage selector switch setting, refer
to the illustration below.
voltage selector switch
1-4
Setting Up Your System
Caution
Before you turn on the power to your system, you must be
sure the voltage selector switch is set to the appropriate
setting for the electrical power source in your location or you
will seriously damage your system.
To change the voltage selector switch setting, insert the tip of a
ball-point pen or a similar tool into the dimple on the switch.
Then slide the switch to the right to select 115 VAC or to the left
to select 230 VAC.
Installing Optional Equipment
Before you set up and connect your system components, you
may want to install any optional equipment you plan to use.
Chapters 6 and 7 give complete instructions for installing
options such as disk drives, memory modules, and option cards.
You may want to list the serial numbers and other important
information about the options you install in the “Equipment
Note that the order in which you install option cards depends
on the type of cards you have. If you will be installing only ISA
option cards that did not come with their own configuration
(CFG) files, you should install them before you connect your
peripheral devices. Follow the instructions in your ISA card
manual to set the card’s switches or jumpers for your system.
You should also install any EISA cards you plan to use before
you connect peripheral devices so your EISA Configuration
utility can automatically detect the cards and configure them
correctly.
Setting Up Your System
1-5
If you plan to install any ISA cards that came with their own
CFG files, you should install them after you have connected the
necessary peripheral devices and run the computer’s EISA
Configuration utility. This allows you to add the CFG file
information to your configuration so the program can give you
the card’s correct jumper and switch settings. Then you can set
the switches and jumpers and install the card. See the
documentation that came with your card(s) for information.
Be sure that the option card(s) you install do not exceed your
computer’s power supply limits, as described in Appendix B.
Then follow the instructions in Chapter 6 to install the cards,
Connecting Peripheral Devices
Refer to the illustration below to locate the ports on the back of
your computer.
voltage
selector switch
keyboard port
serial port 2
VGA port
AC inlet
mouse port
serial port 1
parallel port
1-6
Setting Up Your System
Before connecting the peripheral devices, make sure the power
buttons or switches on the computer and all peripheral devices
are turned off. Then follow these steps to connect the peripheral
devices:
1.
If necessary, insert the mouse cable connector into the
mouse port on the back panel.
Caution
Although the keyboard and mouse ports appear to be
identical, you cannot use them interchangeably. Be sure
to plug the keyboard and mouse into the correct ports.
2.
Insert the keyboard cable connector into the keyboard port
on the back panel.
3.
Connect the interface cables of any other peripheral devices
such as a monitor, printer, or modem to the appropriate
port on the back panel.
4.
Connect the power cords for any peripheral devices to
grounded electrical outlets.
5.
Plug one end of the computer’s power cord into the AC inlet
socket on the back panel.
6.
Plug the other end of the computer’s power cord into an
appropriate electrical outlet.
Be sure to read the next section before you turn on the system.
Setting Up Your System
1-7
Turning On the System
Read the following safety rules to avoid damaging the
computer or injuring yourself:
1-8
cl
Do not connect any power or peripheral device cables when
the computer’s power is on.
cl
Never turn on the computer while a protective card is in a
5.25-inch diskette drive.
cl
Never turn on the computer when its cover is off.
cl
Never turn off or reset your computer while a disk drive
light is on. This can destroy data stored on the disk.
cl
Always wait at least five seconds after you turn off the
power before you turn it on again. This prevents possible
damage to the computer’s electrical circuitry.
ci
Do not leave a beverage near your system or any of its
components. Spilled liquid can damage the circuitry of
your equipment.
Ll
Always turn off the power and wait 30 seconds before you
disconnect the computer’s power cord and device cables,
and remove the cover. Only remove the cover to access
internal devices.
cl
Never press the computer’s power, reset, or
Keyboard/Mouse Lock buttons while the front panel is
removed.
Setting Up Your System
Follow these steps to turn on the system:
1.
Make sure all peripheral devices, such as the mouse,
keyboard, and monitor, have been connected.
2.
Turn on the monitor and any other peripheral devices.
3.
Turn on your system by pressing the power button on the
front panel.
powerbutton
button
power
indicat
light
4.
Verify that the power indicator light on the front panel is
on.
You are now ready to begin using your computer. See the next
section for information on configuring your system.
Setting Up Your System
1-9
Configuring Your System
There are two programs you can use to configure your
computer: the SETUP program and the EISA Configuration
utility. Which one you use depends on the option cards you
may have installed in your computer.
You should use the SETUP program to configure your
computer in the following situations:
CL
You did not install any option cards or installed only ISA
option cards that did not come with configuration (CFG)
files
Cl
You do not have a diskette drive or have disabled your
diskette drive.
You should run the EISA Configuration utility to configure
your system if either of the following is true:
Cl
You have installed an EISA option card
Cl
You have installed an ISA option card that came with a
CFG file.
Your computer’s SETUP program is stored in the system BIOS
ROM. You can run SETUP whenever you turn on or reset the
computer, regardless of whether you have installed an
operating system. See Chapter 2 for instructions on running the
program.
The EISA Configuration utility is on the Reference diskette. See
Chapter 3 for instructions on running this utility.
1-10
Setting Up Your System
Equipment Log
Use this space to record information about your system. You
should refer to this section if you call for assistance.
Computer serial number:
Purchase location:
date:
Monitor serial number:
Printer serial number:
Other device serial number:
Other device serial number:
Other device serial number:
Other device serial number:
Option cards installed:
Slot 1:
Slot 2:
Slot 3:
Slot 4:
Slot 5:
Slot 6:
Slot 7:
Slot 8:
Setting Up Your System
1-11
IDE drives installed:
Bay 1:
Bay 2:
SCSI drives installed:
Bay 1:
Bay 2:
Bay 3:
Bay 4:
Bay 5:
Bay 6:
Other drives installed (diskette, tape, CD-ROM, etc.):
Bay 1:
Bay 2:
Bay 3:
Operating system version number:
Operating system serial number:
Software program
1-12
Setting Up Your System
Version number
Serial number
Chapter 2
Running the SETUP Program
The SETUP program allows you to configure your computer
and set many different system options. You should use SETUP
to configure your computer in the following situations:
Cl You did not install any option cards or installed only ISA
option cards that did not come with configuration (CFG) files
Q You do not have a diskette drive or have disabled your
diskette drive.
If you have installed EISA option cards, you should run the
EISA Configuration utility instead of the SETUP program to
configure your system. See Chapter 3 for more information.
Note
If you plan to operate your computer without either a
monitor, keyboard, or diskette drive, see “Using Special
Configurations” in Chapter 4 before running SETUP or the
EISA Configuration utility. If you’ll be redirecting your
computer’s input and output to a serial port, be sure to see
“Operating Your Computer from a Remote Location” in
Chapter 4 before configuring your system.
Your computer’s SETUP program is stored in the system BIOS
ROM. You can run SETUP whenever you turn on or reset the
computer, regardless of whether you have installed an
operating system.
Note
Any settings you make using the EISA Configuration utility
override those you set using SETUP.
Running the SETUP Program
2-1
Starting the Program
Follow these steps to run SETUP:
1. Turn on the computer or press the reset button. You see the
memory test countdown and then the power-on diagnostic
test countdown. You may also see this prompt:
Press Spacebar to Abort
Memory
Test
If you want to skip the memory test to shorten the time it
takes to enter SETUP, press the spacebar.
(If you press [Ctrl) 171 [E] to reset the computer, it
does not perform the memory test.)
2.
If the power-on diagnostic tests do not find errors, you hear
a beep and may see the following prompt:
To continue press: . . . . . . . SPACEBAR
To configure system press: . . . F1
remains on the screen for four seconds. Press
If the tests find a minor error or you have not yet installed
your operating system, the computer beeps twice; then you
see an error message and the following prompt:
To continue press: . . . . . . . SPACEBAR
To configure system press: . . . F1
2-2
Running the SETUP Program
To continue without running SETUP, press the spacebar.
To run SETUP, press [.
If the power-on diagnostic tests find a serious error, you hear
a beep code indicating the error and the system halts. See
Appendix A for a list of the error beep codes and suggested
solutions to the problem.
Now you see the first page of SETUP information:
Page 1 of 4
Syatclm Time: 10:40:59
symtem Date: Dot 12, 1993
Languacm: Englimh
Onhoard Plop~y: Bhabled
Dhkette A: 3.5". 1.44 MB
Dimkott. Br Not Izmtalled
onhoard 1DE:EJlabl.d
Hard Driva 1: m 3
Eard Drim 2: Not Insitallsd
-Disk Subsystem
Cylindora:
eordn:
Prec~anaation:
Land zone:
Stactora:
siza t
User Definable Drives:
723
13
0
722
51
234
2and3
There are four pages of SETUP information. Follow the
instructions in the next section to view or change your
settings and display the other pages.
Selecting Options
To move the cursor from the current option to the next or
previous available option, press m or [. (If there is
more than one option on a line, you can also press [tl or
[-) to move to the next or previous option.)
Running the SETUP Program
2-3
To change the setting of the currently highlighted option, press
nor& to scroll through the available settings. If the settings
are numeric values, press a to select higher values and m to
select lower values.
To set default values or exit SETUP (with or without saving
your settings), press [. You see a display listing the keys
you can press to perform these functions.
Press [F5) to set all the SETUP options to their default values.
(The system time and date options remain at their current
settings.) See “Exiting SETUP” on page 2-14 for information
about exiting SETUP.
Selecting Settings
The table below lists the settings available for each SETUP
option and describes how they affect your configuration. The
numbers in parentheses refer to notes at the end of the table.
When you finish changing your settings, see “Exiting SETUP”
on page 2-14.
SETUP program options
2-4
zi
Option
Settings
System Time
hh:mm:ss
system Date
dd month yyyy
Set the current day (dd), month,
and year (yyyy); automatically
tracks leap years
Language
English*
Français (French)
Deutsch (German)
Italiano (Italian)
Español (Spanish)
Set to the language in which you
want to display the SETUP
program text
Running the SETUP Program
Set the current hour (hh), minutes
SETUP program options (continued)
Settings
Description
Onboard
Fl O P P Y
Enabled *
Disabled
Set to Enabled to use the built-in
diskette drive controller; set to
Disabled to disable the built-in
controller if you are either not
using a diskette drive or will use a
controller on an option card
Diskette A
Diskette B
5.25”. 360 KB
5.25” 1.2 MB
3.5”, 720 KB
3.5”: 1.44 MB (A*)
3.5”, 2.88 MB
Not Installed (B*)
Set to the type(s) of diskette
drive(s) installed in the system; set
to Not Installed if you do not
have the specified drive installed
Onboard IDE
Enabled
Disabled *
Set to Enabled to use the built-in
IDE hard disk drive controller to
control your IDE drive(s); set to
Disabled to use an external IDE
drive controller (1)
Hard Drive 1
Hard Drive 2
Type nn
Not Installed
User Definable
Drives
2 and 3 *
48 and 49
l
Set to the hard disk drive type of
the specified IDE hard disk drive
or enter parameters for
user-definable drive type
according to the drive’s
documentation; select the
user-defined drive type number
you want to use in the option
described below; select Not
Installed for both options if you
have installed a SCSI hard disk
drive. (For more information, see
“Hard Disk Drive Types” on
page 2-12.)
Select the pair of user-definable
drive types you want to use to
enter your drive’s parameters;
select the type and enter the
parameters using the option
described above
Running the SETUP Program
2-5
SETUP program options (continued)
2-6
Option
Settings
Description
Video Type
VGA/EGA *
CGA40
CGA80
MDA
Not Installed
Select the type of adapter you
installed; if you are using the
built-in adapter, select VGA/EGA
(2)
640x480 Mode
Refresh Rate (3)
60Hz*
75 Hz
x2, x16 @72 Hz
Select the refresh rate frequency
(in Hertz) of the built-in video
controller when it is operating in
640 x 480 mode; see your
monitor manual to determine the
correct refresh rate
800x600 Mode
Refresh Rate
-
This option has no effect on your
system
1024x768 Mode
Refresh Rate
-
This option has no effect on your
system
Video Font
8 x 16
9 x 16*
Select the font dimensions of the
video characters that appear on
the screen; select 9 x 16 for use
with VGA and most computer
programs
OnBoard
Video
Controller
Primary
Secondary
Set to Primary if you are using the
built-in video controller as your
primary display adapter; set to
Secondary to use the built-in
controller as the secondary
controller; if you install a VGA
display adapter card, the
computer may automatically
change the card to the primary
adapter and set the built-in
adapter to Secondary; all BIOS
video writes are directed to the
Primary video display
Offboard
VGA/EGA
Adapter
Installed
Yes *
No
Set to Yes if you installed a video
display adapter on an option
card that contains a BIOS at
address C0000h; select No if you
have not installed a video option
card (4)
l
Running the SETUP Program
SETUP program options (continued)
Option
Settings
Description
Keyboard
installed
Not Installed *
Set to Installed to allow your
computer to operate with a
keyboard; set to Not installed to
use your computer without a
keyboard (for example, as a
network server) and allow
power-on diagnostic tests to
report a disabled keyboard
instead of a failed keyboard
NumLock on
at boot
Yes
No*
Set to Yes to turn on Num Lock
mode whenever you turn on or
reset your computer; set to No to
turn it off
Password
Not installed *
Installed
To set a power-on password,
highlight this option when the
setting is Not installed and press
m or a. Then follow the
instructions on the screen to
enter the password; the setting
changes to Installed. (See
Chapter 4 for more information
about the password function.)
POST Memory
Test Prompt
Enabled *
Disabled
Set to Enabled to display the skip
memory test prompt when you
turn on or reset your computer;
select Disabled to prevent
display of the prompt. (You can
still press the spacebar to skip the
test if you disabled the prompt.)
See page 2-2 for more
information.
POST Setup
Prompt
Enabled *
Disabled
Set to Enabled to display the
prompt to run the SETUP program
when you turn on or reset your
computer; select Disabled to
prevent display of the prompt.
(You can still press [to run
SETUP if you disable the prompt.)
See page 2-2 for more
information.
Running the SETUP Program
2-7
SETUP program options (continued)
2-8
Option
Settings
Description
Boot Device
Select
Floppy or Hard
Drive
Hard Drive Only
Select the device(s) from which
you want to be able to boot your
system; setting is ignored if the
diskette drive is controlled by a
controller on an option card
Base Memory
640 KB *
512KB
Displays the size of the base
memory; setting is 640KB unless
there is a base memory failure or
you reassigned the base memory
between 512KB and 640KB in the
option described below
Extended
Memory
(memory size]
Displays the amount of extended
memory in the system including
memory installed on SlMMs and
any memory option cards; you
cannot change this setting
Base Memory
Above 512K
Enabled *
Disabled
Set to Enabled to assign the base
memory address from 512KB to
640KB to memory on the system
board; set to Disabled if you
install an option card that
reserves these addresses for its
own use
Speaker
Enabled
Disabled
Set to Enabled to turn on the
computer’s built-in speaker; set
to Disabled to turn off the
speaker (cannot be turned on by
application software if Disabled)
LCD
-
This option has no effect on your
system
Onboard
Mouse
Enabled *
Disabled
Set to Enabled if you have
connected a mouse to the
built-in mouse port; set to
Disabled if you are not using a
mouse (frees hardware interrupt
lRQ12) or if you are using a
mouse controller installed on an
option card
l
l
Running the SETUP Program
SETUP program options (continued)
Option
Settings
Description
Parallel Port
Address 378H:
Compatible/lRQ7*
Address 278H:
Compatible/lRQ5
Address 378H:
Bi-directional/lRQ7
Address 278H:
Bi-directional/lRQ5
Disabled
Select one of the Compatible
options to set the port for IBM AT
compatible signals: select one of
the Bi-directional options to set
the port for IBM PS/2 compatible
bi-directional signals; select
Disabled to prevent the port from
reacting to any signals (no
resources are allocated when
Disabled)
Serial Port 1 (5)
Address 3F8H/IRQ4*
Address 2F8H/IRQ3
Address 3E8H/IRQ10
Disabled
Select the address you want to
use for serial port 1; set to
Disabled to prevent the port from
reacting to any signals (no
resources are allocated when
Disabled)
Serial Port 2 (5)
Address 2F8H/IRQ3*
Address 3E8H/IRQ10
Address 2E8H/IRQ11
Disabled
Select the address you want to
use for serial port 2; set to
Disabled to prevent the port from
reacting to any signals (no
resources are allocated when
Disabled)
Console
Redirection to
COM1
Disabled*
1200 Baud
2400 Baud
9600 Baud
Set to Disabled to prevent
redirection of the computer’s
input and output to serial port 1:
set to the speed the computer
should use to copy the
redirected input/output to serial
port 1
Console
Redirection to
COM2
Disabled*
1200 Baud
2400 Baud
9600 Baud
Set to Disabled to prevent
redirection of the computer’s
input and output to the serial
port assigned as COM2; set to
the speed the computer should
use to copy the redirected
input/output to the port
Running the SETUP Program
2-9
SETUP program options (continued)
Option
I/O Recovery
Time
Settings
Description
Fast *
Slow
Select Fast to set the computer’s
processor to operate at its
maximum speed; select Slow to
set the processor to operate at a
simulated 8 MHz speed to
accommodate old application
programs that may require it;
slow speed also disables any
system caching
EnabledWrite Through
EnabledWrite Back
Disabled*
Set to Enabled-Write Through to
enable caching on the
486DX2/66 CPU card; set to
Enabled-Write Back to enable
caching on the Pentium CPU
card; set to Disabled to prevent
caching when you are using
time-dependent software
Standard
Enhanced
Select Enhanced to set a fast I/O
recovery time; set to Standard if
you have trouble with an
application program or option
card that is running in Enhanced
mode
Enabled
Disabled
Concurrent
Refresh
2-10
Enabled
Disabled
l
l
l
Running the SETUP Program
Set to Enabled to improve
performance by posting I/O
writes to the EISA bus; set to
Disabled if any of your option
cards do not support this feature
Set to Enabled to improve
performance by executing
concurrent CPU cache and
main memory refresh cycles; set
to Disabled if you have trouble
with any application programs
while this option is enabled
SETUP program options (continued)
Option
Settings
Description
Onboard
Video BIOS
Mapping
To EOOOOH*
To COOOOH
Select To E0000H to map the
onboard video BIOS to memory
address E0000h: select To C0000H
to map the video BIOS to
address C0000h to provide
compatibility with old
application software (6)
Shadow
C0000 to C7FFF
C8000 to CFFFF
E0000 to E7FFF
Disabled
Enabled
Set any of these options to
enable or disable shadowing of
ROM data from the indicated
memory address range (6)
Scan FLASH
User Area
Enabled
Disabled
l
l
Set to Enabled to allow the BIOS
to call any code you have
installed in the 8KB block EA000h
to EBFFFh prior to booting the
computer (FLASH user area); set
to Disabled to scan the block
normally
* Default setting
1 If you will boot your system from a SCSI hard disk drive, you must disable
the built-in IDE controller and set both hard disk drive types to Not
Installed.
2 When you select Not Installed for the Video Type option, the display type
bits are configured for VGA.
3
If you change the refresh rate, you must press the reset button or turn
the computer off and then on again after saving your settings to reset the
rate.
4 The Offboard VGA/EGA Adapter Installed option settings do not affect
your built-in video controller. To enable or disable this controller, you must
set jumper E0290. See Chapter 6 for more information.
5 You cannot set Serial Port 1 and 2 to the same address. If you attempt to
do so, you see an error message.
6
If you set the Onboard Video BIOS Mapping option to To C0000H, you
must set the Shadow C0000 to C7FFF option to Disabled to avoid a
memory conflict. If you set the Onboard Video BIOS Mapping option to
To E0000H, you must set the Shadow E0000 to E7FFF option to Disabled to
avoid a conflict.
Running the SETUP Program
2-11
Hard Disk Drive Types
The following table lists the types of hard disk drives you can
use in your computer. Check this table and the manual that
came with your hard disk to find the correct type for the hard
disk drive(s) installed in your computer.
If your drive documentation includes only the drive parameters
and not a specific type number, search through this list to find a
type that matches your drive. If none of the types match, select
one of the user-defined drive types (2 and 3 or 48 and 49) and
set your own parameters using the Hard Drive n option. See
page 2-5.
Be sure you enter the correct drive type or parameters for
Hard disk drive types
2-12
Running the SETUP Program
Hard disk drive types (con timed)
Running the SETUP Program
2-13
Hard disk drive types (continued)
46
925
9
-1
925
17
69MB
47
699
7
256
700
17
40MB
48,49
-
-
-
-
-
User-definable
Exiting SETUP
To exit the SETUP program, press m at any of the SETUP
pages and follow the instructions on the screen to do any of the
following:
Ci
To continue running SETUP, press [ again.
Ll
2-14
then exit and reboot the
CI
To load default settings for all the SETUP options, press
[; the program erases any changes you have made
(except for the time and date).
Cl
To exit SETUP without saving your settings, press [.
Running the SETUP Program
Chapter 3
Running the EISA Configuration Utility
The EISA Configuration utility, provided with your system on
the Reference diskette, allows you to configure your computer
when you have installed the following option cards:
Q EISA option cards
Cl
ISA option cards that came with configuration (CFG) files.
Use the program to do the following:
0
Learn about the configuration process
Li
Set the date and time
D
Copy the configuration (CFG) files for any option cards you
install
ci
Configure the system board and any option cards
ci
Create one or more System Configuration Information
(SCI) files
cl
Access other system utilities, such as password, CPU speed,
and cache utilities.
Note
If you plan to operate your computer without either a
monitor, keyboard, or diskette drive, see “Using Special
Configurations” in Chapter 4 before running the EISA
Configuration utility. If you’ll be redirecting your
computer’s input and output to a serial port, be sure to see
“Operating Your Computer from a Remote Location” in
Chapter 4 before configuring your system.
Running the EISA Configuration Utility
3-1
You need to run the EISA Configuration utility to configure
your system with your EISA option cards installed before you
use your computer. You may need to run it again later if you
add or remove options, such as memory, disk drives, or option
cards.
After running the program, you save your current
configuration in the computer’s CMOS RAM and in a file called
SYSTEM.SCI. Your computer checks this information each time
you turn it on and assigns system resources based on the
configuration options you selected.
Once you configure your computer with this utility, you should
not use the SETUP program in your computer’s BIOS. Always
use the EISA Configuration utility to configure your computer.
If you want to create an alternate configuration for your
computer or another computer, you can create an alternate SCI
file. See page 3-25 for more information.
Note
The first time you configure your computer, you must run
the program from the Reference diskette and it is best to
always run it from there. However, you can run the EISA
Configuration utility from your hard disk to speed up its
performance. See page 3-31 for information on copying the
files to your hard disk. Then see page 3-27 for instructions on
running the utility from a command line.
3-2
Running the EISA Configuration Utility
How to Use This Chapter
This chapter is divided into the following four sections:
LI The Configuration Process describes the various aspects of
configuring your computer with the EISA Configuration
utility. It also tells you how to use the keyboard or a mouse
with the program and how to use on-line help.
Cl
Configuring Your System provides step-by-step
instructions for running the EISA Configuration utility and
is organized in the order in which you should perform the
operations.
0
Using Alternate Configuration Files explains how to
create and use alternate configuration files, if this is
necessary.
c1
Using Special Modes tells you how to configure your
computer by running it in special operating modes, such as
non-target modeling mode.
Read “The Configuration Process” first to familiarize yourself
with all aspects of the configuration process. Then perform the
configuration operations in the order they are described under
“Configuring Your System.”
If you need to create alternate configuration files or run the
program in special modes, see pages 3-25 or 3-27, respectively.
Running the EISA Configuration Utility
3-3
The Configuration Process
This section describes the following configuration operations:
0 Using the configuration files
CI
Using the keyboard or a mouse with the program
Cl Using on-line help.
Using Configuration Files
Configuration (or CFG) files provide information to the system
about a cards functions and resource requirements so your
computer can allocate its resources efficiently. They also
provide instructions for setting any switches and jumpers on
ISA cards.
You can copy to your Reference diskette a configuration file for
each card you install using the EISA Configuration utility. EISA
cards come with the necessary CFG file to allow the program to
configure the card automatically. See your EISA card
documentation for more information.
ISA option cards may come with the necessary CFG file for this
program. If you do not have a CFG file for your ISA card, you
can still install the card in your system. However, you should
configure the rest of your system and then follow the
instructions that came with the card to set any of its switches or
jumpers.
3-4
Running the EISA Configuration Utility
Using the Keyboard
If you use a keyboard when you run the EISA Configuration
utility, refer to the table below for a description of the keys you
can use to move the cursor and select items. If you’ll be using a
mouse with the program, see “Using a Mouse” below. Most of
the screens show which keys you can press to perform various
operations. Follow the instructions on each screen.
Whenever the <OK> icon is highlighted, press w to select
<OK>. To select <Cancel>, you can either press the [ key
or highlight <Cancel> and press mEntar
Key commands
Key
Function
moor
m
Moves the cursor to the next field
a
moor=
[or
a
Moves the cursor to the previous field
Highlights items within a list or scrolls the
screen
m
Selects the highlighted option
I
Cancels the current action or menu
@j-J o r IPg
Moves the cursor up or down one screen
[B
Moves the cursor to the first line of
information
(xi-1 [End)
Moves the cursor to the last line of
information
Using a Mouse
The first time you run the EISA Configuration utility, you must
use the keyboard. After configuring your system, load your
operating system and then install your mouse driver. Then you
can run the utility using your mouse.
Running the EISA Configuration Utility
3-5
To select most options, place the cursor on the option, click
once to highlight it, and again to select it.
When you see ? or 4 on the side of a screen, you can scroll the
text. Place the cursor on the arrow indicating the scroll
direction and hold down the mouse button. Release it to stop.
Keep in mind that this chapter gives keyboard instructions
when describing how to use the EISA Configuration utility.
You should substitute the appropriate mouse equivalents when
performing the same operations.
Using On-line He/p
The EISA Configuration utility provides extensive on-line help
information. You can obtain help in the following ways:
Cl
Highlight a menu option to see a description of its function.
D Select Step 1: Important EISA configuration
information for detailed information about each step in
the configuration process.
Q Press the [ key whenever you see Help=F1. The
following menu appears:
EISA Configuration Help
Current screen
Selected item or board
All boards
Keys
Topics
Using help
EISA configuration
Press m to highlight the help information you need; then
press IEnter) to select it.
3-6
Running the EISA Configuration Utility
Configuring Your System
Follow the instructions in this section and on your screen to
configure your computer using the EISA Configuration utility.
You configure your system in the following order:
0
Set the date and time
Ct
Add or remove boards; when you add an option card,
select this option to copy the necessary configuration files
Ct
View or edit the details of your configuration; use this
option to define your configuration
LI
View or print your jumper and switch settings
Cl
Save the configuration as you exit the program.
Starting the Program
Follow these steps to start the EISA Configuration utility:
1.
Insert the Reference diskette in drive A and turn on or reset
the computer.
2.
After a moment, you see the title screen for the EISA
Configuration utility. Press B to continue. You see the
Welcome screen.
Note
If you installed any EISA option cards in your system,
you see a message telling you to configure your
computer. Press IEnter] to continue.
Running the EISA Configuration Utility
3-7
3.
Press IEnter You see the Main Menu:
Main Menu
Learn about configuring your computer
Configure computer
Set date
Set time
Access System Utilities
Maintain system configuration diskette
Exit from this utility
4.
For an overview of the configuration process, highlight
Learn about configuring your computer and
press [Enter. When you have finished reading the three
Help screens, press [Enter) to return to the Main Menu.
(You can press [ to return to the Main Menu at any
time.)
Now set the date and time of your computer’s real-time clock,
as described below.
Setting the Date and Time
The real-time clock in your computer continuously tracks the
date and time-even when the computer is turned off. The first
time you run the configuration program, set the date and time
for your computer. You can set them again later to adjust your
clock for seasonal time adjustments, such as daylight savings
time. The computer automatically changes the date for leap
years.
3-8
Running the EISA Configuration Utility
Follow these steps to set the date and time:
1. At the Main Menu, select Set date. You see a prompt such
as the following:
Date 12-12-1993 (mm-dd-yyyy)
2.
The current setting for Date is highlighted. Correct it as
necessary. You can use the arrow keys to move the cursor
and overtype the date. Then press IEnter
3.
At the Main Menu, select Set time. You see a prompt
similar to the date prompt.
4.
You can use the arrow keys to move the cursor and overtype
the time. Then press [Enter. You see the Main Menu.
Now you can configure your computer, as described below.
Performing the Configuration Steps
Follow these steps to configure your computer:
1. At the Main Menu, select Configure computer. After a
moment, you see this menu:
Steps in configuring your computer
Step 1: Important EISA
configuration information
Step 2: Add or remove boards
step 3: View or edit details
step 4: Examine required switches
step 5: Save and exit
Running the EISA Configuration Utility
3-9
Note
If you installed EISA option cards in your system, the
program first asks you to insert a diskette containing a
CFG file for the EISA card. Remove the Reference
diskette, insert the appropriate configuration diskette,
and press [Enter. Follow the instructions on the screen to
complete the installation and then go to the next step.
3-10
2.
Select Step 1 and read the information displayed on your
screen about configuring your system. If you want to print
any of the screens to the printer connected to port LPT1,
press the @E’ key.
3.
Select Step 2 and follow the instructions on the screen to
add, remove, or move option cards in your configuration
and copy any necessary CFG files to your Reference
diskette. See the next section for more information.
4.
Select Step 3 and follow the instructions on the screen to
view or edit the details of your system board and your
option cards. See “Defining the Configuration Settings”
below for more information.
5.
Select Step 4 if you want to view or print the current
configuration and any switch or jumper settings you may
need to change. Follow the instructions on the screen.
6.
When you finish configuring your system, select Step 5
to save the configuration in your computer’s CMOS RAM
and reboot the system. You can also exit the program
without saving the configuration, if necessary. Follow the
instructions on the screen.
Running the EISA Configuration Utility
Adding or Removing a Board
Select Step 2 : Add or remove boards when you need to
add or remove an option card. The program displays a list of
the computer’s slots with a description of any cards that it
detects. The computer automatically detects EISA cards, but
you must add the necessary ISA card information. Follow the
instructions on the screen to add, move, or remove an option
card.
When you add an option card, you need the configuration
diskette that came with the card. Follow the instructions on the
screen to copy the appropriate CFG files to your Reference
diskette.
Note
Your computer does not come with a CFG File Library
diskette. When adding a card, insert the CFG file diskette
that came with the card. If you are installing an ISA card that
did not come with a diskette, follow the instructions in the
card’s documentation to set the appropriate jumpers.
Defining the Configuration Settings
Select Step 3 : View or edit details from the
configuration menu to view your system configuration options.
Then follow the instructions on the screen to edit the settings of
these options. You can also perform various advanced
configuration operations by accessing the Advanced menu. See
“Using the Advanced Configuration Options,” later in the
chapter, for more information.
You cannot change the settings for certain options because they
are detected and set automatically by the program. Some
options or settings may not be available, depending on the type
of microprocessor installed in your computer.
Running the EISA Configuration Utility
3-11
If you add any EISA option cards to your system, various
configuration options for the card(s) appear on the screen
following the system board options. See your EISA option card
documentation for information about configuring your card(s).
The table below describes the settings available for each of the
system board options. The numbers in parentheses refer to
notes at the end of the table.
System board options
3-12
Option
Settings
Description
System
Processor
Module
(processor type)
Displays the type of processor
module installed in your system
System Board
Extended
Memory
(memory size)
Extended Memory
Displays the amount of
extended memory in the
system including memory
installed on SlMMs and any
memory option cards; you
cannot change this setting
System Base
Memory Option
640KB Base Memory
512KB Base Memory
User Definable
Hard Drives
Types 2 and 3 *
Types 48 and 49
l
Select 640KB to use all of this
memory as base memory;
select 512KB to reassign the
memory addresses from 512KB
to 640KB if you install an option
card that uses these
addresses
Select the pair of
user-definable drive types you
want to use; select the type
and enter the parameters at
the appropriate Hard Drive n
option(s) described below
Running the EISA Configuration Utility
System board options (continued)
Option
Settings
Description
Cache Control
Cache EnabledWrite Through Mode
Cache EnabledWrite Back Mode
Cache Disabled*
Set to Enabled-Write Through
Mode to enable caching on
the 486DX2/66 CPU card; set
to Enabled-Write Back Mode
to enable caching on the
Pentium CPU card; set to
Disabled to prevent caching
when you are using timedependent software. You can
also turn cache control off
and on using the EISA System
Utilities; see Chapter 4.
Onboard
Floppy
Controller
Enable*
Disable
Set to Enable to use the
built-in diskette drive
controller; set to Disable to
disable the built-in controller
and use a controller on an
option card
Diskette A
3.5 inch 1.44 MB drive*
3.5 inch 720 KB drive
3.5 inch 2.88 MB drive
5.25 inch 1.2 MB drive
5.25 inch 360 KB drive
Diskette A Disabled
Set to the type of diskette
drive installed as drive A in
your system; set to Diskette A
Disabled if you have removed
your diskette drive
Diskette B
3.5 inch 1.44 MB drive
3.5 inch 720 KB drive
3.5 inch 2.88 MB drive
5.25 inch 1.2 MB drive
5.25 inch 360 KB drive
Diskette B Disabled l
Set to the type of diskette
drive installed as drive B in
your system; set to Diskette B
Disabled if you did not install a
second diskette drive
Onboard IDE
Hard Disk
Controller
Enable
Disable
Set to Enable to use the
built-in IDE hard disk drive
controller to control your IDE
drive(s); set to Disable to use
an external IDE drive controller
(1)
l
Running the EISA Configuration Utility
3-13
System board options (continued)
3-14
Settings
Description
Hard Drive 1
and
Hard Drive 2
Drive Type nn
Hard Drive n Disabled*
Set to the hard disk drive type
of the specified IDE hard disk
drive or set to user-definable
drive types (2, 3, 48, or 49) and
enter parameters according
to the drive’s documentation;
see “Hard disk drive types”
below (1)
Parallel Port
Base Address 378h
Compatible*
Base Address 378h
Bi-directional
Base Address 278h
Compatible
Base Address 278h
Bidirectional
Disabled
Select one of the Compatible
options to set the port for IBM
AT compatible signals; select
one of the Bi-directional
options to set the port for IBM
PS/2 compatible bidirectional
signals; select Disabled to
prevent the port from reacting
to any signals (no resources
are allocated when Disabled)
-
Serial Port 1
Base address 03F8h*
Base address 02F8h
Base address 03E8h
Disabled
Select the address you want
to use for serial port 1; set to
Disabled to prevent the port
from reacting to any signals
(no resources are allocated
when Disabled) (2)
Serial Port 2
Base address 02F8h *
Base address 03E8h
Base address 02E8h
Disabled
Select the address you want
to use for serial port 2; set to
Disabled to prevent the port
from reacting to any signals
(no resources are allocated
when Disabled) (2)
COM1
Redirection
Disabled*
1200 Baud
2400 Baud
9600 Baud
Set to Disabled to prevent
redirection of the computer’s
input and output to the serial
port assigned to COM1: set to
the speed the computer
should use to copy the
redirected input/output to the
serial port assigned to COM1
Running the EISA Configuration Utility
System board options (continued)
Description
Option
Settings
COM2
Redirection
Disabled
1200 Baud
2400 Baud
9600 Baud
Video Type
VGA/EGA
CGA - 80 columns
CGA - 40 columns
MDA
Not Installed
If you have installed a video
display adapter on an option
card, select the type of
adapter you installed; if you
are using the built-in video
controller, select VGA/EGA
Offboard
VGA/EGA
Video Adapter
No - Enable
Onboard Video
Controller via
Jumper*
Yes - Disable
Onboard Video
Controller via Jumper
Set to Yes if you have installed
a video display adapter on an
option card that contains a
BIOS at address C0000h; select
No if you have not installed a
video option card
Onboard
Video
Controller
Primary
Secondary
Set to Primary if you are using
the built-in video controller as
your primary adapter; set to
Secondary if you are not using
your built-in controller. This
setting is ignored if jumper
E0290 is set to disable the
built-in VGA controller and
you set this option to Primary
Set to Disabled to prevent
redirection of the computer’s
input and output to the serial
port assigned to COM2: set to
the speed the computer
should use to copy the
redirected input/output to the
serial port assigned to COM2
l
l
l
Running the EISA Configuration Utility
3-15
System board options (continued)
3-16
Option
Settings
Description
Onboard
Video BIOS
Mapping
To E0000H l
To C0000H
Disabled
Select To E0000H to map the
onboard video BIOS to
memory address E0000h:
select To C0000H to map the
video BIOS to address COOOOh
for compatibility with older
application software; this
option is set to automatically
set to Disabled if you disable
the Onboard Video Controller.
as described above (3)
640 x 480
Mode Refresh
Rate (4)
60 Hz*
75 Hz
x2, x16 @ 72Hz
Select the refresh rate
frequency (in Hertz) of the
built-in video controller when it
is operating in 640 x 480
mode; see your monitor
manual to determine the
correct refresh rate
800x600
Mode Refresh
Rate
-
This option has no effect on
your system
1024 x 768
Mode Refresh
Rate
-
This option has no effect on
your system
Shadow
C0000h-C7FFFh
C8000h-CFFFFh
E0000h-E7FFFh
Enabled
(E0000h - E7FFFh* )
Disabled
(C0000h - C7FFFh* )
Set to Enabled to shadow
ROM data to the specified
memory address range in
RAM; set to Disabled to leave
data in ROM (3)
Keyboard
Control
Enabled l
Disabled
Set to Enabled to allow your
computer to operate with a
keyboard; set to Disabled to
use your computer without a
keyboard (for example. as a
network server) and allow
power-on diagnostic tests to
report a disabled keyboard
Running the EISA Configuration Utility
System board options ( Continued)
Option
Settings
Description
Onboard
Mouse Control
Enabled*
Disabled
Set to Enabled if you have
connected a mouse to the
built-in mouse port; set to
Disabled if you are not using a
mouse (frees hardware
interrupt lRQ12) or if you are
using a mouse controller
installed on an option card
Speaker
Control
Enabled*
Disabled
Set to Enabled to turn on the
computer’s built-in speaker;
set to Disabled to turn off the
speaker (cannot be turned on
by application software if
Disabled)
CPU Speed
FAST*
SLOW
Select FAST to set the
computer’s processor to
operate at its maximum
speed; select SLOW to set the
processor to operate at a
simulated 8 MHz speed to
accommodate old
application programs that
may require it
NumLock Boot
State
ON at Boot
OFF at Boot*
Select ON at Boot to enable
Num Lock mode whenever
you turn on or reset your
computer; select OFF at Boot
to disable it
I/O Recovery
Time
Standard
Enhanced*
Select Enhanced to set fast
I/O recovery times; set to
Standard if you have trouble
with an application program
or option card that is running
in Enhanced mode
Posted I/O
Writes
Enabled *
Disabled
Set to Enabled to improve
performance by posting I/O
writes to the EISA bus; set to
Disabled if any of your option
cards do not support this
feature
Running the EISA Configuration Utility
3-17
System board options (continued)
3-18
Option
Settings
Description
Concurrent
Refresh
Enabled*
Disabled
Set to Enabled to improve
performance by executing
concurrent CPU, cache, and
main memory refresh cycles;
set to Disabled if you have
trouble with application
programs while this option is
enabled
LCD
-
This option has no effect on
your system
Scan FLASH
User Area
Enabled
Disabled*
Set to Enabled to allow the
BIOS to call any code you
have installed in the 8KB block
EA000h to EBFFFh (FLASH user
area) prior to booting the
computer; set to Disabled to
scan the block normally
POST Memory
Test Prompt
Enabled *
Disabled
Set to Enabled to display the
skip memory test prompt
when you turn on or reset your
computer; select Disabled to
prevent display of the prompt.
(you can still press the
spacebar to skip the test if you
disabled the prompt.) See
Chapter 2 for more
information.
BIOS Setup
Control
Enabled - Prompt for
setup entry *
Enabled - Suppress
setup prompt
Setup Disabled
Select Enabled - Prompt for
setup entry to display the
prompt to run the SETUP
program when you turn on or
reset the computer; select
Enabled - Suppress setup
prompt to prevent display of
the prompt; select Setup
Disabled to prevent entry into
the SETUP program until this
option is changed
Running the EISA Configuration Utility
System board options (continued)
Option
Settings
Description
Boot Device
Control
Boot from floppy or
hard drive*
Boot from hard drive
ONLY
Select the device(s) from
which you want to be able to
boot your system (5)
Reserved
System
Resources
(settings vary)
Press w and m to
display the resources, such as
interrupts and port ranges,
that are reserved for use by
the system board
* Default setting
1
If you will boot your system from a SCSI hard disk drive, you must disable
the built-in IDE controller and set both hard disk drive types to Disabled.
2 You cannot set Serial Port 1 and 2 to the same address. If you attempt to
do so, you see an error message.
3
If you set the Onboard Video BIOS Mapping option to To C0000H. you
must set the Shadow C0000h - C7FFFh option to Disabled to avoid a
memory conflict. If you set the Onboard Video BIOS Mapping option to
To E0000H, you must set the Shadow E0000h - E7FFFh to avoid a conflict.
4
If you change the refresh rate, you must press the reset button or turn
the computer off and then on again after saving your settings to reset the
rate.
5 The Boot Device Control setting is ignored if the diskette drive is controlled
by a controller on an option card.
Running the EISA Configuration Utility
3-19
The options described in the table below appear on the View
or edit details screen only if you are running the EISA
Configuration utility in Advanced mode. See “Using Special
Modes” on page 3-27 for more information.
Advanced mode system board options
Option
Settings
Description
Video Font Size
9x16*
8x16
Select the font dimensions of the
video characters that appear on
the screen
Extended
Memory Range
Definitions
(settings vary)
Displays the defined ranges of
memory resident on the system
board
Additional
expansion
board address
Enabled
Disabled
If you have installed more than
15MB of memory in your system,
you may want to set this option to
Enabled to map additional
address space to the EISA bus for
use by option cards. Enabling this
space opens a 1 MB to 128KB
area between addresses
0F00000h and 0FE0000h and
reduces the available extended
memory by 1 MB. Select Disabled
to use this address area for
extended memory.
Slot 4 AEN
Control
EISA Compatible
ISA Compatible
l
l
When slot 4 is set to EISA
Compatible, it uses the EISA
geographical addressing
scheme. If you set slot 4 to ISA
Compatible, it allows all types of
I/O accesses that may be
required by option cards
addressed in the range 0-255.
* Default setting
3-20
Running the EISA Configuration Utility
Hard disk drive fypes
The following table lists the types of hard disk drives you can
use in your computer. Check this table and the manual that
came with your hard disk to find the correct type for the hard
disk drive(s) installed in your computer.
Be sure you enter the correct drive type or parameters for
your drive; if they are incorrect, the computer will not
Hard disk drive types
07
918
15
-1
17
114 MB
08
-
-
-
-
Unused
09
900
15
-1
17
112 MB
10
977
5
0
17
40 MB
11
855
5
-1
17
35 MB
12
855
7
-1
17
49 MB
13
-
-
-
-
Unused
14
733
7
-1
17
42 MB
16
615
4
-1
17
20 MB
17
-
-
-
-
Unused
Running the EISA Configuration Utility
3-21
Hard disk drive types (continued)
3-22
Running the EISA Configuration Utility
Hard disk drive types (con timed)
Using Advanced Configuration Options
To perform advanced configuration operations, press [nl at
the View or edit details screen. You see the Advanced
menu:.
Lock/unlock boards
View additional system information menu
Set verification mode menu
Maintain SCI files menu
Running the EISA Configuration Utility
3-23
The table below describes the operations you can select from
the Advanced menu and its submenus.
Advanced configuration options
Advanced
menu option
Submenu
option
Description
Lock/unlock
boards
No submenu
Displays the locked/unlocked status of
each board. Locking a board prevents
you from changing any of its
configuration settings.
View additional
system
information
menu
Board
specifications
Displays information about the
identification and physical
characteristics of your board(s).
System
specification:
Displays information about the Option
slots in your computer.
Used
resources
Displays information about the
currently used system resources such as
IRQ levels, interface ports, and memory
addresses and defines which
components are using the resources.
Available
resources
Displays information about unassigned
system resources such as IRQ levels,
interface ports, and memory addresses.
Set verification
mode menu
Maintain SCI
files menu
3-24
Sets the program to automatically
check for resource conflicts and report
them, if they occur (default setting).
Manual
Sets the program so it does not check
for resource conflicts unless you select
the Verify option that appears on the
View or edit details screen. (The Verify
option appears only if you have
selected Manual verify.)
Open
Loads a previously created SCI file and
displays the contents. Any current
configuration information you entered
is lost.
Save as
Saves the current SCI file information to
a backup file. Do not name the
backup file SYSTEM.SCI.
Running the EISA Configuration Utility
Using Alternate Configuration Files
When you save your configuration in your computer’s CMOS
RAM, the computer also creates or updates the System
Configuration Information file called SYSTEM.SCI. You can
also create an alternate SCI file with a different name for your
own computer or for another Epson EISA computer.
You may want to create an alternate configuration for your
own computer that includes a different set of option cards.
Then, whenever you need to use that configuration, you can
load the alternate SCI file and save it in your computer’s CMOS
RAM.
If you run the EISA Configuration utility on a non-target
computer (an IBM AT compatible computer or another Epson
EISA computer), you can create a file for the target computer.
Then you can transport the alternate SCI file to the target
computer, load it, and save it in that computer’s CMOS RAM.
To create an alternate SCI file, follow the guidelines in the next
section. To load an alternate SCI file when you need to use one,
see “Loading an Alternate SCI File” below.
Creating an Alternate SCI file
You can create an alternate SCI file using the following methods:
Cl Select Create backup SCI file from the Maintain
system configuration diskette menu.
Q Select the Save as option from the Maintain SCI files
menu when you are using the advanced configuration
options.
Q
Run the EISA Configuration utility in non-target modeling
mode and save the configuration you create to a backup
SCI file when you exit.
Running the EISA Configuration Utility
3-25
The program asks you to name the alternate SCI file you create.
Do not name the file SYSTEM.SCI; this is the name of your
current configuration file.
Use the third method only when you are running the
configuration program on a non-target computer. This method
protects you from accidentally saving the configuration you
create in that computer’s CMOS RAM. See “Using Special
Modes” for instructions on using non-target modeling mode.
Loading an Alternate SCI File
To load an alternate SCI file and store it in the target
computer’s CMOS RAM, follow these steps:
1.
Run the EISA Configuration utility and select Maintain
system configuration diskette from the Main
Menu.
2.
Select Load a backup SCI file.
3.
Select the alternate SCI file you want to load from the list of
SCI files displayed on the screen.
4.
Exit and save the SCI file in the computer’s CMOS RAM.
Note
You can also load-an alternate SCI file by selecting open
from the Maintain SCI files menu when you are using the
advanced configuration options. (See page 3-23.) This
method allows you to load the file while you are looking at
the View or edit details screen for another configuration.
However, the Open option erases the currently loaded
configuration before loading the new file.
Now the computer is configured according to the information
in the alternate SCI file.
3-26
Running the EISA Configuration Utility
Using Special Modes
You can run the EISA Configuration utility in various special
modes, including non-target modeling mode, by starting the
program with one of the two commands described in this
section. You can also use these commands to run the utility
from a hard disk that runs MS-DOS if you copy the necessary
files to the disk first.
The SD command starts the EISA Configuration utility and also
allows you to run any of the other utilities available on the
Access to other utilities menu. The CF command also starts the
EISA Configuration utility, but you cannot run any other
utilities.
You can run the utilities in different modes by including one or
more parameters on the SD or CF command line, as described
in the next sections.
Using the SD Command
If you want to run the utilities from your hard disk, first follow
the instructions under “Copying the Configuration Files to a
Hard Disk” below. Then follow these steps to use the SD
command:
1.
To run the utilities from a diskette, insert the Reference
diskette in drive A and log onto drive A.
To run the utilities from a hard disk, log onto the drive and
directory where you copied the configuration files.
2.
Type the following and press m to start the program:
SD [parameters1
Running the EISA Configuration Utility
3-27
The table below describes the parameters you can use to
modify the way the program runs on your computer.
Note
To run the EISA Configuration utility in non-target
modeling mode, add the /N parameter to the command line.
Modeling mode only affects the way the configuration utility
operates; it does not affect any of the other utilities you can
run using the SD command.
SD command parameters
3-28
Parameter
Mode
Function
/A
Advanced
mode
Enables four advanced options for
the system on the View or edit
details screen; see page 3-23 for
more information. You can also
enter this mode by pressing Ictr(J
In) at the Welcome screen when
you start the EISA Configuration
utility.
/B
BIOS video
output mode
Causes the program to be
displayed using BIOS int 10h calls for
systems using non-standard displays
or that are redirecting the console
output to a serial port. In default
mode, the program writes directly
to the video memory.
/F
Fast
configuration
operation
Causes the program to determine
the boards and options installed
and configure your system
automatically using the information
in the CMOS RAM; if it is invalid, the
program uses the information in the
SYSTEM.SCI file.
/H
High resolution
display mode
Displays 43 lines per screen on an
EGA monitor and 50 lines per
screen on a VGA monitor. In
default mode, the screen displays
25 lines.
Running the EISA Configuration Utility
SD command parameters (continued)
Parameter
Mode
Function
/K
Keyboard only
mode
Sets the program so a mouse
cannot be used, even if you have
installed one. In default mode, you
can use a mouse as long as a
mouse driver is loaded.
/M
Monochrome
display mode
Causes the program to be
displayed in black and white only.
In default mode, color monitors will
display in color. Run the program in
this mode if you have redirected
the console output to a serial port.
/N
Non-target
modeling mode
Allows you to run the EISA
Configuration utility in non-target
modeling mode; see page 3-25 for
more information.
/P
Permanent
command
interpreter mode
Causes the configuration program
to reboot the system instead of
exiting to your operating system.
Use this mode if there is no
COMMAND.COM file installed on
your hard disk drive.
Using the CF Command
If you want to run the EISA Configuration utility from your
hard disk, first follow the instructions under “Copying the
Configuration Files to a Hard Disk” on page 3-31.
Then follow these steps to use the CF command:
1. To run the utility from a diskette, insert the Reference
diskette in drive A and log onto drive A. To run the utility
from a hard disk, log onto the drive and directory where
you copied the configuration files.
Running the EISA Configuration Utility
3-29
2.
Then type the following and press ( to start the
program:
CF [parameters]
The table below describes the parameters you can use to
modify the way the utility runs on your computer.
CF command parameters
3-30
Parameter
Mode
Function
IA
Advanced
mode
Enables four advanced options for
the system on the View or edit
details screen; see page 3-23 for
more information.
/B
BIOS video
output mode
Causes the program to be
displayed using BIOS int 10h calls for
systems using non-standard displays
or that are redirecting the console
output to a serial port. In default
mode, the program writes directly
to the video memory.
/D
Dispatcher
spawning mode
Causes the program to be
spawned by the dispatcher.
/F
Fast
configuration
operation
Causes the program to determine
the boards and options installed
and configure your system
automatically using the information
in the CMOS RAM; if it is invalid, the
program uses the information in the
SYSTEM.SCI file.
/H
High resolution
display mode
Displays 43 lines per screen on an
EGA monitor and 50 lines per
screen on a VGA monitor. In
default mode, the screen displays
25 lines.
/K
Keyboard only
mode
Sets the program so a mouse
cannot be used, even if you have
installed one. In default mode, you
can use a mouse as long as a
mouse driver is loaded.
Running the EISA Configuration Utility
CF command parameters (continued)
Parameter
Mode
Function
/M
Monochrome
display mode
Causes the program to be
displayed in black and white only.
In default mode, color monitors will
display in color. Run the program in
this mode if you have redirected
the console output to a serial port.
/N
Non-target
modeling mode
Allows you to run the EISA
Configuration utility in non-target
modeling mode; see page 3-25 for
more information.
Causes the program to exit without
rebooting the computer.
Copying the Configuration Files to a Hard Disk
To run the EISA Configuration utility from your hard disk, you
must be running MS-DOS from that disk.
To copy all the configuration files from the Reference diskette
to the hard disk, insert the diskette in drive A, type the
following command, and press [Enter:
COPY A:*.* [d:] [path]
where d: and path are the drive and directory to which you
want to copy the files.
Running the EISA Configuration Utility
3-31
Chapter 4
Using Your Computer
This chapter describes the following operations:
Q Locking the computer’s cover
c3
Locking the front panel door
D
Disabling the keyboard and mouse
Cl
Using the password features
Ll Locking the keyboard
0
Changing the processor speed
Q Controlling the speaker
a Controlling the cache
tl Using the security features
Q Using special configurations
Ci
Operating the computer from a remote location.
locking the Computer’s Cover
You can lock the cover onto the computer to prevent
unauthorized users from accessing its internal components. To
do this, you need a padlock that fits through the hole in the lock
block on the computer’s back panel. When the padlock is in
place, the cover on the computer cannot be removed.
Using Your Computer
4-1
You can also secure the computer to your work area by
inserting a cable lock through the lock block and then through a
secure anchor.
To lock the cover, insert a padlock or cable lock through the
hole in the lock block.
cover lock
To unlock the cover, remove the padlock or cable lock.
Locking the Front Panel Door
You can lock the door that covers your computer’s front panel
to prevent unauthorized users from accessing the following
components:
4-2
Cl
Diskette, tape, CD-ROM, or other external drives
Cl
Power and reset buttons
0
Keyboard/mouse lock button.
Using Your Computer
Your computer comes with two keys that you can use to lock
the front panel door. The keys are taped to the inside of the
door. Open the front panel door and remove the keys from the
bag.
To unlock the front panel door, align the key with the notch in
the lock and insert the key, as shown below. Then press in the
key and turn it clockwise.
To lock the cover, align the notches and insert the key; then
push it in and turn it counterclockwise.
Be sure to store these keys in a secure location.
Using Your Computer
4-3
Disabling the Keyboard and Mouse
You can disable the operation of your computer’s keyboard and
mouse to prevent unauthorized users from executing any
keyboard or mouse commands. To do this, press the
Keyboard/Mouse Lock button on the front panel, as shown
below. The computer disables the keyboard and mouse, and
illuminates the Keyboard/Mouse Lock indicator light.
keyboard/
mouse
lock
button
keyboard/
mouse
lock
indicator
To prevent access to the Keyboard/Mouse Lock button, follow
the instructions on page 4-2 to lock the computer’s front panel
door.
To reactivate the keyboard and mouse, unlock the front panel
door (if necessary), and press the Keyboard/Mouse Lock
button again. The Keyboard/Mouse Lock indicator light goes
out.
You can temporarily disable the keyboard and mouse using
software commands. See Chapters 2 and 3 for more
4-4
Using Your Computer
Using the Password Features
You can set three types of passwords to provide security for
your computer:
Ll Power-on password
Ci Network password
Q Keyboard password.
The power-on password prevents unauthorized users from
using your system by requiring you to enter the correct
password every time you turn on or reset the computer.
The network password modifies the way your power-on
password works by allowing your computer to load your
operating system and network software before requiring you to
enter the correct password. This enables your system to connect
to the network, while preventing unauthorized users from
typing anything at the keyboard.
The keyboard password allows you to temporarily lock the
keyboard without having to reset the computer. This secures
your system when you will be away from it for a while. If you
set a power-on password, it automatically becomes your
keyboard password as well. However, you can set a different
keyboard password or set a keyboard password without setting
a power-on password.
Follow the instructions in the sections below to set, enter,
change, or delete the different types of passwords.
Using Your Computer
4-5
Setting Passwords
There are two ways to set a power-on password:
tl
Using the SETUP program
Cl Using the EISA System Utilities.
To set a power-on password in SETUP, follow the instructions
in Chapter 2 for starting and running the program. Select the
Password option on the second page of SETUP options and
follow the instructions on the screen to set a password.
You must run the EISA System Utilities to set a network and
keyboard password, but you can also use it to set a power-on
password.
Follow these steps to set your password(s):
1.
To start the EISA Configuration utility, insert the Reference
diskette in drive A.
2.
Log onto drive A and type SD. Press [Enter at the next two
screens to bring up the Main Menu.
3. Select Access System
4.
Utilities.
Then select Password Utility. You see the following:
Password Utility Menu
Set Initial Power-on Password
Activate/Deactivate Network Password
Set Keyboard Password
Lock Keyboard
Return to Utilities Menu
Now follow the steps in the appropriate section(s) below.
4-6
Using Your Computer
setting a power-On password
To set a power-on password, follow these steps:
1. Select Set Initial Power-on Password at the
Password Utility Menu.
2.
You see a prompt to enter a password of up to seven
characters. Follow the instructions on the screen to enter the
password twice and return to the Password Utility Menu.
3.
Your power-on password is also now your keyboard
password. If you want to set a different keyboard
password, see “Setting a keyboard password” below.
If you will be using your computer in a network, follow the
steps in the next section to activate a network password.
Activating a network password
To activate a network password, follow these steps:
1. First set a power-on password as described above.
2. Select Activate/Deactivate Network Password from
the Password Utility Menu,
3. At the Network Password menu, select Activate
Network Password.
4.
You see a message confirming the activation. Press IEnter
You see the Password Utility Menu.
To deactivate a network password, follow the steps above, but
select De-activate Network Password instead. If you
want to set a different keyboard password, see the next section.
Using Your Computer
4-7
Setting a keyboard password
Once you set a power-on password, it automatically becomes
your keyboard password as well. If you want to use a different
password for the keyboard, you can set one with the Set
Keyboard Password option. This password takes effect only
temporarily, however; when you turn off your computer, the
power-on password again becomes your keyboard password.
You can also set a keyboard password without setting a
power-on password, but when you turn off your computer or
press the reset button, it erases the keyboard password.
Follow these steps to set a keyboard password:
1.
Select Set Keyboard Password at the Password Utility
Menu.
2.
You see a prompt to enter a new password that will be your
keyboard password. Type a new password and press
[Enter.
3.
At the next prompt, enter the password again. You see the
Password Utility Menu.
Whenever you want to lock your keyboard temporarily, follow
the steps on page 4-4.
Entering Passwords
If you set a power-on password, you must enter it each time
you turn on the computer, press the reset button, or press
[ctrl) [Al) 1E). This is also true if you activate a network
password.
If you set a keyboard password, you can lock your keyboard,
and then you must enter your keyboard password to unlock it.
See page 4-4 for instructions on locking your keyboard and
entering your keyboard password.
4-8
Using Your Computer
Follow these steps to enter a power-on password:
1. When you turn on your computer, press the reset button, or
press Ictrl) IX) (Delete], you see the following prompt:
Enter password:
2. Type your password and press [. The screen does not
display what you type.
After you enter the correct password, you see Password
and the computer loads your operating system.
OK
If you do not enter the correct password, you see Password
is incorrect and another prompt to enter the password.
You have two more chances to enter the correct password; try
again.
If you do not enter the correct password at the third prompt,
you see the following message:
System halted! Must power down.
The computer locks the keyboard. Press the reset button or turn
the computer off and on; then try to enter the correct password
again.
Changing or Deleting Passwords
You can change or delete the power-on password whenever
you see the Enter password: prompt, as described in this
section.
However, you cannot change or delete the power-on password
if a network password is activated. See page 4-7 for instructions
on deactivating the network password and then return to this
section to change or delete the power-on password.
Using Your Computer
4-9
There are several methods you can use to change or delete a
keyboard password. See the appropriate section(s) below to
change or delete your password(s).
Changing or deleting a power-on password
To change or delete a power-on password, follow these steps:
1.
Enter
2.
password:
To change the password, type the current password followed
by a forward slash (/). After the slash, enter the new
password, another slash, and the new password again. For
example:
123/ABC/ABC
To delete a password, type the current password followed
only by a forward slash (/). For example:
123/
(The screen does not display what you type.)
3.
4-10
Press m. You see a message confirming the change or
deletion.
Using Your Computer
Changing or deleting a keyboard password
If your keyboard password is the same as your power-on
password, follow the steps in the section above to change or
delete it. Then reboot your system.
If your keyboard password is different from your power-on
password, you can make both passwords the same by turning
off or resetting your computer. The keyboard password
becomes the same as your power-on password.
To temporarily change your keyboard password to something
other than your power-on password, follow these steps:
1. To start the EISA Configuration utility, insert the Reference
diskette in drive A.
2.
Log onto drive A and type SD. Press [Enter] at the next two
screens to bring up the Main Menu.
3.
Select Access System Utilities.
4.
Select Password Utility.
5.
Thenselect Set Keyboard Password. You see a message
telling you that a keyboard password already exists. Press
IEnter
6.
The computer locks the keyboard and you see a prompt to
enter your password. Type your power-on password and
press Enter
d.
7.
You see a prompt to enter your new keyboard password.
Type a new password and press [Entsr].
8.
At the next prompt, enter the password again. You see the
Password Utility Menu. Follow the instructions on the
screen to exit the EISA Configuration utility.
Using Your Computer
4-11
Locking the Keyboard
You can temporarily lock the keyboard to secure your system
when you are going to leave it unattended. Then, when you
return, you can enter a special keyboard password to unlock it.
To lock your keyboard, you must first set a keyboard
password, as described on page 4-8. Then follow these steps
whenever you want to lock your keyboard:
1.
To start the EISA Configuration utility, insert the Reference
diskette in drive A.
2.
Log onto drive A and type SD. Press m at the next two
screens to bring up the Main Menu.
3. Select Access System Utilities.
4.
Then select Password Utility. You see the following:
Password Utility Menu
Set Initial Power-on Password
Activate/Deactivate Network Password
Set Keyboard Password
Lock Keyboard
Return to Utilities Menu
5. Select Lock Keyboard.
6.
The computer locks the keyboard and you see the following
prompt:
KEYBOARD LOCKED
The keyboard has been locked. Please
enter the keyboard password to unlock it:
4-12
Using Your Computer
When you are ready to use your computer again, type your
keyboard password and press IEnter You see the Password
Utility Menu.
If you enter an incorrect password, the prompt remains on
the screen. Try entering it again; you can try as many times
as you want.
7.
Follow the instructions on the screen to exit the EISA
Configuration utility.
Changing the Processor Speed
Your computer’s processor can operate at two speeds: high and
low. High speed is the maximum speed of your microprocessor
and low speed simulates an 8 MHz processor speed to provide
compatibility with certain older application programs. (See
your program manual to see if you need to set your processor
speed to low.)
You set the default processor (or CPU) speed when you ran
either the SETUP program or the EISA Configuration utility
(described in Chapters 2 and 3). If necessary, you can
temporarily change the processor speed using keyboard
commands or the EISA System Utilities.
If you often use programs that require the processor to operate
at low speed (8 MHz), use the SETUP program or EISA
Configuration utility to set the default CPU speed to low. See
Chapters 2 and 3 for instructions. If you use these programs
only occasionally, use the keyboard commands or the EISA
System Utilities program, described below, to change the
processor speed temporarily.
Using Your Computer
4-13
Entering Keyboard Commands
To change the processor speed, enter one of the keyboard
commands shown in the table below.
Keyboard speed setting commands
Key command
Function
mm1
Changes the speed to low (simulated 8 MHz)
Ictrl]m2
Changes the speed to high
You must use the 1 or 2 key located on the numeric keypad.
When you set the speed to low, you hear a low tone from the
computer’s speaker; when you set it to high, you hear a high
tone. The speed setting remains in effect until you press the
reset button or turn off the computer, or until you change the
setting.
Note
You can use these commands while you are running a
program. However, if that program uses the key command
for another function, you cannot use it to change the
processor speed. If this is the case, exit to your operating
system command prompt and try the command or use the
EISA System Utilities to change the speed, as described
below.
4-14
Using Your Computer
Using the EISA System Utilities
You can temporarily change the processor speed using the
EISA System Utilities. This method is convenient if your
application program does not recognize the [F] [An] key
commands to change the processor speed. Follow these steps:
1. Insert the Reference diskette in drive A.
2.
Log onto drive A and type SD. Press w at the next two
screens to bring up the Main Menu.
3.
Select Access System utilities from the Main Menu.
You see the following:
System Utilities Menu
Password Utility
System Speed FAST
System Speed SLOW
Speaker ON
Speaker OFF
Cache ON
Cache OFF
EXIT Utilities
4. Select System Speed FAST or System Speed SLOW.
You see a message confirming the speed change.
5.
Press m to return to the System Utilities Menu. Then
follow the instructions on the screen to exit the EISA
Configuration utility.
The processor speed you set remains in effect until you press
the reset button, turn off the computer, or change it to a
different setting.
Using Your Computer
4-15
Controlling the Speaker
You can enable or disable the computer’s speaker using the
following three programs:
CI SETUP
CI
EISA Configuration utility
Cl
EISA System Utilities.
Both the SETUP program and the EISA Configuration utility
allow you to define the default setting for the speaker. Follow
the instructions in Chapters 2 and 3.
If you want to change the default setting temporarily, use the
EISA System Utilities, as described below. Then, whenever you
turn off or reset the computer, the setting returns to the default
setting you selected in the SETUP program or the EISA
Configuration utility.
1.
Insert the Reference diskette in drive A.
2.
Log onto drive A and type SD. Press [Enter] at the next two
screens to bring up the Main Menu.
3.
Select Access System Utilities from the Main Menu.
You see the following:
System Utilities Menu
Password Utility
System Speed FAST
System Speed SLOW
Speaker ON
Speaker OFF
Cache ON
Cache
OFF
EXIT Utilities
4-16
Using Your Computer
4.
Select Speaker ON or Speaker OFF. You see a message
confirming the new setting.
5.
Press [EnterJ to return to the System Utilities Menu. Then
follow the instructions on the screen to exit the EISA
Configuration utility.
The setting you define will remain in effect until you turn off or
reset the computer, or until you change it to a different setting.
Controlling the Cache
You can enable or disable the internal and external cache
memory in your computer using the following three programs:
m SETUP program
Ct
EISA Configuration utility
Q
EISA System Utilities.
Both the SETUP program and the EISA Configuration utility
allow you to define the default setting for your computer’s
cache. See Chapters 2 and 3 for instructions.
Using Your Computer
4-17
If you want to change the default setting temporarily, use the
EISA System Utilities, as described below. Then, whenever you
turn off or reset the computer, the setting returns to the default
setting you selected in the SETUP program or the EISA
Configuration utility.
1.
To start the EISA Configuration utility, insert the Reference
diskette in drive A.
2.
Log onto drive A and type SD. Press m at the next two
screens to bring up the Main Menu.
3.
Select Access System Utilities from the Main Menu.
You see the following:
System Utilities Menu
Password Utility
System Speed FAST
System Speed SLOW
Speaker ON
Speaker OFF
Cache ON
Cache OFF
EXIT Utilities
4.
Select Cache ON or Cache OFF. You see a message
confirming the new setting.
5.
Press w to return to the System Utilities Menu. Then
follow the instructions on the screen to exit the EISA
Configuration utility.
The setting you define will remain in effect until you turn off or
reset the computer, or until you change it to a different setting.
4-18
Using Your Computer
Using the Security Features
Your computer comes with several security features that allow
you to prevent access to the computer hardware and software.
You may want to use one or more of the following features to
ensure that your system operates securely:
D
Set passwords. You can create unique power-on, network,
or keyboard passwords to prevent unauthorized users from
accessing your computer when it is operating. See page 4-5
for complete instructions.
Li
Lock the keyboard and mouse. You can disable your
keyboard and mouse controller by pressing the
Keyboard/Mouse Lock button on the computer’s front
panel. This prevents any unauthorized input. See page 4-4
for more information.
0
Suppress the SETUP prompt. You can set an option in the
SETUP program or EISA Configuration utility to prevent
the computer from displaying the prompt to run the SETUP
program. Although you can still enter the command to start
the program, the prompt cannot be seen. See Chapters 2
and 3 for instructions.
0
Set jumpers. You can customize the jumper settings on
your computer’s main system board to prevent alteration of
SETUP or EISA configuration information and disable
writes to the diskette drive(s). See Chapter 6 for more
information.
Cl
Lock up the computer’s components. You can install a
padlock or cable lock to prevent removal of the computer’s
cover or to lock it to your work area. You can also lock the
front panel door to prevent access to the front panel buttons
and your externally-accessible drives. See pages 4-1 and 4-2
for instructions.
Using Your Computer
4-19
You might want to use several of these features together,
depending on the level of security you need for your computer.
For example, if you rarely plan to leave the computer
unattended, you may use only the Keyboard/Mouse Lock
button. However, if you plan to operate the computer in a
remote location, you may want to set the main system board
jumpers and lock the cover and front panel door. Try the
combination of features that is best for you.
Using Special Configurations
If you are going to use your computer without a major
component--such as a keyboard, monitor, or diskette driveyou must take several steps to ensure that your system operates
correctly. Be sure to do the following, depending on which
component you will not use:
Ci
Install your monitor, keyboard, and, if necessary, diskette
drive as you set up your computer so you can run the
SETUP program or EISA Configuration utility. You can
remove any of this equipment once you have configured
your system. See Chapter 1 for instructions.
U
If you’ll be removing the keyboard, be sure to disable the
Keyboard (SETUP program) or Keyboard Control (EISA
Configuration utility) option to prevent your computer’s
power-on diagnostic tests from reporting a fatal keyboard
error. When these options are disabled, the system reports a
non-fatal keyboard error and you can still boot the
computer. See Chapters 2 and 3 for more information.
Ci To prevent an unauthorized user from installing a
keyboard or mouse and using them, press the
Keyboard/Mouse Lock button to disable the keyboard and
mouse controller. Then lock the front panel door to prevent
access to the button. See pages 4-4 and 4-2 for instructions.
4-20
Using Your Computer
0
If you plan to remove your diskette drive and you have
installed EISA option cards, you must run the EISA
Configuration utility before you remove the drive because
the utility is contained on the Reference diskette. If you
want to leave a diskette drive installed, you can secure it by
setting a jumper to prevent diskette writes, disabling the
controller using the SETUP program, and locking the front
panel door that covers the drive. See Chapters 2, 3, 4, and 6
for more information.
Operating Your Computer from a Remote Location
If you want to operate your computer from a remote location,
you must redirect your computer’s input and output functions
to one of the serial ports. To do this, set one of the console
redirection options for COM1 or COM2 in either the SETUP
program or the EISA Configuration utility. See Chapters 2 and
3 for instructions.
If you need to run the EISA Configuration utility after you have
redirected the console, you must include the /B and /M
parameters to the SHELL= command line in the CONFIG.SYS
file on your Reference diskette so you can run the program. The
/B (BIOS video output) parameter causes the computer to use
BIOS video support routines at interrupt 10H for all video
output. The /M (Monochrome display) parameter causes the
computer to use monochrome video attributes even when the
display is directed to a color monitor.
Using Your Computer
4-21
Chapter 5
Accessing Internal Components
To access your computer’s internal components, you need to
remove two system covers. If you are going to install an
externally accessible device in the external drive bays, you also
need to remove the computer’s front panel. This chapter
describes how to remove and replace these items. Be sure to
read the following important safety precautions before you
begin.
Special Precautions
0 While this manual provides detailed instructions for
installing a variety of optional equipment, do not attempt a
procedure if you have any reservations about performing it;
ask your dealer for assistance.
0
Always turn off the computer and then wait at least
30 seconds before you disconnect all cables to the computer
and any peripheral devices, and remove the cover. First
disconnect the power cord from the electrical outlet and
then from the AC inlet on the computer’s back panel. Then
disconnect all peripheral devices from the computer,
including the monitor and keyboard.
Caution
If you do not disconnect the power cable before
removing the system cover you can damage your
equipment.
Cl
The computer is heavy, so use caution when you move it.
Accessing Internal Components
5-1
Cl
If you are not properly grounded, you could conduct static
electricity and damage your equipment. Be sure to ground
yourself by touching the inside of the computer’s back
panel before you touch any of the internal components.
Refrain from shifting your feet once you have grounded
yourself-it is easy to pick up static electricity from
carpeting.
LI
Do not touch any components except those that this manual
instructs you to touch.
0
When disconnecting cables from sockets on the computer’s
main system board or any devices (such as disk drives),
avoid pulling on the cable; grasp the plastic connector to
remove it from the socket.
Ct
When plugging a connector or component into a socket, be
sure to position it correctly. Carefully align any holes in the
connector with the corresponding pins in the socket before
you push in the connector. Otherwise, you can severely
damage the equipment.
tl
If you install optional equipment in the computer, keep the
option’s original packing materials in case you need to
remove or transport the option later.
CI
Always replace the computer’s covers before you turn on
the power or the computer may overheat.
Removing the System Covers
To access your computer’s internal components, you need to
remove the external side cover and you may also need to
remove the internal main system board cover.
Follow the instructions in the sections below to remove the
covers as necessary.
5-2
Accessing Internal Components
Removing the External Side Cover
Follow these steps to remove the external side cover:
1.
If you installed a padlock or a cable lock to lock the side
cover onto your computer, remove the lock now.
2.
The left side of the computer is a cover secured by two
screws at the rear of the system, as shown below. Remove
these screws and set them aside.
3.
Grasp the handle in the back of the cover, shown above, and
gently slide the cover toward the back of the system about
one inch, until the tabs inside the cover clear the slots in the
computer case.
4.
Lift the cover away from the computer and set it aside.
Accessing Internal Components
5-3
Removing the Internal Main System Board Cover
Once you remove the system’s external side cover, you see a
metal cover protecting the main system board. You need to
remove this cover to access the main system board and to
perform such tasks as:
Cl
Installing or removing option cards
LI
Changing jumper settings
Cl
Installing or removing memory modules
Cl
Installing or removing drive cables connected to option
cards or the main system board.
Follow these steps to remove the main system board cover:
1.
5-4
Remove the six retaining screws from the cover, as shown
below. Then set them aside.
Accessing Internal Components
2.
Place your thumb in the hole and slide the cover toward the
front of the computer until it disengages from the locking
tabs.
3.
Tilt the top of the cover toward you and lift it up and out of
the computer. Then set it aside, being careful not to bend
any of the tabs that extend from the cover.
Replacing the System Covers
Before replacing the internal main system board cover, make
sure you left no tools or loose parts inside the computer case.
Also make sure that all spare or loose power and device cables
are securely tucked into the space beneath the upper hard disk
drive bays or above the lower SCSI drive bays.
Replacing the internal Main System Board Cover
Follow these steps to replace the main system board cover:
1. Place the bent tabs on the bottom edge of the cover over the
rail on the bottom of the computer; then tilt the top edge of
the cover up, so it is vertical.
Accessing Internal Components
5-5
2. Slide the cover toward the back of the system so that the tabs
at the top and back edge of the cover engage in the notches
in the computer case, as shown below.
3. Attach the cover to the computer with the six screws you
removed earlier.
5-6
Accessing Internal Components
Replacing the External Side Cover
Follow these steps to replace the external side cover:
1. Position the cover over the computer case so that the edge
with the handle protrudes about an inch beyond the back of
the computer. Align the tabs at the top and bottom of the
cover with the notches in the computer case, as shown
below.
tabs
bottom notch and tab
2.
Slide the cover toward the front of the system so that the
tabs engage in the notches.
3. Replace the two side cover retaining screws you removed
earlier.
4. If necessary, replace the padlock or cable lock on the system.
Accessing Internal Components
5-7
Removing the Front Panel
The upper front panel consists of an inner panel and a door. If
you need to install or remove any devices in the external drive
bays, you must remove the front panel. Follow these steps:
1. If you locked the front panel door, follow the steps in
Chapter 4 to unlock it.
2.
Open the front panel door all the way.
3.
Gently strike the top edge of the door with the palm of your
hand to disengage the front panel from the computer.
Gently strike here
4.
5-8
Remove the front panel and set it aside.
Accessing Internal Components
Replacing the Front Panel
Follow these steps to replace the computer’s front panel:
1. Position the front panel so that the four small square tabs on
the left side of the inner panel align with the square holes in
the left side of the computer case.
2.
Gently press in on the hinge side of the front panel until it
clicks into place.
Accessing Internal Components
5-9
Chapter 6
Installing and Removing Options
This chapter explains how to install and remove the following
components:
CI CPU card
D Option cards
Q Memory modules.
You’ll also find instructions for changing the main system
board jumper settings and for using the VGA feature connector.
Before you perform any of the steps in this chapter, follow the
instructions in Chapter 5 to remove the computer’s side cover
and the main system board cover.
On the next page, you’ll find an illustration of your main
system board which shows the location of any components you
may need to find.
Installing and Removing Options
6-1
Main System Board Map
As you follow the instructions in this chapter and in Chapter 7,
use the illustration below to locate the necessary components
on your main system board.
6-2
Installing and Removing Options
Removing the CPU Card
The CPU card contains your system’s microprocessor and
cache memory. The card plugs into a proprietary slot on your
main system board. You may wish to upgrade your card by
replacing it with a new card containing a Pentium (or other
future) microprocessor or by replacing the CPU chip with an
Intel P24T OverDrive processor. You may also need to remove
the CPU card to access other components on the main system
board.
Before you can remove the CPU card, you must first remove
the retaining bracket that holds it in place. Follow these steps:
1.
Squeeze together the tabs on the slotted end of the retaining
bracket that protrudes from the hole in the back of the
computer. Slide the bracket toward the front of the
computer until the slotted end clears the hole, as shown
below.
holes
narrow
tip
slotted
end
Installing and Removing Options
6-3
2. Continue sliding the bracket forward a couple of inches
until it stops; then pull the slotted end toward you and to
the left until the narrow tip of the bracket comes out of its
hole. Set it aside.
3. Carefully pull the CPU card straight out of its connectors
on the main system board. Do not rock the card from
side-to-side or you will damage the connectors. Be sure not
to touch any of the card’s components or the gold
connectors; handle it only by the edges.
If you are going to replace the CPU chip, see the instructions
that came with the upgrade kit.
When you are ready to replace the CPU card, follow the steps
in the next section.
Installing the CPU Card
When you handle the card, hold it only by its edges; do not
touch any of its components or the gold connectors. Follow
these steps to replace the CPU card in your computer:
1. Align the CPU card with connectors J0730 and J0770 on the
main system board (shown on page 6-2). Then push the
card gently, but firmly, into the connectors.
6-4
Installing and Removing Options
2.
To replace the CPU card retaining bracket, position it so
its narrow tip faces the front of the computer and the
slotted end points to the rear. Also make sure the side with
three protruding tabs faces out, as shown below.
holes
narrow
tip
protruding tabs
3.
Insert the narrow end of the bracket into its hole (as shown
above) until it stops.
4.
Guide the bracket over the edge of the CPU card and slide
the slotted end toward the hole in the back of the computer.
5.
Push the slotted end of the bracket into the hole in the back
of the computer.
Installing and Removing Options
6-5
Installing an Option Card
This section explains how to install an option card in one of
your computer’s eight EISA bus master expansion slots.
It usually does not matter which slot an option card occupies as
long as the card fits in the slot. For example, if you have an 8-bit
card with an additional tab along the bottom, it will not fit in
any of the option slots in your computer.
Before you install an option card, see if you need to change any
jumper settings on the main system board. See page 6-14 for
more information.
If you are installing a high-resolution graphics adapter card
that connects to a VGA feature connector, follow the
instructions below to install the adapter card; then see “Using
the VGA Feature Connector” on page 6-9 to connect the card to
the VGA feature connector in your computer.
Caution
Before you install any option cards, make sure the cards do
not exceed the computer’s power supply limits described in
Appendix B.
Follow these steps to install an option card:
6-6
1.
If this is the first time you are installing a card in the option
slot, you need to remove the metal cover for that slot.
Remove the retaining screw securing the option slot cover
to the inside back panel. Keep the screw to secure the
option card to the computer.
2.
Slide out the slot cover and set it aside. (Store it in a safe
place in case you remove the option card later.)
Installing and Removing Options
3. Unpack the option card and adjust any switches or jumpers
on it, if necessary. (Check the option card instructions.)
When you handle the card, be careful not to touch any of its
components or the gold connectors. If you need to set it
down before you install it, place it gently on top of its
original packing material with the component side facing
up. Keep the packing materials in case you remove the card
later.
Note
You may want to record the card’s serial number in the
“Equipment Log” at the end of Chapter 1.
4.
Hold the card along the top corners and guide it into the
slot, as shown below. (If you are installing a full-length
card, insert the front edge of the card into the
corresponding guide inside the main system board bay.)
top corners
connector
Installing and Removing Options
6-7
Once the connectors reach the slot, push the card in firmly
(but carefully) to insert it completely. You should feel the
card fit into place. If it does not go in smoothly, do not force
it; pull the card all the way out and try again.
5. Secure the end of the card to the computer with the retaining
screw.
Note
If you installed a high-resolution graphics adapter card that
connects to a VGA feature connector, see “Using the VGA
Feature Connector” on page 6-9 for further instructions.
Removing an Option Card
You may need to remove an option card installed in your
computer to access components on the main system board-to
change a jumper setting, for example. You also may want to
remove a card if you no longer need it or want to replace it.
Follow these steps:
1. Remove the retaining screw that secures the option card to
the computer. Then pull the card straight out of its slot.
6-8
2.
Set the card aside with the component side facing up.
3.
Check the main system board jumper settings on page 6-14
to see if you need to change any settings now that you have
removed an option card.
4.
If you will not be reinstalling the card, insert a metal slot
cover in the open slot and secure it with the retaining screw
you removed from the card.
Installing and Removing Options
Using the VGA Feature Connector
The VESA compliant VGA feature connector on your
computer’s main system board allows you to connect an
optional, high-resolution graphics adapter card interface cable.
If you want to attach a graphics adapter card cable to the VGA
feature connector, follow these steps:
1.
Install the graphics adapter card in your system. See
“Installing an Option Card” on page 6-6 for instructions.
2.
Attach the cable that came with your graphics card to the
interface on the card itself. Check your graphics card
manual for more information.
3.
Attach the other end of the graphics card cable to the VGA
feature connector (J0410) on the main system board, shown
on page 6-2.
You do not need to change any jumpers to disable the
Installing and Removing Options
6-9
Memory Modules
Your computer comes with 8MB of memory installed on two,
4MB memory modules on the main system board. By installing
additional memory modules, called SIMMs (single inline
memory modules), you can increase the amount of memory in
your computer to 128MB.
There are four SIMM sockets organized in two banks on the
main system board. You can install SIMMs with a capacity of
1MB, 2MB, 4MB, 8MB, 16MB, or 32MB. Check the following
guidelines to ensure that you choose the correct type of SIMMs
and install them properly:
Ll
Use only 36-bit, tin-plated, fast-page mode, single- or
double-sided SIMMs that operate at an access speed of
70 or 80 nanoseconds (ns). You can install 1MB, 2MB, 4MB,
or 8MB 80ns SIMMs and 16MB or 32MB 70ns SIMMs.
Caution
Be sure you install only tin-plated SIMMs in your
system. Gold-plated SIMMs will corrode when installed
in your tin-plated SIMM sockets and damage both the
socket and the SIMM.
Ll
Fill each bank with two SIMMs of the same size.
Ll Install SIMMs in Bank 0 first (sockets J0550 and J0551). Then
use Bank 1 (sockets J0650 and J0651).
6-10
Installing and Removing Options
The table below lists some sample memory configurations.
Sample SIMM configurations
I
32 MB
I
I
32MB
32MB
I
32MB
128MB
Once you have determined where to add SIMMs, follow the
instructions below to install them.
Installing Memory Modules
Refer to the illustration on page 6-2 to locate the SIMM sockets
on the main system board.
Follow these steps to install a SIMM:
1.
Hold the SIMM so the notched edge faces the computer’s
back panel and place it in the socket at an upward angle of
about 45 degrees relative to the main system board.
Installing and Removing Options
6-11
2.
Push the SIMM into the socket until it is seated firmly. Then
tilt it down until it is 90 degrees relative to the main system
board and clicks into place, as shown below.
If the SIMM does not go in smoothly, do not force it; gently
pull the retaining clips outward, remove the SIMM by its
top edge, and start again.
6-12
3.
Repeat steps 1 and 2 to install any remaining SIMMs,
making sure you fill the sockets in the following order:
J0550, J0551, J0650, and J0651.
4.
If you installed any 16MB or 32MB SIMMs, you must
change the settings of jumpers E0391 and/or E0392 on the
main system board. See page 6-14 for more information.
Installing and Removing Options
5.
The next time you turn on your computer, run the SETUP
program or the EISA Configuration utility to enable the
computer to recognize the additional memory. For more
information, see Chapters 2 and 3.
Removing Memory Modules
If you need to remove memory modules from your computer,
follow the steps below. Check the information on page 6-10 to
be sure you remove SIMMs from the correct sockets.
If you need to remove SIMMs from your computer, follow the
steps below:
1.
Gently pull the retaining clips at each end of the SIMM
socket away from the SIMM until it tilts upward at a
45 degree angle, as shown below.
retaining clip
Installing and Removing Options
6-13
I
Caution
Apply only enough pressure on the retaining clips to
release the SIMM; too much pressure can break the
plastic retaining clips or damage the socket.
2.
Remove the SIMM from the computer and store it in an
anti-static package.
3.
If you wish to remove additional SIMMs, repeat steps 1
and 2, making sure you empty the sockets in the following
order: J0651, J0650, J0550, and J0550.
4.
You may need to change the settings of jumpers E0391
and/or E0392 on the main system board, depending on the
type of SIMMs you removed and the current settings of the
jumpers. See the next section for more information.
5.
The next time you turn on your computer, run the SETUP
program or the EISA Configuration utility to enable the
computer to recognize the new amount of memory. For
more information, see Chapters 2 and 3.
Setting Main System Board Jumpers
The jumpers on your main system board allow you to control
the following computer operations:
6-14
CI
Recover the system BIOS if it becomes corrupted
Cl
Enable or disable the built-in video controller
Cl
Write-protect the diskette drive(s)
Cl
Set the factory defaults for non-volatile RAM (NVRAM)
Cl
Enable or disable the password function
Installing and Removing Options
tl
Set the SIMM sockets to accept standard or high capacity
SIMMS
Li Write-protect the configuration information in the FLASH
memory
Ll Alter the starting video controller base address.
If you need to change any jumper settings, follow the
instructions in this section. The table below lists the jumper
settings and their functions.
Main system board jumper settings
Jumper
number
Description
Jumper
setting
E0191
FLASH memory
1 to 2*
2 to 3
Normal boot
Enables FLASH memory BIOS for
recovery operation
E0290
Video controller
1 to 2*
2 to 3
Enables onboard video controller
Disables onboard video
controller so you can install a
video controller on an option
card
E0291
Diskette
writeprotection
1 to 2
Enables write-protection (readonly mode) for any diskette drive
connected to the built-in
controller
Enables read-write capability
(read/write mode) for any
diskette drive connected to the
built-in controller
2 to 3*
E0292
NVRAM
1 to 2*
2 to 3
Function
Normal non-volatile RAM
operation
Changes EISA configuration or
SETUP values stored in
non-volatile RAM to their default
values
Installing and Removing Options
6-15
Main system board jumper settings (continued)
Jumper
number
Description
E0390
Jumper
setting
1 to 2
2 to 3*
E0391
SIMM Bank 0
1 to 2*
2 to 3
E0392
SIMM Bank 1
1 to 2*
2 to 3
E0721
FLASH memory
write protection
1 to 2*
2 to 3
E0722
Video controller
base address
1 to 2
2 to 3*
l
Function
Disables and clears the
power-on password
Enables power-on password
operation
1 MB, 2MB, 4MB, or 8MB SlMMs
are installed in Bank 0
16MB or 32MB SlMMs are
installed in Bank 0
1 MB, 2MB, 4MB, or 8MB SlMMs
are installed in Bank 1
16MB or 32MB SlMMs are
installed in Bank 1
Enables writes to FLASH memory
using the EISA Configuration
utility or the SETUP program
Disables writes to FLASH memory
Moves video controller starting
address to 03C3H if you installed
a card or application program
that uses address 46E8H
Starting video controller address
is 46E8H
Default setting
Refer to the illustration on page 6-2 to locate the jumpers on the
main system board. If there are any option cards installed in
your computer that block your access to the jumpers, remove
them following the instructions on page 6-8. Then change any
jumper settings as needed.
6-16
Installing and Removing Options
Chapter 7
Installing and Removing Disk Drives
The instructions in this chapter describe how to install and
remove optional drives in your computer. You can use these
instructions to install a variety of devices, including diskette
drives, hard disk drives, SCSI drives, tape drives, and CD-ROM
drives.
Although your drive may look different from the ones
illustrated here, you should be able to install it the same way.
Some of the steps in this chapter may not apply; see the
documentation that came with your drive for more information.
This chapter describes how to do the following:
Cl
Use the correct drive bay
Q Install and remove an externally-accessible drive
Q Install and remove an IDE hard disk drive
0
Install and remove a SCSI drive.
Before you perform any of the procedures described below,
follow the steps in Chapter 5 to remove the system covers and
the front panel, if necessary.
Installing and Removing Disk Drives
7-1
Using the Correct Drive Bay
Your computer contains nine bays that allow you to install
various drive types in the following configurations:
Three externally-accessible bays for mounting half-height
3.5-inch or 5.25-inch drives that use removable media. The
system comes with a 3.5-inch diskette drive installed in the
top external bay.
Four lower internal bays for mounting either four
half-height or two full-height 3.5-inch SCSI drives.
Two upper internal bays for mounting either two
half-height or one full-height 3.5-inch IDE hard disk drives.
You can also mount two half-height or one full-height
3.5-inch SCSI drives in these bays.
upper internal bays
external
bays
7-2
Installing and Removing Disk Drives
If you are installing a hard disk, it is best to install it in an
internal drive bay. This reserves the external bays for any
externally-accessible drives you may want to add later.
Note
Installing a hard disk drive in an externally-accessible bay
is not recommended because the drive can generate excess
electromagnetic interference.
You can install 5.25-inch drives or 3.5-inch drives with 5.25-inch
mounting frames attached in the external bays. See the manual
that came with your drive(s) for instructions on attaching the
mounting frames, if they are not already attached.
Installing a Drive in an External Bay
This section describes how to install a diskette drive or other
externally-accessible device in the external bays. Although the
illustrations in this section show a diskette drive being installed
in the upper bay, the installation procedures apply to any type
of drive you choose to install in any of the external bays.
Before you begin, locate two slide rails and two grounding clips
for each drive you will install. These items came in the box with
your computer. Also locate four screws for each drive; these are
supplied by your drive manufacturer.
1.
Remove the drive from its protective wrapper and place it on
an anti-static surface. Record the drive model and serial
number in the “Equipment Log” on page 1-11.
2.
Set any drive jumpers or switches according to the
manufacturer’s instructions.
Installing and Removing Disk Drives
7-3
3.
Using two screws and a grounding clip, attach a plastic slide
rail to each side of the drive. Position each slide rail so its
narrow end is at the front of the drive with its tab facing
outward, as shown below. Then install a grounding clip
under each of the two screws nearest the front of the drive.
slide rails
ab
grounding clips
4.
If you have not already done so, remove the front panel
from the system as described in Chapter 5.
5.
If you are reinstalling the first drive, locate the two-wire
power cable (P6) attached to connector P5.
If you are installing a second or third drive, locate either the
small (P13) or large (P4) four-wire power cable connector, as
appropriate for your drive’s power socket.
Pull the appropriate cable forward out of the external bay so
you can attach it to the connector on the back of the drive.
7-4
Installing and Removing Disk Drives
6.
Hold the drive in front of the system and connect the power
cable to the drive. Position the cable connector so that its
holes fit over all the pins in the drive and then push in the
connector.
7.
While holding the drive in front of the system, connect
the appropriate ribbon cable to the drive, as described
below.
If you are reinstalling a diskette drive in the top external bay,
use ribbon cable P3. Notice the small tab in the middle of
the cable connector; align this tab with the notch in the
drive’s ribbon cable socket. Make sure the holes in the cable
connector fit over all the pins in the socket; then push in the
connector.
If you are installing a second diskette drive or other device,
use ribbon cable P2. Align the slot in the cable connector
with the gap in the drive’s ribbon cable socket; then push in
the connector.
If you are installing a third drive, use the appropriate ribbon
cable that attaches to your drive’s controller. Then connect
it as described in your drive documentation.
Installing and Removing Disk Drives
7-5
8.
Position the drive so that the plastic slide rails on each side
fit between the guide rails inside the drive bay, as shown
below. Then push the drive into the bay until the slide rails
lock in place.
slide rail
7-6
Installing and Removing Disk Drives
9.
If you installed a device that uses removable media, such as
a diskette drive, you need to remove the appropriate slot
cover from the computer’s front panel. Remove the two
screws that secure the slot cover to the inside of the front
panel, as shown below. Then remove the slot cover and
store it in a safe place.
slot cover
10. Replace the front panel as described in Chapter 5.
Note
Once you have reassembled the computer, you need to run
the SETUP program or the EISA Configuration utility to
inform the system that a diskette drive or other device is
installed. For information, see Chapters 2 and 3.
Installing and Removing Disk Drives
7-7
Removing a Drive from an External Bay
Follow these steps to remove a drive from an external bay:
7-8
1.
If you have not already done so, remove the front panel
from the system as described in Chapter 5.
2.
Notice the tabs on the end of the slide rails attached to each
side of the drive. To release the drive, press each tab in
toward the drive and pull the drive partially out of the bay.
3.
While holding the drive in front of the system, disconnect
the power and ribbon cables attached to the drive. Grasp
the cable connector and pull it straight out from the drive
so you do not damage the connector; do not pull on the
cables.
Installing and Removing Disk Drives
4.
If necessary, remove the slide rails and grounding clips from
the drive. Set them and the screws aside for safekeeping.
5.
Replace the front panel slot cover, if necessary.
6.
Replace the front panel as described in Chapter 5.
Note
Once you have reassembled the computer, you need to run
the SETUP program or the EISA Configuration utility to
inform the system that a diskette drive or other device is
removed. For information, see Chapters 2 and 3.
Installing and Removing an IDE Hard Disk Drive
Your computer supports up to two IDE hard disk drives, which
can be installed in the upper internal drive bays. Before you
install a new IDE drive, be sure to check the drive’s
documentation for the correct jumper settings for the drive. If
you are installing your second drive, you may also need to
change the jumper settings on the drive installed in your
system to indicate which drive is the primary (master) drive
and which is the secondary (slave) drive.
Now follow the steps in the next section to remove the IDE
drive bay assembly.
Installing and Removing Disk Drives
7-9
Removing the IDE Drive Bay Assembly
Follow these steps to remove the IDE drive bay assembly:
1. Remove any cables that are connected to any drives already
installed in the IDE drive bay assembly.
2.
While supporting the IDE drive bay assembly, remove the
screw that attaches it to the computer case at the top of the
bay, as shown below.
8
3.
‘anchor tab
The other end of the drive bay assembly is secured to the
computer by two anchor tabs inserted into slots in the side
wall. To disengage the tabs, slightly lower the end of the
assembly nearest you and lift up on the end next to the side
wall. Then lift the assembly out of the computer, and place
it on an anti-static surface.
Now follow the instructions in the appropriate section below to
install or remove an IDE drive.
7-10
Installing and Removing Disk Drives
Installing an IDE Drive
If you are installing a half-height IDE hard disk drive, you can
install it in either the top or bottom bay. If you are installing a
full-height IDE drive, you must first remove any half-height
drives from the drive bay assembly so the full-height drive can
use both bays. The figures in this section illustrate a half-height
IDE drive installation.
1. Turn the drive bay assembly over and install the drive so
that the component side is facing up, as shown below.
Make sure the ribbon and power cable sockets are at the
end of assembly with the screw hole.
screw hole
2.
Align the two mounting holes in each side of the drive with
the two holes in each side of the drive bay assembly. Then
insert the four screws that came with the drive, as shown
above.
Installing and Removing Disk Drives
7-11
Caution
If you are installing a second drive in the drive bay
assembly, be careful not to scrape or damage the
components on the installed drive.
3.
If you need to install a second IDE hard disk drive, repeat
step 2.
4.
Follow the instructions on page 7-13 to replace the IDE drive
bay assembly.
Removing an IDE Drive
Follow these steps to remove a hard disk drive from the IDE
drive bay assembly:
1.
7-12
Remove the four screws that attach the drive to the
assembly. Be sure to support the drive as you loosen the
screws so it does not damage any other drive you have
installed.
Installing and Removing Disk Drives
2.
Remove the drive from the bay and place it on an anti-static
surface.
3.
If you are removing one IDE drive but leaving another in
the system, you need to change the jumper settings on the
remaining drive. See the documentation that came with
your drive for instructions on changing the jumpers.
4.
Replace the IDE drive bay assembly as described below.
Replacing the IDE Drive Bay Assembly
Follow these steps to replace the IDE drive bay assembly:
1. Position the assembly so the components on the drive(s) face
down and the screw hole in the assembly faces up.
2.
Insert the anchor tabs on the back of the assembly into the
slots in the computer’s side wall, as shown below.
Installing and Removing Disk Drives
7-13
3. Lift up the front end of the assembly and attach it to the top
of the computer case with the screw you removed earlier.
4.
Connect the ribbon and power cables as described in the next
section.
Connecting the IDE Ribbon and Power Cables
The IDE ribbon cable includes three connectors: P1, P2, and P3.
P1 connects to the main system board, and P2 and P3 connect to
the IDE drives.
P3
If your system came with an IDE hard disk drive, this cable is
already installed. If so, follow the steps below to connect the
cable to the drive beginning with step 4.
7-14
Installing and Removing Disk Drives
P1
If your system did not come with an IDE drive already
installed, the ribbon cable came in the box with your computer
and you must first connect it to the computer’s main system
board. Follow the steps below beginning with step 1.
1.
Connect P1 of the IDE ribbon cable to the IDE interface,
J0821, on the main system board. Position the tab on
connector P1 so it faces down and be sure the red stripe on
the ribbon cable faces the computer’s back panel.
red stripe
COIinector Pl
2.
Route the cable up through the cutout in the rear of the
metal panel beneath the IDE drive bay assembly. (The
diskette drive cable is also routed through this cutout.)
Installing and Removing Disk Drives
7-15
3.
Connect P3 of the IDE ribbon cable to the drive in the top
half of the drive bay assembly. Connect P2 of the IDE
ribbon cable to the drive in the lower half of the drive bay
assembly. (If you installed only one drive, connect P3 of the
IDE ribbon cable to the drive.)
Align the tab on the connector with the notch in the drive’s
socket. Be sure the red stripe on the IDE ribbon cable faces
the computer’s front panel.
red stripe
7-16
Installing and Removing Disk Drives
4.
Connect power cable P7 to the power socket of the drive in
the top half of the drive bay assembly. Connect power cable
P6 to the drive in the lower half of the drive bay assembly.
(If you installed only one drive, connect either P6 or P7; it
does not matter which one.) Be sure to position the
connector so that its notched corners line up with the
notched corners of the socket on the drive. Make sure the
holes fit over all the pins and then push in the connector.
5.
Curl up any spare cables and tuck them in the space beneath
the IDE drive bay assembly.
Note
Once you have reassembled the computer, you need to run
the SETUP program or the EISA Configuration utility to
inform the system of your IDE hard disk drive configuration.
For information, see Chapters 2 and 3.
Installing and Removing Disk Drives
7-17
Installing a SCSI Drive
Your computer supports a variety of single-ended SCSI devices.
If you plan to install one to four SCSI drives, use only the SCSI
(lower) internal bays. If you plan to install more than four, you
can install the fifth and sixth drives in the upper internal bays
or in the external drive bays, if the drives use removable media.
Before you begin, locate two slide rails and two grounding clips
for each drive you will install. These items came in the box with
your computer. Also locate four screws for each drive; these are
supplied by your drive manufacturer.
If you plan to install four SCSI drives in the lower internal bays,
install them in the following order: bays 1,2,3, and 4, as shown
below. However, if you are installing fewer than four SCSI
drives, begin with bay 4 and work down. This optimizes
cooling and airflow inside your computer.
bay 2.
bay 1
7-18
I
Installing and Removing Disk Drives
Follow the steps below to install the SCSI drive(s) in your
computer. If your system came with a SCSI hard disk drive
installed, you will not need to install a SCSI adapter or the LED
cable, so begin with step 4. Otherwise, begin with step 1.
1. Follow the instructions in your SCSI adapter documentation
to set any jumpers or switches on the adapter card. Then
see “Installing an Option Card” in Chapter 6 for
instructions on installing the adapter in your computer.
You may want to use option slot 8 so the SCSI device cable
can reach the adapter easily.
2.
Connect P3 of the SCSI hard disk drive activity LED cable that
came with your computer to interface J0190, located in the
lower right corner of the main system board, as shown below.
I
J0190
3.
Connect P1 on the other end of the LED cable to the
appropriate connector on your SCSI adapter. If you
installed two SCSI adapters, remove the plastic tie joining
P1 and P2; then connect P2 to the other SCSI adapter.
4.
Remove the SCSI drive from its protective wrapper and
place it on an anti-static surface.
Installing and Removing Disk Drives
7-19
5.
Record the drive’s model, serial, and SCSI ID number in the
“Equipment Log” on page 1-11.
6.
Follow the instructions in the SCSI drive’s documentation
to set any jumpers or switches on the drive and to install or
remove the terminating resistors.
Note
Do not remove terminating resistors from the SCSI
device you install at the end of the ribbon cable. The last
device on the cable terminates the SCSI bus and must
have terminating resistors installed.
7.
Using two screws and a grounding clip, attach a plastic slide
rail to each side of the drive. Position each slide rail so its
narrow end is at the socket end of the drive with its tab
facing outward, as shown below. Then install a grounding
clip under each of the two screws nearest the narrow end of
the slide rails.
slide rails
7-20
Installing and Removing Disk Drives
8.
Position the drive in the bay so the components face down
and the ribbon and power sockets face outward. Align each
plastic slide rail with the guide rails inside the bay you plan
to use; then slide the drive into the bay until the slide rails
lock in place, as shown below.
guide rail
V
slide rail
\
ribbon and power
cable sockets
9.
Repeat steps 4 through 8 to install any other SCSI drives in
the lower drive bays.
If you installed four or fewer drives, go to the next section.
If you need to install a fifth or sixth SCSI drive in the upper
internal bays, follow the instructions on page 7-9 to remove the
IDE drive bay assembly. Then return to page 7-22 for
instructions on connecting the ribbon and power cables to your
drive(s).
Installing and Removing Disk Drives
7-21
To install a fifth or sixth SCSI drive in the upper external bays,
follow the instructions on page 7-3. Then return to this page for
instructions on connecting the SCSI ribbon and power cables to
your drive(s).
Installing the SCSI Ribbon and Power Cables
This section explains how to connect SCSI ribbon and power
cables to your SCSI drive(s). The ribbon cable transmits data
and the power cable carries electric current to the SCSI device.
Installing the SCSI ribbon cable
The SCSI ribbon cable has seven connectors: P1, P2, P3, P4, P5,
P6, and P7, as shown below.
Note
The SCSI ribbon cable is designed so you can easily connect
up to six SCSI devices. You can attach the middle connectors
(P2 through P6) to any SCSI drive. However, you must attach
P7 (the last connector on the ribbon) to the SCSI device you
have defined as the last device on the bus.
7-22
Installing and Removing Disk Drives
If your system came with a SCSI adapter and a SCSI drive, this
cable is already connected inside your computer. If your
computer did not come with a SCSI subsystem, this cable came
in the box with your computer.
Follow the steps below to connect the SCSI ribbon cable to your
adapter and drives. If the SCSI adapter and at least one SCSI
drive are installed, begin with step 3.
1.
Connect P1 of the SCSI ribbon cable to the SCSI adapter you
installed on the main system board.
2.
To route the cable from the SCSI adapter to the first drive,
guide the cable underneath the adapter and into the gap
between the lower SCSI drive bays and the bottom of the
computer, as shown below.
SCSI
adapter
Pl ’
P2
gap
Installing and Removing Disk Drives
7-23
3. Choose a connector for each SCSI drive you have installed.
Align the tab on the connector with the notch in the drive
socket. Make sure the holes fit over all the pins, and then
push in the connector.
If you are installing up to four SCSI drives, be sure to use P7
for the last drive on the bus. Then proceed to “Installing the
SCSI power cables” on page 7-25.
If you are installing five or six SCSI drives, continue with the
next step.
4. There is a cutout beneath the external bays and above drive
bay 4, as shown in the previous illustration. Insert the
section of the cable that contains connectors P6 and P7
through this cutout. Make sure the red stripe on the cable
faces the outside of the computer and that connectors P6
and P7 are behind the external drive bays.
Note
If you have difficulty routing the cable beneath the
external drive bays, you may want to remove the device
installed in the lowest bay before inserting the cable into
the cutout. See “Removing a Drive from an External
Bay” on page 7-8 for instructions.
5.
Connect P6 or P7 of the SCSI ribbon cable to the SCSI device
that you installed in either the IDE drive bay or the external
drive bay. Be sure to connect P7 of the SCSI ribbon cable to
your last SCSI device.
Now follow the instructions in the next section to connect the
power cables.
7-24
Installing and Removing Disk Drives
Installing the SCSI power cables
Follow these steps to connect power cables to your SCSI
drive(s):
1. You can use P8, P9, Pl 0, or P11 to provide power to any
drives you have installed in the lower internal drive bays.
Position the power cable connector so that its notched
corners line up with the notched corners of the power
socket on the drive. Make sure the holes fit over all the pins
and then push in the connector.
2.
Connect a power cable to each of the remaining drives in the
lower drive bays in the same manner.
3.
If you installed a fifth or sixth SCSI drive in either the upper
internal bays or the external bay, connect power cables P6
and P7 to these drives.
Now see your SCSI adapter and drive documentation for
instructions on installing your SCSI drivers.
Removing a SCSI Drive
Before you remove any SCSI drive(s), check your SCSI drive
documentation for instructions on resetting the switches or
jumpers on your remaining drives and changing your
terminating resistors. Then follow these steps to remove the
drive(s) from your computer:
1.
Disconnect the SCSI ribbon cable connector from the drive.
Grasp the pull tab and pull the connector straight out from
the socket so you do not bend the pins; do not pull on the
cable.
Installing and Removing Disk Drives
7-25
NOTE
If you removed the last device from your SCSI bus, be
sure to reconnect ribbon cable connector P7 to the SCSI
device that will now be the last device on the SCSI bus.
2.
Disconnect the power cable from the power socket on the
drive.
3.
To remove a SCSI drive from the upper internal drive bay,
first follow the steps on page 7-10 to remove the IDE drive
bay assembly.
To remove a SCSI drive from either an external bay or a lower
internal bay, first notice the tab on the end of each slide rail
attached to the drive. To release the drive, press the tabs in
toward the drive; then carefully pull the drive out of the
bay, as shown below.
tabs
7-26
Installing and Removing Disk Drives
4.
If necessary, remove the four screws, two grounding clips,
and two slide rails from the drive and save them.
5.
Repeat steps 1 through 4 for each drive you need to
remove.
Also check your SCSI drive documentation for any other steps
you may need to perform.
Installing and Removing Disk Drives
7-27
Appendix A
Troubleshooting
You should not encounter any difficulties as you set up and use
your computer, but if anything out of the ordinary happens,
refer to this appendix.
If the suggestions here do not help solve the problem, see
“Where to Get Help” in the Introduction for instructions on
contacting your dealer or the Epson Connection.
identifying Your System
When you call for assistance, be ready to provide the serial
number of your computer and its current configuration. You
should also provide the version number of the computer’s
ROM BIOS, as well as the names and version numbers of your
operating system, drivers, and any application programs you
are using. You may have listed some of this information in the
“Equipment Log” at the end of Chapter 1.
You can find the serial number on the computer’s back panel.
If you are able to use your computer, run the SETUP program
or the EISA Configuration utility to view your current
configuration information.
Follow these steps to obtain the other information:
1. Turn on your computer or press the reset button. When the
computer performs its power-on diagnostic tests, the
version number of your system’s ROM BIOS appears at the
top of the screen. Write down the number.
Troubleshooting A-1
2.
When you see the operating system command prompt, enter
the appropriate command to display the version number of
your operating system. (For example if you are using
MS-DOS, type VER and press d
Enter .) Write it down, and
then obtain the version numbers of any application
programs you are using.
Error Messages
Your computer’s built-in memory (ROM) contains a series of
diagnostic programs, called power-on diagnostics. These
programs check internal devices such as ROM, RAM, the timer,
the keyboard controller, and the hard disk drive every time you
turn on the computer or press the reset button, The RAM test
program displays a count of the memory currently installed in
your system.
If the computer finds an error, it reports one of the following
types of error messages:
Ll Power-on diagnostic and boot error messages
Q Error tone codes for fatal errors (that lock up the system)
CI
Error tone codes for non-fatal errors (that do not lock up
the system).
Be sure to write down the error message or tone code pattern
and give the information to your dealer when you report a
problem. These error messages are described below.
A-2
Troubleshooting
Power-on Diagnostic and Boot Errors
When the power-on diagnostic tests detect an error, the
computer displays a message on the screen (as described
below) and the speaker beeps twice. If the error occurs before
the computer initializes the video display, the speaker sounds a
series of beeps (described in the next section).
Each error is identified by a message number and a countdown
number which the computer uses as it executes the test
associated with the error.
The table below lists the power-on diagnostic and boot error
messages, and some basic solutions to the problems. Check the
appropriate section(s) in this appendix for other solutions.
Power-on diagnostic and boot error messages
Real-time clock RAM
Contact your dealer
Troubleshooting A-3
Power-on diagnostic and boot error messages (continued)
Contact your dealer
A-4
Troubleshooting
First 64KB RAM chip or
Contact your dealer
First 64KB RAM chip or
Contact your dealer
First 64KB RAM chip or
Contact your dealer
Power-on diagnostic and boot error messages (continued)
690
706
Fatal onboard video
BIOS conflict at E0000H
Contact your dealer
690
CMOS power failure
691
CMOS checksum failure
Run SETUP or the ECU;
contact your dealer if
the problem persists
692
Extended CMOS
checksum failure
693
Default configuration
failure, unable to write to
FLASH memory (Note
that this error will be
displayed after video has
been initialized.)
680
Initialize EISA slots
Not an error
670
Initialize serial ports
Not an error
Troubleshooting A-5
Power-on diagnostic and boot error messages (continued)
Not an error
570
VGA/EGA configuration
error
540
VGA/EGA BIOS failed to
initialize
Run SETUP or the ECU:
contact your dealer if
the problem persists
520
Initialize console
redirection
Not an error
500
Display sign-on message
Not an error
No timer tick interrupt
Run SETUP or the ECU;
contact your dealer if
the problem persists
490
A-6
Check video
configuration
490
Troubleshooting
Power-on diagnostic and boot error messages (continued)
keyboard or controller
may have failed;
contact your dealer if
the problem persists
Not an error
Troubleshooting A-7
Power-on diagnostic and boot error messages (continued)
correctly; contact your
dealer if the problem
Read nnnn Expecting
Memory read/write
failure at nnnn:nnnn,
Decreasing available
immediately follows any
memory error message
(above) informing you
that memory modules
are failing
270
Initialize extended BIOS
data area
Not an error
250
Chipset initialization 7
Not an error
230
Enable hardware
interrupts
Not an error
210
Read keyboard ID
Not an error
A-8 Troubleshooting
Power-on diagnostic and boot error messages (continued)
and check all
connections; contact
your dealer if the
problem persists
120
110
120
Hard drive configuration
error
Check your
configuration and hard
disk drive type by
running SETUP or the
ECU; contact your
dealer if the problem
persists
121
Hard drive controller
failure
122
Hard drive 0 failure
Run SETUP or the ECU
and check all
connections; contact
your dealer if the
problem persists
Chipset initialization 9
Not an error
Troubleshooting A-9
Power-on diagnostic and boot error messages (continued)
Error
Countdown message
number Message
number
Solution
090
090
Internal cache test
failed-cache disabled
Contact your dealer
080
080
nnnn OH optional ROM
bad checksum = nn H
Correct the address
conflict; contact your
dealer if the problem
persists
083
Shadow of BIOS at
C0000H-C7FFFH failed
Contact your dealer
084
Shadow of BIOS at
C8000H-CFFFFH failed
Contact your dealer
085
Shadow of BIOS at
E0000H-C7FFFH failed
Contact your dealer
070
070
Time of day clock not set
Run SETUP or the ECU
and set the time and
date
060
060
Keyboard is lockedplease unlock
Unlock keyboard
040
040
Configuration error; slot n
Run the ECU; contact
your dealer if the
problem persists
041
ID mismatch error; slot
A-10 Troubleshooting
n
The board in slot n is bad
or its ID does not match
what the ECU expects;
mismatch is due to the
wrong board in slot n or
the wrong configuration
file for the board; run the
ECU to configure slot n
or, if necessary, replace
the board; contact your
dealer if the problem
persists
Power-on diagnostic and boot error messages (continued)
Error
Countdown message
Number
number Message
Solution
042
Invalid ISA configuration
information
An ISA board is
improperly configured;
run the ECU and verify all
jumper and switch
settings
043
Invalid EISA configuration
information
An EISA board is
improperly configured;
run the ECU and verify all
jumper and switch
settings
044
EISA configuration NOT
ASSURED!
If you installed EISA
option cards, this
message appears the
first time you boot your
system after running
SETUP; run the ECU to
properly configure your
system
Enable parity checking
and NMI
Not an error
000
Diskette read failure
There is no diskette in
drive A insert a diskette
and try again; contact
your dealer if the
problem persists
001
Not a bootable diskette
Remove the diskette
from the drive and use a
bootable diskette, or
boot the system from the
hard disk drive; contact
your dealer if the
problem persists
002
No boot device available
Make sure you are using
a bootable diskette or
that your hard disk drive
is formatted; contact
your dealer if the
problem persists
020
Troubleshooting
A-11
Power-on diagnostic and boot error messages (continued)
Error
Countdown message
Number
number Message
Solution
003
Hard drive read failure
The hard disk drive may
have failed; check your
drive type by running
SETUP or the ECU; check
all cable connections;
contact your dealer if
the problem persists
004
No boot sector on hard
drive
The hard disk drive is not
formatted as a bootable
disk; format your hard
disk as necessary;
contact your dealer if
the problem persists
Error Tone Codes
If power-on diagnostic tests detect an error but cannot display
an error message, the computer sounds an error tone code. The
tone code is a distinct pattern of beeps that identifies the error,
such as one beep-two beeps-one beep. If the error is serious
(fatal) the computer locks up, but if the error is not serious
(non-fatal) you can continue using your computer.
A-12
Troubleshooting
The tables below list the fatal and non-fatal error codes.
Error tone codes for fatal errors
Error tone code
Description
1-1-3
Real-time clock write/read failure
1-1-4
ROM BIOS checksum failure
1-2-1
Programmable interval timer failure
1-2-2
DMA initialization failure
1-2-3
DMA page register write/read failure
1-3-1
RAM refresh verification failure
1-3-3
First 64KB RAM chip or data line failure (multi-bit)
1-3-4
First 64KB RAM odd/even logic failure
1-4-1,
First 64KB RAM address line failure
1-4-2
First 64KB RAM parity test in progress failure
2-1-1
First 64KB RAM failure-bit 0
2-1-2
First 64KB RAM failure-bit 1
2-1-3
First 64KB RAM failure-bit 2
2-1-4
First 64KB RAM failure-bit 3
2-2-1
First 64KB RAM failure-bit 4
2-2-2
First 64KB RAM failure-bit 5
2-2-3
First 64KB RAM failure-bit 6
2-2-4
First 64KB RAM failure-bit 7
2-3-1
First 64KB RAM failure-bit 8
2-3-2
First 64KB RAM failure--bit 9
2-3-3
First 64KB RAM failure--bit A
2-3-4
First 64KB RAM failure-bit B
2-4-1
First 64KB RAM failure-bit C
2-4-2
First 64KB RAM failure-bit D
Troubleshooting
I
I
A-13
Error tone codes for fatal errors (continued)
Error tone code
Description
2-4-3
First 64KB RAM failure-bit E
2-4-4
First 64KB RAM failure-bit F
3-1-1
Slave DMA register failure
3-1-2
Master DMA register failure
3-1-3
Master interrupt mask register failure
3-1-4
Slave interrupt mask register failure
3-2-4
Keyboard/mouse controller test failure
Error tone codes for non-fatal errors
Error tone code
Description
3-3-4
Screen memory test failure
3-4-1
Screen initialization test failure
3-4-2
Screen retrace test failure
Power or lock-up Problems
If you are having trouble with the computer’s power or the
system locks up, see the suggestions below.
The computer does not start when you turn it on.
Turn off the power and check the following:
Li Be sure all cables are securely connected to the computer.
Ll Check that the computer and monitor power cords are
plugged completely into their electrical outlets,
LJ
Test the outlet to see if it supplies power.
A-14 Troubleshooting
I
The computer starts but the screen is blank.
See “Monitor Problems” below.
The computer starts but does not boot.
If the computer starts but does not load your operating system,
the problem could be caused by many different factors.
First make sure you have correctly formatted your hard disk
and have properly installed your operating system on it. (See
“Hard Disk Problems” on page A-21.) Also be sure you enabled
the IDE hard disk drive controller and selected the correct drive
type in the SETUP program or the EISA Configuration utility.
If you do not have a hard disk, insert a system diskette in
drive A and press the reset button.
The computer does not respond when you type or click the
mouse.
If you have just turned on the computer, check the following:
Cl
Make sure your keyboard or mouse is securely connected
to the computer.
Q Make sure your keyboard and mouse are not locked. Check
the Keyboard/Mouse Lock indicator to see if they are
locked. If so, press the Keyboard/Mouse Lock button to
unlock them. See Chapter 4 for instructions.
D
If you entered the wrong password and cannot access your
system, see “Password Problems” below.
If you are running a software program, try these procedures:
Cl
If your computer is processing a complicated command or
performing a complex task, it may take a long time to
complete its work. If the computer does not respond after a
reasonable length of time, proceed to the next step.
Troubleshooting
A-15
a
Press [numlodt]. If the Num Lock indicator light on the
keyboard lights up, the computer is probably still
processing a command. If it does not light up, proceed to
the next step.
a
Press [r] 171 [E) or press the reset button to exit the
software program and reboot the computer.
a
If resetting the computer does not work, turn it off and wait
at least five seconds. If you do not have a hard disk drive,
insert a bootable diskette in drive A. Then turn on the
computer and try running the program again.
a
If none of these procedures work, check your software
documentation or contact your software manufacturer for
technical support.
Password Problems
If you set a power-on, network, or keyboard password and you
have trouble entering it, check the section below that describes
the problem you are having.
You enter the password, but nothing happens.
Type the password again and press [. You have three
chances to enter a power-on or network password correctly
before the system locks up. If this happens, press the reset
button to reboot the computer and try again. You can try as
many times as necessary to enter a keyboard password.
You want to change of delete the password.
See Chapter 4 for instructions on changing or deleting your
password.
A-16 Troubleshooting
You have forgotten the current power-on password.
If you have forgotten your power-on password and cannot use
your computer, follow these steps:
1. Turn off the computer, remove the system covers, and clear
the password by moving the main system board jumper
E0390 from position 2-3 to position 1-2. See Chapter 5 for
instructions on removing the covers and Chapter 6 for
instructions on changing the jumper setting.
2.
Replace the computer’s cover. (See Chapter 5.)
3.
If you do not have a hard disk, insert a bootable diskette in
drive A. Turn on the computer and allow it to load the
operating system.
4. Then turn off the computer, remove the covers, and enable
the password function by moving main system board
jumper E0390 from position 1-2 to position 2-3.
5.
Replace the computer’s covers.
If you do not want to set a new password, you do not need
to do anything else. (When you turn on your computer, you
will not see the Enter password prompt.)
If you want to set a new password, go to step 6.
6.
If you ran the SETUP program to configure your computer
the last time, go to step 7. If you ran the EISA Configuration
utility, go to step 8.
7.
Turn on your computer. When you see the prompt, press
[ to run SETUP. Follow the instructions in Chapter 2
to set a new power-on password using the SETUP program.
8.
Insert the Reference diskette in drive A and turn on the
computer. Follow the instructions in Chapter 4 to set a new
power-on password using the EISA System Utilities.
Troubleshooting
A-17
If you need to activate your new power-on password as a
network password, see Chapter 4 for information about using
the EISA System Utilities to activate a network password.
Note
If you set a new power-on password, it automatically
becomes your keyboard password. If you want to set a
different keyboard password, see Chapter 4 for instructions.
Keyboard Problems
a
Make sure the keyboard is securely connected to its port.
a
Make sure your keyboard is not locked. Check the
Keyboard/Mouse Lock indicator to see if it is locked. If so,
press the Keyboard/Mouse Lock button to unlock it. See
Chapter 4 for instructions.
a
If you are still having problems, see “Power or Lock-up
Problems” above.
Monitor Problems
See the suggestions below if you have trouble with your
monitor display.
There is no display on the screen.
CI
Make sure the monitor cables are securely connected to the
monitor, the computer, and the electrical outlet.
A-18 Troubleshooting
0
Check that the monitor’s power switch is on and that the
power light on the monitor is lit. If the power light is on but
you still do not see anything on the screen, check the
monitor’s brightness and contrast controls.
Li
Check to see if the electrical outlet supplies power.
cl
You may have redirected your computer’s input and
output functions to one of the serial ports. If you need to
disable this option, set jumper E0292 on the main system
board to return to the computer’s configuration options to
their default settings. See Chapter 6 for instructions.
The monitor does not display images correctly.
Cl
Make sure your monitor and display adapter match. If you
are using a display adapter card, be sure any switches or
jumpers on the card and on the computer’s main system
board are set properly. See Chapter 6 and the manual that
came with the card for instructions.
Q Be sure you chose the correct display adapter type in the
SETUP program or the EISA Configuration utility. See
Chapters 2 and 3.
Q If you are running an application program, see if you need
to configure it for the type of monitor and display adapter
you have. Also, make sure you are using the correct
monitor and display adapter for your software.
Diskette Problems
Ll Check to see if you inserted the diskette upside down or
did not insert it all the way.
Ll If the diskette is blank, make sure it is formatted.
Troubleshooting
A-19
Ll Place the diskette in the drive of another computer and
repeat the operation. If this works, the trouble may be in
your diskette drive. See “Diskette Drive Problems” below.
Cl
Make sure you enabled the built-in controller and selected
the correct diskette drive type(s) when you ran the SETUP
program or the EISA Configuration utility. See Chapters 2
and 3 for instructions.
Cl
If you cannot write to the diskette, make sure jumper E0291
is set to position 2-3 to enable writes to the diskette drive.
See Chapter 6.
Diskette Drive Problems
If you think there is something wrong with your diskette drive,
check this section.
You see an error message of have difficulty with a diskette
drive.
ci
If you removed your diskette drive and reinstalled it
yourself, review all the instructions in Chapter 7.
Li
Be sure that you ran the SETUP program or EISA
Configuration utility to enable the built-in diskette drive
controller and set the correct diskette drive type. See
Chapters 2 and 3 for instructions.
cl
If you are still having trouble with the drive, contact your
Epson dealer.
The diskette drive is making loud or unusual noises.
Contact your Epson dealer.
A-20 Troubleshooting
Hard Disk Problems
If you think there is something wrong with your hard disk, see
the suggestions below.
you have problems with a newly-installed drive.
Ll If your dealer installed the drive, consult your dealer about
the problem.
c3
If you installed the hard disk yourself, make sure you
carefully followed all the instructions in Chapter 7. Review
the procedures and check all the cable connections to make
sure you installed it correctly. Also check the jumper
settings on your drive to be sure they are set correctly.
Cl
If you are having trouble with a SCSI hard disk, make sure
you have set the appropriate SCSI ID number for the drive
and that you installed the terminators properly on the first
and last SCSI devices. See your SCSI drive documentation
for more information.
CL
Verify that your hard disk drive was physically formatted.
This type of format is usually done by the manufacturer.
Ll Verify that you ran the SETUP program or the EISA
Configuration utility to enable the built-in IDE hard disk
controller and have defined your hard disk drive type or
parameters correctly. See Chapters 2 and 3.
Ll
If you are sure the hard disk has been installed and
prepared properly but you cannot access the drive, review
the instructions in your operating system manual. Make
sure you performed the necessary steps in the installation
process for your configuration.
Cl
If you still cannot identify the problem, consult the dealer
from whom you purchased the drive.
Troubleshooting
A-21
You notice a reduction in hard disk performance.
Cl
The data on the disk may have become fragmented. You
may want to back up all your data and then use a disk
compaction utility to reorganize the files on your disk.
Contact your dealer for information.
U
If you cannot access data on your hard disk or you are
receiving read/write errors, the disk may have a physical
problem. If the problem persists, contact the dealer from
whom you purchased the drive.
Software Problems
Ct
Make sure you are using the correct procedure for starting
the program and that it is installed correctly.
0
Be sure you are logged onto or specifying the correct drive
and directory.
Ct
Some programs must run at a slower operating speed.
Check your software manual to see if this is the case, and
change the operating speed of the processor if necessary.
See “Changing the Processor Speed” in Chapter 4 for
instructions.
Ct
If you are unable to run the SETUP program or the EISA
Configuration utility, make sure you have write-enabled
your computer’s FLASH memory. Check to see if a jumper
is installed in position 1-2 of jumper E0721, as described in
Chapter 6.
Cl
If you are still having problems with your software, consult
your software documentation or contact the manufacturer
for technical support.
A-22 Troubleshooting
Printer Problems
CI
Make sure the printer has power and is properly connected
to the computer. (Also, be sure your printer has paper in it.)
Cl
Check the printer manual for the printer’s correct DIP
switch or control panel settings.
CI
If you are using more than one parallel port or more than
one serial port, check the primary and secondary port
settings in the SETUP program or the EISA Configuration
utility to make sure they are correct. See Chapters 2 and 3
for instructions.
Option Card Problems
Cl
Make sure the option card is properly inserted in its slot.
Check the installation procedure described in Chapter 6
and also see the instructions that came with the card.
Cl
Be sure that you ran the SETUP program or the EISA
Configuration utility to update your configuration after
installing the card. See Chapters 2 and 3.
Q Check to see if you set the necessary DIP switches or
jumpers on the option card. Also be sure you performed the
correct setup procedures for the software you are using with
the option card. See your option card manual and check
your EISA Configuration utility information for the card.
Cl
Check the computer’s power supply limits in Appendix B
and your option card documentation to be sure you have
not installed a card that exceeds the total amperage
allowable in your system.
Cl
If necessary, make sure that you used the proper cable to
connect the device to the option card connector.
Troubleshooting
A-23
Memory Module Problems
cl If the memory count displayed by power-on diagnostics,
the SETUP program, or the EISA Configuration utility is
incorrect, you or your dealer may not have installed the
SIMMs correctly. The SIMMs may be installed in the wrong
sockets, they may be the wrong type of SIMM, or they may
not be inserted all the way into their sockets.
If your dealer installed the SIMMs for you, contact your
dealer; do not attempt to correct the problem yourself. If
you installed them, see “Memory Modules” in Chapter 6
and make sure you followed all the instructions correctly.
cl Check the speed and type of your SIMMs. Install only 80ns
(1MB, 2MB, 4MB, or 8MB) or 70ns (16MB or 32MB), 36-bit,
72-pin, tin-plated, fast-page mode SIMMs.
ci If you installed 16MB or 32MB SIMMs, be sure you
changed the settings of jumpers E0391 and/or E0392 on the
main system board to indicate the type of SIMMs you are
using. See Chapter 6 for instructions.
D Be sure to run the SETUP program or the EISA
Configuration utility after you install or remove memory
modules to automatically update your configuration. See
Chapters 2 and 3 for instructions.
ci If you are still having trouble with your SIMMs, write
down any error messages you see and contact your dealer.
A-24
Troubleshooting
Mouse Problems
tl
Make sure that your mouse is securely connected to its port.
Cl
Make sure your mouse is not locked. Check the
Keyboard/Mouse Lock indicator to see if it is locked. If so,
press the Keyboard/Mouse Lock button to unlock it. See
Chapter 4 for instructions.
CI
Check to see if you installed your mouse driver program
and loaded it into your computer’s memory correctly.
0
Be sure that you set the built-in mouse port option in the
SETUP program or the EISA Configuration utility correctly
for your mouse port. See Chapters 2 and 3 for more
information.
Cl
If you are still having trouble with your mouse, check the
documentation that came with it for troubleshooting
information or contact your mouse dealer.
SCSI Drive Problems
Make sure that the cables connecting any external SCSI
devices are firmly inserted in their ports on the devices.
Verify that you have set the correct SCSI ID numbers and
properly installed the SCSI terminators. See your SCSI
device documentation for more information.
If you have trouble with an internal SCSI drive that you
installed yourself, review the installation instructions in
Chapter 7 to make sure you performed all the necessary
steps.
If you still have trouble with a SCSI drive, contact your
dealer.
Troubleshooting
A-25
Appendix B
Specifications
Main System Board
System
memory
8MB RAM standard on two 4MB SIMMs;
expandable using 1MB, 2MB, 4MB, 8MB,
16MB, or 32MB single- or double-sided
SIMMs up to 128MB (maximum); SIMMs
must be 80ns, 36-bit, 72-pin, tin-plated,
fast-page mode type; 16MB and 32MB
SIMMs may be 70ns, 36-bit, 72-pin,
tin-plated, fast-page mode type
BIOS
256KB on two 128KB FLASH EEPROM
devices for system and video BIOS
Shadow RAM
Automatically copies the system BIOS
from ROM into RAM; shadow RAM
addresses for video BIOS and external
BIOS are software selectable
Video RAM
512KB
Clock/
Real-time clock, calendar, and CMOS
RAM for BIOS use; battery backup;
contents can be cleared to default values
by jumper setting
calendar
CPU Card
CPU
Intel 486DX2, 66 MHz microprocessor;
simulated 8 MHz processor speed
selectable through software or keyboard
command
Specifications B-1
Cache
8KB internal cache in the 486DX2/66
microprocessor; 128KB Intel cache module
with write-through, two-way set
associative cache memory and controller
OverDrive
processor
486DX2 microprocessor on CPU card can
be replaced with optional Intel OverDrive
processor
memory
Interfaces
Monitor
15-pin, D-shell analog connector
Serial
Two RS-232-C, 9-pin, D-shell connectors;
asynchronous
Parallel
25-pin, D-shell connector; supports
IBM AT compatible or PS/2 compatible
(bidirectional) signals; software selectable
Mouse
Mini DIN, 6-pin connector for PS/2
compatible mouse or other pointing device
Keyboard
Mini DIN, 6-pin connector for PS/2
compatible keyboard
Option slots
Eight 32-bit EISA bus master expansion
slots (16-bit and 8-bit ISA compatible)
Speaker
Internal; operation controllable by software
Keyboard
B-2 Specifications
Detachable, two position, 101 or 102
sculpted keys; country-dependent main
typewriter keyboard; numeric/cursor
control keypad; four-key cursor control
keypad; 12 function keys
Con trollers
Diskette
Controller on the main system board
supports up to two diskette drives in any
of these formats:
5.25-inch, high-density, 1.2MB
5.25-inch, double-density, 360KB
3.5-inch, high-density, 1.44MB
3.5-inch, double-density, 720KB
Hard disk
Interface on the main system board
supports up to two IDE drives with
embedded controllers
Video
VGA controller supports standard VGA
resolutions
Mass Storage Bays
Up to nine half-height devices maximum;
one full-height or two half-height internal
bays for IDE or SCSI hard disk drives; four
half-height or two full-height internal bays
for SCSI hard disk drives; three half-height
externally-accessible bays
Physical Characteristics
Width
8.5 inches (21.5 cm)
Depth
23 inches (58.4 cm)
Height
20.4 inches (51.8 cm)
Weight
44.5 lb (20 kg) with one diskette drive only
Specifications B-3
Environmental Requirements
Operating
range
Non-operating
range
Storage
range
Temperature
50° to 95° F
(10° to 35° C)
-40° to 149° F
(-40° to 65° C)
-4° to 140° F
(-20° to 60° C)
Humidity
(non-condensing)
85%at104°F
(40° C)
95% at 131° F
(55° C)
20% to 95% at
131°F(55°C)
Altitude
To 10,000 ft
(3048 m)
To 10,000 ft
(3048 m)
To 10,000 ft
(3048 m)
Condition
Power Supply
230W, fan-cooled, switch-selectable voltage
Type
Input ranges
100 to 120 VAC and 200 to 240 VAC,
50 to 60 Hz
Maximum
current
At 115 Volts, 5 Amps; at 230 Volts, 4 Amps
Output cables
Four main system board cables; nine mass
storage cables
Maximum
outputs
voltage (VDC)
Maximum continuous
current (Amps)
Minimum Peak
load
surge
Watts
+5
30A
11A
150W
-5
0.5A
0A
+12
6A
0.5A
-12
0.5A
0A
output
B-4 Specifications
30A
0.5A
8A
0.5A
2.5W
72W
6.0W
To determine the maximum allowable
amperage of your option cards and other
equipment, use the table below. It lists the
typical system 5 Volt current drain for
your main system board and other
components. Check the 5 Volt amperage
rating of the equipment you install and
make sure the total system amperage does
not exceed 30 Amps.
5 Volt current
limitation
System current drain
.53A running
EISA option slot *
*
2.0A
Each EISA option slot is rated at 4.5A however average current
consumption for all slots used should not exceed 3A per slot. Most EISA
option cards draw 2A. If you install a card drawing more than 2A. install it
in a lower numbered slot (such as 1 or 2) to ensure adequate cooling.
Specifications B-5
Power Source Requirements
120-Volt power source requirements
Reference
standard
North America
125V. 10A
ANSI C73.11,
NEMA 5-15-P.
IEC 83
no. 18/3AWG, or
no. 16/3AWG,
or <HAR>
300V. 10A or 13A
240-Volt power source requirements
AC plug
B-6 Specifications
Plug type
Reference
standard
Power cord
Europe
240V, 10A to
16A
CEE 7/7
IEC 83
lEC127
HD21
<HAR>
1.00 mm2
300V, 10A
UK
240V, 10A
BS 1362
BS 1363A
IEC 83
IEC 127
HD 21
EN 60 320-1
ASTA mark
<HAR>
1.00 mm2
3OOV, 10A
Australia
240V, 10A
ASC112
IEC 127
HD 21
<HAR>
1.OO mm2
3OOV, 10A
North America
24OV, 15A
ANSI C73.20.
NEMA 6-15-P.
IEC 83
UL 198.6
UL/CAS Listed
Type SJT
no. 18/3AWG,
3OOV. 10A
System Memory Map
stem BIOS area
System
Memory
ODFFFFh
Reserved for ROM and RAM
expansion boards
Specifications B-7
100000
?
512MB
F0000
1MB
Recovely BIOS (16KB)
“SW Ama (6KB)
&(OK
EISA Cmfigumtion (EKE)
EC000
EADOO
E8000
B-8 Specifications
Input/output Addresses
I/O address
Device
000-00F
Slave DMA controller 1
020 - 021
Master interrupt controller 1
026
Configuration controller index registers
027
Configuration controller data registers
040 - 043
Interval timer 1
048 - 04B
Interval timer 2
060,064
Keyboard/mouse controller
061
NMI and diagnostic port
070
Real-time clock
070
Enable NMI
071
Real-time clock
078
BIOS loop timer
080 - 08F
DMA page register
092
System control port
0A0 - 0A1
Slave interrupt controller 2
0C0 - ODE
Master DMA controller 2
0F0
Reset numeric coprocessor
0F8 - OFF
Numeric coprocessor
1F0 - 1F8
IDE hard drive controller
278 - 27B
Parallel port 2 (LPT2); parallel port 3 (PS/2-compatible)
2C0 - 2DF
Clock calendar
2E8 - 2EF
Serial port 4 (COM4)
2F8 - 2FF
Serial port 2 (COM2)
378 - 37F
Parallel port 1 (LPT1); parallel port 2 (PS/2-compatible)
3B0 - 3BB
WD90C31 onboard video registers
Specifications B-9
Input/output addresses (continued)
B-10
I/O address
Device
3BC - 3BE
Parallel port 3 (LPT3); parallel port 1 (PS/2-compatible)
3BF - 3DF
16C552 registers
3E8 - 3EF
Serial port 3 (COM3)
3F0 - 3F5
Onboard diskette controller
3F6
Onboard IDE hard drive controller
3F7
Onboard IDE read
3F7
Onboard diskette controller read/write
3F8 - 3FF
Serial port 1 (COM1)
400 - 40B
Extended DMA controller 1 registers
40C - 40F
Extended control/test registers
461 -464
Extended NMI register
464 - 465
Extended bus master
480 - 48F
Extended DMA page register
4C2 - 4CE
Extended DMA 2 registers
4D0
Extended interrupt 1
4D1
Extended interrupt 2
4D4
Extended DMA 2 chaining
4D4
Extended DMA 2 write mode
C02 - C04
System baseboard configuration information
C80 - C83
System baseboard EISA ID register
C84
System baseboard enable
C85 - C87
Reserved
Specifications
System Interrupts
Specifications B-11
Glossary
Access speed
The length of time it takes for an information storage device,
such as memory or a disk drive, to return a piece of data
requested by another device. For example, your computer’s
SIMMs return data requested by the microprocessor at an
access speed of 80ns (nanoseconds).
Address
A number or name that identifies the location where
information is stored in a computer’s memory.
Analog monitor
A monitor that generates, responds to, or acts upon analog
data, such as a VGA monitor. Analog data is transmitted by
varying the voltage levels in a continuous current and can
produce an infinite number of colors or gray shades.
ASCII
American Standard Code for Information Interchange. A
standardized numeric coding system for representing
characters, such as numbers, letters, and graphic symbols. Each
of the 256 ASCII codes occupies one byte of storage. All
computers, printers, and programs can use files transmitted in
standard ASCII code. Extended ASCII codes can be used only
by hardware and software designed to interpret them.
Asynchronous
A method of data transmission in which one machine sends
data, one character at a time, to another machine at variable
intervals that do not need to be synchronized to a timing
device, such as a system clock.
Glossary 1
Base memory
See Conventional memory.
BIOS
Basic Input/Output System. Routines in ROM (Read Only
Memory) that handle the transfer of information among
various hardware components, and between the hardware and
your operating system and other software.
Bus
A wire or group of wires that sends information from
component to component in the computer. The speed of a bus
increases by the number and width of the channels the bus uses
to move data.
Cache
A high-speed type of memory buffer that stores frequently
used data where your microprocessor can access it faster.
CFG (configuration file)
A file that provides the EISA Configuration utility with all the
information it needs about your system board or an option
card. All EISA cards and some ISA cards come with CFG files.
CGA
Color Graphics Adapter. A type of display adapter card that
can generate up to 25 lines of text with 80 characters on each
line, two-color graphics at 640 x 200 resolution, or four-color
graphics at 320 x 200 resolution.
2 Glossary
Complementary Metal-Oxide Semiconductor. A type of
low-power silicon chip used for RAM and switching
applications that is backed up by a battery.
Configuration
The particular setup of your computer’s internal and external
components. A typical configuration consists of a computer
with a certain amount of memory, one diskette drive, and one
hard disk drive connected to a monitor, printer, and keyboard.
Conventional memory
The memory in the computer below 1MB that is available to
MS-DOS and application programs-usually 640KB. Also
called base memory or main memory.
Coprocessor
See Math coprocessor.
Copy-protected program
A program containing a software “lock” that prevents it from
being copied. Some of these programs require you to leave the
program diskette in the drive while you use it. See also Key disk.
CPU
Central Processing Unit. The primary computer device that
interprets instructions, performs the tasks you indicate, keeps
track of stored data, and controls all input and output
operations. See also Microprocessor.
Glossary 3
Cylinders
The vertical alignment of tracks in a hard disk that can be lined
up under one read/write head. The number of tracks on a disk
is equal to the number of cylinders times the number of heads.
See also Tracks.
Default
Any value or setting choice that the computer or a program
makes when the user does not specify an alternative. A default
value stays in effect unless you override it temporarily by
changing the value or you reset the default value itself.
Device
A piece of equipment that is part of a computer system and
performs a specific task, such as a disk drive, a monitor, or a
printer.
Device driver
A file containing instructions that allow your computer to
recognize and communicate with a device. The device may be a
printer, monitor, or other type of device.
Diagnostics
See Power-on diagnostics.
DIP switch
Dual Inline Package switch. A small rocker- or sliding-type
switch on the circuit board of a device that controls a particular
function.
4 Glossary
Disk Operating System. The generic term for the operating
system software that controls a computer and directs its input
and output functions. See also MS-DOS and Operating system.
EGA
Enhanced Graphics Adapter. A type of display adapter card
that allows you to display high-resolution graphics on an EGA
monitor. It can display up to 43 lines of text with 80 characters
on each line, or it can display monochrome or 16-color graphics
at resolutions up to 640 x 350.
EISA
Extended Industry Standard Architecture. A bus standard for
IBM compatible computers that extends the ISA bus
architecture to 32 bits and allows more than one option card to
share the bus easily.
Expanded memory
Memory that specially-written MS-DOS programs can use
when an expanded memory manager program maps that
memory into an accessible area. See also LIM EMS 4.0.
Extended memory
Memory above 1MB that is accessed by the 386 or 486
microprocessors when they are operating in protected or
virtual mode. This memory is available to OS/2® programs, but
is available to MS-DOS only if an extended memory manager
program is installed. See also Expanded memory and OS/2.
Fast-page mode
A dynamic memory mode that allows successive addresses to
access the same DRAM page by changing the column addresses.
Glossary 5
FLASH memory
Non-volatile, rewritable, random access memory. Your
computer’s BIOS and EISA configuration information is
temporarily stored in a FLASH memory device.
Hexadecimal
A base-16 numbering system frequently used by programmers
to represent the binary numbers used by the computer. Any
decimal number between 0 and 255 can be expressed by a
two-digit hexadecimal number consisting of the numbers 0
through 9 and the letters A through F. Hexadecimal numbers
are usually followed by the letter h to differentiate them from
decimal numbers.
IDE
Integrated Drive Electronics. A type of hard disk drive interface
in which the controller is located on the drive, instead of on a
controller card. Your computer includes an interface for up to
two IDE hard disk drives on the main system board.
ISA
Industry Standard Architecture. The 8- or 16-bit bus standard
developed for IBM compatible computers.
Key disk
A diskette containing a copy-protected program and that must
remain in a diskette drive while you use the program. See also
Copy-protected program.
6 Glossary
LAN
Local Area Network. A series of computers connected by cables
in order to share software, data, and peripheral devices, as well
as communicate with each other. LANs are usually composed
of at least two or more computers running special network
software, such as Novell® NetWare.® Personal computers
operating in a LAN environment can also be used as
stand-alone computers.
LIM EMS 4.0
Version 4.0 of the Lotus®/Intel/Microsoft® Expanded Memory
Specification-a description of a capability your computer has
for supporting programs that use expanded memory. See also
Expanded memory.
Main system board
The board built into your computer containing the circuitry and
the primary components your computer needs to operate.
Other boards, such as option cards, can be installed in the
option slots (bus connectors) on the main system board. Also
called motherboard.
Mapping
The method used to mark the geographic location of a resource
within the memory address space.
Math coprocessor
An optional device that enables the computer to process
mathematical calculations faster by using floating point
numbers instead of whole numbers. This speeds up certain
math and graphics operations performed by programs that use
this type of calculation.
Glossary 7
MCGA
Multi-color Graphics Array. A type of display adapter that
emulates a color graphics adapter (CGA). MCGA provides two
additional modes: 640 x 480 in two colors and 320 x 200 in 256
colors. See also CGA.
MDA
Monochrome Display Adapter. A type of display adapter that
displays in 80 column by 25 line text mode in only one color,
such as green or amber.
Memory module
A small circuit board that contains surface-mounted memory
chips. You can add memory modules to the main system board
to expand your computer’s memory. Commonly called a SIMM
(single inline memory module).
MGA
Multi-mode Graphics Adapter. A type of display adapter card
that can display monochrome text and color graphics on the
screen.
Microprocessor
A small CPU contained on one semiconductor chip. See also
CPU.
Modem
MOdulator/DEModulator. A device that allows a computer to
transfer data to and from another computer by transmitting
signals over telephone lines.
8 Glossary
MS-DOS
Microsoft Disk Operating System. The operating system most
commonly used with Intel-based computers. MS-DOS is a
command- based, single-user, single-tasking operating system.
See also DOS, OS/2, and Operating system.
Multifrequency monitor
A monitor that accepts input at different frequencies and can
display in a variety of resolutions.
Multitasking
The ability of a computer and an operating system to work on
more than one command or task at a time. The tasks are
actually not performed at the same time, but assigned priorities
and rapidly processed by the computer in sequential order. See
also OS/2 and UNIX.
Network server
The main computer in a network which controls access to the
rest of the network computers (called workstations). The server
also provides mass storage, programs, and other resources to
the workstations.
Non-target modeling mode
A method you can use to run the EISA Configuration utility to
create an SCI file for another computer. This mode prevents
you from saving the information in the FLASH memory of the
computer on which you are running the program.
Numeric keypad
The number and cursor control keys grouped to the right of the
keyboard. The operation of the dual-use keys on the numeric
keypad is controlled by the [a] key.
Glossary 9
Operating speed
The speed at which the computer’s processor can execute
commands, usually expressed in megahertz (MHz), such as
66 MHz.
Operating system
A collection of programs that manages a computer’s
operations, such as interpreting input, managing files, and
reading and writing data to disk. The operating system (such as
MS-DOS, OS/2, or UNIX) provides the foundation for the other
programs you use and controls the usage of the hardware
resources.
OS/2
Operating System /2. The enhanced operating system
developed jointly by Microsoft and IBM that provides
protected mode processing and multitasking capabilities. See
also DOS, MS-DOS, and Operating system.
Parity
A method used to verify the accuracy of data transmissions by
making the total of the number of l’s in a group of bits odd
(odd parity), even (even parity), or none (no parity).
Partition
(1) The area an operating system defines on a hard disk so you
can use that area as though it were a physically separate device;
(2) to divide a hard disk into separate logical areas. You can
create a primary partition and one or more extended partitions
on a hard disk.
10 Glossary
Power-on diagnostics
Tests stored in a computer’s ROM that the computer runs to
check its internal circuitry, peripheral device configuration, and
operating status each time you turn it on or reset it.
Processor speed
See Operating speed.
RAM
Random Access Memory. The portion of the computer’s
memory used to run programs and store data while you work.
All data stored in RAM is erased when you turn off or reset the
computer; so you must store any data you want to keep on
disk.
Real-time clock
A clock inside the computer that keeps track of the time and
date, even when the computer is turned off, by using power
from a backup battery.
Refresh rate
The frequency with which a monitor can redraw a screen
image. The faster the refresh rate, the less the screen will flicker.
Reset
To restart a computer without turning it off. You can reset your
(warm reset) or the
computer by pressing [m IF]$7
Delete
reset button (cold reset). Resetting erases all data stored in
RAM and reloads your operating system.
Glossary 11
ROM
Read Only Memory. A portion of memory that can only be read
and cannot be modified. ROM retains its contents even when
you turn off the computer by using power from a backup
battery.
RS-232C
A widely used, standard type of serial communication. You can
connect up to two RS-232C devices to the computer’s built-in
serial ports.
SCI files
System Configuration Information files. The file(s) created by
the EISA Configuration utility that contain all the information
about the option cards you have installed and how all of your
system resources are allocated. The most current SCI file is
called SYSTEM.SCI.
SCSI
Small Computer System Interface. A special input/output bus
you can add to your computer to control up to seven SCSI
peripheral devices. You can install multiple SCSI buses. A
typical SCSI subsystem includes a SCSI controller card and
several SCSI devices,
Sector
A small section of a disk track (typically 512 bytes long) that
provides an address at which the computer can store and
retrieve data. See also Tracks.
Self test
See Power-on diagnostics.
12
Glossary
Shadow RAM
The feature in your computer that copies the contents of the
system, video, and any external BIOS ROMs into the RAM area
of memory to speed up processing.
SIMM
See Memo y module.
The physical device that allows you to insert large-capacity
magnetic tape cartridges for compact data storage and backup.
Trucks
Addressable, concentric circles on a disk, resembling the
grooves on a record, which divide the disk into separate
accessible areas. On a tape cassette, the tracks run parallel to
the edge of the tape. See also Sector.
UNIX
A powerful operating system that supports multitasking and is
especially suited to multi-user environments. UNIX@’ is
compatible with a range of computers, from personal
computers to mainframes. See also Operating system.
VGA
Video Graphics Array. A type of high-resolution display
adapter that provides a variety of video modes. Your
computer’s VGA controller supports resolutions up to
640 x 480 on a compatible monitor.
Glossary 13
Wife-protect
To protect the data on a diskette from being changed by placing
a write-protect tab over the notch on a 5.25-inch diskette or by
setting the write-protect switch on a 3.5-inch diskette. You can
also write-protect a file on a disk by using software to designate
the file read-only. When a diskette or file is write-protected,
you cannot erase, change, or record over its contents.
14 Glossary
Index
A
Accessing components, 5-1 -9, 6-3,
6-8
Advanced configuration options,
3-20, 3-23 -24
Altitude, B-4
Application software
compatibility, 2-11
problems, A-22
technical support, Intro-4
Authorized Epson dealers, Intro-4
B
Back panel, 1-6 -7
Base memory, 2-8, 3-12
Bays, mass storage, Intro-1, 7-1 -27,
B-3
Beeps, error, see Error tone codes
BIOS
setup option, 3-18
shadow, 2-11
specifications, B-1
version number, A-1
Bit-interleaving technology, Intro-2
Boards
see Main system board
see Option cards
Burst mode, EISA, Intro-2
Bus, EISA, Intro-2
Bus master expansion slots, B-2
C
Cache memory, Intro-1, 2-10, 3-13,
4-17, 6-3, B-2
Cards
see CPU card
see Option cards
CD-ROM drive, Intro-1, 7-1
CF command, 3-29 -31
CFG files, 1-5 -6, 1-10, 2-1, 3-1,
3-3 -4, 3-10 -11
Clock
real-time, 3-8, B-1
setting, 2-4, 3-8 -9
Components, accessing, 5-1 -9, 6-3,
6-8
Configuration
memory, 6-11
options, 3-11 -23
system, 1-10, 3-1 -31
utility, see EISA Configuration
utility
Console redirection, 2-9, 3-14 -15,
4-21
Coprocessor, math, Intro-1
Cover
locking, 4-1 -2, 4-19 -20
removing, 1-8, 5-1 -5
replacing, 5-5 -7
unlocking, 4-2
CPU card
installing, 6-4 -5
removing, 6-3 -4
specifications, B-1
CPU speed, 2-10, 3-17, 4-13 -15, B-1
Customer support, Intro-4
D
Data transfer speed, Intro-2
Date, setting, 2-4, 3-1, 3-8-9
Depth of computer, B-3
Diskette drive
configuring, 1-10, 2-1, 2-5, 3-13, 6-2
controller, Intro-1, 3-13, 3-19
installing, 7-1 -27
interface, 6-2
operating without, 4-20 -21
problems, A-20
Index 1
Diskette drive
protective card, 1-8
removing, 7-1 -27
security, 4-2
specifications, B-3
types, Intro-1 -2, B-3
Diskettes
double-density, B-3
high-density, B-3
problems, A-19 -20
Display screen, see Monitor
Drive bays, Intro-1, 7-1 -27, B-3
E
EISA
burst mode, Intro-2
bus, Intro-2
bus master expansion slots,
Intro-1, 6-6, B-2
option cards, Intro-1 -2,1-5 -6,1-10,
2-1, 3-1 -2, 3-4, 3-7, 3-10 -12
System Utilities, Intro-2, 4-6,
4-12 -18
technology, Intro-1
EISA Configuration utility
adding board, 3-11
advanced options, 3-23 -24
alternate files, 3-25 -26
CF command, 3-29 -31
CFG files, 1-5 -6, 1-10, 2-1, 3-1,
3-3 -4, 3-10 -11
configuration process, 3-4-6
hard disk drive types, 3-21 -23
performing steps, 3-9 -24
removing board, 3-11
running, Intro-2, 1-5 -6, 1-10, 2-1,
3-1 -31
SD command, 3-27 -29
setting date, 3-8 -9
starting, 3-7 -8
system board options, 3-12 -20
using keyboard, 3-5
2
Index
EISA Configuration utility
using mouse, 3-5 -6
using on-line help, 3-6
using special modes, 3-27 -31
Electromagnetic interference, 1-1
Environmental
conditions, 1-1
requirements, B-4
Epson Connection, Intro-4
Equipment log, 1-11
Error messages, 2-2, A-2 -12
Error tone codes
fatal errors, 2-3, A-2, A-12 -13
non-fatal errors, A-2, A-12, A-14
Expansion slots, Intro-2
Extended memory, 2-8, 3-12
F
FLASH
memory, 6-15 -16
user area, 2-11, 3-18
Floppy disk drive, see Diskette
drive
Floppy diskette, see Diskettes
Front panel
locking, 1-3, 4-2 -3, 4-19 -20
removing, 5-8
replacing, 5-9
unlocking, 4-4
H
Hard disk drive
controller, 2-11, 3-13
IDE, Intro-1, 2-5, 3-13, 6-2
installing, 7-1 -27
interface, Intro-1, 6-2
problems, A-21 -22
removing, 7-1 -27
SCSI, see SCSI
specifications, B-3
types, 2-12 -14, 3-14, 3-21 -23
user-defined, 2-5, 2-12, 3-12, 3-21
Height of computer, B-3
Help
on-line, 3-6
where to get, Intro-4
Humidity, B-4
I
IDE, see Hard disk drive
Identifying system, A-1 -2
Installation overview, 1-2 -3
Interfaces
built-in, Intro-2, B-2
cables, 1-7
diskette drive, 6-2
IDE hard disk drive, Intro-1, 6-2
parallel, Intro-1, B-2
serial, Intro-1, B-2
specifications, B-2
International marketing locations,
Intro-4
ISA
option cards, Intro-1, 1-3,1-5 -6,
1-10, 2-1, 3-1, 3-4, 3-11
technology, Intro-1
J
Jumpers
locating, 6-2
setting, 4-19, 5-4, 6-14 -16
viewing settings, 3-7
K
Key commands, 3-5
Keyboard
cable connector, 1-7, B-2
connecting, 1-3, 1-9
locking, 1-8, 4-4, 4-12 -13, 4-19 -20
operating without, 2-7, 3-16,
4-20-21
password, 4-5, 4-8, 4-11 -13
port, Intro-1, 1-6 -7
problems, A-18
reactivating, 4-4
Keyboard
specifications, B-2
using, 3-5
Keyboard/Mouse Lock button,
1-8, 4-2, 4-4, 4-19 -20
Keys, 1-3, 4-3
L
Language, 2-4
Lock-up problems, A-2, A-14 -16
Locking
cover, 4-1 -2, 4-19 -20
front panel, 4-2 -3, 4-19 -20
keyboard, 1-8, 4-4, 4-12 -13, 4-19 -20
mouse, 1-8, 4-4, 4-19 -20
M
Main system board
accessing components, 5-4, 6-3, 6-8
bay, 6-7
jumpers, 6-2, 6-8, 6-12, 6-14 -16
map, 6-2
specifications, B-1
Marketing locations, international,
Intro-4
Mass storage bays, Intro-1, 7-1 -27,
B-3
Math coprocessor, Intro-1
Memory
base, 2-8, 3-12
cache, Intro-1, 2-10, 3-13, 4-17, 6-3,
B-2
configurations, 6-10 -11
extended, 2-8, 3-12
FLASH, 2-11, 3-18, 6-15 -16
map, system, B-7 -8
modules, see SIMMs
specifications, B-1
test, 2-2
video, B-1
Microprocessor speed, see CPU
speed
Index 3
Microprocessor upgrades, Intro-2,
6-3, B-2
Modem, connecting, 1-7
Monitor
connecting, 1-3,1-7
operating without, 4-20 -21
port, 1-6
problems, A-18 -19
specifications, B-2
Mouse
cable connector, 1-7, B-2
connecting, 1-3, 1-9
locking, 1-8, 4-4, 4-19 -20
port, Intro-1, 1-6 -7, 2-8, 3-17
problems, A-25
reactivating, 4-4
specifications, B-2
using, 3-5 -6
N
Network
file server, Intro-1, 1-3
option card, Intro-2
password, 4-5, 4-7
software, 4-5
0
On-line help, 3-6
Operating system, 1-3, 1-10, 3-31,
4-5, A-2
Option card(s)
adding, 3-9 -11
EISA, Intro-1 -2, 1-5 -6, 1-10, 2-1,
3-1 -2, 3-4, 3-7, 3-10 -12
installing, 1-5 -6, 5-4, 6-1, 6-6 -8
ISA, Intro-1, 1-3, 1-10, 2-1, 3-1, 3-4,
3-11
moving, 3-10
power supply limits, 1-6
problems, A-23
removing, 3-9 -11, 5-4, 6-1, 6-8
Optional equipment, installing,
Intro-2, 1-3, 1-5 -6, 5-1 -2, 6-1 -16
4
Index
P
Parallel port, Intro-1, 1-6, 2-9, 3-14,
B-2
Password(s)
changing, 4-9 -11
deleting, 4-9 -11
entering, 4-8 -9
jumper, 6-16, A-16 -18
keyboard, 4-5, 4-8, 4-11 -13
network, 4-5, 4-7
power-on, 4-5
problems, A-16 -18
setting, 2-7, 4-5 -8, 4-19
Peripheral devices, connecting,
1-6 -7, 1-9
Port(s)
keyboard, Intro-1, 1-6 -7
locating, 1-6
mouse, Intro-1, 1-6 -7, 2-8, 3-17
parallel, Intro-1, 1-6, 2-9, 3-14, B-2
serial, Intro-1, 1-6, 2-9, 2-11, 3-14,
3-19, B-2
VGA, 1-6
Power
button, 1-8 -9
cord, 1-2, 1-7, 5-1, B-4 -6
indicator, 1-9
source requirements, 1-1 -2, 1-4 -5,
B-6
supply, 1-4, B-4 -5
supply limits, 1-6, 6-6, B-5
Power-on diagnostic tests, 2-2 -3,
A-1 -3
Power-on password
changing, 4-10
deleting, 4-10
setting, 4-5 -7
Precautions, iii-vi, 1-8, 5-1 -2
Printer
connecting, 1-3, 1-7
problems, A-23
Processor speed, see CPU speed
R
Real-time clock, 3-8, B-1
Redirecting console, 2-9, 3-14 -15,
4-21
Reset button, 1-8, 2-2, 2-11, 2-14,
3-19, 4-8 -10, 4-14 -15, A-2
ROM BIOS, see BIOS
S
Safety instructions, iii-vi, 1-8, 5-1 -2
SCI files, 3-1 -2, 3-25 -26
SCSI
adapter, Intro-2
bus, 7-20
drives, Intro-1, 2-11, 3-19, 7-1, B-3
ID number, 7-20
problems, A-25
subsystem, Intro-2
terminating resistors, 7-20
SD command, 3-27 -29
Security features, Intro-2, 4-19 -20
Serial ports, Intro-1, 1-6, 2-9, 2-11,
3-14, 3-19, B-2
SETUP program
exiting, 2-14
options, 2-4 -11
running, 1-10, 2-1 -14, A-1
when not to use, 1-10, 3-2
Shadow RAM, 2-11, B-1
SlMMs
configurations, 6-10 -11
double-sided, Intro-1
gold-plated, 6-10
installing, Intro-1, 1-3, 1-5, 5-4, 6-3
6-11 -13
jumpers, 6-16
locating, 6-11
problems, A-24
removing, 5-4, 6-1, 6-13-14
single-sided, Intro-1
specifications, B-1
tin-plated, 6-10, B-1
Software
compatibility, 2-11
problems, A-22
technical support, Intro4
Speaker, 2-8, 3-17, 4-16 -17, B-2
Specifications, B-1 -11
Speed, see CPU speed
System
choosing location, 1-1
identifying, A-1 -2
information, recording, 1-11
interrupts, 3-19, B-11
memory map, B-7 -8
setting up, 1-1 -12
specifications, B-1 -11
T
Tape drive, Intro-1 -2, 7-1
Technical assistance, Intro-4
Technical specifications, B-1 -11
Temperature, B-4
Time, setting, 2-4, 3-1, 3-8-9
Time-dependent software, 2-10
Troubleshooting, A-1 -25
V
VGA
adapter, 2-6, 2-11, 3-15, 6-9
controller, Intro-1, 2-6, 2-11, 3-15,
6-14 -16, B-3
feature connector, 6-1 -2, 6-6, 6-8 -9
port, 1-6, 2-6, 2-11, 3-15
resolutions, Intro-1, B-3
Video
adapter, 2-6, 2-11, 3-15, 6-9
BIOS mapping, 2-11, 3-16, 3-19
controller, Intro-1, 2-6, 2-11, 3-15,
6-14 -16, B-3
RAM, B-1
refresh rate, 2-6, 2-11, 2-14, 3-16,
3-19
specifications, B-3
Voltage selector switch, 1-2, 1-4 -5
Index 5
W
Weight of computer, B-3
Where to Get Help, Intro-4
Width of computer, B-3
6
Index
Epson America International
Epson Latin America
Miami, FL, USA
Tel: (305) 265-0092
Fax: (305) 265-0097
Epson Mexico, S.A. De C.V.
Mexico, D.F., Mexico
Tel: (525) 395-9897
Fax: (525) 395-9499
Epson Argentina, S.A.
Buenos Aires, Argentina
Tel: (541) 322-7487
Fax: (541) 3224637
Epson Do Brasil
SBo Paulo, SP Brazil
Tel: (5511) 813-3044
Fax: (5511) 210-9290
Epson Chile, S.A.
Santiago, Chile
Tel: (562) 231-5358
Fax: (562) 233-3197
Epson Venezuela, S.A.
Caracas, Venezuela
Tel: (582) 241-0433
Fax: (582) 241-6515
Epson Costa Rica, S.A.
San Jose, Costa Rica
Tel: (506) 34-6666
Fax: (506) 25-5709
Epson America, Inc.
International Division
20770 Madrona Avenue
Torrance, CA, USA 90509-2842
Tel: (310) 782-0770
Fax: (310) 782-5051
Epson International Marketing Locations
Epson Deutschland GmbH
Ziilpicher StraBe 6,
4000 Dusseldorf 11
Germany
Phone: 211-56030
Telex: 41-8584786
Epson France S.A.
BP. 320,68 Bis Rue Majolin
92305 Levallois-Perret Cedex
France
Phone: 33-l-4737-3333
Telex: 42-610657
Epson Iberica, S.A.
Avda. de Roma 18-26
08290 Cerdanyola de1 valles
08036 Barcelona, Spain
Phone: 3-582-15-00
Fax: 3-582-15-55
Telex: 50129
Epson Italia s.p.a.
V.le F.lli Casiraghi, 427
20099 Sesto S. Giovanni
Milano, Italy
Phone: 2-262331
Fax: 2-2440641 or 2-2440750
Telex: 315132
Epson Hong Kong Ltd.
25/F., Harbour Centre,
25 Harbour Road
Wanchai, Hong Kong
Phone: 8314600
Fax: 572-5792
Telex: 65542 EPSCO HX
Epson Australia Pty. Ltd.
17 Rodborough Road
Frenchs Forest, N.S.W. 2086
Australia
Phone: 2-452-0666
Fax: 2-451-0251
Telex: 71-75052
Epson Electronics Trading Ltd.
Taiwan Branch
lOF, No. 287, Nanking E. Road,
Sec. 3, Taipei, Taiwan R.O.C.
Phone: 886-2-717-7360
Free phone: 886-080-211172
Fax: 886-2-712-9164
Telex: 785-24444
Epson Singapore Pte. Ltd.
No. 1 Raffles Place #26-00,
Oub Centre, Singapore 0104
Phone: 533-0477
Telex: 87-39536
Epson (U.K.) Ltd.
Business Management Dept. (PC)
Campus 100, Maylands Avenue
Hemel Hempstead, Hertfordshire,
HP2 7EZ, UK
Phone: 0442 61144
Free phone: linkline 0800 289622
Fax: 0422 227227
Telex: 51-824767
Distributors
South America
SISCO
SBo Paulo, SP Brazil
Tel: (5511) 574-8877
Fax: (5511) 572-1306
In-Stock Investments, Inc.
Santa Cruz, Bolivia
Tel: (591-3) 32-54-50
Fax: (591-3) 33-57-83
Siser Ltda.
La Paz, Bolivia
Tel: (591-2) 34-32-45
Fax: (591-2) 35-92-68
Exhibit Computer
Bogota, Colombia
Tel: (571) 2X3-2700
Fax: (571) 218-5370
McSilver, S.A.
Bogota, Colombia
Tel: (571) 230-1014
Fax: (571) 230-9205
UPEN Computer Systems
Bogota, Colombia
Tel: (571) 257-7800
C.I.L.D.S.E.
Quito, Ecuador
Tel: (593) 2-54-3418
Fax: (593) 2-55-4780
Ace Computers & Electronics
Georgetown, Guyana
Tel: (592) 25-65-48
Fax: (592) 26-39-67
A.J. Vierci &CIA
Asuncion, Paraguay
Tel: (595) 21-449-220
Fax: (595) 21-449-234
Alvimer S.R.L. Trading Inc.
Ciudad Del Este, Paraguay
Tel: (595) 61-60234
Fax: (595) 61-60566
Infocenter
Asuncion, Paraguay
Tel: (595) 214-98762
Fax: (595) 214-49514
Control De Procesos Informaticos
Lima, Peru
Tel: (5114) 328-384
Fax: (5114) 355-017
Peru Mercantil, S.A.
Lima, Peru
Tel: (5114) 62-2566
Fax: (5114) 61-8256
Interfase S.A.
Montevideo, Uruguay
Tel: (598) 249-4600
Fax: (598) 249-3040
Caribbean Computer Systems, Ltd.
Bridgetown, Barbados
Tel: (809) 429-7050
Fax: (809) 427-6089
Da Costas Limited
Bridgetown, Barbados
Tel: (809) 427-5854
Fax: (809) 436-9870
North Atlantic Data Systems
Hamilton, Bermuda
Tel: (809) 295-7111
Fax: (809) 292-3834
The Computer Center
Nassau, Bahamas
Tel: (809) 328-0304
Fax: (809) 328-0307
Columbus Limited
Grand Cayman, West Indies, B.W.1
Tel: (809) 949-8039
Fax: (809) 949-7537
Compusupplies, Ltd.
Kingston, Jamaica
Tel: (809) 925-8382
Fax: (809) 925-8115
WTG/AM’EC Systems Limited
Kingston, Jamaica
Tel: (809) 929-9250
Fax: (809) 929-8296
Boolchand Pessomal N.V.
Curacao, Netherlands Antilles
Tel: (599) 961-7545
Fax: (599) 961-7876
Computer Gallery
Hato Rey, Puerto Rico
Tel: (809) 753-0500
Fax: (809) 753-0552
Micro International, S.A.
Santo Domingo, Republica Dominicana
Tel: (809) 533-7096
Fax: (809) 535-3218
IMCON Limited
Castries, St. Lucia, West Indies
Tel: (809) 452-6130
Fax: (809) 452-3883
Complete Computer Systems
Port-of-Spain, Trinidad
Tel: (809) 625-1204
Fax: (809) 623-5426
Central America
Equipos Electronicos Valdez y Cia
San Salvador, El Salvador
Tel: (503) 23-73-43
Fax: (503) 24-53-82
PS2000
Guatemala, Guatemala
Tel: (502-2) 32-57-44
Fax: (502-2) 31-24-49
Servicio Integral De Computation, S.A.
Guatemala, Guatemala
Tel: (502-2) 31-11-70
Fax: (502-2) 32-52-22
CODASA
Tegucigalpa, Honduras
Tel: (504) 33-5685
Fax: (504) 58-0255
Micro-Tee
Managua, Nicaragua
Tel: (505-2) 66-27-15
Fax: (505-2) 66-27-58
Sonitel, C. A.
Panama, Republica De Panama
Tel: (507) 63-98-00
Fax: (507) 63-98-15
reset
button
power
button
keyboard/mouse
lock button
power
indicator Y
IDE/SCSI drive /
indicator
keyboard/mouse
lock indicator
SCSI drive
indicator
voltage selector
switch
/
c
keyboard poti
AC inlet
- mouse port
serial port 2
- serial port 1
- parallel port
A cover lock
8 ’
400234300