1
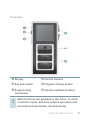
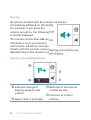
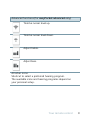
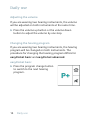
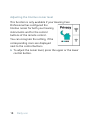
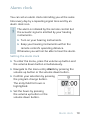
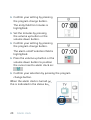
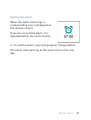
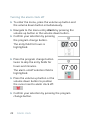
easyPocket basic easyPocket advanced User Guide www.siemens.com/hearing Life sounds brilliant. Content Your remote control 4 Overview5 Display6 Control buttons 8 Key lock switch 10 Programming connection 10 Batteries11 Inserting batteries 11 Checking the battery status 13 Daily use Adjusting the volume Changing the hearing program Turning on and off (mute) Adjusting the tinnitus noiser level 14 14 14 16 18 Alarm clock Setting the alarm clock Ending the alarm Turning the alarm clock off 19 19 21 22 Setup and service functions Setting the time Resetting volume and hearing program Displaying contact data Setting the language of the menu 23 23 25 26 26 2 Content Maintenance and care 27 Troubleshooting28 Important information Intended use Explanation of symbols Transport and storage conditions Disposal information Technical information Conformance information 29 29 29 29 30 30 32 Important safety information Personal safety Product safety 33 33 36 Country-specific information 38 Content 3 Your remote control Your hearing instruments are equipped with wireless technology and can therefore be controlled by a remote control. Both easyPocket basic and easyPocket advanced provide the same basic remote control functions for listening and program change. easyPocket advanced has additional comfort functions. The operating distance of the remote control is approximately 40 inches (1 meter). uMake sure the distance between your remote control and hearing instrument does not exceed the operating distance. CAUTION Read this user guide thoroughly and completely and follow the safety information in this document to avoid damage or injury. 4 Your remote control Overview ૠ ➊ Display ➍ Control buttons ➋ Key lock switch ➎ Program change button ➌ Programming ➏ Volume up/down buttons connection More functions are available in the menu. To enter or exit the menu, press the volume up button and the volume down button simultaneously. Your remote control 5 Display All actions initiated with the remote control are immediately reflected on the display. For example, if you press the volume up button, the following icon is shortly displayed. The remote control does not receive information from your hearing instruments. All actions that you initiate with the controls of your hearing instruments are not reflected on the remote control’s display. Display of easyPocket basic ➊ Indicates change of hearing program and volume ➋ Alarm clock is activated 6 Your remote control ➌ Batteries of the remote control are low ➍ Function of control buttons Display of easyPocket advanced ➊ Indicates change of volume ➋ Program name ➌ Program icon ➍ Program number ➎ Alarm clock is activated ➏ Batteries of the remote control are low ➐ Function of programmable control buttons Power save mode If the remote control is not used for some time, the display automatically turns black. The remote control is then in its power save mode. uPress any button to activate the display again. Your remote control 7 Control buttons You can quickly access two functions with the control buttons on the right hand side of the remote control. The control buttons of the easyPocket advanced can be configured by your Hearing Care Professional. Small icons on the display show the functions. Basic functions Turn hearing instruments on or off. Reset to default volume and hearing program. 8 Your remote control Advanced functions (for easyPocket advanced only) Tinnitus noiser level up. Tinnitus noiser level down. Adjust treble. Adjust bass. All other icons: Shortcut to select a preferred hearing program. The available icons and hearing programs depend on your personal setup. Your remote control 9 Key lock switch uTo prevent any accidental operation while the remote control is in pockets or bags, move the key lock switch to lock position (red color visible). When the key lock is active, all buttons on the remote control are disabled. The following icon is displayed. Programming connection This connection is only to be used by your Hearing Care Professional for programming the remote control. 10 Your remote control Batteries The remote control uses two AAA batteries. Inserting batteries uSlide the battery compartment cover in the direction of the arrow. uInsert the batteries. Make sure the "+" symbols on the battery and compartment are aligned. Batteries 11 uAttach the cover by sliding it onto the remote control. The current time setting is displayed. If you want to change it, refer to section "Setting the time". 12 Batteries Checking the battery status When the batteries of the remote control are low, this is indicated in the status bar. Additionally, you can check the battery status at any time in the menu. uTo enter the menu, press the volume up button and the volume down button simultaneously. uNavigate to the menu entry Info by pressing the volume up button or the volume down button. uConfirm your selection by pressing the program change button. The battery status is displayed: battery full battery empty uTo return to the standard display, press the program change button. Remove empty batteries immediately and dispose of them according to local regulations. Batteries 13 Daily use Adjusting the volume If you are wearing two hearing instruments, the volume will be adjusted on both instruments at the same time. uPress the volume up button or the volume down button to adjust the volume by one step. Changing the hearing program If you are wearing two hearing instruments, the hearing program will be changed on both instruments. The procedure for changing the hearing program differs for easyPocket basic and easyPocket advanced. easyPocket basic uPress the program change button to switch to the next hearing program. 14 Daily use easyPocket advanced uPress the program change button repeatedly until the icon of the desired hearing program is displayed. or uPress the control button next to the icon indicating the desired hearing program. The control buttons have to be configured by your Hearing Care Professional. Daily use 15 Turning on and off (mute) You have several options to turn your hearing instruments on and off with your remote control. Both hearing instruments are simultaneously turned on or off. When you turn your hearing instruments off via remote control, the following icon is displayed. It is displayed until you turn your hearing instruments back on. Additionally, all buttons are disabled. The only available function is to turn the hearing instruments back on. After turning on, the previously used volume and hearing program are set. Via control button uPress the control button next to the following icon to turn your hearing instruments on or off. The control buttons have to be configured by your Hearing Care Professional. 16 Daily use Via menu Turning off: uTo enter the menu, press the volume up button and the volume down button simultaneously. uNavigate to the menu entry HI Mute / Unmute by pressing the volume up button or the volume down button. uConfirm your selection by pressing the program change button. Turning on: uPress any button to activate the display. uWait until the information about the turned off hearing instruments disappears. The menu is displayed and the HI Mute / Unmute entry is still selected. uTo turn your hearing instruments back on, confirm the selection by pressing the program change button. Daily use 17 Adjusting the tinnitus noiser level This function is only available if your Hearing Care Professional has configured the tinnitus noiser for both your hearing instruments and for the control buttons of the remote control. You can recognize the setting, if the corresponding icons are displayed next to the control buttons. uTo adjust the noiser level, press the upper or the lower control button. 18 Daily use Alarm clock You can set an alarm clock reminding you at the same time every day by a repeating signal tone and by an alarm clock icon. The alarm is initiated by the remote control but the acoustic signal is emitted by your hearing instruments. uTurn on your hearing instruments. uKeep your hearing instruments within the remote control’s operating distance. Otherwise you will not be able to hear the alarm. Setting the alarm clock uTo enter the menu, press the volume up button and the volume down button simultaneously. uNavigate to the menu entry Alarm by pressing the volume up button or the volume down button. uConfirm your selection by pressing the program change button. The entry field for hours is highlighted. uSet the hours by pressing the volume up button or the volume down button. Alarm clock 19 uConfirm your setting by pressing the program change button. The entry field for minutes is highlighted. uSet the minutes by pressing the volume up button or the volume down button. uConfirm your setting by pressing the program change button. The alarm on/off selection field is highlighted. uPress the volume up button or the volume down button to position the cursor next to alarm clock on: uConfirm your selection by pressing the program change button. When the alarm clock is turned on, this is indicated in the status bar. 20 Alarm clock Ending the alarm When the alarm clock rings, a corresponding icon is displayed on the remote control. If you do not end the alarm, it is repeated within the next minutes. uTo end the alarm, press the program change button. The alarm clock will ring at the same time on the next day. Alarm clock 21 Turning the alarm clock off uTo enter the menu, press the volume up button and the volume down button simultaneously. uNavigate to the menu entry Alarm by pressing the volume up button or the volume down button. uConfirm your selection by pressing the program change button. The entry field for hours is highlighted. uPress the program change button twice to skip the entry fields for hours and minutes. The alarm on/off selection field is highlighted. uPress the volume up button or the volume down button to position the cursor next to alarm clock off: uConfirm your selection by pressing the program change button. 22 Alarm clock Setup and service functions Setting the time uTo enter the menu, press the volume up button and the volume down button simultaneously. uNavigate to the menu entry Clock by pressing the volume up button or the volume down button. uConfirm your selection by pressing the program change button. The entry field for hours is highlighted. uSet the hours by pressing the volume up button or the volume down button. uConfirm your setting by pressing the program change button. The entry field for minutes is highlighted. uSet the minutes by pressing the volume up button or the volume down button. uSave the settings by pressing the program change button. The time is displayed. Setup and service functions 23 The time is always displayed in the header of the menu. To enter or exit the menu, press the volume up button and the volume down button simultaneously. 24 Setup and service functions Resetting volume and hearing program If you have made changes to volume or program and do not know why the hearing instruments are acting the way they are, you can manually set the default volume and hearing program for your hearing instruments. uTo enter the menu, press the volume up button and the volume down button simultaneously. uNavigate to the menu entry HI Restore by pressing the volume up button or the volume down button. uConfirm your selection by pressing the program change button. The hearing instruments are reset and a corresponding icon is displayed. uYou can also reset the hearing instruments by pressing the control button next to the following icon. The control buttons have to be configured by your Hearing Care Professional. Setup and service functions 25 Displaying contact data If your Hearing Care Professional has saved his or her contact data on the remote control, you can view this information: uTo enter the menu, press the volume up button and the volume down button simultaneously. uNavigate to the menu entry Contact by pressing the volume up button or the volume down button. uConfirm your selection by pressing the program change button. The contact data is displayed. uTo return to the standard display, press the program change button. Setting the language of the menu uAsk your Hearing Care Professional. 26 Setup and service functions Maintenance and care NOTICE uDo not put your remote control in water! uDo not clean your remote control with alcohol or benzine. uClean the remote control as necessary with a soft cloth and use a nonabrasive household soap. uAvoid abrasive cleaning liquids with additives such as citric acid, ammonia, etc. Maintenance and care 27 Troubleshooting Problem and possible solutions The remote control does not work. ■ Check, if the key lock is activated. Deactivate it, if necessary. ■ Change the batteries. Another remote control affects your hearing instruments. ■ Return remote control and hearing instruments to your Hearing Care Professional. Your Hearing Care Professional can change the wireless address to avoid interference. Consult your Hearing Care Professional if you encounter further problems. 28 Troubleshooting Important information Intended use The remote control is intended to operate hearing instruments. Use the remote control only as described in this user guide. Explanation of symbols Points out a situation that could lead to serious, moderate, or minor injuries. Indicates possible property damage. Advice and tips on how to handle your device better. Read and follow the instructions in the user guide. Transport and storage conditions During extended periods of transport and storage, please observe the following conditions: Storage Transport Temperature 10 to 40 °C ‑20 to 60 °C Relative humidity 10 to 80 % 5 to 90 % Air pressure 700 to 1050 hPa 200 to 1200 hPa For other parts, such as batteries, other conditions may apply. Important information 29 Disposal information Within the European Union, the marked equipment is covered by "Directive 2002/96/EC of the European Parliament and of the Council of 27 January 2003 on waste electrical and electronic equipment." Amended by "Directive 2003/108/EC" (WEEE). NOTICE uRecycle hearing instruments, accessories and packaging according to national regulations. NOTICE uTo avoid environmental pollution, do not throw batteries into household trash. uRecycle or dispose of batteries according to national regulations or return them to your Hearing Care Professional. Technical information Siemens easyPocket FCC: SGI‑WL700 IC: 267AB‑WL700 Operating frequencies: Fc=3.28 MHz Maximum field strength @ 10m: -7 dBμA/m Maximum field strength @ 30m: 28.5 dBμV/m 30 Important information FCC and IC compliance information can be found inside the battery compartment. N14203 (EMC and radio communications compliance label Australia) This Class B digital apparatus complies with Canadian ICES‑003. Changes or modifications made to this equipment not expressly approved by Siemens Audiologische Technik GmbH for compliance may void the FCC authorization to operate this equipment. FCC compliance This device complies with Part 15 of the FCC Rules and with RSS‑210 of Industry Canada. Operation is subject to the following conditions: ■ this device may not cause harmful interference, and ■ this device must accept any interference received, including interference that may cause undesired operation. This equipment has been tested and found to comply with the limits for a Class B digital device, pursuant to Part 15 of the FCC Rules. These limits are designed to provide reasonable protection against harmful interference in a residential installation. This equipment generates, uses and can radiate radio frequency energy Important information 31 and, if not installed and used in accordance with the instructions, may cause harmful interference to radio communications. However, there is no guarantee that interference will not occur in a particular installation. If this equipment does cause harmful interference to radio or television reception, which can be determined by turning the equipment off and on, the user is encouraged to try to correct the interference by one or more of the following measures: ■ Reorient or relocate the receiving antenna. ■ Increase the separation between the equipment and receiver. ■ Connect the equipment to an outlet on a circuit different from that to which the receiver is connected. ■ Consult the dealer or an experienced radio/TV technician for help. Conformance information With the CE marking Siemens confirms compliance with the European Directive 93/42/EEC con‑ cerning medical devices and the European Directive 99/5/EC (R&TTE) concerning radio and telecommunications terminal equipment. 32 Important information Important safety information Personal safety WARNING Choking hazard! Your device contains small parts which can be swallowed. uKeep hearing instruments, batteries and accessories out of reach of children and mentally disabled persons. uIf parts have been swallowed consult a physician or hospital immediately. WARNING Risk of injury! uDo not use obviously damaged devices and return them to point of sale. WARNING Risk of affecting electronic equipment! uIn areas where the use of electronics or wireless devices are restricted, verify if your device has to be turned off. Important safety information 33 WARNING Wireless systems may interfere with measuring devices and electronic equipment. uDo not use your device in hospitals or airplanes. WARNING Risk of interference with active implants or life support systems! If you wear a pacemaker: uCarry the remote control at a safe distance of about 12 inches (30 cm) away from the pacemaker. uDo not carry the remote control: - in your breast pocket, - with a lanyard around your neck, - or directly on the skin over the active implant. For all other active implants or life support systems: uPrior to use, have the electromagnetic compatibility verified. 34 Important safety information WARNING Risk of explosion! uDo not use your remote control in explosive atmospheres (e. g. in mining areas). Radiofrequency radiation exposure Information The radiated output power of the device is far below the FCC radio frequency exposure limits. Nevertheless, the device shall be used in such a manner that the potential for human contact during normal operation is minimized. Important safety information 35 Product safety NOTICE uProtect your devices from extreme heat. Do not expose them to direct sunlight. NOTICE uProtect your devices from high humidity. NOTICE uDo not dry your devices in the microwave oven. NOTICE Different types of strong radiation, e. g. during X-ray or MRI head examinations, may damage devices. uDo not use the devices during these or similar procedures. Weaker radiation, e. g. from radio equipment or airport security, does not damage the devices. In some countries restrictions for the usage of wireless equipment exist. uRefer to local authorities for further information. 36 Important safety information NOTICE Your hearing instruments are designed to comply with international standards on electromagnetic compatibility but interference with nearby electronic devices could occur. In this case, move away from the source of interference. NOTICE For instruments with wireless connectivity: When the telecoil program is active, the remote control may cause a pulsing noise. uUse the remote control with a distance greater than 10 cm (4 inches). NOTICE uYour remote control is programmed to exclusively communicate with your hearing instruments. If you experience problems with another person's remote control, consult your Hearing Care Professional. Important safety information 37 Country-specific information 38 Country-specific informatio Siemens Audiologische Technik GmbH Gebbertstrasse 125 91058 Erlangen Germany Phone +49 9131 308 0 Document No. A91SAT-02036-99T01-7600 EN Order/Item No. 108 215 27 | Master Rev01, 02.2013 · EM Printed in Germany | © Siemens AG, 02.2013 www.siemens.com /hearing