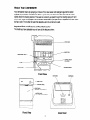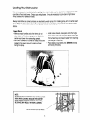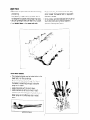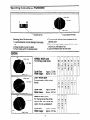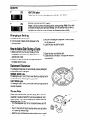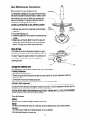
1
of your new RoPER
PRINTED IN THE U.S.A.
automatic dishwasher
154077501A/965408
15407750 1A
DearCustomer...
Pleasetake a few minutesto read this book. It containsinformationand suggestionsto
help you get the best resultsfrom your ROPERdishwasher.
Shouldyou encountera problemwith your dishwasher,pleasecheck the Common
DishwashingProblemsand Solutionssectionof this book. It containshelpfulinformation
solutionsto problemsyou can correctyourself.
Pleasefill in the informationrequestedbelow and save for future reference.
Model No.
Serial No.
Date of Purchase
Tableof Contents
ImportantSafety instructions
About Your Dishwasher
3
4
For Best Results
5
Energy and Water SavingTips
5
Loading Your Dishwasher
6,7
SilverwareBasket
7
Operating Instructions
DetergentDispenser
8
9
How to Add a Dish During a Cvcle
9
CommonDishwashingProblemsand Solutions
10
NormalOperation
User MaintenanceInstructions
10
11
Warranty
12
2
ImportantSafetyInstructions
WARNING: PLEASE FOLLOW BASIC PRECAUTIONS,INCLUDING THE FOLLOWING...
Readall instructionsbeforeoperatingthe
dishwasher.
ONLY use detergentsand wetting agents
recommendedfor use in a dishwasher.Store
detergentsand wetting agents in a cool, dry place
OUT OF CHILDREN’S REACH.
WARNING. Under certain conditions, hydrogen gas
may build up in a hot water system that has not
been used for two weeks or more. HYDROGEN
GAS IS EXPLOSIVE.To prevent possible injury or
damage, turn on all hot water faucets and allow
water to run several minutes BEFORE using your
dishwasher. DO NOT smoke or use any open flame
near the faucets while they are open.
DO NOT tamperwith controls.
DO NOT operateyour dishwasher unless all
enclosurepanels are properly in place.
ALWAYS disconnectelectricalpower to the
dishwasherbefore attemptingservice.
GroundingInstructions
Built-In Models
See the InstallationInstructionsprovidedwith your
dishwasher for importantground information.
Portable Models
This appliance must be grounded. In the event of a
malfunctionor breakdown, grounding will reduce
the risk of electric shock by providinga path of least
DO NOT sit or stand on or abuse the dishwashers
resistancefor electric current. This appliance is
door or racks.
equipped with a cord having an equipmentgrounding conductor and a grounding plug. The
ALWAYS load sharp or pointed tableware with their
plug must be plugged into an appropriate outlet that
handles up (pointsdown) to avoid injury when
is installed and grounded in accordancewith all
reachinginto the dishwasher.Load sharp items and
local codes and ordinances.
knivesso they will not damage the door seal.
DO NOT allow children to play in or around the
dishwasher.
DO NOT wash plastic items unless marked as
“DishwasherSafe” or the equivalent.If an item is
not marked,check the manufacturers
recommendations.
ALWAYS removethe door of a dishwasherwhen
discardingto preventaccidentalentrapment.
DANGER. Improperconnection of the equipmentgrounding conductor can result in a risk of electric
shock. Check with a qualifiedelectrician or service
person if you have any doubts about proper
grounding of the appliance. Do not modifythe plug
providedwith your dishwasher. If it will not fit into
the outlet, have a proper outlet installed by a
qualified electrician.
REMEMBER,only use your dishwasher for its
intendedpurposes.
SAVE THESE INSTRUCTIONS
3
AboutYourDishwasher
Your dishwashercleans by spraying a mixtureof hot, clean water and detergent against the soiled
surfaces of your dishes and tableware.When a cycle starts, the dishwasher fills with water to a level
slightly abovethe heating element.This water is constantly pumped through the rotating spray arm and
center wash tower and sprayed onto the dishes. Soiled water is pumped out and replaced with Cleanwater
during a cycle. The numberof water fills depends upon the cycle being used.
ImportantPartsandFeaturesof YourDishwasher
Themodelyou have selected may not have all the features shown.
e
LOWER
SPRAY
UPPER
/
ARM
RACK
LoWER
RACK
e
NORMAL WATER
FILL LEVEL
FLOAT
DOOR SPRING
HEATING
Front View
DETERGENT
DISPENSER
RINSE AID
DISPENSER
I
\
DOOR PANEL
-‘(OPTIONAL
COLOR
ACCESSPANEL
(OPTIONAL COLOR
PANELS)
PANELS)
Front View
Inner Door
4
ELEMENT
For Best Results
WaterTemperature
For best cleaning and drying results,water should be at least 140°F
(60°C). You can check the temperatureof hot water at your sink
with a candy or meat thermometer.Turn on the faucet nearest the
dishwasher.Let the water run until it is as hot as possible,then
insertthe thermometerinto the stream of water. If the thermometer
reading is below 140°F, have a qualifiedtechnician raise your water
thermostatsetting.
WaterPressure
Water pressureshould be between 15 and 120 pounds per square
inch.To determineif you have enough water pressure, put a 112
gallon container under the fully opened hot water faucet nearest the
dishwasher--itshould be full in less than 14 seconds. Be sure that
all other faucets are shut off during this test.
ElectricalSupply
Your dishwashershould be connectedto its own separate grounded
circuit. It requiresa 15 ampere fuse or circuit breaker protection.. If
there are other outlets on the dishwasher circuit, do not use them
while the machineis operating or you may blow the fuse or trip the
circuit breaker.
EnergyandWaterSavingTips
9 Wash full loads. Runninga half-filleddishwasher uses the same
amount of electricityand hot water as a fully-loadedmachine.
9 Use the LIGHTWASH for lightlysoiled loads. It uses less hot
water and energy than NORMALWASH.
. AIR DRY dishes when you do not need a rapid drying cycle. Allow
a longer drying period (overnight).
9 Load correctlyfor best washing results. Incorrect loading may
cause poor washing and the need to rewash all or part of the load.
. Do not pre-rinse normallysoiled dishes, Using the NORMAL
WASHcycle with the recommendedamount of detergent and
proper loadingwill provide good washing resultswithout hand
rinsing.
* Operate your dishwasherduring off-peak hours. Local utilities
recommendthis to avoid heavy usage of energy at certain times
of day.
5
LoadingYourDishwasher
It is not necessaryto rinse dishes before putting them into the dishwasher.Just remove large pieces and
quantitiesof food and bones. Empty cups and glasses. It may be necessaryto presoak or light scour
firmlycooked-onor baked-on foods.
Always load dishes so soiled surfaces are reached by water spray from rotating spray arm or center wash
tower. Water must be able to drain off completelyfor best results. Spray should reach all surfaces of the
dishes.
LowerRack
l
l
Make sure pot handles and other items do not
stop rotationof the lower spray arm or block the
center wash tower from extendingupward.
Itemswith cooked-on or dried-on foods should be
loaded in the lower rack with soiled surfaces
facing the spray.
NOTE:
DO NOT BLOCK THE CENTER AREA OF THE LOWER
RACK WHEN LOADING. BECAUSETHE CENTER
WASH TOWER EXTENDSTHROUGHTHIS AREA,
BLOCKAGE MAY RESULT IN POOR CLEANING.
DONOT BLOCKCENTER AREA. ’
6
. Load cookie sheets, cake pans and other large
items at the sides. Do not place them across the
front where they will preventwater from reaching
the detergent dispenser.
prongs
. Place plates, soup bowls, etc. between
and facing the spray.
Upper Rack
Place items so open ends face down for cleaning
and draining.
Load glasses in upper rack only. Lower rack is
not designed for glasses and damage may occur.
Be sure lightweightitems are held firmly in place.
Load plastic items in the upper rack only.
l
l
l
l
SilverwareBasket
The silverwarebasket may be loaded either in the
lower rack or on the counter top.
a Be sure no items protrude through the holes in
the basket or extend high enough to stop the
spray arm’s rotation.
9 Load sharp itemswith the points down.
a Load silverwareso items are mixed in each
section to prevent nesting (see illustrationbelow).
Water spray cannot effectivelyclean nested
items.
l
I
L
NESTEDUTENSILS
l
Plastic Items may melt in the lower rack. Only
items marked “Dishwasher Safe” or equivalent
are recommended.
China, crystal, and other delicate items must not
touch other items during the dishwasher’s
operation. Damage may occur.
OperatingInstructions:WUO8OOXO
StartingYourDishwasher
4.Turn the cycle indicator knob clockwise to the
desired cycle.
5.Turn on hot water faucet nearest the dishwasher
and let run until water is hot.
6. Latch dishwasher door to start cycle.
1.Load dishwasherand add detergent (see page
9).
2.Close the door, but do not latch.
3. Push rocker switch for desired option.
Cycles
NORMAL WASH cycle
For normallysoiled dishes.
Approx. 73 Min.
Approx. 8.7 Gal.
Cycle Time:
Water Usage:
. RINSE 1 HOLD
OFF .
LIGHT WASH cycle
For pre-rinsed or lightly soiled
dishes.
. RINSE & HOLD
OFF .
- NORMAL WASH
. LIGHT WASH
. RIME
(L HOLD
-
-
-
-
-
-
-
W
A
S
H
R
I
N
S
E
W
A
S
H
R
I
N
S
E
R
I
D
R
Y
0
-
-
-
--
-
-
-
,w
A
S
H
W
A
S
H
R
I
Approx. 66 Min.
Approx. 6.9 Gal.
Cycle Time:
Water Usage:
-
-
RINSE 81HOLD cycle
For rinsing dishes that will be
washed later. Use the Air Dry
option. Do not use detergent.
Cycle Time:
Water Usage:
Approx. 47 Min.
Approx. 3.5 Gal.
8
ii
E
ZZ
0
F
F
1
F
F
:
E
Options
HEAT DRY option
Heater is on for the entire drying period, resulting in drier dishes.
ENERGYSAVING AIR DRY option
Heater is off during the entire drying period, saving energy. Note: If you wish
to shorten the drying time and save energy, turn the control knob to OFF at
the beginning of the dry cycle and open the dishwasher door slightly.
Changinga Setting
1.Unlatchthe door to stop cycle.
2.Turn the cycle indicator knob clockwiseto the
cycle you want .
3. Be sure the detergent dispenser is filled properly
for the new cycle.
4. Latch the door to start the cycle.
Howto Adda DishDuringa Cycle
1.Make sure there is a full wash cycle yet to be
3.Open the door and add the dish.
completedto ensure that any added items are
4.Close and latch the door. The cycle will resume
washed and rinsed.
automatically.
2. Unlatchthe door to interruptthe cycle and wait for
the water action to stop.
DetergentDispenser
The detergentdispenserwill automaticallyrelease detergent
at the correct time in the cycle.
NORMAL WASH cycle
Fill detergentcups 1 and 3, then cover them by rotatingthe lid
counter-clockwise.Fill detergentcups 2 and 4.
LIGHT WASH cycle
Fill detergentcups 1 and 3, then cover them by rotating the lid
counter-clockwise.
RinseAids
Rinseaids promotefaster, spot-freedrying. Rinse aids are
availablein liquid and solid form and are availableat most
supermarkets.The rinse aid dispenser is located inside the
dishwasherdoor. To use:
Turn the dispensercap l/4 turn counterclockwiseand lift
out.
Pour in rinse aid until liquid touches white cross at bottom
of fill opening. Reinsertcap.
Refillthe rinse aid dispenser approximatelyonce a month.
9
CommonDishwashingProblemsand Solutions
Problem
Solution
Dishes not clean.
Watertemperatureis 140°For higher?
Racksloadedproperly?
Detergentfresh?
Waterpressureis adequate?
Dishes not dry.
Watertemperatureis 140°For higher?
Rinseagentdispenserfilled?
Itemsloadedto permitproperdrainage?
Water spotting or filming.
Watertemperatureis 140°For higher?
Racksloadedproperly?
Watertoo hard?
Correctamountof fresh detergent?
Rinseagentdispenserfilled?
Rust deposits.
Causedby ironin water.Fora permanentsolution,
installan ironfilterin the waterline.To removethe
deposits,1. Loadthe staineditems,butdo notload
silverwareor metalitems.2. Rundishesthroughfull
cycleusing112cupcitricacidcrystals.DONOTuse
detergentwithtreatment.3. Aftertreatment,washload
withdetergentin full cycle.
Aluminum discoloration.
Certainwaterconditions,in combinationwithsome
detergents,maytendto darkenaluminum.Scourall
surfaceswitha soap-filledpad.Try anotherdetergent.
Black marks on dishes.
Metalitemstouchingor rubbingagainstdishesduring
washing.Loadsuchitemsso theydo nottouch.
Dish fading.
Decorationwhichis appliedto glazedsurfaceis most
susceptible.Consultwith manufacturer.
If no information
is available,as is the casewithold china,testwasha
pieceseveraltimes.
NormalOperation
The followingconditionsare normaland indicate proper operation.
A small amount of clean water will remain in the bottom of the tub after each cycle.
* Short time delays occur after a cycle is selected and between washes and rinses.
. The plastic float , located in the left front corner of the tub, is a safety device to prevent overfilling.Never
run the dishwasherwithout the float in place.
l
COLOREDALUMINUM, CASTIRONANDBONEHANDLEDITEMS,HAND-PAINTED
CHINA,WOODEN,PLASTIC,
AND RUBBER ITEMS WHICH ARE NOT LABELED “DISHWASHER SAFE” SHOULD BE WASHED BY HAND.
10
UserMaintenanceInstructions
Cleaningthe PumpandSprayArms
Yourdishwasheris designedto flush away all normalfood soils
that may not havebeen removedfromdishes.However,certain
foreignobjectssuch as fruit pits, bottlecaps,and bones may
collectin the openingsof the pumpand shouldbe removed
periodicallyto avoidcloggingthe drain system.
CAUTION:ALLOWMACHINETO COOLBEFORECLEANING!
1. Holdlowersprayarm and turn tower basecounter-clockwise
to unscrew.
2. Lift out tower and spray arm.
3. Removeany objectsthat havecollectedin the pumpopenings
or outlets.
4. Replacesprayarm bearing.Matchthe slot in the spray arm
with the tab on the bearing.Replacetower base and tighten
securely.The spray arm and towershouldrotatefreely.
PUMP
DrainAir Gap
If the installerof your built-indishwasherinstalledan air gap in
the drain system,it shouldbe checkedperiodicallyto makesure
it is clean.Air gaps are usually mountedon the countertop or in
the wall abovethe dishwasherand can be inspectedby
removingthe cover.
StorageandSeasonalUse
If yourdishwasheris to remainidleforextendedperiodsof time,do the following:
In FreezingTemperatures
1. Shutoffwalerandelectricalpower.
2. Removethe accesspanelanddisconnectthewaterlineon bothsidesof the inletvalve.Allowwaterto drainfrom
dishwasher’s
lines.
3. Connectwaterline to valveandreplaceaccesspanel.
4. Pourone(1) quartof non-toxic,propyleneglycolanti-freezeintotheemptydishwasher.
In Norma/or WarmTemperatures
Waterleftin thebottomof thetub mayevaporatein warmtemperatures
leavingbehindmineraldeposits,Theseminerals
couldcausethemotorshaftsealsto sticktogether,resultingin motorfailure.To preventevaporationof thewater,pourone
(1)quartof non-toxic,propyleneglycolanti-freezeintotheemptydishwasher.
CAUTION:BEFOREUSINGYOURDISHWASHER
AGAIN,RUNIT THROUGHANYFULLCYCLEWITHDETERGENT
IN BOTHCUPSTO CLEARTHETUBANDPUMPSYSTEM.
Careof Surfaces
Exterior
Washwitha mild,non-abrasive
detergentandwater.Rinseanddry.
Interior
Theinterioris self-cleaning
with normaluse.If hardwatercauseslimedepositbuild-up,cleanusingthe following
instructions:
1. Pourtwo(2)cupsof vinegarintotheemptydishwasher.Donotusedetergent.
2. Runthe machinethroughany fullwashcycle.
11
LIMITED
WARRANTY
This Roper appliance is warranted by Whirlpool Corporation
to be free from defect in material and workmanship
to the original domestic purchaser.
Any part which we find to be defective will be repaired or replaced at our option subject to the followlng limitations:
1. Repair or replace
during
the first thirty (39) day from the date of purchase
2. Repair or replace
during
the first (1st) year from date of purchase
any finishes
any other part except
3. Repair or replace during the first five (5) years from date of purchase any magnetron
under warranty is limited to the first (1st) year from date of purchase.
4. During the second (2nd) through fifth (5th) years from the dateof original purchaseon
condenser, drier, or connecting tubing) found defective in material or workmanship
first (1st) year from the date of original purchase.
(porcelain,
enamel or other) and glass parts which we find to be defective.
for the finish, which
we find to be defective.
(on those units so equipped)
which we find to be defective.
Labor on any magnetron
any product so equipped, any part of the refrigerating
system (compressor,
evaporator,
will be supplied. Labor on the refrigerating
system under this warranty is limited to the
5. Replacement parts furnished under the terms of this warranty are warranted only for the unexpired
to obtaining part involved is the responsibility
of the original consumer purchaser.
portion of theoriginal
warranty
period and transportation
charges
6. This warranty applies only to products properly installed, adjusted andoperatedin
accordancewith
instructions
found in the product literature. This warranty
to any product which has been subjected to alteration, misuse, improper installation,
or delivery damage. Nor does it apply to costs for any service requested
tion or to confirm proper operation of appliance.
7. Any repair made under the terms of this warranty
must be performed
by a servicer
SHOULD YOU HAVE ANY QUESTIONS
authorized
CONCERNING
by Whirlpool
Corporation
THIS WARRANTY,
Customer Relations Dept.
Roper Brand A pliances
2000 M 63 Nort t:
Benton Harbour, MI 49022
to service
relative
does not apply
for demonstra-
Roper brand appliances.
PLEASE CONTACT:
Call Toll Free
l+OO) 44-ROPER
l-(900) 4474737
Between 9:00 a.m. - 4:30 p.m.
Monday thru Friday, Eastern Time
If you write or call, please furnish complete model and aerial number of appliance and date of purchase.
Under no circumstances
shall Whirl
01 Cor oration be liable under this warranty for any loss of an incidental or con
uential damages and
all IMPLIED WARRANTIES ARE UMI r ED TO P HE SAME TtME PERIODS STATED HEREIN FOR ROPE t! EXPRESS WARRAN
-l-l ES. Somestates
do
not allow the exclusion or limltation of consequential
damages or limitatlons of how long an implied warranty may last, so the above limitations
or exclusions
may not apply to you. This warranty gives you specific legal rlghts, and you may have other rights which may vary from state to
state.
THIS IS A LIMITED WARRANTY
Phone l-(900)
OF THAT TERM AS DEFINED IN THE MAGNUSOMOSS
If you need service for your Roper brand appliance:
you selling dealer for the authorized servicer in your area.
- or 44-ROPER (l-(900) 4476737) between 8:OO - 430 Eastern Time - Monday
l
l
WITHIN THE MEANING
ACT OF 1975.
Contact
thru Friday.
Products
of Whirlpool Corporation
Benton Harbour, MI 49022