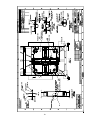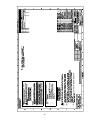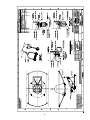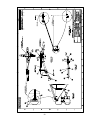
1
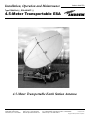
Installation, Operation and Maintenance
Bulletin OM45TFD
Revision C
Type ESA45AA-( ), ESA45AAPT-( )
4.5-Meter Transportable ESA
4.5-Meter Transportable Earth Station Antenna
Andrew Corporation
10500 West 153rd Street
Orland Park, IL U.S.A. 60462
Telephone: 708-349-3300
FAX (U.S.A.): 1-800-349-5444
Internet: http://www.andrew.com
Customer Service, 24 hours: U.S.A. • Canada • Mexico: 1-800-255-1479
U.K.: 0800 250055 • Republic of Ireland: 1 800 535358
15 Augustl, 2005
Other Europe: +44 1592 782612
Copyright © 2005 by Andrew Corporation
Table of Contents
Foreword
Purpose . . . . . . . . . . . . . . . . . . . . . . . . . . . . . . . . . . . . . . . . . . . . . . . . . . . . . . . . . . 3
Content . . . . . . . . . . . . . . . . . . . . . . . . . . . . . . . . . . . . . . . . . . . . . . . . . . . . . . . .3
Proprietary Data . . . . . . . . . . . . . . . . . . . . . . . . . . . . . . . . . . . . . . . . . . . . . . . . .3
Information and Assistance . . . . . . . . . . . . . . . . . . . . . . . . . . . . . . . . . . . . . . . 3
Notice . . . . . . . . . . . . . . . . . . . . . . . . . . . . . . . . . . . . . . . . . . . . . . . . . . . . . . . . . 3
Section 1
Introduction . . . . . . . . . . . . . . . . . . . . . . . . . . . . . . . . . . . . . . . . . . . . . . . . . . . . . . . 4
General . . . . . . . . . . . . . . . . . . . . . . . . . . . . . . . . . . . . . . . . . . . . . . . . . . . . . . . .4
Description. . . . . . . . . . . . . . . . . . . . . . . . . . . . . . . . . . . . . . . . . . . . . . . . . . . . . 5
Performance Specifications . . . . . . . . . . . . . . . . . . . . . . . . . . . . . . . . . . . . . . . 6
Technical Assistance . . . . . . . . . . . . . . . . . . . . . . . . . . . . . . . . . . . . . . . . . . . . .6
Section 2
Operation
Normal System Set-Up Procedure . . . . . . . . . . . . . . . . . . . . . . . . . . . . . . . . . . 9
Stowing Procedure . . . . . . . . . . . . . . . . . . . . . . . . . . . . . . . . . . . . . . . . . . . . . . 9
Towing . . . . . . . . . . . . . . . . . . . . . . . . . . . . . . . . . . . . . . . . . . . . . . . . . . . . . . . . 9
Section 3
Periodic Preventive Maintenance
General . . . . . . . . . . . . . . . . . . . . . . . . . . . . . . . . . . . . . . . . . . . . . . . . . . . . . . . .12
Inspection and Preventive Maintenance . . . . . . . . . . . . . . . . . . . . . . . . . . . . . . 12
Preservation of Component Parts . . . . . . . . . . . . . . . . . . . . . . . . . . . . . . . . . . .14
Lubrication . . . . . . . . . . . . . . . . . . . . . . . . . . . . . . . . . . . . . . . . . . . . . . . . . . . . .15
Section 4
Drawings . . . . . . . . . . . . . . . . . . . . . . . . . . . . . . . . . . . . . . . . . . . . . . . . . . . . . . . . . 17
2
Table of Contents
Foreword
Purpose
Proprietary Data
The scope of this manual is to provide preventive maintenance information together with detailed operational procedures that are required to support maintenance of a 4.5Meter Transportable Receive/Transmit Earth Station
Antenna. The manual is comprised of five distinct sections
to provide convenient reference for authorized operator/service personnel requiring technical information on general
system or specific subsystem equipment.
The technical data contained herein is proprietary to
ANDREW CORPORATION. It is intended for use in operation and maintenance of ANDREW equipment. This data
shall not be disclosed or duplicated, in whole or in part, without express written consent of ANDREW CORPORATION.
Notice
The installation, maintenance, operation or removal of antenna systems requires qualified, experienced personnel.
Andrew operation and maintenance instructions have been
written for such personnel. Antenna systems should be
inspected once a month or as otherwise directed by qualified personnel to verify proper installation, maintenance,
and condition of equipment.
Content
This manual is divided into five distinct sections each of
which deals with a specific technical topic relating to system/component subsystem information. The major divisions
of the manual are described and listed under the following
headings:
Andrew disclaims any liability or responsibility for the results
of improper or unsafe installation or operation practices.
1. Introduction - describes overall manual content, equipment purpose and brief description of the subsystems/components.
Information and Assistance
For additional Andrew supplied product information or further technical assistance, contact:
2. Operation - describes general operational procedures of
the applicable electro-mechanical subsystems required during performance of the earth station system.
Andrew Corporation
10500 W. 153rd Street
Orland Park, IL 60462
Telephone: 1+800-255-1479 (from U.S.A)
1+708-349-3300 (international)
3. Preventive Maintenance - describes periodic preventive
maintenance procedures on electro-mechanical components and subsystems required to maintain proper functional operation of the earth station system.
4. Drawings - includes assembly installation drawings, interface wiring diagrams between electro-mechanical earthstation subsystem components and schematic diagrams of
the subsystem components.
The information contained in this manual is intended to
ensure complete coverage on all Andrew models
(ESA45AA/AAPT) of the 4.5-Meter Transportable
Receive/Transmit Earth Station Antenna System.
Thoroughly review all information provided and utilize procedures applicable only to your specific system.
Notice
All installation, adjustment and operational information
must be strictly adhered to in order to achieve warranted performance specifications.
3
Section 1 - Introduction
1.3 The operating section includes detailed equipment operating procedures required during normal system operation,
while the preventive maintenance section enables qualified
personnel to maintain the equipment using standard hand
tools. The drawing section provides installation, mechanical,
electro-mechanical subsystem and subsystem component
reference drawings as an aid for maintenance and operation. All items covered are designated to be within the operating and maintenance capabilities of the average station
engineering staff personnel.
1.0 Introduction
1.1 This technical manual contains preventive maintenance
information
for
the
4.5-Meter
Transportable
Receive/Transmit Earth Station Antenna (see Figure 1). The
basic equipment and accessories are either manufactured
or design controlled by Andrew Corporation, Orland Park,
Illinois.
1.2 The manual contains all essential information required
for the performance of complete preventive maintenance by
qualified station engineering personnel.
Figure 1. 4.5-Meter Transportable Receive/Transmit Earth Station Antenna
2.0 General
dimensional details.
2.1 The ESA45AA is a Trifold™ 4.5m reflector assembly incorporating a manually operated polarization adjustment
device. This reflector assembly accepts all Andrew feed
systems. Only Andrew (TF) feed systems will comply with
electrical specifications in Section 4. When attaching this
assembly to other than an Andrew type positioner, refer to
Figure 2 and instruction drawings 239343 and 239331 for
appropriate reflector/positioner interface and mounting
2.2 The ESA45AAPT is the same as the ESA45AA above
mounted on a tandem axle trailer. The trailer has four uniquely designed outriggers for ultimate pointing accuracy
across the entire range of operation. The trailer has a load
capacity of 10,000 pounds and can be towed by a sufficiently sized vehicle.
4
3.0 Description
that includes four outriggers for maximum stability. The trailer is provided with a 2-5/16” ball hitch as a standard.
Optional hitch assemblies are available. Optional storage
boxes are also available for mounting on the trailer assembly.
3.1 Primary Radiator. The primary radiator design consists
of a variety of interchangeable feed systems for wide
ranges of applications. These feed systems are patented
beam shaping prime focus designs with the input/output
ports terminated near the focal point of the reflector.
Construction material is aluminum and/or brass with stainless steel fasteners. Each feed system includes a carrying/shipping/storage case and collapsible struts.
3.5 Options. Available options include:
Tx Cross-Axis Waveguide Kits
Type 206520-137-1 WM37 (one run)
Type 206520-137-2 WR 137 (two runs)
Type 206520-75-1 WR75 (one run)
Type 206520-75-2 WR75 (two runs)
3.2 Main Reflector. The Trifold™ reflector assembly is fabricated from aluminum alloy sheet. The reflector assembly is
spun on a precision steel chuck to extremely close tolerances. The reflector is then manufactured in three pieces
with the two side pieces being hinged to allow them to swing
inward for stowing and transport. A reinforced aluminum
panel torsion box forms the primary structure of the reflector assembly. The reflector assembly is mounted to the positioner via a mounting ring. All fasteners are of stainless or
hot-dipped galvanized steel. Quick release fasteners are
incorporated to assure continuous repeatability during stowing and deployment over many years of use.
Type
Type
Type
Type
MKAPVSI azimuth and elevation motorization kit.
PLKPFAP-VSI polarization motorization kit.
STWKAP storage box for trailer.
TF feed systems - refer to Table 1.
3.3 Manual Motorizable Positioner. This heavy duty EL
over AZ positioner supports the 4.5m Trifold™ reflector assembly and mounts to any flat surface, such as roof tops,
concrete slabs, flat bed trailers, etc. Antenna azimuth positioning is performed by a gear box interfaced to a large
chain driven wheel. Support of the wheel and precision rotation is accomplished via cam followers as guidance. Antenna elevation positioning is driven from its 90° stow position to 5° of true elevation by a machine screw jack with
aload capacity of 10 tons. An elevation vernier is provided to
read the elevation angle of the reflector assembly. The positioner is easily upgradeable to motorization at any time.
3.4 Trailer. The trailer assembly is a welded steel structure
48” (1219 mm) Dia.
Reflector Mounting
Ring
15.52” Typ.
(394 mm)
3 x ø 0.844”
(21 mm) Thru
16.12”
(409 mm)
0.75” (19 mm)
Lockwasher
0.375”
(9.5 mm)
22.38”
(568 mm)
Reflector
Mounting Ring
0.75”-10UNC
(19 mm) Hex Nut
Convex
Washer
0.75” (19 mm)
Flatwasher
1.00” (25 mm)
Flatwasher
0.75” (19 mm)
Flatwasher
Reflector Frame
of Andrew Positioner
0.75”-10UNC
(19 mm) Bolt
Figure 2. Reflector to Positioner Attachment Detail
5
Loss
.5 dB
.5/.5 dB
.8 dB
.8/.8 dB
4.1 Refer below for the most pertinent performance specifi-
cations applicable to the 4.5-Meter Transportable
Receive/Transmit Earth Station Antenna System. Refer to
Figures 2 and 3 for dimensional data.
Operating Frequency Band*
C-Band - ReceivelTransmit
Ku-Band - ReceivelTransmit
X-Band - ReceivelTransmit
Antenna Pointing Range, Coarse/(Continuous)
Elevation
5-90° (85°)
Azimuth
330° (330°)
Polarization
360° (90°)
4.0 Performance Specifications
3.625-4.2 GHz/5.850-6.425 GHz
10.95-12.75 GHz/14.0-14.5 GHz
7.25-7.75 GHz/7.90-8.40 GHz
Gain*, at circular waveguide flange of feed. (dBi, ±0.2dB)
Rx Frequency
Rx Gain
Tx Frequency
3.625 GHz
43.0
5.925 GHz
4.000 GHz
44.0
6.175 GHz
4.200 GHz
44.4
6.425 GHz
7.250 GHz
48.4
7.90 GHz
7.500 GHz
48.7
8.15 GHz
7.750 GHz
49.0
8.40 GHz
10.950 GHz
51.6
14.00 GHz
11.950 GHz
52.4
14.25 GHz
12.750 GHz
52.9
14.50 GHz
Wind Loading, Survival
Tx Gain
46.2
46.7
47.0
49.2
49.5
49.8
53.4
53.6
53.7
Wind Loading, Operational
(motor drives)
Trailer Size:
Length
Width
Polarization Discrimination*, (Linearly-Polarized):
C- IKu-Band
>30 dB on axisr
289 in (7.34 m)
96 in (2.44 m)
Weight, with Trifold ® Antenna
4.5 m
7600 lb (3447 kg)
Beamwidth, Mid-band, Degrees C-Band
Ku-Band
3 dB Receive (Transmit)
1.22 (0.85) 0.41 (0.33)
15 dB Receive (Transmit)
2.47 (1.90) 0.86 (0.69)
X-Band
0.66 (0.61)
1.40 (1.29)
Antenna Noise Temperature* - under clear sky conditions, at 68°F (20°C), at the
circular waveguide flange of the feed.
Kelvin
Kelvin
Kelvin
Elevation
(C-Band)
(Ku-Band)
(X-Band)
10°
32
45
45
30°
20
33
34
50°
16
30
29
Feed Type
4.5 m
Reflector Material
Reflector Segments
Mount Type, when applicable
45 mph (72 km/h),
gusting to 65 mph (105 km/h)
Height, with Trifold ® Antenna
4.5 m
118 in (3.0 m), with feed support
108 in (2.75 m), without feed support
Voltage Axial Ratio*, circularly-polarized with 2-port combiner
C-Band, <1.09:1 on axis, Tx
<1.20:1 on axis, Rx
X-Band, <1.20:1 on axis, Tx
<1.20:1 on axis, Rx
Antenna VSWR*, Transmit and Receive
125 mph (200km/h) in stow position,
65 mph (105 km/h) gusting to 80 mph
(125 km/h) in any position of operation
with proper anchoring
<1.3:1
Prime Focus
Precision-Formed Aluminum
3-Pieces, Hinged Transportable
El over AZ, Positioner
Trailer Wheels
4, with 1 spare
Tandem Axle Assembly
12,000 lb (5455 kg) tandem with axle
with 4 in (102 mm) drop
Wheel Size
14.5 in (368 mm)
Tires
G78 x 15 Nylon Bias, 8 ply, 8 x 14.5LT
Trailer Hitch Interface
2.312 in ball hitch (standard) Pintel
hook is available as special order
Trailer Tongue Weight
650 lb (295 kg) nominal
Outrigger Jacks
4, each with 7000 lb (3282 kg) capacity
Front Leveling Jack
5000 lb (2273 kg) capacity
12 Vdc Electrical Connector
6-way, includes both male and female
24-hour Technical Assistance
For technical assistance, call the following numbers at anytime.
Call From
Call To
Telephone
Fax
North America (toll free)
U. S. A.
1-(800)-255-1479
(800)-349-5444
Any Location (International)
U. S. A.
(708)-349-3300
(708)-349-5410
Customer Service Center
The Andrew Customer Service Center gives you direct access to the information and personnel service you need, such
as the following:
• Place or change orders
• Check price and delivery information
• Request technical literature
You can call from any of the following:
Call From
Telephone
Fax
North America
1-800-255-1479 (toll free)
1-(800)-349-5444 (toll free)
United Kingdom
00-800-0-255-1479 (toll free)
00-800-0-349-5444 (toll free)
Australia
0011-800-0-255-1479 (toll free) 0011-800-0-349-5444 (toll free)
China
00-800-0-255-1479 (toll free)
00-800-0-349-5444 (toll free)
New Zealand
00-800-0-255-1479 (toll free)
00-800-0-349-5444 (toll free)
Hong Kong
001-800-0-255-1479 (toll free)
6
001-800-0-349-5444 (toll free)
Figure 2. 4.5-Meter Transportable Antenna Dimensions
7
Figure 3. 4.5-Meter Antenna/Positioner Dimensional Details
8
Section 2 - Operation
1.0 Normal System Set-Up Procedure
Elevation Strut Clamp - must be loose prior
to raising/lowering reflector
WARNING: Extreme care must be taken during the following system set-up and stowing procedures to avoid
bodily injury and/or equipment damage.
1.1 Choose a site which is as level as possible with the rear of
trailer facing as closely as possible in the direction of the satellite.
Note: The reflector has a maximum of ±135° azimuth adJustment but set-up time and antenna stability can be improved by this positioning of trailer.
1.2 Refer to Figure 4. Release outrigger jacks at four corners of trailer by removing locking pins ard reinsert into
closest applicable height adjustment holes to lock in place.
Jack the trailor to a stable and close to level position as possible.
Outrigger
Jack
Assembly
Outrigger
Jack
Locking
Pins
Reflector Hold-down Bolt Assemblies (4)
1.4 Raise reflector to approximately 15° elevation angle
using supplied handwheel on elevation jack.
Height
Adjustments
Holes
1.5 Slowly swing the reflector sides out into their operating
position and lock in place with the two lower 1/2-turn fasteners on each side.
Figure 4. Outrigger Jack Extension
Note: Ensure alignment pins properly aligned.
1.6 Lower the reflector and lock up the remaining 1/2-turn
fasteners to lock the reflector `wing’ panels to main reflector.
CAUTION: Do not use fingers to assist in pin hole alignment and ensure feet are kept away from under pad portion
of outrigger jacks when jack assemblies are being lowered.
1.7 Referencing the following photographs and drawing
239351, remove feed support yoke from stowed location
and using a ladder, carefully climb into the reflector and
assemble the feed support struts.
1.3 Release both elevation safety clamps, elevation strut
clamp and four reflector hold-down bolts.
Elevation Safety Clamps (2)
Remove Feed Support Yoke from stowed location
Do not loosen these
screws (3)
9
Unlock safety pins from strut clamping knobs
1.8 Set antenna to desired elevation angle. Remove locking pin from handwheel on elevation jack shaft by pressing
quick release button on head of locking pin. Remove handwheel and reinstall on azimuth jack shaft. Align corresponding holes and insert locking pin into handwheel
assembly. Release azimuth brake by rotating brake handle
counterclockwise and sweep in azimuth to locate signal.
After desired satellite is found, peak EL and AZ for optimum
signal. Retighten azimuth brake assembly and elevation
strut locking screws.
Note: Pointing accuracy of the antenna will diminish at wind
speeds above 30 gusting to 45 mph. Do not operate the
antenna system at wind speeds above 65 mph and temperatures outside of the range -40°F to 125°F.
Loosen/remove clamping knobs
Feed Support Yoke
Azimuth Brake
2.0 Stowing Procedure
Once all four struts are released, carefully swing each
strut into the center of the reflector. Proceed to assemble each strut to the feed support yoke using the hardware supplied on each strut.
2.1 Lower the antenna to zero degress azimuth.
2.2 Disassemble the feed system and stow as required.
Diassembly of the feed support struts is opposite to the
assembly procedure as described above. Ensure that struts
are tightly clamped together and that safety pins are reinserted into all clamp knobs.
2.3 Raise the antenna to 15° elevation. Position and swing
the reflector sides carefully to their stowed position.
Connect the Pol. Drive cable to the Feed support yoke as shown. Finish assembly by
installing the feed system.
2.4 Lower the antenna to its stowed position making sure
that the two positioning lugs on the bottom of the tilt bed
frame make contact. Tighten azimuth brake, elevation strut
clamp, and elevation safety clamps (2). Engage and rotate
reflector hold down assemblies (4) in clockwise direction
until springs are compressed and allowing metal-to-metal
contact. Rotate hold downs an additional two turns to fully
secure reflector sides in position.
NOTE: During high-wind conditions (in excess of 85 mph),
ensure reflector sides are extended/locked, antenna is positioned to 90° elevation and trailer is raised on outrigger
jacks.
10
Stowed Reflector & Feed Support Struts
3.0 Towing
CAUTION: Ensure front trailer jack is contacting ground
before raising outrigger jack assemblies.
3.1 When hooking trailer to the tow vehicle, position trailer
tongue over ball hitch and carefully lower jack to engage
hitch assembly. Ensure that the trailer jack is fully retracted
and tilted into its tow position, prior to towing.
3.2 The safety chains should be crossed under the tongue
and connected to the tow vehicle. The breakaway cable
from the hydraulic brake mechanism in the trailer hitch
should be connected solidly to the frame or bumper of the
tow vehicle with just enough slack to allow cornering.
3.3 Hook up the electrical pin connector and check that all
brake, signal and turning lights are properly functioning.
11
Section 3 - Periodic Preventive Maintenance
1.0 General
1.1 This section contains periodic preventive maintenance
instructions for the 4.5-Meter Transportable Earth Station
Antenna. Provided in this section are inspection and preventive maintenance procedures including cleaning, lubrication and painting procedures deemed within the capabilities of the average station technician. Refer to the applicable vendor manuals for any repair procedures not included
in this section yet designated as capable of being performed in the “field” rather than requiring specialized facilities, tools and/or test equipment as well as technically
trained personnel.
1.2 An operational checkout procedure provides an accurate indication of the overall earth station performance
and should be performed at monthly intervals or after extended periods of storage or long distances of travel (in
excess of 500 miles). This procedure is essentially performed during the various modes of normal operation of the
earth station. In addition, the operational checkout procedure should be performed after any repairs or adjustments
have been made, or whenever the earth station is suspected of degraded operation. If any discrepancy in performance exists and the condition cannot be readily remedied
to return the earth station to a proper operating condition,
conventional troubleshooting procedures should be followed to locate the fault. After the trouble is determined and
the repairs effected, a final operational checkout procedure
should be performed to verify that all discrepancies have
been corrected.
Warning:
Service personnel must at all times observe all safety regulations. Do not perform any maintenance task on the equipment without first turning off the main power supply. Under
certain conditions, dangerous potentials may exist when the
main supply power controls are in the off position due to
charges retained by capacitors. Always discharge and
ground a circuit after removing power.
2.0 Inspection and Preventive Maintenance
2.1 The following paragraphs describe the inspection and
preventive maintenance procedures for the earth station.
These instructions include general cleaning and inspection,
the preservation of metal parts and lubrication. Periodic
replacement of assemblies or components as a preventive
measure is not required. Malfunctions of the earth station
can be traced to components, assemblies and parts through
the use of conventional troubleshooting procedures.
2.2 General Cleaning. To prevent the excessive accumulation of dust and dirt as well as the removal of such contaminants, thoroughly clean the equipment whenever visually
inspecting the earth station components. No special cleaning procedures are required. However, a thorough cleaning
in accordance with the following procedures is required to
assure continued trouble-free operation.
12
Warning:
Use cleaning solvents outside or in a well ventilated room
with free air circulation. Avoid breathing fumes and excessive skin contact with the solvents. Keep solvents away
from open flame.
A. Electrical Parts. Minor cleaning, such as the removal of
dust and loose foreign particles can be accomplished by
vacuuming, by using a soft brush or lint-free cloth or by
blowing out the dust and dirt with low pressure (5 to 25 psi),
dry compressed air. When using air to blow off the contaminants, either avoid or be careful when directing the air
stream on delicate parts. To remove imbedded dirt, grease
or oil from electrical parts, use a 50% solution of isopropyl
(rubbing) alcohol and apply with a soft bristle brush. It may
be necessary to brush some parts vigorously with a stiff
bristle brush to remove imbedded and hardened dirt particles. If possible, avoid excessive use of cleaning solvent on
electrical insulation. After cleaning, allow the cleaned parts
to dry for 10 to 15 minutes before placing the equipment
into operation.
B. Mechanical Parts. Clean mechanical parts by first
removing dust, dirt and other loose contaminants with a
scraper, stiff brush (bristle, or wire in the case of rust or
other corrosion) or cloth or compressed air at 25 to 40 psi.
Any accumulated imbedded dirt, corrosion, grease or oil
deposits that require further cleaning may be removed with
a bristle or wire brush and a cleaning solvent such as
trichlorethylene, or equal. Ensure that the surfaces of the
reflector alignment pins, 1/4-turn fastners with corresponding spacers and adjacent rib areas remain free of dirt
buildup, cinders and any other foreign matter. After cleaninq,
allow the cleaned parts to dry completely before placing the
equipment into operation. Clean and paint aluminum, galvanized and plastic surfaces in accordance with the procedures outlined in paragraph 3.0, Preservation of Component
Parts.
2.3 Inspection. The frequency of inspection is contingent
upon the user’s individual standards and the operational environment in which the earth station is located. However, a
visual inspection of the earth station components should be
performed at least monthly. Where there are no established
wear limits, perform a visual inspection to locate worn or
damaged parts which could cause improper functioning of
the earth station. Do not attempt to clean resolver assemblies or the feed motorization assembly unless they are
malfunctioning. Inspect the surface of the reflector to
ensure the surface is free of dirt, cinders or other foreign
matter. In the absence of any special inspection requirements, operational tests are the most effective means of
isolating parts and assemblies requiring further inspection.
Any condition noted during inspection that may preclude
continued proper operation of the earth station prior to the
next scheduled inspection should be noted. The discrepant
condition should be corrected (repaired or replaced) immediately or at the conclusion of the inspection procedure.
A. Trailer
1. Check tire pressure, it should be maintained at 85 psi.
2. Lubricate the four corner jacks and the trailer jack.
3. Check ball on the towing vehicle to ensure it has not been
damaged or worn. The brake system will not function properly unless the ball size is 2-5/16 inch diameter.
4. Check the fluid level in the brake system master cylinder
and refill it as required to 1/2 inch below the top of the filler
cap. Use only DOT 3 automotive brake fluid.
5. Check brake linings for wear especially if the trailer is
being towed often. Replace shoes if necessary.
6. Lubricate all links and pivots on the surge brake system
to ensure ease of operation, if required.
7. Adjust brakes as per owner’s maintenance manual.
8. Inspect all wiring and lights for wear or damage which
may have occurred during towing.
9. Visually inspect for loose or missing hardware. Replace
and/or retorque as required.
B. Antenna/Positioner. Inspection of the antenna conforms generally to standard visual inspection procedures
performed on electromechanical equipment. In addition to
these standard procedures, perform the following checks
and visual inspections for the specific conditions noted:
1. Inspect all wiring, flexible waveguide, rigid waveguide
and cables for discoloration and burned insulation, moisture
entry, corrosion, dirt, breaks,security of connection, physical
damage and other signs of deterioration. Examine connections for dirt, corrosion and mechanical defects. Check for
loose or broken lacing and cut, abraded, frayed, brittle and
cracked insulation.
2. Examine connectors for corrosion, broken inserts and
stripped threads. Check connector shells for distortion and
dents, and contact pins for bends, misalignment or other
deformities. Check connector inserts for cracks, and carbon
tracking, burns or charring indicating arc-over.
3. Check all electrical components for dirt, cracks, chips,
breaks, discoloration and other signs of deterioration and
damage. A discolored, blistered or burnt condition is evidence of overload.
4. Inspect the drive chain on the azimuth turn table as well
as cam followers. These parts do require lubrication but a
check should be done to ensure they are functioning properly.
13
5. Operate the azimuth and elevation drives as well as the
feed rotation in both the plus and minus direction at least
once every three weeks during antenna down time. Ensure
that the antenna is under observation during operation to
prevent injury or damage. Check that the limft swftches provided at the end points stop antenna and feed movement
and limit travel to prevent structural interference and damage. Periodically check all limit switch mounting hardware
to ensure that connections are tight. Check motor and limit
switch junction boxes for possible water entry. Check the
actuating arm on each feed limft switch for free movement
without binding.
6. Inspect the elevation jackscrew boot for security of
attachment at both ends, for abrasion, tears, cuts, brittleness and other damage that may expose the jackscrew to
the environment (water, dust, etc.). Minor repairs can be
made with RTV.
7. After system operation, remove feed system and visually
inspect the feed window for dirt and the feed and feed window for distortion, foreign object damage and environmental deterioration due to ice and snow, dust, rain, hail and
highwinds, etc., which may cause electrical component
and/or structural deformation.
8. Check the cable attachment to the resolvers and the
cable insulation for cuts, cracking, abrasion and other deterioration. Check the resolvers for a secure mechanical
attachment.
9. Visually inspect all mechanical parts for freedom of operation with no misalignment, binding or interference. Check
all cabling for sufficient slack to prevent cable strain as well
as adequate restraint to prevent abrasion or chaffing during
antenna and feed movement.
10. Check security of antenna mounting and interconnecting assembly hardware. Replace rather than tighten any
loose A-325 structural hardware. The hardware distorts at
initial installation and once loosened, will not maintain the
required high-strength friction connection. All other assembly and installation hardware should be tightened to its original torqued condition. Use a thread-locking compound
when installing new hardware. Do not use a wrench with a
lever arm longer than two feet.
11. Examine painted aluminum and galvanized surfaces
and touch-up where required in accordance with the procedures outlined in paragraph 3.0, Preservation of
Component Parts.
CAUTION: Do not paint exposed surface of 1/4-turn fastener spacers.
A-325 Hardware Tensioning Procedure
1. Lubricate bolt threads with stick wax to reduce friction.
Do not allow wax under flat washer.
2. After connections are completed, tighten bolts until surfaces are joined and nuts are snug. Do not proceed with
Steps 3 and 4 below unless the connection is final. If bolts
are loosened after Steps 3 and 4, discard and replace with
new hardware. Repeat all steps.
3. Mark nuts and end of bolts with straight line. See Figure
A.
4. Tighten nuts further with extra long wrench or power
wrench until nuts are moved an additional 1/3 turn (120°
±30°). See Figure B.
5. If bolt length exceeds four diameters, further tighten nuts
until they are moved a total of 180°. See Figure C.
A. Before Tensioning
B. After Tensioning
C. After Tensioning
3.0 Preservation of Component Parts
3.1 Aluminum Parts
A. Remove all loose paint and corrosion by scraping, wire
brushing or using steel wool. If using steel wool near the
feed window, make sure that none remains on the feed window. Edges of existing paint can be blended with the metal
surface by using a fine grit sandpaper. Wipe the surface to
be painted with a soft rag dampened in trichlorethylene, lacquer thinner or equal. Be certain to remove all loose paint,
corrosion, imbedded dirt, grease and oil deposits or the
paint will not adhere to the surface. Lacquer thinner will dissolve paint if applied heavily and rubbed vigorously. The
reflector may be washed with plain water if necessary. Do
not use bleach, soap solutions or kerosene as it is difficult
to remove the residue. Allow the cleaned surface to dry
thoroughly before priming.
B. Prime the cleaned surface by applying zincchromate
primer or equivalent. The primer can be applied with a
brush, roller or pressurized spray. If necessary, thin the
primer with lacquer thinner to the proper consistency.
Feather primer onto adjacent painted surfaces. Allow primer
to thoroughly dry before applying the finish paint coat.
C. Use only a highly diffusive white paint to paint the inside
of the reflector. This type of paint disperses light rays,
reducing the focusing effect of the sun’s radiation, thereby
reducing heat buildup caused by the focused sun’s rays on
the feed system. All other surfaces of the antenna may be
14
painted with a gloss white enamel paint. The paint can be
applied with a brush, roller or pressurized spray. If necessary, thin the paint with the appropriate thinner to the proper consistency. Thoroughly paint over the primed surfaces
and blend with the existing painted surface.
D. Andrew Type ESPNTK-2 Touch-Up Paint Kit is available
for restoring damaged paint on aluminum surfaces.
3.2 Painted and Galvanized Steel Surfaces
A. Remove all loose paint and corrosion by scraping, wire
brushing or using steel wool. Edges of existing paint can be
blended with the metal surface by using a fine grit sandpaper. Wipe the surface to be painted with a soft rag dampened in trichlorethylene, lacquer thinner or equal. Be certain
to remove all loose paint, corrosion, imbedded dirt, grease
and oil deposits orthe paint will not adhere to the surface.
Lacquer thinner will dissolve paint if applied heavily and
rubbed vigorously. Do not use bleach, soap solutions or
kerosene as it is diffcult to remove the residue. Allow the
cleaned surface to dry thoroughly before painting.
B. Galvanized surfaces may be painted with a zinc-rich
paint. The paint can be applied with a brush, roller or pressurized spray. If necessary, thin the paint with the appropriate thinner to the proper consistency. Thoroughly paint over
the cleaned surface and blend with the existing painted surface.
C. Painted surfaces of the antenna other than the inside of
the reflector may be painted with a gloss white enamel paint.
The paint can be applied with a brush, roller or pressurized
spray. If necessary, thin the paint with the appropriate thinner to the proper consistency. Thoroughly paint over the
primed surfaces and blend with the existing painted surface.
D. Andrew Touch-Up Paint Kit is available for restoring damaged paint and galvanized surfaces due to corrosion.
E. Proper cleaning of plastic components may be performed in accordance with the following procedure:
3.3 Plastic Parts
Proper cleaning of plastic components may be performed in accordance with the following procedure:
A. Remove all dust and/or dirt from the component surface
using a soft cloth or chamois dampened with a mild detergent or similar household cleaner.
Note: Do not use any abrasive cleansers or strong chemicals to clean the assembly which may cause damage to the
assembly surface.
B. Allow the cleaned surface to thoroughly dry and sparingly apply an automotive type wax to the surface of the
assembly.
C. Lightly polish the surface using a clean, dry rag.
4.0 Lubrication
4.3 Motor Gearbox/Housing Fill and Drain Requirements
4.1 For long life and trouble-free operation, be certain not to
extend the lubrication schedule beyond the frequency recommended in Table 2, Lubrication Chart. The frequency
should be shortened if the antenna is subjected to extensive
use or an adverse environment (e.g. high temperature,
extended periods of rainfall, high humidity, dust storms,
etc.). Any component or part should immediately be lubricated if during inspection or operation, rough, jarring, or
intermittent motion is noted, or if squeaky or other unusual
noises are heard. Use the lubricants recommended in paragraph 4.6. Do not over-lubricate. Over-lubrication often can
be as damaging as under-lubrication. Prior to the application of lubricant to any parts, use a clean cloth and/or bristle brush and remove any old lubricant to prevent an excessive buildup. Be certain to remove any protective caps and
clean off each lubrication fitting prior to injecting fresh
grease.
A. A slight dirt accumulation on the air vent screw through
splash oil cannot be avoided, however, keep vent screw
clean to ensure proper pressure compensation. The initial
oil change of the new gear box should be performed at the
end of three months of operation. Under normal conditions,
the gear box oil should be changed after every six months
of operation after the initial oil change. Under severe environmental conditions, the oil may have to be changed every
three months. Examine a sample of the oil to help determine the appropriate interval. If the antenna is to remain out
of operation for more than two months, it is recommended
that the gear box be completely filled with oil to prohibit rust
and corrosion in the housing. Be certain to drain the excess
oil prior to placing the antenna back into operation.
B. To change the oil, remove the drain plugs and level
plugs, and drain the oil using a 1-1/2 quart container.
Reinstall the drain plugs. Remove the filler plugs. Using an
appropriate funnel, fill the gear box with the indicated oil up
to the level plug (refer to Table 2). Reinstall the level and
tiller plugs.
A. Periodically inspect lifting screw on jackscrew assembly
to ensure adequate lubrication. Loosen jackscrew boot
clamps to expose the lifting screw assembly. Fully extend
jackscrew assembly being careful not to exceed the preset
mechanical limits. Brush a thin coating of Mobil SHC-32
grease on exposed lifting screw. Replace boot and attach
corresponding boot clamps. If lifting screw is rusty, remove
existing lubricant with solvent and wire brush the rusted
area. Rinse with solvent and apply fresh grease. The elevation jackscrew assembly is equipped with two grease fittings and a corresponding pipe plug on the jack housing.
Remove the appropriate pipe plug and fill unit with grease
until lubricant seeps from the pipe plug opening. Replace
and securely tighten the pipe plug.
4.4 Drive Chain Lubrication Requirements
A. Remove drive cover and apply open gear lubricant to
surface of drive and idler sprockets.
B. Remove two (2) sections of the side cover by removing
attaching hardware and apply indicated lubricant to full
length of chain with brush. Rotate positioner in azimuth for
total coverage. Replace side cover sections.
4.5 Cam Followers and Azimuth Ring Lubrication
B. Periodically inspect and remove dust or dirt deposits
from the motor housings to avoid hindering the heat
exchange with the ambient air.
A. Cam followers are filled with Mobilux EP-2 grease and
under normal conditions, will not require refilling. However,
periodic surface coverage with open gear lubricant is
required. Both the cam follower and azimuth ring surfaces
may be brush lubricated without removal of sidecover assemblies.
15
4.6. Lubricant Characteristics
B. Mobil SHC-624tm - A low temperature synthetic oil for
worm gear reducers. Operating temperature range is -40° to
+ 200° F (-40° to +93° C).
A. Mobil Temp SHC-32tm - A non-soap hydrocarbon fluid
type grease. Operating temperature range is -65° to+ 350°
F (-54° to +177°C).
Type
of
Service
C. Open Gear Lubricant - A non-flammable asphaltic type
aerosol lubricant. “REALFILM - EVAPO-H OPEN GEAR
SHIELD” or equivalent.
Lube
Type
No. of Lube
Points or Lube
Quantity
Andrew
Type
Number
Brush
Open gear
lubricant
Surface
Coverage**
220186
Pipe Plug
Mobil
SHC-624
*
47497
Mobil Temp
SHC-32 1
2
49208
Pressure
Fitting
Mobil Temp
SHC-32 1
2
49208
3
Brush
Mobil Temp
SHC-32 1
Surface
Coverage
49208
6
Brush
Open gear
lubricant
20 Cam Followers
and Ring Surface
Coverage**
Components
to be Lubricated
Frequency
(months)
Chain and Sprocket
Surfaces
As
Required
Azimuth/Elevation
Gear Box
6
Idler Sprocket
Bearing
3
Pressure
Fitting
Elevation Jackscrew
Housing
3
Elevation Jackscrew
Assembly
Cam Followers and
Azimuth Ring Mating
Surfaces
1
220186
*Manual systems require 1-1/2 pints of oil, while motorized versions are filled to level plug.
**Spray a small portion of lubricant in a clean container and apply by brush to avoid contamination of adjacent
antenna/positioner components.
Table 2. Lubrication Chart
Inspection requires checking for visible signs of oil leakage,
draining, replacing and adding oil to ensure appropriate oil
level requirements. Refer to paragraph 4.3 for procedure
and recommended intervals between inspection.
Excessively dirty oil will require fresh oil replacement. If oil
leakage is found to be excessive, determine cause and perform required corrective action. Periodic inspection procedures can be less frequent after first or second scheduled
inspections.
1 - Mobil Temp SHC32 and Mobil SHC624 are trademarks of Exxon Mobil Corporation.
16
Section 4 - Drawings
1. This section contains installation/drawings and wiring and
schematic diagrams for the 4.5-Meter Transportable
Receive/Transmit Earth Station Antenna System.
3. The wiring and schematic diagrams illustrate the interface between electromechanical subsystem components.
4. The drawings contained in this section include:
2. The installation drawings describe the subsystem assembly and the mechanical interface between system component assemblies and the vehicle.
Drawing
Description
Positioner/Trailer Interface
Reflector/Positioner Interface
Manual Polarization Drive
Type
ESA45AA-( )
--------239351
17
Type
ESA45AAPT-( )
239331
239343
239351
18
19
20
21
22
23
24
25
26
27
28
29
30
31
32
33
34
35
36
37
38
39
40
41
42
43
44
45
46
47
48
49