1
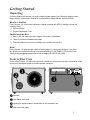
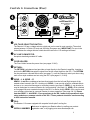
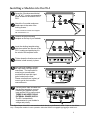
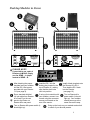
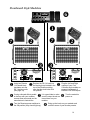
Owner’s Manual
Atomic Amplifiers
Reactor 112
Copyright 2005
Index
Introduction .............................................................................. 1
Product Summary ..................................................................... 1
The Amplifier / Speaker ......................................................................................... 1
Docking System .................................................................................................... 1
Getting Started ......................................................................... 2
Unpacking ............................................................................................................
Front & Rear View ................................................................................................
Controls & Connections (Top) ...............................................................................
Controls & Connections (Rear) ..............................................................................
The DS-1 ..............................................................................................................
Template Kits ........................................................................................................
Installing a Modeler into the DS-1.........................................................................
Basic Set Up .........................................................................................................
2
2
3
4
5
5
6
7
Expanding Your Rig .................................................................. 8
Installing a Blank Template into the DS-1 .............................................................. 8
Desktop Modeler in Stereo ..................................................................................... 9
Floorboard Style Modelers ....................................................................................10
Pro Rack Type Modelers or Preamps .....................................................................11
Tips & Insights ....................................................................... 12
Your Modeler's Settings: ......................................................................................12
Getting To Your Sound: .......................................................................................12
Your Modelers Left and Right Outputs: ................................................................12
Not Using the DS-1: ............................................................................................12
Downloading Custom Tones: ................................................................................13
Reactors used with Analog Preamps ......................................................................13
Using a Microphone vs. Going Direct ...................................................................13
Using Effects Pedals etc. ......................................................................................13
Running Stereo ....................................................................................................13
Good Housekeeping ................................................................ 14
Reactor 112 Specifications ..................................................... 15
Trouble Shooting..................................................................... 16
Contact Atomic ....................................................................... 17
Record Your Purchase Info: * ................................................................................17
Obtaining Service ................................................................... 17
Warranty ................................................................................. 18
II
Introduction
Congratulations on your purchase of an Atomic Reactor 112, a major step in bringing vacuum
tube analog musicality to the digital world. The Reactor 112 is an extremely versatile musical
instrument that provides a live performance platform for your modeling tools and instrument
processors. The Reactor 112 is clearly different from other guitar amplifiers. What we would like
to accomplish in the following pages is to bring you up to speed on exactly how and why we
made it that way.
Product Summary
The Amplifier / Speaker
The Reactor 112 is made up of two systems: the main system which can stand alone is an 18
watt RMS tube audio power amplifier that is joined with a very high efficiency 12” tuned speaker
system. The power amplifier employs top grade components like all polypropylene capacitors, a
tube phase inverter (12AX7) plus two top-grade, EL-84 tubes to deliver full-rated power over a
very wide frequency response, flat out past 20 kHz at very low distortion. It won’t color or alter
the tone created by a modeler, preamp, processor or effects device.
Coupled to the Reactor’s amplifier section is Atomic’s own, high efficiency, custom designed, 12inch speaker. The speaker is mounted in a precisely tuned birch ply cabinet. This gives the
Reactor 112 a speaker system that is wide range and smooth (no sharp peaks or ragged
response). The cabinet features a unique dual flared port and a closed back. The unique design
of the speaker cabinet coupled with the dynamic abilities of both the amp and speaker can give a
level of performance that you would expect to hear from an amp with two to three times the
power capabilities of the Reactor 112. More importantly, the way the amp and speaker system
have been designed, they are able restore to the input signal, especially a digitally created
model, the musical dynamics and feel that we usually expect to hear produced by a well
designed analog tube amp.
Docking System
Early in the development of the Reactor 112 we decided that in addition to providing a world
class sonic solution for taking digital amp modeling tools live, we would also tackle that other
monster inherent to all digital technology. Having seen what happens to the value of all things
digital, we designed the Reactor to be able to easily adapt to changes in technology or modeler
brand popularity. This is the motivation behind the second part of the Reactor 112, The “DS-1”
docking system (Patent Pending). The DS-1 acts as a universal mount for many types of
modelers and preamps. The principle components in the DS-1 are the docking unit, the docking
bay and the Reactor Series Template Kits.
Combined with the appropriate template kit, the DS-1 can accommodate most popular desktop
modelers that are available today. As new modelers are developed, we are able to make
available new template kits. Once a modeler is installed in the DS-1, all of the signal input and
output as well as the power supply connections are made. No wall wart or external power is
required, the Reactor automatically selects and sends the correct power / voltage to the modeler
loaded DS-1. Installation and de-installation is quick and requires no tools. The DS-1 is then
easily loaded into the Reactor 112. A blank template is also available for people who wish to use
rack mount modelers and other choices for preamps, including the growing number of people
using floor based “pedal style” amp modeling products. The Reactor’s classic design will long
outlive current digital technology with value, versatility, and the elegance of a classic.
1
Getting Started
Unpacking
If you are reading this manual you have probably already opened your Reactors shipping carton.
Now would be a good time to familiarize yourself with the things that are inside the carton.
What’s in the Box
Every Reactor 112 comes from the factory shipped complete with a DS-1 docking unit and the
following items:
1. Owners Manual
2. Product Registration Card
Packed with the DS-1
1. One (1) AC line cable for proper usage in the country of purchase.
2. Three (3) mushroom head bumper caps
3. The wiring harness to connect a desktop style modeler into the DS-1.
Note!
Every Reactor 112 goes through extensive testing before it is boxed and shipped. If you have
any questions or suspect there may be a problem relating to your Reactor 112, please E-mail
Atomic at support@atomicamps.com or call the support line at 212-426-1090
Front & Rear View
A view of the Reactor 112 without the grill cloth reveals one of the many secrets to its amazing sound
quality; the closed back tuned and ported speaker enclosure.
Y
X
EFFEC
TS
RETUR
Model Reactor 112
Atomic Amplifiers LLC Orange
CT
SEND
FUS
SEND
Z
XXXXXXX
[
X Speaker.
Y Dual-flared tuned port
Z Opening to access modeler connections for foot controllers etc.
[ Rear connector panel
2
[
Controls & Connections (Top)
Z
X
\
^
Y
X POWER:
]
The power switch turns the power OFF & ON to the Reactor 112. It also acts as the master power
switch for the modeler when connected and housed in the DS-1 (see page 6).
Y INPUT:
This is where you plug in your instrument cable when docking a modeler inside the DS-1. NOTE!
When using a modeler outside of the DS-1, such as a Rack-mount or floor based modeler, the
instrument should be connected to the modeler per the modeler’s instruction manual.
Z COOLING VENT:
The cooling vent is located directly above the tubes and in conjunction with the studio quiet fan
(page 4 – item “6”) does an excellent job of keeping the Reactor cool. No matter how hot the
playing.
KEEP THE COOLING VENT OPEN AND FREE OF OBSTACLES!
[ DOCKING BAY:
This is the mechanism in the Reactor 112 designed to house the DS-1 Docking Unit.
\ MULTI-PIN CONNECTOR & KILL SWITCH:
The MULTI-PIN connector provides the audio & power to and from the dock and the Reactors
electronics. The KILL SWITCH helps eliminate “POPS” and allows the DS-1 to be removed and
reinserted without the user having to turn off and on the power switch on the Reactor 112.
] DOCK LOCKS:
This is where the dock “locks” into place. To release the DS-1 from the Reactor, just push the
handles located on the sides of the DS-1 towards the center and pull up on the dock.
^ INDENTATIONS:
Three circular indentations accommodate the thumbscrews on the DS-1 docking unit (page 6).
3
Controls & Connections (Rear)
[
\
]
EFFECTS
LOOP
RETURN
SEND - L
X
MODEL REACTOR 112
Atomic Amplifiers LLC.
Orange CT.
!CAUTION!
FUSE
SEND - R
X VOLTAGE SELECTOR SWITCH:
Y ^
0101010101
Z
The Reactor 112 has a voltage selector switch and can be used in most countries. The switch
selects between 115Volts (US use) and 240Volts (European use). IMPORTANT! For use in the
United States the voltage selector switch should be set to the 115v setting at all times!
Y AC LINE CONNECTOR:
Accepts a standard grounded AC cable.
Z FUSE HOLDER:
The Fuse Holder houses the power fuse (see pages 15 &16)
[ RETURN:
The RETURN is unbalanced and provides an input directly to the Reactor’s amplifier. Inserting a
jack into the RETURN interrupts the signal from the left output feed from the DS-1. The RETURN
can be used as an outboard effect return (see page 7), or as the Reactor’s main input when using
rack or floor style modelers and not using the DS-1 (see pages 11,12 &13).
\ SEND – L & SEND – R
SENDS - L and R are unbalanced and are direct sends from the Left and Right outputs of the
modeler when housed in the DS-1 docking unit. SEND – L can provide a feed to outboard effects
devices or to a sound reinforcement or recording console (see page 8). SEND – L can be also be
used to feed signal to a second Reactor for “mono stacking” (see page 11). SEND – R is switched
so if engaged converts a modeler housed in the DS-1 for stereo output, SEND – R is used to send
your modelers right signal to a second Reactor for stereo operation. (See page 8 & 10). Please
note that SEND – L and SEND – R are proprietary to the DS-1 and are not operational when
using modelers or preamps outside of the DS-1. Those products should be used according
to their instruction manuals.
] FAN:
The Reactor 112 comes equipped with a special “studio quiet” cooling fan.
^ SERIAL NUMBER:
Make sure to register your Reactor either by mailing your product
registration card, or by logging onto www.atomicamps.com
4
The DS-1
Atomic’s philosophy is to afford its’ customers the opportunity to choose the brand of modeler or
preamp that they prefer, and thus enjoy the sonic characteristics that they demand. The DS- 1
allows Atomic Reactor Series amplifiers to act as a platform for select digital amp modelers and
other types of related equipment. When using a modeler installed in the DS-1, all of the signal
input and output as well as the power supply connections are made (see page 5). No wall wart or
external power is required, the Reactor automatically selects and sends the correct power /
voltage to the modeler loaded into the DS-1. Installation and de-installation requires no tools.
The DS-1 is then loaded into the Reactor 112. The DS-1 design gives the user the ability to
“quick swap” (you don’t have to turn the Reactor on or off and wait for the tubes to come up to
speed) the Dock into and out of the Reactor. With the “quick swappable” capability designed into
the DS-1 you can quickly change Dock/modeler combination.
DS-1 (Top View)
DS-1 (Bottom View)
Template Kits
The installation of your modeler into a Dock requires the proper matching template kit. Currently, the
following kits are available.
MODELER
PART #
LINE 6 POD
ATP2
LINE 6 POD XT
ATPXT
BEHRINGER V-AMP
ATVAMP
BEHRINGER V-AMP 2
ATVAMP
VOX TONELAB
ATTLAB
M-AUDIO BLACK BOX
ATBBOX
For rack mount &
floorboard style
modelers and preamps
use the BLANK KIT. For
more info check out
pages 8, 12, 13, & 14.
Template Kits are designed to adapt most popular
desktop modelers into the Atomic DS-1 Docking Unit.
A template kit consist of a pre-fitted, injection molded
frame and the appropriate mounting hardware to hold a
modeler securely in place inside the DS-1 docking unit.
ATBLANK
The kit also includes the proper power connecting
cable for the modeler to allow the modeler to be
powered by the Atomic Reactor 112’s super high
quality power supply! NO WALL-WART NEEDED!
5
Installing a Modeler into the DS-1
X
Y
Screw the 3 thumbscrews labeled
“A”, "B” &”C”, into the corresponding
holes located on the bottom of the
DS-1.
Attach the 3 rounded mushroom
heads caps to the ends of the
locking screws. *
*A set of mushroom heads come shipped
with each Reactor 112.
Z
Position the proper docking
template on the top of your modeler.
[
Insert the docking template along
with the modeler into the rear of the
DS-1, locating and positioning it in
the notch of the template frame.
\
]
Tighten down the thumbscrews until
modeler is held securely in place.
^
After securing modeler, connect
the Input and, Left/Right output
connectors. The Input cable is
extra long to accommodate
modelers that have their input
jacks located on the front.
Please note that there is plenty of
room to get to foot controller
connections etc.
Use the power cable included with
the docking template to connect
between your modeler’s power
input and the DS-1s power output.
THERE IS NO NEED FOR AN
EXTERNAL POWER SUPPLY.
The DS-1 automatically
compensates for your modeler’s
voltage and polarity.
*The Right Output of the DS-1 connects the modeler directly to the Reactor’s Send - R jack on the effects
loop. It keeps the modeler in mono operation unless the Send R is engaged by plugging a cable into it.
6
Basic Set Up
X
Y
After obtaining the proper template
load your modeler into the DS-1
provided with your Reactor 112.
(Make sure the modelers power
switch is set to on.)
Load the DS-1 into the docking bay
located in the top of your Reactor,
making sure that the dock locks click
into position. Once loaded properly
the audio and power connections are
made between the Reactor and the
DS-1.
Z
Plug the AC cable that comes
supplied with your Reactor 112 into
the AC input located on the back
panel of the Reactor. MAKE SURE
THE VOLTAGE SELECTOR
SWITCH IS SWITCHED TO 115V
FOR USE IN THE U.S.
[
Using a quality, shielded, musical
instrument cable, plug your
instrument into the INPUT jack found
on the Reactors top panel.
EFFECTS
LOOP
RETURN
MODEL REACTOR 112
Atomic Amplifiers LLC.
Orange CT.
SEND - L
!CAUTION!
SEND - R
\
It is a good idea to make sure the
output levels are turned down on
your modeler.
]
If you wish to use out board effects
devices, use SEND – L to go to the
inputs of the effects. From the
outputs of your effects use RETURN.
(for more on effects see page 9).
^
Turn the power switch to the ON
position (it should light up). Your
modeler should power up at the
same time as the amp.
_
Bring up the levels on your modeler
and switch to some of your favorite
presets.
!
For best results, the modeler
should be used in “direct” mode.
FUSE
0101010101
7
Expanding Your Rig
Installing a Blank Template into the DS-1
X
Y
First locate the 8 screws
attaching the template
frame to the top of the DS1. There are 4 screws that
come in groups of 2 on
each side. Remove these
screws (and don’t lose
them!) using a properly
sized Phillips-head
screwdriver.
Remove the template frame
of the DS- 1
Still got the screws?
Z
Replace the template frame
with a blank template
(Atomic Part # ATBLANK –
purchased separately).
Still got the screws?
[
Replace the 8 screws.
(Whew!) You can now load
the DS-1 into the Reactor
as usual *.
The Reactor is now ready
to be used with a Pro-rack
or foot controller style
modeler
*
NOTE! When bypassing the DS-1, the “RETURN” input on the rear jack panel of
the Reactor 112 should be used as the Reactor’s main input, (see pages 11-14).
Inserting a jack into the RETURN puts the Reactor in “Direct Mode” and
automatically cancels out the open audio cables from the DS-1.
8
Desktop Modeler in Stereo
X
]
Z
^
Y
\
EFFECTS
LOOP
EFFECTS
LOOP
RETURN
RETURN
MODEL REACTOR 112
MODEL REACTOR 112
Atomic Amplifiers LLC.
Orange CT.
[
SEND - L
!CAUTION!
SEND - R
*
FUSE
0101010101
Atomic Amplifiers LLC.
Orange CT.
SEND - L
!CAUTION!
0101010101
FUSE
SEND - R
PLEASE NOTE!
If you wish to use a pair of
Reactors in MONO, simply
use the SEND – L output
instead of SEND – R.
X
After obtaining the proper
template load your modeler
into the DS-1 that comes
provided with your Reactor
112 (see page 8).
Y
Load the DS-1 into the
docking bay located in the
top of Reactor #1, making
sure that the dock locks
click into position.
[
Run a standard shielded
1/4 inch cable from Reactor
#1’s Send R on the rear
panel to the Return on
Reactor #2’s rear panel.
\
If using a foot controller with
your modeler, connect it as
normal using the connector
access port located on the
rear of the reactor.
*
^
Turn on Reactor #2s power switch (it
should light up).
_
Z
Install a blank template onto
the Reactor #2’s DS-1.
Then load the DS-1 back
into the Reactor.
(see page 10)
]
Turn on Reactor #1s
power switch (it should
light up). Your modeler
should power up at the
same time as the amp.
Bring up the levels on your modeler and switch
to some of your favorite presets.
9
Floorboard Style Modelers
]
X
X
^
^
Y
Y
Z Z
EFFECTS
LOOP
EFFECTS
LOOP
RETURN
RETURN
MODEL REACTOR 112
MODEL REACTOR 112
Atomic Amplifiers LLC.
Orange CT.
Atomic Amplifiers LLC.
Orange CT.
SEND - L
SEND - L
!CAUTION!
SEND - R
FUSE
Y
!CAUTION!
0101010101
X
Using two Reactor
112s Install blank
templates onto the
DS-1 docking units.
(see page 10)
[
If using outboard effects pedals
or devices with your modeler,
connect them as normal per the
manufacturer’s instructions.
^
Turn the Reactors power switches to
the ON position (they should light up).
Replace the DS-1’s back into
the docking bays located in the
top of the Reactors making
sure that the dock locks click
into position.
\
Z
It is a good idea to make
sure the output levels are
turned down on your
modeler.
_
0101010101
FUSE
SEND - R
Plug the Left and Right
outputs of your Foot
Controller style modeler or
preamp into the pair of
Reactor’s RETURN inputs.
]
Turn the modeler’s
power on.
Bring up the levels on your modeler and
switch to some of your favorite presets.
10
Pro Rack Type Modelers or Preamps
X
X
Y
EFFECTS
LOOP
Y
Z Z
[
EFFECTS
LOOP
RETURN
RETURN
MODEL REACTOR 112
MODEL REACTOR 112
Atomic Amplifiers LLC.
Orange CT.
SEND - L
!CAUTION!
SEND - R
X
Atomic Amplifiers LLC.
Orange CT.
SEND - L
Using two Reactor
112s Install blank
templates onto the
DS-1 docking units.
(see page 10)
FUSE
Y
0101010101
!CAUTION!
Replace the DS-1’s back into
the docking bays located in the
top of the Reactors making
sure that the dock locks click
into position.
0101010101
FUSE
SEND - R
Z
Plug the Left and Right
outputs of your Pro-Rack
style modeler or preamp
into the pair of Reactor’s
RETURN inputs.
using outboard effects
It is a good idea to
If using outboard effects
[ Ifpedals
or devices with your
make sure the
pedals or devices with your
\
]
modeler, connect them as
output levels are
modeler, connect them as
normal per the
manufacturer’s instructions
^
turned down on
your modeler.
Turn the Reactors power switches to the
ON position (they should light up).
_
normal per the manufacturer’s
instructions.
Bring up the levels on your modeler and
switch to some of your favorite presets.
11
Tips & Insights
Your Modeler’s Settings:
The Reactor 112 was designed to bring out the very best in your modeler. Atomic recommends
that in order to achieve the best sounding results, modeler’s should be used in their “direct”
mode. To achieve the most realistic/natural amp and effect sounds, cabinet and mic simulations
can stay “on” but room levels should be turned “off” or be set to 0% and mics should be
positioned “on access”. The bottom line is that tone is very subjective and you should follow
your ears. There are no rules – only what sounds best to you!
Getting To Your Sound:
Many amplification and speaker systems that are transistor based use a bass roll off or a limiter
in an effort to prevent nasty clipping of other undesirable artifacts (this, they call a feature!). If you
have been using such a system (including some headphones), you should be delighted with the
natural sonic openness you will experience with the Reactor 112. The Reactor’s closed back
tuned and ported speaker system can deliver a wide frequency response with extended bottom
end capabilities not found in other combo amps. The benefits of the Reactor become more
evident when players tune down to a “D” or other tunings. By allowing the user to not fight the
amp trying to boost frequencies that aren’t there the amp runs a lot more efficiently, allowing it to
focus its power over the instruments entire frequency spectrum. Your modeler’s tone controls
come to life, and should provide you with a whole new level of control over your sound.
Your Modelers Left and Right Outputs:
Most, if not all, digital amp modelers feature a pair of left and right line outputs. The accepted
standard is that the left output provides the feed for mono operation (see your modelers user
manual!). Plugging a jack into the Right output automatically switches the modeler’s outputs for
stereo operation. The DS-1 docking station is designed to retain your modeler’s standard mono
and stereo operating capabilities even though the right and left outputs are connected. The
modeler remains in standard mono operating mode until a jack is inserted into the Send R output
on the rear jack panel of the Reactor 112. Unless a jack is inserted into the Send R output, a
modeler properly loaded into the DS-1 will continue to provide full mono operation capabilities
when used with the Reactor 112.
Not Using the DS-1:
If you are using a floorboard style or a “Pro” Rack style modeler don’t worry! You can still
experience the sonic superiority of a Reactor by simply plugging your modeler’s output(s) into the
“Return” inputs located on the rear jack panel of the Reactor. When plugging into the Return you
are bypassing the Reactor’s input (see page 2). You are also putting the DS-1 into audio by-pass
mode. You can run your modeler and the rest of your outboard equipment as you normally would
as per their owner’s manuals.
12
Downloading Custom Tones:
The Reactor 112 was designed to bring out the very best in your modeler. That means the one
you own. As the Reactor has become the industry standard for taking modeling tools live some
manufacturers have expressed interest in developing presets for their modelers that are Reactor
specific. Since the DS-1 and the Reactor were designed as a “platform” for different types and
brands of modelers we welcome these efforts to improve your playing experience. Some times
it’s great to have a jumping off point. With this in mind Atomic has gotten together with some of
our industry friends and put together some of our own sound patches. So, check out the Custom
Patches section on our web-site at atomicamps.com. There you will find downloadable custom
Reactor tone patches for all of the most popular modelers and programmable guitar preamps.
Reactors used with Analog Preamps
Variety is the spice of life. That’s why we made the Reactor 112 the perfect platform for all kinds
of guitar amp front ends. Go ahead, experiment, take that TriAxis or Kolbe GP-1 and plug its line
output right into the return input on the rear panel of the Reactor you might be in for a pleasant
surprise!
Using a Microphone vs. Going Direct
At Atomic we feel that this should be up to the player or engineer to decide. Running direct gets
rid of stage bleed and microphone coloration, BUT if you mic the Reactor 112 it sounds an awful
lot like you are micing whatever amp your modeler is set to. This makes the Reactor an excellent
choice for recording studios.
Using Effects Pedals etc.
Many players blend stomp boxes and effects processors from various brands and vintages to
shape their own unique sound and are not ready to give them up for the all in one solution
offered by modelers (as convenient and tempting as it may be). The Reactor 112 works great
with all outboard gear – analog, digital and otherwise! In cases where a modeler is loaded in the
DS-1, use the Reactor as you would any combo amp with an effects loop to position outboard
gear both before and after the preamp (modeler). The Reactor works equally well with floor
based and pro rack modelers. In this instance there is no need to use the effects loop in the
traditional sense since you can insert effects between the modeler and the Reactor’s power
section by putting them after the modeler’s output and before entering the Reactor via the Return
jack. This achieves the same result. As always, consult your effects processor’s manual for
guidelines for proper operation.
Running Stereo
The recommended “norm” for stereo playback in recording and mastering studios as well as
pretty much all listening environments is that the left and right speakers be placed in an
equilateral triangle in conjunction with the listener’s ears. This type of listening / playing set up
takes into consideration things like phase coherency, spatial imaging, and let’s not forget effects
like auto-pan, stereo flanging and Ping-Pong echo. Stereo is great fun to listen to and even more
fun to play through. The sonic “space” that one can create can lead to inspiration, which you just
can’t hang a price tag on. So …Unless you plan on sticking your face directly in front of one of
those all in one stereo cabinets you do the math. 2 Reactors on the other hand allow you to
create a TRUE stereo spread.
13
Good Housekeeping
Output Tube Bias
Your new REACTOR 112 has an internally mounted variable bias control. The bias control is
used to set the idle current in the output tubes, properly matching amp’s performance
characteristics to the type of tubes used. Each different tube brand and manufacturer may
require a slightly different bias setting. An amp’ s bias can drift over time as well as the tubes
bias requirements may change with extended use. The bias should be checked periodically and
when the tubes are replaced. A properly biased amp will sound great and will run reliably and
safely.
Beware! Internal voltages of tube type amplifiers are lethal and capacitors are capable of storing
these lethal charges. To ensure tone and safety, qualified personnel only should carry out
biasing the amp.
Tube Replacement
The REACTOR 112 tube compliment consists in one 12AX7 used as a phase inverter (not a preamp) and two EL-84s for power. For continued optimum performance from your REACTOR 112,
these tubes should only be replaced with tubes of the same type and specification.
The Fuse
The fuse is in the AC supply of the amplifier and will help to protect the amplifier in the event of
an electrical fault or tube failure. If a fuse blows, replace it only with one of the same type and
rating. (Refer to the specification page to determine the correct fuse type and rating.) NEVER
use a fuse with a higher rating as this could damage the amp and present a serious safety
hazard. If the fuse blows repeatedly, the amp should be taken to an authorized service center.
Always Use High Quality Shielded Cables.
The Reactor 112 loves to be fed really good signals so now might be a good time to make sure
your not cheating yourself out of any sound quality. Some cable companies are all hype but
some can provide an amazing improvement. Take some time and “listen to your cables” a few
bucks on a good instrument cable can go a long way toward getting the sound you are looking
for.
14
Reactor 112 Specifications
US: 115V AC, 50/60 Hz 45W
P O W E R R E Q U I R E M E N T S : EU: 240V AC, 50 Hz 45W
AMPLIFIER POWER OUTPUT: 18W into 8 ohms at 3% THD
POWER AMP INPUT SENSITIVITY 175 mv (-13db) at 1000 Hz
(RETURN): for 18watts output
POWER AMP INPUT IMPEDANCE: 56 K ohm
Two EL84 tubes (Power Tubes)
TUBES: One 12AX7A tube (Phase Inverter)
2A 250V at 115V setting
FUSE: 1A 250V at 240V setting
One 12”, 8 ohm 150 watt
SPEAKER: Custom designed speaker
DIMENSIONS:
Height: 19.25 in
Width: 26.00 in
Depth: 11.00 in
(48.9 cm)
(66.0 cm)
(27.9 cm)
Unit Weight 42.50 lbs. (19.3 kg)
WARNING:
TO PREVENT FIRE OR SHOCK HAZARD,
DO NOT EXPOSE THIS UNIT TO RAIN OR
MOISTURE.
NO USER SERVICABLE PARTS INSIDE, REFER
SERVICING TO QUALIFIED PERSONNEL ONLY.
SERVICE BY PERSONS OTHER THAN ATOMIC
AUTHORIZED SERVICE TECHNICIANS MAY
VOID WARRANTY.
THIS UNIT MUST BE EARTH GROUNDED.
15
Trouble Shooting
Reactor does not power up.
1) Is the power cord properly plugged into an electrical outlet?
2) Is there power at the outlet?
3) Is the power cord firmly inserted into the AC input socket on the rear panel?
4) Is the fuse blown?
The Reactor powers up but the modeler does not.
1) Is the Dock power cord the correct match to the modeler?
2) Are the connectors on the ends of the power cable properly connected to the Dock and
modeler power input?
3) Is the modeler power switch in the “ON” position?
The Reactor and the modeler power up but no sound.
1) Is the output level control on the modeler turned up?
2) Is the guitar cable defective?
3) Are the Dock input and two output cables properly connected to the modeler?
4) Has a quarter inch phone plug been left plugged into the Return jack?
5) Is the Dock properly inserted into the Reactor? See warning on Dock-Lock handles.
If none of the above checks have found the problem,
The next step Is to narrow down the possibilities by determining whether the malfunction is in the
Reactor amp/speaker system or in the Docking System. You can do this by plugging your
instrument into The Return Jack, if the instrument can be heard it would indicate that the problem
is with the modeler, the modeler installation, the Dock insertion or a defective Dock.
If after checking all of the above your Reactor 112 is still not performing
correctly, consult your authorized Atomic Service Center or call the Atomic
Amplifier support line
(See Obtaining Service next page)
16
Contact Atomic
Atomic Amplifiers LLC
476 Grace Trail
Orange, CT 06477
(Phone) 212.426.1090
(E-mail) support@atomicamps.com
(Web) www.atomicamps.com
Record Your Purchase Info: *
Atomic Amplifiers Reactor 112
Serial Number:
Date Purchased:
/
/
Purchased From:
Receipt Number:
*Make sure that you fill out and mail-in your product registration card. Doing so
will create a record of your purchase that will be available in case your Reactor is
lost or stolen. You can also register on-line at atomicamps.com
Obtaining Service
How do go about getting my amp to be repaired?
If your amplifier should require service, you have two options: The first option is to take it to an
Authorized Service Center in your area. A list of service centers is available on the ATOMIC
AMPLIFIERS website or by contacting our CUSTOMER SERICE DEPARTMENT. Your second
option is to send the unit back to our factory service center for repair. You should first contact us
for a RETURN AUTHORIZATION NUMBER and shipping instructions.
If I decide to have my amplifier repaired, do I have to pay for it?
If you haven't already, now would be a good time to familiarize yourself with the WARRANTY
that was included with your amp. Within it you will find all the information in regards to what is
covered, how long it is covered, and what is required by the purchaser in order to obtain
Warranty Service.
17
Warranty
Atomic Amplifiers warrants to the original purchaser that this product (exclusive of speakers and tubes) will
be free of defects in material and workmanship for a period of 5 years from the original date of purchase.
Atomic Amplifiers warrants to the original purchaser of this product that the speakers will be free of defects
in material and workmanship for a period of 2 years (tubes for a period of ninety (90) days), from the
original date of purchase by the original purchaser; provided however, it is understood that the speaker
warranty will be subject to the inspection of any speakers by Atomic Amplifiers, Atomic Amplifiers Field
Service Center. These warranties are subject to the conditions, exclusions, and limitations hereinafter set
forth.
This limited warranty is transferable and is valid only when accompanied by a copy of the original sales
receipt with legible purchase date, purchase price, and product is purchased from an authorized dealer in
the United States or Canada and must be returned to the same for any warranty services required). All
exported products are subject to warranty and services to be specified and provided by the authorized
distribution for each country. Excluded from this warranty are defects caused by wear and tear, accident,
misuse, neglect, failure to follow all operating instructions (including the OVERPOWERING of speakers),
alterations and modifications, or act of nature. Such determinations will be made by Atomic Amplifiers.
This limited warranty is also void if:
1) The original retail purchase is not made from an Authorized ATOMIC AMPLIFIERS dealer
2) Any repairs, alterations, or modifications are performed by other than Atomic Amplifiers, or an Atomic
Amplifiers Authorized Service Center.
3) The original serial number affixed to the product is altered, defaced, or removed.
All parts costs for repairs covered under this limited warranty will be borne by Atomic Amplifiers so long
as the repairs have been requested within the applicable warranty periods described above. It is
understood that all repair charges and costs incurred by Atomic Amplifiers for all periods following the
applicable warranty period will be borne and paid for by the purchaser. All labor costs incurred by Atomic
Amplifiers for repairs covered under this limited warranty will be borne and paid for by Atomic Amplifiers
within the applicable warranty period according to rate schedules established by Atomic Amplifiers. All
labor costs and expenses above these rates will not be the responsibility of Atomic Amplifiers. Atomic
Amplifiers, or an Atomic Amplifiers Authorized Service Center MUST do all warranty services.
Transportation charges involved in warranty services are the sole responsibility of the purchaser.
A copy of the original sales receipt must accompany all products being presented to an Atomic Amplifiers
Authorized Service Center for warranty service. All products being returned to Atomic Amplifiers for
warranty service must be accompanied by a copy of the original sales receipt, a detailed description as to
needed repairs, and an Atomic Amplifiers Return Authorization. Atomic Amplifiers reserves the right to
repair or replace this piece of equipment at their option but it is understood that repair or replacement as
provided under this limited warranty is the sole and exclusive remedy to the purchaser for defective or
non-conforming products.
Atomic Amplifiers will not be held liable for any incidental consequential, special, punitive, or exemplary
damages resulting from any defect or failure of this product other than the repair of the Atomic Amplifiers
product subject to the terms of this limited warranty. Any product repaired or replaced under this limited
warranty will, itself, be warranted only for the remainder of the limited warranty period of the original
product being repaired or replaced. Products used for dealer rental purposes shall be warranted from the
date of the original invoice to dealer and if sold will be warranted only for the remainder of the limited
warranty period of the original product.
This warranty gives you specific legal rights, and you may have other rights which vary from state to state,
and province to province, and to the extent required by law, any limited warranty shall be limited to the
duration of this limited written warranty. OTHER THAN AS STATED ABOVE, ATOMIC AMPLIFIERS
MAKES NO WARRANTIES EITHER WRITTEN, EXPRESSED, OR IMPLIED WITH RESPECT TO THE
PRODUCT. THIS WARRANTY IS EXCLUSIVE, AND ATOMIC AMPLIFIERS MAKES NO OTHER
WARRANTY, EXPRESSED OR IMPLIED, INCLUDING IMPLIED WARRANTIES OR
MERCHANTABILITY OR FITNESS FOR ANY PARTICULAR PURPOSE, ALL OF WHICH
WARRANTIES ARE HEREBY BEING DISCLAIMED.
18