1
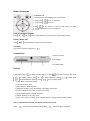
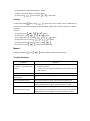
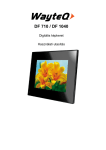
DF-600 and DF-800
User’s manual
Introduction
First of all, thank you very much for purchasing WayteQ product!
Please read this manual carefully before using this product.
This company will continue to provide new functions for the development of the product, and there will be
no separate change in the case of any change in the product’s performance and functions. If the actual
setup and the application methods are not identical to those as set forth in this manual, please access to
the latest product information of our web site.
Package contents
WayteQ DF-600 or DF-800 digital photo frame
AC adapter
User’s manual
Important Safety Precautions
Always follow these basic safety precautions when using your Digital Photo Frame. This will reduce the
risk of fire, electric shock and injury.
Warning: To reduce the risk of fire of shock hazard, do not expose this product to rain or water. To
prevent the risk of electric shock, do not remove the cover. There are no user-serviceable parts inside.
Opening will void your warranty.
Unplug the Digital Photo Frame before performing maintenance. Keep your Digital Photo Frame out of
direct sunlight and heat sources. Protect the power cord. Route power cords so that they are not likely to
be walked on or pinched by items placed on or against them. Pay particular attention to the point where
the power cord is attached to the Digital Photo Frame. Only use the AC adapter included with the Digital
Photo Frame. Using any other power adapter will void your warranty. Unplug the power cord from the
outlet when the unit is not in charging condition.
Cleaning the Digital Photo Frame
Clean the outer surface of the product (excluding the screen) with a soft cloth dampened with water.
Cleaning the display
Treat the screen gently. The screen is made of glass and can be scratched or broken. To clean
fingerprints or dust from the screen, it is recommended to use a soft, non-abrasive cloth such as a
camera lens cloth to clean the screen. If you use a commercial Cleaning Kit, do not apply the cleaning
liquid directly to the screen. Clean the screen with cleaning cloth moistened with the liquid.
Button Illustration
1) Turn on / of
a: Connected to Power adapter to turn on the device;
b: Long press
to turn on the device;
c: Long press
to turn off .
Press
in any function to return to Main Menu; and press
in Main Menu to enter Clock display.
2-3-4-5) Navigation buttons
Press
buttons to step between menu functions or switch between photos.
6) Play / Enter / OK
Press
to start slideshow, view photo or to enter menu.
7) Return
To go back to previous menu press
.
Connections
1. Memory card slot
2. DC adapter
3. CR-2032 battery
Picture
In Main Menu select
or photos in inside memory, or select
to display a picture, press
for photos on memory card. Press
to adjust brightness, press
to pause slideshow and long press
to select, press
to pop up setup option:
*1) View Mode: Vertical / landscape
2) Calendar & Clock: on/off
3) Play Sequence: Order/Random
4) Sideshow: Random, Cross, Mid Spread, Left to Right, Up to Down…
5) Interval: slideshow time in 20s,1m, 30m,1h and 1day.
6) Scale: switch between “Original” and “Auto”
7) Rotate: rotate by 0°/ 90°/ 180°/ 270°
8) Zoom: zoom from 1 to 5 times, press navigation button to change image’s viewing position.
Note: In Calendar & Clock mode, the Rotation and Zoom is invalid.
Press
to enter thumbnail interface. By pressing
again Main Menu will appear.
Upload favourite images
and labels * to inside memory:
You can upload images to inside memory of the device, what you can watch without memory card with
favourite images
function.
1. To upload images create a folder called USER1 on your memory card. Copy images in the folder with
the following names: P0000, P0001, P0002, P0003… Details of images can be: on DF-600 device:
480*800 resolution, DF-800 device: 800x600 resolution, JPG extension. Maximum size of images can be
1 MB.
*To upload labels create a folder called BM on your memory card. Copy max. 4 images with the following
names: L0000.JPG, L0001.JPG, L0002.JPG, L0003.JPG. Maximum resolution of images can be 160x480,
size of images are maximum 200 KB.
2. Put memory card into digital picture frame. Step in Settings menu and select Default settings (see next
page). Start Default settings function. When device restarts it will copy images from the memory card in to
the inside memory. If the device turned on take out memory card and delete folder USER1 and BM.
To delete images and/or labels* from inside memory create an empty USER1 and/or BM folder and do
step 2.
* Only available on DF-600 model
Copy and delete function
Select
from main menu. Press
button into image thumbnails interface, select the target
button for popped up window of “Copy” or “Delete”. (The copied
image, and press & hold
image should be less than 300K). “Delete” operation is same as “Copy”, and only work without storage
media plugged in. Only support importing files from storage media to memory, and only support deleting
files in memory.
Calendar
In Main Menu select
. Enter calendar menu by pressing
brightness, and press
to change month, press & hold
for calendar setting:
1) Time System: 24-hour or 12-hour
2) Time: press
first, and press
to adjust time
3) Calibration: the number of second calibration
4) Date: press
first, and press
to adjust date
5) Date Format: Chronological order of Date, Month and Year
, press
to adjust
for year selection, press
6) Week Beginning: adjust from Monday to Sunday
7) Background: Photo / Black for calendar display
8) Timer: press
first, and press
to adjust time
Setting
In Main Menu select
and press
to enter setup menu of Photo, Clock & Calendar and
Common. About the Photo and Clock & Calendar setting, please refer to function introduction indicated
previously.
Common
1) Language: press
or
2) Theme color: press
to select.
or
to switch
3) Auto brightness: On / off, press
or
4) Night mode: On / off, press
or
to switch.
to switch.
5) Factory default: resume factory setting , press
6) Product info: Press
.
to check product information
Manual
In Main Menu select
, press
. Display will show images introducing device.
Trouble Shooting
Problems
Solutions
Can not power on, even when
1.
Check whether the power adapter is connected well.
the device is connected with a
2.
Reboot the device.
charger.
3.
Contact with your dealer for assistance if your product can not
work well still.
Screen dead
Check whether the backlight is on.
System halted and the device
Unplug the device and plug it again.
can not be off.
Can not playback pictures
Only support pictures in JPEG, JPG format and baseline code.
Failed to read SD card
Check whether they are inserted well.
Check whether the Max Capacity of them is less than 32GB.
Return
to
the
Main
automatically when playing
Menu
Restart playing
(Note: the device has self-protection function which can be activated
automatically once violent impact or external interference exists.)