1
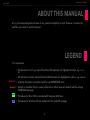
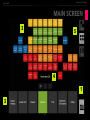
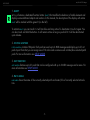
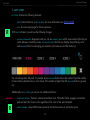
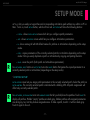
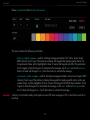
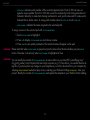
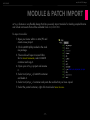
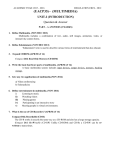
vv
user guide
vv
arts|UNMUTED artsys
USER GUIDE
CONTENTS
CONTENTS 1
INTRO
TRACK SELECTION & TRACING
2
DISCLAIMER 3
TEST CONFIGURATION
3
LEGEND 4
ABOUT THIS MANUAL
4
IMPORTANT INFORMATION 5
WHAT ‘S IN THE PACKAGE
HELP
7
SETUP
8
MAIN SCREEN
9
SETUP MODE
12
MODULE & PATCH IMPORT
7
18
-1-
20
vv
arts|UNMUTED artsys
USER GUIDE
INTRO
THANK YOU for your purchase and trust in my projects.
artsys is as an advanced articulation switching system that combines articulation switching concept from my
4series templates and ease of use known from vROOM, switcheroo and 8liner. With 106 patches, each featuring
up to 21 articulation pads, it provides an open environment for creating your custom controllers for large orchestral templates and live rigs.
artsys
lets easily hide/show patches, assign colors, names and MIDI messages. What’s more, artsys is
ready to import dedicated modules for leading orchestral sample libraries that will be soon available. A powerful
visibility management engine lets you quickly display predefined scenes, filter patches by color and enlarge your
selection for ease of use on stage or in the studio. Add to all these a track selection/tracing engine in Cubendo,
and you’ve got a powerful MIDI tool that provides unparalleled customization and flexibility. And it looks fabulous.
I am really happy to release it and I hope that many users, even those with no Lemur programming skills, will benefit from it.
Cheers,
Przemek Mieszkowski (the developer of arts|UNMUTED premium projects for Liine Lemur for iPad)
PS. Special thanks to Jeff Parent (www.sound-designer.fr) for his valuable insight and involvement in creating and
testing of this product.
-2-
vv
arts|UNMUTED artsys
USER GUIDE
DISCLAIMER
This software is sold as is. No warranties are offered or implied. The user uses the templates at their own risk. I
cannot assume any responsibility for any data loss or corrupted files resulting from the use of arts|UNMUTED templates. I cannot provide support related to the operation of any 3rd party software mentioned in this document. I
cannot guarantee that this manual is free of errors.
You may modify the templates for your own use. You may NOT sell, give away, post online, or distribute arts|UNMUTED templates or any derivatives based on arts|UNMUTED templates without prior permission of the author.
TEST CONFIGURATION
This Lemur project has been tested on the following:
•iPad v1/3/Air with Liine Lemur 5 (iOS 7)
•PC workstation based on Intel 980x processor and Asus Rampage Extreme III motherboard
•Apple Macbook Pro Retina (2013) with Mac OSC 10.9
-3-
vv
arts|UNMUTED artsys
USER GUIDE
ABOUT THIS MANUAL
artsys has been designed with ease of use, speed and simplicity in mind. However, to master the
workflow, you need to read this manual.
LEGEND
For convinience:
•All references to artsys internal functions/GUI elements are highlighted in blue, e.g.:
PROJ-
•All references to Lemur internal functions/GUI elements are highlighted in yellow, e.g.:
SAVE AS
ECT
IMPORTANT!
WARNING!
MAC
PC
•Importat information are marked with the red IMPORTANT mark.
•Actions or condition that can cause mulfunction or other issues are marked with the orange
WARNING! message.
•Procedures for Mac OSX are marked with the green MAC box.
•Procedures for Windows OS are marked with the violet PC message.
-4-
vv
arts|UNMUTED artsys
USER GUIDE
IMPORTANT INFORMATION
arts|UNMUTED artsys:
IMPORTANT!
•takes 94% of Lemur internal memory on load, but the memory consumption is expected to
grow during setup which means that you can’t use any other Lemur projects on the same iPad.
IMPORTANT! •due
to Lemur memory limits live page is temporarily empty. Some controllers will be added
there once Liine lifts the limits.
IMPORTANT! •features
track tracing fucntionality that is currently limited to Cubase and Nuendo. Track selection, however, is possible also in Ableton Live by MIDI mapping.
-5-
vv
arts|UNMUTED artsys
USER GUIDE
HELP
MVIDEOAC
artsys is accompanied with the comprehensive set of tutorials. You can find them on arts|UNMUTED’s website and Youtube channel.
WHAT ‘S IN THE PACKAGE
arts|UNMUTED artsys includes the following components:
•artsys_v1.jzml (Lemur project)
•artsys_GR.xml (Generic Remote file for Cubase and Nuendo)
•User Guide (this document)
-6-
vv
arts|UNMUTED artsys
USER GUIDE
SETUP
artsys is a flexible MIDI device that can send MIDI messages (notes/CC) on any Lemur Target, so the
setup is totally dependent on your needs and working environment. This manual assumes that you are
familiar with Lemur setup and have got a WiFi connection between your Lemur on iPad and your computer. If you haven’t done this yet, go to Liine website and follow the tutorials.
IMPORTANT!
arts|UNMUTED is not responsible for setup/system specific issues. All our projects has been extensively
tested on various machines (Mac/PC) and should work as expected in all Lemur environments. However,
we have helped many people with the setup so feel free to email us at: info@artsunmuted.com.
-7-
vv
arts|UNMUTED artsys
USER GUIDE
MAIN SCREEN
2
5
4
1
3
-8-
vv
arts|UNMUTED artsys
USER GUIDE
1. SHIFT
R
artsys features a dedicated function button (SHIFT) that modifies the behavior of visible elements and
displays some additional objects and sections. In this manual, the description of the display with active
SHIFT will be marked with the green R (on the left).
To activate SHIFT you can touch it - it will turn blue and stay active. To deactivate it, touch it again. You
can also touch and hold the button - it will remain active as long as you hold it. It will be deactivated
upon release.
2. PATCH MATRIX
contains 106 pads. Each pad can send up to 2 MIDI messages and display up to 21 art
pads. Apart from that you can assign one of 12 colors and a name as well as hide/show selected patch
pads. For more information see SETUP MODE.
PATCH MATRIX
3. ART MATRIX
features up to 21 pads that can be configured with up to 3 MIDI messages and a name. For
more information see SETUP MODE.
ART MATRIX
4. INFO AREA
INFO AREA
tion.
shows the name of the currently selected patch and notes/CCs of currently selected articula-
-9-
vv
arts|UNMUTED artsys
USER GUIDE
5. LEFT STRIP
LEFT STRIP
features the following elements:
–– SETUP button that turns on
SETUP MODE
(for more information see SETUP MODE)
–– LIVE - show an empty page for future expansion.
R
With
SHIFT
activated, you will see the following changes:
–– ARTICULATION MARTIX disappears and you can see VISIBILITY AREA with 4 scene selectors that let you
switch between 4 visibility scenes, COLOR FILTER STRIP that lets you display the patches by color
and ENLARGE button for enlarging your selection, and remove color filter button (X).
You can enlarge max. 28 pads - the number above ENLARGE button shows the number of patches visible
in the currently selected scene or color mode. If the number is higher than 28, ENLARGE button is grayed
out.
Additionally, on
IMPORTANT!
R
LEFT STRIP
you will see two additional buttons:
–– FREEZE ART COLOR - “freezes” selected articulation color. When this button engaged, articulation
pads will kept the ‘frozen’ color regardless of the color of the selected patch.
–– SWITCH NAMES - shows MIDI values instead of articulation names on articulation pads.
-10-
vv
arts|UNMUTED artsys
USER GUIDE
SETUP MODE
artsys lets you easily set up patches and corresponding articulation pads without any editor on PC or
Mac. To do so, touch SETUP button, which will turn red. LEFT STRIP will show the following buttons:
–– PATCH - shows
–– ART - shows
PATCH SETUP
ART SETUP
screen which lets you configure patch parameters.
screen which lets you configure articulations parameters.
–– N - shows name grid with 48 default names for patches or articulations depending on the setup
mode.
–– COPY - copies parameters of the currently selected patch or articulation depending on the setup
mode. It lets you easily duplicate a patch or articulation by copying and pasting the data.
R
–– SAVE - saves the patch (both patch and articulations parameters).
In SHIFT MODE, COPY button on LEFT STRIP turns into PASTE button that pastes the copied parameter to a
currently selected patch or articulation (depending on the setup mode).
1. PATCH SETUP
screen lets you assign patch parameters to the currently selected patch. Select the patch on
PATCH MATRIX . The currently selected patch is indicated with a blinking LED. All patch assignments will
affect only currently selected patch.
PATCH SETUP
R
In SHIFT MODE, PATCH MATRIX turns into VISIBILITY GRID that let you hide/show the patches. Touch SHIFT to
display all patches. Hidden “empty” patches are dark gray, hidden patches with assigned parameters
are dark gray, too, but they feature assigned names. To hide a patch, touch it - it will turn dark gray.
Touch it again to show it.
-11-
vv
arts|UNMUTED artsys
USER GUIDE
Below
PATCH MATRIX
there is
PATCH SETUP AREA .
This area contains the following controllers:
–– PATCH CC/TARGET/CHANNEL - used for selecting message parameters (CC value, Lemur target,
MIDI channel). Touch one of the buttons to display the keypad that replaces patch matrix. Active parameter frame will be highlighted in blue. It means that keypad will affect this parameter.
Touch it again to hide the keypad. To deactivate the message, touch SHIFT and touch PATCH CC
button. Its label will change to OFF. Touch the button to activate the message.
––
IMPORTANT!
- used for selecting message parameters (note, Lemur target, MIDI
channel). Touch one of the buttons to display the keypad that replaces patch matrix. Active parameter frame will be highlighted in blue. It means that keypad will affect this parameter. Touch
it again to hide the keypad. To deactivate the message, touch SHIFT and touch PATCH NOTE button. Its label will change to OFF. Touch the button to activate the message.
PATCH NOTE/TARGET/CHANNEL
Contrary to articulation pads, patch pads can send CC/note message as 127 on touch down and 0 on
touch up.
-12-
vv
arts|UNMUTED artsys
USER GUIDE
–– PATCH NO - indicates patch number of the currently selected patch. Each of 106 has been assigned a unique number (from 0 to 106) that is used for example by track tracing mechanism in
Cubendo. Basically, to make track tracing mechanism to work, patch name and CC value sent to
Cubendo has to be the same. To assign patch number value to PATCH CC touch PATCH NO.
–– PATCH NAME - indicates the name assigned to the selected patch.
To assign a name to the selected pad with
1.Touch
PATCH NAME
2. Press
N
3. Press
SAVE
to display
PATCH NAME GRID :
to highlight it.
PATCH NAME GRID
and choose a name.
to save patch parameters. The selected name will appear on the pad.
IMPORTANT!
Please note that when PATCH NAME is grayed out, patch name will not be stored when you press
button. The name is stored only when PATCH NAME is highlighted in blue.
IMPORTANT!
You can modify the content of PATCH NAME GRID in Lemur editor on your Mac/PC by modifying root/
chg_patch_name() script. Replace the text strings in quotes (e.g. t1=’bass drum’,) as needed. Before doing this, if you have done any changes to your template on your iPad, download it to your computer by
selecting LEMUR CONNECTION button (play arrow), selecting your iPad and clicking DOWNLOAD. Save your
project. Modify the content of PATCH NAME GRID and upload the template to your iPad for further editing.
-13-
SAVE
vv
arts|UNMUTED artsys
USER GUIDE
To assign a name to the selected pad manually with Lemur editor on your iPad:
1.On your iPad touch
2. Touch
GEAR ICON
SAVE PROJECT.
3. Enter the name and touch
4. Touch
EDIT PROJECT
5. Touch and hold
RETURN
IMPORTANT!
on the keyboard.
toggle switch.
PATCH NAME .
6. Enter your custom name in
7. Touch
in the upper right corner.
EDIT PROJECT
OPTIONS>CONTENT.
toggle switch again.
While creating your custom project, save it frequently on your iPad and download it to your computer
for backups.
PATCH SETUP AREA
features additional controllers:
–– COLOR SELECTOR - for selecting one of 12 colors for the selected patch.
–– scene selectors (MAIN VIEW, SCENE 1-3) for selecting visibility scenes.
Visibility scenes let you easily create custom layouts for your patches. You may want for example to display only certain instruments for easy access. Touch the respective visibility scene and hide/show respective patches by touching them in SHIFT mode.
-14-
vv
arts|UNMUTED artsys
USER GUIDE
2. ART SETUP
ART SETUP
screen lets you assign articulation parameters to the currently selected articulation.
To define the number of articulation pads (up to 21) for the selected patch:
1.Select the patch with
2. Touch
SETUP
3. Touch
ART
PATCH MATRIX .
button to activate setup mode.
button. You will see
ARTICULATIONS SETUP
screen.
4. Touch SHIFT. ARTICULATIONS MATRIX will change into ARTICULATION GRID. The grid has got 21 cells each represent one of 21 articulation pads. The cells are arranged into 3 rows - the first (bottom)
row of cells stands for full height articulation pads. For example if you want to have up to 7 articulation pads for your patch, select the cells in the bottom row. If you want to have more than
14 articulations, select the cells in the middle row. And if you want to have 3 rows of articulations
(max. 21) use the third row.
5. Touch or release SHIFT. The number of available articulation pads should correspond to your selection on ARTICULATIONS GRID.
To assign a name to the selected articulation pad:
The procedure for assigning the name to the selected articulation pad is basically the same as assigning
the name to the selected patch. Follow this procedure to assign it with ARTICULATION NAMES GRID (you can
display the grid by touching N button (on articulations setup screen this button is marked as N ARTS). The
manual name entry with Lemur editor on iPad is also the same as specified for patch name entry.
IMPORTANT!
If you want to modify the content of the grid, modify chg_art_name() script following the procedure
specified for patch name.
To reset names for all articulation pads, press
SHIFT
-15-
and touch
RESET ART NAMES .
vv
arts|UNMUTED artsys
USER GUIDE
To assign MIDI message parameters:
Each art pad can send up to 3 MIDI messages. Parameters can be configured
with PARAMETER STRIP (identical for each message) shown on the right. When
you touch the parameters, the keypad on the left will change accordingly. You
can also show MIDI numbers instead of MIDI notes for notes with MIDI NUMBERS
button. The keypad selection affects the currently selected parameter highlighted with a blue frame.
1.Touch the first parameter to set note/CC value. If it is
and touch the parameter to activate it.
OFF ,
touch shift
2. Touch NOTE/CC to set the MIDI message type. The display on the first
parameter will change accordingly (note or CC).
3. Touch
VALUE
to set note velocity or CC value.
4. Touch
TARGET
to set Lemur Target for the selected articulation pad.
5. Touch CHANNEL to set MIDI channel for the selected articulation pad. To
set the pad into OMNI mode, press SHIFT and touch OMNI. In this mode the
respective MIDI message will be sent on all MIDI channels.
6. Touch O button to activate NO 0 ON TOUCH UP mode. Normally, the pad
sends value on touch down and 0 on touch up. In this mode, the value
will be sent on touch down and touch up.
It is also possible to assign consecutive CCs or note numbers to all art pads (e.g. C0 for art pad 1, C#0
for art pad 2 etc.). To do this:
1.Select the first art pad and define the parameters you want to copy to all art pads.
2. Touch
SHIFT .
3. ART MSG 1, 2, 3 will turn red. Touch the red item for the respective MIDI message you want to
propagate to all pads. All art pads will be populated with selected parameters.
-16-
vv
arts|UNMUTED artsys
USER GUIDE
MODULE & PATCH IMPORT
artsys features a very flexible design that lets you easily import modules for leading sample libraries
and virtual instruments that will be available from arts|UNMUTED.
To import a module:
1.Open your Lemur editor on Mac/PC and
create a new project.
2. Click cnMAIN.jzlib provided in the module package.
3. The module will open in Lemur Editor.
Go to PROJECT BROWSER, select cnMAIN
container and copy it.
4. Open your artsys project and rename
it.
5. Select root/artsys_v1/cnMAIN container
and delete it.
6. Select root/artsys_v1 container and paste the module that you have copied.
7. Select the pasted container, right click it and select
-17-
SEND TO BACK.
vv
arts|UNMUTED artsys
USER GUIDE
artsys enables you also to import individual patches from arts|UNMUTED modules or your projects.
To do so, you need to understand the design concept. Each patch in artsys is a self-contained unit (a
pad object) that stores all patch and related articulation information. Each patch has got a unique name
(from pd0000 to pd0111). All patch pads are placed in cnMAIN container. The pads are positioned automatically by their names, i.e. pd0000 is the first pad in the top row, pd0001 is the second pad in the
top row, pd0014 is the first pad in the second row from the top etc.). If you delete the patch from your
Lemur project, the next patch will take its position leaving an empty space in the lower right corner of
patch matrix. Patch pad names are also used by the visibility engine. There are 6 dummy pads that are
covered by INFO AREA - they are not functional, however they are needed to ensure right positioning of
the patches. They are dummied to save Lemur memory. So to import a patch you basically need to copy
and paste it.
To import a patch:
1.Open your Lemur project in Lemur editor on your Mac/PC and select the patch pad you want to
copy.
2. Open your target project.
3. Decide which patch you’d like to replace with the one you have copied. Click it to check its
name and write it down.
4. Delete the patch you want to replace.
5. Select root/artsys_v1/cnMAIN container and paste the patch you have copied.
6. The patch will be appear in cnMAIN container with its name truncated, e.g. pd15 not pd0015.
7. Rename the patch with the name you have written down.
8. Click the imported pad and click the arrow to expand its content. Modify n script to correspond
to its name, e.g. if you have imported pd0015 change n script to n=mod+15.
-18-
vv
arts|UNMUTED artsys
USER GUIDE
TRACK SELECTION & TRACING
1. CUBASE/NUENDO
artsys is provided with three dedicated Generic Remote files: artsys_GR_all.xml, artsys_GR_MIDI.xml
and artsys_GR_VST.xml. If you will use artsys to control only MIDI tracks, use artsys_GR_MIDI.xml.
If you want to use it to control only VST tracks, artsys_GR_VST.xml. If you want to control all tracks regardless of their type, use artsys_GR_all.xml . Generic Remot file lets you assign the tracks for track selection/tracing. In proper setup, Cubendo will react to your track selection and also your iPad will trace
the selection in your DAW.
To set up a GR file:
1.In Cubendo go to Devices>Device Setup.
2. Click + in the upper right corner of the dialog box.
3. Choose Generic Remote from the list of devices.
4. Click Import and locate the respecitve Generic Remote file on your hard drive.
5. Click Open.
6. Set MIDI Input and Output as needed. By default, artsys patches are configured to send CC
message corresponding to their patch no on Lemur Target 7.
7.Assign tracks in Channel/Category column as needed.
-19-
vv
arts|UNMUTED artsys
USER GUIDE
The entries in Control Name column correspond to patch numbers
in artsys. By default, each patch
pad in artsys sends MIDI CC on
Lemur Target 7 and MIDI channel
1 that corresponds to its patch number, e.g. patch 25 sends CC25. To
assign a track, check the patch number of your track in artsys, locate
the corresponding entry in Control
Name column in Device Setup>Generic Remote window in Cubase and
select the desired track in Channel/
Category column. Unassigned entries have 1000 value in Channel/
Category column.
IMPORTANT!
IMPORTANT!
IMPORTANT!
Some artsys modules provided
by arts|UNMUTED have their own
Generic Remote files that correspond to the provided Cubendo projects (with VST or MIDI tracks). To
enable track selection/tracing, import the respective GR file with all the tracks already assigned.
There should be only one artsys GR file active at the given moment - if you have several GR files imported as Generic Remote 1, 2 and 3, disable MIDI Input/Output for the files that are not currently
used.
Generic Remote script has got some limitations. It is based on track number and any changes in track
order (adding, deleting or rearranging tracks) will mess with your assignments. Therefore, it should be
used for templates or project parts that are staple and don’t change.
-20-
vv
arts|UNMUTED artsys
USER GUIDE
2. ABLETON LIVE
You can use MIDI mapping functionality to map patches to tracks for track selection. The assignment will
be kept regardless of track position in your project. For more information, see Ableton help on MIDI
mapping.
-21-