1
RM100X Series Professional Receiver &
Decoder User Manual
(For SW Version 1.0.0.0 and above)
Index
About This User Manual ................................................................. iii User Manual Index ............................................................................... iii Chapter 1 Preface ............................................................................................... 1 Front Panel and Rear Panel ..................................................................... 2 Main Menu ........................................................................................... 3 Chapter 2 Input Setup ......................................................................................... 5 Input Source ........................................................................................ 5 RF Input Setup ..................................................................................... 5 IP Input Setup ...................................................................................... 7 Chapter 3 Output Setup ........................................................................................ 9 Output IP Addr List ................................................................................ 9 Output Port List .................................................................................. 10 TSoIP Format ..................................................................................... 10 CVBS Format ...................................................................................... 11 YPbPr/SDI Format ............................................................................... 11 Chapter 4 Program Setup .................................................................................. 13 Scan Program ..................................................................................... 13 Program Descrambler .......................................................................... 14 Program Select ................................................................................... 14 Audio Stream Select ............................................................................ 14 IP Output Channel ............................................................................... 15 Chapter 5 CA Modules ....................................................................................... 16 Chapter 6 System Setting .................................................................................. 17 OSD Language .................................................................................... 17 TS Interface IP ................................................................................... 17 Management Network .......................................................................... 18 Default Config .................................................................................... 19 Reboot .............................................................................................. 20 Chapter 7 Warning Message .............................................................................. 21 Chapter 8 System Information .......................................................................... 22 Chapter 9 Web based console ........................................................................... 23 Input Setup ........................................................................................ 25 RM100x Series Professional Receiver & Decoder User Manual
i
Output Setup ..................................................................................... 26 Program Setup ................................................................................... 26 CA Modules ........................................................................................ 27 System Setting................................................................................... 27 Warning Message................................................................................ 28 System Information ............................................................................ 28 Software Upgrade ............................................................................... 29 ii
RM100x Series Professional Receiver & Decoder User Manual
About This User Manual
This user manual mainly introduce how to operate RM100x Series Professional
Receiver during usage through front panel and web based console.
User Manual Index
Preface: This chapter mainly introduce basic hardware interface of RM100x Series
Professional Receiver, also including front panel and rear panel. Also introducing
main instruction of system menu.
Input Setup: This chapter mainly introduce how to operate the menu of input
and how to set the parameter of input source.
Output Setup: This chapter mainly introduce how to operate the output setup
menu and how to set the parameter of output channel.
Program Setup: This chapter mainly introduce how to operate the program setup
menu and how to set the parameter of program setup.
CA Modules: This chapter mainly display information of CA modules.
System Setting: This chapter mainly introduce how to configure system setting.
Warning Message: This chapter mainly introduce how to check device’s warning
message.
System Information: This chapter mainly introduce how to check device’s
system information.
Web Based Console: This chapter mainly introduce how to configure RM100x
Series Professional Receiver using web based console.
RM100x Series Professional Receiver & Decoder User Manual
iii
1
Preface
RM100x Series Professional Receiver is a broadcast-quality decoder that provides
MPEG-2 SD/HD, H.264 SD/HD decoding, advanced transport stream processing,
cutting-edge IP processing technologies and variety of front-ends including DVBS/C/T/S2,ASI, IP,etc.
Input interface:
DVB-C/S/T/S2
DVB-ASI
IP(Optional)
Decoding Format:
Video:MPEG1,MPEG2,MPEG4,H.264
Audio:MPEG1 Layer1/2, MPEG2 Layer2,AAC,AC3
Output Interface:
CVBS
YPbPr
SDI with embedded audio(Optional)
AES/EBU
ASI
IP
When operating this device, you can control this device totally only using 7 keys
and two lines LCD on front panel.
Please notice, the 7 keys will automatically locked if
no operation in one minute, so you have to unlock the
keys by pressing Left key, Right key, Up key, Down
key sequentially.
RM100x Series Professional Receiver & Decoder User Manual
1
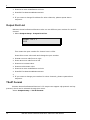
1
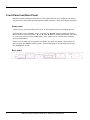
Front Panel and Rear Panel
RM100x Series Professional Receiver’s front panel can let you configure the device
conveniently. Rear panel provides power cable interface, input and output interface.
Front panel
There are one two lines LCD and 7 keys on front panel used to configure device.
LCD has two lines to display menu, you can use ▲and▼ keys to scroll the screen.
Menu used to enter sub menu ,▲, ▼, ►, and ◄ used to modify parameter. OK used
to enter sub menu or save modification, EXIT used to exit current menu without
saving modification.
There are two LEDs on front panel to indicate the device’s status, when power on
and running, the POWER LED is green, when something is wrong with this device,
the ERROR LED is red.
Rear panel
2
RM100x Series Professional Receiver & Decoder User Manual
1
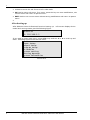
Main Menu
The Figure below is the whole structure of main menu.
Menu Structure
Menu Operation
RM100x Series Professional Receiver can be operated using the keys on front panel.
Following is the usage instruction of the keys.
▼ Used to scroll down the menu, also can be used to decrease parameter in edit
mode.
▲ Used to scroll up the menu, also can be used to increase parameter in edit
mode
► Used to move the edit focus to right in edit mode。
RM100x Series Professional Receiver User Manual
3
1
◄ Used to move the edit focus to left in edit mode
OK Used to enter sub menu, if no menu, press this key can save modification, exit
current menu and return to parent menu.
EXIT Used to exit current menu without saving modification and return to parent
menu.
After booting up
After RM100x Series Professional Receiver booting up, LCD screen display device
model and running status just like following figure.
RM1000-S2
IP:192.168.1.3
If you want to enter main menu, press MENU key and use ▼ or ▲ to scroll up and
down. Following figure list all the sub menu.
Input Setup
Output Setup
Program Setup
CA Modules
System setting
Warning Message
System Information
All Sub Menu
4
RM100x Series Professional Receiver & Decoder User Manual
2
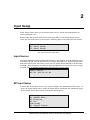
Input Setup
Input Setup menu allow you to select input source, set RF input parameter,IP
input parameter, etc.
Select Input Setup from main menu and press OK to enter Input Setup menu.
There are two sub menus in this menu, following figure list these two sub menus.
Input Source
RF Input Setup
IP Input Setup
Sub menu of Input Setup Menu
Input Source
Currently RM100x Series Professional Receiver can support several different input
interfaces: RF-IN, ASI-IN and IP-IN. To change Input Source, select Input Source
and press ok to enter sub menu, then you can select RF-IN,ASI-IN or IP-IN using
◄ and ►. After selecting, press OK to save modification and exit the current menu,
or press EXIT to discard modification and exit the current menu.
INPUT Source
RF-IN ASI-IN IP-IN
RF Input Setup
IF select RF-IN as input source, you must configure the parameter of RF input . To
enter RF Input Setup menu, select RF Input Setup and press OK. Following figure
is the whole list for sub menus of RF Input Setup Menu.
RF Frequency
RF Symbol Rate
RF Polarity
RF FEC
LNB Setup
RF Signal Status
RM100x Series Professional Receiver & Decoder User Manual
5
2
RF Frequency
Enter this menu to edit the frequency of input signal.
Press ► to move edit focus to right
Press ◄ to move edit focus to left
Press ▲ to increase value
Press ▼ to decrease value
Press OK to save modification and exit
Press EXIT to discard modification and exit
RF Symbol Rate
Enter this menu to edit the symbol rate of input signal.
Press ► to move edit focus to right
Press ◄ to move edit focus to left
Press ▲ to increase value
Press ▼ to decrease value
Press OK to save modification and exit
Press EXIT to discard modification and exit
RF Polarity
Enter this menu to select RF polarity of input signal.
RF Polarity
Horizontal
Vertical
Press ► and ◄ to select Horizontal or Vertical
Press OK to save modification and exit
Press EXIT to discard modification and exit
RF FEC
Enter this menu to select RF FEC of input signal.
RF FEC
1/2 2/3 3/4 5/6 7/8
Press ► and ◄ to select Horizontal or Vertical
Press OK to save modification and exit
Press EXIT to discard modification and exit
6
RM100x Series Professional Receiver & Decoder User Manual
2
LNB Setup
Enter this menu to set LNB parameters.
LNB Power
22KHz Tone
C LO Freq.
KU LO Freq.
ON/OFF
ON/OFF
RF Signal Status
This menu used to display signal strength and quality.
Signal Strength
Signal Quality
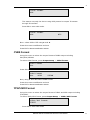
IP Input Setup
IF select IP-IN as input source, you must configure the parameter of IP input . To
enter IP Input Setup menu, select IP Input Setup and press OK. Following figure
is the whole list for sub menus of IP Input Setup Menu.
Input Port
Multicast Mode
Multicast Address
TSoIP Format
1234
OFF
226.1.1.3
UDP
Input Port
Input Port indicates the device is receiving data from which socket port.
To change input port, select Input Port and press OK.
Press ► to move edit focus to right
Press ◄ to move edit focus to left
Press ▲ to increase value
Press ▼ to decrease value
Press OK to save modification and exit
Press EXIT to discard modification and exit
Multicast Mode
RM100x Series Professional Receiver can support multicast mode and unicast mode,
if you set multicast mode off, the device receiving data through IP using unicast
mode.
To change multicast mode, select Multicast Mode and press OK.
Press ► and ◄ to select OFF or ON
Press OK to save modification and exit
Press EXIT to discard modification and exit
RM100x Series Professional Receiver User Manual
7
2
Multicast Address
Multicast address indicates from which IP address the device is receiving data.
To change multicast address, select Multicast Address and press OK.
Press ► to move edit focus to right
Press ◄ to move edit focus to left
Press ▲ to increase value
Press ▼ to decrease value
Press OK to save modification and exit
Press EXIT to discard modification and exit
TSoIP Format
RM100x Series Professional Receiver can support udp and rtp protocal.
To change TSoIP format, select TSoIP Format and press OK.
Press ► and ◄ to select UDP or RTP
Press OK to save modification and exit
Press EXIT to discard modification and exit
8
RM100x Series Professional Receiver & Decoder User Manual
3
3
Output Setup
Output Setup Menu used to configure the parameter of IP output interface when
outputting TS stream through IP interface. RM100x Series Professional Receiver
can support outputting 16 channels simultaneously through IP interface. Using this
menu, you can set the IP address, port number, transport protocol for each
channel
To enter output setup menu, select Output Setup from main menu and press ok.
Following figure is the whole list of sub menus for Output Setup Menu。
Output IP Addr List
Output Port List
TSoIP Format
Local IP Addr
CVBS Format
YPbPr/SDI Format
Output IP Addr List
RM100x Series Professional Receiver can output 16 IP channels through IP
interface simultaneously, each channel can be configured to be different IP
address or same IP address.
1. Select Output Setup> Output IP Addr List. LCD screen like the below figure.
Output IP 1
192.168.6.1
This means the IP address for channel one is 192.168.6.1.
Press OK to enter edit mode and change the IP address
Press ► to move edit focus to right
Press ◄ to move edit focus to left
Press ▲ to increase value
Press ▼ to decrease value
RM100x Series Professional Receiver User Manual
9
3
Press OK to save modification and exit
Press EXIT to discard modification and exit
2. IF you want to change IP address for other channels, please repeat above
sequence.
Output Port List
RM100x Series Professional Receiver also can set different port number for each IP
channel.
1. Select Output Setup> Output Port List.
Output Port 1
1234
This means the port number for channel one is 1234.
Press OK to enter edit mode and change the port number
Press ► to move edit focus to right
Press ◄ to move edit focus to left
Press ▲ to increase value
Press ▼ to decrease value
Press OK to save modification and exit
Press EXIT to discard modification and exit
2. IF you want to change port number for other channels, please repeat above
sequence.
TSoIP Format
RM100x Series Professional Receiver’s IP output can support udp protocol and rtp
protocol, which can be selected through this menu.
Select Output Setup > TSoIP Format.
10
RM100x Series Professional Receiver & Decoder User Manual
3
TSoIP Format
UDP
This means currently the device using UDP protocol to output TS stream
through IP interface.
Press OK to enter edit mode.
TSoIP Format
UDP
RTP
Now,select UDP or RTP using ► and ◄.
Press OK to save modification and exit
Press EXIT to discard modification and exit
CVBS Format
Using this menu to select the output format of CVBS output including
PAL,NTSC,SECAM。
To select CVBS format, press Output Setup > CVBS Format,
CVBS Format
PAL
Press Ok to enter edit mode
CVBS Format
PAL
NTSC
SECAM
Now, using ► and ◄ to select CVBS format.
Press OK to save modification and exit
Press EXIT to discard modification and exit
YPbPr/SDI Format
Using this menu to select the output format of YPbPr and SDI output including
576I,480I。
To select YPbPr/SDI format, press Output Setup > YPbPr/SDI Format
YPbPr/SDI Format
1080I
Press OK to enter edit mode
RM100x Series Professional Receiver User Manual
11
3
YPbPr/SDI Format
1080I 720P 576I
480I
Now, using ► and ◄ to select CVBS format.
Press OK to save modification and exit
Press EXIT to discard modification and exit
12
RM100x Series Professional Receiver & Decoder User Manual
4
4
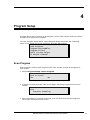
Program Setup
Program Setup menu used to scan program, select audio stream and using which
IP channel to output this program.
To enter Program Setup Menu, select Program Setup and press OK. Following
figure is the whole list of sub menus for Program Setup Menu.
Scan Program
Program Descrambler
Program Select
Audio Stream Select
IP Output Channel
Scan Program
Scan Program used to scan program from input stream and list all programs in
this stream.
1. Select Program Setup->Scan Program.
Sure to Scan?
Yes
No
2. If select Yes and press OK, this device begin searching programs from input
stream.
Hint
Program Scanning
3. After completion of program scanning, then the device list all the programs
have been searched on the screen.
RM100x Series Professional Receiver User Manual
13
4
Program Descrambler
This menu used to select using which slot to descramble program.
1. Select Program Setup->Program Descrambler
Ch101 CCTV1
NONE
2. Press Ok to enter edit mode.
Ch101 CCTV1
NONE
SLOT1
SLOT2
Now, using ► and ◄ to select using which slot to descramble program.
Press OK to save modification and exit
Press EXIT to discard modification and exit
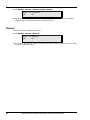
Program Select
Program Select menu is used to select one program from program list to be
decoded and displayed.
1. Select Program Setup->Program Select。
Program Select
〉Ch101 CCTV1
2. Press ▲,▼ to select program
3. Press OK to decode and display selected program, or press EXIT to exit this
menu.
Audio Stream Select
Audio Stream Select menu is used to select one audio stream to decode and
display when one program has more than one audio streams.
1. SelectProgram Setup->Audio Stream Select。
14
RM100x Series Professional Receiver & Decoder User Manual
4
Ch102 CCTV3
1/2
The first line is program name, the second line means there are two audio
streams in this program and the first audio stream is selected currently.
2. Press OK to enter edit mode:
Ch102 CCTV3
1
2
Using ► and ◄ to select which audio stream will be decoded.
3. Press OK to save modification, press EXIT to discard modification and return to
parent menu.
IP Output Channel
IP Output Channel menu used to select IP output channel for each program. All
programs can to outputted through same IP output channel or different channel.
1. Select Program Setup->IP Output Channel:
Ch102 CCTV3
0
The first line is program name, the second line means this program is
outputted through IP channel 0.
2. Press OK to enter edit mode:
Ch102 CCTV3
00
Press ► to move edit focus to right
Press ◄ to move edit focus to left
Press ▲ to increase value
Press ▼ to decrease value
3. Press OK to save modification, press EXIT to discard modification and return to
parent menu.
RM100x Series Professional Receiver User Manual
15
5
5
CA Modules
CA modules used to display information of CA modules and set parameters of CA
modules.
Select CA Modules, press OK to enter edit mode
CA Modules
Slot 1:
{ViAccess }
Using ► and ◄ to select slot
The slot information and menu are provided by CA module manufactures.
16
RM100x Series Professional Receiver & Decoder User Manual
6
System Setting
System Setting menu used to configure global parameter of this device.
To enter system setting, Select System Setting and press OK. Following figure is
the full list of sub menus for System Setting Menu.
OSD Language
TS Interface IP
Management Network
Default Config
Reboot
System Setting Sub Menus
OSD Language
OSD Language menu used to select language displayed on video through CVBS
output.
Select System Setting > OSD Language:
OSD Language
English
This means the OSD language is English now. Press OK to enter edit mode:
OSD Language
Chinese
English
Using ► and ◄ to select which language will be used.
Press OK to save modification, press EXIT to discard modification and return to
parent menu.
TS Interface IP
TS Interface IP menu used to set local IP address for TSoIP Ethernet IP address.
Select System Setting > TS Interface IP:
RM100x Series Professional Receiver & Decoder User Manual
17
6
TS Interface IP
192.168.7.1
If you want to change TS interface IP, Press OK to enter edit mode:
Press ► to move edit focus to right
Press ◄ to move edit focus to left
Press ▲ to increase value
Press ▼ to decrease value
Press OK to save modification and exit
Press EXIT to discard modification and exit
Management Network
Management Network menu can configure the parameter of management network
interface used to manage the device using web based console. Following figure is
the full list of this menu.
IP Address
Net Mask
Default Gateway
Web Login Password
1.Change IP address
Select System Setting > Management Network
IP Address
192.168.6.3
Press OK to enter edit mode:
Press ► to move edit focus to right
Press ◄ to move edit focus to left
Press ▲ to increase value
Press ▼ to decrease value
Press OK to save modification and exit
Press EXIT to discard modification and exit
18
RM100x Series Professional Receiver & Decoder User Manual
6
2.Change Net Mask
Select System Setting > Management Network >Net Mask
Net Mask
255.255.255.0
Press OK to enter edit mode:
Press ► to move edit focus to right
Press ◄ to move edit focus to left
Press ▲ to increase value
Press ▼ to decrease value
Press OK to save modification and exit
3.Change Default Gateway
Select System Setting > Management Network >Default Gateway
Default Gateway
192.168.6.1
Press OK to enter edit mode:
Press ► to move edit focus to right
Press ◄ to move edit focus to left
Press ▲ to increase value
Press ▼ to decrease value
Press OK to save modification and exit
4.Change Web Login Password
Select System Setting > Management Network >Web Login Password
Web Login Password
00000000
Press OK to enter edit mode:
Press ► to move edit focus to right
Press ◄ to move edit focus to left
Press ▲ to increase value
Press ▼ to decrease value
Press OK to save modification and exit
Default Config
This menu used to reset device to default configuration
RM100x Series Professional Receiver User Manual
19
6
Select System Setting > Restore Default Config
Sure to Restore?
Yes
No
Using ► and ◄ to select, select Yes and press OK to reset the device to default
configuration, press EXIT to return to parent menu.
Reboot
This menu used to reboot the device.
Select System Setting > Reboot:
Sure to Reboot?
Yes
No
Using ► and ◄ to select, select Yes and press OK to reboot the device, press EXIT
to return to parent menu.
20
RM100x Series Professional Receiver & Decoder User Manual
7
Warning Message
This menu used to display warning message. When the Error LED is red on front
panel, you can check the warning message by entering this menu.
RM100x Series Professional Receiver & Decoder User Manual
21
8
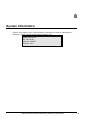
System Information
System information menu used to display information including manufacturer,
software version, device model, serial number, etc.
Manufacturer
SW Version
Device Model
Serial No.
RM100x Series Professional Receiver & Decoder User Manual
22
9
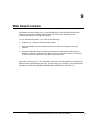
Web based console
Web based console enable you to manage RM100x Series Professional Receiver
using any computer installed web browser connected with RM100x Series
Professional Receiver through IP network.
To use web based console, you must do as following:
1. Prepare one computer installed web browser
2. Connect RM100x Series Professional Receiver with the computer using IP
network
3. Configure RM100x Series Professional Receiver’s management network(see
details in chapter 5, Management Network Menu) and the computer’s network
to ensure their IP address in the same network domain.
Now open web browser on the computer, and input the management IP address of
RM100x Series Professional Receiver just like below, for example, the management
IP address of RM100x SERIES PROFESSIONAL RECEIVER is 192.168.1.3 :
RM100x Series Professional Receiver & Decoder User Manual
23
9
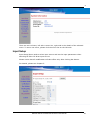
Then, web browser will prompt up a dialogue to allow you input user name and
password:
The default user name and password are both “admin”.
After logging in successfully, we can manage RM100x SERIES PROFESSIONAL
RECEIVER using following web console.
24
RM100x Series Professional Receiver & Decoder User Manual
9
There are two columns, left side is menu list, right side is the details of the selected
menu. To enter one menu, please click the menu list on the left side.
Input Setup
Input Setup Menu used to select input source and set the input parameters when
selecting RF-IN or IP-IN as input source.
Please notice that all modification will take effect only after clicking Set button.
For details, please see Chapter 2.
RM100x Series Professional Receiver User Manual
25
9
Output Setup
Output Setup menu used to configure IP output channel.
Please notice that all modification will take effect only after clicking Set button.
For details, please see Chapter 3.
Program Setup
Program Setup menu used to scan program, select which IP channel to output one
program, select which program to be decoded and displayed.
Please notice that all modification will take effect only after clicking Set button.
For details, please see Chapter 4.
26
RM100x Series Professional Receiver & Decoder User Manual
9
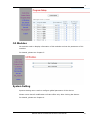
CA Modules
CA modules used to display information of CA modules and set the parameter of CA
modules.
For details, please see Chapter 5.
System Setting
System Setting menu used to configure global parameter of this device.
Please notice that all modification will take effect only after clicking Set button.
For details, please see Chapter 6
RM100x Series Professional Receiver User Manual
27
9
Warning Message
This menu used to display warning message. When the Error LED is red on front
panel, you can check the warning message by entering this menu.
System Information
28
RM100x Series Professional Receiver & Decoder User Manual
9
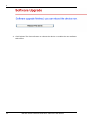
Software Upgrade
Software Upgrade menu can used to upgrade RM100x SERIES PROFESSIONAL
RECEIVER’s software using firmware stored on the computer.
Very Important Notice: Please be sure not power down the
device when upgrading software, otherwise the software
system of the device will be damaged.
To upgrade software, you must do as following:
1. Get correct firmware from Realmagic Technology
2. Click Browse and select the file obtained from step 1
3. Click OK to upgrade software, wait until following message displayed
RM100x Series Professional Receiver User Manual
29
9
4. Click Reboot The Device Button to reboot the device to enable the new software
take effect
30
RM100x Series Professional Receiver & Decoder User Manual