1
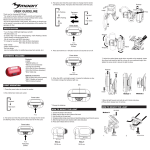
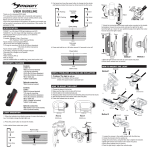
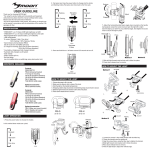
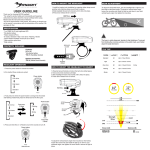
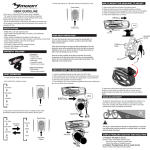
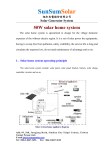
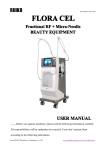
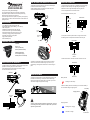
®
USER GUIDELINE
Thank you for choosing MOON headlight!
*For using this product safely and conveniently and keeping it
well-preserved, please read this manual carefully before using.
Please save this manual for future reference.
*Due to the improvement of the product, the product you bought may
not be exactly in accordance with the introduction of this manual. We
apologize for that.
HOW TO MOUNT THE HEADLIGHT TO HELMET
HEADLIGHT OPERATION
1.Wrap belt around helmet and return the belt onto slotted space.
2.Twist screw knob clockwise until tight.
3.Slide headlight forward onto bracket until it clicks into place.
4.Press down release lever to remove.
1. Please make sure that there are no obstacles around the headlight
to keep the air flow smoothly, as the light will get hot during use.
Please don’t touch the light immediately after a long time use.
2. Press the power button to choose the modes:
In this method three modes are cycled.
click
Power button
Over drive
INSTALL
PRESS
SPECIFICATION
High beam
RELEASE
*1 pc CREE XP-G2 (R4) high brightness LED
*Rechargeable lithium polymer battery ( 3.7V 700mAh)
*USB rechargeable
*Headlight with durable aluminum alloy light cap
*4 modes: Over drive / High / Standard / Flashing
*Quick release rubber strap mount (fits 22-31.8 mm)
*Low battery, charging and fully charged indicator
*Automatic fully charged cut-off system
*High precision optical lens
*Water resistant (IPX 4)
Standard
SCREW
KNOB
RELEASE
LEVER
PRESS
3. Fast press two times the power button to change into the strobe
and flashing modes. Fast press two times back to the first cycle.
Power button
BELT
CONTENTS INCLUDED
Contents:
Meteor 100
*USB-01 (USB cable)
*RB-07 (Handlebar bracket)
Optional accessories:
*XP-USC (Wall charger)
*RB-06 (Helmet mount bracket)
PRESS
Fast press
2 times
4. Press and hold the on / off button around 0.5 seconds to turn off.
HOW TO MOUNT THE HEADLIGHT
1.Install the bracket onto handlebar by wrapping rubber strap around
post/bar and stretching strap around hook to secure.
2.Slide headlight forward onto bracket until it clicks into place.
3.Press down release lever to remove.
INSTALL
click
RELEASE
PRESS
To adjust the vertical beam angle when mounted on the helmet,
loosen the screw knob and rotate the light up or down to your
preferred angle, then tighten the screw knob to secure the light in
place.
Power button
BEAM ADJUSTMENT
To adjust the horizontal beam, spin the headlight left to right for your
best side to side beam angle. To adjust the vertical beam angle,
loosen the mounting and rotate the light up and down to your best
vertical beam angle, then tighten the mounting.
PRESS
Battery indicator
Hold 0.5 sec
* Flashing red -low battery
5. When the battery indicator turns flashing red, it means the battery is
low. You'd better charge the light right now.
Low battery
charging indicator
RELEASE
LEVER
!
The beam is widely dispersed, besides its high brightness. To prevent
from blinding the oncoming vehicles on the public roads, you’d better
adjust the angle downward.
Charging indicator
* Flashing blue - charging
RUBBER
STRAP
* Soild blue - charged
Power button
HOW TO CLEAN AND CARE THE LIGHT
*Make sure to clean the dust and dirt on the light with soft damp cloth
after every ride.
*Water resistant is for rain water only. Do not submerge the battery or
the whole light into water when cleaning.
*Once you start using the light, you’d better keep using it.
HOW TO CHARGE BATTERY
Attention: MOON would like to recommend you to use the original
supplied USB cable to charge the battery. Unplug the light cable
once the battery is fully charged.
53°
16°
TOTAL ANGLE
.
SPOT ANGLE
10 M
2.8 M
16
10M
Charging port
420
1. Find the charging place at the back of the light.
2. Lift the rubber cover and you’ll see the charging port.
3. Plug the USB cable to your computer USB port.
4. Plug the charger cable to the light charger port.
5. The charging indicator shows slow flashing blue when the light is
charging, after fully charged it changes to steady.
Side light
20 lux
1600
Emax (LUX)
METEOR 100
0.56 M
2M
0.28 M
1M
Distance (M)
100
LUMENS
!
CAUTION: When riding at night, please follow the guidelines below:
*Carrying a flash light is recommended.
*Use caution when handing, the light may get hot.
*Unplug the headlight if no use.
*Unplug connector by the plug, never by the cable.
*Do not amend or replace any parts with Non-MOON parts.
*Do not dismantle the headlight and battery case.
*Provide sufficient airflow to the headlight for cooling during use.
*Do not control any part of the system under water.
*Do not look directly at light.
*Do not leave the light on and unattended.
*Keep headlight away from fire and combustible materials.
*Do not store head unit when hot or straightway after use.
*Unplug the USB cable when fully charged.
*This light is for bicycle use only.
SIMPLE PROBLEMS ANALYSIS AND SOULUTION
1. Problem: The light is not on
Solution: Check if the battery still has power
Check if the power button is pressed hard
6. It is normal that the battery may get high temperatures during
charging (up to 104°F/40°C), as the chemical in battery is in
reaction. If the battery is not drained completely before charging, it
may also get warm.
7. Several factors can influence the battery’s durability: type of cell
strain, the maintenance routine, the temperature and etc.
Normally speaking, the higher the battery capacity, the longer the
burn time.
MOON warrants to the original purchaser of this product that the
product is free from defects in material and workmanship for a period of
one year. This warranty does not apply to damage due to heat, physical
damage resulting from abuse, neglect, improper repair, improper fit, or
alterations of the fixture. This warranty is in lieu of all other agreements
and warranties, general or specific, express or implied and no
representative or person is authorized to assume liability on behalf of
MOON in connection with the sale and use of this product.
MOON reserves the right to request the return of any product submitted
for warranty consideration. All customers should contact the local dealer
or regional distributor for warranty service.
8. The battery capacity may become ineffective about 80% of its
value after 300-500 charge/discharge cycles. The battery can may
3 years life span under good care.
To make a claim, first call local dealer or regional distributor. Some
issues may be resolved upon the initial call. If return of the product is
necessary, please refer to the following instructions:
9. The battery voltage and capacity decrease apparently at low
temperatures, especially near or below ice point. The capacity
decreases 5%-10% at freezing (burn time decreases 50%). At
-20°C,the capacity decreases 30% (burn time decreases 70%). The
battery performance will return normal when the temperate gets up
to 70°F/20°C.
The battery will lose around 1% of its capacity per day when you
store the battery at normal room temperature. Battery temperate
should never exceed 104°F/40°C, it will lose about 5% of its
capacity per day.
*We recommend that items be sent by a traceable method (such as
FedEx or UPS). MOON is not responsible for lost or misdirected
packages.
*Please include your full contact information (name, address, phone
number, and email [if applicable]), and a description of the issue.
*Address items to: local dealer or regional distributor
10. If you donot use the battery for a long time, be sure to make it a
fully recharge every 3 months before storing again. Please keep the
battery in cool and dry place when storing.
Batteries are covered by 120 days warranty.
Standard
20
Up to 8 hours 35mins
High
50
Up to 3 hours 50 mins
Over drive
100
Up to 2 hours
Flashing
50
Up to 8 hours 20 mins
57.7 g
What is not covered: MOON Lights are covered by a ONE YEAR
LIMITED WARRANTY from the date of purchase. This covers the lights
and cables only. It does not cover the battery or battery internals.
For more information please contact us at cs@moon-sport.com.
2 hours
WA-MOON-METEOR 100