1
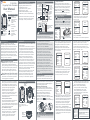
% 99
R 86
IPX2
BPM
30
Do not use if package
is damaged
Serial number
Resistant to liquid
ingress
INTENDED USE
POE101 is intended for measuring
functional oxygen saturation of arterial
hemoglobin (SpO2) and pulse rate for both
adults and children as non-invasive spot
checking and continuous monitoring in
home and professional caring environment,
and transport and mobile environment. It is
designed for fingers between 0.8cm and
2.3cm (0.3 inch ~ 0.9 inch) and for patients
during no-motion condition.
PRINCIPLE OF OPERATION
physiological Principle
POE101 determines SpO2 by measuring
the absorption of red & infrared light
passing through perfused tissue. Changes
in absorption caused by the pulsation of
blood in the vascular bed are used to
determine SpO2 reading and pulse rate.
Data Update and Signal Processing
POE101 in the algorithms automatically
extends the amount of data required for
measuring SpO2 and pulse rate
depending on the measuring conditions.
During normal measurement conditions,
the averaging time is three to six heart
beats. POE101 automatically adjusts the
signal processing during degraded
conditions, such as low perfusion,
ambient light, electromagnetic
interference, and patient motion, which
results in an increase in the dynamic
averaging beyond 10 heart beats or may
• reach 40 heart beats.
Pulse Amplitude Indicator
The Pulse Amplitude Indicator indicates
pulse beat and shows the relative
(non-normalized) pulse amplitude. As the
detected pulse becomes stronger, the bar
• will go higher with each pulse.
SpO2 Waveform Display
Similarly, when a waveform is selected, the
display provides the (non -normalized)
real-time sensor signal. The relative
pulsatile strength and quality of the
incoming signal can be observed.
170
40
BPM
170
40
72
97
72
Pulse rate
(BPM)
SpO2
waveform
Pulse Amplitude
Indicate the
strength of the
signal
CAUTION!
• This oximeter is not an apnea monitor.
• Significant levels of dysfunctional
hemoglobin such as carbonxyhemoglobin
WARNINGS
• Do not use the oximeter in an MRI or CT
environment.
• The oximeter is intended as an adjunct
in subject assessment. It must be used in
conjugation with other methods to
assess clinical signs and symptoms.
• Do not use the oximeter in an explosive
atmosphere to avoid explosion hazard.
• If the monitoring sites have trauma,
disability or other medical conditions,
users should consult doctors before use.
• The oximeter has to measure the pulse
properly to obtain accurate SpO2 reading.
Blood flow restrictors (e.g., blood pressure
cuffs) may hinder pulse measurements.
Remove any objects that may hinder the
performance of the oximeter.
• Please do not leave the device to a child
and always keep the battery cover in
attach to avoid swallowing by a child.
• Federal law (USA) restricts this device
to sale by or on the order of a physician.
Full color
OLED
display
Battery
cover
POE101B)
◄Exit Setting
Brightness ►
Timer
►
Alarm
►
Beat
►
Record
►
Date
►
Default
►
LONG press
1) Adjust the brightness.
Tip
Key right to enter
the sub-menu, please select among level
1~4 to adjust OLED brightness. Level 4 is
the brightest and level 1 is the lowest.
Please select higher level for high
ambient light environment and lower
level for power conservation. press down
for confirmation.
◄Exit Setting
Brightness ►
Timer
►
Alarm
►
Beat
►
Record
►
Date
►
Default
►
Brightness
◄2►
◄Exit
2) Setup the initial timer.
The oximeter provides a simple timing
mechanism at the beginning of each
measurement. For this feature, users
can set the timing period to be 30
seconds, 1 minute, or turn it off.
For the first time use, a protective plastic
membrane is attached to the front panel
Battery Replacement
Strap
hole
Micro-USB
Port
(only for
BEFORE USE
First Time Use
of the oximeter. Please remove the plastic
membrane to allow the OLED display to
show its best performance.
DEVICE FEATURES
Setting & Direction Key
Press to setting and
direction key to rotate the
screen.
or methemoglobin may affect the
accuracy of the measurement.
• Cardio green and intravascular dyes may
affect the accuracy of POE101.
• The performance of the oximeter might be
affected by the presence of a defibrillator.
• The oximeter may not work on all
subjects. If you are unable to achieve
stable readings, please discontinue use.
• The oximeter has motion tolerant algorism
to minimize the possible motion artifact.
However, the oximeter may be still
interpreted by motion. Please minimize
subject motion as much as possible.
• All the materials of the oximeter in contact
with a patient or a user have passed
ISO10993 Biological evaluation of medical
devices accordingly. It shall be no toxicity
harm to children, pregnant or nursing
women.
CAUTION!
Tip
Key right to enter a sub-menu. For
exit, tip it left at “Exit ”selection. Under
adjustment menu, tip
Key right or left
to increase or decrease value, or change
selection and press down for confirmation.
--
SpO2
Read instructions
before use
Type BF, not
defibrillator proof
Caution; consult
accompanying
documents
30
Timer Indicator
(only turn on at
device startup)
%
99
86
----
Please make sure all items are packed. All
items are non-sterile. If any item missing
or damaged, contact your distributor.
97
SpO2 R
Battery Icon
Indicate the
battery power.
Turn “RED”, as
in-sufficient.
Percentage
of oxygen
saturation
(SpO2)
The device allows user to setup the 1)
OLED brightness, 2)initial timer option, 3)
SpO2 & pulse rate alarm range, 4) audio
reminder, 5) data recording interval, 6)
date & time and 7) factory default by
LONG pressing the
key. The setting
mode can be entered either when the
device is off or under operation.
R
Authorized
representative EU
Separate collection for
electrical and
electronic devices
(WEEE)
CE Marking
Audio Icon
Indicate audio
reminder is on
17
40
SYMBOL INFORMATION
Memory Icon
Indicate data is
recording
(only for POE101B)
SpO2 Alarm
Show SpO2
alarm range
BPM Alarm
Show pulse rate
alarm range
BPM0
Ver 1.0 March, 2013
Setup the Device
DISPLAY INTERFACE
%
99
86
User Manual
CONTENTS OF PACKAGE
POE101 includes the following items:
A. Fingertip Pulse Oximeter, 1 unit
B. User Manual, 1 sheet
C. Quick reference card, , 1 piece
D. Warranty Card, 1 piece
E. AAA-Size Alkaline Battery, 1 piece
F. USB cable, 1 piece (for POE101B only)
SpO2
POE101B, C
Fingertip Pulse Oximeter
Before start any measurement, please
make sure the battery power is sufficient
and the setting is correct. If not, please
refer to the following procedures.
Make sure the oximeter is off when
replacing the battery. The device is
powered by one AAA-size alkaline battery.
Please press the
mark on the
battery cover to open it up and installing a
new battery.
CAUTION!
Please dispose the battery according the proper
procedure.
◄Exit Setting
Brightness ►
Timer
►
Alarm
►
Beat
►
Record
►
Date
►
Default
►
Timer
◄30
Sec.►
◄Exit
3) Setup SpO2 and pulse rate alarm range
POE101B,C provide alarm option for
abnormal SpO2 and pulse rate reading.
Users can select the different SpO2
high, SpO2 low, pulse rate (PR) high
and pulse rate low limit to trig the
alarm or turn it off under this submenu.
Please refer to “SPECIFICATION”
table for allowable setting range of the
different parameters. The alarm range
will be shown next to the measurement
on the display, when the alarm option
is turned on.
◄Exit Setting
Brightness ►
Timer
►
Alarm
►
Beat
►
Record
►
Date
►
Default
►
Alarm
Alarm ◄On►
SpO2Hi ◄ 99►
SpO2Lo ◄ 86►
PRLo ◄ 40►
PRLo ◄170►
◄Exit
4) Setup the audio reminder.
The oximeter can give a audio pulse
sound. Please use this submenu to
turn it on/off.
◄Exit Setting
Brightness ►
Timer
►
Alarm
►
Beat
►
Record
►
Date
►
Default
►
Beat
Sound
◄Off►
◄Exit
5) Setup the data recording interval
(only for POE101B).
The oximeter can record the SpO2 and
pulse rate. Users can set the recording
interval as 30 seconds, 1 minute, 5
minutes or turn it off. The corresponding time will be from 24 hours to 10
days. For delete all the memory, please
select “Clear All”for it.
◄Exit Setting
Brightness ►
Timer
►
Alarm
►
Beat
►
Record
►
Date
►
Default
►
Record
Cycle
◄Off►
Clear All
◄Exit
6) Set date and time (only for POE101B).
◄Exit Setting
Brightness ►
Timer
►
Alarm
►
Beat
►
Record
►
Date
►
Default
►
Date
Year ◄2013►
Month ◄ 01►
◄ 01►
Day
◄ 12►
Hour
◄ 00►
Min
◄ 00►
Sec
◄Exit
The date and time will be collect with
each measurement. Please make sure
it is correct, before recording.
7) Back to factory default setting
The option takes all of the setting,
except date&time, back to the
factory default. It only resets the
parameters and does not be erased
the recording data.
◄Exit Setting
Brightness ►
Timer
►
Alarm
►
Beat
►
Record
►
Date
►
Default
►
Parameter
Brightness
Timer
Alarm
Date
Year ◄2013►
Month ◄ 01►
◄ 01►
Day
◄ 12►
Hour
◄ 00►
Min
◄ 00►
Sec
◄Exit
Default Setting
Level 2
Off
SpO2 Hi off; SpO2 Lo 87%
PR Hi off; PR Lo off
Beat sound On
Record
Off
CAUTION!
it is less than 100 milliseconds for
both SpO2 and pulse rate. If the
function is completed turned off,
the icons will not be showned at all.
STEP5. During the operation, if you tip key
up, down, left, or
right,the screen
will rotate in
its direction to
allow users viewing
the results in
% 99
86 97
desired view angle.
170
72
40
STEP6. Press the
Key
on top and the
device will enter
the setting mode.
PC Mode
SpO2
%
99
86
17
40
--
erOut
Fing
72
170
40
%
99
86
BPM
SpO2 R
----
R
BPM0
97
1. POE101 can be operated by either a
patient or a trained personnel. Consult
healthcare professionals before use.
2. The oximeter might not work on cold
extremities due to poor circulation.
Please warm or rub the finger , or
reposition the device to improve it.
3. Check the applied site of a patient
frequently to evaluate body circulation
and skin sensitivity. The recommended
maximum applied time at a single spot
is 4 hours. Misapplication of the
oximeter on applied site with excessive
pressure for prolonged periods can
introduce pressure injury.
72
97
170
40
SpO2 R
BPM
%
99
86
SpO2
R
BPM
170
40
BPM
% 99
R 86
SpO2
72
97
OPERATION
CAUTION!
STEP1. Open up the oximeter and put
one of your fingers into the
opening. Please make sure that
your finger face up and touch the
bottom of the opening before
releasing the clamp.
If the device experiences a data or alarm
condition update period exceeding 30
seconds, the display will shows RED "00"
for both SpO2 and pulse rate reading.
STEP7. If the finger is not detected or
removed, the oximeter will show
”FingerOut”. As the finger keeps
to be undetectable, the device will
turn off automatically in about 3
seconds.
STEP8. If the data recording option is on
(for POE101B only), R will be
showed on the display and the
SpO2 and pulse rate measurement
with corresponding date and time
in a preset interval will be recorded
within the oximeter.
TROUBLESHOOTING
17
40
BPM0
%
99
86
2R
SpO
--
----
STEP2. The device will turn
on automatically,
after finger is
inserted.
STEP3. If timer indicator option is on, it
will start to count down right away.
The time left will be showed in the
square beneath BMP. When time is
up, “OFF”will be showed. This
feature can serve as timer for
patients or care givers to keep
track of the breath
SpO2 R
rate or other
%
applications. By
remove the finger 99
from the device and 86
BPM
insert it back, it can
30
re-trig the timer.
97
BPM
OFF
72
BPM
00
STEP4. After detecting the
pulse signal, the
oximeter shows
972
SpO2 and pulse
7
rate on the display.
The readings will
be updated based
on the signal received
with each pulse. If
is on, the
beat sound will be generated.
STEP5. If the alarm option
SpO2 R
is on, the SpO2
%
and pulse rate (PR)
alarm range will be SpO2 Hi 99
SpO2 Lo 86
showed on the left
BPM
side beside the
170
PR Hi
SpO2 and pulse rate PR Lo
40
reading. Normally,
alarm condition delay is
less than 7 heart beats for SpO2;
and less than 6 heart beats for
pulse rate, after oximetry
condition is altered in the finger.
For alarm signal generation delay,
SpO2
R
%
99
86
BPM0
17
40
Problem
Possible Causes
The oximeter won’t The battery is dead.
The battery is installed
turn on.
incorrectly.
Finger might be trembling or
place incorrectly.
OLED displays is malfunction.
Display lockup or
blank. If the device is
on a finger, changes Electromagnetic interference
(EMI).
will appear at wave
Finger might be trembling or
form or pulse
place incorrectly.
amplitude bar.
No reading of SpO2 Low finger pulse quality.
or pulse rate and
shows dash-line.
Solutions
Replace with a new battery.
Verify correct battery orientations.
Keep the finger steady or align the finger
inward at veritcal-middle of the device.
The reading might not be reliable;
discontinue using the device.
Remove the surrounding electronic
devices away.
Keep the finger steady or align the finger
inward at veritcal-middle of the device.
If it shows less than 2 amplitude bars,
please try the following.
1. Reposition the finger.
2. Warm the finger by rubbing.
3. Select another finger.
Provide immediately mdeical attention to
this patient.
Enter the setting mode and setup to
correct date & time.
A patient’s condition is
SpO2 or pulse rate
abnormal.
alarm appears
Date & time or initial
timer is not correct. The internal ±0.004%
variation from timming circuit.
Timing circuit is malfunction. Replace with a new battery.
Try to restart the device through reinstall
Unable to enter the The battery power is low.
The
key might be
the battery.
setting mode.
malfunction.
Replace with a new battery.
Low battery "
"
The battery power is low.
appears on display
If you have followed the actions recommended above but the problem keeps unresolved,
please call you agent for assistance.
SPECIFICATION
Dimension & Weight
L 67.5 mm (2.63”) x W 38mm (1.48”) x H 25mm (0.98”);
Without battery < 26g (0.92 ounces)
Display
Full color OLED display
Auto on/off
When a finger is inserted, urns on automatically; vise verso,
the device turns off , when the finger is removed.
Input Key
A 5-directional key for screen rotate and device setting.
Measurement Method
Dual wavelength LED (660 nanometers @0.8mW and 940
nanometers @1.2mW; both as max average)
SpO2 Range & Resolution
Range: 0% to 100%; Resolution: 1%
SpO2 Accuracy
Range70%to100%±2%; less than 70% unspecified
Pulse Rate Range&Resolution Range: 30 to 250bpm; resolution: 1bpm
Pulse Rate Accuracy
±1bpm or ±1%, whichever is greater
Alarm Range
High SpO2 alarm: default off; range: 80%~100%;
Low SpO2 alarm: default 87%; range: 50%~95%;
High heart rate alarm: default off; range: 75BPM~250BPM
Low heart rate alarm: default off; range: 30BPM~110BPM;
Data Storage
Store SpO2 and pulse rate reading with corresponding date and
time for up to 960 sets of data (8 hours to 3.5 days)
USB Port (POE101B only)
USB2.0 with Micro USB connector
Water-resistance
Against water splash (IPX2 Approved)
Battery Type
1 AAA size alkaline battery
Usage life
>24 hrs typical operation under default setting
Ambient Temperature
Operating: 5ºCto40ºC (41ºFto104ºF); Storage: -30ºCto70ºC (-22ºFto158ºF)
Atmospheric Pressure
Operating&storage are both 700 hPa to 1013 hPa
Humidity
Operating&storage are both 10% to 90%, non-condensing
Degree of Electrical Protection
Type BF
STEP9. For retrieving the
recording data
from the oximeter
(for POE101B only), please connect the USB
cable within the package from the microUSB port of POE101B to a computer. The
oximeter will then show“PC mode”. At
this moment, POE101B will act only as data
storage device and has no more oximetry
function. After the USB cable is pull out, the
device will turn off and its oximetry
function will be restored . (Please consult
with your local distributor for its download
instruction.)
CAUTION!
For electrical safety and data downloading
quality, please only use the USB cable enclosed
within POE101B package.
Symbols and terminology
%SpO2 - The symbol shows the oxygen
saturation in percentage.
BPM - The pulse rate symbol shows pulse
rate in beats per minute.
Pulse Amplitude - It shows the strength
of signal being detected by the oximeter.
- Battery condition symbol. When
is shown, battery is at low voltage.
30 - Initial Timer. A timing icon appears
at the beginning of each measurement for
breath timing.
- Audio is on. The symbol indicate
audio alarm and beating sound option is
turned on.
R - Data recording is on (for POE101B
only). Record SpO2 and pulse rate
measurement with corresponding date
and time.
MAINTENANCE AND STORAGE
• Remove the batteries inside the battery
compartment if the oximeter will not be
operated for more than one month.
• It is best to preserve the product in a
place where ambient temperature
range is from -30ºC to 70ºC (-22ºF to
158ºF), humidity range from 15% to
90%, and atmospheric pressure range
from 700 hPa to 1013 hPa.
• The commercially available bench top
functional testers and patient simulators
may only be suitable to validate the
pulse rate, but may not be able to verify
the proper oximetry of this pulse
oximeter. Please consultant with your
distributor or the manufacturer proper
model and the usage of functional
testers and patient simulators for this
oximeter. Furthermore, the testers and
simulators may be useful for verifying
that the pulse oximeter being incapable
of providing the data required to
properly evaluate the accuracy of a
system's SpO2 measurements.
CAUTION!
• Do not spray, pour, or spill any liquid on
the oximeter, accessories, switches or
openings.
• Do not use caustic or abrasive cleaning
agents on the oximeter.
• This is a precision medical instrument and
must be repaired by qualified personnel
from manufacturer only.
• Please follow local governing ordinances and
recycling instructions regards disposal or
recycling of the device and components.
• Manufacturer will provide at least 3 years
product service, after manufacturing.
CLEANING THE OXIMETER
Cleaning is as important as proper use.
For surface-cleaning and disinfecting the
oximeter, please refer to the following
procedures:
• Turn off the oximeter before cleaning.
• Clean through the entire device, include
the finger contact spot before use.
• Wipe the surfaces with a soft cloth
damped with a mild detergent or
isopropyl alcohol solution. If low-level
disinfection is required, a cloth damped
with 10% bleach / 90% water solution
may also be used. Do not use undiluted
97
72
This device has been tested under compliance with IEC 60601-1, IEC60601-1-2, IEC80601-2-61 and ISO 10993 requirements.
bleach or any cleaning solution other
than those recommended here, as
permanent damage could result.
• It is recommended that the oximeter
should be kept in a dry environment
anytime. High moisture might affect its
lifetime and damage the oximeter.
0434