1
Saros Test Framework
“Getting Started” Guide
1
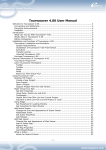
Contents
1 Welcome to STF
How to read this manual
2 The purpose of automating GUI tests
The benefit of best automation
The risks of test automation
3 Introduction to STF
4
5
6
7
10
12
Background
13
What is STF?
14
Introduce members and workflow to STF
15
4 Bot’s family
18
5 What is SWTBot?
19
SWTBot API introduction
20
Handling long operations
25
What cannot be tested with SWTBot
26
6 What is SarosSWTBot?
Why and how to extend SWTBot?
7 What is RemoteBot?
28
30
How to realize distributed testing
31
RemoteBot APIs introduction
36
8 What is SuperBot?
The structure of SuperBot
27
39
40
2
SuperRemoteBot APIs introduction
9 Write robust tests
45
Well-designed test cases
46
Standardized error recovery
49
Describing STF test code
50
References
44
56
3
1 Welcome to STF
This book will introduce the GUI testing tool STF and help you to quickly
write your first robust JUnit test with it.
4
How to read this manual
This manual is divided into the following chapters:
‣ The chapter “The purpose of automating GUI tests” explains why we need to automate GUI tests. We
recommend this chapter if you don’t want to write tests for your code.
‣ The chapter “Introduction to STF” provides a background and instructions to STF.
‣ The chapter “What is SWTBot?” introduces the framework SWTBot. As STF is developed based on
SWTBot and has the same design concept, it is useful to be familiar with its APIs.
‣ The chapter “What is RemoteBot?” introduces the robot RemoteBot, which has the same APIs as
SWTBot, so that if you’ve understood SWTBot, you will have no problem using RemoteBot.
‣ The chapter “What is SuperBot?” introduces the robot SuperBot, which wraps some often-used operations supported by RemoteBot. If you quickly want to write your tests, SuperBot is the best helper for
you.
‣ The chapter “How to write robust tests” provides step-by-step instructions for writing JUnit tests with
STF. This chapter is best suitable for test writers.
5
2 The purpose of automating GUI tests
This chapter provides an overview of the benefits and risks of test automation
What you’ll learn
This tutorial shows you:
‣ The current test state of Saros.
‣ What may be changed with automating GUI tests.
‣ How to avoid the problems caused by test automation.
6
The benefit of best automation
Test automation has many benefits, including those listed below1 .
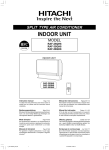
Frequent regression testing
Before
Regression testing is not really carried out in the Sarosteam now. At the moment, fixed bugs or new fea-
!
tures are only manually tested by developers. I.e. we
don’t know exactly if the changes introduce new bugs,
so it is highly possible that new software bugs may be
integrated into the program.
After
Test automation minimizes the effort used to perform
regression testing and can quickly check if the tests
that worked with the previous version of the program
should also pass on the latest version. There can be
higher confidence that no unpleasant surprise shows
Figure 2.1: Regression Testing
source: [F1]
up in the released version.
Run more tests more often
Before
At the moment, Saros is only manually tested every release week. For some test cases more than two
testers are needed. During testing they need to follow the sequence of operations defined in a test case.
If someone does something wrong, all testers need to restart. Testing only 10 test cases may take an entire day.
1
Fewster, Graham 1994, 9-10; Graham, Veenendaal, Evans, Black 2007, 185
7
After
An obvious benefit of test automation is the capability to run many tests in less time, therefore making it
possible to run them more frequently. This leads to increased confidence in the system. And tests which
are repeated automatically will always be repeated exactly in the same way, e.g. operations like connect,
or share project, which are nearly run by every test case.
Execute tests which are difficult or impossible to do manually
Before
‣ It is impossible to manually run the same tests in different test environments.
‣ Running some tasks simultaneously is impossible for a single tester, e.g. editing the same line simultaneously and simultaneously sharing sessions with multi-users.
‣ It’s difficult to run tests in different networks.
After
‣ The same tests can be run on different hardware and operating systems.
‣ Synchronization can be easily simulated using automated tests.
‣ In the later version of STF you can run tests on virtual machines with different network configurations.
Better use of resources
Before
To test some functions of Saros, we first need to build a suitable test environment. E.g. to test the “follow
mode”, we first have to build a session; to test the “write access”, we need to do the same thing. Repeatedly doing the same tasks is very boring.
8
After
By automating such tasks the staff can put more energy into designing better test cases to be executed.
Otherwise, automated tests can be run by someone who does not have to know all the complexities of the
application, or even by another tool like Hudson.
Consistency
Before
A level of consistency that is very difficult to achieve with manual tests.
After
The same tests can be run on different hardware and operating systems. This can confirm cross-platform
quality and consistency.
9
The risks of test automation
It is not always advantageous to automate test cases. A number of problems may be encountered with
automatic testing. Knowing the possible problems can help us to avoid or overcome them. The most common risks are listed below2.
Test maintenance
Problem
If the application’s user interface will change considerably in the near future, it is often necessary to update some, or in the worst case, all tests, so that they may be re-executed successfully. If it’s less time
consuming to rewrite the tests than just updating them, the test automation is very likely to be ceased.
Defensive measures
In the near future we will confront this problem. To strategically deal with it, STF use the so-called design
pattern “page objects” which models elements of the Eclipse workbench, such as views and main menus.
E.g. the page object “SarosVIew” contains only the services to deal with actions in the Saros view. So if
something changes in the view, the fix needs only be applied on place. Define a global properties file to
manage all labels' names and messages, which should be referenced by both source code and STF.
False confidence
Problem
Only because a test suite executed successfully, it does not mean that the software is faultless. The tests
themselves can contain defects or they can be just incomplete. There is always a chance that the tester
has unconsciously implemented tests which can preserve the incorrect results for indefinite time.
Defensive measures
To avoid this phenomenon, STF will first be properly tested itself before writing tests with it. I.e. when
you extend STF, it is generally advisable to write a test for your new extension.
2
Fewster, Graham 1994, 9-10; Graham, Veenendaal, Evans, Black 2007, 186-187
10
Third-party software products contain bugs themselves
Problem
STF is developed based on SWTBot (UI/functional testing tool). SWTBot itself contains some bugs, if you
don’t know that the problem is coming from SWTBot itself, it will take a lot of time finding the cause of
the bug.
Defensive measures
STF has already fixed some known bugs contained in SWTBot. Continually updating SWTBot the version
may already fix some bugs.
Poor testing practices
Problem
When the tests are of poor quality, badly organized and designed, with none or ambiguous documentation,
with little chance to find any bug, than it makes no sense to automate them. The focus should be to improve the testing effectiveness first rather than improving efficiency. After automating chaos, all you get
is a faster chaos.
Defensive measures
So it’s very important to write robust tests. How to do it will be introduced in the last chapter.
11
3 Introduction to STF
This chapter introduces the GUI testing tool “STF” targeted for the Saros
project.
12
Background
Motivation
The original motivation was to find an appropriate GUI testing tool for Saros. Our requirements were:
‣ To test a minimal scenario of Saros, at least two Saros instances are needed, which may be not even at
the same computer. So the GUI testing tool for Saros should support distributed testing.
‣ The event source (activated by an application) and the event target (verified by another application)
are not in the same application and possibly not even at the same computer. So the GUI testing tool
should be able to control the test procedure synchronously.
‣ Saros is an Eclipse plugin project, so the tool should also support high-level operations on widgets of
Eclipse without great effort.
‣ Saros developers are familiar with Java, so it would be better to write test scripts with Java, e.g. JUnit
tests.
Evaluation
In his thesis3, the founder of STF Sandor Szücs intensively evaluated which methods and tools are most
suitable for our testing needs. Refer to this thesis for more information on this.
Conclusion
Based on these requirement the GUI testing tool SWTBot is outstanding among other candidates which
work with JUnit and can test SWT and Eclipse applications. It only does not support synchronization and
distribution. Finally, Sandor decided to write a tool himself that would overcome the shortcomings of
SWTBot. The result is STF.
3
http://www.inf.fu-berlin.de/inst/ag-se/theses/Szuecs10-DPPVI.pdf
13
What is STF?
STF = SWTBot + distribution + synchronization
14
Introduce members and workflow to STF
Workflow with STF can be simulated as activities in a QA-Team.
Staff and their activity in the QA-Team
‣ In the team, there are the 5 skilled simulated testers Alice, Bob, Carl, Dave and Edna. Their job is to
test our application and find bugs for us.
‣ To be able to remotely operate Saros instances, each tester owns two robots “RemoteBot” and “SuperBot”. The testers assign tasks to them and then send the commands to remote Saros instances and perform the commands on it. Actually RemoteBot and SuperBot, rather than performing the commands
themselves, delegate them to the robot “SWTBot“ (SWTBot is the framework used by STF). To the outside world it appears that RemoteBot and SuperBot are executing the commands, but SWTBot is the
one actually doing the work (see the following picture).
‣ Most test tasks require at least two testers. Who has to complete a task and how they cooperate to
finish it, is defined in the corresponding test case. This means that the other testers who are not assigned the task are idle. The following is a piece of code of the test case “TestHandleContacts”. In this
example, Alice and Bob are the test holders.
15
specify Alice and Bob as
contractor
Alice’s tasks
Bob’s tasks
‣ All the test cases are collected in a corresponding test suit managed by a test project. Currently there
are a total of 10 test suits, presented as packages. Every test suit contains the assigned test cases presented as class.
16
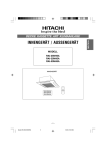
All together: Workflow for testing the scenario “addNewBuddy”
The following diagram describes the scenario in which the testers Alice and Bob run the test case “addNewBuddy”.
17
4 Bot’s family
To fulfill the test requirement of Saros, Bot’s entire family is needed. Each
member has his own special ability and drawback. To know their respective
characteristics can help us efficiently write our tests. In the following chapter I will introduce them in detail.
18
5 What is SWTBot?
This chapter introduces the Java-based functional testing tool “SWTBot”
targeted for SWT and Eclipse based applications. It is the nuclear part of
STF, so it’s necessary to present the framework first.
19
SWTBot API introduction
SWTBot is an Open Source project which has the goal to provide a tool for testing SWT and Eclipse applications. It is a kind of click robot and the click operations on the Eclipse surface are triggered by calling
SWTBot APIs in JUnit tests. SWTBot integrates well with Eclipse and can run on any platform that SWT runs
on, therefore also with Eclipse plugins.
Finding widgets
The main entry point in the SWTBot framework is the class SWTBot which contains extensive APIs to operate the SWT surface. For Eclipse plugin applications we use the subclass SWTWorkbenchBot, as the enhancement provides special services to operate the Eclipse workbench. Therefore you first need to declare a SWTBotWorkbenchBot in your test class (JUnit test).
private final SWTWorkbenchBot swtBot = new SWTWorkbenchBot();
Think of the SWTBot as something that can do tasks for you (e.g. find widgets, click on them, etc).
Muster to find a widget:
SWTBot[Widget] widget = swtbot.[widget][With][Matcher(s)] ();
Example:
SWTBotText textField1 = swtbot.textWithLabel(“Name:”);
SWTBotText textField2 = swtbot.textWithTooltip(“Name:”);
Finding obscure widgets
Internally SWTBot uses the so-called Hamcrest matcher framework to locate widget controllers. In addition to the matchers from Hamcrest, SWTBot uses its own matcher to evaluate the requirements by finding widgets. In SWTBot, the matcher would be instantiated with static factory functions in the class
WidgetMatcherFactory and used to locate widget controllers. What you need is:
To create simple matchers such as
20
withText(“Finish”)
withLabel(“Username:”)
withRegex(“Proceed to step (.*)”)
widgetOfType(Button.class)
withStyle(SWT.ARROW, “SWT.ARROW”)
And combine all matchers with
allOf(matchers...)
anyOf(matchers...)
not(matcher)
allOf(anyOf(matchers...), matchers...)
At last put the whole thing together (the end user API)
public SWTBotTree treeWithLabelInGroup(String l, String g, int i) {
//create the matcher
Matcher matcher = allOf(widgetOfType(Tree.class), withLabel(l), inGroup(g));
//find the widget
Tree tree = (Tree)widget(matcher, index);
//create a wrapper for thread safety and convenience APIs
return new SWTBotTree(tree, matcher);
}
Performing actions
The [Widget]WithLabel method finds the widget control specified with the given label, so you will get a
SWTBot[Widget] object on which actions can be performed.
21
//set text “hello world” in the text field.
swtbot.textField1.typeText(“hello world”);
//click a button
swtbot.button.click();
//chain methods to make them concise
swtbot.menu(“File”).menu(“New”).menu(“Project...”).click();
//delete myClass.Java
swtbot.tree.expand(“Project”).expand(“src”).expand(“myClass.java”).contextMenu(“Delete”).click();
//make a selection in a list
swtbot.list.select(“a”,”b”,”c”);
//make a selection using indexes
swtbot.list.select(1,2,3);
Widgets within a component of the Eclipse workbench
With the additional methods defined in SWTWorkbenchBot the elements of the Eclipse workbench can be
easily controlled, e.g. views and editors may be found by their ID or the rider title.
SWTBotView view1 = bot.viewById(“someViewId”);
SWTBotView view2 = bot.viewByTitle(“someTitle”);
SWTBotEditor editor1 = bot.editorById(“someEditorId”);
SWTBotEditor editor2 = bot.editorByTitle(”someTitle”);
With such view or editor object you can get the object SWTBot again, with which you can access the content limited within the view or editor.
SWTBot editorBot = editor1.bot();
editorBot.textWithLabel(“Name:”).setText(“hallo”);
Furthermore, the API of SWTBotView and SWTBotEditor provides some functions to operate the tab itself.
For instance, the editor can be saved or closed.
editor1.save();
editor1.close();
22
Implement your own matcher
When you want to use your own logic in tests to locate controls, you can implement your own matcher,
which would be passed to SWTBot.wiget(...). Important: the implementation of matchers for SWTBot is
done in such way that the testing of GUI elements are carried out from the UI thread, because access to
the SWT objects is permitted only in the thread. SWTBot provides a helper class UIThreadRunnable for the
process. E.g.
public class WithId<T extends Widget> extends AbstractMatcher<T> {
private final String value;
public WithId(String value) {
this.value = value;
}
protected boolean doMatch(final Object obj) {
String data = UIThreadRunnable.syncExec(new Result<String>() {
public String run() {
return (String) ((Widget) obj).getData(SWTBotPreferences.DEFAULT_KEY);
}
});
return value.equals(data);
}
public void describeTo(Description description) {
description.appendText("with id ".appendText(value);
}
}
Implement your own SWTBot[Widget]
Thread safety(query state)
23
public class SWTBotCheckBox {
public boolean isChecked() {
//evaluate a result on the UI thread
return syncExec(new BoolResult() {
public Boolean run() {
return widget.getSelection();
}
});
}
...
Thread safety (change state)
public class SWTBotCheckBox {
public void select() {
asyncExec(new VoidResult() {
public void run() {
widget.setSelection(true);
}
});
notifyListeners();
}
}
24
Handling long operations
Sometimes the waitUntil(...) method needs to be used. After confirming execution of some costly operation (e.g. creating a new file), this operation can take some time. If the next test started to execute, it
would crash because the focus would be still set to some dialog window or progress bar of previous tests.
To deal with such situation, there are two options
1. The first option is using the sleep() method. But how to know how long it will take for the program to
finish the operation? Setting a fixed number of seconds seems very inflexible.
2. A much better option is using a SWTBot method designed specially to deal with such cases:
/**
* Wait until shell 'shellTitle' closes.
* Do nothing if it does
* not exist anymore.
* @param shellTitle
*/
private void waitUntilShellCloses(String shellTitle) {
try {
bot.waitUntil(Conditions.shellCloses(bot.shell(shellTitle)));
} catch (WidgetNotFoundException e) {
/*
*waitUntil throws exception when window 'shellTitle' is not found.
* This window could be automatically closed after
* operation has finished.
*/
}
}
Problems caused by the second option
But once in few executions an unpleasant situation occurs – the tests crashes. The reason is that if the
operation finishes quicker and the window closes sooner than expected, then bot.shell(shellTitle) will
throw WidgetNotFoundException. The only way to deal with it is to catch it, write a description why it was
caught and log it.
25
What cannot be tested with SWTBot
When writing SWTBot tests, a lot of time can be wasted while trying to do things that cannot be done
(e.g. things that are not supported, or are not implemented yet). Therefore it seems a good idea to mention them in this document:
‣ There is no support for native widgets (Open/Save File Dialogs, Color Dialogs, etc.).
‣ When trying to test AUTs (Application Under Test) restart - it restarts also all the tests and goes into
infinite loops.
‣ You cannot access status bar text.
‣ There is only partial support for the close button x in the top right corner of every window. One can
use the close method for shells but it fails if there will be a confirmation dialog (which is a standard
Eclipse behavior for the main window).
‣ You cannot access the context menu’s submenu items (e.g. in navigator view). There is a workaround treat submenus as elements of the main context menu - but it fails when there are elements with repeating names (e.g. “Other...”) in different submenus.
26
6 What is SarosSWTBot?
SarosSWTBot is an extension of SWTBot to support self-defined widgets
specified for Saros.
27
Why and how to extend SWTBot?
Why
Some problems were encountered when writing tests for ChatView. The GUIdeveloper used self-defined
widgets by building the chat view which do not belong to the SWT library, so they cannot be found by
SWTBot. To solve this problem we need to extend the framework SWTBot.
Another reason to extend SWTBot is because there are some bugs contained in the original framework
SWTBot which hinder smooth test writing. E.g. SWTBot can’t click contextmenus.
How
To let SWTBot know about our own defined widgets, we need to do the following:
1. Define a corresponding so-called SWTBot[Widget] for the self-defined widget. E.g. define SWTBotChatLine for the widget ChatLine; the corresponding code looks like:
public class SarosSWTBotChatLine extends AbstractSWTBot<ChatLine> {
public SarosSWTBotChatLine(ChatLine w) throws WidgetNotFoundException {
this(w, null);
}
public SarosSWTBotChatLine(ChatLine w, SelfDescribing description)
throws WidgetNotFoundException {
super(w, description);
}
}
2. Then define methods in the class SarosSWTBot to get the just defined SWTBotWidget with Matcher.
28
public SarosSWTBotChatLine chatLine() {
return chatLine(0);
}
@SuppressWarnings({ "unchecked", "rawtypes" })
public SarosSWTBotChatLine chatLine(int index) {
Matcher matcher = allOf(widgetOfType(ChatLine.class));
return new SarosSWTBotChatLine((ChatLine) widget(matcher, 0), matcher);
}
The following class diagram presents the relationship between widgets, SWTBotWidgets and SarosSWTBot
29
7 What is RemoteBot?
RemoteBot is a robot who was developed based on SarosSWTBot, but is different from SarosSWTBot, as he can remote-control SWT widgets and support distributed testing.
30
How to realize distributed testing
I’ve already talked about the special test requirement of Saros, such as supporting distribution. To realize
it, it was decided to utilize RMI technology.
How does RMI work?
Here is a brief description of how RMI works:
‣ On the host machine, a server program creates services by first creating local objects that implement
the services.
‣ Next, it exports these objects to RMI. When the object is exported, RMI create a listening service that
waits for clients to connect and request the service. After exporting, the server registers the object in
the RMI registry under a public name.
‣ On the client site, the RMI registry is accessed through the static class Naming. It provides the method
lookup() that a client uses to query a registry. The method lookup() accepts a URL that specifies the
server host name and the name of the desired service. The method returns a remote reference to the
service object.
How do RMI + SWTBot work?
Similarly we can see “Saros” as a server program and services offered by it are SWTBot APIs. Obviously the
simulated testers are our clients, they can remotely operate Saros applications with references to the exported services. The following mapping table shows how RMI was applied to SWTBot.
RMI
RMI + SWTBot
server program
Saros instance
remote services
SWTBot APIs
clients
testers
31
Problems of directly exporting SWTBot APIs
Clients want to remotely operate Saros instances; a service offered by it. This means we only need to define an associated remote object to which the SWTBot object delegates its tasks. The problem is that
SWTBot is implemented as fluent interface and therefore it returns mostly SWT[Widget] objects. These
cannot be exported, because they are platformdependent and cannot be serialized.
To be table to directly use SWTBot APIs on the client side, we also need to define delegates for all
SWTBot[Widget] objects. The following class diagram shows the delegate relationship.
32
How to export RemoteBot - and RemotBot[widget] objects?
Ok, the whole SWTBot APIs are wrapped with RMI, but how to export them? This will be done when you
start Saros instances with test mode. Test mode means that the VM arguments of the run configuration are
configured with the following parameters:
-Xmx512m
-ea
-XX:MaxPermSize=128m
//the path to the bin folder of the Saros project
-Djava.rmi.server.codebase=file:${workspace_loc}/Saros/bin
-Djava.security.manager
//the path to the file “all.policy” which would be needed to export
RMI-Objects-Djava.security.policy=file:${workspace_loc}/Saros/test/STF/all.policy
//assigned port number, which is used by creating the RMIregistry
-Dde.fu_berlin.inf.dpp.testmode=12345
-Dde.fu_berlin.inf.dpp.sleepTime=200
//the IPaddress of the host machine of the server program, which is used by the client to get the RMIregistry.
-Djava.rmi.server.hostname=localhost
Because of the convenience would 5 launch files are defined to run saros instances with test mode, every
launch file assigns a unique port number to the parameter Dde.fu_berlin.inf.dpp.testmode. With the
unique combination of port number and hostname the tester can simply access the Saros instance which
he wants to test. For example, with Saros_STF_Alice.launch you can start a Saros instance with the information: port number 12345 and hostname localhost. Since Alice is configured with the same information
(portnumber 12345 and hostname localhost), Alice can remotely access the Saros instance started by
Saros_STF_Alice.launch.
33
Similarly for every tester there is a
!
corresponding launch file:
‣ Bob -> Saros_STF_Bob.launch
‣ Carl -> Saros_STF_Carl.launch
‣ Dave -> Saros_STF_Dave.launch
‣ Edna -> Saros_STF_Edna.lauch
All the parameters are passed to the
method StartupSaros#earlyStartup() and earlyStartup() is automatically called by IStartup after loading
the plugins during initialization of the workbench (StartupSaros is the implementation of IStartup). In the
method earlyStartup the given parameter is checks if Saros is started normally or with the test mode.
When starting with test mode the method STFController#exportedObjects is called, which is responsible
for creating a registry and exporting all remote objects. The following diagram shows you the steps of how
to export the remote objects.
!
34
How to get the RemoteBot objects on the client side?
All a client has to do is call the registry to obtain a reference to the remote object, and call its methods.
Note that the client receives an instance of the interface we defined earlier, and not the actual implementation.
RemoteBot remoteBot = (RemoteBot) registry.lookup("RemoteBot");
With the reference remoteBot tester can recursive access other RemoteBot[Widget] objects such as
remoteBot.view(“Saros”).toolbarButton(“connect”).click().
35
RemoteBot APIs introduction
Since RemoteBot is only a delegation and its job is simply passing on a duty to SWTBot, RemoteBot APIs
are almost the same as SWTBot’s. RemoteBot is also implemented as fluent interface and instead of returning SWT[Widget] objects it returns RemoteBot[Widget] objects which will be exported too.
SWTBot would be delegated by the class RemoteBot, in which for example the method button is defined
and return the object RemoteBotButton.
public class RemoteBot extends STF implements IRemoteBot {
private static RemoteBotButton button;
private static SWTBot swtBot;
…...
public IRemoteBotButton button(String mnemonicText) throws RemoteException {
button.setWidget(swtBot.button(mnemonicText, 0));
return button;
}
……
}
The class RemoteBotButton delegates SWTBotButton.
public class RemoteBotButton extends AbstractRmoteWidget implements
IRemoteBotButton {
...
private SWTBotButton widget;
...
public void click() throws RemoteException {
widget.click();
...
}
Finding widgets
Like SWTBot we also define a subclass RemoteWorkbenchBot for RemoteBot, which calls the special services supported by SWTWorkbenchBot to operate the Eclipse workbench. To use the bot you first need to
36
initiate testers in your test class (JUnit test). Then the tester can get the reference to IRemoteWorkbenchBot.
initTesters(TypeOfTester.ALICE);
IRemoteWorkbenchBot remoteBot = alice.remoteBot()
RemoteWorkbenchBot uses the same pattern as SWTBot.
Muster:
RemoteBot[Widget] widget = remoteBot.[widget][With][Matcher(s)] ();
Example:
RemoteBotText textField1 = remoteBot.textWithLabel(“Name:”);
RemoteBotText textField2 = remoteBot.textWithTooltip(“Name:”);
Performing actions
You need to get a RemoteBot[Widget] object, which delegates the SWTBot[Widget] object, on which actions can be performed.
//set text “hello world” in the text field
remoteBot.textWithLabel(“Name:”).typeText(“hello world”);
//click a button
remoteBot.button(“Finish”).click();
//chain methods to make them concise
remoteBot.menu(“File”).menu(“New”).menu(“Project...”).click();
Widgets within a component of the Eclipse workbench
With the additional methods defined in RemoteWorkbenchBot the elements of the Eclipse workbench can
easily be controlled, such as views and editors may be found by their ID or the rider title.
RemoteBotView view1 = remoteBot.viewById(“someViewId”);
RemoteView view2 = remoteBot.viewByTitle(“someTitle”);
RemoteEditor editor1 = remoteBot.editorById(“someEditorId”);
RemoteEditor editor2 = remoteBot.editorByTitle(”someTitle”);
37
With such a view or editor object you can get the object RemoteBot again, with which to access the content limited within the view or editor.
RemoteBot editorBot = editor1.bot();
editorBot.textWithLabel(“Name:”).setText(“hallo”);
38
8 What is SuperBot?
SuperBot is a wrapper for RemoteBot. It puts all often used test cases together, so that the test writer can quickly write tests.
39
The structure of SuperBot
SuperBot is built based on RemoteBot but different from RemoteBot as it can find the actual elements of
Eclipse without passing detailed parameters and without checking its state. For example you can focus on
the packageExplorer view with
superBot().views().packageExplorerView();
In comparison RemoteBot needs many steps for it:
if(!bot().isViewOpen(“PackageExplorer”))
bot().openViewById(…..)
bot().view(“PackageExplorer”).activate():
The idea is that within the Eclipse UI there are compositions that your tests interact with. SuperBot simply
simulates these often used elements as objects and the call chaining with SuperBot then represents a
click-path. To perform an action, the test writer only needs to translate the click-path with SuperBot.
Rule: If the last click triggered another event, the corresponding method also needs to treat the event.
Simulate menubar and views
Currently, there are the two menu objects SarosM and WindowM which represent Saros’ and WIndow’s
main menus. They can be accessed with
superBot().menubar().Saros();
superBot().menubar().window();
The other main menus’ actions can also be performed with contextMenus, so I have decided to implement
them only in contextMenu objects. The reason for it is that our test framework should focus on Saros features not Eclipse, so only Eclipse actions needed by Saros are implemented. The following diagram shows
you which elements of the Eclipse workbench are simulated with objects.
40
41
Simulate the contextMenu dynamically
The contextMenu is dynamically changed according to the currently selected widget. So I’ve defined two
contextMenu wrappers: one is specified for Eclipse, the other for Saros. They can only be called when you
first select a widget.
For example, to delete a project, you need to do the following:
1. Open and activate the packageExplorerView.
2. Select the Java project.
3. Click contextMenu “Delete”.
4. Confirm the popUpWindow “Delete Resources” with OK.
The four click actions can be easily interpreted with the following method chaining:
superbot().views().packageExplorerView().selectJavaProject(“Foo-Bar”).delete();
The contextMenu “Delete” is only called if the to-be-deleted project is selected. And according to the
rule defined before the last contextMenu “Delete” triggers a popupWindow, so the function delete() needs
to handle 3 and 4 steps.
Another example to create a project you need to do the following:
1. Open and activate the packageExplorerView.
2. Focus on the content of the packageExplorerView
3. Click the contextMenu “New”->”Project”.
4. Confirm the popUpWindow “New Project” with OK.
The corresponding method chaining looks like this:
superbot().views().packageExplorerView().bot().newC().projekt(“Foo-bar”);
42
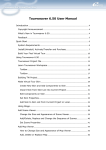
With this concept writing tests is the same as recording your clicking path, so the test writer can very
quickly construct readable and stable tests. The following figure shows us how to simulate the contextMenu click-path with method chaining:
43
SuperRemoteBot APIs introduction
SuperRemoteBot APIs consists of RemoteBot APIs, so what SuperBot can do Bot can also do, but not vice
versa. E.g with Bot and SuperBot we can both do “alice add new Buddy bob”.
With RemoteBot:
alice.bot().view(“Saros”).toolbarButton(“Add a New Buddy”).click();
alice.bot().waitUntilShellIsOpen(“Add Buddy”);
alice.bot().shell(“Add Buddy”).activate();
alice.bot().shell(“Add Buddy”).bot()
alice.bot().shell(“Add Buddy”).bot().comboBoxWithLabel(“XMPP/Jabber ID”).setText(bob.getJID().g
etBase());
alice.bot().shell(“Add Buddy”).bot().button(“Finish”).waitUntilIsEnabled();
alice.bot().shell(“Add Buddy”).bot().button(“Finish”).click();
bob.bot().waitUntilShellIsOpen(“Request of Subskription Received”);
bob.bot().shell(“Request of Subskription Received”) .activate();
bob.bot().shell(“Request of Subskription Received”).bot().button(“Ok”).click();
With SuperBot:
alice.superBot().views().sarosView().addANewBuddy(bob.getJID());
bob.superBot().confirmShellRequestOfSubscriptionReceived();
As you see, the test code written with SuperBot is very concise. So SuperBot is very suitable to quickly
build a test environment for your test cases; and Bot is useful to test some details by performing a task,
e.g. test case “add an account with invalid server name”.
44
9 Write robust tests
This chapter provides step-by-step instructions for writing JUnit tests with
STF.
45
Well-designed test cases
It’s time to begin with writing tests. The effort put into creating well-designed test suites is to satisfy the
following fundamental objectives.
They must be
‣ maintainable
‣ modular
‣ robust
‣ well documented
‣ and they should be built of reusable components
The ideal test should possess those attributes.4
A test case is independent
Why independent?
‣ If a test case relied on the results of the previous test case, then if the first test case failed, it would
most likely cause a failure of the preceding test case. Such cascading errors would make it very difficult to find the root cause of these failures.
‣ The maintainer should be able to choose a subset of test cases to run without having to concern the
interdependencies between test cases. I.e. test cases should be executable in any sequence, unconscious reordering of the test case execution (e.g. by a tester or testing framework) could cause a chain
of failures in a test suite which executed faultlessly the previous day.
Solution
Every test case has to take care of its own setup, verification, and clean-up.
4
Fewster, Graham 1994, 527; Myers 2004, 43-44.
46
‣ In the setup phase, the application should be brought to a state where the actual test can be executed.
‣ In the verification phase, the actual testing is performed, and the results are evaluated to a pass/fail
status.
‣ The clean-up phase should bring the application back to a state of before the setup – the so-called base
state – to make it ready for the next test.
Compromise
Absolute independency is sometimes hard to realize in practice. For tests that modify a complex global
state (e.g. creating or modifying a database), starting all tests from zero for each test case would be far
too expensive. In such situations, test cases relying on specific states can be grouped together, but the
interdependencies between them should be well documented to help future maintainers analyze such a
test suite.5
A test case has a single purpose
An ideal test case should have a single purpose. This should help keeping the code relatively short and
simple to make it easy to understand, debug, and maintain. Moreover, it also means that the outcome of
the test case should always be one of the two: pass or fail. This makes it much easier to interpret the results. In case of failure of a single purpose test case, it is trivial to locate the application function at fault.
This implicates that a test suite should consist of many smaller test cases instead of a few large ones. 6
Unsuccessful test case should not cause others to fail
A test case that fails due to an unexpected error leaves the application in an unknown state. The AUT is
out of synch with what the test case is expecting. A well-behaved test should log the failure, abort and
reset the application to a known base state. It is the task of a test tool to isolate test case failures so that
an unexpected error in one test case does not cause the whole script to abort. All of the most popular GUI
test tools provide this functionality.7
5
Fewster, Graham 1994, 527.
6
Fewster, Graham 1994, 527-528.
7
Fewster, Graham 1994, 528.
47
A test case is well documented
As already mentioned, one of the advantages of writing a good test design is that you can take the test
case description from this document and use it as header comments in the test code. Of course, also inline comments should be used to describe the logic when necessary.Take the header comments for each
test case from the test plan. Make the code easy to maintain. Comment and document well, especially
any workarounds and interdependencies in the test code. All attributes discussed in chapter 2.6 make up
requirements for well-designed test cases. 8
8
Fewster, Graham 1994, 528.
48
Standardized error recovery
There are many things besides a bug in the AUT which can cause a test case to fail. It could be
‣ a bug in the testing code,
‣ an environmental error (e.g. network connection down, no disk space),
‣ an intentional change in the application,
‣ an excessive machine load causing timing errors, etc.
The problem is that when the test crashes, it leaves the application in an unknown state and unless some
actions are taken to reset the AUT to a known state, subsequent tests are likely to fail. A base state is
usually like that main window which is open, active, and not minimized (just as if the application was just
started).
A good practice is to implement the capability of recovering to a state which would allow the continuation with the next test cases. A recovery routine could be for instance:
‣ Log the error
‣ Abort the test case (because it is in an unknown state)
‣ Attempt to come back to a known state (e.g. close all opened windows until the main window is active).
‣ Resume execution with the next test case
Implementing those steps should allow execution of the consequent test cases.9
9
Fewster, Graham 1994, 528-533.
49
Describing STF test code
This chapter familiarizes the reader with the basic elements of the STF test.
The structure of JUnit tests
@BeforeClass
The annotation precedes a setUpBeforeClass() method. This method will be run once before any of the
test methods in the class.
@BeforeClass
public static void runBeforeClass() throws RemoteException,
InterruptedException {
……….
}
In @BeforeClass you first need to specify which testers should be initialized. Initialized testers can use the
references remoteBot and superBot to drive the Eclipse UI.
@BeforeClass
public static void runBeforeClass() throws RemoteException,InterruptedException {
initTesters(TypeOfTester.ALICE, TypeOfTester.BOB);
……..
}
Then clean up the Eclipse workbench with seUpWorkbench(), which closes all opened editors, popUp windows and unnecessary views, delete all existing projects and switch to the Java perspective.
@BeforeClass
public static void runBeforeClass() throws RemoteException,
InterruptedException {
…..
setUpWorkbenchs();
…..
}
50
Besides cleaning up the workbench we need to build the basic test environment like open all Saros views,
check if all testers are in contact, connected, etc. Otherwise, automaticReminder regularly sends surveys
that interrupt the testings, so it’s strongly recommended to disable automaticReminder before testing. All
of this can be done by using the method setUpSaros() defined in the superclass.
@BeforeClass
public static void runBeforeClass() throws RemoteException,
InterruptedException {
…..
setUpSaros();
…..
}
If all test cases are based on a session, you can use the method setUpSessionWithAProjectAndAClass to
quickly build a session.
@BeforeClass
public static void runBeforeClass() throws RemoteException,
…..
setUpSessionWithAJavaProjactAndAClass(alice, bob);
}
@AfterClass
The annotation precedes the afterClass() method. If expensive external resources were allocated in the
BeforeClass method, they have to be released after all the tests in the class have run. All @AfterClass
methods are guaranteed to run even if the BeforeClass method throws an exception.
Bring the AUT back to a state of before the setup – the so-called base state – to prepare it for the next
test. The function resetSaros defined in the superClass ensures that buddy names are reset to default values, connections are disconnected and all existing projects are deleted.
@AfterClass
public static void afterClass() throws Exception {
resetSaros();
}
51
If an additional after-class condition is needed, you can define a new method runAfterClass() in your test
case. E.g. in this example, you want users to leave the sessions after every test method.
@AfterClass
public static void runAfterClass() throws RemoteException,
InterruptedException {
leaveSessionHostFirst(alice);
}
@Before
The annotation causes the method before() to run before every @Test method in the current class.
@Before
public void before() throws Exception {
for (Tester m : activeTesters) {
// m.state
// .debug("\n---------------------------------------------------"
// + "\nExecuting @Test " + name.getMethodName() + " in "
// + getClass().getSimpleName()
// + "\n---------------------------------------------------");
}
}
@After
The annotation precedes the after() method which is usually used to release the resources (allocated in
the @Before method) after the test runs. This method will execute even if the @Test method throws an
exception. In the superclass the function after() is already defined. After() ensures that all unexpected
popup windows and opened editors will be closed after every test.
@After
public void after() throws Exception {
resetWorkbenches();
}
You can define your own @Before and @After functions with different names, if you don’t want to override
the before() and after() of the superclass. E.g. for the test case “SarosViewTest” we’ve defined the addi52
tional conditions that before testing each test, all testers should be in a session, so using the method reBuildSession(Inviter, invitee…) guarantees the precondition. The @After function is responsible of reseting
the session state, i.e. removes all existing follow modes.
@Before
public void runBeforeEveryTest() throws RemoteException {
reBuildSession(alice, bob);
}
@After
public void runAfterEveryTest() throws RemoteException {
resetFollowModel(alice, bob);
}
@Test
The annotation tells JUnit that the public void method to which it is attached can be run as a test case. To
run the method, JUnit first constructs a fresh instance of the class and than invokes the annotated
method. Any exceptions thrown by the test will be reported by JUnit as a failure. If no exceptions are
thrown, the test is assumed to have succeeded.
public class BuddiesViewTest {
@Test
public void addition() {
assertEquals(12, calculator.add(7, 5));
}
@Test
public void subtraction() {
assertEquals(9, calculator.substract(12, 3));
}
}
Write tests with RemoteBot and SuperBot
Create a new Java project with the following click steps:
1. Open and activate the package explorer view
53
2. Focus on the content of the view
3. Click the contextMenu New->Java Project
4. Confirm the window “New Java Project”
With SuperBot:
alice.superBot().views().packageExplorerView() // 1
.bot() // 2
.newC().javaProject(“Foo-Bar”); // 3, 4
With RemoteBot:
// 1
if (!alice.bot().isViewOpen(“Package Explorer”)) {
alice.bot().openViewById(“Package Explorer ID”);
}
alice.bot().view(“Package Explorer”).show();
// 2
alice.bot().view(“Package Explorer”).bot().tree()
// 3
.contextMenu(“New”, “Java Project”).click();
// 4
if (!alice.bot().isShellOpen(“New Java Project”))
alice.bot().waitUntilShellIsOpen(“New Java Project”);
alice.bot().shell(“New Java Project”).activate();
alice.bot().shell(“New Java Project”).bot()
.textWithLabel(“Project Name”).setText(“Foo-Bar”);
alice.bot().shell(“New Java Project”).bot().button(“Finish”).click();
alice.bot().waitUntilShellIsClosed(“New Java Project”);
Delete a buddy with the following click steps:
1. Open and activate the Saros buddies view.
2. Select the buddy whom you want to delete in the buddies list.
54
3. Click the contextMenu “Delete”.
4. Confirm the window “Remove of Subscription”.
With SuperBot:
alice.superBot().views().sarosView() // 1
.selectBuddy(bob.getJID()) // 2
.delete(); // 3
bob.superBot().confirmShellRemovelOfSubscription(); // 4
With RemoteBot:
if (!alice.bot().isViewOpen(“Saros”)) {
alice.bot().openViewById(“SarosID”);
}
alice.bot().view(“Saros”).show(); // 1
alice.bot().view(“Saros”).bot().tree()
.selectTreeItem(bob.getBaseJid()) // 2
.contextMenu(“Delete”).click(); // 3
alice.bot().waitUntilShellIsOpen(“Removal of Subscription”);
alice.bot().shell(“Removal of Subscription”).activate();
alice.bot().shell(“Removal of Subscription”).confirm(OK); // 4
55
source: [F2]
References
[F1] QATestLab, Beyond Regression Tests, URL:
http://blog.qatestlab.com/2011/03/16/beyond-regression-tests/
[F2] Alessandro Rei, Dark Glass, URL:
http://kde-look.org/content/show.php/Dark-Glass+reviewed?content=67902
56