1
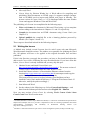
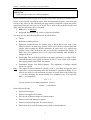
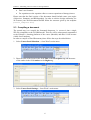
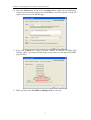
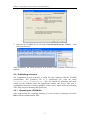
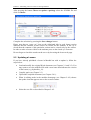
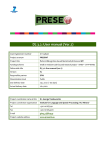
Εducate! - Publishing Lessons on the e-Learning Platform
Publishing Lessons on the e-Learning Platform
This document is intended for the module coordinators and lecturers of the Educate!
Project. The document provides useful instructions for preparing the core educational
content and publishing lessons in the e-learning platform.
1 The structure of a Module
The postgraduate programme offers a number of Modules that are organized in four
Thematic Areas.
Figure 1-1: Basic Programme Components
The Module is a basic element of the postgraduate programme. All educational
content is provided through the Module and its components. The Module components
are shown schematically in the following diagram.
Module
Description*
Lessons*
Educ.
Material
Assignments*
Chat
Exam*
Events
Glossary
Discussion
Forums
Choice
* Required
Figure 1-2: Module Components
1
Εducate! - Publishing Lessons on the e-Learning Platform
The module components marked with an asterisk in Figure 1-1 represent the
compulsory components of each module. These are:
•
The Description, a concise overview of the module, including a description of
the aims, ECTS value, prerequisites, student study time, intended learning
outcomes, learning/teaching methods, assignments, assessment, Syllabus plan
and a suggested reading list of the module.
•
A number of Lessons, usually around 15, each of which should be studied in a
single session.
•
The Exam that represents the main assessment of each module
Lesson
Objectives*
Summary*
Printable
Version*
Core Educational
Material
Bibliography*
Topics*
Quiz*
Exercises
Supporting
Material
* Required
Figure 1-3: Lesson Components
The lesson components marked with an asterisk in Figure 1-3 represent the
compulsory components of each lesson. The greyed area of Figure 1-3 represents the
core educational material. The following chapter 2 explains how to publish this core
educational material. For further information concerning other educational material
and activities please refer to the e-learning platform user manual.
2 Publishing Lessons
The main educational content of a Module is the Lesson. Preparing and publishing a
Lesson in the e-learning platform is in the responsibility of the lecturers. This may
cause some difficulties since the majority of the lecturers is not familiar with
specialized web publishing tools (e.g. Microsoft FrontPage, Macromedia
Dreamweaver). On the other hand it can be assumed that everyone has at least some
experience with common word processors such as Microsoft’s Word. Therefore, a
procedure for publishing lessons in the project’s website has been established, which
requires minimal extra knowledge from the lecturer and utilizes the following
software:
2
Εducate! - Publishing Lessons on the e-Learning Platform
•
Microsoft Word
•
Course Genie by Horizon Wimba Inc. A Word add-on for compiling and
publishing Word documents as HTML pages. It supports multiple formats,
such as SCORM1 used to import and publish web pages in Moodle2. The
newest version of Course Genie (v. 2.2) is distributed under the name Wimba
Create and supports Windows Vista and Word 2007.
The publishing of a Lesson is accomplished in the following steps:
•
Write and format the document in Microsoft Word using a given template
and according to the instructions in Chapters 2.1 and 2.2 respectively.
•
Compile the document into an HTML document using Course Genie (see
Chapter 2.3)
•
Upload (publish) the compiled file to the e-learning platform powered by
Moodle (see Chapter 2.4 and 2.5).
These steps are described in detail in the following chapters.
2.1 Writing the lesson
A Module may include several Lessons, but for each Lesson only one Microsoft
Word document should be written. The authors are responsible for updating the Word
file. All updates will have to be applied to the original document first and then
published.
If this is the first time you apply the procedure you have to first install and adjust the
add-on tool Course Genie following the steps described below. If you have done this
before, Course Genie is already installed and you may skip this part:
1. Obtain a license and install CourseGenie (see
http://www.horizonwimba.com/products/coursegenie/). The newest version of
Course Genie is distributed under the name Wimba Create.
2. Install the Educate-scheme: a) Download the Educate-scheme from the
location http://www.water-msc.org/en/docs.htm b) uncompress and copy the
entire directory Educate to the location C:\Program
Files\courseGenie\resources\en.lproj\schemes (provided that you have
installed Course Genie under the directory C:\Program Files\courseGenie. If
otherwise, modify the path accordingly.)
3. Start Microsoft Word
4. Set the scheme in the following way: Select CourseGenie/Settings… and
then from the Scheme pull-down menu select English US – Educate
Now you may activate Course Genie by selecting Tools/ Course Genie/ Start
Course Genie from Word’s main menu.
1
SCORM (Shareable Content Object Reference Model) is a collection of standards and specifications
adapted from multiple sources to provide a comprehensive suite of e-learning capabilities that enable
interoperability, accessibility and reusability of Web-based learning content. (see
http://www.adlnet.gov/scorm/).
2
Moodle is a free and well known open source course management system (see http://moodle.org/).
3
Εducate! - Publishing Lessons on the e-Learning Platform
The CourseGenie submenu appears on the menu bar.
You are now ready to write your Lesson. In order to achieve design uniformity for all
Lessons, the document has to follow a specific structure and be formatted in a specific
way. For this reason please download and install the Word template you will find in
http://www.water-msc.org/en/docs.htm and modify its contents. This template
includes the basic structure for all Lessons of the Module. In the following Chapter
some basic formatting rules are described, which will ensure that all lessons will be
presented with the same “look and feel” when published. Only a subset of the
functionality of Course Genie is needed in this course. For a detailed description of
the capabilities of Course Genie please read the software documentation.
2.2 Formatting rules
Make sure that all paragraphs in the document have one of the following predefined
styles:
cgSectionTitle
Use this style only once for the title of the Lesson at the beginning of the
document.
cgPageTitle
Use this style for the title of a Topic. After the compilation with Course Genie
each Topic will start in a new HTML-page.
cgHeading
You may divide your Topic into Chapters always beginning with a title. Use this
style for the title of a Chapter within a Topic.
cgCaption
Apply this style to the caption of figures.
4
Εducate! - Publishing Lessons on the e-Learning Platform
cgBodyText
Apply this style to the rest of the paragraphs.
Please note that in order to apply these styles Course Genie needs to be installed first.
Please do not modify predefined styles, fonts and paragraph formats, since this will
not have any effect on the published web page and the compiled version may differ
significantly from the one you see in Word. Try to stick to the predefined styles and
apply only the following effects if needed:
•
bold, italic or underline.
•
paragraph alignments: left, centre or right (not justified)
You may also use the following Microsoft Word elements:
•
Tables
•
Bulleted or numbered lists
•
Equations. Equations may be written using a Word add-on tool such as the
Equation Editor. In most cases Course Genie will be able to convert them into
images when creating the HTML document. In some cases (e.g. when using
Fields) Course Genie will not be able to convert the equations into images. In
these cases the equations have to be converted manually and included as
images in the text
•
Hyperlinks. This includes hyperlinks to the same document or to other URLs.
Just add the links in the Word document as usual. Course Genie will compile
them appropriately into HTML documents.
•
Embedded images (not linked images). The alignment of images should
always be centred.
Hint: The angled bracket characters (usually used as less than and greater than
signs) have a special meaning when the document is exported to XML. If you
want to use them in your document you have to prefix them with a tilde sign
( ~ ) to show that they are meant literally. For example to say “If x is greater
than y” you would use:
If x ~> y
To say “income is less than expenditure” you use:
income ~< expenditure.
Some other useful tips:
•
Do keep lists simple
•
Don't use merged cells in tables
•
Do convert all Drawn images to Painted images
•
Don't use tabs and indents for layout
•
Don't use empty paragraphs for vertical layout
•
Don't run bold or italic formatting across table or list boundaries
5
Εducate! - Publishing Lessons on the e-Learning Platform
•
Don’t use footnotes
•
For equations use the equation editor or convert equations to bitmap pictures
Please note that the final version of the document should include some extra topics
(Objectives, Summary and Bibliography). In order to achieve design uniformity for
all Lessons your Word document should follow the structure given by the template
(lesson_template.dot).
2.3 Compiling a document
The second step is to compile the formatted document, i.e. convert it into a single
ZIP-file compatible to the SCORM model. This file will be subsequently transmitted
to the Educate! e-learning platform of the course (Moodle) and thus it will become
visible for all students.
In order to compile a Word Document please follow the steps described below:
1. Select CourseGenie/Metadata… from Word’s main menu.
2. Enter the title of the lesson in the field Title on the Description tag and the name
of the author in the field Author on the Rights tag.
3. Select CourseGenie/Settings… from Word’s main menu.
6
Εducate! - Publishing Lessons on the e-Learning Platform
4. Select the General tab. Insert in the field Page root a single name describing the
content of the document and in the field Footer a short description, which will
appear at the foot of each HTML page.
5. Select the Content tab. Select Generate Content as Moodle SCORM 2004
Package. (Hint: Use Normal HTML Pages if you want to sea the generated HTML
pages locally).
6. Make sure that in the SCORM tab Multipe SCOs is selected.
7
Εducate! - Publishing Lessons on the e-Learning Platform
7. Generate the SCORM-file by selecting CourseGenie/Generate Course… from
Word’s main menu.
After compiling, the Word document will include some metadata which may be
ignored.
2.4 Publishing a Lesson
The compilation process generates a single file that complies with the SCORM
specifications. The generated file is a compressed file with the name
<original_name>_SCORM2004.zip. This file should be uploaded and made
visible for the students under the appropriate module and lesson. This task is
accomplished from the e-learning platform, which can be found under the following
URL: http://environ.chemeng.ntua.gr/educate/
2.4.1 Uploading the SCORM-file
After logging into the e-learning platform go to the module’s homepage and select
Files from the Administration field.
8
Εducate! - Publishing Lessons on the e-Learning Platform
In the screen that appears press the button Upload a file.
In the subsequent screen you may select the SCORM file and upload it by pressing
the Upload this file button.
The new file is now uploaded on the server.
9
Εducate! - Publishing Lessons on the e-Learning Platform
2.4.2 Making the lesson visible
In the modules homepage switch to the editing mode by pressing the Turn editing on
button.
In the section of the lesson being edited select SCORM/AICC from the activities pulldown menu
In the screen that appears fill in the missing text under the fields Name and
Summary.
10
Εducate! - Publishing Lessons on the e-Learning Platform
After pressing the button Choose or update a package select the SCORM file and
click on Choose.
Complete the selection by pressing the Save changes button.
Please note that an “open eye” icon on the right hand side in each lesson section
indicates that the contents of this section are visible for the students. If the eye is
closed then the contents of this particular section can be viewed only by the teacher.
In order to make a lesson visible to the students press on the closed eye icon once.
Do not forget to check the results on the server by browsing the lesson web-page.
2.5 Updating a Lesson
If you have already published a lesson in Moodle but wish to update it, follow the
steps below:
•
Load and modify the original Word document (see Chapters 2.1 and 2.2). You
may want to save the modified file with a new name that indicates the version
of the lesson (e.g. hydraulics_v2).
•
Compile again (see Chapter 2.3)
•
Upload the compiled document (see Chapter 2.4.1).
•
When in editing mode in the modules homepage (see Chapter 2.4.2) choose
the update icon that appears next to the resources name.
•
Select the new file as described in Chapter 2.4.2.
11