Download 2talk SIP Trunk Configuration Guide for MyPBX


Transcript
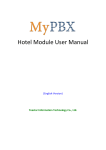
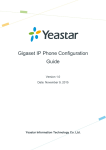
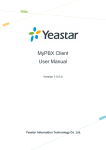
2talk SIP Trunk
Configuration Guide for MyPBX
2talk SIP Trunk Configuration Guide for MyPBX
A. Register a SIP trunk on MyPBX with your 2talk SIP account
Step 1. Go to MyPBX web interface ‘PBX -> Trunks -> VoIP Trunk’ page and click ‘Add VoIP trunk’
button, then fill in the sip account info into the popup window.
Provider Name: customize your trunk name here
Hostname/IP: sip.2talk.co.nz
Domain: sip.2talk.co.nz
User Name: your - 2talk - phone number
Authorization Name: the same as the username
Password: your - 2talk - password
Outbound Proxy Server: sip.2talk.co.nz
Note: If your sip trunk is used for faxing, please use ‘fax.2talk.co.nz’ instead of ‘sip.2talk.co.nz’ while
registering.
If TCP connection is needed rather than UDP, please go to MyPBX web interface ‘PBX -> Advanced
Settings -> SIP Settings’ to enable TCP, then reboot MyPBX to take effect and choose ‘TCP’ as the
Transport when creating your SIP 2talk SIP trunk.
http://www.yeastar.com
2/3
2talk SIP Trunk Configuration Guide for MyPBX
Step 2. Go to ‘Status -> Line Status -> Trunk Status’ to check if the SIP trunk is registered successfully.
B. Call out from the 2talk account
Please refer to your MyPBX user manual to configure the outbound route and call out.
C. Call in the 2talk account
Please refer to your MyPBX user manual to configure the inbound route. If you are using fax trunk and
want to send T.38 fax using this trunk, please set ‘T.38 Support’ as ‘Yes’.
http://www.yeastar.com
3/3