1
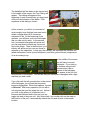
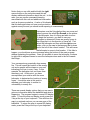
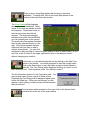
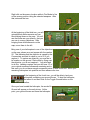
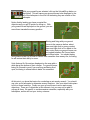
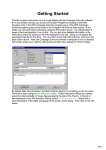
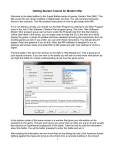
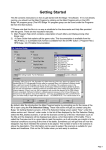
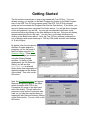
Getting Started This file contains instructions on how to get started with Tour Of Duty. If it is not already running, you should run the Main Program by clicking on the Main Program entry in the HPS Tour Of Duty program group (The HPS Tour Of Duty program group can be found under the Programs list from the Start button). If you prefer, you can print these instructions using the Print button above. You will get about 8 pages of text and graphics if you do this. You can get more detailed information in the instructions below by clicking on the links displayed in the text. Doing so will display the associated help file for this topic. You can return to this help information by clicking on the Back button above. Note: the Tour Of Duty software is designed to run on displays with screen areas up to 1280 by 1024 pixels and with color settings of 16-bit or higher. By default, after the introduction, the Main Program begins by prompting you for the name of the file to open using the File Selection Dialog. These instructions will get you started using the Getting Started scenario. In the list of files displayed by the File Selection Dialog, you will see that #Started.scn is selected. Notice that a short description of the battle appears at the bottom of the dialog. Then click on the OK button. Next, the A/I Selection Dialog will appear. Since we are going to play as the Allies, select Automatic with FOW in the Communist A/I group on the right hand side of the dialog. This will cause the computer to play as the Communist side. Later on, you can also use this dialog to experiment with Optional Rules by clicking on the Rules button. For now, click on the OK button. The battlefield will be drawn on the screen and in the middle of the screen, the Turn Dialog will appear. This dialog will appear at the beginning of each turn and help you keep track of the turn and duration of the battle. Click anywhere in this dialog to close it. In this scenario, you will be in command of an air cavalry troop that has been sent out to attack a village where NVA forces are suspected to be. At the beginning of the scenario, you will have your scout helicopter that you can use for recon. In the second turn, your attack helicopters will arrive and you can use those to attack any forces you find in the village. Then in the third turn, your infantry will arrive and you can use those to advance on the objectives. In this way, the scenario will represent the classical red (attack helicopters), white (scout helicopters), and blue (ground forces) components of an air cavalry troop. In the middle of the screen you will see your scout helicopter. If you click on its location using the left mouse button, then a picture of the helicopter will appear in the Unit List at the bottom of the screen. You will see that your helicopter is equipped with a light machine gun and a radio. If you click with the left mouse button in the picture of the helicopter, you will see that its picture becomes highlighted. When this happens, the unit is Selected. Most every operation you do with a unit requires that you first select the unit. Notice if you click on the picture of a Selected unit, it becomes de-Selected and in this way you can toggle the state of any one unit. Also notice that if you double-click on the map on the location of the unit, it automatically selects the unit and all units in that same location. Notice that you can click and hold with the right mouse button on the unit picture and this will display additional information about the unit. In this case, you can see the command hierarchy associated with this unit and additional information such as its armor protection. A value of 4 indicates that this helicopter does not have much protection against enemy fire and you should avoid exposing it unnecessarily. Helicopters must be flying before they can move and unless you see the words On Ground on the picture of the helicopter, then it is flying and able to move. To begin the scenario, you want to use your helicopter to determine if there are enemy forces in the village that is in the direction of lower left. First select the helicopter and then with the right mouse button, click on the map in the hexagon that is down and to the left of the current location. This will cause the helicopter to move to that location. If this fails to happen, you should see an error message along the bottom of the main program window explaining the problem. Once you are able to move the helicopter, continue to right click in adjacent hexes to move the helicopter down and to the left towards the village. Your movement may eventually draw enemy fire. This will reveal the location of the enemy unit and a graphic will be drawn on your unit indicating your loss, in men, if any. In this example, the helicopter took no losses from the enemy unit. At this point, you have accomplished your mission with the recon helicopter: to determine the location of enemy forces. It would be wise at this point to withdraw your helicopter to reduce its vulnerability to enemy fire. There are several display options that you can use to get more information about the battlefield and what is happening. The program begins in normal 2D display mode. To see the zoom-out display mode, press the 1 key at the top of your keyboard. This will show the map in a reduced scale so you can see more of the battlefield. To return the map to normal 2D display mode, press the 2 key at the top of your keyboard. There is also a Jump Map display that shows you the entire battlefield. To display this, click on the Jump Map button on the toolbar at the top of the main window. The Jump Dialog will be displayed showing the entire battlefield. Allied forces on the map are shown as solid blue squares. Communist forces on the map are shown as solid red squares. The large red rectangle indicates how much of the battlefield you can currently see on the screen. The small red hollow square indicates the currently selected location on the map. Solid yellow squares indicate objectives that you want to take to acquire victory points. You can click anywhere in the Jump Map to cause the main display to scroll to that location, or you can click on the X button in the upper right hand corner of the dialog to close it without changing your location. At this point, you should advance the turn by clicking on the Next Turn button on the toolbar. You will be prompted to save the current battle. Click on the Save button to save the battle using the default filename battle.btl. The Turn Dialog will be displayed showing you that it is now the Communist turn. Click anywhere in the Turn Dialog to close it. The A/I will perform actions for the Communist side. You may receive enemy fire as a result of these actions. Eventually the Turn Dialog will be displayed again and it will be the Allied turn. When your turn begins, you will receive a report telling you that you have reinforcements that have arrived. To bring these reinforcements on the map, click on the Arrived Units toolbar button at the top of the main window. The Arrived Dialog will be displayed showing you what units have arrived and where they will enter the map. Double-click on each entry in the list to place the units on the map. Once you have placed both of these reinforcements on the map, the dialog will automatically be closed. The reinforcements you have received are two Huey gunships, equipped with light machine guns and rockets. Select each of these helicopters and then move them towards the enemy positions to the left. Notice that a second way of moving units which may be easier in this case is to click and hold on the unit’s location on the map with the left mouse button and then drag the mouse to the new location and release the mouse button. This drag-and-drop method of moving units will cause the program to determine a path of minimum movement cost and automatically move the units towards that new location. As you move the helicopters, their movement allowance will decrease. In a corresponding way, the fire ability of your weapons will be reduced indicating you have less time in the turn to fire the weapons because of your movement. In this example, the weapons on the gunship that originally started with a fire ability of 3 are now down to a fire ability of 1. If this fire ability goes to 0, then you won’t be able to fire the weapons in this turn. To fire your weapons, they must be selected and you must be in Fire Mode. To toggle to Fire Mode from the default Move Mode, either click on the mode button on the toolbar, or alternatively, hold down the Control (Ctrl) key on your keyboard. In either case, you should see your mouse cursor change from the normal cross Mode. , indicating Move Mode, to an aiming circle , indicating Fire Right click on the enemy location while in Fire Mode to fire on the enemy position using the selected weapons. After that, advance the turn. At the beginning of the third turn, you will get additional reinforcements and you should bring those on the map. You will see that these are your infantry, that you can use to occupy objectives. After bringing these reinforcements on the map, move them to the left. Bring one of your helicopters to one of the objectives on the map, shown as a red square with the number 20. This indicates that the objective is owned by the Communists and that its value to you is 20 if you capture it. To capture an objective, you must be in its location on the ground. Notice that by flying over the objective, you do not capture it. You must land to do this. Landing requires that you still have 1/3 of your original movement allowance remaining and in this case, you do not have enough movement points to land in this turn. Move your remaining helicopters into position and then advance the turn. At the beginning of the fourth turn, you will be able to land your helicopters containing your ground forces. To land the helicopter, first select it and then click on the Toggle Ground button on the toolbar. Once you have landed the helicopter, the words On Ground will appear on the unit picture. At this point, your ground forces can leave the helicopter. With your ground forces selected, click on the Unload/Drop button on the toolbar. This will cause your ground forces to be displayed to the left of the helicopter in the Unit List indicating they are outside of the helicopter. Notice that by landing you have occupied the objective and you get 20 points for doing so. With your ground forces deployed on the ground, you can move them towards the enemy position. Moving and firing with your ground forces is the same as before: select them and right click to move or select them and right click in Fire Mode to fire. Also notice that your ground forces can be toggled between On Ground state and normal state. You should deploy your ground forces On Ground to reduce their casualties from enemy fire, but doing so will reduce their ability to move. Units that are On Ground are displayed on the map with a white bar at the bottom of their counter. For ground forces, being On Ground is good if you are firing and being fired upon, but being in normal state is better for movement. At this point, you know the basics for conducting an air cavalry assault. You should use your scout helicopter to determine enemy locations. Use your attack helicopters to fire on those locations. Finally use your ground forces to move and occupy objectives. There are 3 objectives in this scenario, but you may not be able to occupy all three. Be careful to avoid excessive casualties, especially with your helicopters, as this will hurt your victory outcome. To view the current victory situation, use the Victory option from the Info Menu. This will display the Victory Dialog showing you the current scoring based on the objectives you have taken and the relative casualties you have suffered. At any point, you can save your battle and at a later time, reload it using the Old option of the File Selection Dialog. Otherwise, you can continue your attack on the NVA forces in the village through the full 9 turns of this scenario. To get more information, see the following help files: User Manual Main Program Help File Scenario Editor Help File Order of Battle Editor Help File