1
B R A N D
Model HPX150 Series
Automatic Battery Charger
User’s Manual
Rev. 1.0
October 17, 2006
For Sales, Support and Service
phone: 407-331-4793
fax: 407-331-4708
website: www.xenotronix.com
email: information@xenotronix.com
Xenotronix/TLI, Inc.
2541 Tracy Road
Toledo, Ohio 43619
Phone: 419-666-6982
Fax: 419-666-6534
Warranty
Seller warrants that its products ("Product(s)") will meet the specifications set forth in its catalog
from time to time, unless the Buyer is notified otherwise prior to delivery. Seller will, without
charge, repair or provide a replacement for any of the Products which prove to be defective in
materials or workmanship within one (1) year from the date of shipment ("Warranty Period").
If, within the Warranty Period, Buyer discovers a defect in materials or workmanship which
interferes with the operation of any Product, Buyer must promptly notify Seller, in writing, of such
defect. Seller's sole obligation to Buyer under this Warranty is to repair and correct any defect in
material or workmanship, or provide a replacement Product to Buyer. Seller's decision with
respect to the applicability of this Warranty to any defect shall be final and conclusive. Seller
reserves the right to require Buyer, at Buyer's sole cost and expense, to return any defective
Product, including any alterations made thereto, F.O.B. Seller's factory in Ohio.
Seller does not warrant against abrasion, corrosion or erosion. Seller shall not be liable to Buyer or
to any other person for work done or repairs made, to remedy any defect, by any person who is not
an authorized representative of Seller, unless Seller's written consent is first obtained by Buyer.
This Warranty does not apply to, and is rendered null and void by, any Product which, after
leaving Seller's manufacturing plant: (a) is repaired or altered without Seller's prior written
approval; (b) is the subject of improper storage, installation or operation; (c) is the subject of
intentional or negligent misuse, misapplication, neglect or accident; or (d) is not used, repaired or
altered in accordance with Seller's written instructions.
Seller expressly reserves the right to declare this Warranty null and void upon Buyer's failure to
make full and timely payments with respect to any Products purchased by Buyer from Seller, in
which event all of Seller's obligations, and Buyer's rights, under this Warranty, shall immediately
terminate. SELLER DISCLAIMS THE IMPLIED WARRANTY OF MERCHANTABILITY
AND FITNESS FOR A PARTICULAR PURPOSE, AND ANY IMPLIED WARRANTIES
ARISING FROM COURSE OF PERFORMANCE, COURSE OF DEALING, OR USAGE OF
TRADE. SELLER SHALL NOT BE LIABLE TO BUYER OR ANY OTHER PARTY UNDER
THIS WARRANTY FOR DIRECT, SPECIAL, CONSEQUENTIAL, INDIRECT OR
INCIDENTAL DAMAGES OF ANY KIND.
Notice to the User
The information contained in this manual is believed to be correct. However,
Xenotronix/TLI, Inc. assumes no responsibility for any inaccuracies therein.
Information in this manual is subject to change without notice. No part of this manual may
be reproduced or transmitted in any form, electronic or mechanical, for any purpose, without
the express written permission of Xenotronix/TLI, Inc.
Copyright © 2006 Xenotronix/TLI, Inc. All rights reserved.
TABLE OF CONTENTS
Model HPX150 Automatic Battery Charger – User’s Manual
Important Safety Instructions . . . . . . . . . . . . . . . . . . . . . . . . . . . . . . . . . . . . 1
Introduction . . . . . . . . . . . . . . . . . . . . . . . . . . . . . . . . . . . . . . . . . . . . . . . . . . 2
Operating Instructions . . . . . . . . . . . . . . . . . . . . . . . . . . . . . . . . . . . . . . . . . 2-3
Charging Notes and Tips . . . . . . . . . . . . . . . . . . . . . . . . . . . . . . . . . . . . . . . 3-4
Troubleshooting . . . . . . . . . . . . . . . . . . . . . . . . . . . . . . . . . . . . . . . . . . . . . . 4
Maintenance Instructions . . . . . . . . . . . . . . . . . . . . . . . . . . . . . . . . . . . . . . . 5
Battery Charger Specifications . . . . . . . . . . . . . . . . . . . . . . . . . . . . . . . . . . . 5
Battery Recommendations . . . . . . . . . . . . . . . . . . . . . . . . . . . . . . . . . . . . . . 6
Dimensions . . . . . . . . . . . . . . . . . . . . . . . . . . . . . . . . . . . . . . . . . . . . . . . . . . 6
Parallel Battery Charger – Supplemental Instructions
Important Precautions . . . . . . . . . . . . . . . . . . . . . . . . . . . . . . . . . . . . . . . . . . 7
Introduction . . . . . . . . . . . . . . . . . . . . . . . . . . . . . . . . . . . . . . . . . . . . . . . . . 7
Operating Instructions . . . . . . . . . . . . . . . . . . . . . . . . . . . . . . . . . . . . . . . . . 7-8
Battery Charger Specifications . . . . . . . . . . . . . . . . . . . . . . . . . . . . . . . . . . . 8
HPX150 User’s Manual
IMPORTANT SAFETY INSTRUCTIONS
SAVE THESE INSTRUCTIONS - This manual contains important safety and operating
instructions for Model HPX150 Battery Chargers. Before using the battery charger,
please read all instructions and cautionary markings on the battery charger, the battery,
and the product using the battery.
CAUTION - To reduce the risk of electric shock:
o Do not expose unit to rain or moisture - use indoors only.
o Do not remove cover. There are no user serviceable parts inside. Refer service to
qualified service personnel.
o Connect the battery charger directly to a grounding receptacle. An adaptor should
not be used with this unit. This unit is equipped with a power cord having an
equipment grounding conductor and a grounding plug (3-prong). The plug must
be plugged into an outlet that has been properly installed and grounded in
accordance with all local and national codes and ordinances.
o Disconnect charger from AC power and battery before attempting any
maintenance or cleaning. Turning off controls may not reduce this risk.
WARNING
o Do not attempt to recharge non-rechargeable batteries. Charge only sealed or
valve regulated, lead-acid, non-automotive, maintenance free rechargeable
batteries. Attempting to charge other types of batteries may result in personal
injury and battery damage.
o The enclosure will become hot during the charge cycle - DO NOT TOUCH!
o Connect or disconnect the output connectors only when the unit is disconnected
from AC power or arcing and burning may result (due to the possible presence of
explosive gases).
DANGER - Never alter power cord or plug provided. If it will not fit the outlet, replace
the power cord with one having the correct plug or have a proper outlet installed by an
electrician. Improper connection will result in the risk of an electric shock or fire.
Make sure cords are located so that they will not be stepped on, tripped over, or otherwise
subjected to damage or stress. Do not operate this unit with a damaged cord or plug replace them immediately. To reduce the risk of damage to electric plug, pull by plug
rather than cord when disconnecting unit.
Do not operate charger if it has received a sharp blow, been dropped, or otherwise
damaged in any way. Do not disassemble charger; incorrect reassembly will result in the
risk of an electric shock or fire. Refer service to qualified service personnel.
Recharge batteries in well ventilated areas to prevent build-up of explosive gases.
Allow space around the unit and adequate air circulation to reduce internal heat buildup.
Do not block vents or operate in a small, enclosed space.
Xenotronix/TLI
1
HPX150 User’s Manual
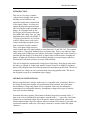
INTRODUCTION
This unit is a two stage, constant
voltage battery charger with current
limiting, current fold back, and
automatic temperature compensation
of the output voltage. It is protected
against shorting the output terminals
and reversing the output terminals on a
battery. It is equipped with an IEC60320 type power input module with
fuse holder and a spare fuse. A 6' long
detachable power cord with NEMA 515P plug is provided for use in North
America. Other power cords can be
ordered with plugs designed to mate
with receptacles in other countries.
There is an input voltage selection
switch located above the input module to select between 115 and 230 VAC. The standard
output cable is 3' long with insulated boots and spring clips. There is one indicator light
on the front panel. It lights green to indicate when power is applied and, when a battery is
attached, that the charger is in float mode. It lights yellow when the unit is charging the
battery. It lights red to indicate a fault condition (shorted or reversed output connector).
The unit has a full metal enclosure to ensure field reliability.
This unit is designed to automatically switch into a single stage, float charge mode when
the battery is charged. A single stage, parallel charger version is available for keeping a
battery fully charged when used with a permanent or intermittent parallel load. The use of
an optional low voltage cut out is recommended when using parallel loads. This unit is
not designed to operate as a standalone power supply.
OPERATING INSTRUCTIONS
Before using this battery charger, make sure it is compatible with your battery. Refer to
the ratings on the battery charger, the specifications in this manual, and your battery
documentation. Charge only sealed of valve regulated, lead-acid, non-automotive,
maintenance free rechargeable batteries. Attempting to charge other types of batteries
may result in battery damage.
Determine the battery polarity. Most batteries identify the positive terminal with a “+”
sign or the color red and identify the negative terminal with a “−” sign or the color black.
Connect the red insulated output clip to the positive battery terminal and connect the
black insulated output clip to the negative battery terminal. If the charger is provided with
a polarized connector, make sure your battery connector is wired to match the output
connector.
Xenotronix/TLI
2
HPX150 User’s Manual
The input voltage setting is displayed on the selection switch on the back of the unit. If
this setting must be changed, make sure the power cord is disconnected while operating
the switch. Operating the switch while power is applied may cause damage to the switch
or charger. Plug the power cord into a properly grounded outlet which supplies the
correct input voltage.
The charger should now be on and charging the battery and the indicator light should
now be yellow. The yellow charge light will stay on until the battery is about 95%
recharged. At this point the indicator will turn green and the charger will begin the float
charge. The battery should be left connected to the charger for at least an additional three
hours to ensure a 100% recharge. To help your battery keep its full capacity, we
recommend the battery be left connected to the charger in float charge mode until ready
to use. This will prevent chronic undercharging, a leading cause of premature battery
failure. The float charge is low enough to prevent overcharging, but high enough to allow
the battery to replace its standing losses and maintain a 100% state of charge. The battery
may be left connected to the charger indefinitely, in float charge mode, without danger of
overcharging.
CHARGING NOTES AND TIPS
For safer and more efficient charging, batteries should be charged with higher voltages
when cold and lower voltages when warm. This unit incorporates automatic temperature
compensation of the output voltage. It will increase the charge voltage in cold conditions
and decrease charge voltage in warm conditions. For this feature to work properly, the
battery and charger should be located in the same environment (allow the battery and
charger to stabilize at room temperature before charging). Initially, the charger voltage
may read a little high until its internal temperature warms during operation, thereby
lowering the voltage.
Make sure that you only charge the proper voltage battery. Trying to charge a lower
voltage battery will cause severe overcharging and trying to charge a higher voltage
battery may damage the charger.
These battery chargers are designed to charge a battery at the C/10 rate (battery capacity
divided by 10 hours). Therefore, a 100 amphours battery would require a 10 amps charge.
Larger or smaller capacity batteries can be charged with these chargers with the
following precautions (refer to these charger specifications & your battery documentation
for proper switch and charge currents to determine compatibility with this charger):
o When charging a larger capacity battery, it is possible the current will never
reduce sufficiently for the charger to enter float mode. Should this occur the
battery may become damaged due to over charging. In such a case, the capacity
is too great and the battery should be charged with a higher current charger or a
parallel charger.
Xenotronix/TLI
3
HPX150 User’s Manual
o When charging a smaller capacity battery, the battery may be undercharged
because the charger switches into float charge mode too early (relative to
capacity). Leave the battery connected to the charger for 16-24 hours to finish
charging in the float charge mode, or have a unit made with a custom switch
current to match the battery capacity.
Xenotronix/TLI can make custom units, or modify our existing units, to exactly match
your charging needs. Call our sales department for technical information and pricing.
Following are some of the modifications we can perform:
o Reduce charge current to match your battery capacity
o Change switch point to match battery and charge rate
o Adjust float and charge voltages for special conditions or batteries
o Make charger into a float charger (single stage)
o Make charger into a parallel charger (for use with loads in parallel with a battery)
o Provide custom cables and connectors
o Private labeling
TROUBLESHOOTING
NO INDICATOR LIGHT - If the indicator light is dark, check to see if the receptacle is
controlled by a light switch or power strip switch. If all else appears normal then the
charger probably needs repair or replacement.
NO CHARGE INDICATOR, NOT CHARGING - If the charger will not go into charge
mode (yellow indicator) then the battery is probably already charged. Try again with
another battery which you know is not charged.
FAULT INDICATOR - If the indicator light is red then either the outputs are hooked up
in reverse or shorted together – make sure of the connection to the battery. Note: A nearly
completely dead battery (less than one volt) looks like a short to the charger. If you
suspect the battery is dead, leave the charger on the battery to see if it will go into charge
mode. The charger will deliver a small amount of current into a dead battery and may
eventually go into normal charge mode and recover the battery.
CHARGER WILL NOT SWITCH INTO FLOAT MODE - If the charger will not switch
into the float mode, even after 24 hours, then the battery is probably damaged and is not
properly accepting the charge. Remove the charger and check the open circuit voltage of
the battery - there should be about 2.15 V/cell for a properly charged battery (divide the
battery voltage by two to get the number of cells). If the battery voltage looks correct
then you may be trying to charge a battery which has too large a capacity for the charger
(see charging notes and tips).
Xenotronix/TLI
4
HPX150 User’s Manual
MAINTENANCE INSTRUCTIONS
FUSE REPLACEMENT - The AC input module contains the main fuse and a spare fuse.
Detach the power cord. Use a flat head screwdriver or a coin to pry open the fuse drawer
or holder. Replace the blown fuse with the spare. You can use the old fuse to push out the
spare fuse. Now is a good time to install a new spare fuse. Replace fuses only with the
same type (as indicated in this manual) and value (as indicated on the charger).
CLEANING - Unplug the charger and disconnect the battery before attempting any
cleaning. If it becomes necessary to clean the enclosure, wipe the enclosure exterior with
a damp cloth. If necessary, use a mild detergent. Do not use an abrasive cleanser or spray
cleaners directly onto the charger. Do not immerse unit in water.
BATTERY CHARGER SPECIFICATIONS
General Conditions
25 °C (77 °F)
Operating temperature
Storage temperature
Dimensions
Weight
Input Fuse Type
Power Requirements
0 to 40 °C (32 to 104 °F)
-40 to 80 °C (-40 to 176 °F)
W 8.5" (21.6 cm) x D 5.3" (16.4 cm) x H 3.4" (11.2 cm)
11.5 lbs. (5.2 kg)
5 x 20 mm fast acting, glass cartridge, UL/CSA approved
115/230 VAC, 50-60 Hz, 3 A
Output Ratings (standard calibration):
Model
HPX150-12C1000
Charge Amps
10 A
Charge Voltage
14.40 VDC
Switch Amps
approx. 1.33 A
Float Voltage
13.60 VDC
HPX150-24C0500
5A
28.8 VDC
approx. 667 mA
27.20 VDC
Other Models (standard calibration):
Charge Amps
see marking label
Charge Voltage
2.40 V/Cell
Switch Amps
approx. Charge Amps/7.5
Float Voltage
2.267 V/Cell
Xenotronix/TLI
5
HPX150 User’s Manual
BATTERY RECOMMENDATIONS
Lead-acid batteries charged @ C/10 rate. Smaller capacity batteries may require a smaller
charge current to be safely charged. Consult the battery manufacturer or Xenotronix/TLI.
Model
HPX150-12C1000
HPX150-24C0500
Battery
12 V, 100 AH
24 V, 50 AH
AH = Ampere-hours.
Lead Acid Batteries are nominally rated at
2V per cell (12V = 6 cells and 24V = 12 cells).
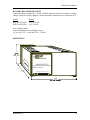
DIMENSIONS
Model HPX-150
Automatic Sealed Lead-Acid
Battery Charger
innovations in battery charging
Xenotronix/TLI
6
HPX150 User’s Manual
Model HPX150 Series
Automatic Parallel Battery Charger
Supplemental Instructions
IMPORTANT PRECAUTIONS
Follow the battery manufacturer’s recommendations when selecting a battery for use with
this unit. The battery should be able to accept the full rated output current of this unit or
the battery may be damaged if the load is disconnected with the battery in a discharged
condition.
When using a load which is greater that the maximum continuous load specification, the
battery may not charge and may begin to discharge. The use of a low voltage disconnect
(LVD) is recommended.
Temperature compensation is disabled for parallel charger models. If using the charger in
an ambient temperature above 35 °C (95 °F) or below 15 °C (59 °F), contact our sales
department about receiving a custom model calibrated to match your battery and ambient
temperature requirements exactly.
INTRODUCTION
This unit is a Parallel Charger version of the model HPX150 Battery Charger. It is
designed to simultaneously float charge a battery while supporting or supplementing a
parallel load. It may also be used to maintain larger capacity batteries than it would
normally be able to charge.
OPERATING INSTRUCTIONS
Refer to the instructions in the main manual for connecting the battery. Connect the load
in parallel with the battery and charger (note the correct polarity if required by the load).
There is one indicator on the front panel. It will light yellow when the unit is operating in
the constant current mode at about 75% or more of its maximum rated current. In the
constant current mode the unit is not regulating voltage and the battery may not maintain
its charge. This unit should not operate continuously in the constant current mode. This
unit should only go into the constant current mode intermittently as the parallel load
requires, or when charging a discharged battery. The indicator light will switch from
yellow to green when the unit is operating in the constant voltage mode at about 75%, or
Xenotronix/TLI
7
HPX150 User’s Manual
less, of its maximum rated current. In the constant voltage mode the unit is regulating
voltage and the battery is being properly charged. When the indicator first changes from
yellow to green the battery should be more than 80% charged, depending on battery size.
It may take an additional 16-24 hours to finish charging the battery to 100%. To insure a
full charge and to help your battery keep its full capacity, we recommend the charger be
left connected to the battery at all times. There is little danger of overcharging the battery
if the above precautions are followed.
If AC power is lost, then the battery must fully support the load. To prevent battery
damage from over-discharging, we recommend the use of a low voltage disconnect
(LVD). The LVD will cut off the load from the battery when the battery is discharged
and, after AC power has been restored, the LVD will automatically reconnect the load
after the battery has received a partial charge.
This charger can support a continuous load up one half of its rated output current. For
example: If the unit is rated for 1 A it will support a continuous load of 0.5 A. This will
leave enough power to keep the battery properly charged and to recharge a discharged
battery in the event of a power failure.
If the load is not continuous, it can be greater than the maximum continuous load
specification. However, when operating with a higher current load the battery may not
keep its charge and may begin to discharge. The load must be shut off intermittently to
insure the battery is kept charged and to allow the charger to cool down.
If the load is greater than the maximum rated output current of the charger, the battery
will become discharged. Allow for adequate recharge time.
BATTERY CHARGER SPECIFICATIONS
Output Ratings (standard calibration):
Model
HPX150-012P1000
Charge Amps
10 A
Maximum Continuous Load 5 A
Voltage
13.60 VDC
HPX150-24P0500
5A
2.5 A
27.20 VDC
Other Models (standard calibration):
Charge Amps
see marking label
Maximum Continuous Load ½ of Charge Amps
Voltage
2.267 V/Cell
Xenotronix/TLI
8