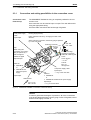
Download User Manual 06/2005 Edition - Service, Support


Transcript
User Manual 06/2005 Edition simodrive POSMO A Distributed Positioning Motor on PROFIBUS DP Brief Description 1 Installing and Connecting–Up 2 Commissioning 3 SIMODRIVE POSMO A Communications via PROFIBUS DP 4 Distributed Positioning Motor on PROFIBUS DP Description of the Functions 5 Fault Handling Diagnostics 6 Installation and Service 7 List of Abbreviations A References B Dimension Drawings C EC Declaration of Conformity D Index E User Manual Valid for Unit SIMODRIVE POSMO A – 75 W motor – 300 W motor 06.05 Edition Software version Version O (3.0) Version G (3.0) 3ls SIMODRIVE documentation Printing history Brief details of this edition and previous editions are listed below. The status of each edition is shown by the code in the ”Remarks” column. Status code in the ”Remarks” column: A.... New documentation B.... Unrevised reprint with new Order No. C.... Revised edition with new status If factual changes have been made on the page since the last edition, this is indicated by a new edition coding in the header on that page. Edition Order No. Remarks 02.99 6SN2197–0AA00–0BP0 A 02.00 6SN2197–0AA00–0BP1 C 04.01 6SN2197–0AA00–0BP2 C 08.01 6SN2197–0AA00–0BP3 C 08.02 6SN2197–0AA00–0BP4 C 05.03 6SN2197–0AA00–0BP5 C 08.03 6SN2197–0AA00–0BP6 C 08.04 6SN2197–0AA00–0BP7 C 06.05 6SN2197–0AA00–0BP8 C Trademarks SIMATIC, SIMATIC HMI, SIMATIC NET, SIROTEC, SINUMERIK, SIMODRIVE and SIMODRIVE POSMO are Siemens trademarks. Other product names used in this documentation may be trademarks which, if used by third parties, could infringe the rights of their owners. Additional information can be found at: http://www.ad.siemens.com/mc Other functions not described in this documentation might be executable in the control. However, no claim can be made regarding the availability of these functions when the equipment is first supplied or in the event of servicing. This publication was produced with Interleaf V 7 We have checked that the contents of this document correspond to the hardware and software described. Nevertheless, differences might exist and therefore we cannot guarantee that they are completely identical. The information in this document is regularly checked and necessary corrections are included in reprints. Suggestions for improvement are also welcome. Siemens AG 2005 All rights reserved. Order No. 6SN2197–0AA00–0BP8 Printed in the Federal Republic of Germany Subject to change without prior notice. Siemens Aktiengesellschaft Foreword Instructions when reading Structure of the documentation The SIMODRIVE documentation is subdivided into the following levels: S General Documentation/Catalogs S User Documentation S Manufacturer/Service Documentation You can obtain more detailed information on the documents listed in the documentation overview as well as additional SIMODRIVE documentation from your local Siemens office. This manual does not purport to cover all details or variations in equipment, nor to provide for every possible contingency to be met in connection with installation, operation or maintenance. The contents of this document are not part of an earlier or existing contract or agreement nor do they change this. The sales contract contains the entire obligation of Siemens. The warranty conditions specified in the contract between the parties is the sole warranty of Siemens. Any statements contained herein neither create new warranties nor modify the existing warranty. Target group This documentation addresses machine manufacturers and service personnel who use the SIMODRIVE POSMO A positioning motor. Technical Support If you have any questions, please contact the following Hotline: A&D Technical Support Tel.: +49 (0) 180 5050 – 222 Fax: +49 (0) 180 5050 – 223 email: mailto: adsupport@siemens.com Internet: www.siemens.com/automation/support-request If you have any questions regarding the documentation (suggestions, corrections), please send a fax or email: Fax form Internet address Fax: +49 (0) 9131/98 – 63315 email: mailto: motioncontrol.docu@siemens.com Refer to the correction sheet at the end of the documentation You can obtain continually updated information about our product in the Internet under: http://www.siemens.com/motioncontrol Current documentation An overview of the complete documentation and the languages in which it is available, updated on a monthly basis, is available in the Internet under the following address: http://www.siemens.com/motioncontrol Follow the menu items –> “Support” –> “Technical Documentation” –> “Documentation – Overview”. The Internet edition of DOConCD, DOConWEB, is available under: http://www.automation.siemens.com/doconweb Certificates You will find the certificates for the products described in this documentation under: http://intra1.erlf.siemens.de/qm/home/index.html E Siemens AG 2005 All Rights Reserved SIMODRIVE POSMO A User Manual (POS1) – 06.05 Edition v Foreword 06.05 Goal This user manual provides detailed information required for operating the positioning motor SIMODRIVE POSMO A. Should you wish for additional information or should exceptional problems arise that are not addressed in sufficient detail in this manual, you can request the required information from your local Siemens office. Information about using this manual The following should be observed when using this manual: 1. Help: The following help is available for the reader: Complete table of contents Header line (as orientation): the main chapter is in the upper header line the sub–chapter is in the lower header line Appendix with – Abbreviations and List of References – Index If you require information on a specific term, look in the Appendix under ”Index” for this term. The Chapter number as well as the page number is specified where information on this term can be found. 2. Identifying ”new” or ”revised” information The documentation 02.99 edition is the first edition. How is the ”new” or ”revised” information identified for the other editions? This is specified directly next to the information ”from SW x.y”. The edition is in the header line on the respective page > 02.99. 3. Notation means ”corresponds to” Numerical representation (examples) – FFFF hex Hexadecimal number – 0101bin Binary number – 100dec Decimal number PROFIBUS signals (examples) – STW.3 Control word bit 3 – ZSW.11 Status word bit 11 Parameter (examples) vi – P10 Parameter 10 without index – P82:28 Parameter 82 with index 0, 1, ... 27 (28 indices) – P82:13 Parameter 82 with index 13 – P82:x Parameter with undefined index x – P56.2 Parameter 56 bit 2 Siemens AG 2005 All Rights Reserved SIMODRIVE POSMO A User Manual (POS1) – 06.05 Edition 06.05 Foreword Edition of the documentation? There is a fixed relationship between the edition of the documentation and positioning motor software release. Software release? The first edition 02.99 describes the functionality of SW 1.0. What is new? The 02.00 edition describes the functionality of SW 1.0 to 1.2. What are the essential new functions for SW 1.2 in comparison to SW 1.0? – Run up mode can be set when the unit is powered up again (P56) – Stand–alone mode (without bus communication, P100, P101) – Suppress block [skip block] – Program stop via traversing block – Set actual position via traversing block The 04.01 edition describes the functionality of SW 1.0 to 1.5. What are the essential new functions for SW 1.3 in comparison to SW 1.2? – Rotary axis: Signal position with modulo evaluation – Direction of rotation of the motor shaft can be reversed (P3) – Holding controller (P56.2, P57) – Status bit ZSW.15: Modified behavior – Behavior when shutting down supplemented – FB 12 ”PARAMETERIZE_ALL_POSMO_A” (from 05.00) Reading and writing the parameter set of a drive What are the essential new functions for SW 1.4 in comparison to SW 1.3? – Worm gear SG 75 – Resetting the ”reference point set” status via P98 – Checkback signal, status of the input/output terminals 1 and 2 – Brake sequence control – Additional diagnostics via P954 – Jogging without PROFIBUS and parameterization – Backlash compensation with correction direction – Flying measurement/actual value setting What are the essential new functions for SW 1.5 in comparison to SW 1.4? – First software for 300 W motors – Shared software for 75 W and 300 W motors – Different union nuts for the connection cover for 75 W and 300 W motors. – ”SimoCom A” parameterizing and start–up tool – PROFIBUS: Initiating a POWER ON–RESET via P97 Siemens AG 2005 All Rights Reserved SIMODRIVE POSMO A User Manual (POS1) – 06.05 Edition vii Foreword 06.05 The 08.01 edition describes the functionality of SW 1.0 to 1.5. – This edition contains troubleshooting information and updates which have been obtained since the 04.01 edition. The 08.02 edition describes the functionality of SW 1.0 to 1.6. – This edition contains troubleshooting information and updates which have been obtained since the 08.01 edition. The 05.03 edition describes the functionality of SW 1.0 to 2.0. – This edition contains troubleshooting information and updates which have been obtained since the 08.02 edition. What are the essential new functions for SW 2.0 in comparison to SW 1.6? – Speed setpoint interface – Choice of positioning or speed setpoint operating mode (P700) – Hardware limit switches The 08.03 edition describes the functionality of SW 1.0 to 2.0. – This edition contains troubleshooting information and updates which have been obtained since the 05.03 edition. – The same connection union for connection covers for 75 W and 300 W motors. The 08.04 edition describes the functionality of SW 1.0 to 2.1. What are the essential new functions for SW 2.1 in comparison to SW 2.0? – Reference to occurring zero mark – Defined delay before next traversing block – New order numbers (MLFB) for replacement parts – New order numbers (MLFB) for UL certification of the 75W and 300W motor The 06.05 edition describes the functionality of SW 1.0 to 3.0. What are the essential new functions for SW 3.0 in comparison to SW 2.1? – POSMO A – 300 W with extended temperature range – Separate version, POSMO A – 300 W (being prepared) – Telegram substitution function UL certification viii SIMODRIVE POSMO A – 75W and – 300W have received UL certification. The UL file number is ”E192450”. Siemens AG 2005 All Rights Reserved SIMODRIVE POSMO A User Manual (POS1) – 06.05 Edition 06.05 Foreword Motor version, software version, motor type, SimoCom A Table 1-1 The following relationships exist between the version of the positioning motor, the software version of the drive software, the motor type and SimoCom A: Version, software release, motor type, SimoCom A Motor version (stamped on the motor) 75 W motor 300 W motor A – B Software release Using SimoCom A 75 W motor 300 W motor can be replaced Version 1.0 yes no no – – 1.1 yes no no – C – 1.1 yes no no – D – 1.2 yes no no – E – 1.2 yes no no – F – 1.3 yes no no – G, H A 1.4 yes yes no – J, K B, C 1.5 yes yes yes 1.0, 2.0, 3.0 L D 1.6 yes yes yes 3.0 M E 2.0 yes yes yes 4.0 N F 2.1 yes yes yes 4.2 O G 3.0 yes yes yes 4.3 Information about the positioning motor can be read from the following parameters: P0052 HW version P0053 SW version P0964 (from SW 1.4) Device identification (refer to Section 5.6.2) Definition: Who are qualified personnel? The associated equipment/system may only be set–up and operated in conjunction with the documentation. Only qualified personnel may commission and operate such equipment/system. Qualified personnel in the sense of safety–relevant information of this documentation are persons who are authorized to commission, ground and tag the equipment, systems and circuits according to the standards of safety technology. Siemens AG 2005 All Rights Reserved SIMODRIVE POSMO A User Manual (POS1) – 06.05 Edition ix Foreword 06.05 Safety information ! ! ! This manual includes information and instructions that you must carefully observe for your own personal safety and to avoid material damage. Information and instructions relating to your own personal safety highlighted using warning triangles. Information and instructions regarding general material damage do not have a warning triangle. Depending on the level of danger, the warning information and instructions are shown in the sequence of decreasing importance. Danger This symbol is always used if death, severe personal injury or substantial material damage will result if proper precautions are not taken. Warning This symbol is always used if death, severe personal injury or substantial material damage can result if proper precautions are not taken. Caution This symbol is always used if minor personal injury or material damage can result if proper precautions are not taken. Caution This warning (without warning triangle) indicates that material damage can result if proper precautions are not taken. Notice This warning indicates that an undesirable situation or condition can occur if the appropriate instructions/information are not observed. x Siemens AG 2005 All Rights Reserved SIMODRIVE POSMO A User Manual (POS1) – 06.05 Edition 06.05 Foreword Correct use ! Please carefully observe the following: Warning The equipment may only be used for those applications described in the Catalog and technical description. Further, equipment may only be used in conjunction with third–party equipment/devices and components that are recommended or certified by Siemens. The perfect, safe operation of the product assumes that it has been correctly transported, correctly stored, mounted and installed. Further, it assumes that it is professionally handled and serviced. Additional information Note This symbol indicates important information about the product or part of the document, where the reader should take special note. Reader’s note This symbol is shown, if it relates to important information which the reader must observe. Technical information ! Warning Operational electrical equipment has parts and components which are at hazardous voltage levels. Incorrect handling of these units, i.e. not observing the warning information, can therefore lead to death, severe bodily injury or significant material damage. Only appropriately qualified personnel may commission/start up this equipment. This personnel must have in–depth knowledge regarding all of the warning information and service measures according to this manual. Perfect, safe and reliable operation of the equipment assumes that it has been professionally transported, stored, mounted and installed as well as careful operator control and service. Hazardous axis motion can occur when working with the equipment. Siemens AG 2005 All Rights Reserved SIMODRIVE POSMO A User Manual (POS1) – 06.05 Edition xi Foreword 06.05 Note When handling cables, observe the following: They may not be damaged, they may not be stressed, they may not come into contact with rotating components. ! Warning When testing the voltage of the electrical equipment of the machines on the system side, all of the SIMODRIVE drive unit connections must be withdrawn or disconnected (EN 60204–1 (VDE 0113–1), Pt. 20.4). This is necessary, as the SIMODRIVE insulation has already been tested, and should not be subject to a new test (additional voltage stressing). ! ! Warning Commissioning is absolutely prohibited until it has been ensured that the machine in which the components described here are to be installed, fulfills the regulations/specifications of the Directive 98/37/EC. Warning The information and instructions in all of the documentation supplied and any other instructions must always be observed to eliminate hazardous situations and damage. The information in the catalogs and offers also applies to the design of special machine and device variants. Further, all of the relevant national, local land plant/system–specific regulations and specifications must be taken into account. All work must be undertaken with the system in a no–voltage condition! Caution When using mobile radio equipment (e.g. cellular phones, walkie–talkies) with a transmitting power of > 1 W close to SIMODRIVE POSMO A (< 1.5 m), this can have a negative impact on the functioning of the SIMODRIVE POSMO A. xii Siemens AG 2005 All Rights Reserved SIMODRIVE POSMO A User Manual (POS1) – 06.05 Edition 06.05 ESDS information and instructions Foreword ElectroStatic Discharge Sensitive Devices Note Components, which can be destroyed by electrostatic discharge are individual components, integrated circuits, or boards, which when handled, tested, or transported, could be destroyed by electrostatic fields or electrostatic discharge. These components are referred to as ESDS (ElectroStatic Discharge Sensitive Devices). Handling ESDS boards: When handling devices which can be destroyed by electrostatic discharge, personnel, workstations and packaging must be well grounded! Electronic boards should only be touched when absolutely necessary. Personnel may only come into contact with the components, if – they are continuously grounded through ESDS wristlets, – they wear ESDS shoes, ESDS shoe grounding strips in conjunction with an ESDS floor surface. Boards may only be placed on conductive surfaces (table with ESDS surface, conductive ESDS foam rubber, ESDS packing bag, ESDS transport containers). Boards may not be brought close to data terminals, monitors or television sets (minimum clearance to the screen > 10 cm). Boards may not be brought into contact with highly insulating materials which can be statically charged, e.g. plastic foils, insulating desktops, clothing manufactured from man–made fibers. Measuring work may only be carried out on the boards, if – the measuring unit is grounded (e.g. via protective conductor), or – for floating measuring equipment, the probe is briefly discharged before making measurements (e.g. a bare–metal control housing is touched). Only touch control boards, option modules and memory modules at the front panel or at the edge of the PC boards. Siemens AG 2005 All Rights Reserved SIMODRIVE POSMO A User Manual (POS1) – 06.05 Edition xiii Foreword 06.05 Space for your notes xiv Siemens AG 2005 All Rights Reserved SIMODRIVE POSMO A User Manual (POS1) – 06.05 Edition Table of Contents 1 2 3 Brief Description . . . . . . . . . . . . . . . . . . . . . . . . . . . . . . . . . . . . . . . . . . . . . . . . . . . . . . 1-19 1.1 General information about SIMODRIVE POSMO A . . . . . . . . . . . . . . . . . 1-19 1.2 Function overview and differences between 75 W/300 W . . . . . . . . . . . . 1-22 1.3 Safety guidelines . . . . . . . . . . . . . . . . . . . . . . . . . . . . . . . . . . . . . . . . . . . . . . . 1-25 Installing and Connecting–Up . . . . . . . . . . . . . . . . . . . . . . . . . . . . . . . . . . . . . . . . . . 2-29 2.1 System overview of SIMODRIVE POSMO A . . . . . . . . . . . . . . . . . . . . . . . 2-29 2.2 2.2.1 2.2.2 2.2.3 Electrical system requirements . . . . . . . . . . . . . . . . . . . . . . . . . . . . . . . . . . . General electrical requirements . . . . . . . . . . . . . . . . . . . . . . . . . . . . . . . . . . . DC power supply (24 V, 48 V) . . . . . . . . . . . . . . . . . . . . . . . . . . . . . . . . . . . . . Regenerative feedback protection when the motor brakes . . . . . . . . . . . . 2-30 2-30 2-31 2-37 2.3 2.3.1 2.3.2 Connection and wiring overview . . . . . . . . . . . . . . . . . . . . . . . . . . . . . . . . . . Connection and setting possibilities in the connection cover . . . . . . . . . . . Protective grounding and potential bonding . . . . . . . . . . . . . . . . . . . . . . . . . 2-43 2-44 2-50 2.4 2.4.1 2.4.2 2.4.3 2.4.4 Mounting SIMODRIVE POSMO A . . . . . . . . . . . . . . . . . . . . . . . . . . . . . . . . Mounting overview . . . . . . . . . . . . . . . . . . . . . . . . . . . . . . . . . . . . . . . . . . . . . . Preparing the cable . . . . . . . . . . . . . . . . . . . . . . . . . . . . . . . . . . . . . . . . . . . . . . Mounting the prepared cables in the connection cover . . . . . . . . . . . . . . . . Extension set ”separate version” POSMO A – 300 W . . . . . . . . . . . . . . . . 2-51 2-51 2-52 2-55 2-58 2.5 2.5.1 2.5.2 Gearbox selection . . . . . . . . . . . . . . . . . . . . . . . . . . . . . . . . . . . . . . . . . . . . . . Gearboxes for SIMODRIVE POSMO A – 75 W . . . . . . . . . . . . . . . . . . . . . . Gearboxes for SIMODRIVE POSMO A – 300 W . . . . . . . . . . . . . . . . . . . . . 2-60 2-60 2-61 2.6 2.6.1 2.6.2 Technical data . . . . . . . . . . . . . . . . . . . . . . . . . . . . . . . . . . . . . . . . . . . . . . . . . Technical data for SIMODRIVE POSMO A – 75 W . . . . . . . . . . . . . . . . . . . Technical data for SIMODRIVE POSMO A – 300 W . . . . . . . . . . . . . . . . . . 2-62 2-62 2-66 Commissioning . . . . . . . . . . . . . . . . . . . . . . . . . . . . . . . . . . . . . . . . . . . . . . . . . . . . . . . 3-73 3.1 General information on commissioning . . . . . . . . . . . . . . . . . . . . . . . . . . . . 3-73 3.2 3.2.1 3.2.2 3.2.3 3.2.4 Commissioning the DP master . . . . . . . . . . . . . . . . . . . . . . . . . . . . . . . . . . . Commissioning and communications for the master . . . . . . . . . . . . . . . . . . SIMATIC S7 function blocks . . . . . . . . . . . . . . . . . . . . . . . . . . . . . . . . . . . . . . Parameterizing and start–up tool ”SimoCom A” (from SW 1.5) . . . . . . . . . Parameterizing and start–up tool C1 master ”SIMODRIVE POSMO A PROFIBUS MASTER” . . . . . . . . . . . . . . . . . . . . . . . . . . . . . . . . . . . . . . . . . . . 3-75 3-75 3-78 3-79 Commissioning an axis . . . . . . . . . . . . . . . . . . . . . . . . . . . . . . . . . . . . . . . . . . Control structure positioning (pos mode) . . . . . . . . . . . . . . . . . . . . . . . . . . . . Control structure, speed setpoint (n–set mode) . . . . . . . . . . . . . . . . . . . . . . Flow diagram to commission a SIMODRIVE POSMO A . . . . . . . . . . . . . . Optimization runs . . . . . . . . . . . . . . . . . . . . . . . . . . . . . . . . . . . . . . . . . . . . . . . 3-90 3-93 3-94 3-95 3-97 3.3 3.3.1 3.3.2 3.3.3 3.3.4 Siemens AG 2005 All Rights Reserved SIMODRIVE POSMO A User Manual (POS1) – 06.05 Edition 3-88 xv Table of Contents 4 5 xvi Communications via PROFIBUS DP . . . . . . . . . . . . . . . . . . . . . . . . . . . . . . . . . . . . . 4-99 4.1 General information about PROFIBUS DP . . . . . . . . . . . . . . . . . . . . . . . . . 4-99 4.2 4.2.1 4.2.2 4.2.3 4.2.4 4.2.5 Process data (PZD area) . . . . . . . . . . . . . . . . . . . . . . . . . . . . . . . . . . . . . . . . Description of the control signals (data to drive) . . . . . . . . . . . . . . . . . . . . . Description of the status signals (data from the drive) . . . . . . . . . . . . . . . . Example: Operating the drive via the control signals with jogging 1 . . . . . Example: The drive should traverse with n–set using the control signals Sequence diagram ”Variable–speed drives” . . . . . . . . . . . . . . . . . . . . . . . . . 4-103 4-104 4-110 4-116 4-117 4-118 4.3 4.3.1 4.3.2 4.3.3 Parameter area (PKW area) . . . . . . . . . . . . . . . . . . . . . . . . . . . . . . . . . . . . . Structure and description of the parameter area . . . . . . . . . . . . . . . . . . . . . Example: Reading parameters via PROFIBUS . . . . . . . . . . . . . . . . . . . . . . Example: Writing parameters via PROFIBUS . . . . . . . . . . . . . . . . . . . . . . . 4-121 4-121 4-126 4-128 4.4 4.4.1 4.4.2 4.4.3 Settings at the PROFIBUS DP master . . . . . . . . . . . . . . . . . . . . . . . . . . . . General information on the DP master . . . . . . . . . . . . . . . . . . . . . . . . . . . . . Installing the new master device files (GSD) . . . . . . . . . . . . . . . . . . . . . . . . Operating the slave with a third–party master . . . . . . . . . . . . . . . . . . . . . . . 4-130 4-130 4-132 4-132 Description of the Functions . . . . . . . . . . . . . . . . . . . . . . . . . . . . . . . . . . . . . . . . . . . 5-133 5.1 Operating mode (from SW 2.0) . . . . . . . . . . . . . . . . . . . . . . . . . . . . . . . . . . . 5-133 5.2 5.2.1 5.2.2 5.2.3 5.2.4 5.2.5 5.2.6 5.2.7 ”Speed setpoint” mode (P700 = 1) (from SW 2.0) . . . . . . . . . . . . . . . . . . . General information on the ”speed setpoint” mode . . . . . . . . . . . . . . . . . . . Ramp–function generator . . . . . . . . . . . . . . . . . . . . . . . . . . . . . . . . . . . . . . . . . Direction of rotation reversal . . . . . . . . . . . . . . . . . . . . . . . . . . . . . . . . . . . . . . Displays the position actual value . . . . . . . . . . . . . . . . . . . . . . . . . . . . . . . . . . Adaptation of the speed controller . . . . . . . . . . . . . . . . . . . . . . . . . . . . . . . . . Parameters for n–set operation . . . . . . . . . . . . . . . . . . . . . . . . . . . . . . . . . . . . Terminal signals . . . . . . . . . . . . . . . . . . . . . . . . . . . . . . . . . . . . . . . . . . . . . . . . . 5-135 5-135 5-136 5-138 5-138 5-138 5-139 5-139 5.3 5.3.1 5.3.2 5.3.3 5.3.4 Programming the traversing blocks (only in the pos mode, P700 = 2) . . Overview of the traversing blocks and programs . . . . . . . . . . . . . . . . . . . . . Structure and description of the traversing blocks . . . . . . . . . . . . . . . . . . . . Selecting and controlling traversing blocks and programs . . . . . . . . . . . . . Behavior of speed–controlled traversing blocks . . . . . . . . . . . . . . . . . . . . . . 5-140 5-140 5-143 5-151 5-152 5.4 5.4.1 5.4.2 5.4.3 5.4.4 Operating modes (only the pos mode) . . . . . . . . . . . . . . . . . . . . . . . . . . . . . Jogging . . . . . . . . . . . . . . . . . . . . . . . . . . . . . . . . . . . . . . . . . . . . . . . . . . . . . . . . Manual Data Input (MDI) . . . . . . . . . . . . . . . . . . . . . . . . . . . . . . . . . . . . . . . . . Automatic . . . . . . . . . . . . . . . . . . . . . . . . . . . . . . . . . . . . . . . . . . . . . . . . . . . . . . Tracking mode . . . . . . . . . . . . . . . . . . . . . . . . . . . . . . . . . . . . . . . . . . . . . . . . . . 5-153 5-153 5-154 5-154 5-154 5.5 5.5.1 5.5.2 5.5.3 5.5.4 5.5.5 5.5.6 5.5.7 5.5.8 5.5.9 5.5.10 5.5.11 SIMODRIVE POSMO A functions . . . . . . . . . . . . . . . . . . . . . . . . . . . . . . . . Referencing . . . . . . . . . . . . . . . . . . . . . . . . . . . . . . . . . . . . . . . . . . . . . . . . . . . . Flying measurement/actual value setting (from SW 1.4) . . . . . . . . . . . . . . Travel to fixed stop . . . . . . . . . . . . . . . . . . . . . . . . . . . . . . . . . . . . . . . . . . . . . . Rotary axis . . . . . . . . . . . . . . . . . . . . . . . . . . . . . . . . . . . . . . . . . . . . . . . . . . . . . Backlash compensation and correction direction (from SW 1.4) . . . . . . . . Jerk limiting . . . . . . . . . . . . . . . . . . . . . . . . . . . . . . . . . . . . . . . . . . . . . . . . . . . . Changeover, metric/inch . . . . . . . . . . . . . . . . . . . . . . . . . . . . . . . . . . . . . . . . . . Reversing the control sense (from SW 1.3) . . . . . . . . . . . . . . . . . . . . . . . . . Standstill monitoring (zero–speed monitoring) . . . . . . . . . . . . . . . . . . . . . . . Digital I/O . . . . . . . . . . . . . . . . . . . . . . . . . . . . . . . . . . . . . . . . . . . . . . . . . . . . . . Jogging without PROFIBUS and parameterization (from SW 1.4) . . . . . . 5-155 5-155 5-166 5-173 5-175 5-177 5-179 5-180 5-180 5-181 5-182 5-184 Siemens AG 2005 All Rights Reserved SIMODRIVE POSMO A User Manual (POS1) – 06.05 Edition Table of Contents 6 7 5.5.12 5.5.13 5.5.14 5.5.15 Standalone mode (without bus communication) (from SW 1.2) . . . . . . . . . Holding brake (from SW 1.4) . . . . . . . . . . . . . . . . . . . . . . . . . . . . . . . . . . . . . . Limit switch monitoring functions . . . . . . . . . . . . . . . . . . . . . . . . . . . . . . . . . . Telegram substitution (from SW 3.0) . . . . . . . . . . . . . . . . . . . . . . . . . . . . . . . 5-185 5-187 5-194 5-197 5.6 5.6.1 5.6.2 5.6.3 Parameters for SIMODRIVE POSMO A . . . . . . . . . . . . . . . . . . . . . . . . . . . General information on parameters . . . . . . . . . . . . . . . . . . . . . . . . . . . . . . . . List of parameters . . . . . . . . . . . . . . . . . . . . . . . . . . . . . . . . . . . . . . . . . . . . . . . Gearbox–dependent parameters, factory default settings . . . . . . . . . . . . . 5-199 5-199 5-201 5-230 Fault Handling and Diagnostics . . . . . . . . . . . . . . . . . . . . . . . . . . . . . . . . . . . . . . . . 6-233 6.1 LED fault display . . . . . . . . . . . . . . . . . . . . . . . . . . . . . . . . . . . . . . . . . . . . . . . 6-233 6.2 6.2.1 6.2.2 Faults and alarms . . . . . . . . . . . . . . . . . . . . . . . . . . . . . . . . . . . . . . . . . . . . . . 6-234 General information on faults and warnings . . . . . . . . . . . . . . . . . . . . . . . . . 6-234 List of faults and warnings . . . . . . . . . . . . . . . . . . . . . . . . . . . . . . . . . . . . . . . . 6-238 6.3 Analog test outputs . . . . . . . . . . . . . . . . . . . . . . . . . . . . . . . . . . . . . . . . . . . . . 6-250 6.4 Bus monitor AMPROLYZER for PROFIBUS DP . . . . . . . . . . . . . . . . . . . . 6-252 Installation and Service . . . . . . . . . . . . . . . . . . . . . . . . . . . . . . . . . . . . . . . . . . . . . . . . 7-253 7.1 Replacing the motor . . . . . . . . . . . . . . . . . . . . . . . . . . . . . . . . . . . . . . . . . . . . 7-253 7.2 Mounting or replacing a gearbox (only relevant for 300 W motors) . . . . 7-255 7.3 7.3.1 7.3.2 Spare parts for SIMODRIVE POSMO A . . . . . . . . . . . . . . . . . . . . . . . . . . . 7-257 List of spare parts for the 300 W motors . . . . . . . . . . . . . . . . . . . . . . . . . . . . 7-257 Drive unit as spare part (only the 300 W motor) . . . . . . . . . . . . . . . . . . . . . . 7-258 A List of Abbreviations . . . . . . . . . . . . . . . . . . . . . . . . . . . . . . . . . . . . . . . . . . . . . . . . . . A-261 B References .......................................................... B-265 C Dimension Drawings . . . . . . . . . . . . . . . . . . . . . . . . . . . . . . . . . . . . . . . . . . . . . . . . . . . C-269 C.1 Dimension drawings for SIMODRIVE POSMO A – 75W . . . . . . . . . . . . . C-269 C.2 Dimension drawings for SIMODRIVE POSMO A – 300W . . . . . . . . . . . . C-273 D EC Declaration of Conformity . . . . . . . . . . . . . . . . . . . . . . . . . . . . . . . . . . . . . . . . . . D-281 E Index . . . . . . . . . . . . . . . . . . . . . . . . . . . . . . . . . . . . . . . . . . . . . . . . . . . . . . . . . . . . . . . . . E-285 Siemens AG 2005 All Rights Reserved SIMODRIVE POSMO A User Manual (POS1) – 06.05 Edition xvii Table of Contents Space for your notes xviii Siemens AG 2005 All Rights Reserved SIMODRIVE POSMO A User Manual (POS1) – 06.05 Edition 1 1 Brief Description 1.1 General information about SIMODRIVE POSMO A Intelligent positioning motor SIMODRIVE POSMO A is an intelligent distributed positioning motor connected as node to the PROFIBUS DP field bus. SIMODRIVE POSMO A can be operated via PROFIBUS DP. This means that all of the signals and data required to commission (start– up) and operate the drive and also to evaluate faults are transferred via PROFIBUS. Further, the positioning motor can be operated in the standalone mode. This means that in this case, bus communications are not required in order to move the positioning motor. SIMODRIVE POSMO A – 75 W SIMODRIVE POSMO A – 300 W not to scale Fig. 1-1 SIMODRIVE POSMO A positioning motor with connection cover and gearbox Reader’s note The following catalog is available for SIMODRIVE POSMO A: References: /KT654/ Siemens AG 2005 All Rights Reserved SIMODRIVE POSMO A User Manual (POS1) – 06.05 Edition Catalog DA 65.4 1-19 1 Brief Description 06.05 04.01 1.1 General information about SIMODRIVE POSMO A 1 Main features The main features are: Power module and complete motion control in the motor Coupled using a communication and power bus PROFIBUS DP Standard slave Positioning functionality which is easy to handle Modular gearbox system with different ratios Applications SIMODRIVE POSMO A can be used in almost all industry sectors, such as: For production machines in packaging, woodworking, glass, printing, plastics For machine tools and transfer lines In medical diagnostics – for example to move examination tables and X–ray equipment Typical applications Here are two typical applications from many: Adjusting formats or endstops Setting process quantities (e.g. via valves) Design The positioning motor is a 1–axis actuating drive with low envelope dimensions and compact power connection, drive converter power section, closed–loop motor control, positioning control (open–loop), communication and bus connection on the motor. A 24 V supply voltage for the 75 W motor and 48 V for the 300 W motor supply the drive power. Reference: Gearbox selection /KT101/ SITOP power, power supplies Catalog The motor can be equipped and operated without a gearbox or with a gearbox from a modular gearbox system. 75 W motor: Modular gearbox system, refer to Chapter 2.5.1 300 W motor: Modular gearbox system, refer to Chapter 2.5.2 Cables Standard cables are used for all connections. Extension set ”separate version” POSMO A – 300 W (being prepared) If mounting space is restricted, it is possible to separate the drive unit from the motor. Using the extension set ”separate version” for SIMODRIVE POSMO A – 300 W the drive unit can be mounted separately from the motor. The power and signal cables required (draggable) are supplied pre–fabricated as the extension set ”separate version” (refer to Table 1-1). 1-20 Siemens AG 2005 All Rights Reserved SIMODRIVE POSMO A User Manual (POS1) – 06.05 Edition 04.01 1 Brief Description 1.1 General information about SIMODRIVE POSMO A Traversing possibilities (examples) The positioning motor can be traversed as follows: Traverse to an end position with a velocity and acceleration which can be overridden. Traverse through a distance in a direction with velocity and acceleration which can be overridden. Traverse with a speed and acceleration which can be overridden, direction is defined by the sign, as long as a time of logic condition is fulfilled. Traverse as soon as an additional time or logic condition is fulfilled. Traverse as long as a time or logic condition is fulfilled. Traversing blocks and programs There are a total of 27 traversing blocks, which can be used as individual blocks or as program. The traversing blocks are subdivided as follows: Trav. block Use 1 and 2 Reserved for jogging 3 – 12 Individual traversing blocks 13 – 17 Program 1 (standard, can be freely parameterized) 18 – 22 Program 2 (standard, can be freely parameterized) 23 – 27 Program 3 (standard, can be freely parameterized) This setting is used as standard. Blocks 3 to 27 can be freely used as single blocks or programs. Communications The PROFIBUS DP field bus allows fast, cyclic data transfer between the individual DP slaves and the higher–level DP master. DP masters include, for example: Central controller of SIMATIC S7 Master–capable communication processes (e.g. CP 5613) Communications modules (e.g. CP 342–5) Standard masters from other manufacturers Reference: Diagnostics /IKPI/ Industrial Communications and Field Devices, Catalog Local diagnostics using LEDs for Fault/Ready. The DP master can read–out and evaluate positioning motor faults and warnings via PROFIBUS. Two freely parameterizable analog test outputs for measurements when service is required. Siemens AG 2005 All Rights Reserved SIMODRIVE POSMO A User Manual (POS1) – 06.05 Edition 1-21 1 1 Brief Description 06.05 04.01 1.2 Function overview and differences between 75 W/300 W 1 1.2 Function overview and differences between 75 W/300 W An overview of the features and functions of SIMODRIVE POSMO A is provided in the following diagram. Function overview Intelligent positioning motor as distributed node connected to PROFIBUS The motor can be operated in the following modes: Closed–loop speed controlled operation Positioning Brake sequence control (from SW 1.4) Connection cover with integrated PROFIBUS address switch and terminating resistor Non–volatile memory (FLASHEPROM) for user data (parameters) Straightforward commissioning by adapting a few parameters 2 terminals for an input or output SIMODRIVE POSMO A Functions Software limit switch Hardware limit switch (from SW 2.0) 27 traversing blocks (2 for jogging) Backlash compensation Set actual value Rotary axis with modulo correction Jerk limiting Standstill monitoring (zero–speed monitoring) Travel to fixed stop Flying block change Standalone mode (from SW 1.2) Holding controller (from SW 1.3) Control sense can be reversed (from SW 1.3) Jogging without PROFIBUS and parameterization (from SW 1.4) Flying measurement/actual value setting (from SW 1.4) Speed setpoint interface (from SW 2.0) Telegram substitution (from SW 3.0) can be parameterized as either input or output Various functions can be C1 master ”SIMODRIVE POSMO A PROFIBUS MASTER” for PC/PG or notebook SimoCom A Parameterizing and commissioning tool (from SW 1.5) parameterized 2 test outputs (0 – 5 V) Communications via PROFIBUS–DP Load power supply 75 W motor: 300 W motor: PZD area 24 V DC 48 V DC LED for diagnostics Different colors and flashing frequencies Function blocks FB 10 FB 11 FB 12 Fig. 1-2 1-22 Load/electronics power supply Via a common cable Via a separate cable (control words/status words) PKW area (read/write parameters) Modular gearbox system 75 W motor: Planetary/worm gear CONTROL_POSMO_A (from 02.00) PARAMETERIZE_POSMO_A (from 02.00) PARAMETERIZE_ALL_POSMO_A (from 05.00) 300 W motor: Planetary gear (can be interchanged) Overview of SIMODRIVE POSMO A functions Siemens AG 2005 All Rights Reserved SIMODRIVE POSMO A User Manual (POS1) – 06.05 Edition 06.05 04.01 1 Brief Description 1.2 Function overview and differences between 75 W/300 W Differentiating features of the various motor types Table 1-1 There are the following basic differences between POSMO A with 75 W and POSMO A with 300 W: Difference: POSMO A with 75 W and 300 W SIMODRIVE POSMO A Name 75 W 300 W Order No. (MLFB) 6SN2 132–11–1BA1 6SN2 155–xy–1BA1 x = 1 ––> motor/drive unit, IP64 gearbox, IP54 x = 2 ––> Degree of protection IP65 y = 1 ––> with motor holding brake y = 0 ––> without motor holding brake Extension set ”separate version” Not possible Outlet direction, side A: Length1 m: 6FX8002–6AA00–1AB0 3 m: 6FX8002–6AA00–1AD0 5 m: 6FX8002–6AA00–1AF0 Outlet direction, side B: Length1 m: 6FX8002–6AA10–1AB0 3 m: 6FX8002–6AA10–1AD0 5 m: 6FX8002–6AA10–1AF0 Software all available versions possible from version A (SW 1.5) Supply voltages 24 V DC 20 % 48 V DC 20 % Rated output 62.5 W (S1) 75 W (S3, 25 %, 1 min) 176 W (S1) 300 W (S3, 25 %, 4 min) Rated speed 3300 RPM (S1) 2000 RPM (S3, 25 %, 1 min) 3500 RPM (S1) 3000 RPM (S3, 25 %, 4 min) Rated torque 0.18 Nm (S1) 0.36 Nm (S3, 25 %, 1 min) 0.48 Nm (S1) 0.95 Nm (S3, 25 %, 4 min) Meas. system integrated 816 increments/motor revolution integrated 4096 increments/motor revolution Ambient temperature 0...45 °C –20...45 °C Gear without gearbox Planetary gearbox 1–stage Planetary gearbox 2–stage Planetary gearbox 3–stage Worm gear without gearbox Planetary gearbox 1–stage Planetary gearbox 2–stage Planetary gearbox, 3–stage (from SW 2.0) Note: The gearbox can be interchanged Connection cover The connection cover for POSMO A 75 W does not fit on the POSMO A 300 W and vice versa, i.e. they cannot be interchanged. Siemens AG 2005 All Rights Reserved SIMODRIVE POSMO A User Manual (POS1) – 06.05 Edition 1-23 1 1 Brief Description 04.01 1.2 Function overview and differences between 75 W/300 W 1 Table 1-1 Difference: POSMO A with 75 W and 300 W, continued SIMODRIVE POSMO A Name 75 W 300 W Dimensions (without gearbox) (approximate data) H H L W L = 202, W = 71, H = 163 [mm] L W L = 254, W = 80, H = 172 [mm] Motor without gearbox: 3.1 kg Motor with 1–stage gearbox: 3.5 kg Motor with 2–stage gearbox: 3.7 kg Motor with 3–stage gearbox: 3.9 kg Motor with worm gear: 3.5 kg Motor without gearbox: 3.9 kg Motor with 1–stage gearbox: 5.1 kg Motor with 2–stage gearbox: 5.4 kg Motor with 3–stage gearbox: 8.2 kg Shaft end (motor) Without keyway Without keyway or with keyway Technical data ––> Refer to Chapter 2.6.1 ––> Refer to Chapter 2.6.2 Weights (approximate data) 1-24 Siemens AG 2005 All Rights Reserved SIMODRIVE POSMO A User Manual (POS1) – 06.05 Edition 08.04 04.01 1 Brief Description 1.3 Safety guidelines 1.3 Safety guidelines 1 Reader’s note In addition to the technical information/instructions specified in the foreword to this documentation, the following danger and warning information/instructions should be carefully observed when using SIMODRIVE POSMO A! ! ! Danger 1. In order to avoid danger and damage, the data and instructions in all of the documentation associated with this product should be carefully observed. Please refer to the Catalogs or contact your local SIEMENS office for the ordering data. 2. All of the work must be carried out by qualified, appropriately trained personnel. 3. Before starting any work on SIMODRIVE POSMO A, the motor must be disconnected in–line with the regulations according to the 5 safety rules. In addition to the main circuits, it is important to observe if there are any supplementary or auxiliary circuits. According to DIN VDE 0105 the ”5 safety rules” are as follows: Disconnect from the power source, lock–out against reclosure, ensure that the equipment really is in a no–voltage condition, ground and short–circuit and cover or partition–off adjacent parts that are under voltage (live). The previously mentioned measures may only be reversed/restored after all of the work has been completed and the motor has been completely installed. 4. All rating plates, warning labels and information labels on the SIMODRIVE POSMO A must be carefully observed! 5. Commissioning is prohibited until it has been clearly identified that the machine, in which this component is to be installed, fulfills the conditions of Directive 98/37/EC. 6. Caution when coming into contact! When SIMODRIVE POSMO A is operational, surface temperatures of over 100 C can occur! Danger of fire! 7. It is prohibited to use POSMO A in hazardous zones and areas. 8. The load power supply (48 V/24 V) and electronics power supply (24 V) are not galvanically isolated. Warning 9. Never disable protective functions and devices even for trial operation. 10.For shaft ends with key, the key must be secured when operated under trial conditions without drive–out element. 11. Check the direction of rotation with the motor uncoupled. Siemens AG 2005 All Rights Reserved SIMODRIVE POSMO A User Manual (POS1) – 06.05 Edition 1-25 1 Brief Description 08.01 04.01 1.3 Safety guidelines 1 ! Caution 12.Suitable equipment must be used when mounting withdrawing drive–out elements (e.g. coupling disk, belt pulley, gear, ...). 13.The motor may not be used as a step. 14.The valid national, local and plant/system–specific regulations and requirements must be carefully observed. Caution 15.It is not permissible to connect the unit to the three–phase line supply as this could destroy the unit. 16.When mounting SIMODRIVE POSMO A with the shaft end facing upwards, it must be guaranteed that no liquid can penetrate into the upper bearing. 17.Ensure that the unit is correctly mounted at its flange and is precisely aligned. If increased noise/vibration/temperatures occur, if in doubt, power down. 18.If large amounts of dirt accumulate, the air ducts should be regularly cleaned. 19.Axial forces are not permissible for SIMODRIVE POSMO A – 300 W with integrated holding brake. After the motor has been mounted, the brake should be checked to ensure that it functions perfectly. The brake is only designed for a limited number of emergency braking operations. It is not permissible to use the brake as operating brake. 20.Supporting SIMODRIVE POSMO A 300 W If the motor is subject to extreme vibration/shock loads, then it must be supported using the three M5 threaded holes and an appropriate bracket. 21.Degree of protection It is not permissible that foreign bodies, dirt or moisture accumulate at the connections. Cable entry glands that are not used must be sealed so that they are dust–tight and watertight! In order to guarantee the degree of protection, all of the connections must be sealed using plugs or with an appropriate PG gland. 22.When mounting and withdrawing drive–out elements at the output shaft, it is neither permissible to apply heavy knocks (e.g. using a hammer) to the shaft end nor exceed the maximum permissible axial or radial load at the shaft end. 23.The motors must be stored under the following ambient conditions: Dry, dust–free and low vibration levels (vrms 0.2 mm/s). 1-26 Siemens AG 2005 All Rights Reserved SIMODRIVE POSMO A User Manual (POS1) – 06.05 Edition 06.05 04.01 1 Brief Description 1.3 Safety guidelines Notice 24.When using SIMODRIVE POSMO A in UL–certified systems, a UL–certified varistor with the following properties is required in the power supply cable. at 24 V ––> VN = 38 V DC/Imax = 2000 A e.g. SIOV–S20–K30 from EPCOS at 48 V ––> VN = 65 V DC/Imax = 6500 A e.g. SIOV–S20–K50 from EPCOS This circuit is not required when using the DC–PMM (refer to Chapter 2.2.3). 25.If changes occur with respect to the normal operating condition, e.g. increased temperatures, noise or oscillation, if in doubt, power down the motor. The cause should then be determined and if necessary a SIEMENS Service Center should be contacted. 26.Machines and systems equipped with SIMODRIVE POSMO A must be in full compliance with the protective requirements of the EMC Directive. The plant/machine manufacturer is responsible in ensuring this. Note 27.It is not permitted to open up the drive units! We recommend that a SIEMENS Service Center carries–out any repair or service work. 28.The connection covers for POSMO A – 75 W and POSMO A – 300 W cannot be interchanged. This means that the connection cover for the 75 W motor does not fit on the 300 W motor and vice versa. 29.After the product has served its lifetime, the individual parts should be disposed of in compliance with local regulations. 30.Possible special versions (including connection systems) and types of construction can differ regarding the technical details! If there is any uncertainty, we urgently recommend that you contact the manufacturer (specifying the type designation and serial number) or have the equipment repaired by a SIEMENS Service Center. 31.Immediately contact the transport company if damage is identified after the equipment has been shipped. In case of damage, the drive units should not be commissioned. 32.When connecting–up, it should be ensured that the connecting cables are protected against torsional stressing, strain and pressure; it should also be ensured that cables cannot kink. 33.Cables listed in the Siemens Catalog NC Z should be used when connecting–up SIMODRIVE POSMO A. 34.Observe the rating plate data regarding type of construction and degree of protection to ensure that they coincide with the conditions at the point of installation! 35.The equipment must be mounted so that any thermal power loss is adequately dissipated. Siemens AG 2005 All Rights Reserved SIMODRIVE POSMO A User Manual (POS1) – 06.05 Edition 1-27 1 1 Brief Description 04.01 06.05 1.3 Safety guidelines 1 Space for your notes 1-28 Siemens AG 2005 All Rights Reserved SIMODRIVE POSMO A User Manual (POS1) – 06.05 Edition 2 Installing and Connecting–Up 2.1 System overview of SIMODRIVE POSMO A System overview and components SIMODRIVE POSMO A positioning motor comprises the following components: Gating/control electronics (PROFIBUS–DP master) (e.g. SIMATIC S7–300 DP) PC/PG (e.g. PG 740) PROFIBUS–DP Checkback signal (e.g. BERO) (optional) (Cables, refer to Chapter 2.3) Control signal (e.g. relay) optional Continues to the power supply of the next SIMODRIVE POSMO A Connection cover SITOP power SIMODRIVE POSMO A Regulated power supply module (external power supply) Gear Power bus (Cables, refer to Chapter 2.3) Continues to the next PROFIBUS node 24 V external supply for electronics (optional) Power Management Module (DC PMM) (optional) Motor Internal pulsed resistor for braking Electronics SITOP power and Regulated power supply module (external power supply) power electronics Note: If the electronics is separately supplied, then the power electronics can be powered–up/powered–down independently of the electronics power supply (no electrical isolation). Fig. 2-1 (removable) External supply for Power electronics (24 V or 48 V) and Electronics (24 V, if there is no dedicated supply) System overview of SIMODRIVE POSMO A Siemens AG 2005 All Rights Reserved SIMODRIVE POSMO A User Manual (POS1) – 06.05 Edition 2-29 2 2 Installing and Connecting–Up 06.05 02.99 2.2 Electrical system requirements 2.2 Electrical system requirements 2.2.1 General electrical requirements 2 General requirements The following general requirements must be observed: The PROFIBUS–DP is coupled in conformance with the Standard. A standard PROFIBUS cable can be used. In order to loop in the optional electronics power supply, the same bus cable can be used that is used in the distributed ET 200X I/O device. References: /ET200X/ Distributed ET 200X I/O All of the bus nodes should be certified for PROFIBUS use. Note When using connector couplings for PROFIBUS, at higher data transfer rates (> 1.5 Mbaud), perfect functioning is no longer guaranteed (cable reflection). An external power supply is required (24 V for a 75 W motor and 48 V for a 300 W motor, refer to Chapter 2.6.1 or 2.6.2 for technical data). The maximum conductor cross–section for the load power supply is 4 mm2. If the power supply being used can supply more current than is permissible for the cable, then the appropriate slow–acting fuses must be provided (e.g. Neozed fuse). A power management module (DC PMM) can optionally be connected between the external load power supply and the input terminals of the SIMODRIVE POSMO A. The DC PMM serves to eliminate the regenerative feedback energy and to limit the conducted noise. For higher levels of regenerative feedback energy, a Power Management Module Extension (DC–PMM_E/48 V) can be connected (refer to Chapter 2.2.3). If the bus communications and position sensing are to remain active even with the load power supply switched–out, then an optional electronics power supply (24 V 20 %) can be used. The cables are routed in the ET 200X bus cable (distributed peripheral system). A BERO can only be connected as type 3–wire PNP. The length of the I/O cables, their ground cables and their 24 V supply cables may be a maximum of 30 m (refer to Table 2-3). The grounding concept is specified corresponding to the data provided in Chapter 2.3. The signal and power cables should be routed with a minimum 20 cm clearance between them and as close as possible to grounded parts. 2-30 Siemens AG 2005 All Rights Reserved SIMODRIVE POSMO A User Manual (POS1) – 06.05 Edition 06.05 02.99 2 Installing and Connecting–Up 2.2 Electrical system requirements When using a contactor in the load power supply, before opening the contactor, it must be ensured that the pulses have been canceled via PROFIBUS (OFF 1). All of the power supplies must have ”protective separation”. When using SIMODRIVE POSMO A in UL–certified systems, a UL– certified varistor with the following properties is required in the power supply cable: 24 V ––> VN = 38 V DC, Imax = 2000 A e.g. SIOV–S20–K30 from EPCOS 48 V ––> VN = 65 V DC, Imax = 6500 A e.g. SIOV–S20–K50 from EPCOS This circuit is not required when using the DC–PMM (refer to Chapter 2.2.3). When using POSMO A – 300 W in the temperature range –20...0 C it should be ensured that all of the system components are certified for this temperature range. 2.2.2 DC power supply (24 V, 48 V) General information on the power supply The load power supply must be dimensioned as a function of the number of positioning motors SIMODRIVE POSMO A and the coincidence factor. Note If possible, the load power supply should be switched–in/switched–out on the primary side. If this is not possible for technical reasons, a power management module (DC PMM) must be connected between the switch element and the SIMODRIVE POSMO A, refer to Chapter 2.2.3. Switching–in and switching–out the 24 V/48 V load power supply on the primary side (line–specific) Line supply Contactor 400 V e.g. SITOP 24 V/48 V DC–PMM Optional, according to Chapter 2.2.3 ... SIMODRIVE POSMO A Fig. 2-2 Switching–in and switching–out the 24 V/48 V on the primary side Siemens AG 2005 All Rights Reserved SIMODRIVE POSMO A User Manual (POS1) – 06.05 Edition 2-31 2 2 Installing and Connecting–Up 08.03 02.99 2.2 Electrical system requirements Switching–in/switching–out the 24 V/48 V load power supply on the primary side (line–specific) 2 Line supply 400 V e.g. SITOP 24 V/48 V Contactor DC–PMM This is absolutely necessary in order to eliminate cable–borne disturbances ... SIMODRIVE POSMO A Fig. 2-3 Switching–in/switching–out the 24 V/48 V load power supply on the secondary side Switching–in/switching–out the 24 V/48 V load power supply on the primary side (line–specific) with a POSMO A which is to be separately switched Line supply Con– tactor 400 V e.g. SITOP 24 V/48 V DC–PMM Optional, according to Chapter 2.2.3 SIMODRIVE POSMO A Contactor DC–PMM This is absolutely necessary in order to eliminate cable–borne disturbances SIMODRIVE POSMO A e.g. for a protective gate Fig. 2-4 2-32 Switching–in/switching–out 24 V/48 V on the primary side with a POSMO A to be separately switched Siemens AG 2005 All Rights Reserved SIMODRIVE POSMO A User Manual (POS1) – 06.05 Edition 08.03 02.99 2 Installing and Connecting–Up 2.2 Electrical system requirements 24 V supply (75 W motor) Technical data for the 24 V supply: refer to Chapter 2.6.1 Recommendation for the 24 V power supply: Use a regulated SITOP power, power supply module to provide the 24 V power supply. There are units with current ratings of 10 A, 20 A and 40 A. Reference: /KT101/ SITOP power, power supplies Catalog Regenerative feedback protection when braking the motor refer to Chapter 2.2.3 48 V supply (300 W motor) Technical data for the 48 V supply: refer to Chapter 2.6.2 First recommendation for the 48 V power supply: Use a regulated SITOP modular 48V/20A power supply module to provide the 48V load power supply. The SITOP 48 V/20 A power supply is a chassis unit. Order No.: Table 2-1 6EP1 457–3BA00 Technical data, SITOP modular 48V/20A Description Name Input voltage 3–ph 230/400 V ... 288/500 V AC Frequency 50 ... 60 Hz (47 ... 63 Hz) Output voltage (setting range) 48 V DC 3 % Output current DC 0 ... 20 A Degree of protection IP20 acc. to IEC 529 Safety class I Dimensions (W x H x D) in mm 240 x 125 x 125 L+ SITOP modular M 48 V Regenerative feedback protection 48 V M (e.g. DC-PMM) Fig. 2-5 SITOP modular 48 V/20 A with regenerative feedback protection Reference: /SI1/ SITOP modular 48 V/20 A power supplies Operating Instructions Regenerative feedback protection when braking the motor refer to Chapter 2.2.3 Siemens AG 2005 All Rights Reserved SIMODRIVE POSMO A User Manual (POS1) – 06.05 Edition 2-33 2 2 Installing and Connecting–Up 06.05 02.99 2.2 Electrical system requirements Our second recommendation for the 48 V power supply: Use two SITOP power regulated power supply modules connected in series to provide the 48 V load power supply. There are units with current ratings of 10 A, 20 A and 40 A. 2 L+ SITOP power M L+ SITOP power M 24 V V1 Regenerative feedback protection (e.g. DC-PMM) 24 V 48 V M V2 Note: Vx Protective diode (blocking voltage: 40 V, current: 3 A) e.g.: Type SB 540 from RS Components Spoerle Order No.: 183–4337 When connected in series, the SITOP power must have the same current ratings. Fig. 2-6 Two SITOP power connected in series to double the voltage Reference: /KT101/ SITOP power, power supplies Catalog Regenerative feedback protection when braking the motor (refer to Chapter 2.2.3) Our third recommendation for the 48 V power supply: Use a rectifier unit to generate the 48 V load power supply. The rectifier unit is an uncontrolled DC power supply with safety transformer and varistor circuit. Order No.: 4AV3596–0EG30–0C Applicable regulations – EN 61558, EN 61131–2 – Conducted Immunity EN 50082–2, Interference Emission EN 50081–1 – Suitable for connection to public or industrial supply systems in accordance with EN 61000–3–2/–3–3 Installation conditions – Upright mounting position – Installation altitude up to 1000 m above sea level – M6 bolt mounting using a bracket – Rooms with outdoor climatic conditions according to DIN 50010 – Ambient temperature –25 C to +40 C – Storage temperature –25 C to +60 C Cable using/protection, refer to Chapter 2.2.1 2-34 Siemens AG 2005 All Rights Reserved SIMODRIVE POSMO A User Manual (POS1) – 06.05 Edition 02.99 2 Installing and Connecting–Up 2.2 Electrical system requirements Technical data Table 2-2 Technical data of the rectifier unit Description Name Input voltage 3–ph. 480 V/400 V AC (+6 %/–10 %) Frequency 50 ... 60 Hz Output voltage 48 V DC Output current 25 A DC Output rating 20 000 µF/100 V Residual ripple <5% Insulating material class T 40/B Degree of protection IP00 Safety class I Regenerative feedback protection when braking the motor refer to Chapter 2.2.3 Coincidence factor If several SIMODRIVE POSMO A are used but they are not all simultaneously operational, then a lower rating load power supply can be used. However a brief overload capability of the power supply must be guaranteed otherwise the electronics of the SIMODRIVE POSMO A would interpret voltage dips as an undervoltage condition and trip. Example 1: 3 SIMODRIVE POSMO A – 75 W – Coincidence factor = 1 – Rated output, full speed ––> 3 4.5 A 1 = 13.5 A Example 2: ––> SITOP power 20 A 3 SIMODRIVE POSMO A – 75 W – Coincidence factor = 0.7 (not all drives are simultaneously operational) – Rated output, full speed ––> 3 4.5 A 0.7 = 9.45 A Example 3: ––> SITOP power 10 A 3 SIMODRIVE POSMO A – 300 W – Coincidence factor = 1 – Rated output, full speed ––> 3 5.25 A 1 = 15,75 A Example 4: ––> SITOP power 20 A 3 SIMODRIVE POSMO A – 300 W – Coincidence factor = 0.5 (not all drives are simultaneously operational) – Rated output, full speed ––> 3 5.25 A 0.5 = 7.875 A Siemens AG 2005 All Rights Reserved SIMODRIVE POSMO A User Manual (POS1) – 06.05 Edition ––> SITOP power 10 A 2-35 2 2 Installing and Connecting–Up 02.99 2.2 Electrical system requirements Withdrawing/ inserting the connection cover under voltage 2 The connection cover can be withdrawn and inserted under voltage with the motor stationary (OFF 1). If the PROFIBUS terminating resistor is not switched in on this node, i.e. if this drive is not the first or last node, then communications to the other bus nodes is not interrupted. Notice When the connection is withdrawn, the actual position is not saved. This means that the drive must be re–referenced after the cover has been inserted. i2t limitation This limiting function protects the positioning motor against permanent overload. If the positioning motor is operated for an excessive time over the permissible load limit, then the available motor current is automatically limited according to a characteristic. I [A] not to scale 9 4.5 Warning 801/P953.1 (refer to Chapter 6.2.2) 0 t [s] 15 i2t characteristic with 75 W motor Fig. 2-7 I [A] not to scale 21 20 Warning 801/P953.1 (refer to Chapter 6.2.2) 15 10.5 10 5 Warning 801/P953.1 (refer to Chapter 6.2.2) 0 Fig. 2-8 2-36 15 60 t [s] i2t characteristic with 300 W motor Siemens AG 2005 All Rights Reserved SIMODRIVE POSMO A User Manual (POS1) – 06.05 Edition 08.04 08.02 02.99 2 Installing and Connecting–Up 2.2 Electrical system requirements 2.2.3 Regenerative feedback protection when the motor brakes General information on regenerative feedback protection If SIMODRIVE POSMO A is used in a system with low mechanical friction, then the electrical energy, regenerated when braking, can influence the load power supply. In cases such as these, regenerative feedback protection must be used. The regenerative feedback protection is dependent on the following: The coincidence factor on the line–up of POSMO A drives The number of positioning motors operated on one line The degree of efficiency of the mechanical system The friction The moments of inertia The regenerative feedback energy of a drive is calculated as follows (without taking into account losses): W = 1/2 J ω2 W: J: ω: Braking energy Braking energy [Ws = (kgm2/s2)] Moment of inertia [kgm2] Angular frequency = (2 π n) / 60 [1/s] with n [RPM] Under the specified conditions, the following typical braking energy per drive is obtained: Conditions – Braking from rated speed in S3 duty – Effective overall moment of inertia = motor moment of inertia Braking energy (in consideration of typically arising losses) – 1.0 Ws ––> SIMODRIVE POSMO A – 75 W – 2.5 Ws ––> SIMODRIVE POSMO A – 300 W The effective total moment of inertia and the braking energy have a linear interrelationship, i.e. for twice the moment of inertia, twice the braking energy is generated when the motor brakes. Rules when using regenerative feedback protection The following rules must be observed for regenerative feedback protection: Regenerative feedback protection must be used when using a clocked load power supply (e.g. SITOP power). If the regenerative feedback energy is unknown, then regenerative feedback protection should always be used. Siemens AG 2005 All Rights Reserved SIMODRIVE POSMO A User Manual (POS1) – 06.05 Edition 2-37 2 2 Installing and Connecting–Up 06.05 08.03 02.99 2.2 Electrical system requirements Power Management Module (DC–PMM) 2 If multiple axes are braked simultaneously in a system for operational reasons, e.g. in the event of an EMERGENCY STOP or quasi–simultaneous traversing, a power management module (DC PMM) must be used in order to convert the regenerative feedback energy. The DC PMM is connected between the load power supply and the first positioning motor SIMODRIVE POSMO A. Type Order No. (MLFB) DC–PMM/24V 9AL2137–1AA00–1AA0 DC–PMM/48V 9AL2137–1BA00–1AA0 Note: Operating instructions in German and English are provided with the power management module (DC PMM). Fig. 2-9 Power Management Module (DC–PMM) Functions, features and technical data: Converting the regenerative feedback energy using an integrated pulsed resistor with i2t monitoring Regenerative feedback protection Signals (e.g. ready, fault) Max. continuous motoring current capacity: Ambient temperature: Continuous power: 25 A 0...55 C 10 W (DC–PMM/24V) 15 W (DC–PMM/48V) Maximum energy drawn: 40 Ws Example for POSMO A – 300 W (for 75 W, the following applies PD = 10 W): For power ratings above 15 W, the drives, that are above 15 W, are integrated up according to the following formula and may not exceed 40 Ws. T T ∫ P dt – ∫ P dt E t D max = 40 Ws 0 0 – Transistor on: Vs 2 (58.5 V)2 Pt = = = 1711.125 W; PD = 15 W RPMM 2Ω Vs = switching threshold PMM 58.1...58.5 V; RPMM = 2 Ω Pt – PD = 1711.125 W – 15 W = 1696.125 W ⇒ increment = 1696.125 W t – Transistor off: Pt = 0; PD = 15 W Pt – PD = – 15 W ⇒ decrement = 15 W t 2-38 Siemens AG 2005 All Rights Reserved SIMODRIVE POSMO A User Manual (POS1) – 06.05 Edition 06.05 02.99 2 Installing and Connecting–Up 2.2 Electrical system requirements The maximum number of positioning motors that can be connected to a DC PMM depends on the current carrying capacity, the coincidence factor of the regenerative feedback and the regenerative feedback energy. If 1 Power Management Module is not sufficient to convert the braking energy, then an additional supply line with an additional DC–PMM (75 W/300 W) must be provided – or a Power Management Module Extension DC–PMM_E/48V (300 W) can be used. Power Management Module Extension (DC–PMM_E/48V) The DC–PMM_E/48 V is connected between the DC–PMM/48V and the first SIMODRIVE POSMO A. The DC–PMM_E/48V cannot be used as an autonomous (standalone) device. It only operates in a group with the DC–PMM/48V. Type Order No. (MLFB) DC–PMM_E/48V 9AL2137–2BA00–1AA0 Note: Operating instructions in German and English are provided with the Power Management Module (DC PMM). Fig. 2-10 Power Management Module Extension (DC–PMM_E/48V) Functions, features and technical data (group, comprising DC–PMM/48V and DC–PMM_E/48V): Additional regenerative feedback protection Max. continuous motoring current capacity: Ambient temperature: 25 A 0...55 C Continuous power: 45 W Maximum energy drawn: 120 Ws As a maximum, one DC–PMM_E/48V may be operated in conjunction with a DC–PMM/48V. Siemens AG 2005 All Rights Reserved SIMODRIVE POSMO A User Manual (POS1) – 06.05 Edition 2-39 2 2 Installing and Connecting–Up 06.05 02.99 2.2 Electrical system requirements 2 Regenerative feedback protection for 24 V supply (75 W motor) Depending on the type of power supply, the following possibilities are available to provide regenerative feedback protection when the motors brake: Non–regulated 24 V power supply (transformer, rectifier) The regenerative feedback protection depends on the following factors: Effective total moment of inertia Coincidence factor Power supply used (output rating) Regulated 24 V power supply (SITOP power) Regenerative feedback protection with diode and capacitor An example is shown in Fig. 2-11 where up to 3 drives can be operated under the following conditions: – Effective overall moment of inertia = motor moment of inertia – Coincidence factor = 1 – Braking from rated speed in S3 duty SITOP power L+ Diode (adapt the current load capacity to SITOP, if required, use a heatsink) 24 V M To the remaining system M SIMODRIVE POSMO A, 1 Elko 15000 µF/50 V SIMODRIVE POSMO A, 3 Fig. 2-11 Example: Regenerative feedback protection with diode and capacitor Regenerative feedback protection with Power Management Module 24 V DC (DC–PMM/24V) 1 DC–PMM/24V can accept a braking power of 10 W. Example: Braking 5 motors, that individually have a rated current of 5 A and a regenerative feedback energy of 3 Ws per braking operation, once simultaneously, then a DC–PMM/24V is sufficient for this single braking operation. However, in this case, it is not possible to continuously brake the motors per second or over a longer time period, as in this case, the maximum permissible continuous power of 10 W would be exceeded and the I2t monitoring would respond. The unit goes into a ”fault” condition and can only be restarted after a ”reset”. 2-40 Siemens AG 2005 All Rights Reserved SIMODRIVE POSMO A User Manual (POS1) – 06.05 Edition 06.05 02.99 2 Installing and Connecting–Up 2.2 Electrical system requirements – Total current through the PMM: 5 x 5 A = 25 A – Pulse load at the pulsed resistor: 5 x 3 Ws = 15 Ws – Continuous power through the pulsed resistor: 15 Ws/1s = 15 W In this application, a maximum of only 3 motors could be braked once per second or over a longer periods of time without the I2t monitoring responding and causing the unit to go into a ”fault” condition (3 x 3 Ws /1s = 9 W < 10 W). Regenerative feedback protection for 48 V supply (300 W motor) Depending on the type of power supply, the following possibilities are available to provide regenerative feedback protection when the motors brake: Non–regulated 48 V power supply (transformer, rectifier) The regenerative feedback protection depends on the following factors: Effective total moment of inertia Coincidence factor Power supply used (output rating) Regulated 48 V power supply (SITOP power) Regenerative feedback protection with diode and capacitor An example is shown in Fig. 2-12 where up to 3 drives can be operated under the following conditions: – Effective overall moment of inertia = motor moment of inertia – Coincidence factor = 1 – Braking from rated speed in S3 duty SITOP modular or 48 V L+ 2 SITOP power 24 V L+ Diode (adapt the current load capacity to SITOP, if required, use a heatsink) 48 V M M To the remaining system M SIMODRIVE POSMO A, 1 Elko 15000 µF/100 V SIMODRIVE POSMO A, 3 Fig. 2-12 Example: Regenerative feedback protection with diode and capacitor Siemens AG 2005 All Rights Reserved SIMODRIVE POSMO A User Manual (POS1) – 06.05 Edition 2-41 2 2 Installing and Connecting–Up 06.05 02.99 2.2 Electrical system requirements Regenerative feedback protection with Power Management Module 48 V DC (DC–PMM/48V) 1 DC–PMM/48V can accept a braking power of 15 W. Example: 2 Braking 5 motors, that individually have a rated current of 5 A and a regenerative feedback energy of 3.5 Ws per braking operation, once simultaneously, then a DC–PMM/48V is sufficient for this single braking operation. However, in this case, it is not possible to continuously brake the motors per second or over a longer time period, as in this case, the maximum permissible continuous power of 15 W would be exceeded and the I2t monitoring would respond. The unit goes into a ”fault” condition and can only be restarted after a ”reset”. – Total current through the PMM: 5 x 5 A = 25 A – Pulse load at the pulsed resistor: 5 x 3.5 Ws = 17.5 Ws – Continuous power through the pulsed resistor: 17.5 Ws/1s = 17.5 W In this application, a maximum of only 4 motors could be braked once per second or over a longer periods of time without the I2t monitoring responding and causing the unit to go into a ”fault” condition (4 x 3.5 Ws/1s = 14 W < 15 W). 2-42 Siemens AG 2005 All Rights Reserved SIMODRIVE POSMO A User Manual (POS1) – 06.05 Edition 08.03 02.99 2 Installing and Connecting–Up 2.3 Connection and wiring overview 2.3 Connection and wiring overview e.g. SIMATIC S7–300 DP 2 e.g. relay e.g. BERO 2 PROFIBUS interface e.g. BERO 1 First node (in this case, the master) ––> switch–in the terminating resistor X9 X6 6L+ X1 5L+ X5 L1 3L+ 5M 3M X2 1VS I/Q1 1M 2VS I/Q2 6M 2M 4L+ 4M 6L+ X5 L1 Ground X1 +24 V/48 V 3L+ 5M 3M 1VS X2 I/Q1 1M 2VS I/Q2 6M 2M 4L+ 4M 5L+ X6 X9 Potential bonding conductor (refer to Chapter 2.3.2) e.g. switch Protective conductor (PE)1) (refer to Chapter 2.3.2) B2 A2X4 B1A1X3 B2 A2X4 Ground A cable B1A1X3 +24 V X7 S1 S1 X7 B cable Last node (here, to the right) ––> switch–in the terminating resistor (refer to Chapter 2.3.1) Set the PROFIBUS node address for the slaves (refer to Chapter 2.3.1) +24 V Ground +24 V/48 V Ground 24 V electronics power supply (e.g. SITOP e.g.power) relay (optional) +24 V/48 V Power Management Module (DC PMM) (optional) Ground Load power supply (e.g. SITOP power) 1) The protective conductor may not be interrupted (refer to Chapter 2.3.2) Fig. 2-13 Connection and wiring overview (example with DC PMM and electronics power supply) Siemens AG 2005 All Rights Reserved SIMODRIVE POSMO A User Manual (POS1) – 06.05 Edition 2-43 2 Installing and Connecting–Up 08.03 02.99 2.3 Connection and wiring overview 2.3.1 2 Connection and setting possibilities in the connection cover Connection cover from the top The SIMODRIVE POSMO A wiring is completely realized in the connection cover. One connection can be used as input or output. The user defines this using the appropriate wiring. All of the cable connections are fed through PG glands. Dummy plugs (reserve) Load power supply cable Refer under the index entry ”changing the cable outlet direction” Input/output When using this connection, the dummy plug is replaced by a PG11 PG gland. Protective conductor Torx T20 max. 3 Nm Cap Slotted screw When using this connection, the dummy plug is replaced by a PG11 PG gland. Potential bonding/ protective connection cable with cable lug and screw Cables for digital inputs/outputs Cross–section: 4 mm2 Thread: M5 x 10 through hole Cable for PROFIBUS or Load power supply cable PROFIBUS and Input/output ––> e.g. to the next drive electronics power supply Cable for PROFIBUS Input/output Slotted screw 4 (1.0 x 6.5) max. 1.8 Nm or PROFIBUS and electronics power supply Input/output ––> e.g. to the next drive Fig. 2-14 SIMODRIVE POSMO A connection cover from the top Caution In order to guarantee the degree of protection, all of the connections must be provided with either a dummy plug or with a PG gland; both of these must be tightly screwed–in. 2-44 Siemens AG 2005 All Rights Reserved SIMODRIVE POSMO A User Manual (POS1) – 06.05 Edition 08.04 02.99 2 Installing and Connecting–Up 2.3 Connection and wiring overview Connection cover from the bottom S1 X3 X1 X6 /X9 Setting PROFIBUS DP cable Load power supply Internal load power supply Input/output Input/output PROFIBUS node address PROFIBUS terminating resistor 2 Note: Equipping differs depending on whether it is a 75 W or 300 W motor L1 B1 A1 B2 A2 X3 X5 X4 S1 X7 5M 3L+ 3M X2 1VS I/Q1 1M 2VS I/Q2 6M 2M 4L+ 4M 5L+ X6 X9 X1 6L+ X4 X2 X7 PROFIBUS DP cable Load power supply Internal interface Input/output X5 3L+ Input/output +24 V electronics power supply input (optional) 3M 0 V ground 1VS Supply 1 Note: I/Q1 Digital input/output 1 Screwdriver for terminals (slotted screws) 1M 0 V ground Where? X1 and X2 X3, X4 and X5 Size! Tightening torque! 2VS Supply 2 1 (0.5 x 3.5) 0.6...0.8 Nm I/Q2 Digital input/output 2 0 (0.4 x 2.5) 0.22...0.25 Nm 2M 0 V ground 4L+ +24 V electronics supply output (optional) 4M 0 V ground Fig. 2-15 SIMODRIVE POSMO A connection cover from the bottom Caution When supplied, the screws in the terminals are not tightened. These must be tightened to the specified tightening torque – even when the terminals are not being used – as otherwise the screws could fall–out when the unit is subject to vibration. Siemens AG 2005 All Rights Reserved SIMODRIVE POSMO A User Manual (POS1) – 06.05 Edition 2-45 2 Installing and Connecting–Up 08.03 02.99 2.3 Connection and wiring overview Connection cover Change cable outlet direction 2 The cable outlet direction is, as standard, in the opposite direction to the motor drive shaft. Depending on the mounting situation, the cable outlet direction of the positioning motor can be changed. How can the cable outlet direction be changed? ––> refer to Fig. 2-16 1. In the unwired connection cover, release the four screws of the connection module. 2. Rotate the connection module and screw back into place. 3. Interchange the load current and PROFIBUS cabling in the connection cover at the top. Connection module Connection cover the bottom Screws Screw type: Oval head screw M3 x 6 – 8.8 SN 60730 Torx T10 max. 1.8 Nm Screws Connection cover from the top Dummy plug 2 Dummy plug 1 After turning the connection module, connect–up as follows: Dummy plugs 1 ––> reserved for future connections Dummy plug 2 When this connection is used, the dummy plug is replaced by a PG11 PG gland for the digital input/output cable. The interchanged cables should be appropriately connected–up. Refer to Chapter 2.4.3 Fig. 2-16 Connection cover: Changing the cable outlet direction 2-46 Siemens AG 2005 All Rights Reserved SIMODRIVE POSMO A User Manual (POS1) – 06.05 Edition 08.04 02.99 2 Installing and Connecting–Up 2.3 Connection and wiring overview Interfaces, terminals, switch S1 Table 2-3 All interfaces, terminals and switches of the SIMODRIVE POSMO A are listed in the following table with technical information. Overview of the interfaces, terminals and switches No. Name Function Type Technical data 1) Load power supply X1 X2 24 V for the 75 W motor 5L+ +24 V/+48 V I/O 48 V for the 300 W motor 6L+ +24 V/+48 V I/O ––> Technical data on the power supply, refer to Chapter 2.6.1 or 2.6.2 5M Ground 24 V/48 V I/O 0V 6M Ground 24 V/48 V I/O 0V PROFIBUS DP bus connection X3 A1 A cable I/O – B1 B cable I/O – A2 A cable I/O – B2 B cable I/O – max. 4 mm2 max. 0.35 mm2 PROFIBUS DP bus connection X4 Cross– section max. 0.35 mm2 Electr. power supply (optional) X5 3L+ +24 V I/O 24 V 20 % 3M Ground, 24 V I/O Current drain: 250 mA The electronics can be separately max. supplied with 24 V via these terminals. 0.75 Advantage: When the load power sup- mm2 ply is shut down, the electronics are still supplied with power and remain functional (no galvanic isolation). 1VS P24 output O Output (terminals Q1 and Q2): I/Q1 Input/output terminal 1 I/O 1M M24 output O 2VS P24 output O I/Q2 Input/output terminal 2 I/O 2M M24 output O – Maximum current/output: 100 mA Supply (terminal VS): – Max. current/terminal: 100 mA Input (terminals I1 and I2): – Current drain: 15 mA – 24 V 20 % max. 0.75 mm2 The following can be connected: BERO (3–wire PNP) External relay Logical I/Os (PLC) Electr. power supply (optional) 4L+ +24 V I/O 4M Ground, 24 V I/O 24 V 20 % The electronics of an additional unit can be supplied from these terminals. Siemens AG 2005 All Rights Reserved SIMODRIVE POSMO A User Manual (POS1) – 06.05 Edition max. 0.75 mm2 2-47 2 2 Installing and Connecting–Up 06.05 02.99 2.3 Connection and wiring overview Table 2-3 No. Overview of the interfaces, terminals and switches, continued Name Function Type Technical data Cross– section 1) 2 X6 – X9 X7 – Internal load power supply O Equipping differs depending on whether it is a 75 W or 300 W motor – Internal interface I/O 15–pin D–sub socket connector – Potential bonding conductor I 0V (route as far as possible in parallel to the PROFIBUS cable) O 0V 4 ... 16 mm2 I 0V O 0V 4 ... 16 mm2 I DIL switch, 10–pin – Protective conductor S1 – PROFIBUS node address ÉÉ ÉÉ ÉÉ ÉÉ ÉÉ ÉÉ ÉÉ ÉÉ ÉÉ ÉÉ ÉÉ ÉÉ PROFIBUS terminating resistor Terminating Terminating 10 On/off ON on OFF off 9 On/off ON on OFF off 8 On/off OFF PROFIBUS communications 7 26 = 64 6 25 = 32 S7: ON 64 OFF 0 5 24 = 16 S6: ON 32 ON 32 4 23 = 8 S5: ON 16 OFF 0 3 22 = 4 2 21 = 2 1 20 = 1 ON OFF Note: ÉÉ ÉÉ PROFIBUS node address Example: 1 2 S4: OFF 0 OFF 0 S3: OFF 0 ON 4 S2: OFF 0 OFF 0 S1: ON 1 ON 1 –––––––––– –––––––––– Σ= 113 37 Standard setting Valid addresses which can be set: 3 to 126 For the first and last physical PROFIBUS nodes, the terminating resistor must be switched–in. Switches 9 and 10 must always be in the same setting. The selected address is indicated using P918 (PROFIBUS node address). From SW 1.4, the following applies: When powering–up the positioning motor, PROFIBUS node address 0 or 127 is detected (all of the address switches are either OFF or ON); this means that the function ”jog operation without PROFIBUS and parameterization” is activated (refer to Chapter 5.5.11). 1) I: Input; O: Output 2-48 Siemens AG 2005 All Rights Reserved SIMODRIVE POSMO A User Manual (POS1) – 06.05 Edition 02.00 02.99 2 Installing and Connecting–Up 2.3 Connection and wiring overview Bus termination for PROFIBUS The following must be taken into consideration for the bus termination at the PROFIBUS DP in connection with the ”DP Slave POSMO A”: The terminating resistor must be switched–in at the first and last bus nodes. 2 Is the ”DP slave POSMO A” the first or last bus node? – If yes? ––> The bus termination must be switched–in using switch S1 (refer to Table 2-3). ––> The bus termination that has been switched–in is only effective if the electronics power supply of the positioning motor is powered–up and the connection is inserted. – If no? ––> The bus termination must be switched–out using switch S1 (refer to Table 2-3). If it must be possible, with bus communications still operational, to power down the SIMODRIVE POSMO A positioning motor without resulting in errors, then the following applies: – This ”DP slave POSMO A” may neither be used as the first nor last bus node. – For this ”DP slave POSMO A”, the bus termination must be switched–out using switch S1 (refer to Table 2-3). – Recommendation: Use an active bus terminating resistor The ”active RS485 terminating element” bus component has its own 24 V supply voltage and can terminate the bus independently of the DP slave. Order No. (MLFB): Siemens AG 2005 All Rights Reserved SIMODRIVE POSMO A User Manual (POS1) – 06.05 Edition 6ES7972–0DA00–0AA0 2-49 2 Installing and Connecting–Up 08.03 02.99 2.3 Connection and wiring overview 2.3.2 2 Protective grounding and potential bonding Protective grounding Use the M5 threaded hole in the connection cover for the protective conductor (refer to Chapter 2.3.1). Notice When removing a POSMO A it is not permissible that the protective conductor is interrupted. We recommend the following when connecting–up the protective conductor: Star–type configuration, or The input and output of the protective conductor at the connection cover must be crimped in one cable lug (refer to Fig. 2-13). Preparing the grounding Connect cable shields, ground connections and electronic grounds to ground through the largest surface area. Cable shields, grounding The cable shields must be connected in the gland to the largest surface area. PROFIBUS cabling Notice The cable shield of each bus node must be connected to ground through the largest possible surface area (at SIMODRIVE POSMO A in the PG gland). Recommendation: Route a potential bonding conductor in parallel to PROFIBUS (cable cross–section 4 – 16 mm2). Use the M5 threaded hole in the connection cover for the potential bonding conductor (refer to Chapter 2.3.1). When using connector couplings for PROFIBUS, at higher data transfer rates (> 1.5 Mbaud), perfect functioning is no longer guaranteed (cable reflection). Grounding load power supply Ground the load power supply at the secondary side in the cabinet. When using a shielded cable, the shield must be connected at the supply point to ground potential through the largest possible surface area. Grounding electronics power supply (optional) Ground the 24 V electronics power supply on the secondary side in the cabinet. The power supply cables are routed without any shielding in the PROFIBUS cable. Power supply PELV Protective Extra Low Voltage The protective extra low voltage (PELV) must have protective separation, be grounded and must be safe to touch. Applicable Standards: DIN EN 60204 Part 1, DIN EN 60529, DIN EN 50178 DIN VDE 0160 2-50 Siemens AG 2005 All Rights Reserved SIMODRIVE POSMO A User Manual (POS1) – 06.05 Edition 06.05 02.99 2 Installing and Connecting–Up 2.4 Mounting SIMODRIVE POSMO A 2.4 Mounting SIMODRIVE POSMO A 2.4.1 Mounting overview Mounting and installation steps 2 The following steps are required when mounting a SIMODRIVE POSMO A: Thoroughly remove all anti–corrosion agents from the shaft end (use typical solvents) Release the connection cover of SIMODRIVE POSMO A Warning: Prevent dirt falling into the open drive Mount the SIMODRIVE POSMO A motor without connection cover (refer to the dimension drawings in Chapter C) Prepare the connection cover for mounting: Prepare the cable ––> refer to Chapter 2.4.2 Install the cables in the connection cover Set the PROFIBUS node address ––> refer to Chapter 2.4.3 ––> refer to Chapter 2.3.1 Switch 8 setting OFF for PROFIBUS communications Set the PROFIBUS terminating resistor ––> refer to Chapter 2.3.1 ––> refer to Chapter 2.3.1 Locate the connection cover on the SIMODRIVE POSMO A and tighten the 2 screws retaining the cover (max. tightening torque, 1.8 Nm) Connect the protective and potential bonding conductors ––> refer to Chap. 2.3.2 Switch–on the power supply for the load and electronics Load power supply (if no independent electronics power supply is present) Load and electronics power supply (if both of the power supplies are separate) LED? off? or red steady light? yes Troubleshooting/diagnostics ––> Refer to Chapter 6 no Commisssion the drive system ––> Refer to Chapter 3 Fig. 2-17 Mounting and installation steps Siemens AG 2005 All Rights Reserved SIMODRIVE POSMO A User Manual (POS1) – 06.05 Edition 2-51 2 Installing and Connecting–Up 08.04 08.03 02.99 2.4 Mounting SIMODRIVE POSMO A 2.4.2 Preparing the cable Note 2 We recommend that connector sleeves are used, but these are not absolutely necessary. The outer cable diameter should be maintained in order to guarantee the IP 54/IP64/IP65 degree of protection. Cable for the load power supply 2 x max. 4 mm2, with or without shield, flexible conductor (finely– stranded) Gland: PG13.5 (with shield connection) for outdoors ∅ = 6–12 mm not to scale 10 Load cable Shield 6 – 12 (a shield is not absolutely necessary) 120 10 Fig. 2-18 Preparing load power supply cable Cable for PROFIBUS (without electronics power supply) 2 x 0.35 mm2, with shield Gland: PG13.5 (with shield connection) for outdoors ∅ = 6–12 mm not to scale 8 PROFIBUS cable 6 – 12 Shield (without electronics power supply) 100 5 Fig. 2-19 Preparing the PROFIBUS cable Recommendation for 2–core reeled cable: 2-52 Not of trailing type 6XV1830–0EH10 Trailing type 6XV1830–3BH10 Siemens AG 2005 All Rights Reserved SIMODRIVE POSMO A User Manual (POS1) – 06.05 Edition 08.02 02.99 2 Installing and Connecting–Up 2.4 Mounting SIMODRIVE POSMO A Cable for PROFIBUS (with electronics power supply) 3 x 0.75 mm2, with or without shield ––> for electronics power supply + 2 x 0.35 mm2, with shield 2 ––> for PROFIBUS not to scale 120 10 8 1) PROFIBUS cable 6 – 12 PROFIBUS (with electronics power supply) Shield 100 5 1) Remove cores which are not used Fig. 2-20 Preparing The PROFIBUS cable with electronics power supply Recommendation for 5–core reeled cable: Cables for inputs/outputs 6ES7194–1LY00–0AA0 2 x 3 x max. 0.75 mm2, with shield, flexible conductor (finely–stranded) Gland: The dummy plug provided should be replaced by a suitable PG11 gland (e.g.: Pflitsch Company, type PG15152m2x6 – gland assembly PG11/13.5 mounted using a multi–sealing insert for 2 cables with 6 mm diameter). not to scale I/O cable 10 1) 8 – 12 1) Shield 1) Remove cores which are not used 120 10 Fig. 2-21 Preparing cables for inputs/outputs Siemens AG 2005 All Rights Reserved SIMODRIVE POSMO A User Manual (POS1) – 06.05 Edition 2-53 2 Installing and Connecting–Up 08.03 02.99 2.4 Mounting SIMODRIVE POSMO A Cables for potential bonding and protective conductor 2 Cross–section: 4 mm2 Torx T20 Thread: M5 x 10, hole max. 3 Nm Note: The potential bonding conductor should be routed as far as possible, in parallel to the Profibus cable. This increases the PROFIBUS noise immunity. It is not permissible that protective conductors are interrupted (refer to Chapter 2.3.2) Fig. 2-22 Potential bonding conductor and protective conductor Example: Cable prepared for installation The following pre–assembled cable is shown in Fig. 2-23: The PROFIBUS cable with electronics power supply Fig. 2-23 Example: Pre–assembled cable for PROFIBUS 2-54 Siemens AG 2005 All Rights Reserved SIMODRIVE POSMO A User Manual (POS1) – 06.05 Edition 02.99 2 Installing and Connecting–Up 2.4 Mounting SIMODRIVE POSMO A 2.4.3 Mounting the prepared cables in the connection cover How are the prepared cables installed? The following sequence should be maintained when installing the prepared cables into the connection cover (refer to Fig. 2-24): 1. Release the nut, dummy plugs and terminal insert/seal from the PG gland. 2. Locate the nut and clamping insert/seal onto the cable. 3. Open–up the shield braiding (remove the insulating foil beneath it). The shield must cover the O–ring by approx. 2 mm. Cleanly cut–off any excessively long shield wires. 4. Assemble the nut with clamping insert/seal. 5. Insert these into the PG gland and tighten the nut. 6. Connect the ends of the cables to the lower side of the connection cover. Point 1 Nut Point 2 Point 3 Point 3 Ó Ó M20 gland Cap Ó Ó Ó Ó Clamping insert/seal ÓÓ ÓÓ ÓÓ ÓÓ O ring Shield M20 gland Connection to the PROFIBUS unit Point 4 Point 5 Point 6 Wiring at X20 Fig. 2-24 How are the prepared cables installed? Siemens AG 2005 All Rights Reserved SIMODRIVE POSMO A User Manual (POS1) – 06.05 Edition 2-55 2 2 Installing and Connecting–Up 08.03 02.99 2.4 Mounting SIMODRIVE POSMO A 2 Fig. 2-25 Example: PG gland with all of the individual parts and components Example: Connection cover mounted The following diagrams show a connection cover that has been connected–up: Connection cover from the top ––> refer to Fig. 2-26 Connection cover from the bottom ––> refer to Fig. 2-27 Fig. 2-26 Connection cover with the cables inserted: View from the top 2-56 Siemens AG 2005 All Rights Reserved SIMODRIVE POSMO A User Manual (POS1) – 06.05 Edition 02.99 2 Installing and Connecting–Up 2.4 Mounting SIMODRIVE POSMO A 2 Fig. 2-27 Connection cover with the cables inserted: View from below Additional protection against moisture When routing the connecting cable, additional moisture protection can be achieved by appropriately angling the connecting cable (water loop). ”Water loop” Fig. 2-28 Cable connection at SIMODRIVE POSMO A with ”water loop” Siemens AG 2005 All Rights Reserved SIMODRIVE POSMO A User Manual (POS1) – 06.05 Edition 2-57 2 Installing and Connecting–Up 06.05 02.99 2.4 Mounting SIMODRIVE POSMO A 2.4.4 2 Extension set ”separate version” POSMO A – 300 W How is the extension set mounted? The separate version for SIMODRIVE POSMO A – 300 W means that the drive unit is mounted separately from the motor. This means that for applications with restricted space, the space requirement of the motor can be flexibly adapted to the mounting space available. The SIMODRIVE POSMO A – 300 W is supplied as complete unit. This is the reason that for this particular application, the drive unit is to be separated from the motor and connected to the motor using the extension set ”separate version”. It is only permissible to use the pre–fabricated extension set from Siemens. Refer to Chapter 1.2 for ordering data. When disassembling the drive unit (refer to Fig. 2-29) and when mounting/installing the extension set (refer to Fig. 2-30), proceed in the following sequence: ! Warning Before disassembling the drive unit, the positioning motor must be brought into a no–voltage condition and locked–out so that it cannot be powered–up again! 1. Release and remove the four retaining screws of the drive unit (do not re–use!). ––> Allen key SW 3 2. Remove the drive unit 1 SW 3 2 Drive unit POSMO A – 300 W Motor Fig. 2-29 Withdraw the drive unit from the motor 2-58 Siemens AG 2005 All Rights Reserved SIMODRIVE POSMO A User Manual (POS1) – 06.05 Edition 06.05 02.99 2 Installing and Connecting–Up 2.4 Mounting SIMODRIVE POSMO A 3. Insert the extension set ”separate version” POSMO A – 300 W at the motor and drive unit. 4. Using the 4 retaining screws supplied, screw the extension set to the motor and drive unit. – Torque wrench (Allen key, SW 3) – Tighten the screws diagonally – Torque: 1.8 Nm 5. Attach the potential bonding and protective conductor (cross–section: 4 mm2) – At the drive unit: Two screw terminals (M5) on the cover ––> refer to Chapter 2.3.1 – At the motor: Two of the three screw threads (M5) for the transport lugs ––> refer to Fig. 2-30 Note: Minimum bending radius of the cables, 100 mm 4 screws supplied loose with the equipment 3 3 5 Extension set, ”separate version” 4 4 5 Potential bonding and protective conductor (both ends) M5 x 10 not to scale Fig. 2-30 Mounting the extension set ”separate version” POSMO A – 300 W Siemens AG 2005 All Rights Reserved SIMODRIVE POSMO A User Manual (POS1) – 06.05 Edition 2-59 2 2 Installing and Connecting–Up 08.04 02.99 2.5 Gearbox selection 2 2.5 Gearbox selection 2.5.1 Gearboxes for SIMODRIVE POSMO A – 75 W Modular gearbox, 75 W motor Table 2-4 Gearbox type without gearbox System data, modular gearbox with planetary/worm gearboxes Stage number – 1 Planetary gearbox 2 3 Worm gear2)3) For SIMODRIVE POSMO A – 75 W, the following gearboxes can be selected and used according to Table 2-4: 1 Reduction Efficiency Torque Permissible1) Available S1 Briefly S1 Rated speed iGearbox hGearbox [Nm] [Nm] [Nm] S3 25 % 1 min [Nm] n (S1) – – – – 0.18 0.36 3300 4.5 0.85 1.2 2.4 0.7 1.4 733 8 0.85 1.2 2.4 1.2 2.4 413 20.25 0.72 8 16 2.6 5.2 163 36 0.72 8 16 4.7 9.3 92 50 0.72 8 16 6.5 13.0 66 126.5625 0.61 24 48 13.9 27.8 26 162 0.61 24 48 17.8 35.6 20 [RPM] 5 0.70 2 4 0.6 1.3 660 24 0.50 3.5 7 2.2 4.3 138 75 0.25 4 8 3.4 6.8 44 1) The specified permissible gearbox torque may not be exceeded. Gearboxes can be briefly loaded (1 – 2 s when starting) with higher torques up to a maximum of twice the continuous torque without causing permanent damage (but this does have a negative impact on the gearbox lifetime). The gearbox could be destroyed if this limit is exceeded. The current limits of the positioning motor are preset in the factory to prevent destruction by the torque produced by the motor. 2) Notice: If the worm gear has to be rotated due to the mechanical design, then the mounting screws must be subsequently tightened to a torque of 2 Nm and secured using Loctite 274. No warranty is accepted for damage caused by incorrect changes. 3) Torsional play < 1° Notice Forced rotation acceleration or delay from the outside is permitted only within the scope of permissible torques. Due to the run–up time of the gearbox, elevated currents may occur when commissioning for the first time (grease distribution in the gearbox). Reader’s note Additional gearbox data Dimension drawings of motors and gearboxes Gearbox–dependent parameters 2-60 ––> refer to Chapter 2.6.1 ––> refer to Chapter C.1 ––> refer to Chapter 5.6.3 Siemens AG 2005 All Rights Reserved SIMODRIVE POSMO A User Manual (POS1) – 06.05 Edition 08.04 05.03 02.99 2 Installing and Connecting–Up 2.5 Gearbox selection 2.5.2 Gearboxes for SIMODRIVE POSMO A – 300 W Modular gearbox, 300 W motor Table 2-5 Gearbox type without For SIMODRIVE POSMO A –300 W, the following gearboxes can be selected and used according to Table 2-5: System data, modular gearbox with planetary gears Stage number – Step– down Efficiency Torque Permissible1) Rated speed Available S1 briefly S1 S3 25 % 4 min S3 6.25 % 4 min n (S1) iGearbox hGearbox [Nm] [Nm] [Nm] [Nm] [Nm] [RPM] – – – – 0.48 0.95 1.9 3500 4 0.90 26 52 1.7 3.4 6.8 7502) 7 0.90 26 52 3.0 6.0 12.0 4292) 12 0.85 36 45 4.9 9.7 19.4 2502) 20 0.85 42 52.5 8.2 16.2 32.3 1502) 35 0.85 44 55 14.3 28.3 55.0 862) 49 0.85 44 55 20.0 39.6 55.0 612) 120 0.80 100 125 46.1 91.2 125.0 252) gearbox 1 Planetary gear 2 3 1) The specified permissible gearbox torque may not be exceeded. The gearboxes may be briefly subject to higher torques (1–stage: 200% continuous torque, 2 and 3–stage: 125% continuous torque) without the gearbox being destroyed (this has a negative impact on the lifetime). The gearbox could be destroyed if this limit is exceeded. The current limits of the positioning motor are preset in the factory to prevent destruction by the torque produced by the motor. 2) Relating to the gearbox rated speed of 3000 rpm. Notice Forced rotation acceleration or delay from the outside is permitted only within the scope of permissible torques. Due to the run–up time of the gearbox, elevated currents may occur when commissioning for the first time (grease distribution in the gearbox). Reader’s note Additional gearbox data ––> refer to Chapter 2.6.2 Dimension drawings of motors and gearboxes ––> refer to Chapter C.2 Gearbox–dependent parameters ––> refer to Chapter 5.6.3 Mounting or replacing gearboxes ––> refer to Chapter 7.2 Siemens AG 2005 All Rights Reserved SIMODRIVE POSMO A User Manual (POS1) – 06.05 Edition 2-61 2 2 Installing and Connecting–Up 02.99 2.6 Technical data 2.6 Technical data 2.6.1 Technical data for SIMODRIVE POSMO A – 75 W 2 Table 2-6 Technical data for the POSMO A – 75 W positioning motor Description Name Load power supply Supply voltage: 24 VDC 20 % Power consumption: rated: 4.5 A for 200% overload (S3): 9 A Electrical data Note: The rated output and rated speed are reduced when the 24 V power supply voltage is fallen below. Electr. power supply (optional) Voltage: 24 V DC 20 % Current drain: 250 mA Digital inputs Voltage: 24 V DC 20 % Current drain: 15 mA Digital outputs Maximum current/output: 100 mA I [A] M [Nm] 9 0.36 Torque/speed characteristic Rated operating point (62.5 W) S3 intermittent duty motor M/n characteristic Motor without gearbox UIN = 24 VDC 200% overload (75 W) 4.5 0.18 No–load operating point S1 continuous duty 0 2000 nN = 3300 nno–load = 3600 n [rev/min] 0 ... 45 °C up to 65 °C with continuous motor current reduction IS1 [A] Permissible ambient temperature Continuous motor current reduction as a function of the ambient temperature 4.5 4 3 2 1 0 2-62 45 50 55 60 65 ϑ [°C] Siemens AG 2005 All Rights Reserved SIMODRIVE POSMO A User Manual (POS1) – 06.05 Edition 06.05 02.99 2 Installing and Connecting–Up 2.6 Technical data Table 2-6 Technical data for the POSMO A – 75 W positioning motor, continued Name Description Degree of protection EN 10034 Part 5 IEC 34–5 IP 54 Note: IP40 at the motor shaft and planetary gearbox shaft. If necessary, an external seal must be provided. The shaft may not run in an oil bath. If necessary, grease lubrication must be provided. Installation altitude Installation altitude above sea level in m 1000 1500 2000 2500 3000 3500 4000 and permissible output Motor data Output as a % of the rated output 100 97 94 90 86 82 77 Motor type Permanent–magnet brushless servomotor (brushless DC: BLDC) Cooling Non–ventilated (free convection) Note: The clearance 100 mm must be maintained to adjacent parts and components on at least three sides of the SIMODRIVE POSMO A Overload monitoring i2t limitation Measuring system (integrated) Incremental Resolution: 816 increments/motor revolution Rated motor speed 3 300 RPM 2 000 RPM (S1) (S3, 25 %, 1 min) Rated motor torque (without gearbox) 0.18 Nm 0.36 Nm (S1) (S3, 25 %, 1 min) Rated motor power (without gearbox) 62.5 W 75 W (S1) (S3, 25 %, 1 min) Rated motor current 4.5 A Motor efficiency 65 % Motor moment of inertia Ratio i: referred to the without gearbox +gearbox 4.5 1,233.2 10–6 kgm2 8 3,897.6 10–6 kgm2 20.25 24,972.8 10–6 kgm2 36 78,926.4 10–6 kgm2 50 152,250.0 10–6 kgm2 126.5625 975,500.2 10–6 kgm2 162 1,598,259.6 10–6 kgm2 5 1,537.5 10–6 kgm2 24 35,424.0 10–6 kgm2 75 345,937.5 10–6 kgm2 Axial load max. 150 N Radial load max. 150 N (effective 20 mm from the mounting plane) Note: The data is only valid for supply voltages of 24 V Without holding brake: 60.00 10–6 kgm2 motor out drive referred to the gearbox out drive Shaft load capability (motor shaft) Siemens AG 2005 All Rights Reserved SIMODRIVE POSMO A User Manual (POS1) – 06.05 Edition 2-63 2 2 Installing and Connecting–Up 08.04 02.99 2.6 Technical data Table 2-6 Technical data for the POSMO A – 75 W positioning motor, continued Name Description S1 continuous operation duty The equipment can operate continually at rated load without the permissible temperature being exceeded. Duty cycle = Operating possibilities (excerpt from VDE 0530) S3 intermittent duty The equipment can only be operated at rated load during the power–on duration specified as a percentage of the load duty cycle without the permissible temperature being exceeded. The equipment is powered down in the no–load interval. Overload factor = 2 Duty cycle = 1 min Duration = 25 % of the duty cycle Measuring surface sound–pressure level EN 21680 Part 1 max. 55 dB (A) 2 S3 – 25 % Backlash Motor without gearbox Note: Speed range: 0 – 3300 RPM 1–stage planetary gear: 1.0 degrees 2–stage planetary gear: 1.0 degrees 3–stage planetary gear: 1.5 degrees Worm gear: <1.0 degrees Shaft load capability (Gearbox shaft) Gearbox data Weights 2-64 Gearbox lifetime Axial load Radial load (for center key) Planetary gear max. 500 N max. 350 N Worm gear 300 N max. 500 N max. A generally valid statement cannot be made about the lifetime as a result of the various possible applications and the resulting load types as well as varying ambient conditions. Factors which influence the lifetime include: Duty types from continuous operation with one direction of rotation up to extreme start/stop operation with load levels from partial load up to full load and significant surge loading. Forced rotation accelerations or delays from the outside. External mechanical loads in the form of a vibration and shock. The ambient temperature and humidity/moisture Motor without gearbox: 3.1 kg Motor with 1–stage gearbox: 3.5 kg Motor with 2–stage gearbox: 3.7 kg Motor with 3–stage gearbox: 3.9 kg Motor with worm gear: 3.5 kg Siemens AG 2005 All Rights Reserved SIMODRIVE POSMO A User Manual (POS1) – 06.05 Edition 08.01 02.99 2 Installing and Connecting–Up 2.6 Technical data Table 2-6 Technical data for the POSMO A – 75 W positioning motor, continued Name Description Relevant Standards IEC 68–2–1, IEC 68–2–2 Operating temperature range 0 ... 45 C Extended operating temperature range to +65 C with continuous reduced motor current Relevant Standards according to DIN EN 60721 Part 3–3, Class 3K5 Transport and storage temperature range –40 ... +70 C Climatic transport and storage conditions Relevant Standards according to DIN EN 60721, Part 3–1 and 3–2, Class 2K4 and 1K4 Mechanical ambient conditions Relevant Standards Climatic environmental conditions 2 Note: Data applies for components which have been packed ready for transport. IEC 68–2–32 Vibration stressing in operation Tested vibration and shock stressing in operation Vibration and shock stressing during transport Pollutant stressing Frequency range 2 ... 9 Hz With constant deflection = 7 mm Frequency range 9 ... 200 Hz With constant acceleration = 20 m/s2 (2 g) Relevant Standards IEC 68–2–6, DIN EN 60721 Parts 3–0 and 3–3 Class 3M6 Shock stressing in operation Peak acceleration max. 250 m/s2 (25 g) Shock duration 6 ms Relevant Standards DIN EN 60721 Part 3–0 and Part 3–3 Class 3M6 Relevant Standards DIN EN 60721 Part 3–3, Class 2M2 Note: Data applies for components which have been packed ready for transport. Relevant Standards IEC 68–2–60 Siemens AG 2005 All Rights Reserved SIMODRIVE POSMO A User Manual (POS1) – 06.05 Edition 2-65 2 Installing and Connecting–Up 04.01 02.99 2.6 Technical data 2.6.2 2 Technical data for SIMODRIVE POSMO A – 300 W Table 2-7 Technical data for the POSMO A – 300 W positioning motor Description Name Load power supply Supply voltage: 48 V DC 20 % 24 V DC 20 % (optional) 5.25 A (with S1) Power consumption: Note: A supply voltage less than 48 V means: ––> lower speed For motors with integrated holding brake, the power supply Electrical data voltage must be > 24 V DC. 24 V DC 20 % Electr. power supply Voltage: (optional) Current drain: Digital inputs Voltage: 500 mA 24 V DC 20 % 15 mA Current drain: digital outputs I [A] 21.0 Maximum current/output: 100 mA M [Nm] Voltage limiting characteristic 24 V Voltage limiting characteristic 48 V 2.0 Current limit S3 1.9 Rated operating point 24 V, 100 W 1.6 Torque/speed characteristic motor M/n characteristic 15.75 S3 intermittent duty Rated operating point 48 V, 300 W 1.2 10.5 0.95 Continuous power rating 176 W Current limit S1 (I2t) 0.8 Motor without gearbox 5.25 0.4 No–load operating point S1 continuous duty 0.0 0.0 1000 2000 3000 Speed limit = 3800 2-66 4000 n [rev/min] Siemens AG 2005 All Rights Reserved SIMODRIVE POSMO A User Manual (POS1) – 06.05 Edition 06.05 04.01 02.99 2 Installing and Connecting–Up 2.6 Technical data Table 2-7 Technical data for the POSMO A – 300 W positioning motor, continued Name Description S1 continuous operation duty The equipment can operate continually at rated load without the permissible temperature being exceeded. Duty cycle S3 intermittent duty Operating possibilities (excerpt from VDE 0530) S3 – 25 % = The equipment can only be operated at rated load during the power–on duration specified as a percentage of the load duty cycle without the permissible temperature being exceeded. The equipment is powered down in the no–load interval. Power–on duration = 25 % ( 60 s) ––> at 3000 RPM and 0.95 Nm Duty cycle S3 – 6.25 % = 4 min Power–on duration = 6.25 % ( 15 s) ––> at 2000 RPM and 1.9 Nm Duty cycle Measuring surface sound–pressure level = 4 min max. 55 dB (A) Motor without gearbox max. 70 dB (A) Motor with 2–stage gearbox Note: Speed range: EN 21680 Part 1 0 – 3000 RPM –20 ... 45 °C up to 65 °C with continuous motor current reduction IS1 [A] 5.25 Permissible ambient temperature Continuous motor current reduction as a function of the ambient temperature 5 4 3 2 1 –20 Degree of protection 45 50 55 60 65 ϑ [°C] IP54 or IP65 can be ordered EN 10034 Part 5 IEC 34–5 Installation altitude Installation altitude above sea level in m Output as a % of the rated output 1000 100 and 1500 97 Permissible output 2000 94 2500 90 3000 86 3500 82 4000 77 Siemens AG 2005 All Rights Reserved SIMODRIVE POSMO A User Manual (POS1) – 06.05 Edition 2-67 2 2 Installing and Connecting–Up 06.05 04.01 02.99 2.6 Technical data Table 2-7 Technical data for the POSMO A – 300 W positioning motor, continued Name Motor type Cooling 3–phase brushless servomotor Note: The motor corresponds to the 1FK6 motor series. Non–ventilated (free convection) Note: The clearance 100 mm must be maintained to adjacent parts and components on at least three sides of the SIMODRIVE POSMO A Overload monitoring Measuring system (integrated) i2t limitation Incremental Resolution: 4096 increments/motor revolution Rated motor speed Rated motor torque (without gearbox) 3500 RPM 3000 RPM 0.48 Nm 0.95 Nm (S1) (S3, 25 %, 4 min) (S1) (S3, 25 %, 4 min) Rated motor power (without gearbox) 176 W 300 W (S1) (S3, 25 %, 4 min) Rated motor current 5.25 A 10.5 A (S1) (S3, 25 %, 4 min) Motor efficiency 75 % 68 % motor motor and drive unit Motor moment of inertia referred to the motor out drive +gearbox referred to the gearbox out drive Ratio i: 2 Motor data Shaft load capability (motor shaft) Holding brake Gearbox data 2-68 Description Note: The data is only valid for supply voltages of 48 V without holding brake: with holding brake: without gearbox 58.00 10–6 kgm2 65.00 10–6 kgm2 4 1,424.0 10–6 kgm2 1,536.0 10–6 kgm2 7 4,267.9 10–6 kgm2 4,610.9 10–6 kgm2 12 13,017.6 10–6 kgm2 14,025.6 10–6 kgm2 20 35,480.0 10–6 kgm2 38,280.0 10–6 kgm2 35 107,065.0 10–6 kgm2 115,640.0 10–6 kgm2 49 209,847.4 10–6 kgm2 226,654.4 10–6 kgm2 120 1,856,160.0 10–6 kgm2 1,956,960.0 10–6 kgm2 Axial load – Motor without holding brake max. 210 N – Motor with holding brake forces not permissible Radial load max. 240 N (effective 30 mm above the plane where the motor is bolted) Brake type Holding torque M4 DC current Opening time Closing time Number of emergency braking operations EBD 0.13BS 1.1 Nm 0.4 A 30 ms 10 ms 2000 with a regenerative feedback energy of 13 Ws Backlash 1–stage planetary gear: <15’ (angular minutes) 2–stage planetary gear: <20’ (angular minutes) 3–stage planetary gear: <25’ (angular minutes) Siemens AG 2005 All Rights Reserved SIMODRIVE POSMO A User Manual (POS1) – 06.05 Edition 08.04 04.01 02.99 2 Installing and Connecting–Up 2.6 Technical data Table 2-7 Technical data for the POSMO A – 300 W positioning motor, continued Name Efficiency Description 1–stage gearbox: 90 % 2–stage gearbox: 85 % 3–stage gearbox: 80 % 2 Temperature Max. permissible temperature: 90 C Speed at the gearbox input Nominal input speed: Max. input speed:3500 RPM 3000 RPM Note: A POSMO A with gearbox can be briefly operated up to the maximum possible speed (depending on the supply voltage). Radial and axial shaft load capability for the gearbox shaft 1-stage/2-stage gearbox 800 700 600 Fr perm [N] Shaft load capability 500 Fa = 0 N 400 300 Fa = 500 N 200 Gearbox data Planetary gear 100 Fa = 1000 N 0 100 200 300 400 500 600 700 800 900 n2 [RPM] 3-stage gearbox 2700 2400 Fr perm [N] 2100 1800 1500 Fa = 1500 N 1200 Fa = 500 N 900 Fa = 0 N 600 Fa = 1000 N 300 0 Fa [N] 100 200 300 400 500 600 700 800 900 1000 n2 [RPM] axial force Fr perm [N] permissible radial force n2 [RPM] drive–out speed Siemens AG 2005 All Rights Reserved SIMODRIVE POSMO A User Manual (POS1) – 06.05 Edition 2-69 2 Installing and Connecting–Up 06.05 04.01 02.99 2.6 Technical data Table 2-7 Technical data for the POSMO A – 300 W positioning motor, continued Name Gearbox lifetime 2 Description A generally valid statement cannot be made about the lifetime as a result of the various possible applications and the resulting load types as well as varying ambient conditions. Factors which influence the lifetime include: Duty types from continuous operation with one direction of Gearbox data rotation up to extreme start/stop operation with load levels from partial load up to full load and significant surge loading. Planetary gear Forced rotation accelerations or delays from the outside. External mechanical loads in the form of a vibration and shock. The ambient temperature and humidity/moisture Weights Climatic environmental conditions Motor without gearbox: 3.9 kg Motor with 1–stage gearbox: 5.1 kg Motor with 2–stage gearbox: 5.4 kg Motor with 3–stage gearbox: 8.2 kg Relevant Standards IEC 68–2–1, IEC 68–2–2 Operating temperature range –20 ... 45 C Climatic operExtended operating ating conditemperature range tions to +65 C with continuous reduced motor current Relevant Standards according to DIN EN 60721 Part 3–3, Class 3K5 Transport and storage temperature range –40 ... +70 C Relevant Standards according to DIN EN 60721, Part 3–1 and 3–2, Class 2K4 and 1K4 Climatic transport and storage conditions Note: Data applies for components which have been packed ready for transport. Mechanical ambient conditions 2-70 Relevant Standards IEC 68–2–32 Siemens AG 2005 All Rights Reserved SIMODRIVE POSMO A User Manual (POS1) – 06.05 Edition 08.01 04.01 02.99 2 Installing and Connecting–Up 2.6 Technical data Table 2-7 Technical data for the POSMO A – 300 W positioning motor, continued Name Description Vibration stressing in operation Frequency range 2 With constant deflection = 7 mm 2 ... 9 Hz Frequency range With constant acceleration = 20 m/s2 (2 g) 9 ... 200 Hz Tested vibration and shock stressing in operation Relevant Standards IEC 68–2–6, DIN EN 60721 Parts 3–0 and 3–3 Class 3M6 Shock stressing in operation Peak acceleration max. 250 m/s2 (25 g) Shock duration 6 ms Relevant Standards DIN EN 60721 Part 3–0 and Part 3–3 Class 3M6 Note: In order to ensure a long lifetime, the motor should be supported if it is subject to external vibration stressing (e.g. continuous operation at the resonant frequency) Tapped holes are provided to support the motor. Vibration and shock stressing during transport Pollutant stressing Relevant Standards DIN EN 60721 Part 3–3, Class 2M2 Note: Data applies for components which have been packed ready for transport. Relevant Standards IEC 68–2–60 Siemens AG 2005 All Rights Reserved SIMODRIVE POSMO A User Manual (POS1) – 06.05 Edition 2-71 2 Installing and Connecting–Up 02.99 06.05 2.6 Technical data Space for your notes 2 2-72 Siemens AG 2005 All Rights Reserved SIMODRIVE POSMO A User Manual (POS1) – 06.05 Edition 3 Commissioning 3 3.1 General information on commissioning Prerequisites for commissioning The following prerequisites must be fulfilled before commissioning the drive: 1. Has the drive been completely installed, cabled and is it ready to be powered–up? ––> Refer to Chapter 2 2. Has the PROFIBUS DP node address been set at the connection cover of SIMODRIVE POSMO A? ––> Refer to Chapter 2.3.1 3. Has the terminating resistor been set at the first and last bus nodes? ––> Refer to Chapter 2.3.1 and Chapter 2.3 4. Is there a master device file (GSD) and has it been installed? ––> Refer to Chapter 4.4.2 Communications between master and slave SIMODRIVE POSMO A can only be controlled and parameterized via PROFIBUS. This is the reason that it is absolutely necessary that communications are established between the DP master and the ”DP slave POSMO A” that is to be commissioned. What are the communication possibilities? C1 master SIMODRIVE POSMO A PROFIBUS MASTER ––> Refer to Chapter 3.2.4 C2 master Parameterizing and start–up tool ”SimoCom A” ––> Refer to Chapter 3.2.3 C1 master SIMATIC S5 or SIMATIC S7 ––> Refer to Chapter 4.4 Third–party master ––> Refer to the documentation associated with the third–party master Standalone operation can be set via P100 and P101:11. This means that operation is possible without PROFIBUS communications (refer to Chapter 5.5.12). Siemens AG 2005 All Rights Reserved SIMODRIVE POSMO A User Manual (POS1) – 06.05 Edition 3-73 3 Commissioning 02.99 3.1 General information on commissioning Overview of the communications Master Slave PROFIBUS DP Standard slave 3 PROFIBUS DP Standard slave PROFIBUS DP telegram data For SIMODRIVE POSMO A the following is valid: Install GSD files PPO type 1 (PPO1) Connect–up Set the address When required, set the terminating resistor S7 – 300 with integrated DP interface S7 – 400 – SFC14 (SW) – SFC15 (SW) PROFIBUS–DP Cyclic data refer to Chapter 4.2, e.g. S7 – 312 CP 342–5 – FC1 (SW) – FC2 (SW) Control word (STW) Status word (ZSW) Parameterizing data SIMODRIVE POSMO A refer to Chapter 4.3, e.g. PC/PG+ – CP 5412 – CP 5511 – CP 5611 Parameter number, Index parameter value PROFIBUS–DP Any third–party master Fig. 3-1 Overview of the communications for SIMODRIVE POSMO A LED after power–on After SIMODRIVE POSMO A has been powered up, the LED has the following status, if no fault/error has been detected: LED flashes green ––> bus connection is not established (refer to Chapter 6.1) 3-74 Siemens AG 2005 All Rights Reserved SIMODRIVE POSMO A User Manual (POS1) – 06.05 Edition 02.99 3 Commissioning 3.2 Commissioning the DP master 3.2 Commissioning the DP master 3.2.1 Commissioning and communications for the master How are communications established between the master and slave? The procedure on how to establish communications between the master and slave is shown using an example with the following prerequisites: Assumptions and prerequisites: The master is a SIMATIC S7–315–2 DP. The prerequisites for commissioning have been fulfilled (refer to Chapter 3.1). The ”DP slave POSMO A” should be integrated into an existing SIMATIC S7 project. The GSD file for the ”DP slave POSMO A” is available and installed (refer to Chapter 4.4.2). How communications are established: 1. Open the existing SIMATIC project. 2. In the hardware catalog, under PROFIBUS–DP, add the station ”SIMODRIVE POSMO A”. 3. Set the PROFIBUS address under properties. The same address must be set at the positioning motor (DP slave) using switch S1 (refer to Chapter 2.3.1). 4. Set the I/O address Part I address O address PKW PZD 256 – 263 264 – 267 256 – 263 (each 8 bytes, addresses as example) 264 – 267 (each 4 bytes, addresses as examples) 5. Close the project and transfer to the master. 6. Power–up the drive and check the LED. LED has steady green light? yes ––> normal operation, communications is running error–free no ––> evaluate the state of the LED (refer to Chapter 6.1) The drive itself identifies the selected baud rate. Note The DP master can now communicate with the DP slave SIMODRIVE POSMO A that has been powered–up. Siemens AG 2005 All Rights Reserved SIMODRIVE POSMO A User Manual (POS1) – 06.05 Edition 3-75 3 3 Commissioning 05.03 02.99 3.2 Commissioning the DP master Data to/from the drive in the PZD and PKW areas The following data transfers in the PZD and PKW areas result from the peripheral addresses configured in the example: Control signals, data to the drive PAB 264 PAB 265 3 PAW 266 Note: Control word (STW) PAW 264 Select block number Description of the PZD area Start byte (STB) PAB 266 ––> Refer to Chapter 4.2 PAB 267 Status signals, data from the drive PEB 264 PEB 265 Status word (ZSW) PEW 264 Fig. 3-2 Actual block number PEW 266 DP slave POSMO A Checkback signal (RMB) PEB 266 PEB 267 Data transfer in the PZD area in the ”positioning” mode (P700=2) (addresses are only as example) Control signals, data to the drive PAB 264 PAB 265 Description of the PZD area PAW 264 Control word (STW) PAW 266 Speed setpoint, bits 0...14, sign, bit 15 PAB 266 Note: ––> Refer to Chapter 4.2 Normalization of the speed actual values: PAB 267 4000hex ––> 1000hex of the speed specified in P880 Status signals, data from the drive PEB 264 PEB 265 DP slave POSMO A Fig. 3-3 3-76 PEW 264 Status word (ZSW) PEW 266 Speed actual value, bits 0...14, sign, bit 15 PEB 266 PEB 267 Data transfer in the PZD area in the ”speed setpoint” mode (P700=1) (addresses are only as example) Siemens AG 2005 All Rights Reserved SIMODRIVE POSMO A User Manual (POS1) – 06.05 Edition 02.99 3 Commissioning 3.2 Commissioning the DP master Data to the drive PAB 256 PAW 256 AK PAW 258 – PAB 257 PNU (parameter number) IND (Index) Reserved PKE IND/reserved PAW 260 PWE 1 (parameter value) PWE PAW 262 PWE 2 (parameter value) PWE PAB 262 Note: The PKW area must be consistently transferred. PAB 263 Description of the PKW area ––> Refer to Chapter 4.3 Data from the drive PEB 256 PEB 257 AK PEW 256 DP slave POSMO A – PNU (parameter number) IND (Index) PEW 258 PWE 1 (parameter value) EB 266 EB 267 PEW 260 PEW 262 PWE 2 (parameter value) PEB 262 Fig. 3-4 Reserved PKE IND/reserved PWE PWE PEB 263 Data transfer in the PKW area (addresses are only example addresses) Commissioning asks after communications have been established After establishing communications, the commissioning of the DP master should be completed. The following tasks have to be fulfilled: 1. Carry out a function check You can set the required enable bits here for the function test. ––> Refer to Chapter 4.2 Move the drive as follows: – Jogging 1 (to the left, 20 % of 3000 RPM motor revolutions) or – Jogging 2 (to the right, 20 % of 3000 RPM) 2. Generate the user program for the PZD area Generating a user program in the DP master to supply the control and status words. ––> Refer to Chapter 4.2 3. Generate the user program for the PKW area Generate the user software the communicate the PKW area. ––> Refer to Chapter 4.3 Siemens AG 2005 All Rights Reserved SIMODRIVE POSMO A User Manual (POS1) – 06.05 Edition 3-77 3 3 Commissioning 05.03 04.01 02.99 3.2 Commissioning the DP master 3.2.2 SIMATIC S7 function blocks Brief description These function blocks make it easier to control and assign parameters for a SIMODRIVE POSMO A positioning motor from the SIMATIC S7 program. This means that a drive, for example, can be parameterized without being knowledgeable about PROFIBUS parameter formats and the task IDs. 3 Which blocks are available? Where are these function blocks? The following function blocks are available: FB 10 CONTROL_POSMO_A (from 02.00) FB 11 PARAMETERIZE_POSMO_A (from 02.00) FB 12 PARAMETERIZE_ALL_POSMO_A (from 05.00) You can obtain all of the function blocks up to Version 1.5 at no charge from your local Siemens office (sales partner). However, these function blocks do not support the ”speed setpoint” mode and will not be further innovated. Function blocks with expanded functional scope (including the ”speed setpoint” operating mode) are available in the software package ”Drive ES SIMATIC” from Version 5.3 onwards. Software Class C Siemens AG accepts no liability and no warranty that these block examples operate error–free. The software license conditions according to Class C apply. ––> Refer to the description of the function blocks which has also been installed Installation Prerequisites: SIMATIC S7 Manager version 4.02 and higher Run the unzipped file ”setup.exe” and following the instructions. The function blocks are then available in the SIMATIC Manager under the ”Posmo A Library Vx” library. The associated description of the function blocks is available as pdf document under: Start ––> Simatic ––> S7 Manuals ––> Posmo A Library Reader’s note In order that you always have an up–to–date description which matches the blocks, please refer to the information on the blocks provided in the PDF document which was also installed. 3-78 Siemens AG 2005 All Rights Reserved SIMODRIVE POSMO A User Manual (POS1) – 06.05 Edition 08.03 02.99 3 Commissioning 3.2 Commissioning the DP master 3.2.3 Parameterizing and start–up tool ”SimoCom A” (from SW 1.5) Prerequisite A PG/PC is required to install the tool; it must fulfill the following minimum requirements: Operating system: Windows 95, Windows 98 or Windows NT Windows ME or Windows 2000 Windows XP 3 32 MB RAM memory 30 MB free memory on the hard disk Where can I get ”SimoCom A”? The ”SimoCom A” parameterizing and start–up tool is available through the Internet as follows: German http://www.ad.siemens.de/mc/html_00/info/download/ English http://www.ad.siemens.de/mc/html_76/info/download/ Which version is the optimum ”SimoCom A” version? The ”SimoCom A” parameterizing and start–up tool can be used for all SIMODRIVE POSMO A drives from SW 1.5 onwards. The functional scope of the ”SimoCom A” tool is continually adapted to the expanded functionality of these drives. In order to parameterize and handle all of the functions of a drive using ”SimoCom A”, the optimum matching ”SimoCom A” must be used. This depends on the drive software release. Reader’s note Which version of ”SimoCom A” optimally matches which drive and which drive software release? Refer to ”SimoCom A” as follows: Help ––> info about ”SimoCom A” ... ––> versions Siemens AG 2005 All Rights Reserved SIMODRIVE POSMO A User Manual (POS1) – 06.05 Edition 3-79 3 Commissioning 02.99 3.2 Commissioning the DP master Installing ”SimoCom A” This is how you install the ”SimoCom A” tool on your PG/PC: Reader’s note The ”readme.txt” file is provided on the software CD. Please observe the information, tips and tricks provided in this file. 3 1. Insert the software CD into the appropriate drive of your PG/PC. 2. Run the ”setup.exe” file in the ”disk1” directory of the required version of ”SimoCom A”. –> START –> RUN –> OPEN SETUP.EXE –> OK 3. Follow the instructions which the installation program displays step– by–step. Result: – The ”SimoCom A” tool has now been installed in the target directory which you selected. – The tool can e.g. be started as follows: –> START –> PROGRAMS –> SIMOCOMA –> SimoComA –> mouse click Un–installing ”SimoCom A” This is how you can un–install the ”SimoCom A” parameterizing and start–up tool from your PG/PC: Using the program/operation of ”SimoCom A” The ”SimoCom A” tool can be e.g. un–installed as follows: –> START –> PROGRAMS –> SIMOCOMA –> un–install SimoComA –> mouse click Using the Control Panel just like any other Windows program – Select the ”control panel” –> START –> SETTINGS –> CONTROL PANEL – Double–click on the ”Software” symbol – Select the ”SimoCom A” program from the selection field – Press the ”add/remove...” button and then follow the instructions Online operation, ”SimoCom A” with drive You can go into online operation as follows: Online operation via the CP 5511/CP 5611 directly with the fieldbus PC/PG <––> CP 5511/CP 5611 <––> PROFIBUS <––> drives Online operation via the MPI interface of SIMATIC S7 PC/PG <––> MPI <––> PROFIBUS <––> drives 3-80 Siemens AG 2005 All Rights Reserved SIMODRIVE POSMO A User Manual (POS1) – 06.05 Edition 05.03 02.99 3 Commissioning 3.2 Commissioning the DP master Prerequisites for online operation The following prerequisites must be fulfilled in order to establish online operation between ”SimoCom A” and a drive via the PROFIBUS DP fieldbus: 1. Communication modules, if ”connect via PROFIBUS” – CP 5511 (PROFIBUS coupling via PCMCIA card) Structure: PCMCIA card, type 2 + adapter with 9–pin SUB–D socket connector to connect to PROFIBUS. Order No. (MLFB): 6GK1551–1AA00 or – CP 5611 (PROFIBUS coupling through a short PCI card) Structure: Short PCI card with 9–pin SUB–D socket to connect to PROFIBUS. Order No. (MLFB): 6GK1561–1AA00 – CP 5613 (PROFIBUS connection via a short PCI card) Structure: Short PCI card with 9–pin SUB–D socket to connect to PROFIBUS, diagnostic LEDs, PROFIBUS controller ASPC2 StepE Order No. (MLFB): 6GK1561–3AA00 For newer PGs, this communications interface is already included. 2. SIMATIC CPU, if ”connect via MPI interface” A routing–capable SIMATIC–CPU is required for a coupling via MPI interface. 3. S7–DOS from V5.0 The software is also installed when installing ”SimoCom A”. 4. Connecting cable – between CP 5511 or CP 5611 and the PROFIBUS fieldbus or – between the MPI interface from the PG and SIMATIC CPU Note Going online/offline in cyclic operation via PROFIBUS: While PROFIBUS is in cyclic operation, ”SimoCom A” with CP xxxx can be attached or disconnected from the fieldbus via the following plug–in cable without creating a fault. Order No. (MLFB): Siemens AG 2005 All Rights Reserved SIMODRIVE POSMO A User Manual (POS1) – 06.05 Edition 6ES7901–4BD00–0XA0 (plug–in cable) 3-81 3 3 Commissioning 05.03 02.99 3.2 Commissioning the DP master Settings for ”SimoCom A” For ”SimoCom A”, communications should be set as follows via PROFIBUS–DP: Options – Settings – Communications ––> ”Interface” dialog” With ”For ”Go online” connect via” set the following: ––> ”direct connection”, if a coupling is directly established using the fieldbus or ––> ”routed via S7”, if coupled via an MPI interface 3 Online operation can be directly established to the drive directly via the fieldbus using the ”Go online” function. Example: Online operation via PROFIBUS PG/PC SIMATIC S7–300 (CPU: S7–315–2–DP) ”SimoCom A” parameterizing and start–up tool MPI or Setup.exe CP 5511 or CP 5611 ÄÄ ÄÄ or or First note (here the master) CP 5613 ––> Switch–in the terminating resistor PROFIBUS–DP At the last node (in this case at the left) ––> switch in the terminating resistor (refer to Chapter 2.3.1) Set the PROFIBUS node address for the slaves (refer to Chapter 2.3.1) Fig. 3-5 3-82 Example for online operation via PROFIBUS: ”SimoCom A” <––> 2 drives Siemens AG 2005 All Rights Reserved SIMODRIVE POSMO A User Manual (POS1) – 06.05 Edition 02.99 3 Commissioning 3.2 Commissioning the DP master Entry into ”SimoCom A” Prerequisites: The parameterizing and start–up tool ”SimoCom A” is installed on the PG/PC and can be started. The following basic screen is displayed after the first start: 3 Fig. 3-6 Basic display of ”SimoCom A” Note This is what you really need to know when using ”SimoCom A”: The program attempts to ”think with you”: If you select a command, which is presently not available for a specific reason (e.g. you are offline and wish to ”move an axis ”), then the program does what you would probably wish it to do: It goes ”online”, and offers you a list of drives and after the required drive has been selected, it opens the traversing window. However, if you do not wish to do this, then you can exit and continue as required. Only the information is provided in the dialog boxes which must be available as a result of the selected configuration. Please observe the information on ”SimoCom A” in Table 3-1. Siemens AG 2005 All Rights Reserved SIMODRIVE POSMO A User Manual (POS1) – 06.05 Edition 3-83 3 Commissioning 02.99 3.2 Commissioning the DP master Information on ”SimoCom A” Table 3-1 The information in the following provides basic information on data on how to handle the parameterizing and commissioning tool ”SimoCom A”. Information on ”SimoCom A” Function 3 Tasks which can be handled using ”SimoCom A” Description Check the wiring (go into the Online Help: connection diagrams) Establish a connection to the drive to be parameterized Change the parameters – The essential parameters are changed, dialog–prompted – You can change all of the parameters using the expert list Traverse the axis Diagnose the drive status – Obtain an overview of all of the connected drives and their status – Detect the connected hardware – Display the terminal status – Alarms and information on how they can be removed Carry–out diagnostics – Parameterize test sockets (DAU1, DAU2). Selected signals in the drive can be routed to the test sockets for measurement with an oscilloscope. Save the results – Save the parameters in the drive FEPROM – Save the parameters in a file/open a file – Print the parameters Compare parameter sets This allows the difference between 2 parameters sets to be identified. Initialize the drive The drive can be initialized using this function. It is then necessary to configure a drive. Load the factory setting The status of a drive when originally shipped can be established using this function. Generate a user parameter list. The user can include a parameter in this list. This list has the same functionality as the expert list. Language Menu ”Option/Settings/Language” Browser The browser (the lefthand window) can be set to the following areas via the lower buttons: Parameter (Par) Operator control (OpCo) Diagnostics (Diag) Close/open the browser: Menu ”Options/settings/browser” 3-84 Siemens AG 2005 All Rights Reserved SIMODRIVE POSMO A User Manual (POS1) – 06.05 Edition 02.99 3 Commissioning 3.2 Commissioning the DP master Table 3-1 Information on ”SimoCom A”, continued Function Description Working offline ... in other words, you are working on the computer only and have no connection to a drive. Only the opened files are included in the browser under ”Operate”. Working online ... in other words, you are connected to one or more drives and ”SimoCom A” also recognizes these drives. This is the case if ”SimoCom A” has already searched for the interface once. You go online, if Your default is set in the menu ”Options/Settings/Communications” (this is realized when starting ”SimoCom A”) Select it with the operation ”Find online drives” During online operation, the opened files and all drives available via the interface are found in the browser under ”Operation”. Note: The parameters displayed via ”SimoCom A” are not cyclically read. Working in the drive or in the file You can work directly in the drive or only at the PC in the file, but only with one data set at any one time. For example, you can be connected with a POSMO A – 300 W (4A) and a POSMO A – 75 W (6A), so that you have access to the parameter sets in both of the drives – and at the same time have several files open. All of these parameter sets are displayed in the browser under ”Operate” and also in the menu ”File”. If you select ”Drive 4A”, then you will see the current status and parameters of drive 4A – but no others. When changing over, for example to the ”My.par” file, then you only see the parameters associated with this file. Parameters files which have been opened can be re–closed using the”File/Close file” menu. Assign the PC the master control ... means that the ”DP Slave POSMO A” should be controlled from the PC. How is the control authority transferred to the PC? The C1 master must signal OFF 1, OFF 2 or OFF 3 Transfer the control authority to the PC using the menu ”Operator control/ control authority for PC” Returning the control authority ... means that the ”DP Slave POSMO A” should be controlled from the C1 master. How is the control authority returned? Bring the drive to a standstill Withdraw the PC controller enable Procedure when commissioning Recommendation: Set the browser to ”Parameter” and work through the following dialog boxes one after the other ”Configuration – re–configure drive” ––> ”Mechanical system” ––> ”Traversing blocks”. 1. Configuration ... enter the drive type, gearbox stage and braking option (only for 300 W motor) used. If this data is changed, this causes the parameters, which are dependent on it, to be re–calculated, i.e. changes previously made to the parameters involved are overwritten. 2. Mechanical system ... here you can define the mechanical system being used (e.g. rotary axis?, external gearbox?). Siemens AG 2005 All Rights Reserved SIMODRIVE POSMO A User Manual (POS1) – 06.05 Edition 3-85 3 3 Commissioning 05.03 02.99 3.2 Commissioning the DP master Table 3-1 Information on ”SimoCom A”, continued Function 3 Description 3. Limits ... here, you can define the basic limit values and properties of all of the position–controlled or speed–controlled traversing blocks. This defines the characteristics of the time–velocity profile and, for speed control sets, the characteristics of the time–speed profile. The maximum current and the maximum overcurrent of the drive can be defined. 4. Digital I/O ... both digital inputs/outputs can be parameterized here. The function of an input/output can be very quickly defined by selecting a text. It is then still possible to display the actual status of the input/output in SimoCom A or, to invert an input/output. 5. Monitoring ... here, you can define several parameter values which are required for correct and safe sequence of a traversing motion. These included, e.g.: Software limit switch Maximum following error Precise stop and standstill window Faults and warnings, which are possible in operation, can also be re–defined here. 6. Controller ... here, you can define the parameters of the control loop. 7. Traversing blocks (only the pos mode) ... here, you can generate the traversing programs by parameterizing the individual traversing blocks. 8. Referencing (only the pos mode) ... here, you can generate the traversing program in an automated way which allows a reference approach travel to a BERO with or without direction reversal. ... here, you can define the parameters for the speed setpoint interface. 9. Speed setpoint interface (only n–set mode, from version 4.0 onwards) Traverse the drive After the drive has been configured, you can already move the axis from the PC. Call: Menu ”Operate/Jog/ ...” or menu ”Operate/MDI/ ...” 3-86 Siemens AG 2005 All Rights Reserved SIMODRIVE POSMO A User Manual (POS1) – 06.05 Edition 02.99 3 Commissioning 3.2 Commissioning the DP master Table 3-1 Information on ”SimoCom A”, continued Function Expert list Description You can influence the complete parameter set of a drive using the expert list, i.e. you can individually change each parameter. In this case, the operator is not additionally supported by dialog boxes. Parameterization using the expert list should only be used in exceptional cases. Operating information: 3 Call: Menu ”Start–up/Additional parameters/Expert list” The standard value and the value limits for the actual parameters are displayed via the tooltip. Modified values only become effective after pressing the Enter key or if another parameter was selected. Values which are not active have a yellow background. Expert list selected ––> Menu ”List” or the righthand mouse key The following functions can be executed in this window: Data transfer – Display filter: Here, you have the possibility of selecting as to which data should appear in the expert list: e.g. all data or only the controller data. – Search: Using F3 (or menu ”List/Search), you can search for specific terminals. For instance, you can search for ”temp” if you wish to know the value for the electronics temperature. – Bit–coded values: With the cursor, go to the line and press F4 (or menu ”List/bit value”). You then obtain a plain text display of the individual bits and can select these at a click of the mouse. Also here, the program attempts to ”think with you”: If you are presently working on a drive and select File/Download into drive” then the program assumes that you wish to download a file, still to be selected, into this particular drive. If a file is presently open, then the program assumes that using the same command, you wish to download this open data set into a drive still to be selected. If these assumptions are not applicable, then you can always undo by canceling. Integrated help The ”SimoCom A” tool is equipped with an integrated help function which supports you when using the ”SimoCom A” and the ”SIMODRIVE POSMO A” drive. You can call the help function for ”SimoCom A”: Using the menu ”Help/help subjects ...” By pressing the ”Help” button By pressing key ”F1” Siemens AG 2005 All Rights Reserved SIMODRIVE POSMO A User Manual (POS1) – 06.05 Edition or or 3-87 3 Commissioning 02.99 3.2 Commissioning the DP master 3.2.4 Parameterizing and start–up tool C1 master ”SIMODRIVE POSMO A PROFIBUS MASTER” Brief description 3 The ”SIMODRIVE POSMO A PROFIBUS MASTER” allows data to be transferred between a PC, PG or notebook as Class 1 master (C1 master) with SIMODRIVE POSMO A via the PROFIBUS–DP fieldbus. A connection to PROFIBUS is implemented using the SIMATIC NET DP programming interface. Reader’s note Limitations and important information should be taken from the readme file supply with the system. A description of the tool is available as online help. You will find installation instructions on the last installation floppy disk. What can the C1 master do? The most important functions of the master include: Controlling SIMODRIVE POSMO A via control signals Displaying status signals (e.g. status word, actual values) Programming, selecting and starting traversing blocks Reading and writing individual parameters Saving and downloading all parameters (including the traversing blocks) Establishing the factory presetting, etc. Where can I obtain the C1 master? You can obtain the master at no charge from your local Siemens office (sales partner). The software is available through the Internet as follows: German http://www.ad.siemens.de/mc/html_00/info/download/ English http://www.ad.siemens.de/mc/html_76/info/download/ 3-88 Siemens AG 2005 All Rights Reserved SIMODRIVE POSMO A User Manual (POS1) – 06.05 Edition 05.03 02.99 3 Commissioning 3.2 Commissioning the DP master System requirements As a minimum, the following hardware and software environment is required in order to operate the C1 master: The PG, PC or Notebook must have – Operating system: Windows 95/98 – 32 MB RAM memory – 10 MB free memory on the hard disk 3 Requirements placed on the communications – CP 5511 (PROFIBUS coupling via PCMCIA card) Structure: PCMCIA card, type 2 + adapter with 9–pin SUB–D socket connector to connect to PROFIBUS. Order No. (MLFB): 6GK1551–1AA00 – CP 5611 (PROFIBUS connection via a short PCI card) Structure: Short PCI card with 9–pin SUB–D socket to connect to PROFIBUS. Order No. (MLFB): 6GK1561–1AA00 – CP 5613 (PROFIBUS connection via a short PCI card) Structure: Short PCI card with 9–pin SUB–D socket to connect to PROFIBUS, diagnostic LEDs, PROFIBUS controller ASPC2 StepE Order No. (MLFB): 6GK1561–3AA00 For newer PGs, this communications interface is already included. Software requirements – SIMATIC NET, SOFTNET–DP/Windows 98 NT 4.0/5.0 or newer Order No. (MLFB): 6GK1704–5DW–3AA0 – TCL/TK Interpreter Version 8.0 (this is included in the installation software) Un–installing the C1 master? This is how you can un–install the C1 master from your PG/PC: Select the ”control panel” –> START –> SETTINGS –> CONTROL PANEL Double–click on the ”Software” symbol Select the program to be uninstalled Press the ”add/remove...” button and then follow the instructions Siemens AG 2005 All Rights Reserved SIMODRIVE POSMO A User Manual (POS1) – 06.05 Edition 3-89 3 Commissioning 05.03 02.99 3.3 Commissioning an axis 3.3 Commissioning an axis The appropriate parameters must be appropriately set to adapt the axis. 3 Parameters for general settings (refer to Chapter 5.6.2) Parameters for monitoring functions (refer to Chapter 5.6.2) The most important parameters for general settings are: P1 Axis type P2 Travel per gearbox revolution P3 Gearbox ratio P4 Dimension unit P8 Maximum speed P10 Maximum velocity P22 Maximum acceleration The most important parameters for monitoring functions are: P6 Software limit switch, start P7 Software limit switch, end P12 Maximum following error P14 Standstill range Note There are neither software switches nor traversing range limits in the n–set mode (from SW 2.0). The drive must always be able to rotate endlessly and therefore to be parameterized as rotary axis. It must be de–referenced. 3-90 Siemens AG 2005 All Rights Reserved SIMODRIVE POSMO A User Manual (POS1) – 06.05 Edition 04.01 02.99 3 Commissioning 3.3 Commissioning an axis Example: Parameterizing a linear axis How are the assumed values represented in Fig. 3-7 in the appropriate parameters? Motor Gearbox 3000 RPM 1 : 4.5 Traversing range –1000 1000 Table POSMO A 20 ÍÍÍÍÍÍÍÍÍ 3 Spindle Fig. 3-7 Example: Parameterizing the linear axis P1 = 0 :Axis type, linear axis P2 = 20 :Travel per gearbox revolution P3 = 4.5 :Gearbox ratio P4 = 0 :Dimension units mm P6 = –1000 :SW limit switch, start P7 = 1000 :SW limit switch, end P8 = 3000 :Maximum speed P10 = 13333.33 :Maximum velocity :vmax = 3000 RPM 1/4.5 20 mm = 13333.33 mm/min When parameterizing a linear axis, the maximum possible traversing range is automatically defined as +/– 200000 mm/degrees/inch. This means that, the software limit switches are de–activated (P0005=P0006) or the software limit switches are active but the drive has not been referenced, so that it can be traversed up to a maximum of +/–200000 mm/degrees/inch. Siemens AG 2005 All Rights Reserved SIMODRIVE POSMO A User Manual (POS1) – 06.05 Edition 3-91 3 Commissioning 04.01 02.99 3.3 Commissioning an axis Example: Parameterizing a rotary axis How are the assumed values represented in Fig. 3-8 in the appropriate parameters? Motor Gearbox Gearbox Traversing range 3000 RPM 1 : 4.5 1:4 0 to 360 degrees (modulo 360 degrees) 3 POSMO A Fig. 3-8 Example: Parameterizing a rotary axis P1 = 360 :Axis type, rotary axis, modulo 360 degrees P2 = 360 :Travel per gearbox revolution P3 = 18 (4.5 4) :Gearbox ratio P4 = 1 :Dimension units, degrees P6 = P7 = 0 :For a rotary axes, deactivate the software limit switch P8 = 3000 :Maximum speed P10 = 60000 :Maximum velocity :vmax = 3000 RPM 360 degrees/18 = 60000 degrees/min For a rotary axis, the internal position actual value calculation limits the maximum modulo value with which a drive can be parameterized. The following inter–relationship exists: F in the following is a conversion factor which depends on the dimension system: Dimension system inch: F = 25.4 Dimension system mm/degrees: F=1 POSMO A 75 W: – P1 < 2147483647 P2 / (F 816 |P3|) – P2 > P1 F 816 |P3| / 2147483647 – |P3| < 2147483647 P2 / (F 816 P1) POSMO A 300 W: – P1 < 2147483647 P2 / (F 4096 |P3|) – P2 > P1 F 4096 |P3| / 2147483647 – |P3| < 2147483647 P2 / (F 4096 P1) From SW 1.6, the following applies: When changing P1, P2 or P3, a check is automatically made in the drive as to whether these three parameter values fulfill the appropriate formula. If the modified value lies outside the valid range, then the drive rejects it and the old value is kept. 3-92 Siemens AG 2005 All Rights Reserved SIMODRIVE POSMO A User Manual (POS1) – 06.05 Edition 05.03 02.99 3 Commissioning 3.3 Commissioning an axis 3.3.1 Control structure positioning (pos mode) The structure of the current/speed and position controller in the ”positioning” mode (pos mode) is shown in the following figure. Description P8 P9 P23 Closed–loop speed controlled nset 3 Speed controller 3 Current regulator 5 6 0 u Program control word (PSW.0) 1 sset P21 nset – P17 P54 2 – P10 P15 P22 P23 P19 P57 P18 i P20 set – 1 Closed–loop position controlled iact P16 P28 M 4 Position controller sact Parameters P8 Maximum speed Measuring signals 1 Current actual value P9 Ramp–up time 2 Speed actual value P10 Maximum velocity 3 Speed setpoint P15 Backlash compensation 4 Position actual value P16 Maximum overcurrent 5 Current setpoint from the speed controller P17 P gain, n controller 6 Current setpoint smoothed P18 Integral action time, n controller P19 Kv factor (position loop gain) P20 Current setpoint smoothing Note: These signals can be output via the analog measuring outputs. P21 Speed setpoint smoothing ––> Refer to Chapter 6.3 P22 Maximum acceleration P23 Jerk time constant P28 Maximum current P54 P gain, n controller, standstill (if P56.2 = 1, this was standard before SW 1.3) P57 P gain, holding controller, standstill (if P56.2 = 0, this was standard from SW 1.3) Note: Additional information on the parameters is provided in the parameter list. ––> Refer to Chapter 5.6.2 Fig. 3-9 Closed–loop structure for the ”positioning” mode for SIMODRIVE POSMO A Siemens AG 2005 All Rights Reserved SIMODRIVE POSMO A User Manual (POS1) – 06.05 Edition 3-93 3 Commissioning 05.03 02.99 3.3 Commissioning an axis 3.3.2 Control structure, speed setpoint (n–set mode) The structure of the current/speed controller in the ”speed setpoint” mode (n–set mode) is shown in the following figure. Description 3 Setpoint PROFIBUS–DP P8 PZD 2 P8 P9 P23 P25 Setpoint P880 P3 4096 Speed controller Closed–loop speed controlled 2 Current regulator 3 4 nset u nset P21 5 – P17 P54 P18 P20 iset – 1 iac t P16 PROFIBUS–DP Actual value PZD 2 M P28 na nact 4096 P880 P3 ct Parameters P8 Maximum speed Measuring signals 1 Current actual value P9 Ramp–up time 2 Speed setpoint P16 Maximum overcurrent 3 Current setpoint from the speed controller P17 P gain, n controller 4 Current setpoint smoothed P18 Integral action time, n controller 5 Speed actual value P20 Current setpoint smoothing P21 Speed setpoint smoothing P23 Jerk time constant Note: These signals can be output via the analog measuring outputs. P25 Override, acceleration ––> Refer to Chapter 6.3 P28 Maximum current P54 P gain, n controller, standstill Note: Additional information on the parameters is provided in the parameter list. ––> Refer to Chapter 5.6.2 Fig. 3-10 Closed–loop control structure, ”speed setpoint” mode for SIMODRIVE POSMO A 3-94 Siemens AG 2005 All Rights Reserved SIMODRIVE POSMO A User Manual (POS1) – 06.05 Edition 05.03 02.99 3 Commissioning 3.3 Commissioning an axis 3.3.3 Flow diagram to commission a SIMODRIVE POSMO A Prerequisites: START Define the dimension units (P4: 0=mm, 1=degr., 2=inch) Axis type? (P1) Start–up tool has been installed Communications established between the master and slave 3 yes Rotary axis Modulo? no Modulo value (P1 = 0) Linear axis Enter modulo value (e.g. P1 = 360 degrees) Enter a gearbox step–down ratio (P3, e.g. for 1 : 4,5 ––> P3 = 4.5 Traversing distance per revolution at the gearbox output (P2) Define maximum velocity (P10 = P8 P2/P3) Define maximum acceleration (P22) The acceleration can be increased as a maximum up to drive current limit Define the software limit switch (P6, P7) P6 = P7 ––> SW limit switched de–activated Set monitoring functions P12 (maximum following error) P14 (standstill range) yes, required Optimization? no The speed and position controllers are preset in the factory and these settings should be adequate for most applications To optimize, the parameters of the control unit should be adapted (refer to Fig. 3-9). The analog test outputs can be used to support the optimization routine (refer to Chapter 6.3). END Fig. 3-11 Flow diagram when commissioning the system for the first time in the positioning mode (P700=2) Siemens AG 2005 All Rights Reserved SIMODRIVE POSMO A User Manual (POS1) – 06.05 Edition 3-95 3 Commissioning 05.03 02.99 3.3 Commissioning an axis Prerequisites: Start–up tool has been installed Communications established START between the master and slave n–set operation? 3 no (P700 = 2) Refer to the flow diagram, Fig. 3-11 yes (P700 = 1 Rotary axis (P1 >0.0) Define dimension units (P4: 1 = degr.) Enter a gearbox step–down ratio (P3, e.g. for 1 : 4.5 ––> P3 = 4.5) Traversing distance per revolution at the gearbox output (P2) Normalization of the maximum speed (P880) Define ramp–up time (P9) Define the override velocity (P24) and acceleration (P25) Set monitoring functions P1426 (tolerance bandwidth, speed actual value) P1427 (delay time Nset reached) yes, required Optimization? no The speed controller is pre–set in the factory and this setting should be adequate for most applications To optimize, the parameters of the control unit should be adapted (refer to Fig. 3-10). The analog test outputs can be used to support the optimization routine (refer to Chapter 6.3). END Fig. 3-12 Flow diagram when commissioning the system for the first time in the speed setpoint mode (P700=1) 3-96 Siemens AG 2005 All Rights Reserved SIMODRIVE POSMO A User Manual (POS1) – 06.05 Edition 04.01 02.99 3 Commissioning 3.3 Commissioning an axis 3.3.4 Optimization runs Optimizing the speed and position controllers ! Parameters for optimizing (refer to Chapter 5.6.2) The speed and position controller is preset in the factory and should be adequate for most applications. However, if changes are required, analog measuring outputs can be used to support the optimization procedure (refer to Chapter 6.3). 3 Caution Only appropriately trained personnel with control knowhow may optimize the speed and current controllers. The following parameters must be configured in this order to optimize the speed and position controller: P17 P gain, n controller P18 Integral action time, n controller P20 Current setpoint smoothing P19 Kv factor (position loop gain) P22 Maximum acceleration P21 Speed setpoint smoothing P54 P gain, n controller, standstill (if P56.2 = 1, this was standard before SW 1.3) P57 P gain, holding controller, standstill (if P56.2 = 0, this was standard from SW 1.3) P15 Backlash compensation P23 Jerk time constant Siemens AG 2005 All Rights Reserved SIMODRIVE POSMO A User Manual (POS1) – 06.05 Edition 3-97 3 Commissioning 02.99 06.05 3.3 Commissioning an axis Space for your notes 3 3-98 Siemens AG 2005 All Rights Reserved SIMODRIVE POSMO A User Manual (POS1) – 06.05 Edition Communications via PROFIBUS DP 4.1 4 General information about PROFIBUS DP General information PROFIBUS DP is an international, open fieldbus standard and is defined in the following Standards: European fieldbus EN 50170 Part 2 DIN 19245 Part 1 and 3 IEC 61158 PROFIBUS DP is optimized for fast, data transfer at the field level for time–critical applications. The fieldbus is used for cyclic and non–cyclic data transfer between a master and the slaves assigned to this master. Master and slave For PROFIBUS DP a differentiation is made between master and slave. Master (active bus device) Devices, which represent a master on the bus, define data transfer along the bus, and are therefore known as active bus nodes. For the masters, a differentiation is made between 2 classes: – DP Master class 1 (DPMC1): These are central master systems that exchange data with the slaves in defined message cycles. Examples: SIMATIC S5, SIMATIC S7, etc. – DP Master class 2 (DPMC2): These are devices for configuring, commissioning, operator control and monitoring in bus operations. Examples: Programming units, operator control and visualization devices Slave (passive bus node) These devices may only receive, acknowledge and transfer messages to a master when so requested. Reader’s note The SIMODRIVE POSMO A positioning motor is a slave on the fieldbus. This slave is designated ”DP slave POSMO A” in the following. Siemens AG 2005 All Rights Reserved SIMODRIVE POSMO A User Manual (POS1) – 06.05 Edition 4-99 4 4 Communications via PROFIBUS DP 02.99 4.1 General information about PROFIBUS DP Data transfer technology, baud rate At power–up, the ”DP slave POSMO A” automatically detects the baud rate set on the fieldbus. Data transfer via PROFIBUS Data is transferred between the master and slaves according to the master/slave principle. The drives are always the slaves. When commissioning the fieldbus, the baud rate is defined the same for all devices starting from the master. This permits extremely fast cyclic data transfer. 4 Essential properties of bus communications Table 4-1 For SIMODRIVE POSMO A for communications via PROFIBUS, the following properties are involved: Essential properties of bus communications Which of these does the ”DP slave POSMO A” have? Features Supports 9.6 kbaud Yes Supports 19.2 kbaud Yes Supports 45.45 kbaud Yes Supports 93.75 kbaud Yes Supports 187.5 kbaud Yes Supports 500 kbaud Yes Supports 1.5 Mbaud Yes Supports 3 Mbaud Yes Supports 6 Mbaud Yes Supports 12 Mbaud Yes Supports the FREEZE control command Yes Supports the SYNC control command Yes Supports automatic baud rate search Yes Station number can be changed via software No Addressing The PROFIBUS node address and the terminating resistor are permanently set in the connection cover of SIMODRIVE POSMO A. ––> Refer to Chapter 2.3.1 4-100 Siemens AG 2005 All Rights Reserved SIMODRIVE POSMO A User Manual (POS1) – 06.05 Edition 02.99 4 Communications via PROFIBUS DP 4.1 General information about PROFIBUS DP Protocol for the ”DP slave POSMO A” DP Master Class 1 (PLC, e.g. SIMATIC S7) PROFIBUS–DP 4 PNO Guideline, profile for ”variable–speed drives” Cyclic data transfer: PZD part Non–cyclic data transfer: PKW part DP slave POSMO A Fig. 4-1 Protocol for the ”DP slave POSMO A” Net data structure according to PPOs The structure of the net data for cyclic operation is referred to as a parameter process data object (PPO) in the ”PROFIBUS profile for variable–speed drives”. Reference: /P3/ PROFIBUS Profile for variable–speed drives The net data structure for cyclic data transfer is sub–divided into two areas, which are transferred in each telegram. Process data area (PZD, process data) This area contains the control words, setpoints and status information and actual values. The following data is transferred with the process data: – Control words and setpoints (task: master ––> drive) or – Status words and actual values (responses: drive ––> master) Description: ––> refer to Chapter 4.2 Parameter area (PKW, parameter identification value) This telegram section is used to read and/or write parameters and to read out faults. Description: ––> refer to Chapter 4.3 Siemens AG 2005 All Rights Reserved SIMODRIVE POSMO A User Manual (POS1) – 06.05 Edition 4-101 4 Communications via PROFIBUS DP 02.99 4.1 General information about PROFIBUS DP Telegram structure for cyclic data transfer The telegrams for cyclic data transfer have the following basic structure: Net data (PPO) Protocol frame (header) 4 Fig. 4-2 PPO types Parameter identifier value (PKW) Process data (PZD) Protocol frame (trailer) Telegram structure for cyclic data transfer There are 5 defined PPO types (PPO1 to PPO5). For SIMODRIVE POSMO A, only PPO type 1 (PPO1) can be used. PPO1 is structured as follows: 4 words for the parameter area (PKW area) 2 words for the process data area (PZD area) Table 4-2 Structure of Parameter Process Data Object 1 (PPO 1) Net data PKW PZD Refer to Chapter 4.3 PKE IND 1st word 2nd word Refer to Chapter 4.2 PWE 3rd word 4th word PZD 1 PZD 2 ... 1st word 2nd word ... PPO1 ... Abbreviations: PPO Parameter Process data Object PKW Parameter ID value PKE Parameter ID IND Sub–index, sub–parameter number, array index PWE Parameter value PZD Process data 4-102 Siemens AG 2005 All Rights Reserved SIMODRIVE POSMO A User Manual (POS1) – 06.05 Edition 05.03 02.99 4 Communications via PROFIBUS DP 4.2 Process data (PZD area) 4.2 Process data (PZD area) Structure Table 4-3 The process data area for PPO type 1 consists of 2 words (PZD 1 and PZD 2). Structure of the process data (PZD) Net data PKW PZD 4 Refer to Chapter 4.3 PKE IND 1st word 2nd word PWE 3rd word 4th word PZD 1 PZD 2 ... 1st word 2nd word ... PPO1 ... ”Positioning” mode (P700=2) Bit 15 ... 0 Master ––> slave Control word (STW) Control signals (refer to Chapter 4.2.1) Master <–– slave Status signals (refer to Chapter 4.2.2) Status word (ZSW) ”Speed setpoint” mode (P700=1) Bit 15 ... 0 15 ... 8 7 ... Select block number (AnwSatz) Start byte (STB) Actual block number (AktSatz) Checkback signal byte (RMB) 15 ... 0 0 Master ––> slave Control signals (refer to Chapter 4.2.1) Control word (STW) Speed setpoint, bits 0...14, sign, bit 15 Status word (ZSW) Speed actual value, bits 0...14, sign, bit 15 Master <–– slave Status signals (refer to Chapter 4.2.2) Abbreviations: PKW Parameter ID value STW PZD Process data AnwSatz Select block number PPO Parameter Process data Object STB Start byte ZSW Status word AktSatz Actual block number RMB Checkback signal byte Siemens AG 2005 All Rights Reserved SIMODRIVE POSMO A User Manual (POS1) – 06.05 Edition Control word 4-103 4 Communications via PROFIBUS DP 05.03 02.99 4.2 Process data (PZD area) 4.2.1 Description of the control signals (data to drive) The master issues its commands to the slave using the control word (STW). Control word (STW) (pos mode) Table 4-4 Structure of control word STW for the pos mode Open holding brake/close holding brake (from SW 1.4) Read–in enable/no read–in enable External block change/no external block change Automatic single block operation/automatic Start referencing/stop referencing Control requested/no control requested Jogging 2 ON/jogging 2 OFF Jogging 1 ON/jogging 1 OFF 4 Bit 15 14 13 12 Note: 1 signal/0 signal 11 10 9 8 7 6 5 4 3 2 1 0 Reset the fault memory Activate traversing task (edge) Operating condition/intermediate stop Operating condition for positioning/stop Enable operation/inhibit operation Operating condition/OFF 3 Operating condition/OFF 2 ON/OFF 1 Note: The signals designated in this way must have at least a ”1” signal in order to be able to operate a motor. Furthermore, STW.8 or STW.9 must be set to ”1” for jogging 1 or 2. Table 4-5 Bit Description of the individual signals in the control word (STW) for the pos mode Signal name Signal status, signal description 1 ON Ready 0 ON/OFF 1 0 OFF 1 Shutdown, decelerating along the down ramp, power disconnected, tracking operation. 1 Operating condition Ready 1 Operating condition/OFF 2 0 OFF 2 The power is disconnected and the motor coasts down, power–on inhibit 4-104 Siemens AG 2005 All Rights Reserved SIMODRIVE POSMO A User Manual (POS1) – 06.05 Edition 02.99 4 Communications via PROFIBUS DP 4.2 Process data (PZD area) Table 4-5 Bit Description of the individual signals in the control word (STW) for the pos mode Signal name Signal status, signal description 1 Operating condition Ready 2 Operating condition/OFF 3 0 OFF 3 Deceleration along the current limit, power disconnected from the motor, tracking operation, power–on inhibit 1 Enable operation Ready 3 Enable operation/ inhibit operation 0 4 Inhibit operation Power disconnected from the motor, motor coasts down, ”operation inhibited” status 1 Operating condition for program The signal must be continuously present in order to execute a traversing task. 4 Operating condition for program/stop 0 Stop Deceleration along the current limit. The motor remains stationary with the holding torque. The actual traversing task is rejected. 1 Operating condition for program The signal must be continuously present in order to execute a traversing task. 5 Operating condition for program/intermediate stop 0 Intermediate stop The drive brakes from an active traversing task along the ramp to n = 0 and then remains stationary with the holding torque. The traversing task is not rejected. For a change to bit 5 = 1, the traversing task is continued. 1/0 6 Activate traversing task (edge) 0/1 Each edge enables a traversing task or a new setpoint (toggle bit). An edge change may only be realized if bit 12 of the status word is used to acknowledge that the previous traversing task was accepted. A program start is valid as a traversing task. 1 7 8 Acknowledge faults (0/1 edge) Refer to Chapter 6.2 Reset fault memory 0 – 1 Jogging 1 ON If operation is enabled and positioning is not active ––> the drive traverses closed–loop speed controlled with jogging setpoint 1. Jogging 1 ON/jogging 1 OFF ––> Refer to Chapter 5.4.1 0 Jogging 1 OFF Siemens AG 2005 All Rights Reserved SIMODRIVE POSMO A User Manual (POS1) – 06.05 Edition 4-105 4 Communications via PROFIBUS DP 06.05 02.99 4.2 Process data (PZD area) Table 4-5 Bit Description of the individual signals in the control word (STW) for the pos mode Signal name Signal status, signal description 1 9 Jogging 2 ON If operation is enabled and positioning is not active ––> the drive traverses closed–loop speed controlled with jogging setpoint 2. Jogging 2 ON/jogging 2 OFF ––> Refer to Chapter 5.4.1 0 Jogging 2 OFF 1 Not used or permanent 1 signal 4 From SW 3.0: If P701 = 1 ––> process data (PZD) are accepted 10 Control from PLC requested 0 – From SW 3.0: If P701 = 1 ––> drive state is kept constant (last valid process data with STW.10 = 1) 1 11 Start referencing/ stop referencing Referencing is executed Requirement: Operation enabled 0 Normal operation 1 Automatic single block operation Disables programmed path controlled operation. 12 Automatic single block operation/automatic Each block has to be re–started. 0 Automatic Programmed path controlled operation is effective. 1 13 14 External block change The active block is interrupted and the subsequent block is selected. This is realized, dependent on the program, with approximate positioning or precise stop. External block change/ no external block change When the block change is recognized, the position actual value of the axis is written into P55 (signal position). 0 No external block change 1 Read–in enable Read–in enable/ no read–in enable The following program block is enabled for execution. 0 No read–in enable 1 Open holding brake The integrated holding brake can be controlled using this signal. 15 The signal corresponds to P56.4 (open holding brake). Open holding brake/ brake sequence control effective Note: If the holding brake is controlled using an input terminal with function number 26 (open holding brake), then this signal has no effect. (from SW 1.4) ––> Refer to Chapter 5.5.13 0 4-106 Brake sequence control effective Siemens AG 2005 All Rights Reserved SIMODRIVE POSMO A User Manual (POS1) – 06.05 Edition 02.99 4 Communications via PROFIBUS DP 4.2 Process data (PZD area) Select block number (AnwSatz) The master selects the traversing block to be started by entering the required block number into this control byte. The selection becomes effective, if: If neither a traversing block nor program is active. The program or the traversing block has been completely executed. The program or the traversing block was canceled by an external signal or a fault. Start byte (STB) The start byte is compared with a bit mask ”SMStart” (P86:x) programmed in a traversing block. This means that the program sequence can be influenced via the start byte. P86:x (high byte) = 0: If there is no function The block is not influenced by the start byte. P86:x (high byte) > 0: Function available The block can only be started if the bits, set in P86:x (high byte), are also set in the start byte. The program control can be additionally influenced via P80:x bit 6 and bit 7. Siemens AG 2005 All Rights Reserved SIMODRIVE POSMO A User Manual (POS1) – 06.05 Edition 4-107 4 4 Communications via PROFIBUS DP 05.03 02.99 4.2 Process data (PZD area) Control word (STW) (n–set mode) Table 4-6 The master issues its commands to the slave using control word STW. Structure of the control word (STW) for the n–set mode Open holding brake/close holding brake (from SW 1.4) Reserved Control requested/no control requested 4 Reserved Bit 15 14 13 12 11 10 9 8 7 6 5 4 3 2 1 0 Reset the fault memory Enable setpoint/inhibit setpoint Ramp–function generator start/ramp–function generator stop Ramp–function generator enable Enable operation/inhibit operation Note: Operating condition/OFF 3 1 signal/0 signal Operating condition/OFF 2 ON/OFF 1 Note: The signals designated in this way must have at least a ”1” signal in order to be able to operate a motor. Table 4-7 Bit Description of the individual signals in the control word (STW) for the n–set mode Signal name Signal status, signal description 1 ON Ready 0 ON/OFF 1 0 OFF 1 Shutdown, decelerating along the down ramp, power disconnected, tracking operation. 1 Operating condition Ready 1 Operating condition/OFF 2 0 OFF 2 The power is disconnected and the motor coasts down, power–on inhibit 1 Operating condition Ready 2 Operating condition/OFF 3 0 OFF 3 Deceleration along the current limit, power disconnected from the motor, tracking operation, power–on inhibit 4-108 Siemens AG 2005 All Rights Reserved SIMODRIVE POSMO A User Manual (POS1) – 06.05 Edition 06.05 02.99 4 Communications via PROFIBUS DP 4.2 Process data (PZD area) Table 4-7 Bit 3 4 Description of the individual signals in the control word (STW) for the n–set mode, continued Signal name Enable operation/ inhibit operation Ramp–function generator enable Signal status, signal description 1 Enable operation Ready 0 Inhibit operation Power disconnected from the motor, motor coasts down, ”operation inhibited” status 1 Enables the ramp–function generator The motor accelerates to the speed setpoint along the parameterized ramp 0 Standstill 5 6 Ramp–function generator start/ramp–function generator stop Enable setpoint/ inhibit setpoint 1 Motor accelerates corresponding to the parameterized ramp 0 The speed is kept at the actual value 0/1 Setpoint enable (acceleration along the ramp) 1/0 Setpoint inhibit No ramp–up at standstill While traversing Braking along the ramp 1 7 8, 9 Acknowledge faults (0/1 edge) Refer to Chapter 6.2 Reset fault memory 0 – 1 Not used or permanent 1 signal From SW 3.0: If P701 = 1 ––> process data (PZD) are accepted 0 – From SW 3.0: If P701 = 1 ––> drive state is kept constant (last valid process data with STW.10 = 1) 1 Open holding brake The integrated holding brake can be controlled using this signal. The signal corresponds to P56.4 (open holding brake). Note: If the holding brake is controlled using an input terminal with function number 26 (open holding brake), then this signal has no effect. ––> Refer to Chapter 5.5.13 0 Brake sequence control effective Reserved 10 Control from PLC requested 11 to 14 Reserved 15 The motor does not accelerate up to its speed setpoint While traversing Braking with the maximum acceleration Open holding brake/ brake sequence control effective (from SW 1.4) Siemens AG 2005 All Rights Reserved SIMODRIVE POSMO A User Manual (POS1) – 06.05 Edition 4-109 4 4 Communications via PROFIBUS DP 05.03 02.99 4.2 Process data (PZD area) 4.2.2 Description of the status signals (data from the drive) Status word (ZSW) (pos mode) Table 4-8 The slave signals its current status to the master using the status word (ZSW). Structure of the status word (ZSW) in the pos mode Load power supply available/load power supply failed Within the traversing block/outside the traversing block Drive traversing/drive stationary Setpoint/traversing task acknowledged (edge) Reference point set/no reference point set Reference position reached/outside reference position Control requested/local control No following error/following error 4 Bit 15 14 13 12 11 10 9 8 7 6 5 4 3 2 1 0 Warning present/no warning present Power–on inhibit/no power–on inhibit No OFF 3 present/OFF 3 present No OFF 2 present/OFF 2 present Fault present/no fault present Note: Operation enabled/operation inhibited 1 signal/0 signal Ready or no fault Ready to be powered–up/not ready to be powered–up Table 4-9 Description of the individual signals in the status word (ZSW) in the pos mode Bit Signal name 0 Ready to be powered–up/ not ready to be powered–up 1 Ready or no fault 2 Operation enabled/ operation inhibited Signal status, signal description 1 Power supply powered–up 0 Not ready to power–up 1 Ready 0 Not ready 1 Operation enabled 0 Operation inhibited 1 The drive is faulted and not operational. The drive goes into the power–on inhibit after the fault has been successfully removed and acknowledged. Fault present/ no fault present Which faults are present? 3 ––> refer to P947 (faults) and (refer to Chapter 6.2) ––> P954 (supplementary information, faults/warnings) 4 4-110 No OFF 2 present/ OFF 2 present 0 No fault present 1 No OFF 2 present 0 OFF 2 command present Siemens AG 2005 All Rights Reserved SIMODRIVE POSMO A User Manual (POS1) – 06.05 Edition 08.02 02.99 4 Communications via PROFIBUS DP 4.2 Process data (PZD area) Table 4-9 Bit 5 6 Description of the individual signals in the status word (ZSW) in the pos mode, continued Signal name No OFF 3 present/ OFF 3 present Signal status, signal description 1 No OFF 3 present 0 OFF 3 command present 1 Power–on inhibit The system can only be powered–up using ”OFF 1” followed by ”ON”. Power–on inhibit/ no power–on inhibit 0 No power–on inhibit 1 Warning present The drive still remains operational. Acknowledgment is not required. Which warning is present? ––> refer to P953 (warnings) and ––> P954 (supplementary information, faults/warnings) 0 Warning not present 1 No following error The dynamic target (reference) actual position comparison is made within the defined following error window. The following error window is defined using P12 (maximum following error) (refer to Chapter 5.6.2). 0 Following error 1 Master, Class 1 0 No master Class 1 (but master, Class 2) Note: Before SW 1.4, the following is valid: The signal is not supported (a permanent ”1” signal). 1 Reference position reached Before SW 1.6 the following applies: The position reference value is located at the end of a traversing task within the positioning window. The traversing task was interrupted by a fault, stop or OFF commands. From SW 1.6, the following applies: The behavior is dependent on P56, bit 3: P56.3=1 – The position reference value is located at the end of a traversing task within the positioning window. P56.3=0 – The position reference value is located at the end of a traversing task within the positioning window. – The traversing task was interrupted by a fault, stop or OFF commands. 0 Outside the refer. position 1 Referencing was executed and is valid 0 Valid reference not available Warning present/ no warning present 7 (refer to Chapter 6.2) 8 9 No following error/following error Control requested/ local control (from SW 1.4) 10 11 Reference position reached/ outside reference position Reference point set/ no reference point set Siemens AG 2005 All Rights Reserved SIMODRIVE POSMO A User Manual (POS1) – 06.05 Edition 4-111 4 4 Communications via PROFIBUS DP 04.01 02.99 4.2 Process data (PZD area) Table 4-9 Description of the individual signals in the status word (ZSW) in the pos mode, continued Bit 12 Signal name Setpoint/ traversing task acknowledged (edge) Signal status, signal description 1/0 An edge is used to acknowledge that a new traversing task or setpoint was transferred. 0/1 Same signal level as STW.6 (activate traversing task (signal edge)). 1 13 Drive traversing/drive stationary 4 14 Within the traversing block/ outside the traversing block 15 Load power supply available/ load power supply failed Traversing task is executed (n 0) The drive is stationary after it reaches its target position. 0 Signals the completion of a traversing task or standstill for intermediate stop and stop. 1 Within the traversing block A traversing block is active. 0 Outside the traversing block No traversing block is active. 1 Load power supply available 0 Load power supply failed This corresponds to the ”undervoltage” fault Note: When an undervoltage condition is detected, the appropriate fault is signaled and ZSW.15 is set to ”0”. Before SW 1.3 the following applies: ZSW.15 is set to ”1”, if, when acknowledging the fault, an undervoltage condition is no longer detected. From SW 1.3, the following applies: ZSW.15 is set to ”1” if an undervoltage condition is no longer detected. The fault itself remains until it is acknowledged. ZSW.15 indicates the status of the load power supply, independent of the fault and acknowledgment. Actual block number (AktSatz) The block number of the actual traversing block is entered into this status byte. Checkback signal byte (RMB) The programmed block components ”MMStart”, ”MMStop” and ”MMPos” corresponding to the program sequence are output in this status byte. If no block is active, then the block number of the selected traversing block is signaled back, i.e. the block which should be the next block to be started. This means that the master has information about programmed block for additional processing and evaluation. Checkback signal (feedback) of the terminal status (from SW 1.4), refer to Chapter 5.5.10 RMB.6 RMB.7 4-112 ––> state of terminal 1 ––> state of terminal 2 Siemens AG 2005 All Rights Reserved SIMODRIVE POSMO A User Manual (POS1) – 06.05 Edition 05.03 02.99 4 Communications via PROFIBUS DP 4.2 Process data (PZD area) Status word (ZSW) (n–set mode) Table 4-10 The slave signals its current status to the master using the status word (ZSW). Structure of the status word (ZSW) for the n–set mode Load power supply available/load power supply failed Reserved Drive traversing/drive stationary Status, terminal 2 Status, terminal 1 Ramp–up completed/ramp–up active Control requested/local control Speed in the tolerance bandwidth/ outside the tolerance bandwidth Bit 15 14 13 12 11 10 9 8 7 6 5 4 3 2 4 1 0 Warning present/no warning present Power–on inhibit/no power–on inhibit No OFF 3 present/OFF 3 present No OFF 2 present/OFF 2 present Fault present/no fault present Note: Operation enabled/operation inhibited 1 signal/0 signal Ready or no fault Ready to be powered–up/not ready to be powered–up Table 4-11 Description of the signals in the status word (ZSW) for the n–set mode Bit Signal name 0 Ready to be powered–up/ not ready to be powered–up 1 Ready or no fault 2 Operation enabled/ operation inhibited Signal status, signal description 1 Power supply powered–up 0 Not ready to power–up 1 Ready 0 Not ready 1 Operation enabled 0 Operation inhibited 1 The drive is faulted and not operational. The drive goes into the power–on inhibit after the fault has been successfully removed and acknowledged. Which faults are present? ––> refer to P947 (faults) and ––> P954 (supplementary information, faults/warnings) 0 No fault present 1 No OFF 2 present 0 OFF 2 command present 1 No OFF 3 present 0 OFF 3 command present Fault present/ no fault present 3 (refer to Chapter 6.2) 4 No OFF 2 present/ OFF 2 present 5 No OFF 3 present/ OFF 3 present Siemens AG 2005 All Rights Reserved SIMODRIVE POSMO A User Manual (POS1) – 06.05 Edition 4-113 4 Communications via PROFIBUS DP 05.03 02.99 4.2 Process data (PZD area) Table 4-11 Bit Description of the signals in the status word (ZSW) for the n–set mode, continued Signal name Signal status, signal description 1 6 4 The system can only be powered–up using ”OFF 1” followed by ”ON”. Power–on inhibit/ no power–on inhibit 0 No power–on inhibit 1 Warning present The drive still remains operational. Acknowledgment is not required. Which warning is present? ––> refer to P953 (warnings) and ––> P954 (supplementary information, faults/warnings) 0 Warning not present 1 Speed is within the parameterized tolerance window 0 Speed is outside the parameterized tolerance window 1 Master, Class 1 0 No master Class 1 (but master, Class 2) Note: Before SW 1.4, the following is valid: The signal is not supported (a permanent ”1” signal). 1 Ramp–up completed 0 Ramp–up not completed Warning present/ no warning present 7 (refer to Chapter 6.2) 8 9 Speed in the tolerance bandwidth/outside the tolerance bandwidth Control requested/ local control Power–on inhibit (from SW 1.4) 10 Ramp–up completed/ramp– up active 11 Status, terminal 1 Checkback signal from the parameterized terminal signals 12 Status, terminal 2 Checkback signal from the parameterized terminal signals 1 13 14 4-114 Drive traversing/drive stationary Traversing task is executed (n 0) The drive is stationary after it reaches its target position. 0 Signals the completion of a traversing task or standstill for intermediate stop and stop. Reserved Siemens AG 2005 All Rights Reserved SIMODRIVE POSMO A User Manual (POS1) – 06.05 Edition 05.03 02.99 4 Communications via PROFIBUS DP 4.2 Process data (PZD area) Table 4-11 Description of the signals in the status word (ZSW) for the n–set mode, continued Bit Signal name 15 Load power supply available/ load power supply failed Signal status, signal description 1 Load power supply available 0 Load power supply failed This corresponds to the ”undervoltage” fault Note: When an undervoltage condition is detected, the appropriate fault is signaled and ZSW.15 is set to ”0”. Before SW 1.3 the following applies: ZSW.15 is set to ”1”, if, when acknowledging the fault, an undervoltage condition is no longer detected. From SW 1.3, the following applies: ZSW.15 is set to ”1” if an undervoltage condition is no longer detected. The fault itself remains until it is acknowledged. ZSW.15 indicates the status of the load power supply, independent of the fault and acknowledgment. Siemens AG 2005 All Rights Reserved SIMODRIVE POSMO A User Manual (POS1) – 06.05 Edition 4-115 4 4 Communications via PROFIBUS DP 02.00 02.99 4.2 Process data (PZD area) 4.2.3 Example: Operating the drive via the control signals with jogging 1 The drive should be operated with jogging 1. Example: Traverse drive with jogging 1 Assumptions for the slave: The drive has been completely commissioned is connected to PROFIBUS–DP and is ready to run. PROFIBUS node address = 12 Assumptions for the master: 4 The DP master is a SIMATIC S7 (CPU: S7–315–2–DP) Hardware configuration – PROFIBUS node address = 12 – Part PKW PZD I address 256 – 263 264 – 267 O address 256 – 263 (not shown in the example) 264 – 267 SIMATIC S7–300 (CPU: S7–315–2–DP) PG/PC MPI Control signals STW AnwSatz/STB PAW 264 = 0100 0101 0011 1111 PAB 266 = 0 PAB 267 = 0 PROFIBUS–DP Status signals ZSW AktSatz/RMB PEW 264 = 1111 x011 0011 0111 PEB 266 = 0 PEB 267 = 0 Input signals at the DP slave Output signals at the DP slave DP slave POSMO A PAB, PAW Peripheral output byte, word PEB, PEW Peripheral input byte, word Fig. 4-3 4-116 STW, ZSW Control word, Status word AnwSatz, AktSatz Select block, Actual block STB, RMB Start byte, Checkback signal byte Example: Operating the drive with jogging 1 Siemens AG 2005 All Rights Reserved SIMODRIVE POSMO A User Manual (POS1) – 06.05 Edition 05.03 02.99 4 Communications via PROFIBUS DP 4.2 Process data (PZD area) 4.2.4 Example: The drive should traverse with n–set using the control signals The drive should be operated with n = 500 rpm (gearbox output) in n–set mode. Example: Traverse drive with n–set Assumptions for the slave: The drive has been completely commissioned is connected to PROFIBUS–DP and is ready to run. PROFIBUS node address = 12 4 Assumptions for the master: The DP master is a SIMATIC S7 (CPU: S7–315–2–DP) Hardware configuration – PROFIBUS node address = 12 – Part PKW PZD I address 256 – 263 264 – 267 O address 256 – 263 (not shown in the example) 264 – 267 SIMATIC S7–300 (CPU: S7–315–2–DP) PG/PC MPI Prerequisites: Gearbox ratio is entered in P3 P880 = 4096 Control signals STW PAW 264 = xxxx xxxx x111 1111 PAW 266 = 0000 0001 1111 01000 PROFIBUS–DP Status signals ZSW PEW 264 = 1010 0111 0011 0111 PEW 266 = 0000 0001 1111 0100 Input signals at the DP slave Output signals at the DP slave DP slave POSMO A PAW Peripheral output word PEW Peripheral input word STW, ZSW Control word, Status word Fig. 4-4 Example: Drive should traverse with n–set Siemens AG 2005 All Rights Reserved SIMODRIVE POSMO A User Manual (POS1) – 06.05 Edition 4-117 4 Communications via PROFIBUS DP 05.03 02.99 4.2 Process data (PZD area) 4.2.5 Sequence diagram ”Variable–speed drives” pos mode STW Control word START ZSW Status word p Bit dep. on the program (0 or 1) s Traversing task bit of the STW x Bit not defined (0 or 1) Power–on inhibit ZSW x00x x111 x111 0000 Change from 0 to 1 or 1 to 0 4 Change from 0 to 1 and back again Power ON Change from 1 to 0 and back again Not ready to power–up ZSW = x00x x111 x000 x000 Referencing (homing) ZSW = 100x 1111 0011 0111 Referencing (homing) ON i.e. STW.11 = 1 OFF 1 i.e. STW.0 = OFF 2 active Initialize i.e. STW = 0100 0100 0011 1111 Referencing (homing) OFF i.e. STW.11 = 0 ZSW = 100x x111 0011 0111 Jogging ZSW = 111x x011 0011 0111 Jogging OFF i.e. STW.8/9 = 0 ZSW = xxxx xxxx x1x0 x000 No OFF 2 i.e.. STW.1 = 1 OFF 3 i.e. STW.2 = 0 (from every device state) Operation enabled Jogging ON i.e. STW.8/9 = 1 OFF 2 i.e. STW.1 = 0 (from every device state) OFF 3 active ZSW = xxxx xxxx x10x x000 Traversing task i.e. STW.6 = Stop i.e. STW.4 = Traversing task active ZSW = 11ps xp11 0011 0111 Intermediate stop i.e. STW.5 = 0 No intermediate stop i.e. STW.5 = 1 No OFF 3 i.e. STW.2 = 1 Fault (from every device state) Fault ZSW = xxxx xxxx xxxx 1xxx Intermediate stop ZSW = 110s xp11 0011 0111 Fig. 4-5 4-118 Fault resolved, acknowledge faults i.e. STW.7 = Flow diagram, ”Variable–speed drives” for the pos mode E Siemens AG 2005 All Rights Reserved SIMODRIVE POSMO A User Manual (POS1) – 06.05 Edition 05.03 02.99 4 Communications via PROFIBUS DP 4.2 Process data (PZD area) n–set operation STW Control word START ZSW Status word p Bit dep. on the program (0 or 1) s Traversing task bit of the STW x Bit not defined (0 or 1) Power–on inhibit ZSW x00x x111 x111 0000 Change from 0 to 1 or 1 to 0 Change from 0 to 1 and back again Power ON Change from 1 to 0 and back again 1) Not ready to power–up ZSW = x00x x111 x000 x000 only valid if STW.5 = 0 (the speed actual value is kept constant) OFF 1 i.e. STW.0 = OFF 2 active ZSW = xxxx xxxx x1x0 x000 Initialize i.e. STW = xxxx xxxx x000 1111 No OFF 2 i.e.. STW.1 = 1 OFF 3 i.e. STW.2 = 0 (from every device state) Operation enabled Speed constant i.e. STW.5 = 0 OFF 2 i.e. STW.1 = 0 (from every device state) ZSW = 1x0x xxxx x000 1111 OFF 3 active Enable setpoint i.e. STW.6 = 1 Braking down to zero speed along a ramp ZSW = xxxx xxxx x0x1 1111 Inhibit setpoint i.e. STW.6 = 0 Braking i.e. STW.4 = 0 Speed increases i.e. STW.5 = 1 STW.6 = 11) STW.6 = 01) Inhibit setpoint i.e. STW.6 = 0 Enable setpoint i.e. STW.6 = 1 Speed setpoint is accepted i.e. STW.4/5/6 = 1 (any sequence) Braking i.e. STW.4 = 0 Speed actual value is kept constant ZSW = xxxx xxxx x101 1111 Braking i.e. STW.4 = 0 Braking with maximum acceleration ZSW = xxxx xxxx x0x0 1111 Braking with maximum acceleration ZSW = xxxx xxxx x1x0 1111 Speed constant i.e. STW.5 = 0 Speed constant i.e. STW.5 = 0 Fig. 4-6 No OFF 3 i.e. STW.2 = 1 Ramp–up to the setpoint ZSW = xxxx xxxx x111 1111 Speed constant i.e. STW.5 = 0 ZSW = xxxx xxxx x10x x000 Fault (from every device state) Fault ZSW = xxxx xxxx xxxx 1xxx Fault resolved, acknowledge faults i.e. STW.7 = Flow diagram ”Variable–speed drives” for the n–set mode E Siemens AG 2005 All Rights Reserved SIMODRIVE POSMO A User Manual (POS1) – 06.05 Edition 4-119 4 4 Communications via PROFIBUS DP 05.03 02.99 4.2 Process data (PZD area) Note The following conditions should be observed: Control word STW.4 has priority over STW.6 Control words STW.4 and STW.6 have priority over STW.5 This means: If the drive brakes along the ramp, then when STW.4 is withdrawn, the drive brakes with the maximum deceleration. If STW.5 = 0. STW.4 and STW.6 brake according to how they are defined. If STW.5 is reset while braking, this does not mean that the speed is kept constant. 4 4-120 Siemens AG 2005 All Rights Reserved SIMODRIVE POSMO A User Manual (POS1) – 06.05 Edition 02.99 4 Communications via PROFIBUS DP 4.3 Parameter area (PKW area) 4.3 Parameter area (PKW area) 4.3.1 Structure and description of the parameter area Tasks For PPO Type 1 for the net data, a parameter with 4 words is also transferred. The following tasks are possible using the parameter range: Request parameter value (reading parameters) Change parameter value (writing into parameters) 4 Request number of array elements Structure of the PKW area Table 4-12 The PKW area comprises the parameter ID (PKE), the sub–index (IND) and the parameter value (PWE). Structure of the parameter area (PKW) Net data PKW Word PKE IND 1 2 PZD PWE 3 4 1 2 PPO1 Bit 15 ... 0 Bit 15 ... 0 Value with the appropriate data type Word 3 Bit 15 ... 8 7 Sub–parameter number (index) Bit 15 ... 12 AK Value range 0 ... 15 refer to Table 4-13 11 Re– served Word 4 ... Reserved 10 ... 0 Word 2 0 PNU Value range 1 ...1 999 Word 1 Abbreviations: PPO Parameter Process data Object PWE Parameter value PKW Parameter ID value PKE Parameter ID PZD AK Process data Task and response ID IND Sub–index, sub–parameter number, array index PNU Parameter number Siemens AG 2005 All Rights Reserved SIMODRIVE POSMO A User Manual (POS1) – 06.05 Edition 4-121 4 Communications via PROFIBUS DP 02.99 4.3 Parameter area (PKW area) Task telegram IDs The IDs for the task telegram (master ––> slave) should be taken from the following table 4-13: Table 4-13 Task IDs (master ––> slave) Function Task identification 4 Response IDs (positive) 0 No task 1 Request parameter value 2 Change parameter value (word) 1 3 Change parameter value (double word) 2 – – 4, 5 0 1, 2 6 Request parameter value (array) 4, 5 7 Change parameter value (array word) 4 8 Change parameter value (array double word) 5 9 Request number of array elements 6 Note: The negative response ID is 7, i.e. this is a task that cannot be executed ––> fault ID, refer to Table 4-15 Response telegram, IDs The IDs for the response telegram (master ––> slave) should be taken from the following table 4-14: Table 4-14 Response IDs (slave ––> master) Function Response ID 0 No response 1 Transfer parameter value (word) 2 Transfer parameter value (double word) 3 – 4 Transfer parameter value (array word) 5 Transfer parameter value (array double word) 6 Transfer number of array elements 7 Task cannot be executed (with error number) 8, 9 and 10 Fault evaluation – If tasks cannot be executed, the slave responds as follows: Outputs a response ID = 7 Outputs an error number in word 4 of the parameter area 4-122 Siemens AG 2005 All Rights Reserved SIMODRIVE POSMO A User Manual (POS1) – 06.05 Edition 04.01 02.99 4 Communications via PROFIBUS DP 4.3 Parameter area (PKW area) Table 4-15 Error IDs for the ”DP slave POSMO A” Error ID Error cause 0 Illegal parameter number (the parameter does not exist) 1 Parameter value cannot be changed (the parameter can only be read or is write protected) 2 Upper or lower value limit exceeded 3 Incorrect sub–index 4 No array (parameter does not have any sub–parameter) 5 Incorrect data type 9 Descriptive element not available 17 Task cannot be executed due to the operating state 18 Other error Data types 4 The data type, to which the parameter is assigned, must be written into the parameter values using the PKW mechanism. The following apply for the format names (acc. to the recommended PROFIBUS guideline): Table 4-16 Parameter formats Format Length (byte) C4 4 Description Fixed–point value, 32 bit with 4 decimal places (value = number/10 000) Example: P11 = 75 000 ––> 7.5 mm I4 4 32–bit integer number (32–bit integer) I2 2 16–bit integer number (16–bit integer) T4 4 32–bit time constant (as for unsigned 32–bit integer) Time as a multiple of the sampling time of 10 ms T2 2 16–bit time constant (as for unsigned 16–bit integer) Time is entered as a multiple of the sampling time Speed control = 1 ms, position control = 10 ms N2 2 Linear normalized value 200 %: 100 % 4 000hex (16 384dec) E2 2 Linear fixed–point value, 16 bit with 7 binary decimal places 0 0hex, 128 4 000hex V2 2 Bit sequence 16 Boolean quantities combined in 2 octets Note All data are saved in the little Endian format (the same as for the PROFIBUS Standard). Siemens AG 2005 All Rights Reserved SIMODRIVE POSMO A User Manual (POS1) – 06.05 Edition 4-123 4 Communications via PROFIBUS DP 02.99 4.3 Parameter area (PKW area) Transferring traversing blocks For SIMODRIVE POSMO A the traversing blocks are saved in parameters which means that they can only be read and changed via the PKW mechanism. Reader’s note The parameters for the traversing blocks are described in Chapter 5.3.2. When mapping the traversing blocks to the parameters, the parameter number defines the block components (position, velocity, etc.) and the sub–parameter number of the traversing block number. 4 Example: P0081.17 ––> position, parameter 81 with traversing block 17 Addressing in the PKW mechanism: The parameter ID (PKE) addresses the block components. The sub–index (IND) addresses the traversing block number This means that a complete set can only be read or changed one after the other via the individual components. Additionally: 1. Machine data is mapped to the parameters 2. Additional parameters (e.g. P947, P953, etc.) are possible from the PROFIBUS Guidelines. Rules for processing tasks/responses The following rules apply for the task/response processing: 1. A task or a response can always only be referred to one parameter. 2. The master must repeat a task until it has received the appropriate response from the slave (clock cycle: 10 ms). 3. The slave provides the response until the master has formulated a new task. 4. The master recognize the response to a task which it issued: – by evaluating the response ID – by evaluating the parameter number (PNU) – if required, by evaluating the parameter index (IND) 5. For response telegrams that contain parameter values, the slave, for this cyclic repeat process, always responds with the updated value. This involves all responses to the tasks ”request parameter value” and ”request parameter value (array)”. 4-124 Siemens AG 2005 All Rights Reserved SIMODRIVE POSMO A User Manual (POS1) – 06.05 Edition 02.99 4 Communications via PROFIBUS DP 4.3 Parameter area (PKW area) Note The time between sending a change task and when the change actually becomes effective is not always the same. No maximum times can be guaranteed! The response times of the PKW channel depend on the utilization level of the fieldbus. 4 Siemens AG 2005 All Rights Reserved SIMODRIVE POSMO A User Manual (POS1) – 06.05 Edition 4-125 4 Communications via PROFIBUS DP 02.00 02.99 4.3 Parameter area (PKW area) 4.3.2 Example: Reading parameters via PROFIBUS Example: Reading parameters via PROFIBUS It at least one fault is present, the drive fault buffer (P947) should be read out and buffered on the master side. Assumptions for the slave: The drive has been completely commissioned is connected to PROFIBUS–DP and is ready to run. PROFIBUS node address = 12 4 Assumptions for the master: The DP master is a SIMATIC S7 (CPU: S7–315–2–DP) Hardware configuration – Node address = 12 – Part PKW PZD What has to be programmed on the master side? I address 256 – 263 264 – 267 O address 256 – 263 264 – 267 (not shown in the example) If the input signal from the peripheral area (I/O area) I265.3 (ZSW1.3, fault present/no fault present) has a ”1” signal, then the following must be executed on the master side (refer to Fig.4-7): 1. Programming SFC14 and SFC15 The standard functions SFC14 ”Read slave data” and SFC15 ”write slave data” are required in order to consistently transfer more than 4 bytes. 2. Request parameter value – Write into the PKW output signals (AB 256 – 263) with AK = 1, PNU = 947, IND = 0, PWE = no significance 3. Read parameter value and save – Evaluate the PKW input signals (EB 256 – 263) – If AK = 1, PNU = 947, IND = 0 and PWE = xx ––> then OK ––> P947 = xx read and buffer – If AK = 7, ––> then not OK ––> evaluate the fault number in EW 262 (refer to Table 4-15) 4-126 Siemens AG 2005 All Rights Reserved SIMODRIVE POSMO A User Manual (POS1) – 06.05 Edition 02.00 02.99 4 Communications via PROFIBUS DP 4.3 Parameter area (PKW area) SIMATIC S7–300 (CPU: S7–315–2–DP) PG/PC MPI PKW area (task) PKE IND PWE1 PWE2 PAW 256 = 0001 0011 1011 0011 PAW 258 = 0000 0000 0000 0000 PAW 260 = 0000 0000 0000 0000 PAW 262 = 0000 0000 0000 0000 AK = 1, PNU = 947 Index = 0 Value (high) Value (low) 4 PROFIBUS–DP Input signals at the DP slave Output signals at the DP slave PKW area (response) DP slave POSMO A PKE IND PWE1 PWE2 PEW 256 = 0001 0011 1011 0011 PEW 258 = 0000 0000 0000 0000 PEW 260 = 0000 0000 0000 0000 PEW 262 = 0000 0001 0010 0000 PAW Peripheral output word AK = 1, PNU = 947 Index = 0 Value (high) Value (low) Bit 8 ––> Speed controller at its limit Bit 5 ––> Standstill monitoring Refer to Chapter 6.2 PEW Peripheral input word PKE Parameter ID IND Sub–index, sub–parameter number, array index PWE Parameter value AK Task and response ID PNU Parameter number Fig. 4-7 Example: Reading parameters via PROFIBUS Note The SIMATIC S7 ”FB 11” block can be used to ”Read parameters via PROFIBUS”. ––> Refer to Chapter 3.2.2 Siemens AG 2005 All Rights Reserved SIMODRIVE POSMO A User Manual (POS1) – 06.05 Edition 4-127 4 Communications via PROFIBUS DP 02.00 02.99 4.3 Parameter area (PKW area) 4.3.3 Example: Writing parameters via PROFIBUS Example: Reading parameters via PROFIBUS Dependent on a condition, a value of 786.5 mm should be written into the position in traversing block 4 (P81:4) via PROFIBUS. Assumptions for the slave: The drive has been completely commissioned is connected to PROFIBUS–DP and is ready to run. PROFIBUS node address = 12 4 Assumptions for the master: The DP master is a SIMATIC S7 (CPU: S7–315–2–DP) Hardware configuration – Node address = 12 – Part PKW PZD What has to be programmed on the master side? I address 256 – 263 264 – 267 O address 256 – 263 264 – 267 (not shown in the example) If the condition to write the position in traversing block 4 is available, then the following must occur on the master side (refer to Fig. 4-8): 1. Write the parameter value (define task) – Write to PKW output signals (AB 256 – 263) with AK = 8, PNU = 81, IND = 4, PWE = 7 865 000dec = 78 02 A8hex 2. Check the task – Evaluate the PKW input signals (EB 256 – 263) – If AK = 5, PNU = 81, IND = 4 and PWE = 7 865 000dec ––> the OK – If AK = 7, ––> then not OK ––> evaluate the fault number in EW 262 (refer to Table 4-15) 4-128 Siemens AG 2005 All Rights Reserved SIMODRIVE POSMO A User Manual (POS1) – 06.05 Edition 02.00 02.99 4 Communications via PROFIBUS DP 4.3 Parameter area (PKW area) SIMATIC S7–300 (CPU: S7–315–2–DP) PG/PC MPI PKW area (task) PKE IND PWE1 PWE2 PAW 256 = 1000 0000 0101 0001 PAW 258 = 0000 0100 0000 0000 PAW 260 = 00 78hex (e.g.) PAW 262 = 02 A8hex (e.g.) AK = 8, PNU = 81 Index = 4 Value (high) Value (low) 4 PROFIBUS–DP Input signals at the DP slave Output signals at the DP slave PKW area (response) DP slave POSMO A PKE IND PWE1 PWE2 PEW 256 = 0101 0000 0101 0001 PEW 258 = 0000 0100 0000 0000 PEW 260 = 00 78hex (e.g.) PEW 262 = 02 A8hex (e.g.) AK = 5, PNU = 81 Index = 4 Value (high) Value (low) PAW Peripheral output word PEW Peripheral input word PKE Parameter ID IND Sub–index, sub–parameter number, array index PWE Parameter value Fig. 4-8 AK Task and response ID PNU Parameter number Example: Writing parameters via PROFIBUS Note The SIMATIC S7 ”FB 11” block can be used to ”write parameters via PROFIBUS”. ––> Refer to Chapter 3.2.2 Siemens AG 2005 All Rights Reserved SIMODRIVE POSMO A User Manual (POS1) – 06.05 Edition 4-129 4 Communications via PROFIBUS DP 02.99 4.4 Settings at the PROFIBUS DP master 4.4 Settings at the PROFIBUS DP master 4.4.1 General information on the DP master Performance features of the PROFIBUS devices 4 PROFIBUS devices have different performance features. The characteristic features of the slaves are summarized in a master device file (GSD) so that all of the master systems can correctly address the DP slave. The features for the various master systems are summarized in a standardized master device file (GSD). What is a master device file (GSD file)? A master device (GSD file) describes the features of a DP slave in a precisely defined, uniform format in accordance with EN 50 170, Volume 2, PROFIBUS. GSD files are saved in the directory ”\GSD”. The associated bitmaps are saved in the directory ”\Bitmaps”. GSD file for the ”DP slave POSMO A” The master device file (GSD) for the ”DP slave POSMO A” is available as ASCII file as follows: File name: SIEM8054.GSD Where is the GSD file for the ”DP slave POSMO A”? From your local Siemens office (sales partner) or via the Internet http://www.profibus.com/gsd/ Data transfer (consistent/ inconsistent) The PKW must be consistently transferred. Consistent data include input/output data areas, which from the contents, contain closed information which cannot be accommodated using a byte, word or double–word structure. For consistent data transfer, you require the SFC 14 and SFC 15 blocks in SIMATIC S7. 4-130 Siemens AG 2005 All Rights Reserved SIMODRIVE POSMO A User Manual (POS1) – 06.05 Edition 02.99 4 Communications via PROFIBUS DP 4.4 Settings at the PROFIBUS DP master Setting up consistent data transfer (e.g. for SIMATIC S7) Proceed as follows to generate the required user program for consistent data transfer: Open ”OB1” (object folder). In the Program Editor, enter the ”CALL SFC 14” command and press the RETURN key. The SCF 14 is displayed with its input and output parameters. Supply the input and output parameters. Now, call–up SFC 15 and appropriately supply the parameters. When the two SFCs are called–up, the associated block shells for these standard functions are automatically copied into the block object folder from the STEP 7 standard library. In order to be able to simply check the data transfer in the application example, allocate the data, as shown in the example, to an appropriate data block. Now save OB 1 with save and close the window of the program editor for the OB 1. Now create DB 40. Using the task bar, change from Windows 95/NT to the SIMATIC Manager and select the blocks object folder. The block objects, system data, OB 1, DB 40, SFC 14 and SCF 15 are in this object folder. Transfer these with ”download all blocks” into the CPU 315–2DP. After the transfer has been completed, the CPU 315–2DP must be switched back to RUN. If the motor is connected, the LED display elements for the DP interface are dark. The CPU must be in the RUN condition. Siemens AG 2005 All Rights Reserved SIMODRIVE POSMO A User Manual (POS1) – 06.05 Edition 4-131 4 4 Communications via PROFIBUS DP 02.99 4.4 Settings at the PROFIBUS DP master 4.4.2 Installing the new master device files (GSD) Installing a new GSD file? When configuring a PROFIBUS–DP system where DP devices are to be incorporated, which the configuring tool does not ”know” then the new GSD files must be appropriately installed. How is a new GSD file installed with SIMATIC S7? New GSD files are installed in ”HW Config” as follows: TOOLS ––> Installing new GSD file 4 Importing station GSD All of the GSD files of DP devices of a plant/system are saved in the project (e.g. for SIMATIC S7). This means that it is always possible to edit this project using an additional configuring/engineering tool, to which the project was transferred – even if the GSD files for the DP devices to be used have still not been installed on this device. GSD files that are only saved in existing projects, but not in the general GSD directory, are transferred into the generally valid GSD directory using GSD import. This means that they can be used for additional new projects. 4.4.3 Operating the slave with a third–party master GSD file required The master device data (GSD file) supplied with the equipment contains all of the information/data that a DP master system requires in order to incorporate SIMODRIVE POSMO A as DP standard slave in its PROFIBUS configuration. If the third–party master system allows a GSD file to be directly incorporated, then the file for the DP slave can be directly copied into the appropriate sub–directory. 4-132 Siemens AG 2005 All Rights Reserved SIMODRIVE POSMO A User Manual (POS1) – 06.05 Edition Description of the Functions 5.1 5 Operating mode (from SW 2.0) SIMODRIVE POSMO A can be either parameterized in the ”positioning” or ”speed setpoint” mode. Mixed operation is not supported. Speed setpoint (P700 = 1) (from SW 2.0) In the ”speed setpoint” mode (n–set mode) a speed setpoint can be entered via PROFIBUS DP; the speed is then controlled to this speed setpoint at the gearbox output. Note In this particular operating mode, only modulo axes (p1 > 0) are permissible. Software limit switches cannot be activated. The following functions are possible in the ”speed setpoint” mode: Rotary axis Jerk limiting Changeover, metric/inch Control sense reversal Digital I/O Holding brake Speed setpoint, interface Hardware limit switches Reader’s note Information on the various functions, refer to Chapter 5. Siemens AG 2005 All Rights Reserved SIMODRIVE POSMO A User Manual (POS1) – 06.05 Edition 5-133 5 5 Description of the Functions 05.03 02.99 5.1 Operating mode (from SW 2.0) Positioning (P700 = 2) In the ”positioning” mode (pos mode), 27 archived traversing blocks can be traversed in the drive. The traversing blocks offer various possibilities for the block change enable (P80, P81) and the positioning type (P80.1: Relative or absolute). The following functions are possible in the ”positioning” mode: Homing Flying measurement/actual value setting (from SW 1.4) Travel to fixed stop Linear/rotary axis Backlash compensation and correction direction (from SW 1.4) Jerk limiting 5 Changeover, metric/inch Reversing the control sense (from SW 1.3) Standstill monitoring (zero–speed monitoring) Digital I/O Jogging without PROFIBUS and parameterization (from SW 1.4) Standalone mode (without bus communication) (from SW 1.2) Holding brake (from SW 1.4) Software limit switch Hardware limit switch (from SW 2.0) Note The factory setting is the ”positioning” mode! Reader’s note Information on the various functions, refer to Chapter 5. 5-134 Siemens AG 2005 All Rights Reserved SIMODRIVE POSMO A User Manual (POS1) – 06.05 Edition 06.05 05.03 02.99 5 Description of the Functions 5.2 ”Speed setpoint” mode (P700 = 1) (from SW 2.0) 5.2 ”Speed setpoint” mode (P700 = 1) (from SW 2.0) 5.2.1 General information on the ”speed setpoint” mode Description For operation with a DP master, a speed setpoint can be cyclically input into the POSMO A 75 W/300 W drives via PROFIBUS DP. The speed actual value is also cyclically fed back via PROFIBUS DP. The ”speed setpoint” mode is activated via P700 = 1 and de–activated via P700 = 2; however, only power–on is effective. The active operating mode is displayed in P930. 5 Note The following control bit must be set to change most of the parameters in the ”speed setpoint” mode: STW.0 = 0 (ON/OFF 1) or STW.4 = 0 (ramp–function generator enable) Corresponds to the state ”no traversing block active” in the ”positioning mode”. If the factory pre–setting is downloaded, then the ”speed setpoint” mode is immediately de–activated and the system goes into the ”positioning” mode. Note Before changing the operating mode, the factory pre–setting should be downloaded using P970. This allows a defined initial status to be achieved. Reader’s note Closed–loop control structure for the speed setpoint interface, refer to Chapter 3.3.2. Siemens AG 2005 All Rights Reserved SIMODRIVE POSMO A User Manual (POS1) – 06.05 Edition 5-135 5 Description of the Functions 05.03 02.99 5.2 ”Speed setpoint” mode (P700 = 1) (from SW 2.0) Transmission elements The speed setpoint and the speed actual feedback value are transferred using PZD data. Primary speed setpoint: Input n–set (PZD2) PROFIBUS–DP (STW) 7FFFhex ... 1000hex (= P880) ... 0000hex ... 8000hex np = PZD2 P880 P3 4096 Limiting (P8) If +/– np greater than/less than +/– P8 ––> Limiting to +/– P8 Ramp-fct. generator Act. value (PZD2) 5 PROFIBUS–DP (ZSW) Fig. 5-1 7FFFhex ... 1000hex (= P880) ... 0000hex ... 8000hex Speed setpoint Hex value to feed back the speed actual value: nact 4096 nact = P880 P3 ( ) M hex Actual speed value Transfer, speed setpoint/actual value Reader’s note PZD data, refer to Chapter 4.2. 5.2.2 Ramp–function generator General information The ramp–function generator is used to limit the acceleration when the speed setpoint changes as a step function. POSMO A transfers the speed setpoint from the DP master to the ramp–function generator as soon as it is in a specific state of the PROFIBUS state machine (refer to Chapter 4.2.2). How do the software limit switches function? At run–up, the software limit switches are automatically de–activated (P6 = P7) and a rotary axis parameterized. In this case, P1 is set to the maximum value which corresponds to the parameterized values P2 and P3. P1 may not be set to zero in ”speed setpoint” mode so that no more traversing range limits can be activated. Referencing is not possible. 5-136 Siemens AG 2005 All Rights Reserved SIMODRIVE POSMO A User Manual (POS1) – 06.05 Edition 06.05 02.99 5 Description of the Functions 5.2 ”Speed setpoint” mode (P700 = 1) (from SW 2.0) The software limit switches must remain de–activated so that the drive can always rotate endlessly. This is the reason that in the speed setpoint mode the drive must be parameterized as rotary axis and be de– referenced. Input/output signals for the ramp–function generator For the ramp–function generator, the following signals are used: Input signals: – Ramp–function generator enable (STW.4 = 1) – Ramp–function generator start/ramp–function generator stop (STW.5 = 1) – Enable setpoint/inhibit setpoint (STW.6 = 1) Output signals: – Speed in the tolerance bandwidth/speed outside the tolerance bandwidth (ZSW.8) – Ramp–up completed/ramp–up not completed (ZSW.10) RFG input nset t RFG output nset nact P1426 P1426 t Speed in the tolerance bandwidth (ZSW.8) t Ramp–up completed (ZSW.10) t0 t1 t t > P1427 t = t1 – t0 Delay time P1427: Ift > P1427, then ”ramp–up completed” (ZSW.10 = 1) Fig. 5-2 Signal characteristics for the ramp–function generator Siemens AG 2005 All Rights Reserved SIMODRIVE POSMO A User Manual (POS1) – 06.05 Edition 5-137 5 5 Description of the Functions 06.05 05.03 02.99 5.2 ”Speed setpoint” mode (P700 = 1) (from SW 2.0) 5.2.3 Direction of rotation reversal P880 is used to normalize the speed which is obtained at the gearbox output of the motor when a setpoint of 1000hex (4096dec) is entered using control word STW. If a negative value is entered into P880, then, in addition, the motor direction of rotation is inverted. There is the following assignment between inversion, direction of rotation, and setpoint: Without inversion, the motor rotates clockwise for a positive setpoint With inversion, the motor rotates anti–clockwise for a positive setpoint Definition of the direction of rotation: 5 When viewing the output shaft, the shaft rotates counter–clockwise The motor direction of rotation is counter–clockwise When viewing the output shaft, the shaft rotates clockwise The motor direction of rotation is clockwise 5.2.4 Displays the position actual value The position actual value can be set with P40 when commissioning the system and so that the axis position can be tracked. P40 corresponds with the settings of P1 to P4. Note The system does not go into the ”drive referenced” state when writing into P40. The write from P40, the drive must be in closed–loop control, but with the condition STW.4 = 0 (internal setpoint = 0). 5.2.5 Adaptation of the speed controller At standstill, the speed controller gain (P17) is changed–over to P54 (P gain, speed controller standstill). 5-138 Siemens AG 2005 All Rights Reserved SIMODRIVE POSMO A User Manual (POS1) – 06.05 Edition 05.03 02.99 5 Description of the Functions 5.2 ”Speed setpoint” mode (P700 = 1) (from SW 2.0) 5.2.6 Parameters for n–set operation The following parameters are used for the general parameterization in the ”speed setpoint” mode: 5.2.7 P8 Maximum speed P9 Ramp–up time P25 Override, acceleration P58 Holding brake, brake opening time P59 Speed, close holding brake P60 Holding brake, brake delay time P61 Holding brake, controller inhibit time P700 Selector switch mode P880 Normalizing N–SET P930 Actual operating mode P1426 Tolerance bandwidth, speed actual value P1427 Delay time Nset reached 5 Terminal signals It is not possible to feed back the terminal signals as was the case previously (pos mode). This is because the feedback signal byte (RMB) is used to display the speed actual value. The relevant bits of the control and status word in the n–set mode are interlocked with the terminals using the appropriate parameterization (P31/P32). Feedback signals of the terminals is realized using status word ZSW (n–set). ––> ZSW.11: Feedback signal, terminal 1 ––> ZSW.12: Feedback signal, terminal 2 Siemens AG 2005 All Rights Reserved SIMODRIVE POSMO A User Manual (POS1) – 06.05 Edition 5-139 5 Description of the Functions 05.03 02.99 5.3 Programming the traversing blocks (only in the pos mode, P700 = 2) 5.3 Programming the traversing blocks (only in the pos mode, P700 = 2) 5.3.1 Overview of the traversing blocks and programs Traversing blocks and programs There are a total of 27 traversing blocks for SIMODRIVE POSMO A. The components are emulated in parameters and the traversing blocks in sub–parameters. The sub–parameter number corresponds to the traversing block number. The traversing blocks are programmed by writing the appropriate parameters into SIMODRIVE POSMO A. Traversing blocks and programs: 5 Table 5-1 Traversing blocks and programs (factory default setting) Jogging – Jogging + Single blocks Program 1 Program 2 Program 3 1 2 3 – 12 13 – 17 18 – 22 23 – 27 P80:1 P80:2 P80:3 – :12 P80:13 – :17 P80:18 – :22 P80:23 – :27 Components PSW (Program control word) P81:1 P81:2 P81:3 – :12 P81:13 – :17 P81:18 – :22 P81:23 – :27 Target position P82:1 P82:2 P82:3 – :12 P82:13 – :17 P82:18 – :22 P82:23 – :27 Velocity or speed P83:1 P83:2 P83:3 – :12 P83:13 – :17 P83:18 – :22 P83:23 – :27 Acceleration P84:1 P84:2 P84:3 – :12 P84:13 – :17 P84:18 – :22 P84:23 – :27 Timer value P85:1 P85:2 P85:3 – :12 P85:13 – :17 P85:18 – :22 P85:23 – :27 Signal position P86:1 P86:2 P86:3 – :12 P86:13 – :17 P86:18 – :22 P86:23 – :27 SMStart, MMStart P87:1 P87:2 P87:3 – :12 P87:13 – :17 P87:18 – :22 P87:23 – :27 MMStop, MMPos Note: Note: Traversing blocks 1 and 2 are permanently reserved for jogging. Traversing blocks 3 to 27 are set in the factory. 5-140 The allocation of block numbers to individual traversing blocks and programs can be changed using P99:21 (Program Manager). Siemens AG 2005 All Rights Reserved SIMODRIVE POSMO A User Manual (POS1) – 06.05 Edition 02.99 5 Description of the Functions 5.3 Programming the traversing blocks (only in the pos mode, P700 = 2) Difference: Single block– program The single traversing blocks and programs have the same structure referred to the parameter structure. The following is valid for single traversing blocks: – These blocks must be individually selected and started. – The program–specific instructions which occur in the traversing blocks (e.g. path mode) are ignored in the traversing blocks (refer to Table 5-6). The following is valid for programs: – A program is started by selecting and starting a block within the program. The additional blocks are then automatically executed as programmed. How are single blocks and programs defined? Blocks 3 to 27 can be combined to form programs via P99:21 (Program Manager). The following rules apply when defining programs: 1. The value, saved under an index of P99:21, is the block number of the first block in the appropriate program area. 2. The block number of the last block in the program area is obtained from the start of the block of the next area minus 1. 3. Valid block starts lie in the range between 3 and 27. 4. The last block of the last valid program area is 27. 5. All block numbers from the first block of the first program area are single blocks. 6. All entries from P99:21 are evaluated in the sequence of the index until an invalid block start or a value less than the previous value is found. The factory default setting for P99:21 is as follows: Table 5-2 P99:21 (program management) (factory default setting) Index P99:21 Value Note: 1 2 3 4 5 6 ... 19 20 13 18 23 0 0 0 ... 0 0 Program 3 Block 23 – 27 Program 2 Block 18 – 22 Program 1 Block 13 – 17 refer to Table 5-1 Siemens AG 2005 All Rights Reserved SIMODRIVE POSMO A User Manual (POS1) – 06.05 Edition 5-141 5 5 Description of the Functions 02.99 5.3 Programming the traversing blocks (only in the pos mode, P700 = 2) Pre–assignment of the traversing blocks 3 ... 27 Table 5-3 Traversing blocks 3 to 27 are preset as follows: Pre–assignment of traversing blocks 3 ... 27 (factory presetting) Presetting of standard traversing blocks 31) Parameters 5 271) Value ... Parameters Value Components P80:3 3 ... P80:27 3 PSW (program control word) P81:3 0 ... P81:27 0 Target position P82:3 100 ... P82:27 100 Velocity or speed P83:3 100 ... P83:27 100 Acceleration P84:3 0 ... P84:27 0 Timer value P85:3 0 ... P85:27 0 Signaling position P86:3 0000Hex ... P86:27 0000Hex SMStart, MMStart P87:3 0000Hex ... P87:27 0000Hex MMStop, MMPos 1) Traversing blocks 3 to 27: Traverse with the maximum speed and maximum acceleration 0 mm relative Such traversing blocks are zero blocks. Such a block can be very simply converted into a standard positioning block by setting the target position and program control word (PSW). Pre–assignment of traversing blocks 1 and 2 for jogging Table 5-4 Traversing blocks 1 and 2 are reserved for jogging and are pre–assigned as follows: Pre–assignment of traversing blocks 1 and 2 for jogging (factory presetting) Pre–assignment of traversing blocks for jogging 11) Parameters 22) Value Parameters Value Components P80:1 0 P80:2 0 PSW (program control word) P81:1 0 P81:2 0 Target position P82:1 –100 P82:2 100 Velocity or speed P83:1 100 P83:2 100 Acceleration P84:1 0 P84:2 0 Timer value P85:1 0 P85:2 0 Signaling position P86:1 0000Hex P86:2 0000Hex SMStart, MMStart P87:1 0000Hex P87:2 0000Hex MMStop, MMPos 1) Traversing block 1: Traverse with maximum speed and maximum acceleration in a negative direction 2) Traversing block 2: Traverse with maximum speed and maximum acceleration in a positive direction 5-142 Siemens AG 2005 All Rights Reserved SIMODRIVE POSMO A User Manual (POS1) – 06.05 Edition 02.99 5 Description of the Functions 5.3 Programming the traversing blocks (only in the pos mode, P700 = 2) 5.3.2 Structure and description of the traversing blocks Structure of the traversing blocks Table 5-5 The traversing blocks are emulated in parameters as follows: Parameters for traversing blocks Block memory... Block 1 80:1 Block 2 80:2 ... ... Description Components PSW Min. Standard Memory Max. Units Format ... 1) 2) Block 27 0000Hex – FFFFhex – V2 ... 80:27 –2 105 – 2 105 mm C4 ... 81:27 N2 ... 82:27 N2 ... 83:27 (Program control word) 81:1 81:2 ... Target position Degrees inch 82:1 83:1 82:2 83:2 ... ... Velocity or speed –1005) Acceleration 0 – 100 % 3) – 100 % 4) 84:1 85:1 84:2 85:2 ... ... Timer value 0 Signaling position –2 105 – 2 106 10 ms T4 ... 84:27 – 2 mm C4 ... 85:27 105 Degrees inch 86:1 86:2 ... SMStart, MMStart 0000Hex – FFFFhex – V2 ... 86:27 87:1 87:2 ... MMStop, MMPos 0000Hex – FFFFhex – V2 ... 87:27 1) The task ID to change a value can be derived from the data width (2 or 4) specified in the format. Examples: I2 ––> AK = 2 for array parameters AK = 7, C4 ––> AK = 3 for array parameters AK = 8 2) Formats: ––> refer to Chapter 4.3, Table 4-16 3) Traversing blocks 1 and 2: Speed = P82:x P26 P24 P8 Traversing blocks 3 to 27: Closed–loop speed controlled operation: Speed = P82:x P24 P8 Closed–loop position contr. operation: Velocity = P82:x P24 P10 4) Traversing blocks 1 and 2: Acceleration = P83:x P27 P25 P9 Traversing blocks 3 to 27: Closed–loop speed contr. operation: Acceleration = P83:x P25 P9 Closed–loop position controlled mode: Accel. = P83:x P25 P22 5) Negative value: ––> Reversal of the motor direction Siemens AG 2005 All Rights Reserved SIMODRIVE POSMO A User Manual (POS1) – 06.05 Edition 5-143 5 5 Description of the Functions 02.99 5.3 Programming the traversing blocks (only in the pos mode, P700 = 2) PSW (Program control word, P80:28) Table 5-6 Bit Structure of the program control word (PSW, P80:28) Description Signal status, description 1 Enter position and velocity (position control) 0 Enter speed (speed control index) Positioning type 1 Relative 1 (only for positioning) 0 Absolute 1 Traverse as soon as the timer no longer runs 2 Timer type 0 Traverse as long as the timer is running Logic operation between timer with start byte 1 Traverse if timer or start byte condition is fulfilled 3 0 Traverse if timer and start byte condition is fulfilled Return program jump (M18) 1 Jump to the start of the program after the end of block 4 0 No response 1 Continuous path mode 0 5 The program control word defines the general properties and characteristics of a traversing block. Motion type Effective for single blocks yes yes no no yes Approximate positioning to the following program block The following block is immediately processed when the time to apply the brake is reached Pos., velocity, motion type, positioning type, traversing type 5 Traversing type 10 66 POSITIONINGABSOLUTE Continuous path mode 30 100 POSITIONINGABSOLUTE Continuous path mode 20 33 POSITIONINGABSOLUTE Precise stop Example: Program with 3 traversing blocks v 100 66 no Brake application point 33 t –33 Block 1 5-144 Block 2 Block 3 Siemens AG 2005 All Rights Reserved SIMODRIVE POSMO A User Manual (POS1) – 06.05 Edition 02.00 02.99 5 Description of the Functions 5.3 Programming the traversing blocks (only in the pos mode, P700 = 2) Table 5-6 Bit Structure of the program control word (PSW, P80:28), continued Description Signal status, description 0 Effective for single blocks Precise stop The position programmed in the block is precisely approached The axis is braked down to standstill The block is changed when the target area is reached (precise stopping window) A precise stop is always executed at the end of program Pos., velocity, motion type, positioning type, traversing type 5 Traversing type 20 66 POSITIONING ABSOLUTE Precise stop 40 100 POSITIONING RELATIVE Precise stop 10 33 RELATIVE Precise stop POSITIONING v 100 no Example: Program with 3 traversing blocks 66 33 Block 1 6 7 8 Negate start byte condition Block 3 t 1 The block is executed, if at least one of the bits, configured in the start mask, is not set. 0 Normal evaluation 1 The following is valid dependent on the condition defined in SMStart: fulfilled not fulfilled SMStart type (from SW 1.2) Block 2 no then the block is executed then the block is skipped 0 Wait until the start condition is fulfilled according to SMStart. The block is executed if the condition is fulfilled and ”Execute block” is present. Program stop 1 Program end when the end of the block is reached (from SW 1.2) 0 No response Siemens AG 2005 All Rights Reserved SIMODRIVE POSMO A User Manual (POS1) – 06.05 Edition no no 5-145 5 5 Description of the Functions 08.04 02.99 5.3 Programming the traversing blocks (only in the pos mode, P700 = 2) Table 5-6 Bit Structure of the program control word (PSW, P80:28), continued Description Signal status, description 1 5 9 Effective for single blocks Before SW 1.4 the following applies: Set reference position The actual position is set the same as the signaled position at the end of the block. In conjunction with this, the end of block means the following: For an exact stop: After entry into the exact stop window For smoothing: After entry into the exact stop window of the next block After withdrawing the start conditions or an external block change: Immediately after entering the exact stop window (from SW 1.2) From SW 1.4, the following applies: no At the end of the block, the position of the last zero mark is set the same as the signal position and the drive is referenced. 0 – Note: Bit 9 = 0 if Bit 10 = 1 (flying actual value setting) or Bit 11 = 1 (flying measurement) or Bit 14 = 1 (reference to occurring zero mark (from SW 2.1) 10 1 Active 0 Inactive Note: Bit 10 = 0 if Bit 9 = 1 (set reference position) or Bit 11 = 1 (flying measurement) or Bit 14 = 1 (reference to occurring zero mark (from SW 2.1) Flying actual value setting (from SW 1.4) 11 1 Active 0 Inactive Note: Bit 11 = 0 if Bit 9 = 1 (set reference position) or Bit 10 = 1 (flying actual value setting) or Bit 14 = 1 (reference to occurring zero mark (from SW 2.1) Flying measurement (from SW 1.4) 12 Traverse along the shortest path (from SW 1.4) 1 Active 0 Inactive yes yes Note: For axes with modulo correction and absolute position data, when the bits are set, the shortest traversing distance is calculated and traversed. yes Programming the traversing direction using the velocity sign is ineffective when the function is active (refer to Chapter 5.5.3). 5-146 Siemens AG 2005 All Rights Reserved SIMODRIVE POSMO A User Manual (POS1) – 06.05 Edition 08.04 02.99 5 Description of the Functions 5.3 Programming the traversing blocks (only in the pos mode, P700 = 2) Table 5-6 Bit Structure of the program control word (PSW, P80:28), continued Description Signal status, description Effective for single blocks Active If a traversing block with the number x+1 should be started after a specified time following traversing block x, this specified time must be configured in traversing block x. The following conditions must be observed for implementation: Traversing block x – Timer mode: ”Traverse as long as the timer is running” (P80:x.2 = 0) – Timer value: desired delay in ms (P84:x) – PSW (program control word): ”Defined delay before next traversing block” (P80:x.13 = 1) Traversing block x+1: – PSW (program control word): ”Wait for start condition” (P80:(x+1).7 = 0) This special delay is handled internally in the drive. It can not be checked via parameter P45 (timer status). In this case, traversing block x+1 starts regardless of the length of the traversing path in traversing block x. If traversing block x is interrupted early due to the loss of a start condition (SMStart), traversing block X+1 also will not start until the time has expired (case 4). v 13 Defined delay time to the next traversing block (from SW 2.1) Case 1: Normal process Block 1 1 Block 2 t t (P80:13 = 1) v 5 Case 2: Traversing block longer than timer value (abortion) no Block 1 Block 2 t t (P80:13 = 1) v Case 3: Terminal function (SimoCom A) Start bit = 1 Block 1 Block 2 t t (P80:13 = 1) v Case 4: Terminal function (SimoCom A) Start bit = 1 Start bit = 0 Block 1 t (P80:13 = 1) Block 2 t t is the timer value of block 1 Siemens AG 2005 All Rights Reserved SIMODRIVE POSMO A User Manual (POS1) – 06.05 Edition 5-147 5 Description of the Functions 08.04 02.99 5.3 Programming the traversing blocks (only in the pos mode, P700 = 2) Table 5-6 Bit Structure of the program control word (PSW, P80:28), continued Description Signal status, description Effective for single blocks Note: Upon an external block change: 13 Defined delay time to the next traversing block (from SW 2.1) If the target position in traversing block x has not yet been reached, an external block change acts like the loss of a start condition in traversing block x. 1 However, if traversing block x+1 has already been selected as the current traversing block (P48), an external block change acts on traversing block x+1. 0 5 Inactive Active The traversing block is aborted upon the occurrence of a zero mark. The reference point is set to the value given in the signal position. 1 14 Reference to occurring zero mark (from SW 2.1) If this function is used together with a digital input (BERO) that is configured with an additional cam monitoring (P31/P32), referencing only takes place if a cam signal edge has occurred in accordance with P56.7. If the corresponding signal has not occurred at the digital input, the drive is de–referenced upon reaching the zero mark. In this case, error 711/912 is signaled. yes Inactive Note: 0 15 5-148 Reserved – Bit 14 = 0 if Bit 9 = 1 (set reference position) or Bit 10 = 1 (flying actual value setting) or Bit 11 = 1 (flying measurement) – – Siemens AG 2005 All Rights Reserved SIMODRIVE POSMO A User Manual (POS1) – 06.05 Edition 02.99 5 Description of the Functions 5.3 Programming the traversing blocks (only in the pos mode, P700 = 2) Timer value (P84:28) Contains the time required for the timer. A value of 0 de–activates the function. Signaling position (P85:28) When this position is passed, the bits, specified in the MMPos, are set and signaled to the master via the feedback signal byte (RMB). From SW 1.4, the following applies: When the ”set reference position” function is activated (PSW.9 = 1) or ”flying actual value setting” (PSW.10 = 1), this parameter is the setting value. The ”signal position” function is then inactive. SMStart (P86:28, high byte) Contains a mask, that determines which bits of the start byte (STB) in the PZD are to be evaluated as additional start bits to start program blocks. A program block starts as soon as, in addition to the normal start enable signals, all of the configured bits are set. If one of the bits is withdrawn, traversing motion stops and the block is exited. A value of 0 de–activates the function. MMStart (P86:28, low byte) MMStop (P87:28, high byte) MMPos (P87:28, low byte) Contain bit masks, which are OR’d with the status signals (feedback signal byte, RMB) when a pre–defined event occurs. These events include: MMStart: Start of the traversing block Bits that are activated at the start of a traversing block. MMStart is reset at the end of block. MMStop: End of the traversing block (as for ZSW.14) Bits that are activated at the end of a traversing block. MMStop is reset at the start of a new traversing block. MMPos: Passing the signaled position Bits that are activated when passing the signaled position. MMPos is reset when a new traversing block is started. Note: MMPos is ineffective when the ”set reference position” (PSW.9 = 1) or ”flying actual value setting” (PSW.10 = 1) function is activated. Siemens AG 2005 All Rights Reserved SIMODRIVE POSMO A User Manual (POS1) – 06.05 Edition 5-149 5 5 Description of the Functions 02.99 5.3 Programming the traversing blocks (only in the pos mode, P700 = 2) 1 2 3 4 5 6 STW bit 6 ZSW bit 12 1. Start from the master 2. Acknowledgment from the motor MMStart 3. Pass over the signaling position 4. Block completed 5. Start the next block from the master 6. Next block 5 Fig. 5-3 MMPos Signal timing for feedback signals from program blocks Difference: closed–loop speed controlled – closed–loop position controlled 5-150 MMStop The parameters, which are saved in the traversing blocks, are only evaluated if it makes sense in the mode specified by the program control word (PSW). This means, for example, in the speed controlled range, the target position is ignored. Siemens AG 2005 All Rights Reserved SIMODRIVE POSMO A User Manual (POS1) – 06.05 Edition 02.99 5 Description of the Functions 5.3 Programming the traversing blocks (only in the pos mode, P700 = 2) 5.3.3 Selecting and controlling traversing blocks and programs Signals for traversing blocks and programs The following PROFIBUS signals are available to select and control the traversing blocks and programs saved in SIMODRIVE POSMO A: Control signals Status signals Description, refer to Chapter 4.2.1 Description, refer to Chapter 4.2.2 Actual block number Select block number (AktSatz) (AnwSatz) Activate traversing task (edge) (STW.6) Automatic single block operation/automatic Within the traversing block/outside the traversing block SIMODRIVE POSMO A (STW.12) External block change/ no external block change (STW.13) Read–in enable/ no read–in enable (ZSW.14) Drive traversing/drive stationary (ZSW.13) Setpoint/traversing task acknowledged (edge) (ZSW.12) (STW.14) Reference position reached/outside reference position Operating condition/interm. stop (ZSW.10) (STW.5) Fig. 5-4 Operating condition/stop Following error/ no following error (STW.4) (ZSW.8) Signals for traversing block and programs Siemens AG 2005 All Rights Reserved SIMODRIVE POSMO A User Manual (POS1) – 06.05 Edition 5-151 5 5 Description of the Functions 08.04 02.99 5.3 Programming the traversing blocks (only in the pos mode, P700 = 2) 5.3.4 Behavior of speed–controlled traversing blocks Description Speed–controlled traversing blocks use the speed controller to regulate the actual speed to the setpoint speed. Because the actual position value/position setpoint has no influence on this control, the position setpoint is set equal to an actual position value resulting from the speed change. What has to be observed? If a speed–controlled traversing block is terminated by a stop command (e.g. due to expired timer) or by an external block change and no error is present, then: if the SIMODRIVE POSMO A switches to closed–loop position con- 5 trol, the actual position present after the standstill is kept according to the controller setting. If during a speed–controlled traversing block the override speed (P24) is set to zero or the control word STW.5 is set to zero (intermediate stop), then the SIMODRIVE POSMO A remains in speed control and regulates the speed to zero, regardless of the current actual position of the axis. From this follows: ––> If, for example, the drive mechanical system moves from the actual position opposing the maximum possible motor current, then the SIMODRIVE POSMO A controls the mechanical system so that at the new position the actual speed is zero. The positional shift does not affect the closed–loop control. ––> For closed–loop control at zero speed, a minimum drive velocity can occur due to the closed–loop control. This is not evaluated by the drive as the axis has no speed when seen over the average. If the SIMODRIVE POSMO A should keep its position at zero speed, then the closed–loop speed control traversing block must be ended and changed–over to closed–loop position control Note The execution of an intermediate stop, for instance to stop the axis temporarily at a position, is not recommended in speed–controlled traversing blocks due to the behavior described above! 5-152 Siemens AG 2005 All Rights Reserved SIMODRIVE POSMO A User Manual (POS1) – 06.05 Edition 05.03 02.99 5 Description of the Functions 5.4 Operating modes (only the pos mode) 5.4 Operating modes (only the pos mode) As standard, SIMODRIVE POSMO A is in the automatic mode. The operating mode can be changed using the bits in the control word. 5.4.1 Jogging Description Traversing blocks 1 and 2 are reserved for jogging. Note Pre–assignment of traversing blocks 1 and 2 for jogging ––> refer to Chapter 5.3.1 5 The jog mode has the following functions: After setting the appropriate control signal, the jog traversing block is selected, and immediately executed. – Control signal STW.8 Jogging 1 ON/OFF – Control signal STW.9 Jogging 2 ON/OFF After this signal has been withdrawn, the block is stopped. The distance to go is rejected. After this, the block selection is re–activated via the control signal ”SNR”. If both jogging signals are simultaneously set or if the axis is not at standstill due to an active traversing block, then jogging is rejected with an alarm. When jogging, speed and acceleration override are effective: – Speed = P82:x P26 P24 P8 (refer to Chapter 5.6.2) – Acceleration = P83:x P27 P25 P9(refer to Chapter 5.6.2) Stop and intermediate stop do not influence the jogging blocks. Defining the direction of rotation of the motor The following is valid when viewing the output shaft of the positioning motor: If the shaft rotates in the counter–clockwise direction ––> ––> the motor direction of rotation is negative (counter–clockwise) This can be achieved, e.g. using jogging 1 If the shaft rotates in the clockwise direction ––> ––> the motor direction of rotation is positive (clockwise) This can be achieved, e.g. using jogging 2 From SW 1.3, the required motor direction of rotation can be set using P3 (gearbox step–down factor (refer to Chapter 5.5.8)). Siemens AG 2005 All Rights Reserved SIMODRIVE POSMO A User Manual (POS1) – 06.05 Edition 5-153 5 Description of the Functions 02.99 5.4 Operating modes (only the pos mode) 5.4.2 Manual Data Input (MDI) Description For SIMODRIVE POSMO A, the MDI mode is replaced when selecting a single traversing block. New coordinates are programmed by overwriting one of the traversing blocks which is then transferred at the next start. 5.4.3 Automatic Description 5 In the ”automatic mode”, traversing blocks and programs can be selected, started and their behavior significantly influenced via the interface. When programs are run, it is possible to change over into the ”automatic single–block mode” using the control signal STW.12. This is used to test the drive system. 5.4.4 Tracking mode Description If an axis is in the tracking mode, then the control is disabled and its position reference value tracks the actual position actual value. For SIMODRIVE POSMO A, the tracking mode cannot be explicitly selected. In fact, it becomes implicitly active if e.g. closed–loop control is no longer active after withdrawing STW.0. 5-154 Siemens AG 2005 All Rights Reserved SIMODRIVE POSMO A User Manual (POS1) – 06.05 Edition 08.04 02.99 5 Description of the Functions 5.5 SIMODRIVE POSMO A functions 5.5 SIMODRIVE POSMO A functions 5.5.1 Referencing Description Table 5-7 Type For SIMODRIVE POSMO A, an incremental position measuring system is used. In order that the positioning motor identifies the axis zero, the measuring system must be synchronized with the axis. What are the referencing possibilities? Referencing possibilities Approach the visual mark Set the actual value via P40 ––> This position is assigned to the required actual value. Approach the endstop Set the actual value via P40 ––> This position is assigned to the required actual value. Axis without reference cams Approach the visual mark Set STW.11 ––> The position of the last zero mark which was passed is overwritten by the value from P51) (reference point coordinate). Approach the endstop Set STW.11 ––> The position of the last zero mark which was passed is overwritten by the value from P51) (reference point coordinate). Axis with reference cams2) Flying Reference travel to BERO without direction reversal ––> The axis remains stationary after exiting the reference cam. The position of the last zero mark which was passed is overwritten with the reference position1). Sketch ÏÏÏÏÏÏÏÏ ÏÏÏÏÏÏÏÏ ÏÏÏÏÏÏÏÏ ÏÏÏ ÏÏÏÏÏÏÏÏ ÏÏÏÏÏÏÏÏ ÏÏÏÏÏÏÏÏ ÏÏÏ ÄÄÄÄ Reference approach to the BERO with direction reversal ––> The axis remains stationary after exiting the reference cam. The position of the last zero mark which was passed is overwritten with the reference position1). Reference to occurring zero mark (from SW 2.1) Refer to Chapter 5.5.1 ”Flying actual value setting” function (from SW 1.4) Refer to Chapter 5.5.2 1) The actual position to be written is corrected by the distance which was traveled since the last zero mark. 2) This function must be emulated using the existing traversing blocks (refer to the following examples). Siemens AG 2005 All Rights Reserved SIMODRIVE POSMO A User Manual (POS1) – 06.05 Edition 5-155 5 5 Description of the Functions 04.01 02.99 5.5 SIMODRIVE POSMO A functions Secondary conditions when referencing The following limitations apply when referencing: The positioning motor supplies the following zero marks: – 75 W motor ––> 4 zero marks per motor revolution – 300 W motor ––> 1 zero mark per motor revolution The position of the zero mark, which was last recognized, is overwritten with the value in P5 (reference point coordinate) by setting STW.11 (start referencing/stop referencing). The actual position to be written is corrected by the distance which was traveled since the last zero mark. Prerequisite: The axis must be at a standstill and be in closed–loop control. If the axis is moving, then the value is not accepted and an alarm is output. 5 If the motor was not moved after being powered up, i.e. a zero mark has still not been passed, and therefore there is no valid position for a zero mark, then referencing is rejected and a warning output. The ”referenced” status is lost. Generally, the following is valid: ZSW.11 (reference point set/no reference point set) is used to display whether an axis is referenced. Resetting the status ”reference point set” (from SW 1.4) For a stationary axis that has been referenced, the ”no reference point set” state is re–established by writing a 0 into P98. The following applies for a non–referenced axis: – No blocks with absolute position data are executed. – The axis zero of the axis is the position after the drive has been powered up. ! Warning For non–referenced axes, the software limit switches are not monitored. Suitable measures must be implemented in the system (e.g. hardware limit switches) in order to avoid injury to personnel and damage to the machine. 5-156 Siemens AG 2005 All Rights Reserved SIMODRIVE POSMO A User Manual (POS1) – 06.05 Edition 04.01 02.99 5 Description of the Functions 5.5 SIMODRIVE POSMO A functions Setting actual value by writing into P40 The SIMODRIVE POSMO A positioning motor can be referenced at a specific axis position by writing the required actual value into P40 (position actual value). For a stationary axis, this position is accepted as position actual value, and after this, SIMODRIVE POSMO A is considered to have been referenced. Move, e.g. using ”jogging” to the required axis position. Reference the positioning motor by writing the actual value, valid for this axis position, into P40 (position actual value). Note For ”set actual value”, the same conditions must exist as when referencing, i.e. the drive must be closed–loop controlled and be stationary. Set the reference position to the zero mark via the traversing block (from SW 1.4) 5 The reference position can be set to a zero mark using the traversing block as shown in the following program example. Example: Program control word (PSW) = 515dec (10 0000 0011bin) P80:x Bit 9 = 1 ––> Set reference position Bit 1 = 1 ––> relative Bit 0 = 1 ––> enter the position and velocity (closed–loop pos. contr.) Target position = 100.0 mm P81:x Speed = 100 % P82:x Acceleration = 100 % P83:x Time = 0 ms P84:x MeldPos = 50.0 P85:x For this traversing block, the axis traverses through 100 mm relative. At the end of the block, the setting value for the reference position is read from ”MeldPos”, in order to correct the distance moved since the last zero mark. The axis is then referenced. This function corresponds to referencing an axis with reference cams (refer to Table 5-7). Set the actual value via the traversing block (before SW 1.4) The actual value can be set via a traversing block as shown in the above program example. At the end of the block, the position, saved in ”MeldPos” becomes the new actual position of the drive. Siemens AG 2005 All Rights Reserved SIMODRIVE POSMO A User Manual (POS1) – 06.05 Edition 5-157 5 Description of the Functions 02.99 5.5 SIMODRIVE POSMO A functions Reference approach with ”traverse to fixed endstop” The ”travel to fixed stop” function can be used as follows for referencing: Set the current to a permissible value for the fixed endstop. – P28 (max. current) = ”required current” – P16 (max. overcurrent) = ”required overcurrent” Suppress the ”speed controller at the endstop ” fault. – P30.0 = ”1” Fault ”speed controller at its limit” ––> is re–defined to become a warning Traverse to the fixed endstop by jogging When the endstop is reached, it is displayed as follows: – ZSW.7 = ”1” 5 ––> means ”warning present” and – P953.7 = ”1” ––> means ”speed controller at the endstop” Cancel jogging Set a valid position actual value for the fixed endstop position – Write a valid position actual value into P40 P40 = ”requested actual value” Position actual value or – Assign a valid position actual value from P5 The position of the last zero mark is set to the value in P5 (reference point coordinate) by ”start referencing” and ”stop referencing” (STW.11). The actual position to be written is corrected by the distance which was traveled since the last zero mark. Set the ”stop referencing” depending on ”reference point set” (ZSW.11). Reader’s note ”Travel to fixed stop” function 5-158 refer to Chapter 5.5.3 Siemens AG 2005 All Rights Reserved SIMODRIVE POSMO A User Manual (POS1) – 06.05 Edition 02.99 5 Description of the Functions 5.5 SIMODRIVE POSMO A functions Reference point approach to BERO without direction reversal The reference point approach is executed via program. The axis traverses without direction of reversal dependent on the reference cam signal. Zero marks ÄÄÄÄÄ ÄÄÄÄÄ Reference cam signal (e.g. from BERO) Reference mark Reference cams Traversing profile Fig. 5-5 5 Reference travel to BERO without direction reversal Prerequisites: Connect reference cam signal to terminal 1 (X5, I/Q1, refer to Chapter 2.3) Define terminal 1 as input and transfer the input terminal signal directly into the start byte (e.g. start byte bit 7 ––> P31 = 25, refer to Chapter 5.5.10) Program the following traversing program (example): Program block (e.g. block 13) – SMStart bit 7 as start condition – Program control word (PSW) = 224dec (00 1110 0000bin) (E0hex) (closed–loop speed controlled with smoothing, negated start byte, skip when start byte is not fulfilled) – Speed e.g. 20 % (= approach velocity) – Acceleration 100 % Program block (e.g. block 14) – SMStart bit 7 as start condition – Program control word (PSW) = 384dec (01 1000 0000bin) (180hex) (closed–loop speed controlled without negated start byte) – Speed e.g. 5 % (= shutdown velocity) – Acceleration 100 % – Program end when the end of the block is reached Start program As soon as ZSW.14 = ”0” (outside traversing block) is signaled, the reference point can be set with STW.11 (start referencing/stop referencing). Siemens AG 2005 All Rights Reserved SIMODRIVE POSMO A User Manual (POS1) – 06.05 Edition 5-159 5 Description of the Functions 04.01 02.99 5.5 SIMODRIVE POSMO A functions Set reference coordinate The position of the last zero mark before the end of the second program block is therefore set to the value in P5 (reference point coordinate). Set simplified reference position (from SW 1.4) The drive is automatically referenced when the above traversing program is run if the following is specified in the second block: P85:14 (signaling position for block 14) = set ”required reference point coordinate” Set PSW.9 (set reference position) to 1 In this case, the last part of the example above is eliminated. 5 Note If the direction of rotation is reversed in both traversing blocks (negative velocity), the reference point approach is executed in the opposite direction. In order to select the last zero mark at the reference cam as reference point coordinate, the shutdown velocity should be selected low enough, so that when braking after leaving the cam, no other zero marks are passed. Reference cam length A cam length should be selected so that the axis brakes from the approach velocity to the shutdown velocity while still at the cam. 5-160 Siemens AG 2005 All Rights Reserved SIMODRIVE POSMO A User Manual (POS1) – 06.05 Edition 02.99 5 Description of the Functions 5.5 SIMODRIVE POSMO A functions Reference approach to the BERO with direction reversal The reference point approach is executed via program. The axis traverses with direction reversal depending on the reference cam signal. Zero marks Reference mark ÄÄÄÄÄ Reference cam signal (e.g. from BERO) Reference cams Traversing profile Fig. 5-6 5 Reference approach to the BERO with direction reversal Prerequisites: Connect reference cam signal to terminal 1 (X5, I/Q1, refer to Chapter 2.3) Define terminal 1 as input and transfer the input terminal signal directly into the start byte (e.g. start byte bit 7 ––> P31 = 25, refer to Chapter 5.5.10) Program the following traversing program (example): Program block (e.g. block 13) – SMStart bit 7 as start condition – Program control word (PSW) = 224dec (00 1110 0000bin) (E0hex) (closed–loop speed controlled with smoothing, negated start byte, skip when start byte is not fulfilled) – Speed e.g. 20 % (= approach velocity) – Acceleration 100 % Program block (e.g. block 14) – SMStart bit 7 as start condition – Program control word (PSW) = 384dec (01 1000 0000bin) (180hex) (closed–loop speed controlled without negated start byte) – Speed e.g. –5 % (= shutdown velocity with direction reversal) – Acceleration 100 % – Program end when the end of the block is reached Start program As soon as ZSW.14 = ”0” (outside traversing block) is signaled, the reference point can be set with STW.11 (start referencing/stop referencing). Siemens AG 2005 All Rights Reserved SIMODRIVE POSMO A User Manual (POS1) – 06.05 Edition 5-161 5 Description of the Functions 08.03 04.01 02.99 5.5 SIMODRIVE POSMO A functions Set reference coordinate The position of the last zero mark before the end of the second program block is therefore set to the value in P5 (reference point coordinate). Set simplified reference position (from SW 1.4) The drive is automatically referenced when the above traversing program is run if the following is specified in the second block: P85:14 (signaling position for block 14) = set ”required reference point coordinate” Set PSW.9 (set reference position) to ”1” In this particular case, the last section in the example above is eliminated. 5 Note If the direction of rotation is reversed in both traversing blocks, the reference point approach is executed in the opposite direction. In order to select the last zero mark at the reference cam as reference point coordinate, the shutdown velocity should be selected low enough, so that when braking after leaving the cam, no other zero marks are passed. Reference cam length The cam length should be selected, so that the axis brakes from the approach velocity to standstill while still at the cam. Position of the reference cam If the reference cam is not favorably mounted, when the traversing program starts from the cam, a different reference point can be obtained than when starting in front of the reference cam. Remedy: Extend the referencing (homing) program so that initially the axis moves away from the cam. 5-162 Siemens AG 2005 All Rights Reserved SIMODRIVE POSMO A User Manual (POS1) – 06.05 Edition 08.04 02.99 5 Description of the Functions 5.5 SIMODRIVE POSMO A functions Reference to occurring zero mark (from SW 2.1) Use of the function in a traversing program Note Before starting the function, the drive should be de–referenced (set P98 to 0) The following two cases show examples of a referencing program. The blocks in the reference program have the following functions: Block 1: ”Traverse up to cam” Block 2: ”Leave cam” Block 3: ”Reference to occurring zero mark” Block 4: ”Traverse to absolute position” Case 1: 5 Starting in front of the cam (e.g. referencing with direction reversal) Zero marks Reference cam signal Block 1 ÄÄÄÄÄ ÄÄÄÄÄ Zero mark Reference cams Traversing profile Block 4 Block 3 Block 2 Fig. 5-7 Reference to occurring zero mark, start in front of the cam Referencing is performed at the zero mark occurring after leaving the cam. Siemens AG 2005 All Rights Reserved SIMODRIVE POSMO A User Manual (POS1) – 06.05 Edition 5-163 5 Description of the Functions 08.04 02.99 5.5 SIMODRIVE POSMO A functions Case 2: Starting at the cam (e.g. referencing with direction reversal) Zero mark ÄÄÄÄ ÄÄÄÄ Traversing profile Reference cams Block 4 Block 3 Block 2 Block 1 is immediately rejected because the start condition ”traverse up to cam” is rejected. 5 Fig. 5-8 Reference to occurring zero mark, start at the cam Referencing is performed at the zero mark occurring after leaving the cam. The function ”reference to occurring zero mark” can be assigned to an individual traversing block (with the No.: X ) of the drive. The activation takes place with P80:X.14 = 1. The corresponding traversing block (relative position/absolute position/speed–controlled) is executed until occurrence of a zero mark. The drive is referenced at the zero mark to the position given in the signal position (P85:X). If the function is executed in connection with a positioning block (relative position/absolute position), the specified path must pass over a zero mark. A speed–controlled block stops at the zero mark. Note The function ”Reference to occurring zero mark” cannot be used simultaneously with one of the following functions in a traversing block: ”Flying measurement” (P80:X.11 = 1) ”Flying actual value setting” (P80:X.11 = 1) ”Set reference position” (P80:X.9 = 1) Using the function with the help of the parameterizing and start– up tool SimoCom A (from version 4.02.xx) The reference dialog allows the configuration of a referencing program with 4 traversing blocks, in accordance with the diagrams shown in the dialog. 5-164 Siemens AG 2005 All Rights Reserved SIMODRIVE POSMO A User Manual (POS1) – 06.05 Edition 08.04 02.99 5 Description of the Functions 5.5 SIMODRIVE POSMO A functions As in the previous referencing function (before SW 2.1), all required data must be entered in the dialog. This data must then be confirmed with ”Generate traversing program”. Functions of the referencing program: Block X: ”Traverse up to cam” Block X+1: ”Leave cam” Block X+2: ”Reference to occurring zero mark” Block X+3: ”Traverse to absolute position” The selected input terminal is automatically monitored for a cam signal edge through the use of the dialog in SimoCom A. P56.7 can be used to configure whether the cam signal edge to be monitored should be a negative (P56.7 = 0; standard value for leaving the cam) or a positive (P56.7 = 1 leaving an inverted cam). The traversing program generated by the dialog is only created according to the standard setting (setting P56.7 = 0). If no corresponding cam signal edge occurs, the program is aborted (in traversing block X+2) with error message 711 and supplementary information 912. In this case (use of the referencing program with cam monitoring), the drive is de–referenced. Referenced axis when powering up again Before SW 1.2, the following is valid: If a referenced axis is switched–out, then it is still referenced after it has been switched–in again if it was not moved when it was switched– out (refer to ZSW.13 = 0). From SW 1.2, the following applies: Another behavior when the axis is switched–in again can be set using P56 (operating options). ––> refer to Chapter 5.6.2 under P56 Behavior when powering–down For axes with extremely low friction, it should be noted that a motor can move into a preferred position when it is powered–down. In the least favorable case, this uncontrolled compensation movement is 11 degrees on the motor shaft. If the electronics power supply is simultaneously switched–out, then this drive motion is not detected. Possible counter measures include: If there are separate electronics and load power supplies then the electronics power supply must be switched–off with a delay after the load power supply has been switched off. The pulses should be cancelled before switching–off the load and electronics power supply (e.g. using STW.1 = 0). Siemens AG 2005 All Rights Reserved SIMODRIVE POSMO A User Manual (POS1) – 06.05 Edition 5-165 5 5 Description of the Functions 08.02 02.99 5.5 SIMODRIVE POSMO A functions 5.5.2 Flying measurement/actual value setting (from SW 1.4) Note For the ”flying measurement/actual value setting” function, digital input 1 is updated in a 125 µs grid. While the motor is braking, a 0/1 edge is ineffective and the ”flying measurement/actual value setting” function is not executed. Flying measurement (from SW 1.4) The positioning motor can be used for test purposes using the ”flying measurement” function. v 5 Block 18 t Block 19 Input signal ”flying measuring/actual value setting” 1 0 What happens for a 0/1 signal edge? No input signal detected? Fig. 5-9 Brakes along the braking ramp t Block change with delete distance to go The position value is written into P62 (measuring position) Continue the program Traverses as programmed in the block The measured value in P62 (measuring position) is not updated Example: Flying measurement What should be done? The following has to be done in order to use the ”flying measurement” function? 1. Connect the signal transmitter to digital input 1 (X5 terminal I/Q1) ––> the signal transmitter must be high active ––> refer to Chapter 2.3 and 2.4 2. Assign digital input 1 to the ”flying measurement/actual value setting” function ––> In the SimoCom A using the tab ”Par” and entry ”digital inputs/ outputs” ––> by setting SIMATIC S7 P31 to 27 3. Program the traversing block, activating the ”flying measurement” function ––> set PSW.11 to ”1” 4. Read the measured value after a 0/1 signal edge has been detected ––> P62 (measuring position) = measured position value 5-166 Siemens AG 2005 All Rights Reserved SIMODRIVE POSMO A User Manual (POS1) – 06.05 Edition 08.02 02.99 5 Description of the Functions 5.5 SIMODRIVE POSMO A functions Example Position–controlled traversing motion to the cam/BERO with stop if a cam was not detected. v Block 10 Block 9 t Block 11 Input signal ”flying measurement” 1 0 t v Block 10 5 Block 9 t Input signal ”flying measurement” 1 0 Brakes along the braking ramp Block change with delete distance to go What happens for a 0/1 signal edge? The position value is written into P62 t (measuring position) What happens if an edge is not detected? Continue the program (here: block 10) The drive changes after the traversing distance, specified in block 9, to block 10. The drive stops because this does not contain a start condition. This means, that in comparison to a speed–controlled solution, it can be ensured that the drive does not endlessly move if the cam/BERO is either not wired at all or is defective. Fig. 5-10 Example: Position–controlled traversing motion to cam/BERO with stop Using a special configuration of the traversing blocks, the ”flying measurement” function can be executed so that the drive stops if the BERO/cam is not reached within a specified maximum distance. In this particular case, the program is still active and must be interrupted using a stop command. In this case, the first program block selected is – e.g. block No. 9. What should be done? The following has to be done in order to use the ”flying measurement” function? 1. Connect the signal transmitter to digital input 1 (X5 terminal I/Q1) ––> the signal transmitter must be high active ––> refer to Chapter 2.3 and 2.4 Siemens AG 2005 All Rights Reserved SIMODRIVE POSMO A User Manual (POS1) – 06.05 Edition 5-167 5 Description of the Functions 08.04 02.99 5.5 SIMODRIVE POSMO A functions 2. Assign digital input 1 the function ”accept value directly in the start byte (bit 7)” ––> In the SimoCom A using the tab ”Par” and entry ”digital inputs/ outputs” ––> by setting SIMATIC S7 P0031 to 25 3. Program the traversing block (e.g. Block No. 9) as follows ––> In the SimoCom A using the tab ”Par” and entry ”traversing blocks” ––> Select the ”relative” traversing type (via SIMATIC S7 P0080:9 bit 0 = 0) ––> Enter the target position (max. distance to the cam) The sign of the distance specifies whether the signal lies in the positive or negative traversing direction to the actual value. (If this distance was moved through, the drive stops and changes to the following traversing block.) 5 ––> Select the block change enable ”continue flying” (via SIMATIC S7 P0080:9 bit 5 = 1) ––> In the section block PSW, select ”flying measurement: active” (via SIMATIC S7 P0080:9 bit 10 = 1) 4. Then program the following traversing block as follows (e.g. block No. 10) ––> Select the ”relative” traversing type (via SIMATIC S7 P0080:10 bit 0 = 0) ––> Position = 0, set the velocity to the value of block 9 (v 0) (via SIMATIC S7 P0081:10 = 0; P0082:10 = 0) ––> Select the block change enable ”continue flying” (via SIMATIC S7 P0080:10 bit 5 = 1) ––> in the selection box PSW ”SM start type” check the default setting ”SM start type: wait” (bit=0) (via SIMATIC S7 P0080:10 bit 7 = 0) ––> in the selection box PSW, select ”flying measurement: active” (via SIMATIC S7 P0080:10 bit 10 = 1) This means that a measurement is also made if the cam is passed while braking. ––> Set SM/MM – start bit 15 = 1 (via SIMATIC S7 P0086:10 bit 15 = 1) This means that the traversing block is only executed if the BERO/cam was also reached. The program can be started under the ”Control” tab, entry ”Automatic”. The program with the number of the start block must be selected to do this. 5-168 Siemens AG 2005 All Rights Reserved SIMODRIVE POSMO A User Manual (POS1) – 06.05 Edition 08.02 02.99 5 Description of the Functions 5.5 SIMODRIVE POSMO A functions Possible program sequence: 1. The following happens if the BERO/cam in block 9 signals a 0/1 edge at the digital input before the braking phase: – The motor brakes along the braking ramp – A block change with delete distance to go is initiated – The measured position value is written into P0062 (measuring position) – The program continues with block 10. As a result of the cam feedback signal via start byte bit 7, this immediately receives the start condition, specified in the SM/MM start and changes to block 11. 2. The following happens if the BERO/cam in block 9 did not provide a signal at the digital input before the braking phase: – The motor brakes along the braking ramp and then changes, after this has been initiated, to traversing block 10 – If, the cam still outputs a signal in the braking phase, then the measuring function in block 10 is executed and a change is made to traversing block 11. – If a cam does not output a signal in the braking phase, then traversing block 10 does not have a valid start condition and therefore goes into the state ”wait for start condition”. In this case, the program has not been completed. When the cam signal or BERO outputs a signal via the digital input, the program with block 11 is continued without a position having been measured. Siemens AG 2005 All Rights Reserved SIMODRIVE POSMO A User Manual (POS1) – 06.05 Edition 5-169 5 5 Description of the Functions 04.01 02.99 5.5 SIMODRIVE POSMO A functions Flying actual value setting (from SW 1.4) Setting of the actual value can be triggered via a 0/1 signal edge at input terminal 1 during processing of a block. The dimension system is then re–synchronized. The following blocks are then executed in the new reference system. Block 13 v Block 14 t 5 Input signal ”flying measuring/actual value setting” 1 0 t Brakes along the braking ramp Block change with delete distance to go What happens for a 0/1 signal edge? The actual value is set to the position in P85:28 (signal position) ––> the new reference system applies from this position No input signal detected? Traverses as programmed in the block Fig. 5-11 Example: Flying actual value setting What should be done? The following has to be done in order to use the ”flying actual value setting” function? 1. Connect the signal transmitter to digital input 1 (X5 terminal I/Q1) ––> the signal transmitter must be high active ––> refer to Chapter 2.3 and 2.4 2. Assign digital input 1 to the ”flying measurement/actual value setting” function ––> In the SimoCom A using the tab ”Par” and entry ”digital inputs/ outputs” ––> by setting SIMATIC S7 P31 to 27 3. Program the traversing block, activating the ”flying actual value setting” function ––> set PSW.10 to ”1” 4. Enter the value for ”actual value setting” ––> P85:28 (signaled position) = required actual value 5-170 Siemens AG 2005 All Rights Reserved SIMODRIVE POSMO A User Manual (POS1) – 06.05 Edition 08.02 02.99 5 Description of the Functions 5.5 SIMODRIVE POSMO A functions Example Flying actual value setting followed by absolute positioning (from SW 1.4) The following example shows how the actual value can be set flying when approaching a BERO/cam and then an absolute or relative positioning operation can be started. However, for safety reasons, positioning should be interrupted if neither BERO nor cam were detected within a specified maximum distance. In this case, the first program block selected is – e.g. block No. 9. 1. Connect the signal transmitter to digital input 1 (X5 terminal I/Q1) ––> the signal transmitter must be high active ––> refer to Chapter 2.3 and 2.4 2. Assign digital input 1 to the ”flying measurement/actual value setting” function ––> In the SimoCom A using the tab ”Par” and entry ”digital inputs/ outputs” ––> by setting SIMATIC S7 P31 to 27 3. Program the traversing block (e.g. Block No. 9) as follows ––> In the SimoCom A using the tab ”Par” and entry ”traversing blocks” ––> Select the ”relative” position (PSW.0 = 1) ––> Select the block change enable ”flying” (via SIMATIC S7 P0080:9 bit 5 = 1) ––> Enter the target position (max. distance to the cam) The sign of the distance specifies whether the signal lies in the positive or negative traversing direction to the actual value. ––> in the selection box PSW, select ”flying actual value setting: active” (PSW.10 = 1) ––> enter the required actual value in the signaling position. If a relative positioning to the new reference point is then to be carried– out in block No. 10, then the block change enable condition in block No. 9 must be programmed for ”continue flying”. The block is now changed with delete distance to go. The traversing block to find the signals has now been programmed If the signal is detected within the maximum distance via the digital input, then the actual position is set to the required actual value and the drive goes into the state ”reference point set” (ZSW1.11=1). If the subsequent traversing blocks are configured as absolute blocks, these are only executed if the ”flying actual value setting” was successful in traversing block number 9. Siemens AG 2005 All Rights Reserved SIMODRIVE POSMO A User Manual (POS1) – 06.05 Edition 5-171 5 5 Description of the Functions 02.99 5.5 SIMODRIVE POSMO A functions However, in this case, it is necessary that the drive is in the state ”reference point is not set” (ZSW1.11=0) before the start of traversing block No. 9. If the drive was already referenced when block No. 9 was started, and a signal was not found, then it is possible that the absolute blocks were executed in the incorrect reference system. This is the reason that before the program is started, POSMO A must always be ”de–referenced” (P98 = 0). 5 5-172 Siemens AG 2005 All Rights Reserved SIMODRIVE POSMO A User Manual (POS1) – 06.05 Edition 04.01 02.99 5 Description of the Functions 5.5 SIMODRIVE POSMO A functions 5.5.3 Travel to fixed stop Description A linear or rotary axis can be moved in the closed–loop speed controlled mode to a fixed endstop using the ”travel to fixed stop” function. Upon reaching a fixed endstop, the defined torque/force is then built up. This feature can be used, e.g. as follows: To clamp workpieces (e.g. to press the spindle sleeve against the workpiece) To approach the mechanical reference point (refer to Chapter 5.5.1) What should be done? The following has to be done to traverse to a fixed endstop: Set the current to a permissible value for a fixed endstop – P28 (max. current) = ”required current” – P16 (max. overcurrent) = ”required overcurrent” 5 Suppress the ”speed controller at the endstop” fault – P30.0 = ”1” Fault ”speed controller at its limit” ––> this is re–defined to become a warning Move to the fixed endstop closed–loop speed–controlled (PSW.0 = ”0” or jogging) When the endstop is reached, it is displayed as follows: – ZSW.7 = ”1” ––> means ”warning present” and – P953.7 = ”1” ––> means ”speed controller at the endstop” Stop traversing What has to be observed? The following has to be observed: Note The ”travel to fixed stop” function can only be practically used when traversing in the closed–loop speed controlled mode (PSW.0 = ”0” or jogging). For closed–loop position controlled techniques (PSW.0 = ”1”), the ”fixed endstop reached” state can only be exited using OFF commands. Limit P28 and P16 to values at which torques significantly below the torque limit occur at the gearbox output. P28 maximum current P16 maximum overcurrent Limit the traversing velocity to a value which is significantly below the maximum velocity at the rated speed. Siemens AG 2005 All Rights Reserved SIMODRIVE POSMO A User Manual (POS1) – 06.05 Edition 5-173 5 Description of the Functions 08.04 02.99 5.5 SIMODRIVE POSMO A functions The following must also be observed: The function ”travel to fixed stop” causes an externally forced rotation delay and therefore an externally forced torque that must be below the permissible torques indicated in Chapter 2.5.1 for POSMO A – 75 W and 2.5.2 for POSMO A – 300 W. The electrical torque limiter is ineffective here! The torque must therefore be limited with mechanical measures for forced braking. The endstop therefore cannot be designed to be permanently fixed; rather, it must be flexible enough that the forced braking process is extended over a specific minimum time ∆t. The minimum time results from: The translated moment of inertia of the motor = JMot i The speed at the gearbox output (NShaft,) at which the endstop is approached. The speed must be entered in rad/s for computational inspection. 5 The maximum permissible gearbox torque for the POSMO A – 75 W with i = 162 : 1 and a speed of 18 rpm (corresponds to a motor speed of 2916 rpm) yields, for example ∆t = NShaft (JMot i2) Mmax_perm 18 rpm 2π (0.00006 kg m2 1622) 60 smin–1 = = 65 ms 48 N m The mechanical components of the endstop according to the diagrams in Table 5-7 must therefore be designed to be flexible enough that the motion is not braked abruptly, but is extended over at least 65 ms. The centrifugal masses that are braked to a standstill by the mechanical endstop comprise not only the moment of inertia of the motor (as in the above example), but all moments of inertia and linearly moved masses participating in the motion. For the event that the mechanical forced braking takes place unevenly, a corresponding safety factor must be accounted for in the brake time calculation. As an alternative to a carefully soft design of the endstop, the mechanical limitation of the torque during forced braking can also be implemented with a coupling on the gearbox output. The coupling then exhibits the required flexibility krot in the direction of rotation, whereby only the translated motor moment of inertia need then be considered as centrifugal mass. krot = Mmax_perm 1 2 2) NShaft2 (JMot i (48 N m)2 = 1 (0.00006 kg m2 1622) 18 rpm 2π = 410 N m rad–1 60 smin–1 Upon transfer of the maximum permissible torque for this gearbox, the coupling twists by approx. 1/10 rad, in other words about 6 degrees. The user must check whether this much twisting can be accepted. 5-174 Siemens AG 2005 All Rights Reserved SIMODRIVE POSMO A User Manual (POS1) – 06.05 Edition 04.01 02.99 5 Description of the Functions 5.5 SIMODRIVE POSMO A functions 5.5.4 Rotary axis Parameterizing rotary axes A rotary axis is parameterized using the following parameters: P1 axis type e.g. = 360 P2 travel per gearbox revolution e.g. = 360 P3 gearbox step–down factor e.g. = 18 P4 dimension units e.g. = 1 Example (refer to Chapter 3.3): A rotary axis with modulo 360 and dimension units of degrees is parameterized with these typical values. Programming The traversing characteristics of a rotary axis are dependent on which positioning type has been programmed – either ABSOLUTE or RELATIVE. Absolute motion – Target position The target position is programmed in the traversing block using P81:28 and is executed, modulo–corrected. Example: P81:4 = 520 ––> for modulo 360, the axis is positioned to 160 – Velocity and traversing direction The velocity and traversing direction is programmed in the traversing block using P82:28. Velocity: Absolute value of P82:28 Traversing direction: +: –: Traverse through the shortest distance: Sign of P82:28 ––> positive direction ––> negative direction PSW.12 = ”1” (from SW 1.4) Relative motion – Target position and traversing direction The target position is programmed in the traversing block using P81:28 and is not executed, modulo–corrected. P81:28 > 0 P81:28 < 0 ––> positive traversing direction ––> negative traversing direction Examples: P81:4 = 520 ––> the axis moves in a positive direction through 520 P81:4 = –10 ––> the axis moves in a negative direction through 10 – Velocity Velocity: is entered via P82:28 Siemens AG 2005 All Rights Reserved SIMODRIVE POSMO A User Manual (POS1) – 06.05 Edition 5-175 5 5 Description of the Functions 04.01 02.99 5.5 SIMODRIVE POSMO A functions 0° 0° Example 1 315° 45° Example 1 315° 45° Start 270° 90° Start 270° 90° Example 2 225° 135° Example 2 225° 180° 5 135° 180° Positioning type = ABSOLUTE Positioning type = RELATIVE Example 1 (PSW.12 = ”0”): Example 1: P81:4 = 315 P81:4 = –90 P82:4 = –100 P82:4 = 100 ––> Traverse with 100 % to 315° negative ––> Traverse with 100 % through 90° negative Example 2 (PSW.12 = ”0”): Example 2: P81:4 = 315 P81:4 = 135 P82:4 = 100 P82:4 = 100 ––> Traverse with 100 % to 315° positive ––> Traverse with 100 % through 135 ° positive Fig. 5-12 Example: Programming rotary axes Signal position (P85:28) Signal position (P55) The following should be observed for the signaling position: Before SW 1.3 the following applies: – The drive has precisely one zero position (refer to Chapter 5.5.1). The signal position is viewed, referred to this position. – A modulo evaluation is not made. The following applies from SW 1.3: – The signal position is saved, evaluated as modulo value Software limit switch The software limit switches act the same as for a linear axis. P6 Software limit switch, start (refer to Chapter 5.6.2) P7 Software limit switch, end The software limit switches are de–activated with P6 = P7. 5-176 Siemens AG 2005 All Rights Reserved SIMODRIVE POSMO A User Manual (POS1) – 06.05 Edition 04.01 02.99 5 Description of the Functions 5.5 SIMODRIVE POSMO A functions 5.5.5 Backlash compensation and correction direction (from SW 1.4) Description When an indirect measuring system is used (position measuring encoder at the motor), at each direction reversal, the mechanical play is first traveled through before the axis moves. For this measuring system, mechanical play falsifies the traversing distance. This is because at direction reversal, the axis moves too little by the absolute value of the play. After entering the backlash compensation and the correction direction, at each direction reversal, the axis actual value is corrected depending on the actual traversing direction. 5 Table Backlash M G ÏÏÏ ÏÏÏÏÏ ÏÏÏÏÏÏÏÏ M Motor G Encoder For a direction reversal, the encoder actual value leads the actual value (table) ––> the table does not traverse far enough Fig. 5-13 Backlash Example: Determining the backlash The following procedure is recommended to determine the backlash of an axis: Traverse the axis e.g. in the positive direction – take up the play Mount a dial gauge on the axis mechanical system Note down the actual position 1 (read P40) Traverse the axis in the negative direction until axis movement can be detected at the dial gauge Note down the actual position 2 (read P40) The backlash is obtained from the difference between actual position 1 and actual position 2. Siemens AG 2005 All Rights Reserved SIMODRIVE POSMO A User Manual (POS1) – 06.05 Edition 5-177 5 Description of the Functions 04.01 02.99 5.5 SIMODRIVE POSMO A functions Correction direction (from SW 1.4) The correction direction of the backlash compensation is defined as follows using the sign of P15: P15 = positive ––> positive correction direction The following applies when first traversing after power–on: Traversing in the positive direction – backlash is corrected Traversing in the negative direction– backlash is not corrected P15 = negative ––> negative correction direction The following applies when first traversing after power–on: Traversing in the positive direction – backlash is not corrected Traversing in the negative direction– backlash is corrected 5 Note The following applies when entering a value in P15 (backlash compensation): Depending on the sign of P15, the actual value can be immediately shifted by the value entered for the backlash. The backlash value becomes effective immediately and is taken into account in the display. Parameter (refer to Chapter 5.6.2) 5-178 P15 Backlash compensation Siemens AG 2005 All Rights Reserved SIMODRIVE POSMO A User Manual (POS1) – 06.05 Edition 02.99 5 Description of the Functions 5.5 SIMODRIVE POSMO A functions 5.5.6 Jerk limiting Description Acceleration and deceleration are step–like if jerk limiting is not used. Using jerk limiting, a ramp–type increase can be parameterized for both quantities, so that approach and braking are ”smooth” (jerk–limited). Applications Jerk limiting can be used, e.g. for positioning tasks using liquids or generally to reduce the mechanical stressing on an axis. v 5 t a P22 P22 t P23 r t a [mm/s2] P23 = TR [s] = r [mm/s3] a: Acceleration r: Jerk t: Time TR : Jerk time v: Velocity Fig. 5-14 Jerk limiting Parameter (refer to Chapter 5.6.2) P23 Jerk time constant P22 Maximum acceleration Siemens AG 2005 All Rights Reserved SIMODRIVE POSMO A User Manual (POS1) – 06.05 Edition 5-179 5 Description of the Functions 04.01 02.99 5.5 SIMODRIVE POSMO A functions 5.5.7 Changeover, metric/inch Description When changing over between mm and inch and vice versa, all existing values, dependent on length measurements, are automatically changed. All of the following inputs and outputs are handled in the new dimension units. Parameter (refer to Chapter 5.6.2) 5 5.5.8 P4 Dimension unit Reversing the control sense (from SW 1.3) Description Before SW 1.3 the following applies: The direction of rotation of the motor shaft depends on whether it traverses in the positive or negative direction and cannot be changed. From SW 1.3, the following applies: The direction of rotation of the motor shaft can be set as required, dependent on whether traversing in the positive or negative direction using P3. Table 5-8 Traversing and direction of rotation of the motor shaft Traversing direction Rotation of the motor shaft when viewing the motor shaft drive out end P3 = positive Parameter (refer to Chapter 5.6.2) 5-180 P3 = negative (from SW 1.3) Traversing in the positive direction Clockwise Counter–clockwise Traversing in the negative direction Counter–clockwise Clockwise P3 Gearbox ratio Siemens AG 2005 All Rights Reserved SIMODRIVE POSMO A User Manual (POS1) – 06.05 Edition 02.00 02.99 5 Description of the Functions 5.5 SIMODRIVE POSMO A functions 5.5.9 Standstill monitoring (zero–speed monitoring) Description Using the standstill monitoring function, the system can detect when the axis leaves the target position (under load, for hanging axes, etc.). Mode of operation The monitoring time (P13) is started after the motion block has been completed (position reference value = target setpoint). After the monitoring time (P13) has expired, it is cyclically monitored as to whether the actual axis position remains within the standstill range (P14) around the target position. Objective: Continually check whether the position of the axis is also maintained. Position value x Target range (P11) Target position Position reference value Standstill range (P14) Position actual value The standstill monitoring is cyclically evaluated from here Monitoring time (P13) t Fig. 5-15 Standstill monitoring (zero–speed monitoring) Fault When the standstill monitoring responds, an appropriate fault is signaled. Switching–off When the next block is started, the standstill monitoring is disabled. Parameter (refer to Chapter 5.6.2) P11 Target range P13 Monitoring time P14 Standstill range Siemens AG 2005 All Rights Reserved SIMODRIVE POSMO A User Manual (POS1) – 06.05 Edition 5-181 5 5 Description of the Functions 04.01 02.99 5.5 SIMODRIVE POSMO A functions 5.5.10 Digital I/O Description For SIMODRIVE POSMO A, there are 2 freely–parameterizable input/ output terminals. The function of a terminal is defined by appropriately parameterizing it. Designation of the input/output terminals (refer to Chapter 2.3.1) – X5 terminal I/Q1 Terminal 1 – X5 terminal I/Q2 Terminal 2 Parameterization of the input/output terminals (refer to Chapter 5.6.2) 5 – P31 Function, terminal 1 – P32 Function, terminal 2 Note The digital inputs/outputs are updated every 10 ms. Reader’s note List of function numbers for digital inputs/outputs? ––> refer to Chapter 5.6.2 under P31 (function, terminal 1) The list is valid for terminals 1 and 2. 5-182 Siemens AG 2005 All Rights Reserved SIMODRIVE POSMO A User Manual (POS1) – 06.05 Edition 04.01 02.99 5 Description of the Functions 5.5 SIMODRIVE POSMO A functions Control The following rules apply for allocating functions: The hardware inputs/outputs are high active. Rules for input terminals – A hardware terminal has a higher priority than a PROFIBUS signal If a terminal is parameterized as input, then this terminal completely assumes the function, i.e. a control signal, with the same significance, received via PROFIBUS, is ignored. Exceptions: If a terminal is parameterized to the value 100, 101 or 102 (OFF 1, OFF 2, OFF 3 logically AND’ed with the terminal) then the following applies: The signals are only present if they are set from both the terminal and the PROFIBUS–DP master (this is a safety measure). – If the 2 input terminals are assigned the same function number, then terminal 2 has priority. ! Warning The appropriate signals from PROFIBUS DP are ignored! Rules for output terminals – Output signals are output via a terminal without influencing PROFIBUS communications. – Inversion: The outputs can be inverted by adding 128 to the values specified in the function list. Example: The ”reference point set” signal should be output inverted via terminal 1. ––> Parameter value = 74 + 128 = 202 (refer to Chapter 5.6.2) ––> set P31 = 202 ––> a signal is set at the terminal if SIMODRIVE POSMO A is not referenced. Signaling the terminal state (from SW 1.4) The actual state of the terminal can be displayed in the feedback signal byte (RMB) by adding 256 to the value specified in the function list. RMB.6 ––> state of terminal 1 RMB.7 ––> state of terminal 2 Feedback signal byte (RMB)refer to Chapter 4.2 and 4.2.2 Siemens AG 2005 All Rights Reserved SIMODRIVE POSMO A User Manual (POS1) – 06.05 Edition 5-183 5 5 Description of the Functions 04.01 02.99 5.5 SIMODRIVE POSMO A functions 5.5.11 Jogging without PROFIBUS and parameterization (from SW 1.4) Description Using this function, it is possible to immediately traverse the positioning motor in the jog mode using the input terminals without PROFIBUS communication and without parameterization. If PROFIBUS node address 0 or 127 is detected when the positioning motor is powered–up (all address switches are either OFF or ON), then the following is executed: The factory default setting for the parameters is downloaded. Parameters which were possibly changed beforehand are ignored. Jogging is selected with the following data: 5 – P100 = 17471dec ––> simulation of the control word – P31 = 4 function, terminal 1 <––> jogging – – P32 = 5 function, terminal 2 <––> jogging + These changes are not saved. What should be done? The following has to be done to be able to use the positioning motor in the jogging mode without parameterization and PROFIBUS: 1. Connect the load power supply and both digital inputs ––> refer to Chapter 2.3 and 2.4 2. Set the PROFIBUS node address to 0 or 127 ––> refer to Chapter 2.3.1 and Table 2-3 ! Caution For reliable operation, it is absolutely necessary that the motor is correctly mounted and connected up (refer to Chapter 2). 3. Switch on the load power supply 4. Operate the positioning motor in the jogging mode 24 V/0 V at X5, I/Q1 ––> jogging 1 ON/OFF (jogging –) 24 V/0 V at X5, I/Q2 ––> jogging 2 ON/OFF (jogging +) Note Jogging mode refer to Chapter 5.4.1 After setting a PROFIBUS node (device) address 0 or 127 then standalone operation is possible as usual (refer to Chapter 5.5.12). 5-184 Siemens AG 2005 All Rights Reserved SIMODRIVE POSMO A User Manual (POS1) – 06.05 Edition 04.01 02.99 5 Description of the Functions 5.5 SIMODRIVE POSMO A functions 5.5.12 Standalone mode (without bus communication) (from SW 1.2) Description ! Setting standalone mode Safety signals, such as e.g. OFF1 are continually required. This means, that when bus communications are interrupted, the motor is immediately shut down with fault. This can be prevented using P100 (simulation of the control word). Caution In standalone mode, the drive is automatically reset in event of an error, in other words: The faults which occur are automatically acknowledged Before SW 1.3 the following applies: The block sequence is re–started From SW 1.3, the following applies: The block sequence is continued from the next defined block If the value of P100 is not equal to zero (e.g. 443Fhex), when powering– up without a master or if communications fail then after 3 seconds, the control word is replaced by this value. The terminal signals remain active with the highest priority. A maximum of ten traversing blocks in the range 3 to 27 can be preset with SIMODRIVE POSMO A in P101:11 for the standalone mode. These specified blocks are then processed consecutively in standalone mode. Rules when executing the blocks: Execution sequence: from P101:1 to P101:10 If it is recognized that P101:x = 0, then the last block which is entered is continuously repeated. If the block lies within a program range, then the program is executed, as programmed from this block. The factory default setting for P101:11 is as follows (refer to Table 5-9): Table 5-9 P101:11(block sequence in the standalone mode) (factory default setting) Index P101:11 Value 1 2 3 4 5 6 7 8 9 10 0 0 0 0 0 0 0 0 0 0 Siemens AG 2005 All Rights Reserved SIMODRIVE POSMO A User Manual (POS1) – 06.05 Edition 5-185 5 5 Description of the Functions 04.01 02.99 5.5 SIMODRIVE POSMO A functions Jogging operation in the standalone mode Assumption: Jogging 1 and 2 are permanently connected via digital inputs and parameterized using P31 and P32 (refer to Chapter 5.5.10). This means that when the bus communications fail, in order that the positioning motor can still be jogged via these inputs, the following applies: Before SW 1.3 the following applies: In order to be able to jog, only one block without traversing motion may be entered in P101:1. e.g.: P101:1 = 5, P101:2 – :10 = 0, block 5 with standard values The following applies from SW 1.3: In order to be able to jog, P101:1 – :10 = 0 or 0. 5 If a block sequence is specified in P101:10, then a jogging signal which is present is always effective before repeating the last specified block. e.g.: P101:1 = 5, P101:2 = 7 and P101:3 – :10 = 0 ––> Jogging becomes effective before repeating block 7 Parameter (refer to Chapter 5.6.2) 5-186 P100 Control word simulation P101:11 Block sequence in standalone mode Siemens AG 2005 All Rights Reserved SIMODRIVE POSMO A User Manual (POS1) – 06.05 Edition 05.03 04.01 02.99 5 Description of the Functions 5.5 SIMODRIVE POSMO A functions 5.5.13 Holding brake (from SW 1.4) Using the brake sequence control, the axes can be held at standstill to avoid undesirable motion. Description The sequence control can be used both for motors with integrated holding brake as well as to control an external holding brake. Holding brake for 75 W motors 75 W motors do not have an integrated holding brake. An external holding brake can always be used. In this case, it is controlled using an appropriately parameterized digital output. Holding brake for 300 W motors 300 W motors are optionally available with integrated holding brake. An external holding brake can always be used. In this case, the brake is controlled using an appropriately parameterized digital output. Warning It is not permissible to use the integrated holding brake as working brake, as generally it is only designed for a limited number of emergency braking operations. Axial forces may not be applied to the shaft – both when installing and operating the system! ! Voltage V Current I Brake opened IB UB t0 t0 = Opening time tc1 t tc1 = Closing time Fig. 5-16 Terminology (time) for holding operation Reader’s note Technical data, refer to Chapter 2.6.2, Table 2-7. Siemens AG 2005 All Rights Reserved SIMODRIVE POSMO A User Manual (POS1) – 06.05 Edition 5-187 5 5 Description of the Functions 04.01 02.99 5.5 SIMODRIVE POSMO A functions Holding brake connection The brake sequence control operates with the ”open holding brake” output signal. The signal can be output as follows: Motor with integrated holding brake (only 300 W motors) No additional wiring is required for the brake sequence control. Motor with external holding brake The external holding brake is controlled using a digital output with function number 95 (open holding brake). The following must be observed: – Output terminal X5, I/Q1, I/Q2 – Activated via P56.4 and P56.6 – Parameterizing the output terminal ––> refer to Chapter 5.5.10 5 – Connecting up the output terminal ––> refer to Chapter 2.3 – The relay for the holding brake is connected at the parameterized output terminal. Parameter (refer to Chapter 5.6.2) Signals (refer to Chapter 5.5.10) The following parameters are available for the ”Holding brake” function: P31 Function, terminal 1 P32 Function, terminal 2 P56.4 Open holding brake P56.5 Monitoring, holding brake undervoltage P56.6 Open the holding brake, also for an external holding brake P58 Holding brake, brake opening time P59 Speed, close holding brake P60 Holding brake, brake delay time P61 Holding brake, controller inhibit time The following signals are relevant for the ”holding brake” function: Input signal – Input terminal (X5, I/Q1, I/Q2) Function number 26 Open holding brake – PROFIBUS Control signal STW.15 Open holding brake Output signal – Output terminal (X5, I/Q1, I/Q2) Function number 95 5-188 Control external holding brake Siemens AG 2005 All Rights Reserved SIMODRIVE POSMO A User Manual (POS1) – 06.05 Edition 04.01 02.99 5 Description of the Functions 5.5 SIMODRIVE POSMO A functions Open brake When the brake control is activated, when the status changes from ”ready” to ”operation enabled”, the brake is opened. At the same time, the pulses are enabled and the axis goes into closed–loop controlled operation without a traversing task. The holding controller is switched in. In order to give the brake the necessary time to mechanically open, the drive starts after the brake opening time (P58). The drive goes into the ”operation enabled” status after the time in P58 has expired. Objective when setting the brake opening time The brake opening time should be selected, so that after the ”controller enable” is issued, the speed controller becomes active when the motor holding brake opens. For all other settings, the control acts against the brake. The following applies: Brake opening time (P58) Time to open the holding brake Ready ”Controller enable” Transitio n Operation enabled 1 0 Output signal 1 ”control external holding brake” 0 Holding controller 5 t t 1 0 t Speed setpoint t P58 (holding brake, brake opening time) Speed controller active 1 0 1 Holding brake 0 ÄÄÄÄÄ ÄÄÄÄÄ Time t t to open the holding brake Fig. 5-17 Opening the brake: Behavior when the status changes from ”ready” to ”operation enabled” Siemens AG 2005 All Rights Reserved SIMODRIVE POSMO A User Manual (POS1) – 06.05 Edition 5-189 5 Description of the Functions 04.01 02.99 5.5 SIMODRIVE POSMO A functions Closing the brake when withdrawing the ”controller enable” The ”controller enable” is withdrawn for the following events: STW.0 (ON/OFF 1) = 1/0 signal STW.2 (operating condition/OFF 3) = 1/0 signal A fault occurs, where it is possible to brake in a controlled fashion (e.g. software limit switch actuated) What happens if the ”controller enable” is withdrawn? The axis is actively braked and the brake delay time started – The axis is actively braked according to the data entered (ramp or maximum deceleration) – The brake delay time (P60) is started The brake control signal is withdrawn 5 The brake control signal is withdrawn, if – nact = nholding brake (P59), or – The brake delay time (P60) has expired Start the controller inhibit time (P61) and then cancel the pulses Positioning mode Speed setpoint OFF 1 – OFF 3 – fault t Drive braked actively (e.g.: regenerative braking) Actual speed value P59 nholding brake t Output signal ”control external holding brake” ”Internal pulse enable” 1 0 P60 Holding brake brake delay time 1 0 ÄÄÄÄ ÄÄÄÄ ÄÄÄÄ P61 1 Holding brake t 0 t Holding brake controller inhibit time Time t to close the holding brake Fig. 5-18 Closing the brake: Behavior when withdrawing ”controller enable” Objective for this setting 5-190 The controller inhibit time should be harmonized so that the closed– loop control is only withdrawn after the brake has been closed. This prevents an axis from possibly sagging. Siemens AG 2005 All Rights Reserved SIMODRIVE POSMO A User Manual (POS1) – 06.05 Edition 04.01 02.99 5 Description of the Functions 5.5 SIMODRIVE POSMO A functions Closing the brake when the ”pulse enable” is withdrawn The ”pulse enable” is withdrawn when the following events occur: STW.2 (operating condition/OFF 2) = 1/0 signal STW.3 (operation enabled/operation inhibited) = 1/0 signal A fault occurs, where it is no longer possible to brake in a controlled fashion (e.g. encoder fault) What happens if the ”pulse enable” is withdrawn? When the pulse enable is withdrawn, the drive ”coasts” down and the output signal ”open holding brake” is canceled. The motor ”coasts” down until the brake becomes effective mechanically and brings the motor to a standstill. After the time taken for the brake to close, the drive is braked by the motor holding brake. 5 Positioning mode OFF 2 – operating inhibit – fault 1 ”Pulse enable” 0 Output signal 1 ”control external holding brake” 0 t t Speed setpoint t The drive ”coasts” down The drive is braked by the holding brake Actual speed value Holding brake 1 0 ÄÄÄÄÄ ÄÄÄÄÄ Time t t to close the holding brake Fig. 5-19 Closing the brake: Behavior when withdrawing ”pulse enable” ! Warning When this type of braking is used, it subjects the holding brake to mechanical wear and therefore should only be seldomly used. Siemens AG 2005 All Rights Reserved SIMODRIVE POSMO A User Manual (POS1) – 06.05 Edition 5-191 5 Description of the Functions 04.01 02.99 5.5 SIMODRIVE POSMO A functions Example: Motor with external holding brake Task and assumptions: A motor with external holding brakes should be used for hanging axes. The holding brake is to be controlled via output terminal 1. What other settings are required? 1. Connect the relay to control the motor holding brake to output terminal 1. 2. Assign the ”control external holding brake” function to output terminal 1. P31 = 95 3. Activate the brake sequence control in the drive. P56.4 = 0, STW.15 = 0 4. Set the parameters to open the holding brake. 5 – P58 (holding brake, brake opening time) The brake opening time must be set so that it is equal to or greater than the time required to actually open the holding brake. 5. Set the parameters to close the holding brake when ”controller enable” is withdrawn. – P59 (speed, close holding brake) – P60 (holding brake, brake delay time) The brake delay time (P60) must be harmonized with the speed, at which the holding brake is closed (P59). – P61 (holding brake, controller inhibit time) The controller inhibit time must be harmonized with the time that it takes to close the brake so that the drive cannot sag. Example to determine the controller inhibit time Mark the position of the axis and initiate a fault which results in the controller enable being withdrawn (e.g. change the setting of the software limit switch in P6 or P7). Does the axis sag (drop slightly)? ––> yes, then increase the controller inhibit time (P61) ––> no, then the settings are OK 5-192 Siemens AG 2005 All Rights Reserved SIMODRIVE POSMO A User Manual (POS1) – 06.05 Edition 04.01 02.99 5 Description of the Functions 5.5 SIMODRIVE POSMO A functions 24 V Open/close the holding brake Terminal 1 Terminal 2 0V Brake sequence control Ä ÄÄ ÄÄ Ä ÍÍÍÍÍÍÍÍÍÍ Motor with integrated holding brake (optional) External holding brake Parameters P31 Function, terminal 1 P32 Function, terminal 2 P56.4 Open holding brake P56.5 Monitoring, holding brake undervoltage P56.6 Open the holding brake, also for an external holding brake P58 Holding brake, brake opening time P59 Speed, close holding brake P60 Holding brake, brake delay time P61 Holding brake, controller inhibit time Inputs/Outputs P31 = 26 Terminal 1 as input with ”open holding brake” function P32 = 95 Terminal 2 as output with the ”control external holding brake” function Fig. 5-20 Example: Integrated holding brake – external holding brake Siemens AG 2005 All Rights Reserved SIMODRIVE POSMO A User Manual (POS1) – 06.05 Edition 5-193 5 5 Description of the Functions 06.05 08.04 02.99 5.5 SIMODRIVE POSMO A functions 5.5.14 Limit switch monitoring functions Description For POSMO A, the following limit switch monitoring functions can be used: Hardware limit switch (from SW 2.0) Software limit switch The limit switch monitoring functions can be used to limit the operating range or to protect the machine and are also available in the n–set mode. ÏÏ ÏÏ ÏÏ ÏÏ ÏÏ 5 Hardware limit switch start (NO contact)1) Software limit Software limit switch switch start end P6 P7 Hardware limit switch end (NO contact)1) ÏÏ ÏÏ ÏÏ ÏÏ ÏÏ Mechanical Mechanical end of end of traversing traversing range range Input terminal Input terminal with the function number 28/301) with the function number 29/311) ”Hardware limit switch start” ”Hardware limit switch end” 1) From SW 3.0 the following applies: The hardware limit switch can also be implemented as an NC contact (refer to P31/P32). Fig. 5-21 Limit switch monitoring functions Hardware limit switch (HW limit switch) There is a hardware limit switch for every axis and every approach direction. The hardware limit switches must be connected to an input terminal (P31/P32) with the following function numbers. Function ”hardware limit switch start” ––> function number 28 Function ”hardware limit switch, end” ––> function number 29 ––> Refer to Chapter 5.6.2 Traverse to a hardware limit switch? When traversing to a hardware limit switch, the associated input signal is set and the following response is automatically initiated: The axis is braked down to the maximum velocity set using P28 (maximum velocity). The following fault is signaled: 5-194 – Fault 706/707 software limit switch, start/end – Supplementary info 911 hardware limit switch, passed/reached Siemens AG 2005 All Rights Reserved SIMODRIVE POSMO A User Manual (POS1) – 06.05 Edition 05.03 02.99 5 Description of the Functions 5.5 SIMODRIVE POSMO A functions How do you move away from a hardware limit switch? If an axis is located at a hardware limit switch, then it can be moved away as follows: 1. Acknowledge the fault 2. Return the axis to the valid traversing range In the jog mode or via velocity, move away in a direction opposite to the approach direction or 1. Withdraw the controller enable (control signal ON/OFF1) 2. Set the input terminal (function number 28/29) to 0 Note If the hardware limit switch was passed, then it is only possible to continue to traverse in the original direction, if after acknowledging the fault, the axis is traversed in the opposite direction and again passes over the hardware limit switch. Software limit switches (SW limit switches) P6, P7 The software limit switch start (P6) and software limit switch end (P7) can be correspondingly set to limit the operating range or to protect the machine. Notice The software limit switches only become active if the following conditions exist: P6 < P7 pos mode: The axis is referenced (”reference point set” output signal) Only then is it certain that the axis will be immediately stopped if it attempts to move out of the permissible range. Note The SW limit switch monitoring is dependent on the axis type as follows: For a linear axis or rotary axis with modulo correction, the following is valid: ––> The software limit switches can be activated via P6<P7 and set via P6 and P7. Siemens AG 2005 All Rights Reserved SIMODRIVE POSMO A User Manual (POS1) – 06.05 Edition 5-195 5 5 Description of the Functions 05.03 02.99 5.5 SIMODRIVE POSMO A functions Traverse to a software limit switch? Upon traversing to a software limit switch, the following reaction is automatically triggered: When the axis reaches the software limit switch, then the axis is braked down to the velocity set in P10 (maximum velocity). The axis therefore comes to a standstill after the limit switch. One of the following faults/warnings is signaled: 5 How do you move away from a software limit switch? – Fault 706 software limit switch, start – Fault 707 software limit switch, end – Alarm 803 software limit switch, start – Alarm 804 software limit switch, end If an axis is located at a software limit switch, then it can be moved away as follows: 1. Acknowledge the fault 2. Return the axis to the valid traversing range In the jog mode or via velocity, move away in a direction opposite to the approach direction or withdraw the controller enable (OFF1) and ”manually” move the drive. 5-196 Siemens AG 2005 All Rights Reserved SIMODRIVE POSMO A User Manual (POS1) – 06.05 Edition 06.05 02.99 5 Description of the Functions 5.5 SIMODRIVE POSMO A functions 5.5.15 Telegram substitution (from SW 3.0) Description ! For specific applications it is necessary that under no circumstances (PROFIBUS–DP fails) that the axis of the drive comes undesirably to a standstill or the drive state can be configured to ”freeze” to run–down the master. Warning For P701=1, the function is immediately effective. The drive only evaluates PZD data if STW.10 = 1. It must be carefully ensured that the drive can always be stopped using an EMERGENCY SWITCHING–OFF button/function In addition we recommend that one of the two input terminals should be parameterized with the ”OFF1” function (refer to P31/P32). The function is available for both operating modes – ”positioning” and ”speed setpoint” (P700). Behavior after being activated (P701 = 1) PZD data that is available (STW, block selection and start byte) is only evaluated if the STW.10 ”control from PLC requested” is equal to ”1”. If STW.10 changes from ”1” to ”0”, then the currently active drive state (PZD data being used) is frozen. The drive uses the last received STW, block selection and start byte (or speed setpoint) where STW.10 was 1. PZD data that is received is only taken into account if STW.10 = 1. In this case, PZD data must be sent from the same master type as before the connection was lost. It is not possible to interrupt a connection with a Class 1 master (S7–CPU) and resume communications with a Class 2 master (PG/SimoCom A) (refer to P928). If the drive is powered–up (power–on) and P701 = 1 was previously saved in the FEPROM (refer to P971), then the drive only responds when PZD data is available, if STW.10 = 1. If the bus connection to the drive fails, then the currently active drive state is frozen. The drive uses the last received STW, block selection and start byte where STW.10 was 1. After the bus connection has been restored, PZD data that is received is only taken into account again if STW.10 = 1. Also in this case, PZD data must be sent from the same master type as before the connection was interrupted. Siemens AG 2005 All Rights Reserved SIMODRIVE POSMO A User Manual (POS1) – 06.05 Edition 5-197 5 5 Description of the Functions 06.05 02.99 5.5 SIMODRIVE POSMO A functions The drive LED indicates when PZD data is being actively substituted ((P701 = 1 and STW.10 = 0). In this case, the LED flashes, alternating between yellow/green. If STW.10 = 1, then the behavior of the LED is compatible to the behavior with P701 = 0. The function cannot be used in the standalone mode (refer to P100). Independent of the operating mode and independent of P701, parameters P967 and P972 always display the PZD data presently being internally used in the drive. This can used, when establishing a connection to the drive, after bus failure or replacing the master, to immediately send the last valid control word (for which STW.10 = 1), the last valid block selection and start byte (or speed setpoint) to the drive. This means that the connection can be immediately restored without changing the status of the drive. 5 Behavior for P701 = 0 (factory pre–setting) 5-198 The drive behavior is compatible to previous software releases. PZD data is always evaluated independently of STW.10. Siemens AG 2005 All Rights Reserved SIMODRIVE POSMO A User Manual (POS1) – 06.05 Edition 04.01 02.99 5 Description of the Functions 5.6 Parameters for SIMODRIVE POSMO A 5.6 Parameters for SIMODRIVE POSMO A 5.6.1 General information on parameters General information The majority of the parameters required when commissioning the system for the first time are, for SIMODRIVE POSMO A, already preset in the factory (factory default setting). All of the motor, power module and encoder data are known because of the fixed hardware. This means that the commissioning (start–up) data is limited to defining the gearbox (refer to Chapter 5.6.3) and the system geometry as well as some positioning data and software limit switches. Saving parameters There is a non–volatile memory to save parameters. After parameters have been changed, they must be saved by transferring them into the non–volatile memory. The parameters are loaded from the non–volatile memory after power up. Transfer into the non–volatile memory? Set P971 from 0 to 1 Data save is automatically acknowledged with P971 = 0 Changing parameters For safety reasons, some parameters can only be changed if a traversing block is not active, i.e. the motor is not moving (equalization movements initiated by the closed–loop position control are an exception). Exceptions: It is always possible to change parameters of traversing blocks which are not selected. It is always possible to change parameters which do not have an appropriate ID. Illegal change tasks are rejected in the PKW part with PROFIBUS fault number 17 (task not able to be executed due to the operating state) (refer to Chapter 5.1). Siemens AG 2005 All Rights Reserved SIMODRIVE POSMO A User Manual (POS1) – 06.05 Edition 5-199 5 5 Description of the Functions 04.01 02.99 5.6 Parameters for SIMODRIVE POSMO A Setting the factory default The factory setting of parameters for SIMODRIVE POSMO A can be re–established if required. Establish the factory default setting? Set P970 from 1 to 0 Download is automatically acknowledged with P970 = 1 The parameters are now in the volatile memory (RAM). After the parameters have been transferred into the non–volatile memory, the factory default setting is loaded when powering up. Set P971 from 0 to 1 Data save is automatically acknowledged with P971 = 0 5 Service functions for parameters (refer to Chapter 5.6.2) For SIMODRIVE POSMO A, the following service functions are available with reference to parameters: P980:78 Supported parameters List of all supported parameters P990:78 Changes with respect to the factory default setting List of all of the parameters that have been changed with respect to the factory default setting Parameters for identification (refer to Chapter 5.6.2) 5-200 The following parameters are available for positioning motor identification: P52 Hardware version P53 Firmware version P964:8 (from SW 1.4) Drive identification Siemens AG 2005 All Rights Reserved SIMODRIVE POSMO A User Manual (POS1) – 06.05 Edition 06.05 04.01 02.99 5 Description of the Functions 5.6 Parameters for SIMODRIVE POSMO A 5.6.2 List of parameters Reader’s note The parameters, listed in the following, are valid for all software releases of SIMODRIVE POSMO A. The complete list is updated corresponding to the Edition of this documentation (refer to the Edition status in the header line) and corresponds to the software release of SIMODRIVE POSMO A documented here. The parameters that are dependent on the software release are appropriately identified. 5 The parameters are listed as follows: Explanation of the parameter list Parameter number (examples) P0010 Parameter 10 without index P0082:28 Parameter 82 with index 0, 1, ... 27 (28 indices) P0082:13 Parameter 82 with index 13 P0082:x Parameter 82 with undefined index x P0056.2 Parameter 56 bit 2 Parameter text Data type ––> Refer to Chapter 4.3.1 decimal hexadecimal Pdddd || hh word_word word_word 075W 300W Min Standard xx xx Max xx Units xx Data type yy Effective zz Parameter description Motor type Specifies for which motor the parameter is valid. 075W ––> 75 W motor 300W ––> 300 W motor Units MSR: Dimension system grid 1 MSR = 1 mm for P4 = 0 1 MSR = 1 degr. for P4 = 1 1 MSR = 1 inch for P4 = 2 Effective immediately ––> becomes immediately effective when a change is made When a parameter is changed, it is not permissible that a traversing block is active. If a parameter can be changed while the axis is traversing, then an explicit reference is made. In the ”speed setpoint” mode, this means that STW.4 must be 0. RO ––> Read Only The parameter can only be read and not written into. Fig. 5-22 Parameter list Siemens AG 2005 All Rights Reserved SIMODRIVE POSMO A User Manual (POS1) – 06.05 Edition 5-201 5 Description of the Functions 06.05 04.01 02.99 5.6 Parameters for SIMODRIVE POSMO A Parameter list The following parameters are available for SIMODRIVE POSMO A: Version: 04.03.02 P0001 / 01 300W Min 0 5 Axis type Standard 0 Max 200000 Unit MSR Data type C4 Effective immed. 0.0 ––> Linear axis > 0.0 ––> rotary axis The value corresponds to the modulo correction of the axis (e.g.: P1 = 360 ––> 0.0 – 359.9). Note: If the drive is programmed as a rotary axis (P1 > 0), the start and end of software limit switches must lie within the modulo range. Furthermore, P6>=0 and P7<=P1 must apply. The following applies from SW 1.6: The parameter is limited in relation to the gear reduction factor and the travel per gear revolution. The following formula applies: F = Conversion factor (mm ––> F = 1 ; inch ––> F = 25.4) P1 < 2147483647 * P2 / (F * 4096 * |P3| ) The following applies from SW 2.0: Only the procedure with modulo axes is possible in the ”Speed setpoint” operating mode (P930). 075W Min 0 Standard 0 Max 200000 Unit MSR Data type C4 Effective immed. 0.0 ––> Linear axis > 0.0 ––> rotary axis The value corresponds to the modulo correction of the axis (e.g.: P1 = 360 ––> 0.0 – 359.9). Note: If the drive is programmed as a rotary axis (P1 > 0), the start and end of software limit switches must lie within the modulo range. Furthermore, P6>=0 and P7<=P1 must apply. The following applies from SW 1.6: The parameter is limited in relation to the gear reduction factor and the travel per gear revolution. The following formula applies: F = Conversion factor (mm ––> F = 1 ; inch ––> F = 25.4) P1 < 2147483647 * P2 / (F * 816 * |P3| ) The following applies from SW 2.0: Only the procedure with modulo axes is possible in the ”Speed setpoint” operating mode (P930). 5-202 Siemens AG 2005 All Rights Reserved SIMODRIVE POSMO A User Manual (POS1) – 06.05 Edition 06.05 04.01 02.99 5 Description of the Functions 5.6 Parameters for SIMODRIVE POSMO A P0002 / 02 300W Min 0.0001 Distance per gearbox revolution Standard 10 Max 200000 Unit MSR Data type C4 Effective immed. The parameter specifies the travel which is moved through in the reference system after a gearbox revolution. Note: The following applies from SW 1.6: With a modulo axis (P1 > 0), the path per gear revolution is limited by the axis type and the gear reduction ratio. The following formula applies: F = Conversion factor (mm ––> F = 1 ; inch ––> F = 25.4) P2 > P1 * F * 4096 * |P3| / 2147483647 075W Min 0.0001 Standard 10 Max 200000 Unit MSR Data type C4 Effective immed. The parameter specifies the travel which is moved through in the reference system after a gearbox revolution. Note: The following applies from SW 1.6: With a modulo axis (P1 > 0), the path per gear revolution is limited by the axis type and the gear reduction ratio. The following formula applies: F = Conversion factor (mm ––> F = 1 ; inch ––> F = 25.4) P2 > P1 * F * 816 * |P3| / 2147483647 Siemens AG 2005 All Rights Reserved SIMODRIVE POSMO A User Manual (POS1) – 06.05 Edition 5-203 5 5 Description of the Functions 06.05 04.01 02.99 5.6 Parameters for SIMODRIVE POSMO A P0003 / 03 300W Min –200000 5 Gearbox step-down ratio Standard 1 Max 200000 Unit – Data type C4 Effective immed. The step-down ratio should be entered in accordance with the gear used. Note: P3 = 0 is not permissible. Sign change ––> direction of rotation change This parameter has a gearbox-dependent factory default. The following applies before SW 1.3: Min. value = 0.0001 The following applies from SW 1.6: With a modulo axis (P1 > 0), the gear reduction ratio is limited by the path per gear revolution and the axis type. The following formula applies: F = Conversion factor (mm ––> F = 1 ; inch ––> F = 25.4) |P3| < 2147483647 * P2 / (F * 4096 * P1) 075W Min –200000 Standard 1 Max 200000 Unit – Data type C4 Effective immed. The step-down ratio should be entered in accordance with the gear used. Note: P3 = 0 is not permissible. Sign change ––> direction of rotation change This parameter has a gearbox-dependent factory default. The following applies before SW 1.3: Min. value = 0.0001 The following applies from SW 1.6: With a modulo axis (P1 > 0), the gear reduction ratio is limited by the path per gear revolution and the axis type. The following formula applies: F = Conversion factor (mm ––> F = 1 ; inch ––> F = 25.4) |P3| < 2147483647 * P2 / (F * 816 * P1) P0004 / 04 300W 075W Min 0 Dimension units Standard 0 Max 2 Unit – Data type I2 Effective immed. Dimension units for parameter values (0 = mm, 1 = degree, 2 = inch). P0005 / 05 300W 075W Min –200000 Reference point coordinate Standard 0 Max 200000 Unit MSR Data type C4 Effective immed. The parameter specifies the position at the reference point. Note: The parameter value can be changed while traversing. 5-204 Siemens AG 2005 All Rights Reserved SIMODRIVE POSMO A User Manual (POS1) – 06.05 Edition 06.05 04.01 02.99 5 Description of the Functions 5.6 Parameters for SIMODRIVE POSMO A P0006 / 06 300W 075W Min –200000 Software limit switch, start Standard –200000 Max 200000 Unit MSR Data type C4 Effective immed. The parameter specifies the software limit switch, left negative. de-activated: P6 = P7 activated: P6 < P7 Note: Also refer to P7. If the drive is programmed as a rotary axis (P1 > 0), the start and end of software limit switches must lie within the modulo range. Furthermore, P6>=0 and P7<=P1 must apply. The following applies from SW 2.0: Software limit switches are not possible in the ”Speed setpoint” operating mode (P930). P0007 / 07 300W 075W Min –200000 Software limit switch, end Standard 200000 Max 200000 Unit MSR Data type C4 5 Effective immed. The parameter specifies the software limit switch, right positive. de-activated: P6 = P7 activated: P6 < P7 Note: Also refer to P6. If the drive is programmed as a rotary axis (P1 > 0), the start and end of software limit switches must lie within the modulo range. Furthermore, P6>=0 and P7<=P1 must apply. The following applies from SW 2.0: Software limit switches are not possible in the ”Speed setpoint” operating mode (P930). P0008 / 08 300W Min 0 Maximum speed Standard 3000 Max 3800 Unit rpm Data type C4 Effective immed. Unit rpm Data type C4 Effective immed. Unit ms Data type T2 Effective immed. Max. motor speed referred to the motor axis 075W Min 0 Standard 3000 Max 3600 Max. motor speed referred to the motor axis. P0009 / 09 300W 075W Min 10 Acceleration time Standard 100 Max 15000 During this time, in the speed-controlled operation, the setpoint is set as follows: Ramp-up: From zero up to the maximum permissible actual speed Ramp-down: From the maximum permissible actual value down to zero The following applies from SW 2.0: The ramp-up time can be changed with immediate effect in the ”Speed setpoint” operating mode. This is also possible when the drive is moving. Siemens AG 2005 All Rights Reserved SIMODRIVE POSMO A User Manual (POS1) – 06.05 Edition 5-205 5 Description of the Functions 06.05 04.01 02.99 5.6 Parameters for SIMODRIVE POSMO A P0010 / 0A 300W 075W Min 0 Maximum motor velocity Standard 30000 Max 2000000 Unit MSR/min Data type I4 Effective immed. Data type C4 Effective immed. Max. permissible velocity, dependent on the system. The max. speed in P8 was not exceeded in operation. Note: This parameter has a gearbox-dependent factory default. P0011 / 0B 300W 075W Min 0 5 Target range Standard 2 Max 200000 Unit MSR The parameter specifies the precise stopping range (precise stopping window). Note: P0011 may not be set too low, as otherwise a traversing task cannot be completed. The setting is dependent on the encoder resolution and the gear ratio. P0012 / 0C 300W 075W Min 0 Max. following error Standard 200000 Max 200000 Unit MSR Data type C4 Effective immed. The parameter specifies the maximum permissible following error. Note: The following error status is displayed using status signal ZSW.8 (no following error / following error). P0013 / 0D 300W 075W Min 0 Monitoring time Standard 100 Max 2000000 Unit ms Data type T4 Effective immed. After the motion block has been completed (position ref. value = target ref. value), this time is started. After the time has expired, the standstill monitoring and P gain are activated for standstill (P54, P57). P0014 / 0E 300W 075W Min 0 Standstil range Standard 200000 Max 200000 Unit MSR Data type C4 Effective immed. Tolerance range for the closed-loop position control at standstill. Note: The parameter value can be changed while traversing. P0015 / 0F 300W 075W Min –200000 Backlash compensation Standard 0 Max 200000 Unit MSR Data type C4 Effective immed. The mechanical backlash for direction reversal can be compensated using this parameter. P15 = negative ––> Correction direction negative P15 = positive ––> Correction direction positive Note: The following applies before SW 1.4: Min. value = 0.0 5-206 Siemens AG 2005 All Rights Reserved SIMODRIVE POSMO A User Manual (POS1) – 06.05 Edition 06.05 04.01 02.99 5 Description of the Functions 5.6 Parameters for SIMODRIVE POSMO A P0016 / 10 300W Min 0 Max. overcurrent Standard 10.5 Max 42 Unit A Data type C4 Effective immed. Max. overcurrent for the breakaway torque. Note: This parameter has a gearbox-dependent factory default. The parameter is valid for: n < 100 RPM and max. 500 ms Maximum values depend on the gear unit ––> see User Manual under the heading ”Gear unit dependant parameters (factory settings)” The following applies as from SW 1.5: The parameter value can be changed while traversing. 075W Min 0 Standard 9 Max 18 Unit A Data type C4 Effective immed. Max. overcurrent for the breakaway torque. Note: This parameter has a gearbox-dependent factory default. The parameter is valid for: n < 100 RPM and max. 500 ms Maximum values depend on the gear unit ––> see User Manual under the heading ”Gear unit dependant parameters (factory settings)” The following applies as from SW 1.5: The parameter value can be changed while traversing. P0017 / 11 300W Min 0 P gain, speed controller Standard 3 Max 100 Unit – Data type I4 Effective immed. Data type I4 Effective immed. The parameter specifies the P gain for traversing operation. Note: The parameter value can be changed while traversing. Also refer to P54 075W Min 0 Standard 20 Max 100 Unit – The parameter specifies the P gain for traversing operation. Note: The parameter value can be changed while traversing. The following applies before SW 1.2: Max. value = 40 Also refer to P54 P0018 / 12 300W Min 2 Integral action time, speed controller Standard 10 Max 1000 Unit ms Data type T2 Effective immed. The parameter specifies the I component for the speed controller. Note: The parameter value can be changed while traversing. 075W Min 2 Standard 22 Max 1000 Unit ms Data type T2 Effective immed. The parameter specifies the I component for the speed controller. Note: The parameter value can be changed while traversing. Siemens AG 2005 All Rights Reserved SIMODRIVE POSMO A User Manual (POS1) – 06.05 Edition 5-207 5 5 Description of the Functions 06.05 04.01 02.99 5.6 Parameters for SIMODRIVE POSMO A P0019 / 13 300W 075W Min 0.1 Kv factor (position loop gain) Standard 1 Max 9.9 Unit 1000/min Data type C4 Effective immed. The parameter defines at which traversing velocity of the axis, which following error is obtained. Kv factor significance Low: Slow response to a setpoint-actual value difference, following error is high High: Fast response to a setpoint-actual value difference, following error is low P0020 / 14 300W 075W Min 0.3 5 Current setpoint smoothing Standard 0.3 Max 10 Unit ms Data type C4 Effective immed. Data type C4 Effective immed. Data type C4 Effective immed. Lowpass (PT1 characteristics) Note: The parameter value can be changed while traversing. P0021 / 15 300W 075W Min 2 Speed setpoint smoothing Standard 2 Max 100 Unit ms Lowpass (PT1 characteristics) Note: The parameter value can be changed while traversing. P0022 / 16 300W Min 0 Maximum acceleration Standard 4000 Max 200000 Unit MSR/s2 Max. acceleration for closed-loop position controlled operation. Note: This parameter has a gearbox-dependent factory default. 075W Min 0 Standard 1000 Max 200000 Unit MSR/s2 Data type C4 Effective immed. Max. acceleration for closed-loop position controlled operation. Note: This parameter has a gearbox-dependent factory default. P0023 / 17 300W 075W Min 0 Jerk time constant Standard 0 Max 400 Unit ms Data type T4 Effective immed. The acceleration/deceleration is changed over this time. Note: Input resolution = 10 ms 5-208 Siemens AG 2005 All Rights Reserved SIMODRIVE POSMO A User Manual (POS1) – 06.05 Edition 06.05 04.01 02.99 5 Description of the Functions 5.6 Parameters for SIMODRIVE POSMO A P0024 / 18 300W 075W Min 0 Override velocity Standard 16384 Max 16384 Unit % Data type N2 Effective immed. Closed-loop speed control: referred to P8 (maximum speed) Closed-loop position controlled: referred to P10 (maximum velocity) Note: The parameter value can be changed while traversing. P0025 / 19 300W 075W Min 0 Override acceleration Standard 16384 Max 16384 Unit % Data type N2 Effective immed. Closed-loop speed control: referred to P9 (acceleration time) P25 = 50% means: Doubling of ramp P25 = 10% means: Multiplication by 10 of ramp Closed-loop position controlled: referred to P22 (maximum acceleration) The following applies from SW 2.0: The acceleration override can be changed with immediate effect in the ”Speed setpoint” operating mode. This is also possible when the drive is moving. P0026 / 1A 300W 075W Min 0 Override speed, jogging Standard 3276 Max 16384 Unit % Data type N2 Effective immed. Data type N2 Effective immed. Referred to P8 (maximum speed). Is calculated in addition to P24 (override velocity). Note: The parameter value can be changed while traversing. P0027 / 1B 300W 075W Min 0 Override acceleration, jogging Standard 8192 Max 16384 Unit % Refer to P9 (acceleration time). Is calculated in addition to P25 (override acceleration). Siemens AG 2005 All Rights Reserved SIMODRIVE POSMO A User Manual (POS1) – 06.05 Edition 5-209 5 5 Description of the Functions 06.05 04.01 02.99 5.6 Parameters for SIMODRIVE POSMO A P0028 / 1C 300W Min 0 Max. current Standard 10.5 Max 21 Unit A Data type C4 Effective immed. Upper limit, motor current. Note: The parameter value can be changed while traversing. This parameter has a gearbox-dependent factory default. Maximum values depend on the gear unit ––> see User Manual under the heading ”Gear unit dependant parameters (factory settings)” 075W Min 0 5 Standard 9 Max 9 Unit A Data type C4 Effective immed. Upper limit, motor current. Note: The parameter value can be changed while traversing. This parameter has a gearbox-dependent factory default. Maximum values depend on the gear unit ––> see User Manual under the heading ”Gear unit dependant parameters (factory settings)” P0029 / 1D 300W 075W Min 0 Electronics temperature tolerance time Standard 120000 Max 2000000 Unit ms Data type T4 Effective immed. For an electronics overtemperature condition, after this time, the warning is changed to a fault, i.e. the appropriate response is activated. Note: The electronics temperature is displayed using P47. Input resolution = 10 ms The parameter value can be changed while traversing. P0030 / 1E 300W 075W Min 0 Fault suppression Standard 0 Max F Unit Hex Data type I2 Effective immed. If the bit is set, instead of the appropriate fault, only a warning is output. Bit 0: Speed controller at its endstop Bit 1: Start, software limit switch or end, software limit switch Software limit switches always stop an axis. Bit 2: Standstill monitoring Bit 3: Undervoltage of the load current supply (from SW 1.6) Note: The parameter value can be changed while traversing. P0031 / 1F 300W 075W Min 0 Function terminal 1 Standard 0 Max 793 Unit – Data type I2 Effective immed. The function of the terminal is defined using this parameter: The following applies from SW 2.0: The meaning of terminal parameterization depends on the operating mode (P930). Parameters with different meanings are marked. 5-210 Siemens AG 2005 All Rights Reserved SIMODRIVE POSMO A User Manual (POS1) – 06.05 Edition 06.05 04.01 02.99 5 Description of the Functions 5.6 Parameters for SIMODRIVE POSMO A Parameters which are not marked have the same function in both operating modes. 0 No function 1 I (STW.4) Positioning operating mode:Operating condition positioning. Stop and reject the actual traversing task on cancelation. Stop Speed setpoint operating mode:Ramp-function generator enable. Stop with maximum acceleration on cancelation. 2 I (STW.5) Positioning operating mode:Operating condition positioning. Stop without rejecting the actual traversing task on cancelation. Stop Speed setpoint operating mode: Ramp-function generator START / Rampfunction generator STOP. The actual speed remains constant on cancelation. 3 I (STW.6) Positioning operating mode:Activate traversing task Speed setpoint operating mode: Setpoint enable. Deceleration at the ramp on cancelation. 4 I (STW.8) Positioning operating mode:Jogging – Speed setpoint operating mode:No function 5 I (STW.9) Positioning operating mode:Jogging + Speed setpoint operating mode:No function 6 I (STW.11) Positioning operating mode:Referencing Speed setpoint operating mode:No function 7 I (STW.12) Positioning operating mode:Automatic single block. Speed setpoint operating mode:No function 8 I (STW.13) Positioning operating mode:External block change. Speed setpoint operating mode:No function 9 I (STW.14) Positioning operating mode:Read-in enable. Speed setpoint operating mode:No function 10 I (RMB.0) Positioning operating mode:Accept value directly in checkback byte (bit 0). Speed setpoint operating mode:No function 11 I (RMB.1) Positioning operating mode:Accept value directly in checkback byte (bit 1). Speed setpoint operating mode:No function 12 I (RMB.2) Positioning operating mode:Accept value directly in checkback byte (bit 2). Speed setpoint operating mode:No function 13 I (RMB.3) Positioning operating mode:Accept value directly in checkback byte (bit 3). Speed setpoint operating mode:No function 14 I (RMB.4) Positioning operating mode:Accept value directly in checkback byte (bit 4). Speed setpoint operating mode:No function 15 I (RMB.5) Positioning operating mode:Accept value directly in checkback byte (bit 5). Speed setpoint operating mode:No function 16 I (RMB.6) Positioning operating mode:Accept value directly in checkback byte (bit 6). Speed setpoint operating mode:No function 17 I (RMB.7) Positioning operating mode:Accept value directly in checkback byte (bit 7). Speed setpoint operating mode:No function 18 I (STB.0) Positioning operating mode:Accept value directly in start byte (bit 0). Speed setpoint operating mode:No function 19 I (STB.1) Positioning operating mode:Accept value directly in start byte (bit 1). Speed setpoint operating mode:No function 20 I (STB.2) Positioning operating mode:Accept value directly in start byte (bit 2). Speed setpoint operating mode:No function 21 I (STB.3) Positioning operating mode:Accept value directly in start byte (bit 3). Speed setpoint operating mode:No function 22 I (STB.4) Positioning operating mode:Accept value directly in start byte (bit 4). Speed setpoint operating mode:No function 23 I (STB.5) Positioning operating mode:Accept value directly in start byte (bit 5). Speed setpoint operating mode:No function Siemens AG 2005 All Rights Reserved SIMODRIVE POSMO A User Manual (POS1) – 06.05 Edition 5-211 5 5 Description of the Functions 06.05 04.01 02.99 5.6 Parameters for SIMODRIVE POSMO A 24 I (STB.6) 25 I (STB.7) 26 I (STB.15) 27 I 5 28 29 30 31 64 65 66 67 68 69 70 71 72 E E E E O O O O O O O O O (ZSW.0) (ZSW.1) (ZSW.2) (ZSW.3) (ZSW.4) (ZSW.5) (ZSW.6) (ZSW.7) (ZSW.8) 73 O (ZSW.10) 74 O (ZSW.11) 75 O (ZSW.12) 76 O (ZSW.13) 77 O (ZSW.14) 78 O (ZSW.15) 79 O (STB.0) 80 O (STB.1) 81 O (STB.2) 82 O (STB.3) 83 O (STB.4) 84 O (STB.5) 85 O (STB.6) 86 O (STB.7) 87 O (RMB.0) 5-212 Positioning operating mode:Accept value directly in start byte (bit 6). Speed setpoint operating mode:No function Positioning operating mode:Accept value directly in start byte (bit 7). Speed setpoint operating mode:No function Open holding brake (software version 1.4 and higher) Positioning operating mode: On-the-fly measurement / actual value setting (software version 1.4 and higher) This function is only possible via terminal 1. Other input parameters can also be used. The input is updated in a 125 microsecond grid for the function ”On-the-fly measurement / actual value setting”. Speed setpoint operating mode:No function Hardware limit switch start (closing contact) (as of SW 2.0) Hardware limit switch end (closing contact) (as of SW 2.0) Hardware limit switch start (opening contact) (as of SW 3.0) Hardware limit switch end (opening contact) (as of SW 3.0) Ready for power-up Ready Operation enabled Fault OFF 2 OFF 3 Power-on inhibit Warning Positioning operating mode: Following error. Speed setpoint operating mode: Speed within tolerance band Positioning operating mode: Setpoint position reached. Speed setpoint operating mode: Ramp-up complete Positioning operating mode: Reference point set. Speed setpoint operating mode: Checkback from Terminal1 Positioning operating mode: Acknowledge traversing task. Speed setpoint operating mode: Checkback from Terminal2 Drive moves Positioning operating mode: Within traversing block. Speed setpoint operating mode:No function Load power supply available Positioning operating mode: Accept value directly from start byte (bit 0). Speed setpoint operating mode:No function Positioning operating mode: Accept value directly from start byte (bit 1). Speed setpoint operating mode:No function Positioning operating mode: Accept value directly from start byte (bit 2). Speed setpoint operating mode:No function Positioning operating mode: Accept value directly from start byte (bit 3). Speed setpoint operating mode:No function Positioning operating mode: Accept value directly from start byte (bit 4). Speed setpoint operating mode:No function Positioning operating mode: Accept value directly from start byte (bit 5). Speed setpoint operating mode:No function Positioning operating mode: Accept value directly from start byte (bit 6). Speed setpoint operating mode:No function Positioning operating mode: Accept value directly from start byte (bit 7). Speed setpoint operating mode:No function Positioning operating mode: Accept value directly from checkback byte (bit 0) (software version 1.2 and higher). Speed setpoint operating mode:No function Siemens AG 2005 All Rights Reserved SIMODRIVE POSMO A User Manual (POS1) – 06.05 Edition 06.05 04.01 02.99 5 Description of the Functions 5.6 Parameters for SIMODRIVE POSMO A 88 O (RMB.1) 89 O (RMB.2) 90 O (RMB.3) 91 O (RMB.4) 92 O (RMB.5) 93 O (RMB.6) 94 O (RMB.7) Positioning operating mode: Accept value directly from checkback byte (bit 1) (software version 1.2 and higher). Speed setpoint operating mode:No function Positioning operating mode: Accept value directly from checkback byte (bit 2) (software version 1.2 and higher). Speed setpoint operating mode:No function Positioning operating mode: Accept value directly from checkback byte (bit 3) (software version 1.2 and higher). Speed setpoint operating mode:No function Positioning operating mode: Accept value directly from checkback byte (bit 4) (software version 1.2 and higher). Speed setpoint operating mode:No function Positioning operating mode: Accept value directly from checkback byte (bit 5) (software version 1.2 and higher). Speed setpoint operating mode:No function Positioning operating mode: Accept value directly from checkback byte (bit 6) (software version 1.2 and higher). Speed setpoint operating mode:No function Positioning operating mode: Accept value directly from checkback byte (bit 7) (software version 1.2 and higher). Speed setpoint operating mode:No function Control external holding brake (software version 1.4 and higher) OFF 1 logically ANDed with the terminal OFF 2 logically ANDed with the terminal OFF 3 logically ANDed with the terminal 95 O 100 I (STW.0) 101 I (STW.1) 102 I (STW.2) Note: If a terminal is parameterized as input or output, the following applies: ––> Addition with 256 means: Positioning operating mode: Status display via RMB.6/7. (terminal 1/2) (SW 1.4 and higher). Speed setpoint operating mode: Status check back via ZSW.11 (terminal 1) ZSW.12 (terminal 2). If a terminal is parameterized as output, the following applies: ––> Addition with 128 means: Inversion for signal output. Applies from SW 2.1: This function can be used only with the function ”Reference to occurring zero mark”. ––> Addition with 512 means: the terminal input is monitored for an edge. The addition of 512 is only possible for terminal parameterizations from the interval [18..25] (accept the value in the start byte). The type of the edge to be monitored can be parameterized in P56.7. The parameter value can be changed during the procedure. P0032 / 20 300W 075W Min 0 Function terminal 2 Standard 0 Max 793 Unit – Data type I2 Effective immed. Refer to P31 (function, terminal 1). Siemens AG 2005 All Rights Reserved SIMODRIVE POSMO A User Manual (POS1) – 06.05 Edition 5-213 5 5 Description of the Functions 06.05 04.01 02.99 5.6 Parameters for SIMODRIVE POSMO A P0033 / 21 300W 075W Min 0 Address, test socket 1 Standard FC32 Max FFFFFFFF Unit Hex Data type I4 Effective immed. The parameter addresses the measured value for output via the analog test output. FC00 Speed setpoint (motor shaft) FC66 Actual speed value (motor shaft) FC6A Position actual value FC32 Current actual value FC38 I set (speed controller) FC3A I set (smoothed) Note: The parameter value can be changed while traversing. P0034 / 22 5 300W 075W Min 0 Shift factor, test socket 1 Standard 7 Max F Unit Hex Data type I2 Effective immed. Data type I2 Effective immed. Data type I4 Effective immed. Unit Hex Data type I2 Effective immed. Unit Hex Data type I2 Effective immed. Shift factor for analog test socket 1. Note: Shift factor change of +1 corresponds to doubling the value Shift factor change by –1 corresponds to halving the value The parameter value can be changed while traversing. P0035 / 23 300W 075W Min 0 Offset, test socket 1 Standard 80 Max FF Unit Hex Offset for analog test socket 1. Note: With offset = 80 hex, for ”0” 2.5 V is output. The parameter value can be changed while traversing. P0036 / 24 300W 075W Min 0 Address, test socket 2 Standard FC66 Max FFFFFFFF Unit Hex Note: Refer to P33 (address, test socket 1). P0037 / 25 300W 075W Min 0 Shift factor, test socket 2 Standard 0 Max F Note: Refer to P34 (shift factor, test socket 1). P0038 / 26 300W 075W Min 0 Offset, test socket 2 Standard 80 Max FF Note: Refer to P35 (offset, test socket 1). 5-214 Siemens AG 2005 All Rights Reserved SIMODRIVE POSMO A User Manual (POS1) – 06.05 Edition 06.05 04.01 02.99 5 Description of the Functions 5.6 Parameters for SIMODRIVE POSMO A P0039 / 27 300W 075W Min – Position setpoint Standard – Max – Unit MSR Data type C4 Effective RO This parameter specifies the position setpoint in the selected unit of measurement. P0040 / 28 300W 075W Min –200000 Position actual value Standard 0 Max 200000 Unit MSR Data type C4 Effective immed. This position is directly accepted as new actual value by writing the required position into P40 The drive must be closed-loop controlled and stationary. The axis is then considered to have been referenced. The following applies from SW 2.0: It is possible to write the actual position value in the ”Speed setpoint” operating mode. The axis is always dereferenced in this operating mode. P0041 / 29 300W 075W Min – Speed setpoint Standard – Max – Unit rpm Data type C4 Effective RO Data type C4 Effective RO Data type C4 Effective RO Unit A Data type C4 Effective RO Unit ms Data type T4 Effective RO Unit MSR Data type C4 Effective RO ”Positioning” operating mode: Indicates the speed setpoint relative to the motor shaft. P0042 / 2A 300W 075W Min – Actual speed Standard – Max – Unit rpm ”Positioning” operating mode: Indicates the speed setpoint relative to the motor shaft. P0043 / 2B 300W 075W Min – P0044 / 2C 300W 075W Min – P0045 / 2D 300W 075W Min – P0046 / 2E 300W 075W Min – Current setpoint Standard – Max – Unit A Current actual value Standard – Max – Timer status Standard – Max – Following error Standard – Max – Siemens AG 2005 All Rights Reserved SIMODRIVE POSMO A User Manual (POS1) – 06.05 Edition 5-215 5 5 Description of the Functions 06.05 04.01 02.99 5.6 Parameters for SIMODRIVE POSMO A P0047 / 2F 300W 075W Min – Electronics temperature Standard – Max – Unit C Data type C4 Effective RO This parameter serves to monitor the electronics temperature in the >0 C range to avoid possible overheating of the module. Temperatures in the negative temperature range are not monitored and not correctly displayed. P0048 / 30 300W 075W Min – Actual traversing block, block number Standard – Max – Unit – Data type I2 Effective RO The parameter specifies the block number of the traversing block presently being processed. P0049 / 31 5 300W 075W Min – Following block, block number Standard – Max – Unit – Data type I2 Effective RO The parameter specifies the block number of the next block. The following block is the next traversing block to be executed. P0050 / 32 300W 075W Min – P0051 / 33 300W 075W Min – P0052 / 34 300W 075W Min – Velocity setpoint Standard – Max – Unit MSR/min Data type I4 Effective RO Unit MSR/min Data type I4 Effective RO Unit – Data type I4 Effective RO Data type I4 Effective RO Actual velocity Standard – Max – Hardware version Standard – Max – The parameter indicates the hardware version of the motor. =1 ––> Hardware version A =4 ––> Hardware version D, etc. P0053 / 35 300W 075W Min – Firmware version Standard – Max – Unit – The parameter indicates the firmware version of the drive. Example: = 10202 ––> Firmware version 01.02.02 5-216 Siemens AG 2005 All Rights Reserved SIMODRIVE POSMO A User Manual (POS1) – 06.05 Edition 06.05 04.01 02.99 5 Description of the Functions 5.6 Parameters for SIMODRIVE POSMO A P0054 / 36 300W Min 1 P gain, speed controller standstill Standard 2 Max 100 Unit – Data type I4 Effective immed. Data type I4 Effective immed. This parameter specifies the P gain for axis at standstill. Note: Refer to P56.2 The parameter value can be changed while traversing. 075W Min 1 Standard 5 Max 100 Unit – This parameter specifies the P gain for axis at standstill. Note: The following applies before SW 1.2: Max. value = 40 The following applies before SW 1.4: Min. value = 0 Refer to P56.2 The parameter value can be changed while traversing. P0055 / 37 300W 075W Min – 5 Signal position Standard – Max – Unit MSR Data type C4 Effective RO Last position for external block change or when canceling the program block by withdrawing the start byte condition. Note: The following is valid for the position for rotary axis: The following applies before SW 1.3: ––> no modulo evaluation The following applies from SW 1.3: ––> modulo evaluation P0056 / 38 300W 075W Min 0 Operating options Standard 0 Max FFFF Unit Hex Data type V2 Effective immed. Bit 1.0 Drive referenced and behavior after restart (from SW 1.2) = 00: The motor is referenced when powering-up again if it had already been referen-ced when powered-down and was stationary. The behavior is as it was before SW 1.2. = 01: The motor is referenced when powering-up again if it was already referenced when powered-down and was not stationary (ZSW.13). = 1x: The motor is not referenced when powering-up again. (x: the bit can either 0 or 1) Bit 2 The following applies from SW 2.0: The drive is always dereferenced in the ”Speed setpoint” operating mode (P930). Bit 0 and bit 1 have no function in this operating mode. P gain at standstill (from SW 1.3) = 0: P gain of holding controller active (P57) = 1: Speed controller P gain active (P54) The following applies from SW 2.0: The speed controller is always active in the ”Speed setpoint” operating mode (P930). Bit 2 has no meaning here. P54 is effective at zero speed. Siemens AG 2005 All Rights Reserved SIMODRIVE POSMO A User Manual (POS1) – 06.05 Edition 5-217 5 Description of the Functions 06.05 04.01 02.99 5.6 Parameters for SIMODRIVE POSMO A Bit 3 5 Response of Bit 10 in the status word ”Setpoint position reached” (as of SW 1.6) = 0: ”Set position reached” is signaled when: – traversing block fully completed – Abort of the traversing block by: Fault, Stop or OFF commands = 1: ”Setpoint position reached” is signalled only after full completion of the traversing block. Bit 4 Open holding brake (from SW 1.4) = 0: Brake sequence control active = 1: Open holding brake Bit 5 Monitoring, holding brake undervoltage (from SW 1.4) = 0: Deactivatd (P947.12) = 1: Activated (P947.12) Bit 6 Open holding brake is also effective for external holding brakes (from SW 1.4) = 0: Brake sequence control active = 1: Open holding brake is also effective for an external holding brake Bit 7 Option bit for the function: ”Reference to occurring zero mark” (from SW 2.1) The following applies if one of the two input terminals has been parameterized with the function ”Cam monitoring”: = 0: A check is made as to whether a negative cam edge (leaving the cam) occurred before the zero mark. = 1: A check is made as to whether a positive cam edge (leaving an inverted cam) occurred before the zero mark. Bit 14 This bit controls the response to the fault message ”undervoltage load power supply”. The following applies as of SW 3.0: this fault only occurs if the drive is to be switched from follow-up mode to control mode. If no enable signals are set in the control word and only the power supply to the electronics is switched on, the alarm ”Undervoltage load power supply” is signalled. This alarm automatically disappears when the load power supply is switched in. = 0: Response to fault 701 as described previously = 1: Response to fault 701 as in previous software versions P0057 / 39 300W Min 5 P gain, holding controller standstill Standard 20 Max 250 Unit – Data type I4 Effective immed. Max 250 Unit – Data type I4 Effective immed. P gain for axis standstill. Note: Refer to P56.2 075W Min 50 Standard 100 P gain for axis standstill. Note: Refer to P56.2 Available from SW 1.3. 5-218 Siemens AG 2005 All Rights Reserved SIMODRIVE POSMO A User Manual (POS1) – 06.05 Edition 06.05 04.01 02.99 5 Description of the Functions 5.6 Parameters for SIMODRIVE POSMO A P0058 / 3A 300W 075W Min 0 Holding brake, brake opening time Standard 100 Max 1000 Unit ms Data type T4 Effective immed. Data type C4 Effective immed. For ”pulse enable” the setpoint is output delayed by this time. Note: Available from SW 1.4. P0059 / 3B 300W 075W Min 0 Speed, close holding brake Standard 10 Max 3000 Unit rpm When withdrawing ”controller enable” and this speed is fallen below, the holding brake is closed. The holding brake is always closed after the time in P60 has expired. Note: Available from SW 1.4. P0060 / 3C 300W 075W Min 0 Holding brake, brake delay time Standard 400 Max 15000 Unit ms Data type T4 Effective immed. When withdrawing ”controller enable” this time is started and after it expires, the holding brake is closed. The holding brake can also be closed if the speed in P59 is fallen below. Note: Available from SW 1.4. P0061 / 3D 300W 075W Min 0 Holding brake, control blocking time Standard 100 Max 1000 Unit ms Data type T4 Effective immed. When withdrawing the brake control signals, this time is started and after it has expired, the pulses are deleted. Note: Available from SW 1.4. P0062 / 3E 300W 075W Min –200000 Measuring position Standard 0 Max 200000 Unit MSR Data type C4 Effective immed. The position value for the ”flying measurement” function is written into this parameter. Note: This parameter is overwritten at each measuring operation. Available from SW 1.4. P0080:28 / 50 300W 075W Min 0 Program control word PSW Standard 3 Max FFFF Unit Hex Data type V2 Effective immed. The program control word defines the general behavior of a traversing block. Bit 0 Motion type = 1: Enter position and velocity = 0: Enter speed Siemens AG 2005 All Rights Reserved SIMODRIVE POSMO A User Manual (POS1) – 06.05 Edition 5-219 5 5 Description of the Functions 06.05 04.01 02.99 5.6 Parameters for SIMODRIVE POSMO A Bit 1 5 Positioning type (only when positioning) = 1: Relative = 0: Absolute Bit 2 Timer type = 1: Traverse as long as the timer no longer runs = 0: Traverse as long as the timer runs Bit 3 Logic operation between timer with start byte = 1: Traverse if the timer or start bytes are fulfilled = 0: Traverse if the timer and start byte are fulfilled Bit 4 Return jump to program = 1: Jump to the start of the program after the end of the block = 0: No response Bit 5 Traversing type = 1: Continuous path mode = 0: Precise stop Bit 6 Negate start byte condition = 1: Block is executed if at least one of the bits set in the start mask is not configured = 0: Normal evaluation Bit 7 SMStart type (from SW 1.2) = 1: The following is valid dependent on the condition defined in SMStart: Fulfilled ––> Execute block, Not fulfilled ––> Skip block = 0: Wait until the start condition is fulfilled acc. to SMStart Bit 8 Program stop (from SW 1.2) = 1: End of program at end of block = 0: No response Bit 9 Set reference position, actual position = 1: Active Before SW 1.4 the following applies: At the end of the block the actual position is set the same as the signaled position. The following applies from SW 1.4: At the end of the block, the position of the last zero mark is set the same as the signaled position and the drive is referenced. = 0: Inactive Bit 10 Flying actual value setting (from SW 1.4) = 1: Active = 0: Inactive Bit 11 Flying measurement (from SW 1.4) = 1: Active = 0: Inactive Bit 12 Traverse through the shorted path (from SW 1.4) = 1: Active (only for modulo correction with absolute position data) = 0: Inactive Note: Refer to P81:28 (target position). Bit 13 Defined delay time until the next traversing block (from SW 2.1) =1 Active: The next traversing block begins after exactly the time parameterized in the timer value irrespective of the distance to be traversed in the current traversing block and irrespective of the discontinuance of any start conditions. (As a result of ”external block change” during the traversing motion, the following block also waits until the delay time has expired.) This function is valid only in conjunction with the timer type ”traverse as long as the timer runs” (compare bit 2). This function is valid only for the following traversing block (after skipping the following traversing block, the started delay time is no longer evaluated). 5-220 Siemens AG 2005 All Rights Reserved SIMODRIVE POSMO A User Manual (POS1) – 06.05 Edition 06.05 04.01 02.99 5 Description of the Functions 5.6 Parameters for SIMODRIVE POSMO A The following block only waits until the time has expired if this has been parameterized with P80:x.7=0 (wait for start condition). The delay time runs down internally in the drive. It c a n n o t be controlled via P45. =0 Inactive Bit 14 Reference to occurring zero mark (from SW 2.1) =1 Active: The traversing block is canceled if a zero mark occurs. The reference point is set to the value stated in the signaling position. If this function is used in conjunction with an input terminal (BERO) which has been parameterized with an additional cam monitoring (compare P31/P32), then referencing takes place only if a cam edge according to P56.7 has occurred. If the corresponding signal has not occurred at the input terminal, then the drive is dereferenced when it reaches the zero mark. In this case, fault 711 and the supplementary information 912 are signaled. =0 Inactive P0081:28 / 51 300W 075W Min –200000 Target position Standard 0 Max 200000 Unit MSR Data type C4 5 Effective immed. The parameter specifies the target position in the traversing block. Note: Index (using as an example P81): P81:0 ––> no significance P81:1 ––> traversing block 1 P81:2 ––> traversing block 2 ... P81:27 ––> traversing block 27 Block numbers (factory default): 1 Traversing block jogging – 2 Traversing block jogging + 3 ... 12 Single block 13 ... 17 Program 1 18 ... 22 Program 2 23 ... 27 Program 3 All blocks before program 1 are single blocks. P0082:28 / 52 300W 075W Min –16384 Velocity or speed Standard 16384 Max 16384 Unit % Data type N2 Effective immed. The parameter specifies the velocity or speed in the traversing block. Note: Refer to P81:28 (target position). P0083:28 / 53 300W 075W Min 0 Acceleration Standard 16384 Max 16384 Unit % Data type N2 Effective immed. The parameter specifies the acceleration in the traversing block. Note: Refer to P81:28 (target position). Siemens AG 2005 All Rights Reserved SIMODRIVE POSMO A User Manual (POS1) – 06.05 Edition 5-221 5 Description of the Functions 06.05 04.01 02.99 5.6 Parameters for SIMODRIVE POSMO A P0084:28 / 54 300W 075W Min 0 Timer value Standard 0 Max 20000000 Unit ms Data type T4 Effective immed. Unit MSR Data type C4 Effective immed. Contains the time required for the timer. Note: Value 0 de-activates the function. Input resolution = 10 ms Refer to P81:28 (target position). P0085:28 / 55 300W 075W Min –200000 5 Message position Standard 0 Max 200000 When passing this position, the bits, specified in MMPos (P87:28) are set, and signaled to the master via the return byte (RMB). Note: The following is valid for the position for rotary axis: The following applies before SW 1.3: ––> no modulo evaluation The following applies from SW 1.3: ––> modulo evaluation The following applies from SW 1.4: If the ”set reference position” function is activated (PSW.9= 1) or ”flying actual value setting” (PSW.10= 1), this parameter is the setting value. The signaling position function is then inactive. Refer to P81:28 (target position). P0086:28 / 56 300W 075W Min 0 SMStart MMStart Standard 0 Max FFFF Unit Hex Data type V2 Effective immed. Message mask start (MMStart): Contains the bit mask which is activated when starting a traversing block and which is OR’d with the status signals (RMB). Start mask start (SMStart): Contains a mask, which defines which bits of the start byte (STB) are evaluated in the PZD as additional start bits. The block starts as soon as all of the configured bits are set in addition to the normal start enable signals. If one of the bits is withdrawn, traversing motion stops and the block is ended. Note: Value 0 de-activates the function. Refer to P81:28 (target position). 5-222 Siemens AG 2005 All Rights Reserved SIMODRIVE POSMO A User Manual (POS1) – 06.05 Edition 06.05 04.01 02.99 5 Description of the Functions 5.6 Parameters for SIMODRIVE POSMO A P0087:28 / 57 300W 075W Min 0 MMPos MMStop Standard 0 Max FFFF Unit Hex Data type V2 Effective immed. Message mask stop (MMStop): Bits, which are activated at the end of a traversing block and on the status signals (RMB). MMStop is reset when starting a new traversing block. Message mask, position (MMPos): Bits, which are activated when passing the signaling position and are OR’d with the status signals (RMB). MMPos is reset when starting a new traversing block. Note: Value 0 de-activates the function. Refer to P81:28 (target position). P0097 / 61 300W 075W Min 0 Carry-out POWER-ON RESET Standard 0 Max 1 Unit – Data type I2 5 Effective immed. A POWER-ON RESET for the drive can be carried-out using this parameter. 0 Output status 1 Carry-out POWER ON-RESET Note: After P0097 = 1, POWER ON-RESET is immediately carried-out. Communications is interrupted. The master does not receive an acknowledgment. Available with software version 1.5 and higher. P0098 / 62 300W 075W Min 0 Reset reference point set Standard 0 Max 1 Unit – Data type I2 Effective immed. 0 No reference point set 1 Reference point set Note: For a stationary, referenced axis, when writing zero into P98 = 0, the ”No reference point set” status is re-established. Refer to ZSW.11 Available from SW 1.4. P0099:21 / 63 300W 075W Min 0 Program management Standard 0 Max 27 Unit – Data type I2 Effective immed. The parameter specifies the start of a program. P99:0 ––> no significance P99:1 ––> start, program 1 (standard value = 13) P99:2 ––> start, program 2 (standard value = 18) P99:3 ––> start, program 3 (standard value = 23), etc. Note: The parameter value can be changed while traversing. Siemens AG 2005 All Rights Reserved SIMODRIVE POSMO A User Manual (POS1) – 06.05 Edition 5-223 5 Description of the Functions 06.05 04.01 02.99 5.6 Parameters for SIMODRIVE POSMO A P0100 / 64 300W 075W Min 0 Control word simulation Standard 0 Max FFFF Unit – Data type V2 Effective immed. If the cyclic communication with Master Class 1 is interrupted for more than 3 seconds, this control word is used. All terminal signals remain active with priority. =0 ––> no simulation = 17471 dec (= 443F hex) ––> value recommended for simulation Note: The parameter value can be changed while traversing. P101 must be > 0. When operating the system with Master Class 2 alone (SimoCom A), the simulation mode is activated immediately when making entries in P100. Available from SW 1.2. P0101:11 / 65 5 300W 075W Min 0 Block sequence in standalone operation Standard 0 Max 27 Unit – Data type I2 Effective immed. For standalone operation, a maximum of 10 traversing blocks can be entered in the range 3 to 27 in P101:11. These specified blocks are executed one after the other in the standalone mode. P101:0 ––> no significance P101:1 ––> 1st block P101:2 ––> 2nd block, etc. Note: The parameter value can be changed while traversing. Available from SW 1.2. P0700 / 2BC 300W 075W Min 1 Operating mode selector switch Standard 2 Max 2 Unit – Data type I2 Effective PO This parameter is used for selecting the operating mode. Operating mode changes only take effect when the parameter set is saved in the FEPROM (P971 0 ––> 1) followed by a Power If SimoCom A is in use, the operating mode should be selected via the configuration dialog. The following operating modes are supported: 1 ––> Speed setpoint 2 ––> Positioning The parameter corresponds to parameter 930. Note: Before changing the operating mode load factory default setting via P970. This allows achieving a pre-defined initial status. Available with software version 2.0 and higher. 5-224 Siemens AG 2005 All Rights Reserved SIMODRIVE POSMO A User Manual (POS1) – 06.05 Edition 06.05 04.01 02.99 5 Description of the Functions 5.6 Parameters for SIMODRIVE POSMO A P0701 / 2BD 300W 075W Min 0 Activate substitution Standard 0 Max 1 Unit – Data type I2 Effective immed. The parameter is used to activate the telegram substitution function. WARNING: The parameter acts i m m e d i a t e l y. After activation, the drive responds only to PZD control signals, provided STW.10=1. Read b e f o r e using the parameter the further description in the online help for SimoComA. (Menu: Help–>Short Introduction SimoComA–>Contents–>Telegram substitution.) P701=1 Telegram substitution activated P701=0 Telegram substitution deactivated Available from SW3.0 and higher. P0880 / 370 300W 075W Min –100000 N-SETPOINT normalization Standard 4096 Max 100000 Unit rpm Data type C4 5 Effective immed. This parameter defines the normalization as to which speed sets in at the gear output when a setpoint of 1000h (4096d) is specified via the control word (STW). P0918 / 396 300W 075W Min – PROFIBUS node address Standard – Max – Unit – Data type I2 Effective RO Data type V2 Effective immed. Data type I2 Effective RO The node address is read from address switch S1. P0928 / 3A0 300W 075W Min 1 Control authority PZD Standard 1 Max 2 Unit – Request for control authority from a Class 2 DP master. Note: Available from SW 1.4. P0930 / 3A2 300W 075W Min – Actual operating mode Standard – Max – Unit – This parameter indicates the active operating mode. P930 = 2 means: Positioning operating mode software version 2.0 and higher: P930 = 1 means: Speed setpoint operating mode. Siemens AG 2005 All Rights Reserved SIMODRIVE POSMO A User Manual (POS1) – 06.05 Edition 5-225 5 Description of the Functions 06.05 04.01 02.99 5.6 Parameters for SIMODRIVE POSMO A P0947 / 3B3 300W 075W Min – Faults Standard – Max – Unit – Data type I2 Effective RO The parameter indicates, bit-coded, which faults are present. Bit0 corresponds to Fault 700, Bit1 corresponds to Fault 701, etc. Note: SimoCom A: Read about possible faults in the online help: Help ––> Help topics ––> Index ––> 700...715 User Manual: The description of the faults, how they can be acknowledged as well as a list of all the faults is provided in Section ”Fault handling and diagnostics”. Refer to the index entry ”Faults”. 5 P0953 / 3B9 300W 075W Min – Warnings Standard – Max – Unit – Data type I2 Effective RO The parameter indicates, bit-coded, which alarms are present. Bit0 corresponds to Warning 800, Bit1 corresponds to Warning 801, etc. Note: SimoCom A: Read about possible warnings in the online help: Help ––> Help topics ––> Index ––> 800...812 User Manual: The description of the warnings, how they can be acknowledged as well as a list of all the warnings is provided in Section ”Fault handling and diagnostics”. Refer to the index entry ”Warnings”. P0954 / 3BA 300W 075W Min – Additional information on faults/warnings Standard – Max – Unit – Data type I2 Effective RO The parameter indicates, bit-coded, which supplementary information is available. The additional information allows to diagnose the faults and warnings exactly. Bit0 corresponds to Supplementary information 900, Bit1 corresponds to Supplementary information 901, etc. Note: SimoCom A: Read about possible supplementary information in the online help: Help ––> Help topics ––> Index ––> 900...911 User Manual: The description of the faults/warnings, how they can be acknowledged as well as a list of all the faults/warnings is provided in Section ”Fault handling and diagnostics”. Refer to the index entry ”Faults/Warnings”. See also P947 and P953. Available from SW 1.4. 5-226 Siemens AG 2005 All Rights Reserved SIMODRIVE POSMO A User Manual (POS1) – 06.05 Edition 06.05 04.01 02.99 5 Description of the Functions 5.6 Parameters for SIMODRIVE POSMO A P0964:8 / 3C4 300W 075W Min – Drive identification Standard – Max – Indices: 0 Siemens = 42d 1 Drive type 2 Firmware version 3 Firmware date (year) 4 Firmware date (day/month) 5 No. of axes 6 No. of option modules 7 Gearbox code Note: Available from SW 1.4. P0967 / 3C7 300W 075W Min 0 Unit – Data type V2 Effective RO POSMO A 75W/300W = 1201/1202 (x.yy.zz) (xxxx decimal) (ddmm decimal) (always 1) (always 0) 5 Control word Standard 0 Max FFFF Unit Hex Data type V2 Effective immed. This parameter corresponds to the control signals ”control word (STW)”. Note: The following applies from SW 1.4: If the Class 2 DP master has control authority, then control is realized via this parameter. The following applies from SW 2.0: The meanings of bits 4, 5, 6, 8, 9, 11, 12, 13 and 14 depend on the active operating mode. SimoCom A: Please consult the online help for more detailed information: Help ––> Help topics ––> Index ––> PROFIBUS diagnostics User Manual: Bit assignment, refer to Section ”Communications via PROFIBUS-DP”. Refer to the index entry ”Process data”. P0968 / 3C8 300W 075W Min – Image of current status word Standard – Max – Unit Hex Data type V2 Effective RO This parameter corresponds to the status signals ”status word (ZSW)”. The following applies from SW 2.0: The meanings of bits 8, 10, 11, 12, 14 depend on the active operating mode (P930). Note: SimoCom A: Please consult the online help for more detailed information: Help ––> Help topics ––> Index ––> PROFIBUS diagnostics User Manual: Bit assignment, refer to Section ”Communications via PROFIBUS-DP”. Refer to the index entry ”Process data”. Siemens AG 2005 All Rights Reserved SIMODRIVE POSMO A User Manual (POS1) – 06.05 Edition 5-227 5 Description of the Functions 06.05 04.01 02.99 5.6 Parameters for SIMODRIVE POSMO A P0970 / 3CA 300W 075W Min 0 Factory default download Standard 1 Max 1 Unit Hex Data type V2 Effective immed. Data type V2 Effective immed. 1/0 ––> Download the factory default Note: Downloading is automatically acknowledged with a 1. P0971 / 3CB 300W 075W Min 0 Write into FEPROM Standard 0 Max 1 Unit Hex 0/1 ––> Save parameter set in a non-volatile memory Note: Saving is automatically acknowledged by a 0. 5 P0972 / 3CC 300W 075W Min 0 Select block number and PZD start byte/n-setpoint Standard 0 Max FFFF Unit Hex Data type V2 Effective immed. This parameter corresponds to the control signals ”select block number” and ”start byte”. If the Class 2 DP master has control authority, then control is realized via this parameter. Note: Available from SW 1.4. The following applies from SW 2.0: The speed setpoint is transferred using these bits in the ”Speed setpoint” operating mode (P930). The setpoint specifies the speed at the gear output. P0973 / 3CD 300W 075W Min – Actual block number and checkback byte / n-actual Standard – Max – Unit Hex Data type V2 Effective RO For the complete PZD status, the actual block number and the return byte in the PKW channel are signaled here. Note: Available from SW 1.4. The following applies from SW 2.0: The actual speed value is returned using these bits in the ”Speed setpoint” operating mode (P930). The actual value represents the speed at the gear output. 0980:116 / 3D4 300W 075W Min – Supported parameters Standard – Max – Unit – Data type I2 Effective RO All of the parameters supported by the device are listed here in an increasing sequence. P980:0 ––> no significance P980:1 = 1 (P1) ... P980:77 = 990 (P990) 5-228 Siemens AG 2005 All Rights Reserved SIMODRIVE POSMO A User Manual (POS1) – 06.05 Edition 06.05 04.01 02.99 5 Description of the Functions 5.6 Parameters for SIMODRIVE POSMO A 0990:116 / 3DE 300W 075W Min – Changes with respect to the factory default Standard – Max – Unit – Data type I2 Effective RO All of the parameters which have been changed over the factory default are listed here in an increasing sequence. P990:0 ––> no significance P990:1 = 4 (e.g. P4) P990:2 = 990 (P990) P990:3 = after the end of the list Note: For parameters with index, the parameter number is listed if at least 1 parameter of the array was changed. P1426 / 592 300W Min 0 075W Min 0 Tolerance band for actual setpoint value Standard 100 Max 3800 Unit rpm Data type C4 Effective immed. Standard 100 Max 3600 Unit rpm Data type C4 Effective immed. 5 This parameter defines the tolerance band for the actual speed value. If the actual speed value is within this tolerance band around the specified setpoint, the bit ”Speed within tolerance band” is output (ZSW.8). Note: This parameter is visible in SimoCom A only in operating mode ”Speed setpoint” (P930). Available with software version 2.0 and higher. P1427 / 593 300W 075W Min 0 Delay time Nsetpoint has elapsed Standard 0 Max 15000 Unit ms Data type T2 Effective immed. This parameter defines the delay time following which the bit ”Ramp-up complete” (ZSW.10) is output. If the actual speed value for the specified time is within the tolerance band (P1426), ZSW.10 is output. Note: This parameter is visible in SimoCom A only in operating mode ”Speed setpoint” (P930). Available with software version 2.0 and higher. Siemens AG 2005 All Rights Reserved SIMODRIVE POSMO A User Manual (POS1) – 06.05 Edition 5-229 5 Description of the Functions 08.04 05.03 04.01 02.99 5.6 Parameters for SIMODRIVE POSMO A 5.6.3 Gearbox–dependent parameters, factory default settings Depending on the gearbox used, the parameters listed in Table 5-10 are pre–set before the equipment is supplied: Gearbox– dependent parameters Table 5-10 Gearbox–dependent parameters (factory presetting – default) Gearbox Step– down ratio Type iGearbox 5 P964:7 Gear– box code P3 P10 P16 P22 P28 Gearbox step– down factor Maximum velocity Maximum overcurrent Maximum acceler– ation Maximum current – [mm/min] [A] [mm/s2 ] [A] 75 W motor: Gearbox–dependent parameters (factory default setting) without gearbox Planetary gearbox Worm gear 5-230 2049 1 30000 18.0 1000 9.0 4.5 2050 4.5 6660 13.33 225 7.8 8 2058 8 3750 7.5 125 4.6 20.25 2059 20.25 1480 18.0 50 9.0 36 2060 36 830 11.11 30 7.9 50 2061 50 600 8.0 20 5.6 126.5625 2062 126.5625 237 9.48 8 7.8 162 2063 162 185 7.4 6 6.0 5 2064 5 6000 18.0 200 9.0 24 2065 24 1250 7.3 40 7.3 75 2066 75 400 2.7 13 5.3 Siemens AG 2005 All Rights Reserved SIMODRIVE POSMO A User Manual (POS1) – 06.05 Edition 08.04 04.01 02.99 5 Description of the Functions 5.6 Parameters for SIMODRIVE POSMO A Table 5-10 Gearbox–dependent parameters (factory presetting – default), continued Gearbox P964:7 Step– down ratio Type iGearbox Gear– box code P3 P10 P16 P22 P28 Gearbox step– down factor Maximum velocity Maximum overcurrent Maximum acceler– ation Maximum current – [mm/min] [A] [mm/s2 ] [A] 4000 21.0 300 W motor: Gearbox–dependent parameters (factory default setting) 20511) Keyway without Gearbox Smooth shaft (without keyway) 20672) 20751) 1 30000 42.0 20762) 5 2052 4 2068 4 7500 42.0 1000 21.0 7 4285 42.0 570 21.0 12 2500 37.5 330 21.0 20 1500 26.25 200 21.0 35 855 15.7 115 14.8 49 610 11.2 80 10.6 120 250 10.4 33 10.4 2053 7 2069 2054 12 Planetary gearbox 2070 2055 20 2071 2056 35 2072 2057 49 2073 2078 120 1) Upper value 2) Lower value 2079 ––> gearbox code for the motor without holding brake ––> gearbox code for the motor with holding brake Notice After another gearbox type has been mounted, the gearbox–dependent parameters no longer match the gearbox and must therefore be changed corresponding to Table 5-10. P964:7 (gearbox code) can only be changed with ”SimoCom A” using the drive configuration. Siemens AG 2005 All Rights Reserved SIMODRIVE POSMO A User Manual (POS1) – 06.05 Edition 5-231 5 Description of the Functions 04.01 02.99 06.05 5.6 Parameters for SIMODRIVE POSMO A Space for your notes 5 5-232 Siemens AG 2005 All Rights Reserved SIMODRIVE POSMO A User Manual (POS1) – 06.05 Edition Fault Handling and Diagnostics 6.1 6 LED fault display An LED with the following significance is provided on the rear of the positioning motor for diagnostics LED: LED fault display Table 6-1 What does an LED mean when it is bright? LED display Color none How is it lit? from Is the bus OK? no What status does the drive have? What are the fault possibilities? The equipment is powered down or is defective The power supply is incorrectly connected (incorrect polarity) Steady light no Disappears after the system has completely run up. Red Red/yellow Critical hardware defect, CPU cannot be used Briefly after power up, even if the unit is OK Flashing yes Alternating flashing light no Steady light yes Flashing yes Fault present, drive not ready Read–out the fault number ––> refer to Chapter 6.2 Bus communications interrupted Standard operation Run–up, bus being initialized (baud rate adjustment, configuration, parameterization) No bus connection established: Green Yellow Yellow/ green (from SW 1.2) Steady light no Flashing no Alternating flashing light no – Bus cables not OK – Address incorrectly set – Bus parameterizing error Bus run–up, incorrect configuration telegram Bus run–up, incorrect parameterizing telegram Standalone mode is active ––> Refer to Chapter 5.5.12 From SW 3.0: P701 = 1 (telegram substitution activated) and the received STW.10 = 0. The drive uses precisely the last valid STW (with STW.10 = 1). Siemens AG 2005 All Rights Reserved SIMODRIVE POSMO A User Manual (POS1) – 06.05 Edition 6-233 6 6 Fault Handling and Diagnostics 08.04 04.01 02.99 6.2 Faults and alarms 6.2 Faults and alarms 6.2.1 General information on faults and warnings When a fault or warning is detected then this is displayed in the positioning motor by setting the appropriate status signal and the fault/warning bits in P947, P953 and P954. Preliminary comment The faults and warnings can be evaluated as follows: Via PROFIBUS in cycle operation By reading the status signal and evaluating the bit–coded parameter values for the faults and warnings (P947, P953 and P954). Via SimoCom A in online operation The faults or warnings that have occurred are converted into an appropriate fault/warning number and displayed. 6 Table 6-2 Overview of faults and warnings Fault number Warning number for SimoCom A Fault bit Warning bit P947.0 700 ... ... P947.15 715 P953.0 800 ... ... P953.15 815 P954.0 900 ... (from SW 1.4) ... 915 Status signal Meaning Fault 700 ZSW.3 (faults present) ... Fault 715 Warning 800 ZSW.7 (warning present) ... Warning 815 Supplementary information 900 ZSW.3 or ZSW.7 ... Supplementary information 915 P954.15 6-234 Siemens AG 2005 All Rights Reserved SIMODRIVE POSMO A User Manual (POS1) – 06.05 Edition 05.03 04.01 02.99 6 Fault Handling and Diagnostics 6.2 Faults and alarms Differences between faults and warnings? What is the difference between a fault and a warning? Faults (refer to Table 6-2) – A fault causes an appropriate response for the positioning motor. – Faults must be acknowledged after the fault cause has been removed. – The motor signals ”fault present” using its diagnostics LED – red flashing light. Warnings (refer to Table 6-2) – Warnings are automatically deleted after the cause of the fault has been removed. Faults Faults indicate to the user positioning motor states where the motor can only be shut down or switched into a no current condition. How does the DP master evaluate faults? 1. By reading the status signal ZSW.3 (fault present) 6 A ”1” signal indicates that there is at least 1 fault. 2. By reading P947 (3B3hex) The parameter value indicates, bit–coded, which faults are present (refer to Table 6-2 and Chapter 6.2.2). 3. By reading P954 (3BAhex) (from SW 1.4) The parameter value indicates, bit–coded, which supplementary information is present (refer to Table 6-2 and Chapter 6.2.2). How are the faults acknowledged? 1. Remove the cause of this fault (refer to Chapter 6.2.2). 2. STW.7 (reset the fault memory) = set 0/1 signal edge. 3. Set the STW.0 (ON/OFF 1) to ”0” and ”1”. Note If the status signal ZSW.3 (fault effective) is not ”0”, then the above points should be repeated for the fault or faults that are still present. SIMODRIVE POSMO A can only resume normal operation after all of the faults that are present have been acknowledged. The faults are described in detail in Chapter 6.2.2. Siemens AG 2005 All Rights Reserved SIMODRIVE POSMO A User Manual (POS1) – 06.05 Edition 6-235 6 Fault Handling and Diagnostics 08.04 04.01 02.99 6.2 Faults and alarms Fault suppression Fault suppression should only be used for start–up purposes or for special traversing programs. When fault suppression(s) are active, the correct program execution must be monitored by the higher–level control. ”Speed controller at endstop” fault suppression The fault is converted to a warning. This fault suppression should only be used for the function ”travel to fixed stop”. If this fault suppression is used in other traversing programs, the appearance of the warning ”Speed controller at endstop” must be handled by the higher–level control. In addition, the bit of the status word ”Position setpoint reached” (ZSW.10) must be evaluated to ensure that a target position was reached correctly despite the occurrence of warnings. ”Undervoltage” fault suppression This fault suppression serves to suppress a fault suppression upon switching on the drive if the load power supply is connected separately and is switched on only after the electronics power supply. 6 The fault suppression must be deactivated before starting a traversing movement. If a voltage dip occurs during a positioning instruction while the fault ”Load power supply undervoltage” is suppressed, this positioning instruction is aborted. Warnings Warnings indicate to the user motor statues that do not necessarily mean that operation must be interrupted. How does the DP master evaluate warnings? 1. By reading the status signal ZSW.7 (warning effective) A ”1” signal indicates that there is at least 1 warning present. 2. By reading P953 (3B9hex) The parameter value indicates, bit–coded, which warnings are present (refer to Table 6-2 and Chapter 6.2.2). 3. By reading P954 (3BAhex) (from SW 1.4) The parameter value indicates, bit–coded, which supplementary information is present (refer to Table 6-2 and Chapter 6.2.2). Note If the status signal ZSW.7 (warning effective) is not ”0”, then the above points must be repeated for the warning or warnings that are still present. Warnings are described in detail in Chapter 6.2.2. 6-236 Siemens AG 2005 All Rights Reserved SIMODRIVE POSMO A User Manual (POS1) – 06.05 Edition 08.02 04.01 02.99 6 Fault Handling and Diagnostics 6.2 Faults and alarms Remedy For faults and warnings, measures are described which can be applied to remove/withdraw the fault/warning. In this case, one of the possibilities specified is to replace the positioning motor. For POSMO A – 300 W, it is also possible, corresponding to the information given as counter–measure, to only change the drive unit. Replacing the positioning motor ––> refer to Chapter 7.1 Replacing the drive unit (only POSMO A – 300 W) ––> refer to Chapter 7.3.2 6 Siemens AG 2005 All Rights Reserved SIMODRIVE POSMO A User Manual (POS1) – 06.05 Edition 6-237 6 Fault Handling and Diagnostics 06.05 04.01 02.99 6.2 Faults and alarms 6.2.2 List of faults and warnings Reader’s note The faults and warnings, listed in the following, are valid for all software releases of SIMODRIVE POSMO A. The complete list is updated corresponding to the Edition of the documentation (refer to the Edition status in the header line) and corresponds to the software release of SIMODRIVE POSMO A documented here. The individual faults and warnings are not designated as a function of the software release. Version: 04.03.02 700 / P947.0 Overvoltage Cause The load voltage has exceeded 35 V (75 W motor) or 60 V (300 W motor). When braking, the braking energy is excessive which causes an inadmissible increase in the load voltage. Remedy Provide regenerative feedback protection. Acknowledgement Remove cause, set STW.7 = 1/0 and STW.0 = 0/1 Stop response Pulse suppression 701 / P947.1 Undervoltage of the load current supply Cause The load voltage has fallen below 17 V. The load power supply is overloaded. SITOP: The load voltage was powered-down when braking due to overvoltage. The following applies as of SW 3.0: this fault only occurs if the drive is to be switched from follow-up mode to control mode. If no enable signals are set in the control word and only the power supply to the electronics is switched on, the alarm ”Undervoltage load power supply” is signalled. This alarm automatically disappears when the load power supply is switched in. The response to the fault can be set with P56.14. Remedy Increase load power supply rating. SITOP: Provide regenerative feedback protection. Acknowledgement Remove cause, set STW.7 = 1/0 and STW.0 = 0/1 Stop response Pulse suppression 6 6-238 Siemens AG 2005 All Rights Reserved SIMODRIVE POSMO A User Manual (POS1) – 06.05 Edition 06.05 04.01 02.99 6 Fault Handling and Diagnostics 6.2 Faults and alarms 702 / P947.2 Electronics temperature Cause The electronics temperature is > 90 degrees Celsius and has been present for longer than specified in P29 (electronics temperature tolerance time). An excessive electronics temperature is first signaled using warning 800 (warning, electronics temperature). The ambient temperature is too high. Remedy Observe the de-rating characteristic. Reduce ambient temperature. Acknowledgement Remove cause, set STW.7 = 1/0 and STW.0 = 0/1 Stop response Braking with maximum acceleration (P22) 703 / P947.3 Overcurrent fault Cause The current limit has been exceeded. The motor or the electronics is defective. Remedy Replace the positioning motor. Acknowledgement Remove cause, set STW.7 = 1/0 and STW.0 = 0/1 Stop response Pulse suppression 704 / P947.4 Encoder fault Cause The signal sequence for the rotor position identification is not permissible. The number of increments between two rotor position signals lies outside the permissible tolerance. The motor or the electronics is defective. Remedy Replace the positioning motor. Acknowledgement Remove cause, set STW.7 = 1/0 and STW.0 = 0/1 Stop response Pulse suppression 705 / P947.5 Standstill monitoring Cause The motor was moved out of the standstill area (P14) in the closed-loop controlled status. Note: The fault can be changed-over to a warning using P30 (fault suppression). Remedy Check P14 (standstill area). Acknowledgement Remove cause, set STW.7 = 1/0 and STW.0 = 0/1 Stop response Pulse suppression Siemens AG 2005 All Rights Reserved SIMODRIVE POSMO A User Manual (POS1) – 06.05 Edition 6 6-239 6 Fault Handling and Diagnostics 06.05 04.01 02.99 6.2 Faults and alarms 6 706 / P947.6 Software limit switch, start Cause The actual position lies outside the range defined by the software limit switch. When traversing to a software limit switch, the motor is always stopped. SW 1.6 and higher: This fault is also signalled if the traversing range limits of the axis (+/– 200000mm or degrees or inches) are reached. In this case, the Additional information 910 (P954.10) is output. SW 2.0 and higher: This error is also output when the corresponding hardware limit switch (start) has been overrun. In this case, additional information 911 (P954.11) is output. Note: The fault can be changed-over to a warning using P30 (fault suppression). Remedy Move away in the opposite direction. Check P6 (software limit switch, start). Acknowledgement Remove cause, set STW.7 = 1/0 and STW.0 = 0/1 Stop response Braking with maximum acceleration (P22) 707 / P947.7 Software limit switch, end Cause The actual position lies outside the range defined by the software limit switch. When traversing to a software limit switch, the motor is always stopped. SW 1.6 and higher: This fault is also signalled if the traversing range limits of the axis (+/– 200000mm or degrees or inches) are reached. In this case, the Additional information 910 (P954.10) is output. SW 2.0 and higher: This error is also output when the corresponding hardware limit switch (end) has been overrun. In this case, additional information 911 (P954.11) is output. Note: The fault can be changed-over to a warning using P30 (fault suppression). Remedy Move away in the opposite direction. Check P7 (software limit switch, end). Acknowledgement Remove cause, set STW.7 = 1/0 and STW.0 = 0/1 Stop response Braking with maximum acceleration (P22) 6-240 Siemens AG 2005 All Rights Reserved SIMODRIVE POSMO A User Manual (POS1) – 06.05 Edition 06.05 04.01 02.99 6 Fault Handling and Diagnostics 6.2 Faults and alarms 708 / P947.8 Speed controller at stop Cause The speed controller is at its limit for more than 200 ms. The required speed is not reached. The load or friction is too high or the drive is too small. The current limit (P28, P16) is set too low. The drive is defective. Note: The fault can be changed-over to a warning using P30 (fault suppression). Remedy Reduce load. Increase current limit. Replace the positioning motor. Check the drive parameterization. Acknowledgement Remove cause, set STW.7 = 1/0 and STW.0 = 0/1 Stop response Pulse suppression 709 / P947.9 Bus communications Cause Bus communications between the master and slave has failed. The bus cable has been withdrawn or is defective The EMC faults on the bus cable are too high. Remedy Check fieldbus. Acknowledgement Remove cause, set STW.7 = 1/0 and STW.0 = 0/1 Stop response Pulse suppression 710 / P947.10 Hardware watchdog reset Cause After a restart, after initiating the CPU monitoring, the positioning motor goes into a fault condition. Note: The following applies from SW 1.3: Afterwards the positioning motor is no longer referenced. Remedy Posmo A 75W : Posmo A 300W : Acknowledgement Remove cause, set STW.7 = 1/0 and STW.0 = 0/1 Stop response Pulse suppression Siemens AG 2005 All Rights Reserved SIMODRIVE POSMO A User Manual (POS1) – 06.05 Edition 6 Replace the positioning motor. Replace the drive unit. 6-241 6 Fault Handling and Diagnostics 06.05 04.01 02.99 6.2 Faults and alarms 6 711 / P947.11 Flying measurement/actual value setting Cause The ”flying measurement/actual value setting” function has not been correctly parameterized. The bit combination for the program control word (PSW) is illegal. No function is executed. When the function is running, terminal 1 was re-parameterized as output. The motion is cancelled and the axis is braked with the maximum deceleration. From SW 2.1: This fault is also signaled if a fault has occurred during the execution of the function ”Reference to occurring zero mark” (see P80, P31/32, P56). In this case, the supplementary information 912 is also signaled. The function ”Reference to occurring zero mark” cannot be used in conjunction with P80:x.9, P80:x.10 or P80:x.11. Remedy Check program control word (PSW.9, PSW.10, PSW.11). Check terminal parameterization (P31 = 27 or other input parameterization). Acknowledgement Remove cause, set STW.7 = 1/0 and STW.0 = 0/1 Stop response Pulse suppression 712 / P947.12 Holding brake, undervoltage Cause At least the following voltage characteristics are required in order to open and hold the integrated holding brake: Open Load power supply > 24 V Stop Load power supply > 18 V The drive is stopped if the load power supply voltage is too low. Note: This fault can be disabled for a motor without holding brake (P56.5 = 0). Remedy Check the load power supply and increase rating. Acknowledgement Remove cause, set STW.7 = 1/0 and STW.0 = 0/1 Stop response Pulse suppression 713 / P947.13 Reference position lost Cause During shutdown, the drive was in motion. Therefore, the reference positon has not been accepted. The drive is not referenced. Remedy Reference drive. Acknowledgement Remove cause, set STW.7 = 1/0 and STW.0 = 0/1 Stop response Pulse suppression 714 / P947.14 Error in the FEPROM Cause We have detected a fault in the non-volatile memory (FEPROM). Remedy Additional information? ––> Evaluate P954 Acknowledgement Remove cause, set STW.7 = 1/0 and STW.0 = 0/1 Stop response Pulse suppression 6-242 Siemens AG 2005 All Rights Reserved SIMODRIVE POSMO A User Manual (POS1) – 06.05 Edition 06.05 04.01 02.99 6 Fault Handling and Diagnostics 6.2 Faults and alarms 715 / P947.15 System error Cause An internal fault was detected in the drive. Remedy Activate/deactivate positioning motor. Check and correct the motor data. Posmo A 75W : Replace the positioning motor. Posmo A 300W : Replace the drive unit. Acknowledgement Remove cause, set STW.7 = 1/0 and STW.0 = 0/1 Stop response Pulse suppression 800 / P953.0 Electronics temperature warning Cause The electronics temperature is > 90 degrees Celsius. If the permissible maximum electronics temperature is exceeded for longer than the time specified in P29 (electronics temperature tolerance time), then a fault is output and the drive is powered-down. The ambient temperature is too high. Remedy Observe the de-rating characteristic. Reduce ambient temperature. Acknowledgement not required Stop response None 801 / P953.1 Motor i2t monitoring Cause The I2t limiting for the motor current is active, the current is limited to Irated. The load or the load duty cycle is too high. Remedy Reduce load duty cycle. Acknowledgement not required Stop response None 802 / P953.2 Standstill monitoring Cause The motor was moved out of the standstill area (P14) in the closed-loop controlled status. Note: The warning is only signaled if the appropriate fault is suppressed. Remedy – Acknowledgement not required Stop response None Siemens AG 2005 All Rights Reserved SIMODRIVE POSMO A User Manual (POS1) – 06.05 Edition 6 6-243 6 Fault Handling and Diagnostics 06.05 04.01 02.99 6.2 Faults and alarms 6 803 / P953.3 Software limit switch, start Cause The actual position lies outside the range defined by the software limit switch. When traversing to a software limit switch, the motor is always stopped. SW 1.6 and higher: This warning is also signalled if the traversing range limits of the axis (+/– 200000mm or degrees or inches) are reached. In this case, the additional information 910 (P954.10) is output. SW 2.0 and higher: This warning is also output when the corresponding hardware limit switch (start) has been overrun. In this case, additional information 911 (P954.11) is output. Note: The warning is only signaled if the appropriate fault is suppressed. Remedy Move away in the opposite direction. Check P6 (software limit switch, start). Acknowledgement not required Stop response None 804 / P953.4 Software limit switch, end Cause The actual position lies outside the range defined by the software limit switch. When traversing to a software limit switch, the motor is always stopped. SW 1.6 and higher: This warning is also signalled if the traversing range limits of the axis (+/– 200000mm or degrees or inches) are reached. In this case, the additional information 910 (P954.10) is output. SW 2.0 and higher: This warning is also output when the corresponding hardware limit switch (end) has been overrun. In this case, additional information 911 (P954.11) is output. Note: The warning is only signaled if the appropriate fault is suppressed. Remedy Move away in the opposite direction. Check P7 (software limit switch, end). Acknowledgement not required Stop response None 6-244 Siemens AG 2005 All Rights Reserved SIMODRIVE POSMO A User Manual (POS1) – 06.05 Edition 06.05 04.01 02.99 6 Fault Handling and Diagnostics 6.2 Faults and alarms 805 / P953.5 Jogging: Jogging not possible Cause Drive not enabled. Jogging already selected. Traversing block being processed. Note: Additional information? ––> evaluate P954 Remedy – Acknowledgement not required Stop response None 806 / P953.6 Referencing: Position not accepted Cause When referencing, the position was not accepted. Motor moving (ZSW.13 = 1). Drive not enabled. Traversing block being processed. After power-on: The motor has still not moved. Note: Additional information? ––> evaluate P954 Remedy The motor must be stationary and closed-loop controlled. Acknowledgement not required Stop response None 807 / P953.7 Speed controller at stop Cause The speed controller is at its limit for more than 200 ms. The required speed is not reached. The load or friction is too high or the drive is too small. The current limit (P28, P16) is set too low. The drive is defective. For the ”traverse to fixed endstop” function, this warning is output when the fixed endstop is reached. Note: The warning is only signaled if the appropriate fault is suppressed. Remedy Reduce load. Increase current limit. Replace the positioning motor. Acknowledgement not required Stop response None 808 / P953.8 Start absolute block not possible Cause A block with absolute position data can only be started for a referenced drive. Remedy Reference drive. Acknowledgement not required Stop response None Siemens AG 2005 All Rights Reserved SIMODRIVE POSMO A User Manual (POS1) – 06.05 Edition 6 6-245 6 Fault Handling and Diagnostics 06.05 04.01 02.99 6.2 Faults and alarms 6 809 / P953.9 Program cannot be started Cause Drive not enabled. Invalid block number selected. Enable signals missing. A traversing block is already being processed. STW.11 (start referencing) is set. Traversing block with absolute position data and drive not referenced. Positioning mode not enabled (STW.4, STW.5) Note: Additional information? ––> evaluate P954 Remedy – Acknowledgement not required Stop response None 810 / P953.10 Invalid program selection Cause An attempt was made to either select block 0 or a block > 27. Remedy Select valid block (1 to 27). Acknowledgement not required Stop response None 811 / P953.11 Speed limiting active Cause The required axis velocity requires a higher speed than that specified in P8 (max. speed). Up to SW 1.5: The velocity is limited to the maximum speed. The following applies from SW 1.6: P24 ”Override speed” is limited so that maximum speed is used. Remedy Enter lower velocity. Adapt P10 (max. velocity). Adapt P8 (max. speed). Acknowledgement not required Stop response None 812 / P953.12 Undervoltage of the load current supply Cause The following applies from SW 1.6: The load voltage has fallen below 17 V. The load power supply is overloaded. SITOP: The load voltage was powered-down when braking due to overvoltage. Remedy Increase load power supply rating. SITOP: Provide regenerative feedback protection. Acknowledgement not required Stop response None 6-246 Siemens AG 2005 All Rights Reserved SIMODRIVE POSMO A User Manual (POS1) – 06.05 Edition 06.05 04.01 02.99 6 Fault Handling and Diagnostics 6.2 Faults and alarms 900 / P954.0 Operation not enabled Cause Bits to enable the drive missing. Remedy Set enable signals in the control word (STW). Acknowledgement not required Stop response None 901 / P954.1 Illegal operating status Cause If the program is running, jogging or referencing is not possible. Remedy – Acknowledgement not required Stop response None 902 / P954.2 Single block active Cause If the program is running and in the single block mode, jogging or referencing is not possible. Remedy – Acknowledgement not required Stop response None 903 / P954.3 Both jogging signals active Cause – Remedy – Acknowledgement not required Stop response None 904 / P954.4 Positioning mode not enabled Cause Operating condition for program missing (STW.4). Remedy – Acknowledgement not required Stop response None 905 / P954.5 Axis has still not been moved Cause The axis was still not moved after power-on. Remedy – Acknowledgement not required Stop response None Siemens AG 2005 All Rights Reserved SIMODRIVE POSMO A User Manual (POS1) – 06.05 Edition 6 6-247 6 Fault Handling and Diagnostics 06.05 04.01 02.99 6.2 Faults and alarms 6 906 / P954.6 FEPROM error upon writing or deletion Cause Presumably, there is a hardware fault in the non-volatile memory (FEPROM). Remedy Replace the positioning motor. Acknowledgement not required Stop response None 907 / P954.7 FEPROM No positional data available Cause In order to restart, the drive requires positional data. This has not been saved correctly upon the last ramp-down. Remedy If necessary, reference the drive. Activate/deactivate positioning motor. Replace the positioning motor. Acknowledgement not required Stop response None 908 / P954.8 FEPROM No factory setting available Cause Presumably, there is a hardware fault in the non-volatile memory (FEPROM). Remedy Replace the positioning motor. Acknowledgement not required Stop response None 909 / P954.9 FEPROM No user parameters available Cause Presumably, the drive was deactivated when saving the user parameters into the non-volatile memory (FEPROM). There may also be a hardware fault in the non-volatile memory (FEPROM). Remedy Check and correct the motor data. Restore the data in the FEPROM. Replace the positioning motor. Acknowledgement not required Stop response None 910 / P954.10 Traversing range limit reached Cause Axis has reached a traversing range limit. The traversing range limits of the axis are +/– 200000mm or degrees or inches. Remedy For drives turning endlessly, a modulo value must be entered in Parameter 1. Acknowledgement not required Stop response None 6-248 Siemens AG 2005 All Rights Reserved SIMODRIVE POSMO A User Manual (POS1) – 06.05 Edition 06.05 04.01 02.99 6 Fault Handling and Diagnostics 6.2 Faults and alarms 911 / P954.11 Hardware limit switch crossed/reached Cause The axis has reached or crossed a hardware limit switch. The exact limit switch is defined by the simultaneously output error or warning of the software limit switch. Remedy Acknowledge fault. Continued travel in opposite direction. Note: Continued travel is generally only possible in the opposite direction. If the hardware limit switch is crossed, continued travel in the original direction is only possible if travel continues in the opposite direction following fault acknowledgement and if the hardware switch is crossed again. This ensures that the axis is within the permitted traversing range. Acknowledgement not required Stop response None 912 / P954.12 No cams occurred before the zero mark Cause This supplementary information has been reported together with the fault 711 ”Flying measurement/actual value setting”: The function ”Reference to occurring zero mark” has been activated in the current traversing block. In addition, an input terminal has been parameterized with the function ”Cam monitoring”. However, a reference cam edge was not detected before the zero mark occurred. The drive has therefore been dereferenced for safety reasons. Remedy Ensure that the input terminal connected to the cam is correctly parameterized and that the cam is connected to the correct input terminal. Ensure that the type of BERO (NC contact/NO contact) corresponds to P56 (bit7). Acknowledgement not required Stop response None Siemens AG 2005 All Rights Reserved SIMODRIVE POSMO A User Manual (POS1) – 06.05 Edition 6-249 6 6 Fault Handling and Diagnostics 04.01 02.99 6.3 Analog test outputs 6.3 Analog test outputs Description ! There are analog test outputs at the rear of the SIMODRIVE POSMO A that are only accessible when the cover has been unscrewed (removed). Caution Measurements may only be made in exceptional cases by appropriately trained personnel. The ”correct” text sockets must be used, as short–circuits will permanently damage the module (refer to Fig. 6-1). The following parameters are available for the analog test sockets: P33, P34, P35 address, shift factor and offset for DAU 1 P36, P37, P38 address, shift factor and offset for DAU 2 6 Which signal is output via the test outputs? This is defined by entering an appropriate address in P33 or P36. SIMODRIVE POSMO A with cover attached Screw type: Pin 3 Pin 1 Counter–sunk screw M4 x 12 – 8.8 SN 63261 Torx T15/80 Pin Function max. 3.9 Nm 1 DAU 1 2 DAU 2 3 M (reference) Test pins 2 1 2 3 ––> 75 W motor ––> 300 W motor 0.64 X11 SIMODRIVE POSMO A with cover removed 2.54 2.54 5V 2.5 V Test sockets: 0.64 mm Fig. 6-1 6-250 0 V of the meas. signal 0V SIMODRIVE POSMO A test sockets with the cover removed Siemens AG 2005 All Rights Reserved SIMODRIVE POSMO A User Manual (POS1) – 06.05 Edition 04.01 02.99 6 Fault Handling and Diagnostics 6.3 Analog test outputs Caution In order to guarantee the degree of protection of SIMODRIVE POSMO A, after measurements have been made at the analog test sockets, the cover must be screwed back on. Standard assignment The test sockets provide the following signals as standard: DAU 1 (current actual value) P33 P34 P35 (ADDRESS: FC32hex 64562dec) shift factor = 7: ∆V = 1.9 V 9 A ––> 75 W motor ∆V = 1.0 V 12 A ––> 300 W motor offset = 80hex 128dec DAU 2 (speed actual value) P36 P37 P38 (ADDRESS: FC66hex 64614dec) shift factor = 0: (∆V = 0.625 V 1000 RPM) offset = 80hex 128dec 5V Offset 2.5 V = 80hex 0V Fig. 6-2 6 ∆V = 1.25 V 1000 RPM for a shift factor = 1 ∆V = 0.625 V 1000 RPM for a shift factor = 0 V nact = 0 RPM Voltage values when measuring the speed actual value Note With offset = 80hex a voltage of 2.5 V is output for ”0”. A shift factor change of +1 corresponds to doubling the value A shift factor change of –1 corresponds to halving the value Siemens AG 2005 All Rights Reserved SIMODRIVE POSMO A User Manual (POS1) – 06.05 Edition 6-251 6 Fault Handling and Diagnostics 08.02 04.01 02.99 6.4 Bus monitor AMPROLYZER for PROFIBUS DP Possible supplementary addresses The following supplementary addresses are available: Speed setpoint: FC00hex 64512dec same normalization as the speed act. value Position actual value: FC6Ahex 64618dec shift factor = 6: 1 motor revolution 4 V = 4: 1 motor revolution 5 V ––> 75 W motor ––> 300 W motor Iset (n controller): FC38hex 64568dec same normalization as the current act. value Iset (smoothed): FC3Ahex 64570dec same normalization as the current act. value Reader’s note The signals are shown in Chapter 3.3.1. 6 6.4 Bus monitor AMPROLYZER for PROFIBUS DP Description The AMPROLYZER bus monitor can be used to diagnose, monitor and trace data transfer in PROFIBUS networks. AMPROLYZER (Advanced Multicard PROFIBUS Analyzer) Internet address The software is freeware and is available from the Internet as follows: ––> http://www.ad.siemens.com/simatic–cs ––> search for the article number 338386 The self–extracting EXE file can be downloaded. For more information on the AMPROLYZER bus monitor, please refer to the information in the Internet and the files supplied. 6-252 Siemens AG 2005 All Rights Reserved SIMODRIVE POSMO A User Manual (POS1) – 06.05 Edition 7 Installation and Service 7.1 Replacing the motor Replacing the motor We recommend the following procedure when the positioning motor has to be replaced: 1. Save the parameters of the SIMODRIVE POSMO A. The parameters will be required again for the new motor. 2. Cancel the pulses: Control signal STW.1 (OFF 2) = 0 3. Power–down the load and electronics power supplies. 4. Release and remove the connection cover of the positioning motor (2 screws). 7 Protect the connecting cover and now open positioning motor against dirt – appropriately cover. 5. Unscrew the complete defective positioning motor together with the gearbox. 6. Bolt on the new complete SIMODRIVE POSMO A. Before installing, clean the shaft ends thoroughly of anti–corrosion agents with a typical solvent. 7. Release and withdrawn the connection cover of the new SIMODRIVE POSMO A (2 screws). Protect the connecting cover and now open positioning motor against dirt – appropriately cover. 8. Locate the wired ”old” cover on the new positioning motor which has been bolted into place and tighten the screws (2 screws). 9. Power–up the load and electronics power supplies. 10.Re–load the parameters saved under the first point. 11. Check: Does the positioning motor run fault–free? – if yes ––> then the ”old” connection cover is O. K. – if no ––> the ”old” connection cover is possibly defective replace the connection cover 12.Screw the connection cover back onto the positioning motor. 13.Return to the following address. Siemens AG 2005 All Rights Reserved SIMODRIVE POSMO A User Manual (POS1) – 06.05 Edition 7-253 7 Installation and Service 08.01 04.01 7.1 Replacing the motor Addresses to return the positioning motor You can also obtain the address of your local regional spare parts center at the following Internet address Address: http://www3.ad.siemens.de/partner Product group: SIMODRIVE Note If the ”old” connection cover of the SIMODRIVE POSMO A is not defective, then it should be left at the mounting location and should then be re–mounted on the ”new” positioning motor with the existing wiring. 7 7-254 Siemens AG 2005 All Rights Reserved SIMODRIVE POSMO A User Manual (POS1) – 06.05 Edition 08.01 04.01 7 Installation and Service 7.2 Mounting or replacing a gearbox (only relevant for 300 W motors) 7.2 Mounting or replacing a gearbox (only relevant for 300 W motors) What is required to mount or replace gearboxes? The following materials and tools are required to mount or replace a gearbox: 1. Four retaining screws per motor (M6 x 20 acc. to DIN 6912) 2. Tools: SW 4 and SW 5 Allen keys 3. Sealing agent: (e.g. Fluid D from Teroson) 4. Loctite: (e.g. Loctite Type 649) 5. Solvent: (e.g. Sevenax 72) 6. New gearbox: refer to the modular gearboxes in Chapter 2.5.2 What preparations have to be made? The following preparations must be made before mounting or changing gearboxes: This point is only valid if the gearbox is be replaced – Remove the cover from the mounting hole – Rotate the clamping hub with respect to the adapter plate in order to line–up the mounting holes – Release the clamping hub coupling of the gearbox – Release the 4 screws between the motor and gearbox – Remove the gearbox Prepare the gearbox to be mounted – Clean the opening for the gearbox input shaft – Clean the mounting surface and remove any possible damage (e.g. impressions in the mating surfaces, burs) Preparing the motor – Clean the motor shaft – Clean the mounting surface and remove any possible damage (e.g. impressions in the mating surfaces, burs) – Apply a sealing agent to the motor flange Siemens AG 2005 All Rights Reserved SIMODRIVE POSMO A User Manual (POS1) – 06.05 Edition 7-255 7 7 Installation and Service 04.01 7.2 Mounting or replacing a gearbox (only relevant for 300 W motors) What are the steps when mounting a gearbox? When mounting a gearbox, proceed as follows: 1. Carefully locate the gearbox on the motor by applying gentle pressure until there is no longer a gap between the motor and gearbox. 2. Tighten the clamping hub coupling – Tool: Allen key SW 4 – Torque: max. 6 Nm 3. Establish the connection between the motor and gearbox – Tool: Allen key SW 5 – Tighten the screws diagonally – Torque: max. 5 Nm 10 % 4. Secure the screws (Loctite) Notice If another gearbox has been mounted, the gearbox–dependent parameters no longer match the gearbox being used and these parameters must be appropriately changed. ––> Refer to Chapter 5.6.3 7 7-256 Siemens AG 2005 All Rights Reserved SIMODRIVE POSMO A User Manual (POS1) – 06.05 Edition 08.04 04.01 7 Installation and Service 7.3 Spare parts for SIMODRIVE POSMO A 7.3 Spare parts for SIMODRIVE POSMO A 7.3.1 List of spare parts for the 300 W motors What spare parts are there? The following spare parts are available for SIMODRIVE POSMO A – 300 W: Drive unit 6SN2157–0AA01–0BA1 Planetary gearbox, degree of protection IP54 ––> Only available as a new part with a delivery time of 10 days. – Planetary gearbox i=4 6SN2157–2BD10–0BA0 – Planetary gearbox i=7 6SN2157–2BF10–0BA0 – Planetary gearbox i = 12 6SN2157–2BH10–0BA0 – Planetary gearbox i = 20 6SN2157–2CK10–0BA0 – Planetary gearbox i = 35 6SN2157–2CM10–0BA0 – Planetary gearbox i = 49 6SN2157–2CP10–0BA0 – Planetary gearbox i = 120 6SN2157–2DU10–0BA0 Planetary gearbox, degree of protection IP65 ––> Only available as a new part with a delivery time of 10 days. – Planetary gearbox i=4 6SN2157–2BD20–0BA0 – Planetary gearbox i=7 6SN2157–2BF20–0BA0 – Planetary gearbox i = 12 6SN2157–2BH20–0BA0 – Planetary gearbox i = 20 6SN2157–2CK20–0BA0 – Planetary gearbox i = 35 6SN2157–2CM20–0BA0 – Planetary gearbox i = 49 6SN2157–2CP20–0BA0 Siemens AG 2005 All Rights Reserved SIMODRIVE POSMO A User Manual (POS1) – 06.05 Edition 7-257 7 7 Installation and Service 06.05 04.01 7.3 Spare parts for SIMODRIVE POSMO A 7.3.2 Drive unit as spare part (only the 300 W motor) Replacing the drive unit We recommend the following procedure if a drive unit is to replaced: 2 slotted screws 4 (1.0 x 6.5) Connection cover 4 self–tapping Allen keys SW 3 M4 x 16 2.5 – 3 Nm 7 Gearbox Motor Drive unit not to scale Fig. 7-1 Replacing the drive unit Reader’s note Up–to–date and binding information on this subject should be taken from the documentation provided with the spare parts ”Installation and mounting instructions, replacing the drive unit”. What is required to replace the drive unit? The following are required to replace the drive unit: 1. Tools – Screwdriver Size 4 (1.0 x 6.5) – Allen key SW 3 2. New drive unit 3. Parameter sets of the old drive unit (save and make available) 7-258 Siemens AG 2005 All Rights Reserved SIMODRIVE POSMO A User Manual (POS1) – 06.05 Edition 06.05 04.01 7 Installation and Service 7.3 Spare parts for SIMODRIVE POSMO A How do you replace the drive unit? The drive unit is replaced as follows: Caution The positioning motor must be brought into a no–voltage condition before the drive unit is replaced. 1. Remove the connection cover – Tool Screwdriver, Size 4 (1.0 x 6.5) 2. Release the four screws retaining the drive unit – Tool Allen key SW 3 3. Remove the old drive unit 4. Mount the new drive unit 5. Tighten the four screws retaining the drive unit – Tool Allen key SW 3 – Tighten the screws diagonally – Tightening torque 2.5 – 3 Nm 7 6. Locate the connection cover and tighten the screws – Tool Screwdriver, Size 4 (1.0 x 6.5) 7. Load the parameter set The parameter set provided must be downloaded into the new drive unit from the old drive unit. 8. Testing the positioning motor Note For the separate version where the motor and drive unit are separated, the installation sequence when replacing the drive unit is the same. However, in this case, the drive unit is removed from the extension set ”separate version”. Order No. (MLFB) The spare drive unit has the following Order No: Order No. (MLFB): Address to return the drive unit (300 W motor) 6SN2157–0AA01–0BA1 Refer to Chapter 7.1 under ”Address to return the positioning motor” for the address of the regional spare parts department that is responsible for you. Siemens AG 2005 All Rights Reserved SIMODRIVE POSMO A User Manual (POS1) – 06.05 Edition 7-259 7 Installation and Service 04.01 06.05 7.3 Spare parts for SIMODRIVE POSMO A Space for your notes 7 7-260 Siemens AG 2005 All Rights Reserved SIMODRIVE POSMO A User Manual (POS1) – 06.05 Edition List of Abbreviations A ABS Absolute AC Alternating Current AK Task and response ID AktSatz Actual block number: Part of the status signals AMPROLYZER Advanced Multicard PROFIBUS Analyzer: Bus monitor for PROFIBUS AnwSatz Select block number: Part of the control signals Bin Abbreviation for binary number BLDC Brushless Direct Current Permanent–magnet brushless servomotor C1 master PROFIBUS master, Class 1 C2 master PROFIBUS master, Class 2 C4 PROFIBUS parameter format COM Communications module CP Communications processor CPU Central Processing Unit DC Direct current Dec Abbreviation for decimal number DIL Dual–In–Line DP Distributed Periphery DPMC1, 2 DP Master Class 1, 2 DP Master Class 1, 2 EMC ElectroMagnetic Compatibility EN Europäische Norm [European Standard] EPROM Program memory with fixed program ESD Modules/components that can be destroyed by electrostatic discharge ESDS Electrostatic Discharge Sensitive Devices: components sensitive to electrostatic discharge FB Function block FLASHEPROM Flash EPROM: Memory which can be read and written into FOC Fiber–optic cable Siemens AG 2005 All Rights Reserved SIMODRIVE POSMO A User Manual (POS1) – 06.05 Edition A A-261 A List of Abbreviations A 04.01 FW Firmware GSD Master device file: describes the features of a DP slave Hardware Hardware HEX Abbreviation for a hexadecimal number HWE Hardware limit switches I2 PROFIBUS parameter format I4 PROFIBUS parameter format i Gearbox step–down ratio I Input IB Input byte IBN Commissioning IEC International Electrotechnical Commission: International standard in electrical technology IN Input IND Sub–index, sub–parameter number array index: Part of a PKW INT Integer: Integer number IW Input word Kv Position loop gain (Kv factor) LED Light Emitting Diode M Ground MB Mega byte MDI Manual Data Input MPI Multi Point Interface: Multi–point serial interface MSR Dimension system grid N2 PROFIBUS parameter format nact Speed actual value NN Standard zero (average sea level) nset Speed setpoint O Output OB Output byte OC Operating condition Order No. [MLFB] Machine Readable Product Designation: Order No. Out Output OW Output word A-262 Siemens AG 2005 All Rights Reserved SIMODRIVE POSMO A User Manual (POS1) – 06.05 Edition 04.01 A List of Abbreviations P Parameter PAB Peripheral output byte PAW Peripheral output word PC Personal Computer PEB Peripheral input byte PELV Protective extra low voltage Protective extra–low voltage The protective extra–low voltage PELV must have protective separation, be grounded and shockproof PEW Peripheral input word PG Programming device PKE Parameter identification: Part of a PKW PKW Parameter identification value: Parameterizing part of a PPO PLC Programmable logic controller (e.g. SIMATIC S7) PMM Power Management Module PNO PROFIBUS User Organization PNU Parameter numbers PO POWER ON POSMO A Positioning Motor Actuator: Positioning motor PPO Parameter process data object: Cyclic data telegram when transferring data with PROFIBUS–DP and the ”variable–speed drives” profile PROFIBUS Process Field Bus: Serial data bus PS Power supply PSW Program control word PZD Process data: Process data section of a PPO Q Output RAM Random Access Memory Program memory that can be read and written into REL Relative RMB Checkback signal byte RO Read Only S1 Continuous duty S3 Intermittent duty SN Siemens Standard SNR Block number SS Interface Siemens AG 2005 All Rights Reserved SIMODRIVE POSMO A User Manual (POS1) – 06.05 Edition A-263 A A List of Abbreviations 04.01 STB Start byte STW Control word SW x.y Software x.y SW x Key size x mm SWE Software limit switch T4 PROFIBUS parameter format Term. Terminal VDE Verband Deutscher Elektrotechniker [Association of German Electrical Engineers] VDI Verein Deutscher Ingenieure [Association of German Engineers] VS Power supply xact Position actual value xset Position setpoint value ZSW Status word A A-264 Siemens AG 2005 All Rights Reserved SIMODRIVE POSMO A User Manual (POS1) – 06.05 Edition B References General documentation /KT654/ Catalog DA 65.4 2005 SIMODRIVE 611 universal and POSMO Order No.: E86060–K5165–A401–A4 /BU/ Catalog NC 60 2004 Automation Systems for Machine Tools Order No.: E86060–K4460–A101–B1 Order No.: E86060–K4460–A101–B1 –7600 (English) /Z/ MOTION–CONNECT Connections & System Components for SIMATIC, SINUMERIK, MASTERDRIVES and SIMOTION Catalog NC Z Order No.: E86060–K4490–A001–B1 Order No.: E86060–K4490–A001–B1–7600 (English) /ST7/ SIMATIC Programmable Logic Controllers Catalog SIMATIC S7 Catalog ST 70 Order No.: E86 060–K4670–A111–A3 /KT101/ SITOP power, Power Supplies Catalog KT 10.1 2002 Order No.: E86060–K2410–A101–A4 /SI1/ SITOP modular 48V/20A Power Supplies (6EP1 457–3BA00) Operating Instructions 07.2002 Order No.: C98130–A7552–A1–1–6419 /STEP7/ Automation with STEP 7 in STL SIMATIC S7–300/400 Programmable Logic Controllers SIEMENS; Publicis MCD Verlag; Hans Berger Order No.: A19100–L531–B665 ISBN 3–89578–036–7 Siemens AG 2005 All Rights Reserved SIMODRIVE POSMO A User Manual (POS1) – 06.05 Edition B B-265 B References 06.05 Electronic documentation /CD1/ The SINUMERIK System DOC ON CD (with all SINUMERIK 840D/840Di/810D/FM–NC and SIMODRIVE publications) Order No.: 6FC5 298–7CA00–0AG2 Documentation for PROFIBUS /IKPI/ Catalog IK PI 2005 Industrial Communications and Field Devices Order No.: E86060–K6710–A101–B4 Order No.: E86060–K6710–A101–B4–7600 (English) /P1/ PROFIBUS–DPV1, Basics, Tips and Tricks for Users Hüthig; Manfred Popp EN50170 ISBN 3–7785–2781–9 /P2/ PROFIBUS–DP, Fast Entry PROFIBUS User Organisation e.V.; Manfred Popp Order No.: 4.071 /P3/ PROFIBUS, Profile for Variable–Speed Drives, PROFIDRIVE September 1997 Edition PROFIBUS User Organization e.V. 76131 Karlsruhe , Haid–und–Neu–Straße 7; Order No.: 3.071 /P4/ Decentralization with PROFIBUS–DP Design, Configuring and Using PROFIBUS–DP with SIMATIC S7 SIEMENS; Publics MCD Verlag; Josef Weigmann, Gerhard Kilian Order No.: A19100–L531–B714 ISBN 3–89578–123–1 /P5/ Manual for PROFIBUS Networks SIEMENS; Order No.: 6GK1 970–5CA10–0AA0 B B-266 Siemens AG 2005 All Rights Reserved SIMODRIVE POSMO A User Manual (POS1) – 06.05 Edition 06.05 B References Manufacturer/Service documentation /POS1/ SIMODRIVE POSMO A User Manual Order No.: 6SN2 197–0AA00–0BP8 (06.05 Edition) /POS2/ SIMODRIVE POSMO A (08.03 Edition) Mounting Instructions 75/300 W Motor (provided with each drive) Order No.: On request /posa_mv/ SIMODRIVE POSMO A – 300 W (03.05 Edition) Mounting Instructions Extension Set ”Separate Version” Order No.: On request /posa_mta/ SIMODRIVE POSMO A – 300 W (12.01 Edition) Mounting Instructions Replacing the Drive Unit Order No.: On request /posa_mtg/ SIMODRIVE POSMO A Mounting Instructions Replacing the Gearbox Order No.: On request /S7H/ SIMATIC S7–300 (2002 Edition) Installation Manual Technological Functions – Reference Manual: CPU Data (HW Description) – Reference Manual: Module Data Order No.: 6ES7 398–8AA03–8AA0 (02.04 Edition) /S7HT/ SIMATIC S7–300 Manual: STEP 7, Fundamentals, V. 3.1 Order No.: 6ES7 810–4AC02–8AA0 (03.97 Edition) /S7HR/ SIMATIC S7–300 Manual: STEP 7, Reference Manuals, V. 3.1 Order No.: 6ES7 810–4CA02–8AR0 (03.97 Edition) /ET200X/ SIMATIC Distributed ET 200X Manual EWA 4NEB 780 6016–01 04 Part of the package with Order No. 6ES7 198–8FA01–8AA0 (05.01 Edition) Siemens AG 2005 All Rights Reserved SIMODRIVE POSMO A User Manual (POS1) – 06.05 Edition B B-267 B References /EMV/ 06.05 SINUMERIK, SIROTEC, SIMODRIVE EMC Design Guidelines Configuration Manual (HW) Order No.: 6FC5 297–0AD30–0BP1 (06.99 Edition) You will find an up–to–date declaration of conformity on the Internet at http://www4.ad.siemens.de Please enter the ID No: 15257461 in the field ’Search’ (top right) and then click on ’go’. B B-268 Siemens AG 2005 All Rights Reserved SIMODRIVE POSMO A User Manual (POS1) – 06.05 Edition Dimension Drawings C.1 Contents C Dimension drawings for SIMODRIVE POSMO A -- 75W The dimension drawings for the SIMODRIVE POSMO A -- 75W positioning motor with the following gearboxes are provided in this chapter: S Motor without gearbox ----> refer to Fig. C-1 S Motor with planetary gearbox, stages 1, 2, 3 ----> refer to Fig. C-2 S Motor with worm gearbox ----> refer to Fig. C-3 C E Siemens AG 2005 All Rights Reserved SIMODRIVE POSMO A User Manual (POS1) -- 06.05 Edition C-269 F E D C B A * Pro/E * M5 The reproduction, transmission or use of this document or its contents is not permitted without express written authority. Offenders will be liable for damages. All rights, including rights created by patent grant or registration of a utility model or design, are reserved. 1 2 A B 0.2 [.007] 0.2 [.007] 0.2 [.007] M4, 7 deep [M4, .276 deep] M5 M4 3 3 Pg--Verschraubung Pg threaded joint Type Type Pg13.5 threaded joint HSK M EMV Hummel Pg 11 dummy plugs, Type 514/11 Pflitsch 36± 0.1 [ 1.418 ± .003 ] 40± 0.1 [ 1.575 ± .003 ] 49± 0.1 [ 1.929 ± .003 ] Comunicado como segredo empresarial. Reservados todos os direitos Weitergabe sowie Vervielfältigung dieser Unterlage, Verwer-tung und Mitteilung ihres Inhalts nicht gestattet, soweit nicht ausdrücklich zugestanden. Zuwiderhandlungen verpflichten zu Schadenersatz. Alle Rechte vorbehalten, insbesondere für den Fall der Patenterteilung oder GM--Eintragung. 2 71± 1 [ 2.795 ± .039 ] Confiado como secreto industial. Nos reservamos todos los derechos Confie’ a titre de secret d’ entreprise. Tous droits reserves M5, 7 deep [M5, .276 deep] 1 A 63± 1 [2.480 ± .039] 4 B 4 cable cable 12.0--6.0 [.472--.236] ------ 100± 1 [ 3.937 ± .039 ] C-270 B 5 Tightening torque Tightening torque M5 M4 124± 0.5 [ 4.882 ± .019 ] A 147± 1 ± .039] [5.787 5 3.0 26 1.8 16 Nm inlb Rev. aa Modification O. No. projection First angle DIN 6 Belonging to this: 59± 0.7 [ 2.323 ± .027 ] 125± 0.8 [ 4.921 ± .031 ] 6 Date 01.06.04 Tolerances: ISO 8015 Tolerance ISO 2768--mk Name M General tolerance: A Site: A & D Erlangen F80 Hecht A&D MC RD 45 Dep.: Rosenboom Author: Check: 05.04.2004 Date: Surface: 0.06 [.002] 0.03 [.001] 1:1 A5E00269782 8 without gearbox Article: Replacement for / replaced by: A5E00269782 Type/MLFB: 6SN2132--.....--.... Name: MB Doc.type Revision aa kg/piece: A SIMODRIVE POSMO A -- 75W Material: Scale: Doc. number: 2 --0.3 [ .079 --.011 ] 25± 1 [ .984 ± .039 ] 7 8+0.005 --0.011 +.0001 [ .3150 --.0004 ] 25 --0.04 [ .984 --.001 ] 63± 0.5 [ 2.480 ± .019 ] Fig. C-1 A2 1 1 Sheets: Sheet: Sheet size E D C B A PRO/E--CAD C CAD--Drawing Manual modification prohibited C Dimension Drawings 08.04 08.03 02.99 C.1 Dimension drawings for SIMODRIVE POSMO A -- 75W Dimension drawing: SIMODRIVE POSMO A -- 75 W without gearbox E Siemens AG 2005 All Rights Reserved SIMODRIVE POSMO A User Manual (POS1) -- 06.05 Edition E Siemens AG 2005 All Rights Reserved SIMODRIVE POSMO A User Manual (POS1) -- 06.05 Edition F E D C B * Pro/E * M5 1 Weitergabe sowie Vervielfältigung dieser Unterlage, Verwer-tung und Mitteilung ihres Inhalts nicht gestattet, soweit nicht ausdrücklich zugestanden. Zuwiderhandlungen verpflichten zu Schadenersatz. Alle Rechte vorbehalten, insbesondere für den Fall der Patenterteilung oder GM--Eintragung. The reproduction, transmission or use of this document or its contents is not permitted without express written authority. Offenders will be liable for damages. All rights, including rights created by patent grant or registration of a utility model or design, are reserved. Comunicado como segredo empresarial. Reservados todos os direitos 2 3 2 1 M5 M4 A A A B 205.5 [8.091] 190.5 [7.500] 175 [6.890] L mm[inch] 0.15 [.005] Getriebestufen Gearbox stages 40± 0.1 [ 1.575 ± .003 ] Confiado como secreto industial. Nos reservamos todos los derechos 1 2 71± 1 [ 2.795 ± .039 ] Confie’ a titre de secret d’ entreprise. Tous droits reserves M5, 7.5 deep [M5, 0.295 deep] A CAD--Drawing Manual modification prohibited 63± 1 [2.480 ± 0.039] 100± 1 [ 3.937 ± .039 ] Fig. C-2 B Motor--Typ Motor type BG 63x55 BG 63x55 BG 63x55 80.5 [3.169] 65.5 [2.579] 50 [1.969] 124± 0.5 [ 4.882 ± .019 ] B L mm[inch] A 147± 1 ± 0.039] [5.787 4 3 4 5 5 6 [L 3.0 1.8 26 16 Nm inlb L1± 2 1± .079] Rev. aa Modification O. No. projection First angle DIN 6 Belonging to this: Date 01.06.04 Tolerances: Name M . Erlangen F80 Site: A & D Hecht MC RD45 Dep.: Rosenboom Check: 05.04.04 Surface: . . Date: . Tolerance A 12 [.472] Scale: Doc. number: 1:1 A5E00269786 0.06 [.002] 0.03 [.001] A with planetary gearbox Article: Replacement for / replaced by: a5e00269786 Type/MLFB: 6SN2132--.....--.... Name: MB Doc.type Revision aa kg/piece: SIMODRIVE POSMO A -- 75W Material: . . 8 12+0.008 --0.003 +.0003 [ .4724 --.0001 ] 32 --0.039 [ 1.260 --.001 ] 52± 0.3 [ 2.047 ± .011 ] 63± 0.5 [ 2.480 ± .019 ] 3 [ .118 ] 25± 1 [ .984 ± .039 ] 7 Author: . . ISO 2768--mk ISO 8015 General tolerance L2± 1 [L 2± .039] Gearbox Gearbox Spring washer 4x6.5 DIN 6888, Series A Curved washer .157x.256 cable cable 12.0--6.0 [.472--.236] ------ Tightening torque Tightening torque M5 M4 59± 0.7 [ 2.323 ± .027 ] 11 ± 0.5 [ .433 ± .019 ] Pg--Verschraubung Pg threaded joint Type Type Pg13.5 threaded joint HSK M EMV Hummel Pg 11 dummy plugs, Type 514/11 Pflitsch 3 . A2 1 1 Sheets: Sheet: Sheet size E D C B A PRO/E--CAD 08.04 08.03 02.99 C Dimension Drawings C.1 Dimension drawings for SIMODRIVE POSMO A -- 75W C Dimension drawing: SIMODRIVE POSMO A -- 75 W with planetary gearbox C-271 F E D C B Spring washer 3x5 DIN6888, series A Scheibenfeder .118x.197 M5 The reproduction, transmission or use of this document or its contents is not permitted without express written authority. Offenders will be liable for damages. All rights, including rights created by patent grant or registration of a utility model or design, are reserved. Comunicado como segredo empresarial. Reservados todos os direitos Confiado como secreto industial. Nos reservamos todos los derechos Weitergabe sowie Vervielfältigung dieser Unterlage, Verwer-tung und Mitteilung ihres Inhalts nicht gestattet, soweit nicht ausdrücklich zugestanden. Zuwiderhandlungen verpflichten zu Schadenersatz. Alle Rechte vorbehalten, insbesondere für den Fall der Patenterteilung oder GM--Eintragung. 30± 0.1 [ 1.181 ± .003 ] 41 [ 1.614 ] 56 [ 2.205 ] M5, 8 deep [M5, .315 deep] 28 [1.102] 71± 1 [ 2.795 ± .039 ] 2 A B M4 M5 3 3.5 [ .138 ] A 3 Pg--Verschraubung Pg threaded joint Type Type Pg13.5 threaded joint HSK M EMV Hummel Pg 11 dummy plugs, Type 514/11 Pflitsch 86± 0.3 [ 3.386 ± .011 ] 3.5 [ .138 ] 30 [ 1.181 ] A 12 [ .472 ] Confie’ a titre de secret d’ entreprise. Tous droits reserves 0.08 [.003] A 0.03 [.001] 25 --0.04 [ .984 --.001 ] 2 25 --0.04 [ .984 --.001 ] 50± 0.1 [ 1.969 ± .003 ] A 10 g5 [ .394 ] 63± 1 [2.480 ± .039] 100± 1 [ 3.937 ± .039 ] 1 4 B 5 3.0 1.8 26 16 Nm inlb 125± 0.8 [ 4.921 ± .031 ] 59± 0.7 [ 2.323 ± .027 ] 11 ± 0.5 [ .433 ± .019 ] Tightening torque Tightening torque M5 M4 124± 0.5 [ 4.882 ± .019 ] A 5 147± 1 [5.787 ± .039] cable cable 12.0--6.0 [.472--.236] ------ B 4 6 63± 0.5 [ 2.480 ± .019 ] Rev. aa Modification O. No. projection First angle DIN 6 Belonging to this: Date 02.06.04 Tolerances: Name . Hecht Check: Site: A & D Erlangen F80 MC RD45 Rosenboom Dep.: 05.04.2004 Date: Surface: . . Author: . . . Tolerance ISO 8015 ISO 2768--mk M General tolerance 1:1 A5E00269803 with worm gearbox Article: Replacement for / replaced by: A5E00269803 Type/MLFB: 6SN2132--.....--.... Name: MB Doc.type Revision aa kg/piece: Gearbox Gearbox M5, 8 deep [M5, .315 deep] 8 SIMODRIVE POSMO A -- 75W Material: . . Scale: Doc. number: M4 .8 deep [M4, 0.315 deep] 36± 0.1 [ 1.417 ± .003 ] 50± 0.1 [ 1.969 ± .003 ] 35 [1.378] 71 [2.795] 50± 0.1 [ 1.969 ± .003 ] 7 30± 0.1 [ 1.181 ± .003 ] C-272 38 [ 1.496 ] 35 31 [ 1.378 ] [ 1.220 ] Fig. C-3 . A2 1 1 Sheets: Sheet: Sheet size E D C B A PRO/E--CAD C CAD--Drawing Manual modification prohibited C Dimension Drawings 08.04 08.03 02.99 C.1 Dimension drawings for SIMODRIVE POSMO A -- 75W Dimension drawing: SIMODRIVE POSMO A -- 75W with worm gearbox E Siemens AG 2005 All Rights Reserved SIMODRIVE POSMO A User Manual (POS1) -- 06.05 Edition C Dimension Drawings 06.05 08.04 08.03 02.99 C.2 Dimension drawings for SIMODRIVE POSMO A -- 300W C.2 Contents Dimension drawings for SIMODRIVE POSMO A -- 300W The dimension drawings for the SIMODRIVE POSMO A -- 300W positioning motor with the following gearboxes are provided in this chapter: S Motor without gearbox ----> refer to Fig. C-4 S Motor with planet. gearbox (1--stage, 2--stages) ----> refer to Fig. C-5 S Motor with planetary gearbox (3--stage) ----> refer to Fig. C-6 S SIMODRIVE POSMO A -- 300 W extension set ”separate version” -- Motor without gearbox ----> refer to Fig. C-7 -- Motor with planet. gearb. (1--stage, 2--stages) ----> refer to Fig. C-8 -- Motor with planetary gearbox (3--stage) ----> refer to Fig. C-9 C E Siemens AG 2005 All Rights Reserved SIMODRIVE POSMO A User Manual (POS1) -- 06.05 Edition C-273 tung und Mitteilung ihres Inhalts nicht gestattet, soweit nicht The reproduction, transmission or use of this document The reproduction, transmission or use of this document or its Confi titre de secret d’entreprise. Tous droits rservs. ausdrücklich zugestanden. Zuwiderhandlungen Confiado como secreto industial. Nos reservamos todos los derechos zu Schadenersatz. Alle Rechte vorbehalten, insbesondere für contents is not permitted without express written authority . Comunicado como segredo empresarial. Reservados todos os direitos den Fall der Patenterteilung oder GM--Eintragung. Offenders will be liable for damages. All rights, including rights verpflichten C-274 created by patent grant or registration of a utility model or design, Fig. C-4 are reserved. * Pro/E * F E D C B A prohibited Manual modification 1 +0.012 60 --0.007 j6 +.0004 [ 2.3622 --.0002] 1 3 [ .118] 2 24.5 [ .965 ] m 16 [.630] 4 [ .157 ] Ausführung mit Paßfeder / version with key 30 [ 1.181] 8 [ .315 ] Zentrierung/centering DIN332 -- DR M5 2 C 5 [.197] CAD--Drawing 3 22 [ .866 ] 3 5 1:4 4 Rev. aa projection First angle O. No. 01 Modification DIN 6 Belonging to this: version Ausf./ Thread M5x10 (3x) for lifting eye and support / thread M5x10 (M5x.394) (3x) useful for lifting eye and support 36 [ 1.417 ] Dimensions acc. to DIN 6885 Sh. 1 / Dimensions acc. to DIN 6885 Sh.1 k 4 172 [6.77] Date 04.06.04 not toleranced size Tolerance acc. to DIN 42955 flange and shaft not toleranced size ± 1mm ± 1mm Name Nesm Tolerance acc. to DIN 42955 Flange and shaft 6SN2155 Type Erlangen F80 Site: D MC RD45 Dep.: & Hecht A Nesmiyan Check: 26.11.03 Surface: . . . Author: Date: . . . 36 [1.417] mm [inch] shaft height Achshöhe/ 6 1:2 A5E00282014_oG 4.0[8.8] mit Bremse/ with brake 6SN2155 Article: Replacement for / replaced by: A5E00282014 Type/MLFB: Name: o.G. 8 254 [10] Doc.type MB m Revision AO kg/piece: . 140 [5.512] mm [inch] k Länge / length Dimension drawing POSMO A 300W without gearbox dimension sheet POSMO A 300W without gearbox Material: . . Scale: Doc. number: 3.9[8.6] kg [lb] ohne Bremse/ without brake Gewicht / weight 80 [ 3.150 ] 72 [ 2.835 ] 7 A3 Sheets: Sheet: 1 1 Sheet size D C B A C Dimension Drawings 08.04 02.99 C.2 Dimension drawings for SIMODRIVE POSMO A -- 300W Dimension drawing: SIMODRIVE POSMO A -- 300 W without gearbox E Siemens AG 2005 All Rights Reserved SIMODRIVE POSMO A User Manual (POS1) -- 06.05 Edition PRO/E--CAD +0.012 14 +0.001 k6 +.0004 [ .5512 +.0001] tung und Mitteilung ihres Inhalts nicht gestattet, soweit nicht contents is not permitted without express written authority . The reproduction, transmission or use of this document The reproduction, transmission or use of this document or its Confi titre de secret d’entreprise. Tous droits rservs. ausdrücklich zugestanden. Zuwiderhandlungen Offenders will be liable for damages. All rights, including rights Confiado como secreto industial. Nos reservamos todos los derechos zu Schadenersatz. Alle Rechte vorbehalten, insbesondere für created by patent grant or registration of a utility model or design, verpflichten E Siemens AG 2005 All Rights Reserved SIMODRIVE POSMO A User Manual (POS1) -- 06.05 Edition * Pro/E * F E D C B A prohibited M5 [ 1.5748 --.0006] 1 +0.012 16 +0.001 k6 +.0004 [ .6299 +.0001] h6 40 --0.016 1 [ .472 ] 12 30 [ 1.181] 9 [ .354 ] 64.3 [ 2.532 ] Manual modification 2 27.5 [ 1.083 ] 3 B B [ .984 ] 25 m 72 [ 2.835 ] 3 1:4 Dimensions acc. to DIN 6885 Sh. 1/ Dimensions acc. to DIN 6885 Sh.1 2 [ .079 ] 18 [ .709 ] Ausführung mit Paßfeder / version with key l B--B 2 5 [ .197 ] Comunicado como segredo empresarial. Reservados todos os direitos den Fall der Patenterteilung oder GM--Eintragung. are reserved. 70 [ 2.756 ] Fig. C-5 4 k 4 36 [ 1.417 ] 6SN2155 6SN2155 6SN2155 03 04 6SN2155 Type 02 01 version Ver. / O. No. Modification aa Rev. projection First angle DIN 6 4/7 Date 02.06.04 not toleranced size: not toleranced size: acc. to DIN 42955 flanges and shaft tolerance acc. to DIN 42955 Flanges and shaft tolerance 12/20/35/49 4/7 12/20/35/49 Belonging to this: 1--stufig/ 1--stage 2--stufig/ 2--stage 1--stufig/ 1--stage 2--stufig/ 2--stage Gearbox ratios/ ratios Getriebe/gearbox 6 ± 1 mm Name Nesm ± 1mm MC RD45 Erlangen F80 Dep.: Site: D Hecht Check: & Nesmiyan Author: A 26.11.03 Surface: . . . 5.5[12.1] 5.2[11.5] 5.4[11.9] 5.1[11.2] 1:2 158[6.220] 136[5.354] 146[5.748] 124[4.882] mm [inch] l A5E00282014 with 1&2 st. g. 254[10] 254[10] 254[10] 254[10] k Länge / length 80 [ 3.150 ] 7 140[5.512] 140[5.512] 140[5.512] 140[5.512] m Article: 6SN2155 Replacement for / replaced by: A5E00282014 Type/MLFB: Name: Doc.type MB Dimension drawing Posmo A 300W with 1-- and 2--stage gearbox dimension sheet Posmo A 300W with 1-- and 2--stage gearbox Material: . . Scale: Doc. number: 5.6[12.3] 5.3[11.7] 5.5[12.1] 5.2[11.5] kg [lb] without brake/mit Bremse/ without brake with brake Gewicht / weight Date: . . . 36[1.417] 36[1.417] 36[1.417] 36[1.417] mm [inch] shaft height Achshöhe/ 172 [6.772] Thread M5x10 (3x) for lifting eye and support / thread M5x10 (M5x.394) (3x) useful for lifting eye and support 5 Schutzart/ Revision AO kg/piece: . IP65 IP65 IP 54 IP 54 Sheets: Sheet: 1 1 Sheet size A3 Degree of protection 8 D C B A PRO/E--CAD CAD--Drawing 08.04 02.99 C Dimension Drawings C.2 Dimension drawings for SIMODRIVE POSMO A -- 300W C Dimension drawing: SIMODRIVE POSMO A -- 300W with planetary gearbox (1--stage, 2--stage) C-275 tung und Mitteilung ihres Inhalts nicht gestattet, soweit nicht contents is not permitted without express written authority . The reproduction, transmission or use of this document The reproduction, transmission or use of this document or its Confi titre de secret d’entreprise. Tous droits rservs. ausdrücklich zugestanden. Zuwiderhandlungen Offenders will be liable for damages. All rights, including rights Confiado como secreto industial. Nos reservamos todos los derechos zu Schadenersatz. Alle Rechte vorbehalten, insbesondere für created by patent grant or registration of a utility model or design, verpflichten * Pro/E * F E D C B h6 55 --0.019 A prohibited Manual modification [ 2.1654 --.0007] 178.6 Comunicado como segredo empresarial. Reservados todos os direitos den Fall der Patenterteilung oder GM--Eintragung. are reserved. 1 M6 1 +0.015 20 +0.002 k6 +.0005 [ .7874 +.0001] ] [ 7.030 45 --0.2 16 [ .630 ] [ 1.772 --.007] [ .354 ] 9 2 2 84 [ 3.307 ] C-276 l 3 C--C 22.5 [ .886 ] 84 [ 3.307 ] C C 36 [ 1.417] 4 72 [ 2.835 ] 3 1:4 Dimensions acc. to DIN 6885 Sh.1 4 Dimensions acc. to DIN 6885 Sh.1 / 4.5 [ .177 ] Ausführung mit Paßfeder / version with key 6 [ .236 ] Fig. C-6 m Ausf./ 01 version 36 Rev. aa projection First angle 120 acc. to DIN 42955 Date 08.06.04 not toleranced size: not toleranced size: acc. to DIN 42955 flanges and shaft tolerance ± 1 mm Name Nesm Achshöhe/ Erlangen F80 Site: D MC RD45 Dep.: & Hecht A Nesmiyan Check: 26.11.03 Surface: . . . 1:2 k 228[8.976] mm [inch] l Länge / length m 140[5.512] 84 [ 3.307 ] 80 [ 3.150 ] A5E00282014 with 3 st. g. 254[10] 7 Article: 6SN2155 Replacement for / replaced by: A5E00282014 Type/MLFB: Name: Doc.type MB Dimension drawing Posmo A 300W with 3--stage gearbox dimension sheet Posmo A 300W with 3--stage gearbox Material: . . Scale: Doc. number: 8.2[18.1] 8.3[18.3] kg [lb] ohne Bremse/ mit Bremse/ without brake with brake Gewicht / weight Author: Date: . . . 36[1.417] mm [inch] shaft height ± 1 mm Gearbox ratios ratios Flanges and shaft tolerance 3--stufig/ 3--stage O. No. 6 172 [6.772] Thread M5x10 (3x) for lifting eye and for support / thread M5x10 (M5x.394) (3x) useful for lifting eye and support Getriebe/gearbox Modification DIN 6 Belonging to this: 6SN2155 Type k 5 ] [ 1.417 C Schutzart/ Revision AO kg/piece: . IP 54 Sheets: Sheet: 1 1 Sheet size A3 Degree of protection 8 D C B A PRO/E--CAD CAD--Drawing C Dimension Drawings 08.04 02.99 C.2 Dimension drawings for SIMODRIVE POSMO A -- 300W Dimension drawing: SIMODRIVE POSMO A -- 300W with planetary gearbox (3--stage) E Siemens AG 2005 All Rights Reserved SIMODRIVE POSMO A User Manual (POS1) -- 06.05 Edition E Siemens AG 2005 All Rights Reserved SIMODRIVE POSMO A User Manual (POS1) -- 06.05 Edition F E D C B prohibited * Pro/E * [ .118 ] 3 24.5 [ .965 ] 8 [ .315 ] [ 1.181] 30 m Weitergabe sowie Vervielfltigung dieser Unterlage, Verwer-tung und Mitteilung ihres Inhalts nicht gestattet, soweit nicht ausdrcklich zugestanden. Zuwiderhandlungen verpflichten zu Schadenersatz. Alle Rechte vorbehalten, insbesondere fr den Fall der Patenterteilung oder GM--Eintragung. The reproduction, transmission or use of this document or its contents is not permitted without express written authority. Offenders will be liable for damages. All rights, including rights created by patent grant or registration of a utility model or design, are reserved. Comunicado como segredo empresarial. Reservados todos os direitos Confiado como secreto industial. Nos reservamos todos los derechos 1 2 2 k Zentrierung/centering DIN332 -- DR M5 Confi ’titre de secret d’entreprise. Tous droits rservs. +0.012 60 --0.007 j6 +.0004 [ 2.3622 --.0002] A 1 +0.012 14 +0.001 k6 +.0004 [ .5512 +.0001] Manual modification 109 36 3 4 22 [.866] 5 Ausf./ 01 version 3 6SN2155 Type Achshöhe/ 36 [1.417] mm [inch] shaft height 4 2.9[6.4] 3.0[6.6] kg [lb] mit Bremse/ with brake 1.5[3.3] 5 Umrichterseite/Inverter ohne Bremse/ without brake ohne Kabel/without cable Motorseite/motor side Gewicht / weight ohne Kabel/without cable Gewicht / weight 184.1 [7.248] mm [inch] k Länge / length m 140 [5.512] Additional dimension data on the motor -- 300 W and drive unit, refer to the dimension drawings for SIMODRIVE POSMO A -- 300 W in Chapter C.2. Note: Ausführung mit Paßfeder / version with key Dimensions acc. to DIN 6885 Sh.1 Dimensions acc. to DIN 6885 Sh.1 Thread M5x10 (3x) for lifting eye and can be used for support / thread M5x10 (M5x.394) (3x) useful for lifting eye and support [ 1.417 ] CAD--Drawing [ 4.291 ] 5 [.197] Fig. C-7 6 1:4 Rev. Modification projection First angle DIN 6 Belonging to this: 159.399 [6.276 ] Date Name Tolerances: Site: Dep.: Check: Author: . . . Tolerance ISO 8015 ISO 2768--mk Date: 172 [6.772] General tolerance 46 [ 1.811] 1:2 A5E00282014_oG_AA_M Type/MLFB: 6SN2155 Replacement for / replaced by: Article: A5E00282014 Name: MC RD45 A &D 80 [3.150] 72 [2.835 ] 97 [3.819 ] 109.5 [4.311 ] 8 kg/piece: . Sheet size A2 E D C B A Doc.type MB Revision AC Sheets: 1 Sheet: 1 Dimension drawing POSMO A 300W modular without gearbox dimension sheet Posmo A 300W modular without gearbox Material: . Scale: Doc. number: . Erlangen F80 Hecht Heilmann 20.04.2005 Surface: . . . 7 PRO/E--CAD 06.05 02.99 C Dimension Drawings C.2 Dimension drawings for SIMODRIVE POSMO A -- 300W C Dimension drawing: SIMODRIVE POSMO A -- 300 W extension set ”separate version” without gearbox C-277 F E D C B 40--0.016 h6 [ 1.5748 --.0006 ] * Pro/E * M5 12 [.472] A 30 [1.181 ] 9 [.354] l 109.5 [4.311 ] 1 den Fall der Patenterteilung oder GM--Eintragung. ausdr cklich zugestanden. Zuwiderhandlungen verpflichten zu Schadenersatz. Alle Rechte vorbehalten, insbesondere fr Weitergabe sowie Vervielfltigung dieser Unterlage, Verwer-tung und Mitteilung ihres Inhalts nicht gestattet, soweit nicht created by patent grant or registration of a utility model or design, are reserved. Offenders will be liable for damages. All rights, including rights The reproduction, transmission or use of this document or its contents is not permitted without express written authority . Comunicado como segredo empresarial. Reservados todos os direitos Confiado como secreto industial. Nos reservamos todos los derechos ’ de secret d’entreprise. Tous droits rservs. Confi titre +0.012 k6 16+0.001 +.0004 [ .6299+.0001 ] A 64.3 [2.532] 27.5 [1.083 ] 2 k B 25 [.984 ] B B--B version with key 4 Dimensions acc. to DIN 6885 Sh.1 Dimensions acc. to DIN 6885 Sh.1 for lifting eye and support thread M5x10 (M5x.394) (3x) useful and can be used for support / Thread M5x10 (3x) for lifting eye 36 [1.417 ] Ausführung mit Paßfeder / m 3 72 [2.835] 5 2 6SN2155 6SN2155 04 6SN2155 03 6SN2155 Type 02 01 Ver. / version 3 1--stufig/ 4/7 1--stage 2--stufig/ 12/20/35/49 2--stage 1--stufig/ 4/7 1--stage 2--stufig/ 12/20/35/49 2--stage Getriebe/gearbox 4.1[9.0] 4.2[9.2] kg [lb] 36[1.417] 4.5[9.9] 4.6[10.1] 36[1.417] 4.2[9.2] 4.3[9.5] 36[1.417] 4.4[9.7] 4.5[9.9] 36[1.417] mm [inch] 4 1.5[3.3] 1.5[3.3] 1.5[3.3] 1.5[3.3] mm[inch] l Länge / length m 184.1 [7.248] 146[5.748]140[5.512] 5 184.1 [7.248] 158[6.220]140[5.512] 184.1 [7.248] 136[5.354]140[5.512] IP65 IP65 IP 54 IP 54 80 [3.150] 97 [3.819] Schutzart/ Degree of protection 46 [1.811] 184.1 [7.248] 124[4.882]140[5.512] Gewicht / weight Gewicht / weight Achshöhe/ cableKabel/without cable shaft height ohne Kabel/withoutohne Motor / motor Umrichter / inverter bersetzungen / without brake/ mit Bremse/ k ratios without brake with brake Additional dimension data on the motor -- 300 W and drive unit, refer to the dimension drawings for SIMODRIVE POSMO A -- 300 W in Chapter C.2. Note: 70 [2.756] C-278 109 [4.291] Fig. C-8 6 Tolerances: ISO 8015 Tolerance ISO 2768--mk A&D Erlangen F80 MC RD45 Hecht Site: Dep.: Check: 20.04.2005 Surface: . . . Heilmann . . . Author: Date: Name General tolerance Rev.Modification Date First angle projection DIN 6 Belonging to this: 7 159.399 [6.276] 1:4 Doc. number: 1:2 A5E00282014 with 1&2 st. g. 172 [6.772] kg/piece: . A2 Sheet size E D C B A Article: Replacement for / replaced by: A5E00282014 Type/MLFB: 6SN2155 Doc.type Revision MB AC 1 1 Sheets: Sheet: dimension sheet POSMO A 300W modular Name: with 1-- and 2--stage gearbox with 1-- and 2--stage gearbox Dimension drawing POSMO A 300W modular Material: . . Scale: 8 PRO/E--CAD C 1 CAD--Drawing Manual modification prohibited C Dimension Drawings 06.05 02.99 C.2 Dimension drawings for SIMODRIVE POSMO A -- 300W Dimension drawing: SIMODRIVE POSMO A -- 300 W extension set ”separate version” with planetary gearbox (1--stage, 2--stage) E Siemens AG 2005 All Rights Reserved SIMODRIVE POSMO A User Manual (POS1) -- 06.05 Edition E Siemens AG 2005 All Rights Reserved SIMODRIVE POSMO A User Manual (POS1) -- 06.05 Edition H G F E D C h6 M6 16 [.630 ] 45--0.2 [ 1.772 --.007 ] 9 [.354] 109.5 [4.311 ] 2 l * PRO/E * 2 Weitergabe sowie Vervielfltigung dieser Unterlage, Verwer-tung und Mitteilung ihres Inhalts nicht gestattet, soweit nicht ausdr cklich zugestanden. Zuwiderhandlungen verpflichten zu Schadenersatz. Alle Rechte vorbehalten, insbesondere fr den Fall der Patenterteilung oder GM--Eintragung. 1 The reproduction, transmission or use of this document or its contents is not permitted without express written authority . Offenders will be liable for damages. All rights, including rights created by patent grant or registration of a utility model or design, are reserved. Comunicado como segredo empresarial. Reservados todos os direitos Confiado como secreto industial. Nos reservamos todos los derechos Confi titre de secret d’entreprise. Tous droits rservs. 55--0.019 B [ 2.1654--.0007 ] 20+0.015 +0.002 k6 +.0005 [ .7874+.0001 ] A 84 [3.307] 1 CAD--Drawing Manual modification prohibited 72 [2.835 ] 01 k 120 36[1.417] mm [inch] kg [lb] 7.2[15.9] 7.3[16.1] 1.5[3.3] 7 3 4 5 mm [inch] l m IP 54 Schutzart/ Degree of protection 254[10] 228[8.976]140[5.512] 6 159.399 [6.276 ] 8 7 8 Abmaße nach DIN 6885Bl1/ Dimensions acc. to DIN 6885 Sh.1 Länge / length C--C 22.5 [.886 ] Gewicht / weight Gewicht / weight Achshöhe/ ohne Kabel/without cable shaft height ohne Kabel/without cable Motor / motor Umrichter / inverter k ohne Bremse/ mit Bremse/ without brake with brake bersetzungen / ratios Getriebe/gearbox 6SN2155 3--stufig/ 3--stage Type C 36 [1.417 ]C 6 Thread M5x10 (3x) for lifting eye and can be used for support / thread M5x10 (M5x.394) (3x) useful for lifting eye and support 5 Ausführung mit Paßfeder / version with key Ausf./ version 4.5 [.177 ] m 4 36 [1.417 ] 84 [3.307 ] 109 [4.291 ] Additional dimension data on the motor -- 300 W and drive unit, refer to the dimension drawings for SIMODRIVE POSMO A -- 300 W in Chapter C.2. Note: 3 6 [.236] Fig. C-9 9 9 Rev. Modification First angle projection DIN 6 Belonging to this: 1:2 10 Date Name . Scale: Heilmann Hecht MC RD45 Erlangen F80 Type/MLFB: 6SN2155 Dep.: Site: 1:2 kg/piece: . G F E D C B A A1 Sheet size Replacement for / replaced by: Article: Doc.type Revision A5E00282014 MB AC with 3 stage gearbox Name: 1 Sheets: 1 Sheet: dimension sheet POSMO A 300W modular mit 3--stufigem Getriebe Mablatt POSMO A 300W modular Author: Check: A& D 12 Doc. number: A5E00282014 with 3 st. G._m . . Material: Date: . . Surface: 20.04.2005 . . . Tolerances: General tolerance ISO 2768--mk Tolerance ISO 8015 80 [3.150 ] 84 [3.307 ] 97 [3.819 ] 11 PRO/E--CAD 06.05 02.99 C Dimension Drawings C.2 Dimension drawings for SIMODRIVE POSMO A -- 300W C Dimension drawing: SIMODRIVE POSMO A -- 300 W extension set ”separate version” with planetary gearbox (3--stage) J C-279 46 [1.811 ] 172 [6.772] C Dimension Drawings 02.99 06.05 C.2 Dimension drawings for SIMODRIVE POSMO A -- 300W Space for your notes C C-280 E Siemens AG 2005 All Rights Reserved SIMODRIVE POSMO A User Manual (POS1) -- 06.05 Edition EC Declaration of Conformity D Note An excerpt of the EC Declaration of Conformity for SIMODRIVE POSMO A is provided in the following. The complete EC Declaration of Conformity can be found as follows: Reference: /EMC/ EMC Configuring Guidelines D Siemens AG 2005 All Rights Reserved SIMODRIVE POSMO A User Manual (POS1) – 06.05 Edition D-281 D EC Declaration of Conformity 08.02 D Fig. D-1 D-282 EC Declaration of Conformity Siemens AG 2005 All Rights Reserved SIMODRIVE POSMO A User Manual (POS1) – 06.05 Edition 08.02 D EC Declaration of Conformity D Fig. D-2 Annex A to the EC Declaration of Conformity (excerpt) Siemens AG 2005 All Rights Reserved SIMODRIVE POSMO A User Manual (POS1) – 06.05 Edition D-283 D EC Declaration of Conformity 08.02 Annex C to the EC Declaration of Conformity No. E002 D Fig. D-3 Annex C to the EC Declaration of Conformity (excerpt) D-284 Siemens AG 2005 All Rights Reserved SIMODRIVE POSMO A User Manual (POS1) – 06.05 Edition Index A Abbreviations, A-261 Acknowledging faults, 6-235 Address, 2-45, 2-48 Documentation (Fax, email), v Internet, v Technical Support, v Ambient conditions, 2-70 AMPROLYZER (bus monitor), 6-252 Analog test outputs, 6-250 Standard assignment, 6-251 Supplementary addresses, 6-252 Applications, 1-20 Automatic, 5-154 Axis type, 3-91, 3-92 B Backlash compensation, 5-177 Bits for faults, 6-234 for warnings, 6-234 Blocks (FB 10, 11, 12), 3-78 Brake sequence control (from SW 1.4), 5-187, 5-194 Bus communications Addressing, 4-100 Data transfer via PROFIBUS, 4-100 Establishing the, 3-75 Features, 4-100 Bus monitor, 6-252 Bus termination, 2-48, 2-49 E Cable Changing the outlet direction, 2-46 Example: Prepared, 2-54 for electronics power supply, 2-53 for inputs/outputs, 2-53 for PROFIBUS-DP, 2-52 for the low power supply, 2-52 Cable installation Example, 2-56 How?, 2-55 Moisture protection, 2-57 Certificates, v Changing the cable outlet direction, 2-46 Characteristic Ambient temperature, 2-62, 2-67 i2t, 2-36 M/n 300 W motor, 2-66 M/n 75 W motor, 2-62 Closed–loop control structure, pos mode, 3-93 Closed–loop control structure, n-set mode, 3-94 Closed–loop position control Overview, 3-93 Standstill monitoring (zero–speed monitoring), 5-181 Coincidence factor, 2-35 Commissioning an axis, 3-90 Establish communications, 3-75 Prerequisites, 3-73 Tool for, 3-79, 3-88 Communications via PROFIBUS, 1-21, 4-99 Components, 2-29 E C C1 master, 4-99, 4-111, 4-114 C2 master, 4-99, 4-111, 4-114 Siemens AG 2005 All Rights Reserved SIMODRIVE POSMO A User Manual (POS1) – 06.05 Edition E-285 E Index Connection cover 75/300 W motor, 1-23, 2-45, 2-48 from below, 2-45 from the top, 2-44 Withdraw/insert under voltage, 2-36 Connection overview, 2-43 Consistent data transfer, 4-130 Continuous duty S1, 2-64, 2-67 Control authority (from SW 1.5), 3-85 CP 5511, 3-89 Correct use, xi CP 5611, 3-89 Current documentation, v D E Danger information, x Data transfer Consistent, 4-130 Inconsistent, 4-130 Data type, 4-123, 5-201 DC-PMM, 2-38 DC-PMM_E/48V, 2-39 Declaration of Conformity, D-281 Device identification, ix Diagnostics LED, 1-21, 6-233 PROFIBUS, 6-252 Difference 75/300 W motor, 1-23 Digital inputs/outputs Connecting–up, 2-43 Description, 5-182 Rules, 5-183 Status (from SW 1.4), 4-112, 5-183 Digital outputs, 5-182 Dimension drawing, C-269 300 W motor with planetary gearbox 1-stage, C-275 with planetary gearbox 2-stage, C-275 with planetary gearbox 3-stage, C-276 without gearbox, C-274 75 W motor with planetary gearbox, C-271 with worm gearbox, C-272 without gearbox, C-270 Dimension drawing, extension set, ”separate version”, 300 W motor with planetary gearbox 1-stage, C-278 with planetary gearbox 2-stage, C-278 with planetary gearbox 3-stage, C-279 without gearbox, C-277 E-286 06.05 Direction of rotation changeover, 5-143 Direction of rotation definition, motor, 5-153 Display terminal status (from SW 1.4), 4-112, 5-183 Drive unit as spare part (300 W motor), 7-257, 7-259 Replacing (300 W motor), 7-259 E EC Declaration of Conformity, D-281 Effective, 5-201 Electrical design Coincidence factor, 2-35 i2t limiting, 2-36 Power supply, 2-31 Regenerative feedback protection, 2-37 ESDS instructions, xiii Establish communications, 3-75 Establish factory default setting, 5-200 Expert list (from SW 1.5), 3-87 Explanation of symbols, x External block change, 4-106 F Fault evaluation, 6-233, 6-234 Fault suppression, 6-236 Fault LED, 6-233 Faults, 6-235 Acknowledgment?, 4-105, 4-109, 6-235 Bits and numbers, 6-234 Difference to warnings, 6-235 Evaluating via PROFIBUS?, 6-235 Overview, 6-234 Status signal (ZSW.3), 4-110, 4-113, 6-235 Which warnings are there?, 6-234 Flying actual value setting (from SW 1.4), 5-170 Flying measurement (from SW 1.4), 5-166 Function block, 1-22, 3-78 FB 10 (CONTROL_POSMO_A, from 02.00), 3-78 FB 11 (PARAMETERIZE_POSMO_A, from 02.00), 3-78 FB 12 (PARAMETERIZE_ALL_POSMO_A, from 05.00), 3-78 Siemens AG 2005 All Rights Reserved SIMODRIVE POSMO A User Manual (POS1) – 06.05 Edition 06.05 Function overview, 1-22 FW version, ix E Index Inversion Direction of rotation, motor shaft, 5-180 Output terminals, 5-183 Start byte condition, 5-145 G Gear, Selection of, 1-20 Gearbox 300 W motor Data, 2-68, 2-69, 2-70 Dependent parameters, 5-231 M/n-characteristic, 2-66 Modular system, 2-61 75 W motor Data, 2-64 Dependent parameters, 5-230 M/n-characteristic, 2-62 Modular system, 2-60 as spare part (300 W motor) Degree of protection IP54, 7-257 Degree of protection IP65, 7-257 Code, 5-230, 5-231 Permissible torque, 2-60, 2-61 Replacing (300 W motor), 7-255 Gearbox–dependent parameters (factory presetting – default), 5-230 Grounding, 2-50 H Hardware limit switch, 5-194 Help for the reader, vi Holding brake (from SW 1.4), 5-187, 5-194 Holding controller (from SW 1.3) Integral action time, 3-93, 3-94 P gain, 3-93 Homing, 5-155 Overview, 5-155 Hotline, v HW version, ix I i2t characteristic, 2-36 Importing station GSD, 4-132 Individual traversing blocks, 5-141 Inputs/outputs, digital, 5-182 Installation altitude, 2-63, 2-67 Integrated help, 3-87 Interfaces, 2-47 Intermittent duty S3, 2-64, 2-67 Internet address, v Siemens AG 2005 All Rights Reserved SIMODRIVE POSMO A User Manual (POS1) – 06.05 Edition J Jerk limiting, 5-179 Jogging operation, 5-153 In the standalone mode, 5-186 without PROFIBUS and parameterization (from SW 1.4), 5-184 K Kv factor (position loop gain), 3-93 L LED display, 6-233 Linear axis, 3-91 List of abbreviations, A-261 of faults, 6-238 of gearbox–dependent parameters, 5-230 of parameters, 5-202 of references, B-265 of the gearboxes (300 W motor), 2-61 of the gearboxes (75 W motor), 2-60 of the terminal functions, 5-182 of warnings, 6-238 M Master Class 1, 4-99, 4-111, 4-114 Class 2, 4-99, 4-111, 4-114 Master device file (GSD), 4-130 MDI, 5-154 Meas. system 300 W motor, 2-68 75 W motor, 2-63 Measurement, flying (from SW 1.4), 5-166 Measuring outputs, 6-250 Modulo value, 3-92, 5-175 Moisture protection, 2-57 E-287 E E Index Monitoring when positioning Following error, 4-111 Reference position reached, 4-111 Standstill monitoring (zero–speed monitoring), 5-181 Motor holding brake (from SW 1.4), 5-187, 5-194 Motor identification, 5-200 Motor type, 1-19, 1-23, 5-201 Mounting and installation steps for gearboxes (300 W motor), 7-256 for motor mounting, 2-51 for the drive unit (300 W motor), 7-259 MSR (dimension system grid), 5-201 N New information for SW 1.2, vii for SW 1.3, vii for SW 1.4, vii for SW 1.5, vii for SW 2.0, viii for SW 2.1, viii for SW 3.0, viii Identification of, vi Node address (station address), 2-45, 2-48 Notes Danger and warning information, x Electrostatic discharge sensitive devices, xiii Hotline, v Technical, xi Technical Support, v Numbers for faults, 6-234 for warnings, 6-234 Numerical formats, 4-123 06.05 Operating modes Automatic, 5-154 Homing, 5-155 Jogging operation, 5-153 MDI, 5-154 Tracking operation, 5-154 Operation with third–party master, 4-132 Operation without bus communications, 5-185 Order No. for 300 W motor, 1-23 for 48 V rectifier unit, 2-34 for 75 W motor, 1-23 for catalogs and documentation, B-265 for DC-PMM (Power Management Module), 2-38, 2-39 for SITOP power module 48V/20A, 2-33 for spare parts, 7-257 Overview Closed–loop control structure, pos mode, 3-93 Closed–loop control structure, n-set mode, 3-94 Connecting–up, 2-43 Connection, 2-43 Control signals, 4-104, 4-108 Faults, 6-234 Functions, 1-22 Gearbox, 2-60, 2-61, 5-230 Homing, 5-155 Mounting, 2-51 Parameters, 5-202 References, B-265 Status signals, 4-110, 4-113 System, 2-29 Traversing blocks, 5-140 Warnings, 6-234 O E Offline with SimoCom A (from SW 1.5), 3-85 Online with SimoCom A (from SW 1.5), 3-85 Operating mode Positioning, 5-134 Speed setpoint, 5-133 E-288 Siemens AG 2005 All Rights Reserved SIMODRIVE POSMO A User Manual (POS1) – 06.05 Edition 06.05 P Parameter area (PKW area), 4-101, 4-121 Data types, 4-123 Fault evaluation, 4-122 How is a task executed?, 4-124 Structure of, 4-121 Task/response processing, 4-124 Task/response IDs, 4-122 Transferring traversing blocks, 4-124 Parameterizing, using SimoCom A (from SW 1.5), 3-79 Parameterizing and start–up tool ”SimoCom A” (from SW 1.5), 3-79 Parameters All modified, 5-200 All supported, 5-200 Factory default setting, 5-200 for identification, 5-200 Formats for, 4-123 Gearbox–dependent (300 W motor), 5-231 Gearbox–dependent (75 W motor), 5-230 General information, 5-199 List of, 5-202 Listing the, 5-201 Saving, 5-199 Service functions, 5-200 Path controlled operation, 5-144 PELV, 2-50 Personnel – qualified?, ix PG gland, 2-56 Position measuring encoder 300 W motor, 2-68 75 W motor, 2-63 POSMO A – 300 W, Extension set, ”separate version”, 1-20 Potential bonding, 2-50 Potential bonding conductor, 2-44 Power Management Module (DC-PMM), 2-38 Power Management Module Extension (DCPMM_E/48V), 2-39 Power–on inhibit, 4-111, 4-114, 4-118, 4-119 Powering–down, 5-165 PPO types, 4-102 Precise stop, 5-145 Siemens AG 2005 All Rights Reserved SIMODRIVE POSMO A User Manual (POS1) – 06.05 Edition E Index Process data (PZD area), 4-101, 4-103 Control signals Control word (STW), 4-103 Control word (STW) (n-set mode), 4-108 Control word (STW) (pos mode), 4-104 Select block number (AnwSatz), 4-103, 4-107 Speed setpoint, 4-103 Start byte (STB), 4-103, 4-107 Status signals Actual block number (AktSatz), 4-103, 4-112 Actual speed value, 4-103 Checkback signal (RMB), 4-103, 4-112 Status word (ZSW), 4-103 Status word (ZSW) (n-set- mode), 4-113 Status word (ZSW) (pos-mode), 4-110 PROFIBUS-DP Address, 2-45, 2-48 Baud rate, 4-100 Bus monitor, 6-252 Cable for, 2-52 Data transfer technology, 4-100 Example: Operate drive, 4-116, 4-117 Example: Reading parameters, 4-126 Example: Writing parameters, 4-128 General information, 4-99 Master and slave, 4-99 Node address (station address), 2-45, 2-48 Terminating resistor, 2-45, 2-48, 2-49 Programs, 1-21, 5-140, 5-141 Classifying the, 5-141 Program areas, 5-140 Program control word (PSW), 5-144 Selecting and controlling, 5-151 Protective conductor, 2-44 Protective grounding, 2-50 E Q Qualified personnel, ix E-289 E Index R References, B-265 Referencing (homing) Limitations for, 5-156 Reset (from SW 1.4), 5-156 Set via actual value, 5-157 to cam with reversal, 5-161 to cam without reversal, 5-159 to occurring zero mark (from SW 2.1), 5-163 to zero mark via the traversing block (from SW 1.4), 5-157 via fixed endstop, 5-158 Regenerative feedback protection, 2-37 Replacing the drive unit (300 W motor), 7-258 the gearbox (300 W motor), 7-255 the motor, 7-253 Replacing a motor, 7-253 Replacing the drive unit (only 300 W motor), 7-258 Revisions, vi Rotary axis, 3-92, 5-175 S E S1 continuous duty, 2-64, 2-67 S1 switch S1, 2-45, 2-48 S3 intermittent duty, 2-64, 2-67 Safety information, x Screwdriver for connection cover, 2-44 for connection module, 2-46 for cover (measuring), 6-250 for terminals, 2-45 Sequence diagram ”Variable–speed drives” n-set mode, 4-119 pos mode, 4-118 Set actual value Flying (from SW 1.4), 5-170 via traversing block, 5-157 Write via P40, 5-157 Settings at the DP master, 4-130 Shaft load capability Gearbox shaft (300 W motor), 2-69 Gearbox shaft (75 W motor), 2-64 Motor shaft (300 W motor), 2-68 Motor shaft (75 W motor), 2-63 SIMATIC blocks, 3-78 E-290 06.05 SimoCom A (from SW 1.5) Entry in, 3-83 Information on, 3-84 Installing/un–installing, 3-80 Integrated help, 3-87 Optimum version, 3-79 SIMODRIVE POSMO A Brief description, 1-19 Function overview, 1-22 System overview, 2-29 Wiring overview, 2-43 SITOP Power, 2-33, 2-34 Software Class C, 3-78 Software limit switch, 5-195 Software release, ix Spare parts, 7-254, 7-257 Speed controller Integral action time, 3-93, 3-94 P gain, 3-93, 3-94 P gain, standstill (zero speed), 3-93, 3-94 Standalone mode (from SW 1.2), 5-185 Standstill monitoring (zero–speed monitoring), 5-181 Status signal for faults (ZSW.3), 6-235 for warnings (ZSW.7), 6-236 Step–down ratio, 2-60, 2-61 Support, v SW limit switches, 5-195 Switchover Closed–loop speed-/position controlled, 5-144 Metric/inch, 5-180 System overview, 2-29 System requirements, 2-30 T Technical data 300 W motor, 2-66 75 W motor, 2-62 Ambient conditions, 2-70 Electrical data, 2-62, 2-66 Holding brake, 300 W motor, 2-68 Motor data 300 W motor, 2-68 Motor data 75 W motor, 2-63 Technical Support, v Telegram structure for cyclic data transfer, 4-102 Siemens AG 2005 All Rights Reserved SIMODRIVE POSMO A User Manual (POS1) – 06.05 Edition 06.05 Telegram substitution (from SW 3.0), 5-197 Terminal status (from SW 1.4), 4-112, 5-183 Terminals, 2-44, 2-45, 2-47, 5-182 Terminating resistor, 2-45, 2-48, 2-49 Tool for connection cover, 2-44 for connection module, 2-46 for cover (measuring), 6-250 for replacing gearboxes (300 W motor), 7-255 for replacing the drive unit (300 W motor), 7-258 for terminals, 2-45 Tightening torque, 2-45 Tracking operation, 5-154 Travel to fixed stop, 5-158, 5-173 Traversing blocks, 1-21, 5-140 Classifying the, 5-140 Pre–assignment block 3 to 27, 5-142 Pre–assignment, blocks 1 and 2, 5-142 Programming the, 5-143 Selecting and controlling, 5-151 Structure of, 5-143 Traversing possibilities, 1-21, 5-144 Traversing without PROFIBUS and parameterization (from SW 1.4), 5-184 U UL certification, viii UL approval, 1-27, 2-31 Units, 5-201 Using the manual, vi E Index W Warning information, x Warnings, 6-236 Bits and numbers, 6-234 Difference to faults, 6-235 Evaluating via PROFIBUS?, 6-236 Overview, 6-234 Status signal (ZSW.7), 4-111, 4-114, 6-236 Which warnings are there?, 6-234 Water loop, 2-57 Weights for a 300 W motor, 2-70 for a 75 W motor, 2-64 What is new? for SW 1.2, vii for SW 1.3, vii for SW 1.4, vii for SW 1.5, vii for SW 2.0, viii for SW 2.1, viii for SW 3.0, viii Wiring overview, 2-43 X X1, 2-45, 2-47 X2, 2-45, 2-47 X3, 2-45, 2-47 X4, 2-45, 2-47 X5, 2-45, 2-47 X6, 2-45, 2-48 X7, 2-45, 2-48 X9, 2-45, 2-48 V Varistor, 1-27, 2-31 Version of SimoCom A, ix of the firmware, ix of the hardware, ix overview, ix the motor, ix Z Zero mark, 5-156, 5-159, 5-161 E Siemens AG 2005 All Rights Reserved SIMODRIVE POSMO A User Manual (POS1) – 06.05 Edition E-291 E Index 06.05 Space for your notes E E-292 Siemens AG 2005 All Rights Reserved SIMODRIVE POSMO A User Manual (POS1) – 06.05 Edition To SIEMENS AG A&D MC BMS P.O. Box 3180 Recommendations Corrections for document: SIMODRIVE POSMO A D–91050 Erlangen Phone/Fax: +49 (0)180/5050–222 (Hotline) Fax: +49 (0)9131/98–63315 (Documentation) Email: motioncontrol.docu@siemens.com Manufacturer/Service Documentation User Manual From Order No.: Edition: Name Your company address/Dept. Address Postal/zip code: Distributed Positioning Motor on PROFIBUS DP City: Phone: / Telefax: / Recommendations and/or corrections 6SN2197–0AA00–0BP8 06.05 If you come across any printing errors in this document, please let us know using this form. We would also appreciate your ideas and suggestions for improvement. SIMODRIVE POSMO A General Documentation/Catalogs SINUMERIK SIMODRIVE Catalog Catalog Catalog DA 65.4 SIMODRIVE 611 universal and POSMO SL 01 System solutions KT 10.1 IK PI Industrial Communication and Field Devices Power supplies SITOP power ST 70 SIMATIC Catalog NC 60 Automation Systems for Machine Tools CA 01 Components for Automation & Drives ST 80 SIMATIC HMI Manufacturer/Service Documentation SIMODRIVE SIMODRIVE POSMO A User Manual Manual POSMO A Mounting Instructions EMC Design Guidelines 75 W motor 300 W motor SINUMERIK SIROTEC SIMODRIVE (supplied with each drive) Electronic Documentation SINUMERIK SIMODRIVE 840D/810D/ FM–NC/611/ Motors SINUMERIK SIROTEC SIMODRIVE DOC ON CD The SINUMERIK System Distributed I/O System ET200 (PROFIBUS Configuring Guidelines) Siemens AG Automation and Drives Motion Control Systems Postfach 3180, D – 91050 Erlangen Bundesrepublik Deutschland www.siemens.com/motioncontrol © Siemens AG 2005 Subject to change without prior notice Order No.: 6SN2197–0AA00–0BP8 Printed in the Federal Republic of Germany