1
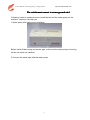
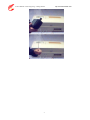
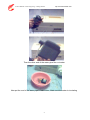
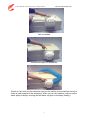
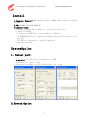
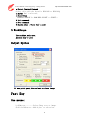
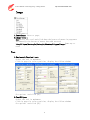
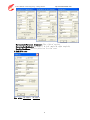
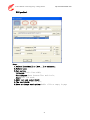
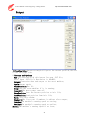
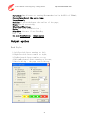
User’s Manual of Laser Engraving / Cutting machine
http://en.shenhuilaser.com/
THE CTRUCTURE OF LASER ENGRAVER
Main components:CO2 laser , laser switch ,control motherboard ,control panel ,flat
bench ,fixture ,
Light system ,illuminating system and water-cooling system
◆ Explanation of the control panel :
Electric current adjustment : using this button to adjust the electric current output.
Electric current range: mA : refers to actual output electric currnet of the
engraver .The output current range of K40 is 0-20 mA .(generally the current will
not over 15 mA)
Laser switch: After pressing the button ,the laser switch be pressed before each
engrave ,otherwise the laser will not shine.
Checking switch: Only available for checking .
Switchboard : Master switch for controlling engraver.
◆ Appearance and connecting directions of the engraver:
Parallel digital port : At right side of the engraver , the port will connect with
relevant port on the computer through printing cable .
Switchboard port : At right hinder of the engraver (5A) ,close to the switch port ,
safety coefficient of the machine can be guaranteed .
Water-cooling pipe port : It is for the circulation of cooling water . To lengthen the
service life of the laser tube , purified water is to promoted .
Fan port : At the hinder of the engraver and used for the installation of exhaust
fan . The fan must be correctly installed for the cleanness of the machine .
◆ Installation of the Engraver : (detailed procedures )
1. Unpacking , put the engraver flatly on the desk ,turn on the switch and observe
the self-check of the machine (‘Recover ’ button, at the left upper corner of the
platform ).
2. Connect one end of the water pipe to the pump (normally right end is intake
pipe ). Put the other end and switch to see water current is normal or not (water
circulation means normal ).
3. Turn on ‘laser switch ’ and ‘checking switch ’ and adjust output electric
current .presently the laser pipe will illuminate (Note : laser can’t be seen by
bare eyes .Hands should not be inserted into its avoid being burnt ).
4. Shut off switchboard , connect engraver and computer through relevant ports
and turn on the switch of engraver and computer one by one . Enter engrave
surface , fix the engrave surface onto focusing area of the focus lens .then
make a trial.
1
User’s Manual of Laser Engraving / Cutting machine
http://en.shenhuilaser.com/
The switch must connect to secure ground wire!
Following I want to introduce how to install the fan and the water pump on the
machine , hoping it can help you :
1.Water pump and smoke pipe installation
Before Install Water pump and smoke pipe, make sure the water pump is running.
but do not switch on machine.
2.Connect the water pipe with the water pump
2
User’s Manual of Laser Engraving / Cutting machine
3
http://en.shenhuilaser.com/
User’s Manual of Laser Engraving / Cutting machine
http://en.shenhuilaser.com/
Then the other end of the water pipe flow out water
Now put the end of the water pipe in water ware, Make sure the water is circulating
4
User’s Manual of Laser Engraving / Cutting machine
http://en.shenhuilaser.com/
Prepare the fan for smoke
Smoke pipe for fan
Install fan on the smoke exit
5
User’s Manual of Laser Engraving / Cutting machine
http://en.shenhuilaser.com/
Fan is installed
Install smoke pipe on smoke fan
Switch on fan while run the machine now you can switch on the machine and try to
make a small sample of the engraving. When you run the machine, make sure the
water pump is always running and the water on pipe is circulatory flowing !
6
User’s Manual of Laser Engraving / Cutting machine
http://en.shenhuilaser.com/
◆ Operating instructions :
1. Engraving procedures: Turn on switchboard of the engraver and make sure
cooling water circulation is functional. After measuring the engraving object.
Pinch it on the focus of the focus lens . Turn on computer, enter engrave
surface and make typesetting.
2. Notes and maintenance points :
a) The engraver should be put on flat surface without slant. Avoid collision when
move.
b) Check out cooling water, pararrel line and switch before getting in use.
Conduct without cooling water is strictly prohibited to proof against laser
destruction. Reflection mirror and focus lens should be examined frequently
with absorbent cotton wiping off the dirt. Damaged plating coat should be
replaced in time.
c) Deviated light road should be adjusted instantly during engraving process
(non-professionals are prohibited to touch it ).
d) Before engraving new material, first judge it whether suitable to the laser
engraver and get parameters through experiment. During engraving process,
any part of human body is prohibited putting into light road avoid being burnt).
Note: laser .reflection mirror and focus lens are exhaustible
material. Ventilation pipe should be connected outdoors.
◆ Common breakdown and the fixation :
A.
a)
b)
B.
a)
b)
After typesetting and output .if the laser head don’t move , you should :
Be sure that the engraver is connecting to the computer.
Shut off the switch and check whether the parallel line is well connected.
If the laser don’t illuminate , you should :
Be sure that the laser switch has been pressed down.
Check whether the electric current button at the zero place. If so, adjust it to
appropriate place.
c) Observe the cooling water in normal process or not. If it stops to work, maybe
the laser has been damaged, and you should shut off the machine immediately.
In half an hour, check whether the cooling water unit returns to normal state, if
so reopen the machine.
d) If the power of the laser decreases, then maybe it reaches its longevity and
should replace it in time. If the laser work normally and engraving parameter is
right. But engraving effects is not good. then you should :
a) Check whether engraving surface is on the focusing area of the focus lens.
7
User’s Manual of Laser Engraving / Cutting machine
http://en.shenhuilaser.com/
b) Judge whether the engraver power is decreasing . If so , you should increase
output current or change the laser .
c) Check whether the light road is diverted: cover the entrance of the first , second
and third reflector (the first generation machine has four reflectors) with
polyester film successively , press down laser switch and hand checking
switch . observe the location of light spot . If the spot diverts from the certer of
entrance . you should adjust the position and angle of laser or reflector slightly
to guarantee the light road pass through the focus lens . (The adjustment of
light road is not easy . please contact the maintenance section.)
d) If extra lines take place in engraving process; you should check the pararrel
digital line and replace it if necessary.
8
User’s Manual of Laser Engraving / Cutting machine
http://en.shenhuilaser.com/
Install
1.Computer: Memory >64MB ,Harddisk space >10MB, Have printer or caving
machine.
2.OS:WINDOWS 95/98/ME/2000/XP.
3.Install steps:
a.Insert software CD to CDDriver, and run install file.
b.Install USB KEY.
I.Insert the USB KEY to your computer's USB port.
II.WINDOWS message is found the hardware and install the driver for
the key.
III.Wait for message is install completed.
c.Run the software.
SystemOption
1、Select port:
a.Default: Use LPT1 port and address is 378H
AUTO openfile : Don't used!
b.Custom: Use COM1-4 or LPT1-2,But there isn't used;
2.System Option
9
User’s Manual of Laser Engraving / Cutting machine
http://en.shenhuilaser.com/
a.Select Control Command
Select this with the board is MS10102 or MS10104.
b.2D/3D: Don't selected;
c.Resolution
Default is 1000 X 1 = 1000 DPI< /FONT > < /FONT >
d.Init command .
e.Over command.
f.Random Line : There isn't used!
3.WorkScope
The machine work area.
Another isn't used!
Output Option
If use print port,then select as above image.
Fast Key
Use mouse:
LeftButton---------Select/Drag text or image.
Shift+LeftButton---Add object to selection.
10
User’s Manual of Laser Engraving / Cutting machine
http://en.shenhuilaser.com/
Ctrl+LeftButton----Select/Drag one character in text.
RightButton--------Displat edit menu.
Menu fastkey:
F1—Help
F2---SaveAs F3---Printmanage F4---Show/hide
stokewidens
F5---Show/hide rectangle for object
F6---show/hide object properties
F7---Zoom in
F8---Zoom out
Ctrl+F---SquarenessSeal
Ctrl+T---RectangleSeal
Ctrl+Y---RoundSeal
Ctrl+U---EllipseSeal
Ctrl+N---NewEmpty
Ctrl+O---Open file
Ctrl+Z---UNDO
Ctrl+X---Cut
Ctrl+C---Copy
Ctrl+V---Past
Ctrl+Del---Delete
Ctrl+Q---Exit
Use fastKey in edit:
Leftbutton of mouse---Select/drag text or image
Rightbutton of mouse---Select/drag one character in text
---subtrahend step + ---add step Up_KEY-----Move up the
object
Insert---subtrahend the object width
Down_KEY---Move down the
object
Delete ---Add the object width
Left_KEY ---Move left the
object
PageUP ---subtrahend the object hei
Right_KEY ---Move right the
object
PageDown--Add the object height
Home: a.Revolving left one character or image
b.Subtrahend the ellipsetext's height
c.Subtrahend image's line widt
End : a.Revolving right one character or image
b.Add the ellipse's height
c.Add image's line width
F9----Subtrahend the distance
F10---Add the distance
F11---Revolving left the ellipsetext
F12---Revolving right
ellipsetext
11
User’s Manual of Laser Engraving / Cutting machine
http://en.shenhuilaser.com/
FixPosition:
---Subtrahend step
Up_KEY ---Move up red rectangle
rectangle
Left_KEY---Move left red rectangle
rectangle
F2---Fixposition
F4---Save position
-
12
+
--- Add step
Down_KEY---Move Down red
Rgith_KEY ---Move right red
F3---Stop
F5---Read position
User’s Manual of Laser Engraving / Cutting machine
http://en.shenhuilaser.com/
Menu
File
Help
Edit View
Image
Text
Output
13
PageSize SystemOption
User’s Manual of Laser Engraving / Cutting machine
http://en.shenhuilaser.com/
File
1.New: Create SquarenessSeal RectangleSeal RoundSeal EllipseSeal
2.NewEmpty: Create a empty page, Add some text or image to page.
3.Open:Load .YZ file.
4.Save:Save the page to YZ or BMP/JPG/JPEG file.
5.Input image :
a.Open---open and read images from the device;
b.Select: Select the device for read images;
6.Output PrintManage :Output the page to PrintManage;
7.PrintManage:Manage all print pages;
8.PrintSet:Set the printer's option;
9.Option...: Set system's options;
10.PassWord:Set passwrod for use this software;
11.Exit:Close this sotware.
Edit
1.UNDO:Cancel up the one step;
2.Cut: Put selected object to paste and delete;
3.Copy: Put selected object to paste;
4.Paste: Put to page from paste;
5.PasteList: List the objet to all page;
6.Delete:Delete the selected object;
7.EditImage: Use default imagetool to edit;
8. SelectAll:Select all object in page.
14
User’s Manual of Laser Engraving / Cutting machine
http://en.shenhuilaser.com/
Tools
1. SelectOrder:Display the object's order;
2.StokeWidens:Display the The following window ;
All:All object use this option;
Specify:Some selected object use this object;
3.Regulater:Change the object's option ;
4.Alignment Palette:
1.Align left edges;
2.Align horizontal centers;
3.Center horizontally in window;
15
User’s Manual of Laser Engraving / Cutting machine
http://en.shenhuilaser.com/
4.Align right edges;
5.Align tops;
6.Align vertical centers;
7.Center vertically in window;
8.Align bottoms;
5.Tools1/2
1.Open file;2.Save to file;3.Output to
PrintManage;4.PrintManage;5.Zoom In;6.Zoom
Out ;7.Comparison=1:1;8.Fix in window .
Note:
Text---char in multi/single byte language;
Another---char in anyone language;
Horizontal/Vertical---List type;
Ellipse---list type at ellipse edge;
1. Select;
2. Dot;
3. Line;
4. Ellpise;
5. Triangle;
6. Rectangle;
7. Rhombus;
8. Polygon;
9. Input image;
10.Horizontal/Vertical text in mongolian ;
11.Horizontal/Vertical text in another language;
12.Horizontal/Vertical text in mongolian ;
13.TextEllipse in multibytlanguage ;
14.TextEllipse in another language;
15. TextEllipse in multibyte language .
16.Clean all text and images.
16
User’s Manual of Laser Engraving / Cutting machine
http://en.shenhuilaser.com/
Image
1.PasteImage: Paste to page;
2.Image tools :
Dot:Select this tool and click down the button of mouse in page,move
the mouse,Up the button of mouse,then add succeed;
Line/Ellipse/Rectangle/Triangle/Rhombus/Polygon/Image:Same way to
used.
Text
1.Horizontal/Vertical text:
Select the tool in mainmenu
Click in page for select position, display the follow windows
Set options and click [ok]
2.TextEllipse:
Select the tool in mainmenu
Click in page for select position, display the follow windows
Set options and click [ok]
17
User’s Manual of Laser Engraving / Cutting machine
http://en.shenhuilaser.com/
Horiaontal/Vertical diameter: The ellpise'option;
SatarAngle/EndAngle:Up angle = 0,left angle>0,right angle<0;
HeadUp/HeadDown: Select position for the text.
3.EAN13/8 code
See also: 蒙文输入、维文输入
18
User’s Manual of Laser Engraving / Cutting machine
Output
1.AllPage:Output all object in the page;
2.Selection:Output user selected object;
3.NotSelection:Don't output selected object.
PageSize
1.PageSize:Output(eidt) page size;
2.Style:Recangle/Ellpise/Triangle/Rhomgon;
3.WorkSize:Edit page size.
ImageCoversion
Image change to 1bit image;
Image move color;
Get image's outline.
19
http://en.shenhuilaser.com/
User’s Manual of Laser Engraving / Cutting machine
http://en.shenhuilaser.com/
Help
1.Help:This file;
2.FastKey:Can used key of keyboard at use the software;
3.Updata:The information for Updata;
4.Question:Anwser some question at using the software;
5.About:display the name of this software;
6.HomePage:See the moshisoft's websit.
20
User’s Manual of Laser Engraving / Cutting machine
http://en.shenhuilaser.com/
Function
Edit:Create new page and add text or images...
Print:Output the page to printer
Output:Output the page to the carve machine
Input text in mongolian
Use text in another language
21
User’s Manual of Laser Engraving / Cutting machine
http://en.shenhuilaser.com/
Edit
1.New...:SquarenessSeal/RectangleSeal/RoundSeal/EllepseSeal;
2.NewEmpty:All object add with owner;
SquarenessSeal
Step:
1.Select [ SquarenessSeal] of [New...] of mainmenu ;
2.Sele type:Two word/Three word-1/Three word-2/Four word in chinese;
3.LefttoRight;
4.Set option,click [ok];
5.Move or change word option:
22
User’s Manual of Laser Engraving / Cutting machine
http://en.shenhuilaser.com/
Selec Regulater of [view] of mainmenu;change option at this;
6.Redisplay right window:double click at empty in page.
RectangleReal
Step:
1.Select [RectangleSeal] of [New...] of mainmenu;
2.Select style:Rect/Round/line;
3.Set option;
4.Input text and select used font;
5.The word width:Auto or set;
6.Move or change word option:
Selec Regulater of [view] of mainmenu;change option at this;
6.Redisplay right window:double click at empty in page.
23
User’s Manual of Laser Engraving / Cutting machine
http://en.shenhuilaser.com/
RoundSeal
Step:
1.Select [RoundSeal] of [New...] of mainmenu;
2.Select type;
3.Set option:
L1/2width:Circle line width;
OutsideSpace:Spave between Text and circle;
Angle:Text list used;
4.Edit text and select font;
5.The word width : Auto or set;
6.Move or change word option: double click at empty in page.
24
User’s Manual of Laser Engraving / Cutting machine
http://en.shenhuilaser.com/
EllipseSeal
Step:
1.Select [RoundSeal] of [New...] of mainmenu;
2.Select type;
3.Set option:
L1/2width:Circle line width;
OutsideSpace:Spave between Text and circle;
Angle:Text list used;
4.Edit text and select font;
5.The word width: Auto or set;
6.Move or change word option:double click at empty in page
25
User’s Manual of Laser Engraving / Cutting machine
http://en.shenhuilaser.com/
NewEmpty
Create new empty page,add text and image,then move and change it's options.
(Save to file and be used )
Print
Step:
1.Creat and edit page;
2.Set PrintManage's options;
3.Output to PrintManage;
4.Move;
5.Output to printer.
Note:PrintManage's option is enable before Output PrintManage
PrintManage
Can output some page to printer.
26
User’s Manual of Laser Engraving / Cutting machine
http://en.shenhuilaser.com/
Explain:
1.Select [PrintManage] of [FIle] of mainmenu
a.The white palce is the print page,the edit page must inside;
b.Use mouse to move the edit page;
c:Key:Up/Down/Left/RIght;DEL is delete the edit page;
2.[ReadFile]:Load the page from .YZ file;
A.InvertText:The text is Mirror;
B.InvertColor:The text color change to not color number;
C.Del:ete:If selected,click to delete the edit page;
D.RandomLine;
E.Color:Select the text color;
3.[Print]:Output all page to printer ;
4.[Refresh]:Redisplay all page;
5.[ClearAll]:Delete all pgae;
6.[Exit]:Close this window;
27
User’s Manual of Laser Engraving / Cutting machine
http://en.shenhuilaser.com/
Output
1.FixedPosition:Output rectangle/ellipse at the current position;the size
is the edit page size.
2.Buttons and Options
PLT :If selected,click this button for open .PLT file;
Note: Input .PLT file's Resolution is 1016DPI;
Output:Conversion data and output to the carve machine;
Again:Output again;
FixedPosition:See (1);
Stop:Stop the carve machine if it is running;
PowerOff:The motor power turn off;
SavePosition:Save the Current position to init file;
LoadPosition:Load position from init file;
Exit:Close this window;
Number+1:The first text if numbers,it add one after output;
Carving:The machine's running speed at carving;
Outline:The machine's running speed at outline;
Normal:The machine's running speed if no laser;
28
User’s Manual of Laser Engraving / Cutting machine
http://en.shenhuilaser.com/
Partition:Jump distance at running(Recommendation 3 * 0.0254 = 0.762mm);
Convex/Cave:Select the carve type;
Versa/Normal;
Outline:If selected,Output the outline of the page;
Slope:Special processing;
XPosition/YPosition;
Style:use it at FixedPosition ;
Step:Move distance if use FastKey;
Unit : mm;
See also:FixedPosition
Output option
Output option
Work Style:
1.LeftVertical:Carve running at left;
2.RightVertical:Carve runnin at right;
3.TopHorizontal:Carve runnint at top;
4.BottomHorizontal:Carve running at bottom;
5.Revole 90 deg : the page revole 90 reg;
29
User’s Manual of Laser Engraving / Cutting machine
http://en.shenhuilaser.com/
Output Type:
1. Output machine: Use this file driver output to carve machine;
2. Save to PLT file: write the data to .PLT file;
◆ After-sale service :
Thank you for buying Shenhui laser machine sincerely, if you
have any other problem, please contact with us without hesitate!
30