Transcript
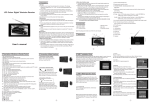
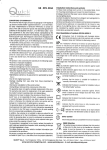
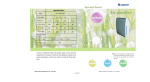
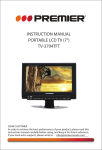
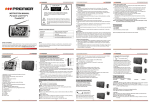
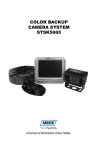
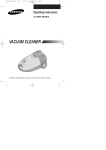
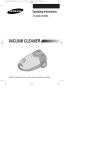
4. Remote Control Operation
2. Accessories
LCD Color Monitor
Open the package and make sure all the accessories are included.
3. AV conversion line
4. Remote control
1. AV and power supply conversion line
2. Automobile adapter
User's manual
VOL - / + (Volume adjust):
Press VOL - , the volume of Display decreases.
Press VOL + , the volume of Display increases.
CH+/-: Channel Select (Downward/Upward) Button.
Yellow line for Video 1 input
Red line for Video 3 input
White line for Audio input
In-socket power supply 12-24V input
Single black wire connects to the positive
current of backup light).
MODE (Mode): Press this button, users can realize the five picture statuses
3. Appearance
of Standard, Soft, Vivid, light and Personal.
POWER(Standby/Exit game): Press this button to switch from "Standby"
1. Precautions
mode and "ON". while playing game, press to exit playing.
MUTE (Mute): Press this button, sound disappears, press it again or VOL+
1. Storage
1)Keep this product away from extremely hot or cold places. The storage temperature
ranges from -40 to 60 and the working temperature from -5 to 40 .
2)Do not use this product at damp environment like bathtubs, wash basins, kitchens,
washtubs, as well as basements, swimming pools or similar places.
3)Do not expose this unit to high humidity, dust or oil smoke.
4)Do not throw or drop this product.
5)Do not subject this device to the inside of a case or strong vibrations, avoiding
strong collision.
6)Do not push on or scrub this product with sharp objects.
2. Maintenance
1)Disconnect all cables of this device at first before cleaning.
2)Wipe the enclosure, screen and keys using soft cloth with a little soft detergent on.
3)Do not use polishing cloth, abstergent, and all types of propellants or chemical
detergents like alcohol and benzene to clean your device.
Warning!
1)For the sake of safety for yourself and others, please don't watch or turn on the
monitor during driving.
2)It is very dangerous to watch or operate the monitor while driving.
Special Notice
Bright spots or dark spots may appear on the screen. This is a normal phenomenon
associated with the active matrix display technology and is not a sign of malfunction.
Do not attempt to maintain. For any failures, please turn off the unit immediately and
contact us or local dealer. This device integrates a great deal of fine electronic
components. Disassembly or alternation may result in damages or breaks.
1
Basic Display Operation Methods
2. Adjust the volume.
3. Connect the monitor to external AV, the single black wire of power cord to the
positive power supply of backup light, and the car-backing video output terminal
to the red AV3 line of the display.
6.Volume decreases
7.Volume increases
8.Power Indicator
9.Standby/Exit game
10.Remote receiving window
Caution: When backing vehicle, if the black single wire connects to the positive
pole of backup light, the Display switches to AV3 automatically and
displays the character of Back up.
6. Menu Operation
Press MENU to display options as follows:
PICTURE
SYSTEM
OPTION
CLOCK
6.1. PICTURE
CONTRAST, BRIGHT, COLOR, SHARP and TINT displays on the screen as
below:
Press Ch or CH to select the item CONTRAST:
5
CALL (Call): Press this to display current locating signal channel condition.
TIMER: Time setup of sleep off, it is used to set the time off within 120
minutes.
LANG: Press to switch multi-language OSD menu such as English, German,
French, Spanish, Italian and Russian etc.
CALE: Press this button to show Year, Month, Day and Week. Press
1.TFT-LCD Screen
2.AV2 Input
3.Earphone Jack
4.AV1/AV2/AV3 Shift
5.Down Select
6.Menu
7.Volume decreases, analog quantity selection 8.Volume increases, analog quantity selection +
9.Power indicator
10.Standby/Exit game
11.Remote receiving window
12.Loudspeaker
13.Audio / Video / Power / Car-backing Connection Terminal
CH-/CH+to adjust the Year, press VOL-/VOL+ to adjust the Month.
AV: Press to shift AV mode.
Press VOL+ or VOL- is to adjust the analog quantity of CONTRAST.
Press CH or CH in turn is to select BRIGHT, COLOR, SHARP and TINT,
and also press VOL+ or VOL- can adjust the analog quantity of BRIGHT,
COLOR, SHARP and TINT.
Note: Only when displaying the picture of NTSC system, it will show the
character of TINT in the Picture menu.
6.2. SYSTEM
INPUT, COLOR-SYS, BLUE BACK, LANGUAGE and GAME displays on the
screen as below:
6.2.1. Press CH or CH to select the item INPUT:
Then press VOL- or VOL + to shift the picture from AV1 AV2 AV3 or vice
versa.
Then press VOL- or VOL + to shift the picture from AV1 AV2 AV3 or vice
versa.
6.2.2. Press CH or CH to select the item COLOR-SYS:
Then press VOL- or VOL+ to revolve the screen in order of AUTO, PAL and
NTSC. Please choose carefully the correct system, otherwise, it may cause
achromatic or inferior color. It is recommended to select on AUTO position.
6.2.3. Press CH or CH to choose BLUE BACK:
Press VOL- / VOL+ can realize the ON / OFF of BLUE BACK under no signal.
6.2.4. Press CH or CH to select the item LANGUAGE:
Press VOL - / VOL + can realize selection of ENGLISH, GERMAN, FRENCH,
SPANISH, ITALIAN and RUSSIAN etc OSD menu language.
6.2.5. Press CH or CH to select the item GAME:
Press VOL+ or VOL- on remote controller to enter into GAME, press VOL- to
move leftward, VOL +, rightward, CH , quick downward, and CH , rotate the
game by 360 degrees, press POWER is to exit game and resume to picture
status.
Note: You can only play the Game with remote controller.
6.3. OPTION
HORIZONTAL,VERTICAL and ZOOM modes will display on the screen as
below:
Car-backing
pickup head
: Press this button to flip the picture vertically.
Red Video 3
5. Basic Operation Methods
Black
Basic interface connection
5.1. Connection Method of AV Conversion Line
1) Hold the 8-core AV conversion line, align the side of jack marked with
on conversion line with the side of jack marked with
on AV conversion
line of the Display and insert accordingly
Yellow
Connect with power supply
of backup light: When
backing the car, the display
automatically turns on, locks
up at Video 3 and displays
the car-backing picture.
3
6.3.3. Press CH or CH to choose the item ZOOM:
Press VOL - / VOL+ can realize selection of picture mode: 4:3 mode and 16:9
mode.
6.4. CLOCK
TIME, ON-TIME, OFF-TIME and ATTENTION will display on the screen as
below:
Press VOL- / VOL+ to set up CLOCK.
Press VOL-/VOL+ set ON-TIME then press CH or Ch to select OFF-TIME ,
and set it. You can time on/off the monitor.
Adjustment of other items is the same as that of TIME , and setup of CLOCK
for all items is 24 hours at the most.
Notes: Set up the item of Time first then other item can be set.
7. Before you request for repair
Phenomena below are not necessary mean failure with Monitor.
Please check off per following methods before you request for repair.
Phenomena
White
Black
Video 1
4
8. Technical Parameters
Product: LCD Color Monitor
Display Device: Color TFT-LCD
Screen Size: 7 inches
Audio Output: 0.8W (MAX)
Loudspeaker: one 4.5cm round loudspeaker
Connecting Terminal: Earphone jack, audio / video (AV) input jack,
external power supply input jack, backup connection terminal
Application Power Supply: Car battery (12-24V) Automobile adapter
Power Consumption: about 5W
Outer Dimension: W 200mm
H 133mm
T 38mm (incl. frame)
Weight: 540g (incl. Frame)
Resolution: 1440 (H)
234 (V)
Contrast: 300:1
2
Brightness: 200cd/m
Visible Angle: U: 40/D:60 L/R: 60
Possible Causes
No picture, no sound
Improper connection with Automobile adapter. Use of unauth
orized power supply. Power Switch is on OFF position.
Warning
No picture
Check whether AV line is plugged well.
No sound
Whether audio line is connected well, or the sound volume is
turned off till minimum.
No repairable components exist in the machine. Don't try to dismantle and
improve the unit, and the high voltage in the machine may cause danger.
Maintenance and adjustment of the unit is subject to professionals.
Dark picture
Whether Brightness and Contrast adjusted correctly;
Whether environment temperature too low.
No color
Whether color is well-adjusted
6.3.1. Press CH or CH to choose the item HORIZONTAL:
Press VOL- / VOL+ can realize HORIZONTAL, and press again is to resume
the picture.
Upside down or
Maybe improperly adjusted Up / Down, Left / Right in the
lateral inverted picture remote controller.
6.3.2. Press CH or CH to choose the item VERTICAL:
Press VOL- / VOL+ can realize VERTICAL, and press again is to resume the
picture.
No car-backing
function (i.e. Picture)
6
5.2. Connection Diagram of Visible
Car-backing:
The display system automatically
locks up at Video 3 when backing
the car and it resumes to normal
status at the end of backup.
: Press this button to flip the picture horizontally.
2
1. Connect with power supply and turn on power by pressing POWER.
1.AV2 INPUT
2.Earphone Jack
3.AV1 / AV2 / AV3 Shift
4.Down Select
5.Menu
to resume normal sound.
2)Align the small end of AV conversion line
with the AV2 jack on front panel of the
Display, and just connect the external input
video with the yellow line and the audio line
with the red or white line.
This operation instruction is only intended for reference. No further notice is
available to any modification of all information contained therein.
after some items in this manual means it is available with this function.
Whether the single black AV wire connecting to the positive
power cord of backup light is loose or not. Whether the
connection hea d of red AV socket is of poor contact.
7
8