1
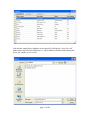
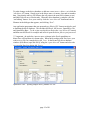
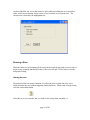
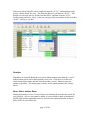
KronoTrax – Race User Manual
TracTronix
Last updated: 2008.08.04
Software version: 1.2.0.4
Software release date: 2008.08.04
page 1 of 20
Table of Contents
KronoTrax – Race User Manual..........................................................................................1
TracTronix.......................................................................................................................1
Overview....................................................................................................................3
Requirements..............................................................................................................3
Getting started - installation.......................................................................................4
KronoTrax Settings....................................................................................................7
Setting up the IR Beam Units...................................................................................10
Driver Database........................................................................................................10
Defining the Main Race Grid (the race list)........................................................13
Running a Race.........................................................................................................14
Arming the race...................................................................................................14
Ready and Starting...............................................................................................15
Finishing..............................................................................................................16
D.N.F...................................................................................................................16
Penalties...............................................................................................................17
Move, Add or delete a Racer...............................................................................17
New Racer Grid...................................................................................................18
Open Race............................................................................................................18
Restoring a Race Grid From the Backup file.......................................................18
Finishing a Race..................................................................................................19
Practice Race............................................................................................................19
Printing Race Result.................................................................................................19
Technical Support.....................................................................................................20
page 2 of 20
Overview
KronoTrax – Race is a Windows application programme custom designed for recording
AutoCross race results. It automates the recording of race results and allows the race list
or grid to be built before hand.
KronoTrax uses timing input hardware such as the TracTronix USB timer called TTU100
or an older serial based interface (MX1). When uses with the TTU100 timer up to four
racers (cars) can be on the course at once (one after another of course) and their results
will be timed automatically down to a thousandths of a second.
KronoTrax provides settings to configure the software for single channel infrared beams
such as a single start/finish line where one beam and infra red (IR) receiver handles both
start and finish signalling. When set for single channel mode only one racer (car) can be
timed at once. The settings can be changed for dual channel IR beams where one channel
(beam) is located at the start line and the other IR beam set to another channel is located
at the finish line. When set for dual channel IR beam mode KronoTrax-Race will be able
to time up to four cars on the course at once. The cars must start one after another.
KronoTrax-Race provides a driver database utility for managing drivers/cars. When the
“usual” racers are entered into the driver database it is a quick and simple matter to define
the race grid – a sheet or window that contains the racers listed from top to bottom in the
order they will start.
The driver database can also be managed in any application that can read/write CSV
(Comma Separated Variable length text) type file formats, such as MS Exell, MS Access,
OpenOffice Calc or Base and others if the user prefers advanced sorting functions.
The main race grid can be created ahead of time to simplify the running of he race.
Racers can be added or removed at race time if required.
KronoTrax automatically saves race results to disk file every 5 seconds to minimize any
inconvenience caused by a unexpected PC/Windows/programme shutdown. The race
grid can be reopened and the racing restarted where it was before the failure occurred.
Race results can also be saved in HTML format for easy posting to a web site.
Requirements
Operating system: MS Windows 2000, XP or XP pro, Vista
page 3 of 20
USB: 2.0 or 1.1 version, one port. TTU100 is a full speed device. USB bus powered.
Disk space: 5 MByte
Memory: at least 50 MByte available after the operating system has started up. Right
click the task bar (usually bottom of screen) and select task manager. Click the
Performance tab and check the available amount under Physical Memory (K). 50000 or
more needs to be displayed there.
Important: Power management must be disabled (set to always on or presentation
mode). The PC must not go into standby mode while the race is in progress. The USB
must not be put into suspend mode (standby) while KronoTrax is in use. See your
Windows settings – control panel – power options or power management. The System
Standby option should be set to never.
Getting started - installation
The installation of KronoTrax-Race is performed by an install (setup.exe) programme
found on the KronoTrax CD-ROM. If an update to this software was provided over the
Internet or email attachment special installation instructions will be provided.
To install the KronoTrax software from CD-ROM simply load the KronoTrax CD-ROM
disk into your CD or DVD/CD drive and the installation software should automatically
start up. If not, start Windows Explorer (Start menu/Accessories/Windows Explorer)
open the CD drive (normally D: or E: depending on what hardware is installed in your
PC) and then open setup.exe.
page 4 of 20
The installation is fairly straight forward; the default choices should work well in most
cases. The installation folder can be changed from the default (C:\Program
files\TracTronix\KronoTrax) if required by clicking the “Change...” button, otherwise
just click the “Next >” button as shown below.
page 5 of 20
When the installationis finished, click the “Finish” button.
page 6 of 20
If using the TTU100 USB based timer plug the USB cable provided into the TTU100 unit
and then to your PC. TTU100 uses the same USB driver as a USB mouse or USB
keyboard and if such a device has been or is already attached to your PC then TTU100
should be recognized by Windows right away. If you do not have a USB keyboard or
mouse and one has never been attached to your PC Windows will automatically load the
driver (called a HID driver) when TTU100 is plugged in the first time. Windows may
require you to restart your PC.
KronoTrax Settings
Open KronoTrax from either the desktop short-cut icon created by the installation
setup.exe programme
or from the Windows Start menu – All Programs – KronoTrax.
Once KronoTrax has started open the Settings menu and select settings
The settings windows should appear which looks similar to the image below.
page 7 of 20
-
-
-
Race name: this text is displayed in the title bar of KronoTrac. It can be used to
keep track of which race or which heat is being timed.
Single start/finish line: single start/finish line mode uses a single IR beam (set to
start/stop mode) located at the start/finish line. The racer starts when the IR beam
is cross and finishes when it is cross again, thus the course is a loop. If this field
is not checked then separate start and finish line IR beams are used.
Number of racers: set this field to the maximum number of racers in the main
race grid.
Number of laps: when the single start/finish line mode checkbox is checked then
the number of laps can be increased from 1. This number of laps must be
completed in order for a racer to finish the race. For example if the number of
laps is set to 3 then the IR beam must be cross 4 times, once to start the racer, then
three more times for each lap (final lap finishes the racer)
Penalty amount (msec): if penalties such has hitting cones on the course cause a
penalty enter the number of millisecond for each penalty here. For example if one
penalty is 2 seconds worth enter 2000 (msec) here. 1000 msec = 1 second.
page 8 of 20
-
Select TTU100 timer / (com port): If the TTU100 timer is being used check this
box. Else uncheck it and select the Com port that the serial RF receiver is
plugged into (e.g. Com1).
- Help pdf file: The pdf file (path and file name) of the KronoTrax help file. It is
normal set to this file, unless the user wishes to use their own help file in which
case enter the path and filename for it here.
- Sound Waves files: Three sounds can be played by KronoTrax. The arming wave
file (.wav) is played when the race is armed. The default is the “gentlemen start
your engines” sound). A sound can be played when a racer starts (crosses the
start IR beam). A wave file can be played when a racer finished. The sound play
can be disabled for each of the three sounds using the “disable start sound”,
“disable finish sound” and “disable arm sound”. It has been our experience that
the start and finish sounds are useful for running the race, provided they are short
in duration..
1. Enable start/stop buttons: If the user wishes to have the ability to cause a start or
finish event by clicking the mouse on a toolbar button (in additional to the RF
signals received) then check this checkbox. Once checked the start timer and
stop timer toolbar buttons are enabled.
- Display measurements: the display measurement includes calculating average
speed and acceleration for each finished racer. Note that the number of laps must
be set to 1 to enable this feature.
o Track length: the distance from the start line to the finish line (if not
single start/finish line) or the length around the track (if single start/finish
line checked). This distance is in feet (if not in metric) or metres (if in
metric…see below).
o Speed in metric. The units for the track length field described above
become metres when this field is checked, else it is in feet. When this
field is checked the speed is calculated as (track length/time) in km/hr and
the average acceleration is in km/hr/hr. or km/hr**2. Else the speed is in
mph and the average acceleration is in miles/hour/hour (miles/hour**2).
o Show acceleration instead of penalties. If penalties are not being used
then the user has the option to show average acceleration (see above two
items)
- Okay or Cancel: If the Okay button is clicked then the field values above are
saved to disk (file name is KronoTrax.ini) and these values become active. If the
Cancel button is clicked then the field values are discarded and no change to the
active values takes place.
*** it is highly recommended that the settings are not changed while the race is
armed and racing has started.
page 9 of 20
Setting up the IR Beam Units
-
single start/finish line: When KronoTrax settings are set to “single start/finish
line” mode (see above description for KronoTrax Settings) a single IR beam is
located at the start/finish line. That is one IR beam that when crossed starts a
racer and when crossed again finishes the racer. The IR receiver unit needs to be
set to “start/stop” mode. See the IR receiver unit user manual for instructions.
Note that it is possible to have physically separate start and finish lines if two IR
beam are used but both IR receivers must be set to start/stop mode.
-
separate start and finish lines: When the start line and finish line are physically
separate lines and up to four racers can be on the course at once then the start line
IR receiver unit must be set to “start/stop” mode and the IR receiver unit at the
finish line must be set to “split” mode. When KronoTrax receives a “start/stop”
RF signal it will start the next ready racer (if not all four timers are already
running). When the next start/stop RF signal is received KronoTrax will start the
next ready racer (again up to four running timers possible). When a “split” RF
signal is received by KronoTrax the longest running racer is finished. The next
split RF signal received will finsh the next longest running racer…and so on.
split times: when KronoTrax is setup for “single start/finish line” mode a second
IR beam /RF channel can be used for split timing. The IR beam RF reciver unit
located at the split time point of the course must be set to “split time” mode.
-
Driver Database
Although KronoTrax allows the editing of the race grid (list) directly it is recommended
that racers be added to the driver database, especially if they are frequent participants at
your events. Once the driver and car information has been entered in the driver database
it is quick and simple to create a race grid. To open the driver database click the “driver
db” toolbar button
A sample driver database looks like:
page 10 of 20
Note that the sample driver database can be opened by clicking the “open driver db”
button on the top left of the Edit Racer (i.e. driver database) window, and selecting the
driver_db_sample_new-2.csv file.
page 11 of 20
To make changes to the driver database or add new racers (racer = driver + car) click the
“edit driver db” button. Simply type in the driver name, car name, class and car number
data. Note that the tab key will advance the cell point to the next field (column or row)
and Shift-Tab will move it backwards. When the driver database is complete click the
“end editing” button. Save your work by click the “save driver db” button and enter a
filename in the dialogue that appears, and clicking “Save”.
Any application programme that can open and save files in CSV format can also be used
to maintain the driver database. This includes MS Excel, MS Access, OpenOffice Calc,
and OpenOffice Base. To do so just save the driver db (use the “save driver db” button)
and then start MS Excel for example and in Excel open the driver_db.csv you just saved.
*** important: do not delete, insert or move columns in the Excel spreadsheet as
KronoTrax will load them in column order. When finish working with Excel save your
work as a csv file, for example driver_db_3.csv. In the KronoTrax driver database
windows (Edit Racer) open this file by using the “open driver db” button and select the
.csv saved in Excel (eg. driver_db_2.csv).
OpenOffice Calc – opening sample driver_database csv file
page 12 of 20
Driver database open in OpenOffice Calc. append, delete, insert rows as required. do not
alter row #1 and do not add, delete, insert or move columns A – E.
Defining the Main Race Grid (the race list)
The main race grid has file menu functions to create a new (blank) race sheet (or grid),
save the race to a csv file or open a previously saved race file.
With your driver database open, simply double click the row of a racer to automatically
copy of that driver's information into the main race grid. The row in the driver db that
was double click is appended to the main race grid (meaning added to the end of the list).
Note that the driver database or edit race window can be sorted by just clicking on the
column title. For example clicking on the “car name” column title will sort the driver db
by car name. Clicking on the “class” column title will sort it by class. This makes
finding a racer out of a large database easier.
If the driver or racer is not in any of your driver databases then it can be put in the main
grid by clicking the “edit race” toolbar button and typing in the Car #, Car Name, Driver,
and Class data. When finished editing click the “end editing” toolbar button. The user
page 13 of 20
can also right click any row in the main race grid (while not editing the race) and select
either, move racer to bottom, insert a racer (a row) or delete racer (current row). The
current racer is shown by the highlighted row.
Running a Race
When the main race grid contains all the racers in the required start order you are ready to
begin racing, assuming that the IR beam(s), IR receiver(s) and TTU100 timer is already
setup and working.
Arming the race
The purpose of the arm (timer) function is to allow the start or finish line to be cross
before and after the race without triggering timing functions. When ready to begin racing
click the Arm toolbar button
Select the racer (row) number that you wish to start racing from, normally #1
page 14 of 20
The racer (row) number that was entered above will be made “ready”. The text “ready”
will be displayed in the Status column. When the start line IR beam is cross KronoTrax
will be notified and that racer's timer will start counting.
Ready and Starting
When a timer is available (up to four with TTU100 and separate start/finish lines, or one
in single start/finish line mode) the next racer down the race grid ready to start will be
shown with “ready” in the status column. If “ready” is not displayed in the status column
for a racer then either all timers are busy or the timer is not armed (see arming the race
above). If a car crossed the start line and their status in not “ready” the start signal will
be ignored by the TTU100 timer (or KronoTrax if using the serial port RF receiver).
On crossing the start line the “ready” racer's timer will start to count and the status
column will indicate “started”.
page 15 of 20
Finishing
When a racer cross the finish line the longest running timer will stop and the status
column will indicate “finished” (in separate start/finish line mode). If in single
start/finish line mode then the one and only started timer will stop and the status will
change to “finished'. If more than one lap is required to finish a race (in single
start/finish mode) then each time the start/finish line is crossed after starting a lap time
will be captured but the timer will continue to count of course, until all laps have
finished.
In the event that a ready racer started but immediated stalls and race rules allow
restarting, then the “ReStart” toolbar button can be used to restart the last started timer.
After the stalled car has backed up behind the start line click the “ReStart” toolbar button
to zero the timer and change the status from started to ready.
D.N.F.
page 16 of 20
If the racer fails to finish the course completely then the “D.N.F.” toolbar button can be
used to “did not finish” the racer. The status for that racer will indicate “D.N.F.”. Note
that the user can click the row for the racer that D.N.F. and then click the “D.N.F.
Toolbar button and select “okay” or the user can type in the row number for the racer that
“D.N.F”, whichever you like.
Penalties
If penalties are incurred during the race such as hitting marker cones then the “penalty”
toolbar button can be used to mark penalties for a racer. Click the row for the racer
which incurred the penalty and then click the toolbar “penalty” button to apply the
number of penalties. The setting page is used to set the penalty amount (see, settings
above).
Move, Add or delete a Racer
During the running of a race if a racer fails to start and must be moved to the end of the
race grid (list) , or a new racer must be added, or a racer failed to show up and must be
deleted right click the applicable racer row and select the required function, as shown
below for the 6th racer on the list.
page 17 of 20
*** It is highly recommended that the user does not add, insert or delete a racer above the
“ready” racer row or the last running timer. Unpredictable results will occur.
New Racer Grid
When the user is ready to begin creating a new main race grid simply open the
KornoTrax File menu and select “new”. A blank new race is created. Open the settings
menu and enter a race name appropriate for the race and click the Okay button.
Open Race
If the user wishes to open an existing race, prehaps one that was created before hand open
the KronoTrax file menu and select “open” and from that select the .csv file that
represents the race file. If heats or the same race is being ran multiple times, once the
heat is finished (see Finishing a Race below) save the main race grid by using the File
menu using a file name that indicating which heat was just finished, and then click the
Arm toolbar button to reset the timers to zero and reset the status columns to waiting, but
otherwise the main race grid will not tbe altered.
Restoring a Race Grid From the Backup file
In the unlike event that KronoTrax was forced to shutdown unexpectedly open the
RaceBackup.csv file to load the race data which was saved just before the shutdown.
Arm the race and start from the racer # (row #) that was started before the shutdown
occurred.
page 18 of 20
Finishing a Race
When all racers have finished (or d.n.f.-ed) the race click the “Finish” toolbar button.
When this is done the timer is disarmed and all running timers are stopped and marked as
D.N.F. Note that the start and finish line IR beams can be cross without triggering a
timer when “finished”.
Practice Race
It is highly recommended that the user practices a race before a real race is run. Go
through the steps of entering the settings in KronoTrax as required for your race
environment, create the main race grid from your driver database and arm the timer. A
real timer (TTU100 or the RX1 serial timer) is not required. In the settings enable the
start/stop buttons (see settings above). Click the “start timer” button toolbar to start a
racer off and clik the stop timer toolbar button to finish a racer. Go through several
racers and practice the .D.N.F. Function, “move racer buttom”, insert racer”, “detele
racer” right click main race grid functions.
Also, it is recommended that the user setup the IR equipment and timer together with
KronoTrax and run a practice race to become familier with the equipment and how to
interact with it using KronoTrax. This will minimize the chance of errors running a race
and hence avoid frustrating any participants.
Before racing begin test the IR and timer equipment with KronoTrax to make everything
is working and within range before the actual race begins. The “triggered” LED on the
TTU timer will indicate when an IR signal has been received by the IR reciever and in
turn received by the TTU100 timer. It normally flashed quickly several times for each
signal received, which is a good indication of the wireless receiption. You can reset the
timers and status columns by using the Finish and then Arm buttons when everything is
working and you are ready to start racing.
Printing Race Result
When racing has concluded the race results can to calculated and printed or saved to file
using the print race toolbar button. This function will sort the race results by class and
fastest time. Racers which did not finish are listed after the finished racers while ones
that did not start are listed last. The results can be saved to CSV file for storage in a
database like MS Access or MySQL or a spreadsheet applicaiton like MS Excel
page 19 of 20
(OpenOffice Calc), where further processing can be done. The results can also be saved
in HTML format for publishing to a web site.
Technical Support
Technicall support can be obtained by browsing to www.tractronix.com and nagivating to
the support page (http://www.tractronix.com/support.html). A techincal support question
can also be e-mailed to support@tarctronix.com. TracTronix will response to the email
as quickly as possible.
page 20 of 20