1
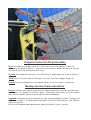
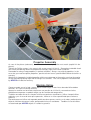
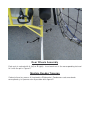
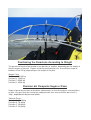
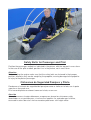
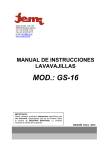
User´s Manual
Introduction
Thank you for choosing the paratrike Mustang 503. We would like to invite you to
spend some of your time reading and familiarizing yourself with this manual, which will
allow you to discover the characteristics of your new engine. Thanks to the maintenance
tips found inside, you will always be able to trust your engine and enjoy your purchase for
a long time.
We would also like to invite you to hand over this manual along with the engine if
you decided to sell; the new owner will find it as useful as you did.
The manufacturer, or, if the case be, the distributor, are at your full disposal to
answer any questions and concerns and solve any problem. YOUR SAFETY AND THE
SAFETY OF OTHERS ARE OUR BIGGEST CONCERN.
We would like to inform you that the contents of this manual will not give you the
information necessary to operate the paratrike; this manual contains only the information
necessary to assemble and maintain your paratrike. To operate the paratrike you must
head to a flight school, where an instructor will teach you to fly.
Please read this manual before operating the paratrike.
Introducción
Gracias por haber elegido el paratrike Mustang 503. Le invitamos a invertir un poco de su
tiempo en la lectura de este manual, que le permitirá descubrir las características de su
nuevo motor. Gracias a los consejos sobre mantenimiento y la periodicidad de los
controles, usted podrá confiar en todo momento en su motor y disfrutar por mucho tiempo
de su adquisición.
Le invitamos también a entregar este manual junto con el motor si decidiese venderlo. Al
nuevo propietario seguro que le resultará tan útil como a usted.
La empresa fabricante, o en su caso, la distribuidora quedan a su entera disposición para
responder a cualquier pregunta y, si se diese el caso, solucionar cualquier problema,
puesto que SU SEGURIDAD Y LA DE LOS DEMÁS SON LO MAS IMPORTANTE PARA
NOSOTROS.
También queremos informarle que el contenido de este manual no le aportará la
información necesaria para volar el paratrike; este manual contiene solamente la
información necesaria para montar el paratrike y su mantenimiento. Para volar el
paratrike usted debe dirigirse a una escuela de vuelo, donde el instructor le enseñará a
volar.
Antes de operar el paratrike es imprescindible leer este manual.
C/ Pedro Muñoz 13630 Socuéllamos
Ciudad Real – España
Tel: (0034) 926 532 105 Móvil: (+34) 609 265 625
E-mail: airfer@airfer.com
comercial@airfer.com
WWW.AIRFER.COM
Propeller Protection Ring Assembly
First: Assemble the top part; to do this, install the screws that appear in Figure 1A,
followed by the band in Figure 1. Leave the screws and the band a bit loose so that you
are able to install the other pieces with ease.
Second: Assemble the lower part; start with Figure 2, followed by the screw in Figure 3.
Third: Next, install the lower band (Figure 4); finally, install the support (Figure 5).
Fourth: Once the equipment is assembled, tighten all screws, bands, and velcros.
Montaje del Aro Protección Hélice
Primero montaremos la parte superior, para esto pondremos los tornillos que aparecen
en la Figura 1A y después la cinta en Figura 1. Dejaremos los tornillos y la cinta un poco
flojos para así poder montar las demás piezas con comodidad.
Segundo montamos la parte inferior de los aros, empezando por la Figura 2, después el
tornillo de la figura 3. A continuación montamos la cinta inferior (Figura 4) y por último el
soporte (Figura 5).
Una vez ensamblado todo apretaremos todos los tornillos, cintas y velcros.
Propeller Assembly
As seen in the picture (red arrow), the two letters from each propeller must match (capital N in the
picture).
Tighten the Phillips screws (star screws) with a pressure of 12 N/m^2. Remember to double check
the screws periodically because temperature changes might cause them to loosen.
Remember to always keep propellers in perfect condition. Always use original propellers; in the
case that you need to replace propellers, purchase them from a specialized distributor that offers a
warranty.
Warning: An improperly installed propeller might cause damage to the engine, causing the engine
to stop functioning during flight and resulting in an accident. The use of propellers not authorized
by AIRFER will void the warranty.
Montaje Hélice
Como se puede ver en la foto y como indica la flecha roja, las dos letras de cada hélice deben
coincidir. Así será el montaje correcto.
Apretar los tornillos en forma de estrella con una presión de 12 N/m^2 y recuerda revisarlas
periódicamente porque se podrán aflojar con los cambios de temperatura.
También recuerda conservar siempre la hélice en perfectas condiciones. Utiliza siempre hélices
originales y en el caso de tener que reponerlas, hazlo en un sitio especializado que te ofrezca
garantía.
Recuerda que una hélice mal reparada podrá ocasionar graves averías en el motor, pudiendo este
dejar de funcionar durante el vuelo, provocando incluso un accidente. También el uso de hélices
no autorizado por AIRFER dejará sin validez la garantía.
Front Wheel and Direction Bar Assembly
First: Assemble the wheel set and install the top sheet (Figure H) with its three screws.
Second: Install the direction bar with the bolt (Figure D); finally, install the screw in Figure
R.
Montaje Rueda Delantera y Dirección
Primero montaremos el conjunto de la rueda y ponemos la chapa superior (Figura H) con
sus tres tornillos.
Después ponemos la barra de dirección con la tuerca (Figura D) y a continuación
montamos el tornillo (Figura R).
Rear Wheels Assembly
Each axle is marked with L (left) or R (right). Insert each one in the corresponding slot and
fix it with the pin in Figure P.
Montaje Ruedas Traseras
Cada eje tiene las marcas L (izquierda) o R (derecha). Pondremos cada una donde
corresponda y la fijaremos con el pasador de la figura P.
Startup
After making sure that everything is properly assembled and that nothing can enter the propeller,
such as seatbelts; slings; etc., proceed to engine startup.
First: Using the fuel pump (Figure FP), make the fuel rise to the carburetor until the carburetor is
full.
Second: Put the three switches in the ON position and turn on the red button (lower position) in
the accelerator control panel, all while pulling on the air lever (Figure A). This lever will be on for
several seconds, until the engine starts up without stopping.
DO NOT accelerate during this process; the engine will drown.
It’s important that the trike is well secured; it is best to lean it on a car or wall.
Puesta en Marcha
Después de haber comprobado que todo está bien montado y que no pueda entrar nada en la
hélice, como los cinturones, eslingas, etc., podemos proceder a poner el motor en marcha.
Primero hacemos subir la gasolina al carburador utilizando la pera (Figura FP) hasta que notemos
que el carburador se ha llenado.
Después pondremos los tres interruptores en posición ON y accionaremos el botón rojo (inferior)
del mando del acelerador, al mismo tiempo que accionamos la palanca del aire (Figura A). Esta
palanca la tendremos accionada varios segundos hasta que el motor consiga arrancar y no se
pare.
No debemos acelerar durante este proceso pues el motor se ahogará.
Es importante que el trike esté bien sujeto, lo mejor será apoyarlo contra el coche o la pared.
Positioning the Parachute According to Weight
The parachute band will be placed in one position or another, depending on the weight of
the passenger or the pilot. Keep in mind that each position has an oscillation range of
between 5 and 10 kg, depending on the weight of the pilot.
Weight Chart
Position A: 90-100 kg
Position B: 70-80 kg
Position C: 50-60 kg
Position D: 40-50 kg
Posición del Parapente Según el Peso
Según el peso del pasajero o del piloto, colocaremos la cinta de carga en una posición o
en otra. Hay que tener en cuenta que cada posición tiene una oscilación de entre 5 y
10kg., dependiendo del peso del piloto.
Tabla de Pesos
Posición A: 90-100 kg
Posición B: 70-80 kg
Posición C: 50-60 kg
Posición D: 40-50 kg
Safety Belts for Passenger and Pilot
Position the passenger seatbelt as indicated in the picture, with the top part in cross form.
In the case of the pilot seatbelt, position it as in the picture, not in cross form.
Attention
Before starting the engine make sure that the safety belts are fastened in their proper
position, otherwise they can be caught by the propeller, causing damage to the propeller
or injury to the pilot or passenger.
Cinturones de Seguridad Pasajero y Piloto
Pondremos el cinturón de seguridad del pasajero como se indica en la foto, con la parte
superior en forma de cruz.
En el caso del piloto se colocará como en la foto, no en cruz.
Atención
Antes de arrancar el motor deberemos asegurarnos de que los cinturones están
abrochados en su posición pues si no fuese así podrían ser aspirados por la hélice,
causando la rotura de esta e incluso nosotros podríamos sufrir algún daño.
MAINTENANCE
It is advised that you follow a maintenance and check-up control. We advise that checkups be given every twenty (20) hours of use; this way you can be sure that the paratrike is
ready for operation at any given moment.
•
•
•
•
•
•
•
During the twenty (20) hour check-ups, you must double-check the trike’s screws
(front wheel, direction bar, rear wheels, protection ring, propeller, etc.); above all,
you must double-check the anchor screws in the engine, the pinion, exhaust pipe,
propeller, etc. It is also necessary to clean the carburetor’s air box and examine the
state of the spark plugs; replace if needed.
After 120 hours of use, perform proper examinations of the engine; for this, you will
have to consult the manufacturer’s manual.
As a maximum, every two (2) years replace the engine’s shock mounting and the
gasoline tubes.
Make sure that the paratrike’s textile components, such as the harness and the
parachute bands, are not soiled by harmful liquids, such as gasoline, oil, solvents,
etc. In this case, the harness can be washed with water and neutral soap.
However, if the parachute bands come into contact with the above-mentioned
liquids, they must be replaced with clean and original bands.
The parachute bands must not be manipulated or altered under any circumstance.
In any case, it is advised that they be replaced every four (4) years, replacing them
sooner if it is necessary.
In regards to propeller maintenance, the buyer is informed that the propeller is the
most important component of the paratrike and that it must always be kept in perfect
conditions. It is advised that any and all repairs be performed by a specialized
company with labor warranty. Remember that a propeller in a poor state can result
in serious damage to the engine, causing it to stop working during flight and causing
an accident. The use of propellers not authorized by PARAMOTORES AIRFER will
void the warranty.
It is advised that before all flights, a visual examination of every single component
of the trike is made. If the trike is not in ideal conditions, abstain from operating and
immediately solve the problem.
If you have any questions or concerns, please address them with your distributor or
directly with us.
C/ Pedro Muñoz 13630 Socuéllamos
Ciudad Real – España
Tel: (0034) 926 532 105 Móvil: (+34) 609 265 625
E-mail: airfer@airfer.com
comercial@airfer.com
WWW.AIRFER.COM
WARRANTY
Paramotoring is a sport in which no single basic set of rules is regulated in regards
to manufacturing, use of materials, engine characteristics, or types of harnesses to
be used, among other aspects. For this reason and given that the paramotor’s use
is commercially unregulated, PARAMOTORES AIRFER is not obligated to issue any
type of warranty, because the customer is purchasing a good developed for
experimental use in motorized parachute flight. The customer is advised via this
document of this circumstance of legal exemption of warranty. However, all of our
models include a commercial warranty voluntarily issued by the manufacturer for
one (1) year from the date of delivery, keeping in mind the following points.
1. The commercial warranty provided by PARAMOTORES AIRFER (henceforth
the warranty) does not cover engine irregularities, given that the causes of such
are undetectable (lack of oil in the fuel, improperly lubricated, low quality oil,
improper use, etc).
2. The company is not responsible for any imperfection caused by improper use of
the engine; the customer agrees to strictly follow the described maintenance, as
well as the pre-flight examination. Not following these guidelines will void the
warranty.
3. The warranty does not cover the normal wear of parts caused by use or damage
caused by the installation of parts not provided by PARAMOTORES AIRFER.
4. The warranty does not cover engines used in races, competitions, or for
commercial purposes.
5. The warranty does not cover damage caused by use of the engine without
propellers or damage caused by altering any part of the paramotor if the
alteration has not been authorized in writing by PARAMOTORES AIRFER.
6. The warranty does not cover damage caused by the use of propellers not
approved by PARAMOTORES AIRFER.
7. The warranty does not cover damage caused by oxidation (rust), premature
wear due to water exposure, sand infiltrations, or exposure to any foreign
objects.
8. The warranty does not cover damage resulting from mechanical manipulation by
a service not authorized by PARAMOTORES AIRFER.
9. The warranty does not cover damage caused by improper transport.
CUSTOMER SERVICE PROCEDURES
If you have any problems, difficulties, or concerns, please contact the company at:
1. Authorized PARAMOTORES AIRFER customer service centers.
2. Authorized PARAMOTORES AIRFER distributors.
VALIDITY OF WARRANTY
The warranty will be valid only if the buyer completes the registration card and sends it into
the authorized PARAMOTORES AIRFER distributor within fifteen (15) natural days of
delivery of the paramotor.
NOTICE OF WARNING
This paramotor, due to its design, may be subject to sudden stops. This stop may cause
impact upon landing. This type of accident may result in serious injury, including death.
For this reason, the paramotor equipment must never be flown in closed spaces, wind
currents, inappropriate heights, or under any other circumstances in which it may not be
possible to make a smooth landing after a sudden engine stop. This equipment must only
be flown in daylight and under visual flight conditions (Visual Flying Rules V.F.R.).
WARNING
This paramotor is not certified by any establishment. It has not passed any security or
durability tests or examinations and it does not fall into any patterns of airplane engine
standards. It is designed SOLELY for experimental use in paramotors, non-certified
vehicles and venturous flights, in which engine failure might endanger the safety of any
persons involved.
The user or owner assumes all risks of use and recognizes that via its use, the
engine might be subject to a sudden stop.
ALL TRANSPORTATION COSTS ARE BUYER’S RESPONSIBILITY.
ATTENTION: THE PROPELLER IS THE MOST IMPORTANT PART OF THE
PARAMOTOR. IT SHOULD ALWAYS BE CLEAN AND SMOOTH. IN CASE OF WEAR,
IT SHOULD BE REPLACED OR REPAIRED AND BALANCED BY THE
MANUFACTURER.
A DAMAGED PROPELLER CAN WRECK THE PARAMOTOR, WITH THE
APPROPRIATE CONSEQUENCES.
PARAMOTORES AIRFER IS NOT RESPONSIBLE FOR ANY STRUCTURAL
IMPERFECTION IN THE PARAMOTOR CAUSED BY AN IMPROPERLY REPAIRED
PROPELLER OR A PROPELLER WITH GENERAL IMPROPER UPKEEP.
Our paramotors are delivered as a KIT; therefore, the paramotor’s use and
maintenance are solely the customer’s responsibility. The customer must make a
complete examination of all of the paramotor’s parts and elements which are
detailed in the maintenance and pre-flight examination BEFORE STARTING THE
ENGINE.
PARAMOTORES AIRFER IS NOT RESPONSIBLE FOR ANY INCIDENT
RESULTING FROM NOT HEEDING THE PREVIOUS WARNINGS.
EXPLICIT OR IMPLICIT WARRANTIES
In so far as it is allowed by local law, the previous warranties are exclusive and do not
include any other warranties or conditions, written or oral, expressed or implied.
PARAMOTORES AIRFER rejects all warranty or condition implied in commerce. This
warranty will provide the customer specific legal rights, as well as possibly providing other
rights that vary from one country, state, or province to another.
PARAMOTORES AIRFER reserves the right to modify your warranty policy at any
moment, it being understood that such changes won’t alter the conditions applicable to
engines sold while the warranty that appears above is valid. In case of litigation
PARAMOTORES AIRFER recognizes only the courts of Castilla-La Mancha.
C/ Pedro Muñoz 13630 Socuéllamos
Ciudad Real – España
Tel: (0034) 926 532 105 Móvil: (+34) 609 265 625
E-mail: airfer@airfer.com
comercial@airfer.com
WWW.AIRFER.COM
WARRANTY CARD AND CHECK-UP REGISTRY
1st Check-up
2nd Check-up
Date: __ __________ ____
Date: __ __________ ____
Incidents/Irregularities: _______________
____________________________________
____________________________________
____________________________________
____________________________________
Incidents/Irregularities: _____________
__________________________________
__________________________________
__________________________________
__________________________________
Company Seal and Signature:
Company Seal and Signature:
3rd Check-up
4th Check-up
Date: __ __________ ____
Date: __ __________ ____
Incidents/Irregularities: _______________
____________________________________
____________________________________
____________________________________
____________________________________
Incidents/Irregularities: _____________
__________________________________
__________________________________
__________________________________
__________________________________
Company Seal and Signature:
Company Seal and Signature:
WARNING: If one of the above indicated check-ups is not performed for any reason
outside of this company’s control, the warranty will be void.
AGREEMENT OF WARRANTY
I, ________________________________________________,
With D.N.I. ________________________________________,
Recognizing in my own name sufficient capacity for the issuance of this document, declare:
That I am solely responsible for my actions and freely purchase a paramotor for experimental and
venturous flight, which might merit some risk. In declaration of the fact that I am solely responsible of any
and all incidents that might take place during its operation, and freeing the manufacturer of all civil and
criminal liability that might arise in case of incident or accident, I sign this document.
DATE:
SIGNATURE:
WARRANTY REGISTRATION CARD
1. In order to comply with the requirements of the warranty, it is necessary that this form be properly
and completely filled out by the user and/or owner of the paramotor and returned to
PARAMOTORES AIRFER by ordinary mail within fifteen (15) days of delivery, to the following
address:
Paramotores Air Future SLU
C/ Pedro Muñoz, 22
13630 Socuéllamos (Ciudad Real) España
This requirement not being properly filled, the benefits of the warranty will be denied.
2. No other type of warranty is available, besides the conditions defined in the present warranty.
3. Paramotor Model: C2-Mustang
Distributor: Paramotores Air Future SLU
Company Seal
Engine No: (Not required)
Propeller Model: ___________________________________
Date of Purchase (date of delivery): ___ __________ _____
Buyer: ___________________________________________
I have fully read and understood the user manual and I agree with the procedure and conditions described
above.
DATE:
SIGNATURE: