1
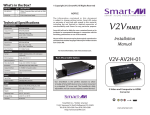
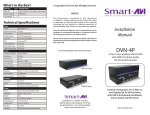
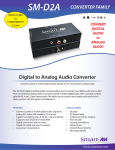
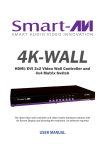
What’s in the Box?
PART NO.
QTY
VNET+4PS
1
4X1 KVM WUXGA, USB2.0, Audio switch
Power Supply
1
PS5VDC2A
User Manual
1
© Copyright 2011 Smart-AVI, All Rights Reserved
DESCRIPTION
Technical Specifications
VIDEO
Format
VGA RGB Analog (75Ω, 0.7Vp-p)
Resolution
Up to 1600x1200 @ 85Hz2048x1536 @ 60Hz
Input Interface
(4) HD-15 Male
Output Interface
(1) HD-15 Female
H Frequency Range
30-95KHz
V Frequency Range
50-180Hz
NOTICE
The information contained in this document
is subject to change without notice. Smart-AVI makes
no warranty of any kind with regard to this material,
including but not limited to, implied warranties of
merchantability and fitness for any particular purpose.
Smart-AVI will not be liable for errors contained herein or for
incidental or consequential damages in connection with the
furnishing, performance or use of this material.
No part of this document may be photocopied, reproduced or
translated into another language without prior written consent
from Smart-AVI.
AUDIO
Frequency Response
20 Hz to 20 KHz
Impedance
600 ohm
Nominal Level
0-1.0 V
Common Mode
Rejection at 60dB
Input Interface
(8) 3.5 mm Stereo Audio
Output Interface
(2) 3.5 mm Stereo Audio
For more information, visit www.smartavi.com.
Rack Mountable Option
Installation
Manual
VNET+ 4P
4-Port Cross-platform WUXGA KVM
with USB Keyboard and Mouse,
Stereo Audio, and Microphone
USB
Signaling
USB 1.1 and 1.0
Input Interface
(4) USB Type B
Output Interface
(2) USB Type A
CONTROL
Front Panel
Tact Switch
OTHER
Power
External 100-240 VAC/5VDC2A @10W
Dimensions
7.875”W x 1.625”H x 3.5”D
Weight
7 lbs.
Approvals
UL, CE, ROHS Compliant
Operating Temp.
32-131°F (0-55 °C)
Storage Temp.
-4-185 °F (-20-85 °C)
Humidity
Up to 95%
Emulation
NO KEYBOARD OR MOUSE EMULATION
Our SmartRack is the perfect solution to allow
virtually all SmartAVI devices to be custom mounted
in a standard 19” server rack. The SmartRack is fully
adjustable and can secure/organize several devices.
Control 4 Computers, PC or Mac
on one Display with USB Keyboard
and Mouse, Stereo Audio and
Microphone
SmartAVI, Inc. / Twitter: smartavi
11651 Vanowen St. North Hollywood, CA 91605
Tel: (818) 503-6200 Fax: (818) 503-6208
http://www.SmartAVI.com
www.smartavi.com
Introduction
Product - Installation Diagram
The VNET+4P is a cross-platform KVM WUXGA switch
capable of sharing one WUXGA Monitor between
four computers, PC or Mac. View four computers with
WUXGA on a single screen, saving money and desktop
space.
PC
Features
•
•
•
•
•
•
Supports Mac, PC, Linux and Sun
Supports High Resolution 1920x1200 60Hz
WUXGA
Supports USB keyboard and mouse
Balanced stereo audio output
Front panel tactile switch with LED indicator
Supports Auto-scan mode for simple
discovery
Applications
•
•
•
•
Home Theater Integration
Digital Signage Deployment
Information Kiosks/Displays
Film/Recording Studios
In the medical or industrial field, where it may not be
practical (or safe) to have one or more CPUs in the
general vicinity, SmartAVI’s VNET Switch Series is the
perfect solution, allowing for either PC or Mac signals
to be extended from computer to the display.
Another practical use for one of our VNET Switch would
be for media recording studios, where soundproofing
and space issues come into play. Using a VNET Switch
eliminates the inherent “hum” of a powered CPU and
gives you the freedom of using your keyboard, mouse
and monitor without having to find room for the
computer itself in the same workspace.
VNET+4P
Mac
Installation
1. Turn off all computers and the display.
2. Connect the VGA extension cables, USB cables, and audio cables (not included) to the computers and to the “IN”
ports on the VNET+4P.
3. Connect the display to the “OUT” VGA connector on the VNET+4P.
4. Connect USB mouse and keyboard to the “OUT” USB connector on the VNET+4P.
5. Connect speakers to the “OUT” audio connector on the VNET+4P.
6. Connect the power cord and power on the VNET+4P.
7. Power on the computers and the display.
8. Use the front panel buttons to select the desired input port.
Switching Between Ports
Front Panel Control
To switch ports using the front panel, press either the up or down
button to cycle through the available ports. The selected port number
will be indicated on the LED display.
VNET+4P Front
VNET+4P Rear