1
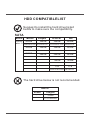
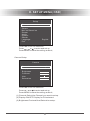
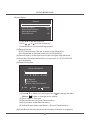
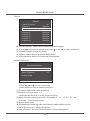
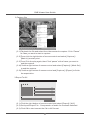
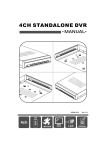
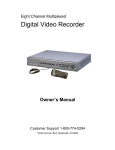
8CH STANDALONE DVR
USER MANUAL
2009 FEB. Ver1.0
8ch
ALARM
VGA
LAN
Remote
HDD COMPATIBLELIST
Suggest to install the hard drive listed
below to make sure the compatibility.
SATA
Brand
Capacity/
Model no
Maxtor
250GB
Seagate
HITACHI
WD
250GB
250GB
250GB
STM3250310AS
ST3250824AS
320GB
HDT725025VLA380 WD2500AAJS
320GB
320GB
STM3320820AS
500GB
ST3320620SV
HDT725032VLA360 WD3200AAKS
500GB
500GB
STM3500630AS
320GB
ST3500320SV
500GB
HDT725050GLA360 WD5000AAKS
750GB
750GB
HDS721075KLA330 WD7500AAKS
1TB
HDS721010KLA330
1TB
WD10EACS
The hard drive below is not recommended.
SATA
Brand
Seagate
Capacity/
750GB
Model no
ST3750330AS
USB Drive Compatible List
Below listed USB drive is recommended.
Brand/Capacity
Backup
Palyback
A-DATA / 1G
PASS
PASS
A-DATA / 4G
PASS
PASS
A-DATA / 8G
PASS
PASS
Transcend / 1G
PASS
PASS
Transcend / 4G
PASS
PASS
Transcend / 8G
PASS
PASS
SanDisk / 4G
PASS
PASS
SanDisk / 8G
PASS
PASS
SONY / 4G
PASS
PASS
SONY / 8G
PASS
PASS
CONTENT
A. FEATURE
1
B. SPECIFICATIONS
2
C. INSTALLATION
3
D. FRONT PANEL
4
E. OPERATION
5
F. BACKUP
15
G. RECORD
15
H. RECORDING HOURS (BASED ON 400G HARD DRIVE) 16
I. DVR VIEWER USER GUIDE
16
J. REMOTE CPNTROL
19
A.FEATURES
1.Triplex Standalone(Record / Playback / Network).
2.Recording speed 60/50fps.
3.Support flash slot USB archiving.
4.Screen position adjustable.
5.NTSC / PAL system compatible.
6.Advance video compression MPEG.
7.Manual / Motion / Programmed recording modes.
8.Automatically recording while alarm triggered.
9.Playback search by Time / Date / Event List modes.
10.Watch Dog.
11.HD usage rate indicator.
12.Motion detection.
13.Support Audio recording (4 Input 10utput).
14.Support SATA HD.
15.Auto Sequence Switching of channels.
16.Support PTZ(Pan/Tilt/Zoom) control.
17.Support Alarm Input (8 Input,10utput).
18.Support Mouse OSD control.
19.LAN (TCP/IP,DHCP).
20.CD/DVD-RW Backup (Option).
21.IR remote controller (Option).
22.VGA output (Option).
1
B.SPECIFICATION
Video System
Operating System
VGA output
Video Input
Audio Input
Video Output
Audio Output
OSD interface
Display Frame
NTSC/PAL
Embedded RTOS
D-SUB 15P VGA(OPTION)
8 x (1Vp-p 75 ohm) BNC
4 x RCA
2 x (Monitor Out) BNC
1 x RCA
OSD、Multi-Language
NTSC
240 fields/S (8x30 fields/S )
200 fields/S (8x25 fields/S )
PAL
60 fps
NTSC
Recording Frame
50 fps
PAL
Triplex
Record / Playback / Network
NTSC
640x448
Video resolution
Display
PAL
640x544
NTSC
640x224
Recording
PAL
640x272
Normal
Video Compression Modified
High
MJPEG
Highest
Hard Drive Storage
SATA HDD X 1
Host
USB,CD/RW,DVD(Option)
Backup Device
Time / Date / Event List
Mode
Playback Search
YES
Full Screen
Alarm Input
8 Input , 1 Output
Motion Detection
YES
Video Loss Detection
YES
Auto Switching
YES
Buzzer Output
YES
Brightness Adjustable
YES
Contrast Adjustable
YES
VGA Output Resolution
800x600/1024x768/1280x720/1280x1024
Mouse Control
YES
P/T/Z Control
YES
Watch Dog
Auto Power Recovery
LAN
MPEG4(TCP/IP,DHCP)
Power Supply
DC 12V / 4A(AC100V~240V 50/60HZ)
2
C.INSTALLATION
(1)
(2)
(3) (4) (5)
(6)
(7)
(8)
(9)
COM NO NC
12345678G
G D+D=G
ALARM I/O
RS-485
(7)
COM NO NC
12345678G
ALARM I/O
G D+D-G
R S - 485
(1) MOUSE PORT.
(2) VIDEO IN.
(3) VIDEO OUT.
(4) AUDIO OUT.
(5) AUDIO IN.
(6) LAN.
(7) 1~8:ALARM IN.
G:GROUND.
COM:Relay COM output.
NO:Relay N.O. output.
NC:Relay N.C. output.
D+、D-:RS-485.
(8) POWER INPUT:Please use the power supply enclosed.
The adaptor must be:DC-12V / 4A.
(9) XGA Output.
3
D.FRONT PANEL
21
24
22
1
2
3
4
1
2
3
4
5
6
7
8
5
6
7
8
10
11
12
13 14
15
9
16
17
18
19
20
23
1. Full Display of CH1
2. Full Display of CH2
3. Full Display of CH3
4
Full Display of CH4
5. Full Display of CH5
6. Full Display of CH6
7. Full Display of CH7
8. Full Display of CH8
9.
8-division display.
10.
4-division display.
11.
MENU:Press this button to enter menu or save the setting and exit.
12.
UP selection / setup the time of backup.
13.
Down selection / setup the time of backup.
14.
Select/ Enter.
15.
RECORD the live display (Manual Record).
16.
PAUSE the playback.
17.
Fast Rewind of playback / MUTE ON Live Mode.
18.
STOP playback then back to live Mode.
19.
Playback.
20.
Fast Forward of playback / Auto Switching.
21.
Power Indictor.
22.
Master HD indictor: Light up while Master HD working.
23.
Slave HD indictor: Light up while Slave HD working.
24.
USB SLOT for backup.
4
E. SETUP MENU(OSD)
Setup
Camera
Record
Sensor
Mot ion Detect ion
Screen
Audio
System
Search
Language
Exit
English
Press ▲▼ to do the selection
Press
,
or to enter and set up.
Press MENU to save the setting and exit.
Camera Setup
Display
1
On
▲
Channel
▲
Camera
Brightness
Contrast
Hue
Saturation
Press ▲▼ to do the selection
Press
,
or to enter and set up.
Press MENU to save the setting and exit.
(1) Channel:Select the Channel you want to setup.
(2) Display:ON/OFF Display for CH selected.
(3) Brightness/Contrast/Hue/Saturation setup.
5
SETUP MENU(OSD)
Record Setup
Record
Record Speed
Record Quality
Event Rwc Duration
Record Schedule
Event Buzzer
High
10
off
Press ▲▼ to do the selection
Press
,
or to enter and set up.
Press MENU to save the setting and exit.
(1)Record Speed.
NTSC:Defaulted on 7fps per channel,total 60fps/8CH.
PAL:Defaulted on 6fps per channel,total 50fps/8CH.
(2)Record Quality:Video quality at levels of Higest/Hight/Normal.
(3)Event Rec Duration:defaulted on 10 seconds. 5/10/15/20/25/30
secs available.
(4)Record Schedule:
Record Schedule
▲
0
3
6
9 12 15
18 21 23
No Record
Time Record
Motion+Sensor Record
:Left,
▲
▲
:Right,
/
:Change,
(1)Press▲▼ to select left and right of time
to change the rec .
status .
Press to change all rec status.
(2)Time range 0~24 hours.
(3)Red marker as Full Time Record status.
(4)Gray marker as No Record status.
(5)Yellow/Green marker as Motion + Sensor Record status.
(5)Event Buzzer:Buzzer duration when Alarm or Motion is triggered.
6
SETUP MENU(OSD)
Sensor
Sensor
Alarm Duration
Sensor-1
Sensor-2
Sensor-3
Sensor-4
Sensor-5
Sensor-6
Sensor-7
Sensor-8
off
N/Open
N/Close
Disable
Disable
Disable
Disable
Disable
Disable
★ Alarm Duration:Select the Duration time after trigger.
★ Press
to select the sensor and press
or
to enter and setup.
★ Disable:Disable trigger by Alarm.
★ N/Open:Alarm device is Nornal Open Mode.
★ N/Close:Alarm device is on Normal Close Mode.
Motion Detection
Motion Detection
1
off
off
Channel
Sensitivity
Alarm Duration
Motion Area
Press ▲▼ to do the selection
Press
,
or to enter and set up.
Press MENU to save the setting and exit.
(1)Channel : Select the camera to setup
(2)Sensitivity:Level range 1~4
(defaulted as Off,level 1 as the most sensitive).
(3)Alarm Duration:defaulted as Off. Adjustable 5、10、15、20、25、30
seconds、CONT(continuous).
(4)Motion Area setup.
★ Please apply following a & b steps before setting Motion Area.
a:Setup Sensitivity in “Motion Detection”
b:Select Motion + Sensor Record status in “Record Schedule”
7
SETUP MENU(OSD)
Screen
Screen
Border
Video Adjustment
Auto Switching
XGA Resolution
On
01
800×600
Press ▲▼ to do the selection
Press
,
or to enter and set up.
Press MENU to save the setting and exit.
(1) Border : Division mode with or without white border(ON/OFF).
(2) Video Adjustment:To adjust screen Position(Up/Down/Right/Left).
(3) Auto Switching:The duration of each channel during Auto Switching.
Range:1~10 seconds.It must be selected 01 at least to enable
auto switching.
(4) XGA Resolution 800 x 600 / 1024 x 768 (defaulted) /1280 x 720
/ 1280 x 1024.
Audio
Audio
Channel
Record
Mute
Input Volume
Ouput Volume
1
On
Off
Press ▲▼ to do the selection
Press
,
or to enter and set up.
Press MENU to save the setting and exit.
(1)Channel : Select the channel that you want to record the audio.
(2)Record:On / Off.
(3)Mute:On / Off.
(4)Input Volume.
(5)Output Volume.
8
SETUP MENU(OSD)
System
System
Hard Disk Setup
Password Change
Time Set
Event List
Loss Alarm
Off
Network
Pan/Tilt Device
(DVR0860.FWI)
F/W Upgrade
Press ▲▼ to do the selection
Press
,
or to enter and set up.
Press MENU to save the setting and exit.
(1)Hard Disk Setup
TOTAL:152617 MB
Used: 82420MB
Yes
▲
Overwrite Enable
Format HDD
▲
Hard Disk Setup
54%
DISKO:152617MB WDC WD1600AVJS-6
(1.1)Overwrite Enable:
When HDD capacity is full, set:
Yes:HDD will be overwritten (continue recording)
NO: Stop the recording.
(1.2)Format HDD:
When enter this setting,it requests 6 digital password input.
If password is correct,the HDD will be formatted.If not,it will say
“Password Incorrect”
(1.3)HDD Status:
This tells the usage status of HDD,including HDD total capacity
and the percentage used.
★ Default Password is 111111.
★ When installing a new HDD,please format HDD as the first step.
9
SETUP MENU(OSD)
(2)Password Change
Password Change
Current Password
1 2 3 4 5 6 7 8 9 0 - =≠
q w e r t y u i o p﹝ ﹞
Shift
asdfghjkl;
zxcvbnm,./
Enter
Current Password: ______
New Password: ______
Confirm Password: ______
★ If the current password was given incorrectly,it will say “
Password Incorrect”
★ Default Password is 111111.
(3)Time Set
Time Zone
(GMT+08:00)
[Taipei]
Time Set
2009/01/08 15:57:10
Daylight Saving Time
No
Apply
▲
▲
Time Set
(3.1) Time Zone:Select the time zone at your end.
(3.2) Time Set;Setup time,year/month/date hour/minute/second.
(3.3) Daylight Saving Time:Yes/No.
(3.4) Apply:It will be update the time set.
10
SETUP MENU(OSD)
(4)Event List
Event List
13:59:54
13:59:53
13:59:23
11:19:35
11:19:35
11:19:14
11:18:25
11:18:25
11:18:08
11:17:54
PAGE (01/09)
REC START
POWER ON
POWER OFF
REC START
POWER ON
POWER OFF
REC START
POWER ON
POWER OFF
REC START
▲
▲
▲
09/01/15
09/01/15
09/01/15
09/01/15
09/01/15
09/01/15
09/01/15
09/01/15
09/01/15
09/01/15
▲
084
083
082
081
081
079
078
077
076
075
(4.1)Playback by searching an event from Event List.
(4.2)TIME: Each event is recorded and listed every four
hours automatically.
(4.3)MOTION:Motion even List.
(4.4)SENSOR:Sensor even list.
(5)Loss Alarm:set buzzer ON/OFF in case of the video loss.
(6)Network Settings
Network Settings
Yes
Enable
Local IP
Port
8841
Mac Address 12:34:56:78:9A:BC
Password
111111
Video Quality
4
Press ▲▼ to do the selection
Press
,
or to enter and set up.
Press MENU to save the setting and exit.
(6.1)Enable:YES/NO to enable or disable the network.
(6.2)Local IP:Setup Local IP.
11
SETUP MENU(OSD)
Local IP
IP Type
IP Address
Gateway
Net Mask
[STATIC]
192.168. 1.218
192.168. 1. 1
255.255.255. 0
IP TYPE:DHCP/STATIC.
IP ADDRESS:Setup the IP address.
GATEWAY:Default Gateway.
NET MASK:Setup the NET MASK.
(6.3)Port:Setup network port.
(6.4)Mac Address.
(6.5 )Password:Password (default 111111) for review in remote.
(6.6)Video Quality:Setup the video quality level. There are 1~5 levels
and 5 is the best quality.
(7)Pan/Tilt Device
Pan/Tilt Device
Channel
ID
Nodel
Pan/ Tilt Test
RS-485(Baudrate)
1
1
None
115200
(7.1)Channel:Select the channel with PTZ device.
(7.2)ID:Set the ID the same with PTZ device.
(7.3)Model:The protocol could be NONE、Pelco D、Pelco Por
MERI LI-LIN.
(7.4)Pan/Tilt Test:Enter the test of PTZ.
(7.5)RS485(Baudrate):Set the baudrate.
(7.6)Select the PTZ channel on live to enter PTZ Mode.
Then Press
to select Direction,focus, Zoom and brightness
setting. After change setting,click “pause” to exit.
12
SETUP MENU(OSD)
CH 7
▲
▲
▲
2 0 09 /01 /1 5 0 9 :1 6:1 3
▲
:Focus:Press ▲▼ or
to setup.
:Zoom In/Out:Press ▲▼ or
to setup.
:Up/Down/Right/Left:Press ▲▼ or
:Brightness:Press ▲▼ or
to setup.
to setup.
(8)Firmware Upgrade
F/ W Upgrade
Current Ver: 1.5.7
New
Ver: 1.5.7
PRESS( )START,( )CANCEL
Save updated firmware on the USB device and plug it on DVR.
Before starting,the current version and new version will been
shown on screen.
★ To prevent from system error,please do not remove USB device
while firmware is updating. DVR must reboot after firmware update.
★ HDD must be installed to support firmware update running.
13
SETUP MENU(OSD)
Time Search
Time Search
Start
Ent
2009/01/05 12:56:20
2009/01/08 16:12:46
2009/01/05 12:56:20
Search
(1)Select the start date and time to playback the video .
(2)During the playback:
●
Fast forward of playback. Click twice for X 2 speed and 3 times
for X3 speed .
●
●
●
Fast rewind of playback. Click twice for X 2 speed and 3 times
for X3 speed.
Press to pause the playback.
Press to stop the playback.
Exit
Exit
Save& Exit
Exit Without Saving
Load Setup Default
(1)Save & Exit:Save all setting and exit menu.
(2)Exit Without Saving:Exit menu without saving any changes of setting.
(3)Load Setup Default:Run all setting to be the defaults.
14
F.BACKUP
CH1
CH2
Start
End
Size
CH4
CH5
CH7
CH8
CH6
■:EXIT
▲
▲:START TIME
●:CDR COPY
CH3
2009/01/08 15:30:38
2009/01/08 15:30:38
128 KB
:END TIME
:USB COPY
:HELP
▲
2009/01/08 15:38:56
(1)Plug USB device into USB slot in front panel of DVR.
(2)Press“
”to playback and search/select the video.
(3)Press“
”to enter the backup menu.
(4)Press“
”to choose the start time of backup.
(5)Press“
”to choose the end time of backup ( it will come out with
the data capacity of chosen time between start and end).
(6)Press“
”to start backup.
(7)Or press“ ● ”to start backup by CD-RW.
(8)Press“ ■ ”to back to live mode after completing the backup .
G.RECORD
When DVR is recording(by time, motion or Sensor), the mark ● will be shown
on the upper right corner of each channel on screen.
15
H.RECORDING HOURS
(BASED ON 400GB HDD, TIME RECORDING)
★ Following data is reference only.
In NTSC system
Video Signal
NTSC
60fps
PAL
15fps
3fps
90 hours 180 hours
900 hours
Video quality
Highest
45 hours
High
75 hours 150 hours 300 hours 1500 hours
Normal
95 hours 190 hours 380 hours 1900 hours
In PAL system
Video Signal
30fps
50fps
12fps
3fps
90 hours 180 hours
900 hours
25fps
Video quality
Highest
45 hours
High
70 hours 140 hours 280 hours 1400 hours
Normal
90 hours 180 hours 360 hours 1800 hours
I.DVR Viewer User Guide
★ Minimum System Requirements:
1. CPU - 1GHz
2. RAM - 1GB
3. Video Card - Video RAM 512MB (NVIDIA GEFORCE 8400 GS )
1.File playback
CH1 2009/01/05 12:56:46
CH 2 2009/01/05 12:56:4 2
32009/01/05 12:56:45
CH4 2009/01/05 12:56:46
CH 5 2009/01/05 12:56:4 1
CH6 2009/01/05 12:56:41
CH7 2009/01/05 12:56:47
CH 8 2009/01/05 12:56:4 8
▲
PLAY ×1.0 2009/01/05 12:56:48
(1.1) Execute the VVF Player.
(1.2) Click the right button of mouse control. Select and click “OpenFile”to
get the file you want to playback. The file format must be .vvf format.
16
DVR Viewer User Guide
2.Capture film
Player
Netviewer
Open File...
F2
Open Disk...
▲
Export
Close
F4
Show Time
Always On Top
▲
Playback
Mark In
▲
Audio
▲
Capture
Mark Out
Export
Full Screen
Maximize
▲
Aspect Ratio
▲
Split Mode
Event List
Search Time
Video Intervaln SETTING
Options...
About Viewer
F1
Exit
Alt+F4
(2.1)Playback the file and select the video wanted to capture. Click “Pause”
at video you want to start to capture.
(2.2)Then,click the right button of mouse control and select [Capture] /
[Mark In] as start point.
(2.3)Then Click the play again,then Click “pause” at the frame you want to
end the capture.
(2.4)Click the right button of mouse control and select [Capture] / [Mark Out]
to end the capture.
(2.5)Click the right button of mouse control and [Capture] / [Export] to finish
the exportation.
3.Export To AVI
×
Export To AVI
Export Channel
1
2
3
4
Audio
Input File
Browse...
Output File
Browse...
Compression
Select...
Progress
0%
OK
Cannael
(3.1) Click the right button of mouse control and select [Export] / [ AVI ].
(3.2) Set Input/Output File、Compression of audio for channels selected.
(3.3) Click OK to start convert the file to AVI format.
17
DVR Viewer User Guide
4.Options
CH1 2009/01/05 12:56:46
CH 2 2009/01/05 12:56:4 2
32009/01/05 12:56:45
×
Options
General
Always on top(A)
Use DirectDraw
Show playback time(T)
Repeat playback(R)
CH4 2009/01/05 12:56:46
CH 5 2009/01/05 12:56:4 1
CH6 2009/01/05 12:56:41
On screen display date/time format
▲
%Y/%m/%d %H:%M:%S
2009/01/12 12:04:119
Path for still capture
CH7 2009/01/05 12:56:47
CH 8 2009/01/05 12:56:4 8
C:\VxCapture
Browse...
OK
Cannael
PAUSE 2009/01/05 12:56:57
(1)Always on top:Screen always keeps on top.
(2)Use DirectDraw:To get support of DirectX in Windows.
(3)Show playback time.
(4)Repeat playback.
(5)On screen display date/time format.
(6)Path for still capture:It's the file path where the pictures (captures) are
saved in your computer.
5.Login
×
Login
Use dynamic ip service
IP address
192.168.10.100
192.168.10.100
Port 8841
8841
Password
Login
Cancel
(1)Execute the Viewer and click
at bellow-listed functions to login and
access the DVR live display.
(2)Use dynamic ip service:Click it if you're using the Dynamic IP service.
(3)IP address:Key in the DVR address.
(4)Port:DVR com port.
(5)Password:Key in the password (default:111111).
(6)An icon
will be displayed on bottom of screen when your login is succeed .
18
J.REMOTE CONTROL
REC
POWER
REC:Full time record for all channels.
AUTO:auto sequence CH switching.
AUTO
BAKUP
INFO
:Playback and Pause .
SEARCH
AUDIO
:Fast rewind.
AUDIO: Mute .
ZOOM
:Fast forward.
PTZ:PTZ setup.
PTZ
Z+
F+
Z-
F-
Z +:P T Z Z o o m in.
Z - :P T Z Z o o m out.
:Stop the playback and return to live
display.
F+: PTZ f o c u s +.
F - :P T Z F o c u s -.
:UP Selection.
E N T E R:Enter into the selection of
the MENU.
ENTER
:Right Selection.
: Left Selection .
MENU
CANCEL
CANCEL: Exit current menu without saving .
M E N U:Enter MENU /
or save and exit MENU.
1
2
3
4
5
6
7
8
9
10
11
12
13
14
15
16
4X4
3X3
2X2
PIP
3×3:9-division in display.
:Down Selection.
Channels 1-8.
2×2:4-division in display.
19
H12C086001