1
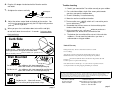
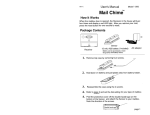
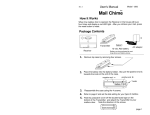
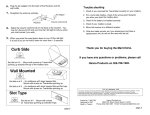
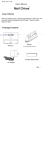
User's Manual
Rev. N
Model 1200
tm
Mail Chime
Recode Procedure
How It Works
Shown below is a recode procedure. It is very unlikly that you should ever
need to use this procedure.
Your unit will not lose it's code unless someone holds the reset button on
the receiver down for an extened period of time.
When the mailbox door is opened, the Receiver in the house will beep
four times and display a red LED light. After you retrieve your mail, press
the reset button to reset.
Package Contents
Only use this procedure at a last resort when you feel you have a problem
with your unit.
tm
Mail Chime
2 3
1
4
battery
Transmitter
Reset
Hanna Products Inc.
1. Remove the transmitter from your mailbox door by removing
the four screws.
2. Place the transmitter down on a surface next to your receiver
so that the battery is facing up.
Receiver
1.
3. Hold down the reset button on the Receiver until the lights
goes out. It will take about 8-9 seconds before the light goes
out. (The light will come back on, but do not worry about it)
4. Release the reset button and immediately turn over the
Transmitter so that the battery is facing down on the table.
(Remember to turn over the Transmitter immediately.)
Battery can be purchased at most
drug stores and battery stores.
Remove top case by removing four screws.
2
1
2.
3
4
Place the battery into the battery holder. Be sure the positive end is
towards the knob at the end of the case.
positive end
negative end
5. You should hear either 2 quick beeps or 4 long beeps
depending on how old your unit is. If you hear either of
these sounds then you have re-coded your unit correctly.
AC adaptor
12 volt, A23 battery
knob
battery
6. Test your unit in your home before mounting it to your
mailbox.
3.
4.
5.
6. After re-coding, it is best to turn your transmitter so the
battery is facing up until you are ready to mount it back
on your mailbox door. It is in an off position when the
battery is facing up.
page 4
Reassemble the case using the 4 screws. Put screws in from top.
Refer to page 2 and set the dial setting for your type of mailbox.
Peel the protective cover off the double faced tape on the
bottom of the Transmitter and attach the Transmitter to your
mailbox door. Note the direction of the arrows.
double faced tape
page 1
6.
Plug the AC adaptor into the back of the Receiver and the
wall outlet.
7.
Straighten the antenna vertically.
Trouble shooting
AC Adaptor
1. Check if you mounted the Transmitter correctly on your mailbox.
2. For a curb side mailbox, check if the arrows point towards
you when you open the mailbox door.
3. Check if the battery is installed correctly.
Receiver
8.
9.
Volume control knob
Adjust the volume control knob on the back of the receiver. You
may turn the sound off and use only the LED light to tell you when
your mail arrives if you wish.
When you press the reset button down to turn off the red light,
do not hold it down for more than 1-2 seconds. Just press down
firmly and let up.
5. The transmitter uses a ball tilt switch so it is normal for you to
hear a rattle when you tip it.
6. Remember that the four screws on the transmitter go into
the base from the top side.
7. Units are made as sets, so if you should ever purchase a
replacement unit, do not mix the new with the old.
8. The knob on the transmitter will be set on # 4 for curb side
mailboxes. Do not move the knob unless you have a
wallmounted or slot type mailbox.
Curb Side
2
4. Move the receiver to a different location.
3
1
4
Limited Warranty
Set dial on # 4 - Mount with arrows on Transmitter
pointing up towards the top of the mailbox door.
(Arrows should point towards you when you open the door).
2
1
During first 30 days, defective units must be returned to retailer
for an exchange.
2
3
4
2
3
4
After 30 days, defective units must be returned with prepaid postage to
Hanna Products Inc. along with sales receipt showing date of purchase.
Defective units returned within the first six months from the purchase date will
be either repaired or replaced without charge.
1
Wall Mounted
1
3
4
Set dial on # 3 - for mailboxes with large tapered lids.
Mount with arrows on Transmitter pointing up.
Set dial on # 2 - for mailboxes with short tapered lids and flat tops.
Mount with arrows on Transmitter pointing up.
Units returned after six months up to one year from date of purchase, must be
accompanied with a restocking, shipping & handling fee of $18.00.
FCC ID: RNCMAIL-1200
This device complies with Part 15 of the FCC rules. Operation of this device is subject to the following conditions: (1) This
device may not cause harmful interference, and (2) This device must accept any interference received, including
interference that may cause undesired operation. CAUTION: Changes or modifications not expressly approved by the
party responsible could void the user's authority to operate this equipment.
Slot Type
4
3
3
2
Patent No. 7,506,796
Designed in USA
Made in Taiwan
2
4
1
1
Set dial on # 4 - Mount with arrows
on Transmitter pointing up towards hinge.
page 2
Hanna Products Inc.
2602 37th Street, Rock Island, IL 61201
Email: hannaproducts@mchsi.com
Ph/fax no. 309-788-1982
page 3