1
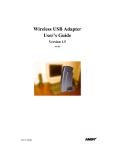
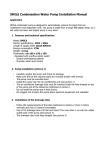
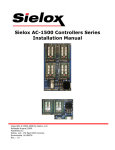
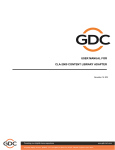
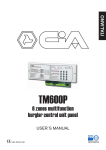
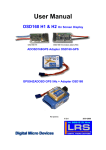
QUICK GUIDE
NEXCOR Cardiac Monitor
Model NX3L
List of Symbols ...................................................................... 02
Precautions............................................................................03
Restrictions............................................................................04
Possible working problems and solutions ...........................06
Battery.................................................................................... 07
Battery load indication .......................................................... 08
Battery loading ...................................................................... 09
Battery insertion in monitor ................................................. 09
Belt use ................................................................................. 10
Monitor use............................................................................ 12
The electrodes .......................................................................13
Cable connection to the electrodes ..................................... 15
LIST OF SYMBOL
Manual / Equipment Symbology
ATTENTION: IDENTIFIES CONDITIONS OR ACTIONS
WHICH NEED HIGHER ATTENTION ON THE PART OF
THE USER.
WARNING: IDENTIFIES CONDITIONS OR PRACTICES
WHICH MIGHT PUT EQUIPMENT AT RISK.
NOT PROTECTED
CLASS II
EQUIPMENT
AGAINST DEFIBRILLATOR
ELECTROMAGNETIC
RADIATION
LOW BATTERY
MONITOR ON OR
OFF
ELECTRODE NOT
CONNECTED
MONITORING
CENTRAL CALLING
BUTTON
HANDY SIGNAL
INTENSITY
MICROPHONE
VOLUME CONTROL
PROTECT AGAINST
RAIN AND HUMIDITY
HUMIDITY LEVEL
TEMPERATURE
LIMITS
NOT EXPOSE TO SUN
2
PRECAUTIONS
Whenever using the monitor verify the proper operation
form, following all user manual determinations;
The monitor cannot operate properly if stored or used under
circumstances beyond the ambit declared in the manual, or
if it is submitted to shocks or falls;
Make sure that the battery is correctly inserted into the
equipment;
Check the cable and electrode connectors before use, and if
some evident damage is stated, contact the manufacturer;
Use the monitor preferably with the support belt;
To send the data and information collected during the
monitoring, the monitor needs access to the GSM Handy
Network;
To guarantee a precise performance and avoid device
failure, do not let the monitor enter in contact with liquids or
be exposed to extreme humidity;
3
The device might not be used in contact with water as
for example, rain, bath, swimming pool or seawater;
The monitor cleaning should be performed daily after
its use with a clean and dry cloth;
With the use of safety belts in vehicles, take care to
avoid that any pressure is exercised on the monitor or
on the electrodes;
WARNING: The monitor cabinet should only be
removed by a qualified service staff. Except to the
battery, there are no internal parts to be selected
by user
RESTRICTIONS
Attention
Equipment is not compatible for the use together with
a defibrillator;
The device should not be used close to equipment that
issues electromagnetic or high frequency signals, for
instance, chirurgical equipments;
4
Equipments with communication via RF (radio frequency)
might affect the monitor performance;
Do not stretch, twist or kink the cables;
Follow the specific legislation with regard to the monitor use
in aircrafts, as it works via handy network;
Remove the battery if monitor shall not be used for more
than 15 days;
Do not remove or exchange the GSM chip (SIM Card)
delivered with the instrument;
The monitor is not recommended for the use in sport
activities or which require intense physical efforts;
The use of the monitor in case of artificial pacemaker users
should be prescribed and accompanied my medical
professionals. As the Nexcor monitor operates via the use of
the handy network, in case of the concomitant use with a
pacemaker, the restrictions determined by the pacemaker
manufacturer should be duly observed;
The USB monitor entry located at the higher level is for
manufacturer’s use only, and should not be used for another
purpose.
5
POSSIBLE WORKING PROBLEMS AND SOLUTIONS
Problem
Monitor does not
turn on
Possible Solution
»
Verify if the battery is
correctly inserted;
»
Verify if the battery is loaded.
Verify if the electrode plugs
are correctly connected
to the electrodes;
» Verify the electrodes and
perform the exchange
if they are peeling away;
» Verify if the cable or plugs
show some average
and request the exchange;
» Disconnect and reconnect
the monitor with
connected cable and plugs.
»
Blue Led remains
on for more
than 10 seconds
6
Problem
Nexcor vibrates
and the yellow
Led remains on
Green Led is off
and monitor issues
a sonorous signal
from time to time
Calling signal
Speaking tone
is too low
Possible Solution
»
»
»
Substitute the battery for
another fully charged battery.
Verify its location and look for
the place that presents the
best GSM Handy
Network connection.
Use the volume control
bottoms for a more
proper volume.
BATTERY LOADING
The battery type is of NEXCOR BP4L.
The external loader MODEL is 3J - NX3LC.
7
BATTERY LOAD INDICATION
The NEXCOR has a battery level indicator, which alerts
user whenever the battery should be reloaded.
Yellow
Led
When the battery reaches 30% of the load, the NEXCOR
vibrates and the yellow led shall blink. When the load
is 10% or less, the yellow led shall remain on to alert
user on the battery exchange need. The user should
stay alert to be sure that the battery is always loaded,
and that a loaded exchange battery is always ready to
perform the substitution.
8
BATTERY LOADING
To load the battery, insert it in the external loader as
shown in the image below:
Connection
Entry
BATTERY INSERTION IN MONITOR
To insert the battery into the instrument, press the
button that opens the battery cap and remove it. Install
the battery following the battery and monitor indication
arrows. Close the cap as shown below:
9
BELT USE
The belt should be used as follows:
1) INTRODUCE THE RIGHT
ARM AND THE HEAD IN
THE CLOSED STRAP
2) ADJUST THE WAISTBAND
AND TIE THE FASTENERS
10
3) PUT THE MONITOR INTO
THE POCKET WITH THE
BUTTON IN THE FORWARD
AND THE CABLES IN THE
UPWARD POSITION
4) PASS 3 OF THE 4 ELECTRODES
THROUGH THE WAIST
ELASTIC BELTS
5) PASS 2 OF THE 4 ELECTRODES
THROUGH THE STRAP
BELTS OF THE HOLDER
11
MONITOR USE
Your NEXCOR should be used as follows:
To turn-on the NEXCOR, press the turn-on button until
the orange light gets on (see the images), indicating
that the NEXCOR is on.
Orange Led
lights
12
THE ELECTRODES
The electrodes should
always keep a direct
contact to the skin
and should be
positioned as follows:
RIGHT
SIDE
RED
YELLOW
GREEN
BLACK
RED: The electrode should be positioned on the
superior RIGHT part of the thorax, just below
the clavicle bone;
YELLOW: To be connected to the electrode, which should
be positioned on the superior LEFT side of the thorax,
just below the clavicle bone;
BLACK:: To be connected to the electrode, which should
be positioned on the inferior RIGHT side of the thorax,
just below the last rib;
GREEN: To be connected to the electrode, which should
be positioned in the inferior LEFT side of the thorax,
just below the last rib.
13
The correct electrode positioning, as well as the direct
contact of the electrodes to the skin are essential
to allow the NEXCOR to capture the heart electrical
impulses
The electrodes should be substituted every day or
whenever the user takes a bath;
Before the bath, remove the electrodes, and after the
bath insert new electrodes;
Be careful to substitute the electrodes when they show
low adherence to the skin;
The low adherence might be caused by transpiration
or by the natural skin oiliness.
IMPORTANT: It is normal that men have hair on the
thorax, on the places where the electrodes should
be positioned. The hair generates interference in the
electric impulse capturing, and this fact impairs or
even prevents the generation of electrocardiograms.
Thus, if this is your case, shave the hair at the
places where the electrodes shall be placed on.
14
CABLE CONNECTION TO THE ELECTRODES
Install an electrode in each one of the four cable
connectors as shown in the image above. Position the
electrode pin into the central hole of the connector until
hearing the electrode locking into the connector.
IMPORTANT: The NEXCOR is a monitoring device. The
diagnosis on the health condition of the user should
always be provided by a specialized physician, and
with the use of all means and equipment which are
appropriate for mentioned purpose.
15
NEXCOR – Manufactured and Distributed by 3J Tecnologia, under the
license of Corcam Tecnologia S/A.
www.nexcor.com.br
Rua Sampaio Viana, 202 - conjs. 104/105 - Paraíso - São Paulo
SP - CEP 04004-000 - (11) 3294-7667 / 3294-7671.