1
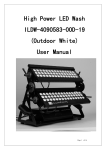
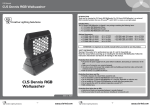
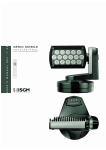
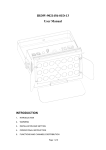
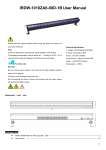
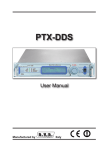
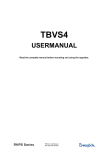
HIGH POWER LED Pro Wash
User Manual
(IRDW-7049126-00D-11)
1、Introduction
Thank you for purchasing IRDW-7049126-00D-11 high power LED washer. This product is featured
with LED. It will provide you splendid vision enjoyment.
z
Configuration
* 49 PCS 3IN1 high power LED(RGB module)
z
Angle
* PAN adjustable -15°---75°
* TILT adjustable
-50°---50°
* Optical Angle 25°
2、Safety Information
Read this manual before powering or installing the fixture. Follow the safety information listed below
and observe all warnings in this manual. If you have any question about how to operate the fixture safely,
please contact the dealer or Neo-Neon after service.
z Always ground earth electrically. And use only the power supply compliance with electrical code.
z Replace the fuse and the bulbs with the same specified type.
Page 1 of 7
z
z
z
No spare parts are available. If needed, please contact the factory.
Do not operate if the ambient temperature exceed 40℃.
If any problem, please contact the professionals or the technicians.
Under the circumstances that the mains power is not
grounded (earthed), it is strongly recommended that the
base housing should be grounded (earthed) in case of the
potential damage caused by the electrostatic or electricity
accumulation.
3、Installation and Setting
3-1 Mounting:
3-2 PAN & TILT Adjustment:
For PAN or TILT Movement adjustment, please use the 6mm hex key(TILT)and 3mm hex key(PAN)
Page 2 of 7
4、Operation Instruction
Panel:
10 : 30
2
3
1
4
1:LED Screen。
2:Enter。
3:UP。
4:DOWN。
5、Function Introduction:
1)
5 editing available programes, at most 10 modes per programe
2)
36 editing available time trigger event. It can be setted the start and the end time of the programe
via per event.
3)
Temperature Sensor inside. Ensure the temperature of the light head is below 60 degrees.
5-1
Menu Introduction:
serial
number
Name
Display
matter
1
Address
A001
Main
menu
matter
display
Press
enter
button
display
Main
menu
matter
change
Submenu
Submenu
option
How is enter
into
submenu
funtion
Set the DMX’s
start and end
channel.
Up/enter
change
Rblac
2
Balance
Gblac
balanc
√
Bblac
Press”Enter”
key for 2-3
seconds
Set the R,G, B
of the balance
parameter
Enable
3
Boost
boost
4
White Led
Run Hour
R_H
5
Green Led
Run Hour
G_H
6
Bule
Run Hour
B_H
7
L_H
Press
enter
button
display
Press
enter
button
display
Press
enter
button
display
Press
enter
button
display
Press
enter
button
display
Default
OFF
Default
Boost off
Up/enter
change
Red
LED
running time
Up/enter
change
Green
LED
running time
Up/enter
change
Blue
LED
running time
Up/enter
change
R,G,B
LED
running time
Page 3 of 7
8
Signal
signal
9
brightness
bright
10
Display Flip
Or Not
DSPFLI
11
12
Dmx delay
Time
Dmxdl
Press
enter
button
display
Press
enter
button
display
Press
enter
button
display
Press
enter
button
display
Don’t
change
Select DMX
Up/enter
change
Adjust
the
brightness of
the display.
Adust
the
display to be
obverse
or
reverse.
Set the time
that the unit
should keep
for the latest
working
mode
when
there’s
no
DMX signal.
Up/enter
change
Up/enter
change
time
√
YEAR
M/D
H:M
Press”Enter”
key for 2-3
seconds
Set the Pro
Wash’s inside
time
WEEK
13
Factory
Parameters
FACT
14
Previous
Parameters
PREV
Return to the
value that has
just
been
setted.
Return to the
value that has
been
setted
previously.
Red
Green
15
Test
test
√
Bule
CTC
All
shutt
Dimer
16
Temperature
17
Master
18
Slaver
19
Schedule
Enable or not
temper
SlavID
Sched
Press”Enter”
key for 2-3
seconds
Test
Pro
Wash’s R,G,B
Color
temperature ,
frequency
Running
normal
situation
To display the
temperature.o
f the light
head
via
Centigrade or
Fahrenheit
Press
enter
button
display
Up/enter
change
Press
enter
button
display
Up/enter
change
Set
the
running mode
as a master
unit or a slave
unit.
Press
enter
button
display
Up/enter
change
Set the slave
No.
when
working as a
slave unit.
Up/enter
change
Select
whether it will
run as the way
of the time
trigger event
that
setted
inside.
Press
enter
button
display
Page 4 of 7
20
Program Run
Select
the
running
programe.
Pgrun
Prog
SCENE
FIXT
shutt
dimer
R
G
B
21
Program Set
Pgset
√
mac
tm_h
Press”Enter”
key for 2-3
seconds
Set the unit’s
running
programe.
tm_m
tm_s
fd_h
fd_m
fd_s
SCNRUN
event
program
22
Schedule
Schedl
√
day
start
Press”Enter”
key for 2-3
seconds
Set the time
trigger event
end
enable
1)
Addr:Set the DMX’s start and end channel.
2)
Balance:Set the value of the balance white light. Press”Enter” key for 2-3 seconds to go to the
next menu. Enabling selection: ON or OFF.
3)
r_h,G_h,B_h: Separately display the LED running time of R,G,B.
4)
bright:Adjust the brightness of the display.
5)
Dspflip:Adust the display to be obverse or reverse.
6)
Dmxdly:Set the time that the unit should keep for the latest working mode when there’s no
DMX signal.
7)
Time:Set the unit’s inside time.Press the “Enter” key for 2-3 seconds to go to the next menu.Then
it can set the Year,month,day,hour,minute,week.
8)
FACT:Return to the value that has just been setted.
9)
PREV:Return to the value that has been setted previously.
10) TEST:Press the “Enter” key for 2-3 seconds to go to the next menu.Then test the working state of
the R,G,B LED of the unit.
11) TEMPER:To display the temperature.of the light head via Centigrade or Fahrenheit.
12) Master:Set the running mode as a master unit or a slave unit.
13) SLAVEID:Set the slave No. when working as a slave unit.
14) SCHEDL:Select whether it will run as the way of the time trigger event that setted inside.
15) Pgrun:Select the running programe.
16) Pgset: Press the “Enter” key for 2-3 seconds to go to the next menu.Set the unit’s running
programe.Each programe has the below setting,
Page 5 of 7
(1)SCEN:Select the mode 1-10 that you would like to set.
(2)FIXT: When the unit runs as the master one,it can set the slave No. that the current mode
includes. The below selections are available: all No., odd No.,even No.,or any one of the slave
units.
(3)shutter:Set the strobe state of current mode. Quick strobe ,strobe with quick lighting up and
slow crushing out,strobe with slow lighting up and quick crushing out,random strobe etc. Each
state can be setted the speed.
(4)dimmer: Set the brightness of current mode.
(5)R,G,B : The brightness of each LED.
(6)mac:Select the unit’s effect of inside programe.
(7)tm_h,tm_m,tm_s:The running time of current mode:Hour,Minute,Second.
(8)fd_h、fd_m、fd_s: The running FADE time of current mode:Hour,Minute,Second.
(9)SCNRUN: Enable this mode or not.
When the above setting is over,please press “Enter” key for 2-3 seconds to save the
setting. and exit the menu.
17) SCHEDU:Set the time trigger event.Press the “Enter” key for 2-3 seconds to go to the next menu
for the setting.There’ re below settings for each event.
(1)event:Select the event that you would like to set.
(2)program:Select the program that the event includes.
(3)day: Set the day on which the event should run. Monday to Sunday is available.
(4)start:Set the time at which the event should start to run.
(5)end: Set the time at which the event should stop.
(6)enable:Enable the event or not.
DMX Function:
1)、Function Channel:
0 – 3 : All crush out.
4 – 6 Manual Dimmer Mode.
7 – 59 Changing Strobe. 7: the fastest;59:the slowest.
60 – 78 Fading Strobe .60:the fastest;78:the slowest.
79 – 87 Random Strobe.79:the fastest;87:the slowest.
89 – 255 Manual Dimmer Mode.
2)、Master Manual Dimmer Control:0--255
3)、Red Manual Dimmer:0—255
4)、Green Manual Dimmer:0—255
5)、Bule Manual Dimmer:0—255
6)、Color Temperature Adjusting:
0 - 19
color termperature adjusting closed.
20 - 255 From cold + 2000 K° to warm - 2000 k°
7)、Function Channel(Can control several connected units)
0-7
backup
8 - 15
low speed fading effect. Wait for 5 seconds.
16 – 23 middle speed fading effect.Wait for 5 seconds.
24 - 31
high speed fading effect.Wait for 5 seconds.
32 - 39
low speed fading effect.No waiting.
40 - 47
middle speed fading effect. No waiting.
48 - 55
high speed fading effect.No waiting
Page 6 of 7
56 - 63
64 - 70
71
72 - 79
80 - 87
very low speed fading effect.No waiting
seven colors low speed changing. chase.
backup
seven colors middle speed changing. chase.
seven colors high speed changing. chase.
6、Maintenance and Cleansing
6-1
Troubleshooting
Trouble
Cause
Shooting
No power supply
Check the mains power switch and the
cables.
Fuse burned
Disconnect the power and replace the fuse
with the same specification. If the fuse is
burned again, the problem should be cause
by the circuit. Please consult the technician.
Check whether the
temperature of the
surrounding or housing
has exceeded 80 degrees.
Take the broken unit out,and ask the special
technician to maintain it..
Fixtures do not
respond.
Resetting is normal,but
the menu no affecting.
6-2
Cleansing
IRDW-7049126-00D-11 requires simple routine maintenance to secure its long life span and best
performance.
1. Maintain the cleaning of the fan and the air vents. Dust should be removed from the fan and the
vents periodically to secure the cooling and heat dissipation.
2.Maintain the cleaning of the optical components.
3.Check the wires such as the wire connection or the earthed wire periodically to secure the safety.
7、Technical Specification
Master Dimmer:0-100%
Power:210W
power input:AC100-240V
60/50Hz
Size:L376mmXW232 mmXH432 mm
Weight:13.5kg
Page 7 of 7