1
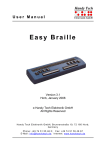
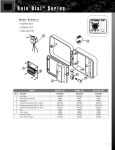
Short Reference for the Active Braille
Version 1.0
Please also review the detailed User Manual, which is included in printed (not Braille) format
and in daisy format on the enclosed CD.
The two space bars are located at the centre front. In the following description the left space
bar is called [SPCL] and the right space bar is called [SPCR]. If either the left or right space
bar can be used they will be called [SPC].
Above the Braille display you can find 8 ergonomic function keys. These function keys are
also used for Braille input. They correspond to the usual Braille keyboard layout and are,
from the left to the right as follows:
7
3
2
1
4
5
6
8
Located in the middle of the device are 40 ergonomic Braille display elements with integrated
cursor routing keys. The cursor routing (CR) keys which are integrated as part of each Braille
cell enable you to place the cursor directly at the text position of this Braille cell.
The Triple Action Keys are to the left and right of and flush with the Braille cells You can
activate the Triple Action keys at the top, in the centre, and at the bottom. The Triple Action
Key functions are:
The left or right Triple Action Key's (Up) position also serves as a reading key to move
backward within the text, and will be referred to as [TLU] or [TRU] in the list below. The left or
right Triple Action Key's (Down) position also serves as a reading key to move forward
through the text, and are referred to as [TLD] or [TRD] in the list below. In the event of the
right as well as the left Triple Action Key (Up) can be pressed, it is called [TU]. If alternatively
the Triple Action Key left or right (Down) can be used, this is called [TD]. In the case that you
need to press both [TU] and [TD] simultaneously, such as setting a mark within the Editor,
you may press the keys at the top left [TLU] and bottom right [TRD], or at bottom left [TLD]
and top right [TRU].
The centre position of either the left or right Triple Action Key [TLC] and [TRC] can be used
for additional functions.
If you move along the right side of the housing towards the back, you will first feel the main
power button. Located behind the power button is a USB type A port to connect a USB
keyboard. Behind the USB type A port is the outlet for the power supply.
On the left side of the device are from the front to the back – another USB type A port to
connect a USB keyboard, a Micro SD card for service reasons and a USB type B port to
connect a PC.
Please do not remove the Micro SD card at any time from the device while it is on. Data on
the card can be damaged. Please turn the Active Braille off, before you insert or remove the
Micro SD card.
Left on the back side you find a round headphone plug (2.5 mm) to connect a headphone or
an external loudspeaker. The Active Braille is shipped with an adapter cable to connect also
a 3.5 mm connector.
You find a list of important functions an there corresponding key combinations in the
following tables:
Navigating the Menu System
Function
One menu item to the left
One menu item to the right
First menu item within one level
Last menu item within one level
Move up one menu level
Select or move down one menu level
Toggle check box
Select menu item directly
Return to suspended Editor
Keys
TU or SPC+7 or SPC+1
TD or SPC+8 or SPC+4
SPC+1 2 3
SPC+4 5 6
TLC
TRC
SPC or TRC or CR keys
Hotkeys
SPC+1 2 3 4 5 6
Editor Functions
Function
Abort operations, cancel markings
Read text
Start automatic reading
Change automatic reading speed
Manual scrolling
Halt automatic reading
Automatic scrolling via ATC on/off
Delete character at cursor position
Backspace
Cursor to top of file (Home)
Cursor to end of file (End)
Cursor to beginning of line
Cursor to end of line
Cursor to beginning of next sentence
Cursor to beginning of previous sentence
Cursor to next word
Cursor to previous word
Move cursor left
Move cursor right
Move cursor one line up
Move cursor one line down
Direct cursor placement
Mark beginning of block
Cut block
Copy block
Delete block (without copying)
Paste block
Exchange mark and cursor
Toggle insert/overstrike mode
Set mark
Jump to mark
Incremental forward search
Incremental backward search
Forward search and replace
Display character in ASCII
Insert current date
Insert current time
Keys
TLC
TU or TD
SPC+TD
TU or TD, if automatic reading is active
SPC
CR keys
Chord A (SPC + 1 7)
SPC+4 5
Chord b (SPC+1 2)
SPC+1 2 3
SPC+4 5 6
SPC+1 3
SPC+4 6
SPC+5
SPC+2
SPC+6
SPC+3
SPC+7
SPC+8
SPC+1
SPC+4
Cursor Routing Keys
SPC+TRC or press CR key twice at beginning
of block
Chord x (SPC+1 3 4 6)
Chord c (SPC+1 4)
Chord X (SPC+1 3 4 6 7), or SPC+1 2
Chord v (SPC+1 2 3 6)
SPC+7 8
Chord i (SPC+2 4), insert mode is default
TU+TD
Chord m (SPC+1 3 4)
Chord f (SPC+1 2 4)
Chord F (SPC+1 2 4 7)
Chord r (SPC+1 2 3 5)
Chord D (SPC+1 4 5 7)
Chord d (SPC+1 4 5)
Chord t (SPC+2 3 4 5)
Function
Save file (without closing it)
Open file from Editor
Open file in read-only mode
Switch to next file
Switch to previous file
Save and close file
Suspend Editor
Editor's Setup menu
Status display
Switch to PC Mode
Help
Keys
Chord s (SPC+2 3 4)
Chord o (SPC+1 3 5)
Chord O (SPC+1 3 5 7)
SPC+5 6 8
SPC+2 3 7
Chord e (SPC+1 5)
SPC+1 2 3 4 5 6
Chord u (SPC+1 3 6)
Chord S (SPC+2 3 4 7)
Chord p (SPC+1 2 3 4)
Chord h (SPC+1 2 5)
Keys in PC Mode
Function
Return to menu
Switch between Braille display and status
module display
Keys
Hold down SPC+1 3 4 about half a second
SPCL+SPCR
Fixed Key Functions on External Keyboard
Function
Switch external keyboard to PC
Entire Braille display line to left
Entire Braille display line to right
Cursor to top of file
Cursor to end of file
Toggle between insert and overstrike
Delete current character
Delete character left of cursor
Set beginning of block
Copy block
Cut block
Delete block (without copying)
Paste block
Exchange mark and cursor
Status display
Incremental forward search
Incremental backward search
Forward search and replace
ESC function
Navigation
Cursor to previous word
Cursor to next word
Cursor to previous sentence
Cursor to next sentence
Cursor to beginning of line
Cursor to end of line
Set mark
Jump to mark
Switch to next file
Switch to previous file
Suspend Editor
Save file (without closing it)
Key/Key Combinations
Chord : (SPC+2 5)
Page up
Page down
Ctrl+Pos1
Ctrl+End
Insert
Delete
Backspace
Ctrl+Enter
Ctrl+c
Ctrl+x
Ctrl+X or backspace
Ctrl+v
Ctrl+Tab
Ctrl+S
Ctrl+f
Ctrl+F
Ctrl+r
ESC
Arrow keys
Ctrl+cursor left
Ctrl+cursor right
Ctrl+cursor up
Ctrl+cursor down
Pos1
End
Ctrl+M
Ctrl+m
ALT+Tab
ALT+Shift+Tab
Ctrl+Space
Ctrl+s
Function
Save and close file
Help
Editor's Setup menu
Switch to PC Mode
Display character in ASCII
Open file from Editor
Open file in read-only mode
Insert current date
Insert current time
Key/Key Combinations
Ctrl+e
Ctrl+h
Ctrl+u
Ctrl+p
Ctrl+D
Ctrl+o
Ctrl+O
Ctrl+d
Ctrl+t
Screen Reader Functions
The key assignments for the different screen readers Window-Eyes, JAWS and
Hal/SuperNova on the Active Braille are as similar as possible. In the following table, you find
the assignments for Window-Eyes. You can find the tables for JAWS and Hal/SuperNova as
well as the complete table for Window-Eyes in the user manual.
Control Key/Braille Dot
Function
[7]
Go to focus
[3]
Go to the active window's title bar
[2]
Toggle Braille tracking on/off
[1]
Move Braille display section one line up
[SPCL] or [TU]
Braille display section to the left
[SPCR] or [TD]
Braille display section to the right
[4]
Move Braille display section one line down
[5]
Toggle between Window-Eyes-cursor and mouse cursor
[6]
Go to the active window's status line
[8]
Drag mouse to focus
[7 8]
Specifies whether type of control element will be indicated or
not
[3 8]
Toggle Browser Mode on/off
[2 8]
Toggle between 6/8 dot Braille
[1 8]
Handy Tech configuration dialog
[4 8]
Toggle blank spaces
[5 8]
Drag cursor to mouse
[2 3]
Beginning of line
[5 6]
End of line
[6 8]
Toggle Show Attributes on/off
[1 2 3]
Top of file
[4 5 6]
End of file
[5 6 8]
Run through attributes
[TLC]
Tab
[TRC]
Shift +Tab
[SPC + 1 2 7]
Toggle Braille input on/off
[SPC + 1 7]
ATC on/off
[SPC + 1 2 3]
ATC reading protocol on/off