1
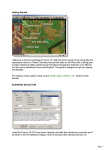
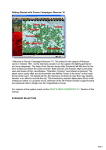
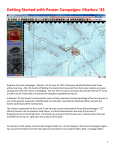
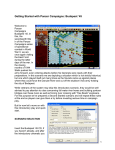
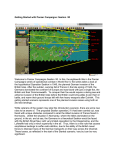
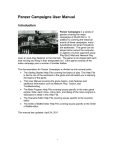
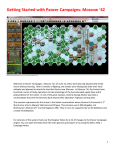
GETTING STARTED Welcome to Panzer Campaigns Alamein ’42. More than the fate of North Africa rests in the outcome of this struggle. The Suez Canal, the Mediterranean, the oil fields of Arabia and the back door of the Soviet Union will all fall prey should Rommel break through this last barrier thrown up by the Allies between the rail outpost of El Alamein and the great Qattara Depression. With the Allies revitalized by a new commander in Montgomery, the last vestiges of reserves by way of the ANZAC’s and new materiel notably armor in the form of US Sherman medium tanks, what lies before you as either side, represents a desperate fight. Will you allow Axis forces to ultimately link in the Soviet Caucasus and reign free in the Indian Ocean? This guide will get you playing immediately. SELECT A SCENARIO Page 1 Insert your Alamein ’42 CD if you haven’t already and after the introductory cinematic you’ ll be taken to the File Selection Dialog. Click the scenario #00_Started and then ok. SELECT A SIDE This takes you to the AI Selection Dialog where you choose the side you wish to play. For the purposes of this tutorial, select Axis AI "Manual" for yourself, and "Automatic With Fog of War" for the Allies. Click ok to get the game underway, you are now the Axis commander. Page 2 TURN 1 Your first Command Report will appear with information relevant to the first turn. Note its contents and click ok to close it. If you look at the map, you’ll see some oval shapes with numbers inside them. These are your geographical objectives. Allied-controlled objectives are colored tan or brown. Axis-controlled objectives are blue or orange. If you look at the northeast corner of the map, you will also see some objectives with a "?" and a "0" in them. These are Exit Objectives. The Axis Exit Objective is colored blue. This will be covered shortly. (Tip: To scroll the map use the scroll bars or click Settings and Auto Scroll in the Menu Bar). Page 3 Click Info and then Victory on the Menu Bar. As you can see, to obtain a Major Victory in this battle you must earn 100 Victory Points by the scenario’s end. Click ok to close it. Your goal therefore, is to earn 100 Victory Points through any combination of; holding geographical objectives, inflicting enemy loses or exiting your own forces via your Exit Objective by the scenario’s end. (Note: If you incur losses, points are taken away from you). Page 4 In this scenario your side moves first. Click on the hex indicated. The Unit Boxes of any units in the hex will be displayed in the Hex Info Area. Let’s move the German armored car unit represented at the top of the list. To do so click its Unit Box so that it lights up. To move the unit one hex, right click any adjacent location. If able, the unit will move. The Status Bar will tell you why if not. Page 5 Let’s now move the unit to a distant hex. Ensure that the unit is still selected. Now with the left button down, drag it a few hexes along the trail. Let’s see how far this unit can still potentially move. Click the Reachable Hexes Button on the Toolbar and its movement span will highlight. (Tip: Click the Divisional Markings Button on the Toolbar Bar to add color to your forces based on the organizations to which they belong). Page 6 Let’s now move another unit but this time, in Travel Mode. (Travel Mode is a special state that usually gives a unit a larger movement allowance particularly when using roads). Click the hex as shown and select the Italian infantry unit at the top of the list in the Hex Info Area. Note its highlighted movement span on the map. Click the Change Travel Mode Button on the Toolbar and you’ll see a number of things happen. A white line will appear at the bottom of the unit’s icon, a "T" will appear next to its movement points in its Unit Box and its highlighted movement span will slightly grow. This unit is now in Travel Mode. (Important Note: When in Travel Mode, offensive and defensive strengths are greatly reduced). Page 7 Move the unit to the distant hex as shown using any method you desire. Now click the Change Travel Mode Button. If the unit possesses sufficient movement points, it will redeploy. (Note: Some units such as towed weaponry must be in Travel Mode to move). Click the Reachable Hexes button to turn highlighting off. To the right of your infantry unit you will see a light tan armored car unit. Click on it. In the Hex Info Area you will see that this is an enemy unit. (Note: Enemy unit information with fog of war active will be hidden from you and summarized as; "X"=1 to 9 men/vehicles, "XX"=10-99 and "XXX"=100 to 999). Page 8 Click the hex as shown and select your Italian tank unit. Move it adjacent to the enemy. Did the enemy fire at you? The system handles enemy defensive fire during your turn if so and will likewise fire your units during its turn. In the Hex Info Area, right click the Unit Box of your tank unit and you will see that its range against "hard targets" such as armored cars is 1 hex. If your unit survives fire against it and possesses sufficient movement points you may return fire. To do so, select your unit exactly as you did for movement. Now with the Control key pressed, place the mouse over the adjacent enemy unit and a crosshairs will appear. Page 9 Right click to fire. (Note: Where more than one enemy unit exists in a hex, a pop-up dialog will allow you to select your target). The results of your fire will be shown on screen. Either there will be no effect, you’ll cause a loss, disrupt the enemy (the results will be yellow) or cause it to be broken (the results will be red). Most direct fire occurs against adjacent hexes. (Tip: Do not worry if your outcome does not match the one illustrated as no scenario plays the same way twice). Page 10 Let’s now fire some artillery. Artillery can fire at any unit in its range as long as an eligible spotter can see it. Click the hex as shown and select the Italian artillery unit. Now check your artillery unit’s range. You will see that it is 7 hexes and the enemy armored car unit just sits within this range. To fire artillery, do exactly as you did with direct fire – place your mouse over the enemy unit and with the Control key pressed, right click the enemy’s hex. The results of your fire Page 11 will be shown on screen. Now let’s soften the enemy up with airpower. The Command Report at the beginning of your turn advised that you have airpower available. Click the enemy’s hex again and now click the Call Air Mission Button on the Toolbar. A dialog will appear showing any air units available. You will see two squadrons of JU87 Stuka dive-bombers ready for orders. Click either squadron’s line and then ok. An air mission will be conducted against the selected hex and if successful, its combat results will be displayed on screen. Let’s now order an advance into the enemy’s hex itself. To enter an enemy occupied hex, you must assault it. Move the Italian armored car unit adjacent to the enemy as shown. Page 12 Ensure that your unit is still selected. If it has sufficient movement points remaining (they will be colored white or green), right click the enemy’s hex. A dialog will appear announcing the initiating of an assault. To resolve your assault, click the Resolve Assault Button on the Toolbar. Results will appear showing both sides’ losses in the format "your losses/enemy losses". If you win and any remaining enemy retreat, you will capture its hex. If you win and the enemy is unable to retreat, you will capture some of its forces but not enter the hex. (Remember, do not worry if your outcome does not match the one illustrated, as play will differ). Page 13 (Tip: Whether through movement or assault, if you capture an objective hex you will earn its Victory Points. However, objectives may be recaptured an endless number of times in a scenario. Only the side owning it at a scenario’s end claims the points in its total. To take an objective hex simply enter it. You do not need to remain there). Let’s now move another Italian armored car unit as shown. Move it one more hex as indicated. Did you hear an explosion? If so, you have entered a minefield. Depending on the minefield’s strength, your unit may take losses. Mines exist throughout the Alamein ’42 theatre and can be removed by engineers or mine clearing units, none of which are available to you in this scenario. Page 14 Now move the unit one hex adjacent to the north. Did it fail to move as ordered? Notice that a Wire icon has appeared. Check the Status Bar and you will see that you have attempted to enter an Obstacle hex. An Obstacle requires a unit’s full movement allowance to enter and as with minefields, engineers can remove them. Continue to move your units about and fire as you wish, both directly and indirectly. Use your remaining airpower if you desire. Remember that units may move, fire and assault so long as they possess sufficient movement points. When you have finished your actions click the Next Turn Button on the Toolbar and click ok if prompted. The enemy will move and fire its forces. Your units might fire automatically in reply. Some enemy movement may be spotted. Your next turn will be announced once the Axis Command Report appears. TURN 2 Page 15 Look at your Turn 2 Command Report. Amongst its variable information, you will see that reinforcements have arrived. Click ok to close it. Let’s reinforce your line. Click the Arrived Units Button on the Toolbar and an Arrived Dialog will appear listing reinforcements available for entry. Click the "Axis HQ 21Pz" line as shown and then ok. Page 16 Now look at the left edge of the map and you will see your reinforcements in position. Based on the movement points remaining, they are now ready to be selected for orders like any other unit. USING EXIT OBJECTIVES During this scenario depending on the strategy you choose, you may desire to earn Victory Points by exiting units from the map. (Note: Not all scenarios include exit objectives). Page 17 To earn Victory Points by exiting a unit, move your unit onto the Exit Objective hex as shown. Click Command and the Remove From Map on the Menu Bar. A Remove Dialog confirmation will pop up. Click yes. The unit will then leave the map and the Exit Objective will change from a "0" into a number representing the Victory Points earned. With each unit subsequently exited, the Page 18 indicated number of Victory Points earned will grow. (Note: An Exit Objective benefits only the side to which it belongs, exiting a friendly unit at an enemy Exit Objective or any other hex will simply remove that unit from the map. Once a unit leaves the map it is permanently removed from the scenario. With Fog of War active enemy Exit Objectives will always show as "?"). FINISH THE GAME You now know how to move, fire and assault with your forces. With the victory conditions in mind keep maneuvering your forces in the manner you see fit. The end of the game will be announced at the conclusion of the enemy’s final turn at which time, the final victory tally will be shown. To restart the scenario click File then Selection in the Menu Bar. A list of scenarios will appear and you may select any by double clicking its entry. FURTHER INFORMATION This guide is designed to make you feel comfortable with what’s going on in Panzer Campaigns but it is no substitute for the User Manual which is the series’ rulebook. You can see this while playing by pressing User Manual here. The Main Program Manual discusses the various elements of the interface in helpful detail. You can see this while playing by pressing F1 or click Main Program Help File here. Page 19 If you wish to delve inside the game designer’s head, press F3 while running the game and the Designer’s Notes will be yours or click Notes Help File here. Pressing F4 invokes a feature called the Parameter Data Table. It provides a host of information including movement costs, terrain benefits and stacking limits amongst other things. Lastly, documentation for the game’s editors may be found in the following help files: Scenario Editor Help File Order of Battle Editor Help File Finally, be sure to check out the "What's New in Alamein ’42" section of this manual. WHAT’S NEW IN ALAMEIN ’42? SAND STORMS Sand storms are a hybrid of the winter storm feature introduced with Panzer Campaigns Rzhev ’42. During a Storm, movement costs are doubled, visibility is reduced to 1 hex and combat/assault strengths are halved. The Command Report and Status Bar will tell you when Storm conditions are in effect and with background sounds on, the sounds of the Storm will be heard during play. MINEFIELDS Page 20 Though not a new rule, the Alamein campaign was notable for its prolific use of minefields by both sides. Players are reminded that once a minefield or obstacle leaves the line of sight of their units, these features are rendered invisible on the map. Refer to the Designer’s Notes for a discussion of the real life impact of this phenomenon as it actually affected the conduct of battle. Page 21