1
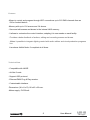
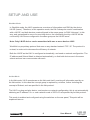
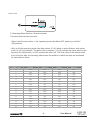
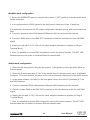
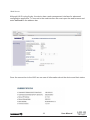
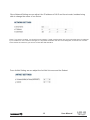
User Manual
Rev. 12.03.01
INDEX
Before Starting
3
Contents of the package
3
Cautions
3
Information
3
Introduction
4
Features
5
Technical data
5
Setup and Use
6
WokNet Mode
6
Art-Net Mode
6
OSC Mode
7
Front Panel
8
Rear panel
9
Worknet mode configuration
10
ArtNet mode configuration
10
Web Server
11
1
User Manual
About ouchOsc
14
LM-5 Layouts & TouchOsc
15
Copying Layouts
15
Linking TouchOsc & LM-5
17
Use & Programming
20
Program
20
Live
22
Execute
24
OSC Commands Implementation
25
DMX Control
26
Edit
36
Play
47
Considerations about TouchOSC
and LM 5
58
59
Reply Messages
2
User Manual
BEFORE STARTING
Contents of the package
• 1 x LightMouse LM-5
• 1 x External power supply DC 5V 500mA
• 1 x User manual
Cautions
•
To reduce the risk of electric shock or fire, do not expose this appliance to rain or moisture.
•
Do not spill water or other liquids on the unit.
•
Turn off the unit immediately, in case to detect malfunctions. If you detect smoke or unusual
odor from the equipment, stop using and unplug it.
•
Do not open the unit. Thre are not serviciable elements inside. Do not dismantle or modify
the unit, it will void the warranty
•
Do not try to repair it. Repairs by unqualified persons may cause damage or malfunction.
Contact an authorized service
Information
•
Keep the unit dry. This product is not water resistant and can malfunction if exposed to high
humidity levels. The internal oxidation, can cause damage.
•
Do not hit the unit. This product may malfunction, if subject to severe hits and vibrations.
•
Keep away from strong magnetic fileds. Not use or place unit near equipment generating
strong electromagnetic radiation or magnetic fields. Heavy loads of these fields as radio
emitters, may interfere with or affect the internal circuitry of the product.
•
Cleaning. Because of the smoke residue or dust, clean the outside of the required units.
Use a conventional glass cleaner and a soft cloth.
•
Copyright. No section of this manual may be reproduced, transmitted, transcribed, stored in
any system or translated into any language deninguna form or medium without permission.
3
User Manual
INTRODUCTION
The LM-5 LightMouse of WORK makes the lighting control at events and facilities, may finally
be something accessible to everyone, not just a territory restricted to people with technical
training in lighting.
Thanks to it can be controlled through open protocol OSC (Open Sound Control), the LM-5
LightMouse allows end users to design their own lighting console appropriate to their needs, in
order to control the installation using WIFI connection through your iPhone or Android device.
This means that the user can generate a console adapted both installation requirements as to
their knowledge level, eliminating technique barriers techniques, democratizing the lighting control
and making it accessible to everyone.
In addition, the LM-5 LightMouse as close a "Swiss army knife" for lighting controlling. Not only
has ArtNet Node (Ethernet to DMX interface) butcan also be controlled by OSC server to create
DMX data, has an internal memory capable of storing Cues and Cue DMX-lists, with its own
stand and fade time, and allows using 512 DMX channels with 100 scenes and shows.
4
User Manual
Features
-Allows to control and program through WIFI connections up to 512 DMX channels from an
iOS or Android device.
-Memory with up to 100 scenes and 24 shows.
- Save and edit scenes and shows in the internal LM-5 memory.
- It allows to customize the control interface, adapting it to user needs on each facility.
- Provides a better feedback of actions, editing and recording scenes and shows
- Makes it possible to integrate lighting control with audio edition and visual production programs
live.
-It works as ArtNet Node -2 compliant at all times.
Technical Data
- Compatible with LM-3E.
- Art-Net 2 node.
- Support OSC protocol.
- Ethernet-DMX Plug & Play receiver.
- Customizable interface.
-Dimensions (W x H x D): 80 x 45 x 80 mm.
-Mains supply: 5V 500mA
5
User Manual
SETUP AND USE
WorkNet Mode
In WorkNet mode, the LM-5 operates as a receiver of information sent DMX by the device
LM-3E (issuer). Therefore, in this operation mode, the LM-5 always be used in combination
with a LM-3E, and both devices mustconfigured in the same group (or DMX Universe). In this
way, and generalized to more of a receiving device, the information sent by a LM-3E will be
received by LM-5 those configured in the same group as the LM-3E issuer.
Note: Only LM-3E device can be associated with one or more devices LM-5.
WorkNet is a proprietary protocol that runs on any standard network TCP / IP. The protocol is
unicast, in order not to decrease the efficiency of network.
Both the LM-3E as the LM-5 is configured automatically, and need no network configuration. The
IP address and Subnet Mask is obtained automatically, so that both devices are in the same
subnet and and can communicate with each.
Art-Net Mode
In Art-Net mode, LM-5 operates as an Art-Net node itself, receiving all information sent by an
Art-Net emitter. In this case the concept group is replaced by universe, further including the
concept of Subnet, such as specified in Art-Net protocol.
The LM-5 is a plug and play device and requires no network configuration, this is set automatically
obtaining an IP address 2.x.x.x and a subnet mask of 255.0.0.0 as specified by Art-Net protocol.
This mode is enabled and configured using the switches on the rear panel, This point will be
explained later on.
6
User Manual
OSC Mode
In OSC mode (Open Sound Control) LM-5 operates as a lighting console able to store and
playback up to 100 scenes and 24 shows. The LM-5 is a plug and play device, because by
using Zeroconf allows users without experience, in computer networks, to connect the LM-5
with his device quickly and easily.
You just have to configure the input and output ports. It is further explained how to do it.
If the LM-5 is playing a show and suffers a power failure electricity, this will run the show again
automatically supplying again.
If the LM-5 is playing a show stored and receives Art-Net signal, this signal will priority on the
show. This is very useful in installations where it is needed to control timely illumination from a
lighting console.
In this way the configuration of the switches in the rear side does not affect.
Note: If you encounter connection problems between your device iPhone, iPad ... and LM-5,
make sure that our network supports Multicast sending (sending information on a network to
multiple destinations simultaneously), specifically to address 224.0.0.251, in addition to open
port 5353.
If not possible to open the 5353 port, LM-5 did not "discover" automatically, however, you can
connect to it using its IP directly. Contact your Network administrator for more information.
7
User Manual
Panel Frontal
1. LED Power:
This red LED lits when the unit has power supply.
2. PLUG IN connector
Using the included external power supply (5V, 500 mA) it is posible the
feed the unit. Note: It you use this connections, the Terminal Block
(5) must no be used.
3. ACT LED
This green LED flicks when the Ethernet port is connected and emitting
or receiving datas.
4. LINK LED:
This green LED lits when the Ethernet LAN port is connected
5. Terminal Block
Using an external power supply (5V, 500 mA) it is posible the feed the
unit. Note: It you use this connections, the PLUG IN connection
(2) must no be used.
6. Selector
Under WORKNET protocol, this selector allows to select up to 16
reception groups (0-F). Each group disposes its own LM-3E emitter,
configured in the same receivers group.
Under Art-Net protocol this selector allows to select one of the 16 DMX
universes inside configurated Subnet.
7. DMX OUT:
This XLR-5 connector sends DMX signal to a control line with DMX
compatible devices like moving heads, scanners, RGB drivers, etc.
8. LAN:
RJ 45 connector which allows the LM-5 connection to a Ethernet
8
User Manual
Rear Panel
9. Operating Mode Selector / Subnet switcher
This dip-switch has two functions:
- Select, with the dip number 1, the operating mode (WorkNet (OFF position) or Art-Net
(ON position).
- Only in Art-Net operating mode, the dips number 2,3,4,5 allow to select Subnet, with values
from 0 to 15 (16 positions). The black colour numbers (1,2,4,8) indicate the value taken by the
dip when the ON position, in OFF position the value is 0. The final value of the Subnet is the
sum of the four dips. the following table shows the position in which the dips are positioned
for each Subnet value:
SubNet Value
Switch 2
Switch 3
Switch 4
Switch 5
0
OFF
OFF
OFF
OFF
1
ON
OFF
OFF
OFF
2
OFF
ON
OFF
OFF
3
ON
ON
OFF
OFF
4
OFF
OFF
ON
OFF
5
ON
OFF
ON
OFF
6
OFF
ON
ON
OFF
7
ON
ON
ON
OFF
8
OFF
OFF
OFF
ON
9
ON
OFF
OFF
ON
10
OFF
ON
OFF
ON
11
ON
ON
OFF
ON
12
OFF
OFF
ON
ON
13
ON
OFF
ON
ON
14
OFF
ON
ON
ON
15
ON
ON
ON
ON
9
User Manual
WorkNet mode configuration
1. Select the WORKNET protocol using the dip number 1 (OFF position) in the dip-switch block
on the rear panel.
2. In the group selector (UNIV) placed in the front panel, select one of the 16 positions.
It is necessary, at least one LM-3E emitter configured in the same group, and connected to the
LAN.
3. Connect a standard cable RJ45 between Ethernet LAN connector and the network.
4. Connect a DMX cable in the DMX OUT connector to feed the devices in the line with DMX
signal
5. Supply the unit with 5 V DC, 500 mA for either samples intended to purpose (or Plug-in
Terminal Block).
6. Now, it is possible to receive DMX information sent by the control console. The ACT LED
flashes when the unit emitts or receives Ethernet network data.
ArtNet mode configuration
1. Select the Art-Net protocol using the dip number 1 (ON position) of the dip-switch block on
the rear panel.
2. Select the Subnet using dips 2,3,4,5 in dip-switch block on the rear panel (up to 16 different
positions). This value must be the same as the value of Subnet configurated in the DMX console.
3. In the group selector (Universe) on the front panel, select one of the 16 positions (0-F) for
the DMX universe.
4. Connect a standard RJ45 cable between Ethernet LAN connector and the network.
5. Connect a cable DMX in the DMX OUT connector to feed the devices in the line with DMX
signal
6. Supply the unit with 5 V DC, 500 mA for either samples intended to purpose (or Plug-in
Terminal Block).
7. Now, it is possible to receive DMX information sent by the control console. The ACT LED
flashes when the unit emitts or receives Ethernet network data.
10
User Manual
Web Server
Although LM-5 is plug & play, the device has a web management interface for advanced
configuration properties. To connect to the web interface we must open the web browser and
enter lm5.local in the address bar.
Once the connection to the LM-5 we can see all information about the device and their status.
11
User Manual
Since Network Setting we can adjust the IP address of LM-5 and its net mask, besides being
able to change the name of our device.
Note: If you want to rename, you should not use spaces, if used must be taken into account that the space is replaced
by an underscore. If the name is changed, it is important remember the new name assigned, so that we can connect
to the device the next time you want to access the Web interface.
From ArtNet Setting we can adjust the Art-Net Universe and the Subnet
12
User Manual
On Startup Settings Since we can select the boot configuration of LM-5, and may choose
between 3 modes: None, Last show and User Show.
In None mode to start the LM-5 does not take any action, standing waiting to receive orders.
In Last Show mode to start the LM-5 will automatically run the show that was playing when
turned off.
In Show User Mode to start the LM-5 will run the show we choose (between 1 and 24).
Once the desired changes must save and restart the LM-5 to take effect.
13
User Manual
ABOUT TOUCHOSC
The layouts provided by Equipson are designed to TouchOSC. This is an IOS and Android
devices application that lets you send and receive Open Sound Control over Wi-Fi messages
using the UDP protocol.
The application supports remote control and receive feedback from software and hardware
which implement OSC protocol as much as LM-5, Pure Data, Max / MSP / Jitter, OSCulator,
VDMX, Resolume Avenue 3, Plogue Bidule, Reaktor, Quartz Composer, and others.
The interface provides several different controls to send and receive messages:
- Faders
- Rotary Controls
-Pushers
-Toggles
- XY areas
-Multi-faders
-Multi-toggles
-LEDs
-Encoders
Supports multi-touch gestures and can use up to five controls at once Layouts currently can only
be used in IOS devices.
TouchOSC App can be downloaded from AppStore
14
User Manual
LM5 LAYOUTS & TOUCHOSC
Equipson offers a layouts set designed to control the LM-5, with them it is posible to control
from a RGB facility to an event with up to 24 channels.
The layouts are available for download on the official website of Equipson. www.equipson.es
Copying Layouts:
The Layouts process load in TouchOSC is explaining following. in this, open iTunes program,
select the device and we move to the tab applications, select the app TouchOSC and "click"
on add.
15
User Manual
We start TouchOsc.app on our device, and we move to the Layout menu and select the
layout that we have loaded from iTunes:
When the Layout is selected, the window will return to previous menu
16
User Manual
Linking TouchOSC & LM-5
The connection between the LM-5 and TouchOSC is very simple, you only need a WiFi AP
to connect them.
Once all the connections are finished, proceed to connect the LM-5 to electric network.
Before Start TouchOSC proceed to link the IOS device with AP Wifi network which has
connected the LM-5. Once they are linked, we start the App.
.1 º- Enter in the Connections Menu> Osc
17
User Manual
2º- Activate the OSC connection and adjust the input and output ports:
-Port ( outgoing ) : 8000
-Port ( incoming ) : 9000
3 º- Under "Hosts Found" section, select the entry "LM-5" that appears:
18
User Manual
4º -We return back and we click on "Done". We're ready to use our LM-5.
19
User Manual
USE & PROGRAMMING
Programing
By default, the Layout starts in programming tab, since it can perform all functions of
Programming and Editing:
Programing a Show:
1º - Click Live button to see the changes in real time.
2º- Select a Show. (eg show 1)
3º- Adjust the channel level
4º- Adjust the Stand time
5º- Adjust the Fade time
6º- Press the Record button to save your changes, so we have created the
Scene 1 within Show 1
7º- Click on the button Add Scene to add a new scene to Show 1.
8º- Repeat steps 3 through 7 to add a second scene to show 1.
20
User Manual
Editing a Scene:
1º - Click on the Live button to see the changes in real time.
2º - Select the show you want to edit. (eg show 1)
3º- Using Next and Prev buttons, you can move between scenes and, therefore, locate the scene
we want to edit. These will be illuminating as you move through them, besides the fader banks
will be updated by programming.
4º- When you find the scene that is to edit, adjust the levels and times correcting it to our liking.
5º- Press the REC button to save your changes.
Deleting a Scene:
1º - Click on the Live button to see the changes in real time.
2º - Select the show you want to edit. (eg show 1)
3º- Using Next and Prev buttons, you can move between scenes and, therefore, locate the scene
we want to edit. These will be illuminating as you move through them, besides the fader banks
will be updated by programming.
4º- When you find the scene that is to eliminate, press Del Scene button.
Deleting a Show:
1º- Select the show you want to eliminate. (p.ej show 1 )
2º- Press Del Show button.
21
User Manual
Live
From Live tab you can work live and play shows stored in the LM-5.
Using in Live:
1º- Click on the Live button to see the changes in real time.
2º- Adjust the channel levels.
3º- Press the button All Zero to set to 0% for all channels.
4º- Press the button All Full to set to 100% all channels.
5º- Use the encoder to adjust the level of Master
6º- Press DB button to activate the BlackOut.
7º- Press the DB button again to deactivate the BlackOut.
22
User Manual
Automatic Playing:
1º- Click on the Live button to see the changes in real time.
2º- Select a show (eg show1).
3º- Press Play button, so the show will run automatically.
playing a scene after another, acording to the programming done.
4º- Use the Speed fader to adjust the playback speed of the show.
5º- Press the Stop button to end playback of the show.
Manual Playing:
1º- Click on Live button to see the changes in real time.
2º- Select a show (eg show1).
3 º- Press Go button, so will run the first scene of the show.
4º- Press Next button to skip to the next scene.
5º- Press Prev button to return to the previous scene.
6º- Press Stop button to end playback of the show.
23
User Manual
Execute
From the Execute tab you can run independently scenes to shows.
Playing:
1º- Select any scene you've recorded, (only the scenes with information can be selected).
(Eg Scene1).
2º- Click on Go button.
3º- Select another scene (eg Scene2).
4º- Press Go button.
5º- Repeat steps 3 and 4 with different scenes.
24
User Manual
COMMANDS IMPLEMENTATION
Below are listed the commands used, in this way the LM-5 can be used from any application that
supports OSC: Lemur, Control, Quartz Composer, Isadora, MaxMSP, TouchDesigner ...
Notes:
The text in red colour can be modified to access an index, channel ...
The OSC method is defined as: address, parameters (eg / dmx / set / ch, ii: Method with
address "/ dmx / set / ch" and two integer parameters. )
The detailed methods are explained below using TouchOSC base.
25
User Manual
DMX Control
Configuring a MultiFader in TouchOSC:
The command entered indicates a particular value multifader, specifically this
multifader controlls the first 12 channels.
This is because after the / dmx / set / ch / we added a 1 indicating the first control channel
is 1 and the Faders section we entered the number of channels that we want the multifader,
in this case 12. In this way we are controlling the first 12 channels.
As each DMX channel can have a value between 0 and 255 in Value Range section we
assign the minimum and maximum value that will have the faders that make up this
multifader.
The specific command used is:
/dmx/set/ch/ init_ch/offset_ch ,f
Where:
init_ch: Starting channel
offset_ch: Offset to add to init_ch in order to obtain the accessed channel.
Parameters:
f (Float): 0 to 255 with the value of the channel.
26
User Manual
Configuring a Fader or Rotary:
The entered command indicates a particular value multifader, specifically this mulltifader controls
the Master.
This is because after the / dmx / set / ch / we added a -1 indicating the control channel will
be -1, in this case we are monitoring the Master due to the -1 is reserved for him. If instead
of -1 to 1 we would DMX controlling channel 1, and if we put 24, we would controlling the DMX
channel number 24.
As a DMX channel can have a value between 0 and 255 inValue Range section we assign the
minimum and maximum value that will have the Fader or Rotary that controls the Master.
Need not always be at least 0 and maximum 255, we give the minimum and maximum values
that interests us, avoiding thus able to lower or raise the intensity of a channel of certain values.
The specific command used is:
/dmx/set/ch/ channel ,f: Put a channel to a particular level.
Where:
channel: channel to be accessed.
Parameters:
Float: d to 255 with the value of the channel.
27
User Manual
Reciving the value of one channel with a Label
The two methods previously seen, return the value of the channel through message:
/dmx/set/ch/ channel ,i,
Indicating in channel the modified channel and as a parameter the value of the channel. in
this particular case, the label indicating the value of DMX channel 1. Therefore, we can add
a label above or below each channel to know the value exact each.
28
User Manual
Creating a Toggle to control the Black Out
The entered command enables the Black Out state, allowing, through aToggle to activate
or deactivate it.
As a button can only have 2 values oscilating between 0 and 1, in Value Range paragraph
we assign the minimum value (Deactivated) and the maximum value (Activated) to be the
Black Out at 0 and 1 respectively.
To properly function, we activate the Local Feedback Off option, so, the Toggle will not lits
pushing over the iPad, otherwise when the LM-5 activate or deactivate the Black Out.
The specific command used is:
/dmx/set/black_out ,f
Parameters:
Float with 0 or 1 activating/deactivating the Black Out.
Note: It returns /dmx/set/black_out ,i message
29
User Manual
Creating a Push Button to pass all channels to 0.
The entered command can pass all the DMX channels to 0 through a Push Button.
As a push button can only have 2 values between 0 and 1, in Value Range section we assign
to the minimum (standby) and the maximum value (Active) the value 0 and 1 respectively.
It is necessary to enable the Local Feedback Off option thus the Toggle will lit when you
click on the iPad.
It should be borne in mind that this command resets all DMX channels, ie, ifrom the
channel 1 to channel 512. No matter what the layout only controls 12, 24, 48 ... channels.
The specific command used is:
/dmx/set/clear ,f: Pass all DMX channels to 0.
Parameters:
Float. It is not used but it is necessary for TouchOSC compatibility.
Note: It returns /dmx/set/clear ,i message
30
User Manual
Creating a Push Button to pass all channels to 255.
The entered command can pass all the DMX channels to 255 through a Push Button.
As a push button can only have 2 values between 0 and 1, in Value Range section we assign
to the minimum (standby) and the maximum value (Active) the value 0 and 1 respectively.
It is necessary to enable the Local Feedback Off option thus the Toggle will lit when you
click on the iPad.
It should be borne in mind that this command resets all DMX channels, ie, ifrom the
channel 1 to channel 512. No matter what the layout only controls 12, 24, 48 ... channels.
The specific command used is:
/dmx/set/set ,f: Pass all DMX channels to 255.
Parámetros:
Float. It is not used
Note:It returns the /dmx/set/set ,i message
31
User Manual
Creating a Rotary or Fader to adjust the Stand Time in a scene
The entered command allows to set the stand time of a scene (if this is selected) via a
Fader or Rotary.
The Stand Time of each scene is expressed in milliseconds so that in the Value Range
section we assign the minimum value to 100 (1 second) and the value up to 10000 (10
seconds) to be the Fader or Rotary that control de Stand Time in the selected scene.
The specified command is:
/dmx/set/stand ,f
Parameters:
Float: time in ms.
Note:It returns a /dmx/set/standReply ,s , message indicating the time value (in seconds)
into the string
32
User Manual
Reciving the Stand Time of a scene with a Label
The method previously seen, returns the Stand Time value of a scene through the message:
/dmx/set/standReply ,s
Indicating in the string (s) the assigned time. In this particular case, the Label indicates the
scene time value for scene 2. Thus we can add an scene adjustment label above or below
the Fader or Rotary to know the exact time allocated.
33
User Manual
Creating s Rotary or Fader to adjust the Fade Time in a scene
The entered command allows to set the Fade time of a scene (if this is selected) via a
Fader or Rotary.
The Fade Time of each scene is expressed in milliseconds so that in the Value Range
section we assign the minimum value to 100 (1 second) and the value up to 10000 (10
seconds) to be the Fader or Rotary that control de Fade Time in the selected scene.
The specified command is:
/dmx/set/fade ,f
Parameters:
Float: time in ms.
Note:It returns a /dmx/set/fade ,s Reply message indicating the time value (in seconds)
into the string
34
User Manual
Reciving the Fade Time of a scene with a Label
The method previously seen, returns the Fade Time value of a scene through the message:
/dmx/set/fadeReply ,s
Indicating in the string (s) the assigned time. In this particular case, the Label indicates the
scene time value for scene 2. Thus we can add an scene adjustment label above or below
the Fader or Rotary to know the exact fade time allocated.
35
User Manual
EDIT
Creating a Multi Toggle to edit shows
The entered command set to "Edit Mode" the selected show, specifically, this Multi Toggle
allows selection of up to 24 shows.
Designing our own Multi toggle we have to take into account a number of limitations in
TouchOSC to which the LM-5 has had to adapt. Things to take into account:
1º- Order :
By default, the MultiToggle starts numbering from left to right and from
bottom to top
2º- Disposition: By default the MultiToggle not list each Toggles one after another,
but it sorts by Row and Column. for this reason it is important to note
that the disposition of MultiToggle must be 8 buttons wide by 3 high
for a proper operation. This disposition is the expects and
understands the LM-5 to handle the shows. To modify it could cause
malfunction.
36
User Manual
As a button can only have 2 values oscillating between 0 and 1, in Value Range section we
assign the minimum value (Deactivated) and the maximum value (Activated) to be the Shows
selector 0 and 1 respectively.
To properly function we activate the Local Feedback Off, therefore, theToggles not lit when you
click on the iPad, otherwise when the LM-5 enable or disable each of the shows.
To keep the shows are selected when choose them, we activate the Exclusive Mode option.
By this way, you can only selected one show at the same time.
The specified command is:
/dmx/edit/show/ fil /col ,f: Pass the indicated show to edit mode.
fil: Selected line in the TouchOSC multipush.
col: Selected column in the TouchOSC multipush.
Parameters:
Float: value as 0 or 1. If value is 0, it does not effect (TouchOSC limitation).
Note: Using
the fil and col value, the unit obtains the show number. It is valid for 3 columns
esxclusively. It returns a [1]. LM-5 Reply packages for certain actions
37
User Manual
Creating a Multi Toggle to edit shows
The entered command set to "Edit Mode" the selected scene, specifically, this Multi Toggle
allows selection of up to 100 scenes.
Designing our own Multi toggle we have to take into account a number of limitations in
TouchOSC to which the LM-5 has had to adapt. Things to take into account:
1º- Order :
By default, the MultiToggle starts numbering from left to right and from
bottom to top
2º- Disposition: By default the MultiToggle not list each Toggles one after another,
but it sorts by Row and Column. for this reason it is important to note
that the disposition of MultiToggle must be 10 buttons wide by 10 high
for a proper operation. This disposition is the expects and
understands the LM-5 to handle the shows. To modify it could cause
malfunction.
38
User Manual
As a button can only have 2 values oscillating between 0 and 1, in Value Range section we
assign the minimum value (Deactivated) and the maximum value (Activated) to be the Shows
selector 0 and 1 respectively.
To properly function we activate the Local Feedback Off, therefore, theToggles not lit when you
click on the iPad, otherwise when the LM-5 enable or disable each of the scenes.
To keep the scenes are selected when choose them, we activate the Exclusive Mode option.
By this way, you can only selected one scene at the same time.
The specified command is:
/dmx/edit/scene/ fil /col ,f It goes to the indicated scene to edit mode.
fil: Selected line in the TouchPSC multipush.
col: Selected column in the TouchOSC multipush.
Parameters:
Float: value as 0 or 1. If value is 0, it does not effect (TouchOSC limitation).
Note: It
returns [1] and [2]. LM-5 Reply packages for certain actions
39
User Manual
Creating a Push Button to access to previous scene
The entered command allows to go to the previous scene in Edit mode through a Push Button.
As a push can only have 2 values oscillating between 0 and 1, in Value Range section we
assign the minimum value (Deactivated) and the maximum value (Activated) 0 and 1
respectively.
To properly function we activate the Local Feedback Off, therefore, the Push buttons not lit
when you click on the iPad, otherwise when the LM-5 enable or disable each of the scenes.
The specified command is:
/dmx/edit/prev ,f: It goes to the previous scene.
Parameters:
Float: value as 0 or 1. If value is 0, it does not effect
Note: It
returns [1]. LM-5 Reply packages for certain actions
40
User Manual
Creating a Push Button to access to next scene
The entered command allows to go to the next scene in Edit mode through a Push Button.
As a push can only have 2 values oscillating between 0 and 1, in Value Range section we
assign the minimum value (Deactivated) and the maximum value (Activated) 0 and 1
respectively.
To properly function we activate the Local Feedback Off, therefore, the Push buttons not lit
when you click on the iPad, otherwise when the LM-5 enable or disable each of the scenes.
The specified command is:
/dmx/edit/next ,f: It goes to the next scene.
Parameters:
Float: value as 0 or 1. If value is 0, it does not effect
Note: It
returns [1]. LM-5 Reply packages for certain actions
41
User Manual
Creating a Toggle to show the changes in real time.
The entered command allows to display programming changes in real time via a toggle, allowing
activated or deactivated it.
While we are programming you probably have activated this function to "see
we're doing ", however when we need to set a new scene and do not want to see the changes,
we disable this function.
As a push can only have 2 values oscillating between 0 and 1, in Value Range section we
assign the minimum value (Deactivated) and the maximum value (Activated) for the Black
Out, 0 and 1 respectively.
To properly function we activate the Local Feedback Off, therefore, the Push buttons not lit
when you click on the iPad, otherwise when the LM-5 enable or disable the Black Out.
The specified command is:
/dmx/edit/goLive ,f. It passes to Live mode.
Nota: It
returns [1] and [2]. LM-5 Reply packages for certain actions
/Live ,: Only used to refresh and to go out to Edit mode.
Note: It
returns [2] LM-5 Reply packages for certain actions
42
User Manual
Creating a Push Button to delete a scene
The entered command allows to delete the selected scene inside Edit mode through a Push
Button.
As a push can only have 2 values oscillating between 0 and 1, in Value Range section we
assign the minimum value (Deactivated) and the maximum value (Activated) 0 and 1
respectively.
To properly function we activate the Local Feedback Off, therefore, the Push buttons not lit
when you click on the iPad, otherwise when the LM-5 select or not each scene.
The specified command is:
/dmx/edit/delScene ,f. It deletes the current scene.
Parameters:
Float: Value as 0 or 1. If value=0, it does not effect
Note: It
returns [1] LM-5 Reply packages for certain actions.
43
User Manual
Creating a Push Button to delete a show
The entered command allows to delete the selected show inside Edit mode through a Push
Button.When the show is deleted, all scenes stored inside it will be eliminated.
As a push can only have 2 values oscillating between 0 and 1, in Value Range section we
assign the minimum value (Deactivated) and the maximum value (Activated) 0 and 1
respectively.
To properly function we activate the Local Feedback Off, therefore, the Push buttons not lit
when you click on the iPad, otherwise when the LM-5 select or not each show.
The specified command is:
/dmx/edit/delShow ,f. It deletes the current show.
Parameters:
Float: Value as 0 or 1. If value=0, it does not effect
Note: It
returns [1] LM-5 Reply packages for certain actions.
44
User Manual
Creating a Push Button to add a scene
The entered command allows to add a scene into selected show in Edit mode through a Push
Button.
As a push can only have 2 values oscillating between 0 and 1, in Value Range section we
assign the minimum value (Deactivated) and the maximum value (Activated) 0 and 1
respectively.
To properly function we activate the Local Feedback Off, therefore, the Push buttons not lit
when you click on the iPad, otherwise when the LM-5 add the scene.
The specified command is:
/dmx/edit/addScene, f. It adds a scene to the current show
Parameters:
Float: Value as 0 or 1. If value=0, it does not effect
Note: It
returns [1] LM-5 Reply packages for certain actions.
45
User Manual
Creating a Push Button to add a scene.
The entered command allows to record a scene into selected show in Edit mode through a
Push Button.
As a push can only have 2 values oscillating between 0 and 1, in Value Range section we
assign the minimum value (Deactivated) and the maximum value (Activated) 0 and 1
respectively.
To properly function we activate the Local Feedback Off, therefore, the Push buttons not lit
when you click on the iPad, otherwise when the LM-5 record the scene.
The specified command is:
/dmx/edit/rec, f. It saves the current scene
Parameters:
Float: If 1, it saves the scene. If 0, it does not effect
Note:
It returns /dmx/edit/rec ,f, with the similar parameters as the received in the message.
46
User Manual
Play
" Creando un Multi Toggle para seleccionar una escena
The entered command select a scene to be rplayeded in particular this Toggle Multi allows
to select up to 100 scenes. It should note that this MultiToggle only serves to select
which scene we execute, not execute it.
Designing our own Multi toggle we have to take into account a number of limitations in
TouchOSC to which the LM-5 has had to adapt. Things to take into account:
1º- Order :
By default, the MultiToggle starts numbering from left to right and from
bottom to top
2º- Disposition: By default the MultiToggle not list each Toggles one after another,
but it sorts by Row and Column. for this reason it is important to note
that the disposition of MultiToggle must be 10 buttons wide by 10 high
for a proper operation. This disposition is the expects and
understands the LM-5 to handle the shows. To modify it could cause
malfunction.
47
User Manual
As a button can only have 2 values oscillating between 0 and 1, in Value Range section we
assign the minimum value (Deactivated) and the maximum value (Activated) to be the Scene
selector 0 and 1 respectively.
To properly function we activate the Local Feedback Off, therefore, theToggles not lit when you
click on the iPad, otherwise when the LM-5 enable or disable each of the scenes.
To keep the scenes are selected when choose them, we activate the Exclusive Mode option.
By this way, you can only selected one scene at the same time.
The specified command is:
/dmx/play/scene/ fil /col ,f : It selects a scene to play (It selects the scene not play it).
fil: Selected line in the TouchOSC multipush.
col: Selected column in the TouchOSC multipush.
Parameters:
Float: 1 or 0. If value=0, it does not effect
Note: It
is valid for 10 columns exclusively. It returns nothing
48
User Manual
" Creating a Push Button to play a selected scene
The entered command can play a pre-selected scene in the MultiToggle previously seen.
As a push button can only have 2 values oscillating between 0 and 1, in Value Range
section we assign to the minimum (standby) and the maximum value (Active) the value 0
and 1 respectively.
To function properly disable the Local Feedback Off, therefore, the Push Button will lit up
when push over the iPad.
The specified command used is:
/dmx/play/scene ,f: Play the selected scene
Parameters:
Float: 1 or 0. If value=0, it does not effect
Note: It
returns nothing
49
User Manual
" Creating a Multi Toggle to select a show to play it
The entered command select a show to play it, in particular this Toggle Multi allows
to select up to 24 shows.
Designing our own Multi toggle we have to take into account a number of limitations in
TouchOSC to which the LM-5 has had to adapt. Things to take into account:
1º- Order :
By default, the MultiToggle starts numbering from left to right and from
bottom to top
2º- Disposition: By default the MultiToggle not list each Toggles one after another,
but it sorts by Row and Column. for this reason it is important to note
that the disposition of MultiToggle must be 8 buttons wide by 3 high
for a proper operation. This disposition is the expects and
understands the LM-5 to handle the shows. To modify it could cause
malfunction.
50
User Manual
As a button can only have 2 values oscillating between 0 and 1, in Value Range section we
assign the minimum value (Deactivated) and the maximum value (Activated) to be the Show
selector
To properly function we activate the Local Feedback Off, therefore, theToggles not lit when you
click on the iPad, otherwise when the LM-5 enable or disable each of the shows.
To keep the shows are selected when choose them, we activate the Exclusive Mode option.
By this way, you can only selected one show at the same time.
The specified command is:
/dmx/play/show/ fil /columna ,f: It selects a show to play it (It selects the show not play it).
fila:Selected line in the TouchOSC multipush.
col: Selected column in the TouchOSC multipush.
Parameters:
Float: 1 or 0. If value=0, it does not effect
Note: It
returns [3] LM-5 Reply packages for certain actions
51
User Manual
Creating a Push Button to play a selected show sequentially
The entered command can play a pre-selected show in the MultiToggle previously seen. This
mode plays all scenes that make the show one after another in the order they were recorded
including the stored Stand and Fade times.
As a push button can only have 2 values oscillating between 0 and 1, in Value Range section
we assign to the minimum (standby) and the maximum value (Active) the value 0 and 1
respectively.
To function properly activate the Local Feedback Off, of this So the Push Button not light up
when you click on the iPad, otherwise when the LM-5 play the show.
The specific command used is:
/dmx/play/show/play ,f. It plays the selected show.
Parameters:
Float: 1 or 0. If value=0, it does not effect
Note: It
returns [3] LM-5 Reply packages for certain actions
52
User Manual
Creating a Push Button to play a selected show manually
The entered command can run a pre-selected show the MultiToggle previously seen. This mode
plays scenes that make the show manually, we can move forward and backward between them
at any time regardless of the Stand Time.
As a push button can only have 2 values oscillating between 0 and 1, in Value Range section
we assign to the minimum (standby) and the maximum value (Active) the value 0 and 1
respectively.
To function properly activate the Local Feedback Off, of this So the Push Button not light up
when you click on the iPad, otherwise when the LM-5 play the show.
The specific command used is:
/dmx/play/show/play_stpgo ,f: It plays the selected show in Stop & Go mode.
Parameters:
Float: 1 or 0. If value=0, it does not effect
Note: It
returns [3] LM-5 Reply packages for certain actions
53
User Manual
" Creating a Rotary or Fader to modify the speed of the show
The entered command indicates a particular value to the multifader, specifically this
multifader modifies the speed of the show.
The modification is performed on the stored Stand time to record the scene. In this method the
values refer to the speed factor, being x1 the smallest and x10 the largest factor speed. Thus
we can extend the Stand time up to 10 times slower than was recorded.
The specific command used is:
/dmx/play/show/speed ,f. It modifies the speed of the show
Parameters:
Float: 1 or 0. If value=0, it does not effect
Note: It
returns [3] LM-5 Reply packages for certain actions
54
User Manual
" Creating a Push Button to access to next scene
The entered command allows to pass to the next scene after select a show and have played it
in manual mode through a Push Button.
As a push button can only have 2 values oscillating between 0 and 1, in Value Range section
we assign to the minimum (standby) and the maximum value (Active) the value 0 and 1
respectively.
To properly function, activate the Local Feedback Off, so, the Push Button not lit when you
click on the iPad, otherwise when the LM-5 run each of the scenes.
It should be borne in mind that due to some limitations on TouchOSC, at reaching the last scene
inside the show, the push button stays lit.
The specific command used is:
/dmx/play/show/next ,f. Next scene in Stop and Go mode.
Parameters:
Float: 1 or 0. If value=0, it does not effect
Note: It
returns [3] LM-5 Reply packages for certain actions
55
User Manual
Creating a Push Button to access to previous scene
The entered command allows to pass to the previous scene after select a show and have played
it in manual mode through a Push Button.
As a push button can only have 2 values oscillating between 0 and 1, in Value Range section
we assign to the minimum (standby) and the maximum value (Active) the value 0 and 1
respectively.
To properly function, activate the Local Feedback Off, so, the Push Button not lit when you
click on the iPad, otherwise when the LM-5 run each of the scenes.
It should be borne in mind that due to some limitations on TouchOSC, at reaching the last scene
inside the show, the push button stays lit.
The specific command used is:
/dmx/play/show/prev ,f. Previous scene in Stop and Go mode.
Parameters:
Float: 1 or 0. If value=0, it does not effect
Note: It
returns [3] LM-5 Reply packages for certain actions
56
User Manual
Creating a Push Button to stop the played show
The entered command allows to stop the performed showas much in automatic mode
as in manual mode via a push button.
As a push button can only have 2 values oscillating between 0 and 1, in Value Range
section we assign to the minimum (rest) and the maximum value (Active) the value 0 and
1 respectively.
To properly function activate the Local Feedback Off so, the Push Button not lit when you
click on the iPad, otherwise when the LM-5 stop the show.
The specific command used is:
/dmx/play/show/stop ,f. It stops the played show.
Parameters:
Float: 1 or 0. If value=0, it does not effect
Note: It
returns
[3] LM-5 Reply packages for certain actions
57
User Manual
Considerations about TouchOSC and LM-5
Although the provided layouts work with up to 24 channels, the LM-5 supports 512 DMX channels
and can record and operate them. Thus, we can create our layouts with many channels as you
want (up to 512) but considering that from channel 24 will not receive feedback on the value of
these channels. That's because TouchOSC requests to be 1 post per channel returns the state
of the 512 channels, which involves sending up to 512 different OSC frames this being a WiFi
network overload and the LM-5 processor .
58
User Manual
LM-5 Reply packages for certain actions
All commands listed on each section
[1] Common reply messages editing shows/scenes
It returns the next messages if:
Editing a show : /dmx/edit/show/fila/co , indicating the line and column
corresponding to the show and as parameter; (1, if it is being edited) or (0 if it is not
being edited). It is only valid for 3 columns exclusively.
Editing a show : /dmx/edit/scene/fila/co , indicating the line and column
corresponding to the show and as parameter; (1, if it is being edited) or (0 if it is not
being edited). It is only valid for 10 columns exclusively.
[2] Common reply messages modifying Live/Edit parameters:
It returns:
/dmx/set/ch/1 . iiiiiiiii. It modifies the fader on the upper line. Parameters: 12 entire
numbers with the values of each channel.
/dmx/set/ch/13 . iiiiiiiii. It modifies the fader on the llower line. Parameters: 12 entire
numbers with the values of each channel.
24 messages like: /dmx/set/ch/channel, I.It indicates the acceded channel and the
channel value as parameter.
/dmx/set/stand, i. Indicating the STAND time in ms.
/dmx/set/fade, i. Indicating the FADE time in ms.
/dmx/set/ch/-1, i. Indicating the MASTER value.
/dmx/set/ch/-1/1, i. Indicating the MASTER value.
/dmx/set/black_out, i. Indicating the Black Out value (1 or 0).
59
User Manual
[3] Common reply messages playing scenes/shows:
/dmx/play/show/ fil /col ,i. It indicates the played show. Parameter to 0, the show
stop plays, parameter to 1, the show plays. I can be send several times,
deactivating one show and activating another show. It is valid for 3 columns
exclusively.
/dmx/play/show/scene/fila/co ,i. same as previous point but in order to indicate
the played scene in the show. It is valid for 10 columns exclusively.
/dmx/play/show/speed ,f. It indicates the speed of the show in ms in the float.
/dmx/play/show/speedReply ,s. It indicates the speed of the show in seconds
in the string.
60
User Manual
EQUIPSON, S.A.
Avda. El Saler, 14 - Pol. Ind. L´Alteró, 46460 - Silla (Valencia) Spain
Tel. +34 96 121 63 01 Fax + 34 96 120 02 42
www.equipson.es/ equipson@equipson.es