1
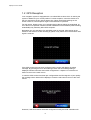
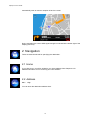
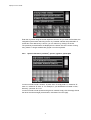
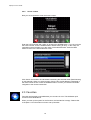
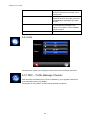
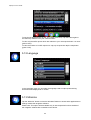
Navilock maptrip 2009
User’s Guide
Creation date: August 5th, 2009
maptrip 2.5 User’s Guide
Table of Contents
A Navigation Software User’s Guide .............................................................................................................4
1
2
Main Menu ................................................................................................................................................. 4
1.1
General Information........................................................................................................................... 4
1.2
GPS Reception.................................................................................................................................. 5
Navigation.................................................................................................................................................. 6
2.1
Home ................................................................................................................................................. 6
2.2
Address ............................................................................................................................................. 6
2.2.1
City ............................................................................................................................................... 6
2.2.2
Special characters (‘umlauts’), spaces, hyphens, apostrophe..................................................... 7
2.2.3
Deleting entries ............................................................................................................................ 8
2.2.4
Street ............................................................................................................................................ 8
2.2.5
House number ............................................................................................................................ 10
2.3
Favorites .......................................................................................................................................... 10
2.4
Map.................................................................................................................................................. 11
2.5
POI .................................................................................................................................................. 12
2.6
POI in City ....................................................................................................................................... 13
2.7
POI Text .......................................................................................................................................... 14
2.8
Multi-Stop Route.............................................................................................................................. 15
2.9
Coordinates ..................................................................................................................................... 16
2.10
Zip Code .......................................................................................................................................... 16
2.11
Previous Destinations...................................................................................................................... 17
2.12
Start Navigation ............................................................................................................................... 19
2.13
Alternative Routes ........................................................................................................................... 19
3
Route Planning ........................................................................................................................................ 20
4
Position .................................................................................................................................................... 22
5
Options .................................................................................................................................................... 23
5.1
Truckrouting .................................................................................................................................... 23
5.1.1
Entering Dimensions of a Truck ................................................................................................. 23
5.1.2
Destination in a restricted area .................................................................................................. 25
5.2
Favorites .......................................................................................................................................... 25
5.2.1
Adding favorites ......................................................................................................................... 25
5.2.2
Deleting favorites ....................................................................................................................... 27
5.2.3
Renaming favorites .................................................................................................................... 27
5.3
Volume ............................................................................................................................................ 27
5.4
Map View ......................................................................................................................................... 28
5.5
POI-Display ..................................................................................................................................... 29
5.6
Route Settings ................................................................................................................................. 29
5.7
Profiles ............................................................................................................................................ 30
maptrip 2.5 User’s Guide
6
5.8
GPS-Settings................................................................................................................................... 31
5.9
Units ................................................................................................................................................ 32
5.10
TMC – Traffic Message Channel .................................................................................................... 32
5.10.1
Receive TMC Data ................................................................................................................ 33
5.10.2
Auto avoid ............................................................................................................................. 33
5.10.3
Alternative TMC receiver ...................................................................................................... 33
5.11
Traffic .............................................................................................................................................. 33
5.12
Language ........................................................................................................................................ 34
5.13
Minimize .......................................................................................................................................... 34
5.14
Speedwarnings................................................................................................................................ 35
5.15
GPS-Logs ........................................................................................................................................ 35
5.16
Blockades ........................................................................................................................................ 36
5.17
About ............................................................................................................................................... 36
While on the Road ................................................................................................................................... 37
6.1
Travel Information ........................................................................................................................... 37
6.2
Zoom ............................................................................................................................................... 37
6.3
Route Overview and Destination View ............................................................................................ 38
6.4
Driving Instruction Volume .............................................................................................................. 38
6.5
Options ............................................................................................................................................ 39
6.5.1
Mute ........................................................................................................................................... 39
6.5.2
Map View.................................................................................................................................... 39
6.5.3
Night Mode ................................................................................................................................. 40
6.5.4
Interstations ................................................................................................................................ 40
6.5.5
Block KM .................................................................................................................................... 40
6.5.6
Traffic ......................................................................................................................................... 41
6.5.7
TMC............................................................................................................................................ 41
6.5.8
GPS-Logs ................................................................................................................................... 41
6.5.9
Speedwarnings .......................................................................................................................... 41
6.5.10
Blockades.............................................................................................................................. 41
6.5.11
Quit ........................................................................................................................................ 41
B FAQs regarding Truck Navigation............................................................................................................42
C Copyright Notice ........................................................................................................................................44
D End User License Agreement (“EULA”) ..................................................................................................45
maptrip 2.5 User’s Guide
A
Navigation Software User’s Guide
When employing a navigation system in a vehicle, i.e., this software and the accompanying
hardware, it is your responsibility to set up, secure and use the system in a manner that does not
restrict your vision in any way and will not lead to accidents, injuries or material damages. You, as
the user of this product, are solely responsible for driving safely. Do not handle this product while
driving—always park the car first.
1 Main Menu
The main menu contains five options:
1. Navigation: Here you can enter the destination to start navigation.
2. Route Planning: Here you can plan the route to check the distance and
approximate travel time.
3. Position: Indicates your current GPS position on the map.
4. Options: Here you can define diverse navigation device settings (e.g., saving
frequently visited addresses).
5. Traffic: Displays a list of current traffic conditions (if TMC is installed)
6. Quit: Quits the navigation program.
1.1 General Information
Your navigation program always displays a red button with a white arrow in the lower
left corner. The red button acts as a “back” function and will take you to the previous
step in the menu. If you get lost in the navigation menu, repeatedly click the RED button
until you return to the main menu.
On many screens a green button is displayed on the lower right-hand side. This
GREEN button allows you to confirm entries or scroll through menus.
4
maptrip 2.5 User’s Guide
1.2 GPS Reception
Your navigation system is equipped with a so-called GPS receiver which is used by the
system to determine your current position. For best reception, mount the device such
that it is exposed to the sky without obstruction. When used within buildings or the
interior of the car, GPS reception might not be sufficient for operation.
For this reason, please mount your navigation device directly below the windshield, as
far to the front as possible. Please note that metallized front windshields (heat insulating
windshields) may adversely affect GPS reception.
Navigation can only take place if a valid GPS signal is received. After setting up the
device for the first time or after traveling by plane, it may take a few minutes until a valid
signal is received.
If the GPS-receiver has not been configured yet the screen will display the above
message. By pressing the blue “GPS settings” button the GPS settings dialog is
displayed. Please read more about GPS configuration in chapter 5.8. Press the red
button to return to the main menue.
In case the GPS-receiver has been pre-configured but the GPS-signal is of poor quality
the message shown below will be displayed. Press the red button to return to the main
menue.
However, if the GPS receiver has been configured correctly the route calculation will
5
maptrip 2.5 User’s Guide
automatically start as soon as reception is back to normal.
During navigation the current GPS signal strength is indicated at the bottom right of the
display (red circle).
2 Navigation
There are several methods for specifying the destination:
2.1 Home
If you click Home, you will be guided to your home address. See Chapter 5.2 for
detailed information on how to set up your home address.
2.2 Address
2.2.1
City
You can enter the destination address here.
6
maptrip 2.5 User’s Guide
Enter the city name using the screen keyboard. As soon as you enter the first letter, the
navigation system starts searching for the city. Possible matches are presented in a
results list. If the desired city is shown, you can select it by clicking it in the list.
The previously entered letters are displayed in the bottom line of the screen. During
entry, letters no longer available are grayed out on the keyboard.
2.2.2
Special characters (‘umlauts’), spaces, hyphens, apostrophe
You do not need to enter ‘umlauts’. In place of an ‘Ä’ simply enter ‘A’, instead of ‘Ö’
enter ‘O’, instead of ‘Ü’ enter ‘U’. For example, if your destination is located in ‘Köln,’
Germany, just enter ‘K O L N’.
You do not need to enter spaces and hyphens. Instead, simply click the empty field to
the left of the white triangle (at the bottom, third button from the right).
7
maptrip 2.5 User’s Guide
2.2.3
Deleting entries
If you make a mistake, click the backspace key to delete the wrong entry.
2.2.4
Street
Start by entering the first two letters of the street you are trying to locate. The bottom
line displays the city where the street is being searched.
Alternatively, you can select DOWNTOWN if you want to drive to the center of the
respective city.
8
maptrip 2.5 User’s Guide
In this example “R O T E” was entered. If the desired street is displayed in the list, you
can select it by clicking it in the list.
In large cities it is possible that streets with the same name exist in different districts.
In this case, choose the desired destination based on the zip code or the district
indicated in the list.
9
maptrip 2.5 User’s Guide
2.2.5
House number
Next you are requested to enter the house number.
Enter the house number and confirm by pressing the GREEN button. If you do not know
the house number, click the GREEN button without making an entry. In this case, the
navigation system will take you to the center of the selected street. Press the RED
button to return to the street selection screen.
Click Search Crossroad to find all streets intersecting the selected street (Roteichenweg
in this example). When you select an entry from the list, the full address is displayed in
the lower screen section. Press the GREEN button to confirm your selection and start
navigation to the chosen intersection.
2.3 Favorites
Favorites are frequently used addresses you can store in a list. This facilitates quick
access to these destinations.
When you start up the system for the first time, the favorites list is empty. Please refer
to Chapter 5.2 for information on how to set up favorites.
10
maptrip 2.5 User’s Guide
Click a list entry to select it. Now the full address is displayed in the bottom part of the
screen. Confirm your selection by pressing the GREEN button. Navigation will
commence immediately.
2.4 Map
This mode allows you to select your destination directly from within the map.
Use the plus/minus button to zoom in or out.
Click the button with the four arrows (red circle) to activate the scroll mode. You can
now move the map with your finger.
11
maptrip 2.5 User’s Guide
Activate the selection tool (red circle) to select a destination by directly clicking into the
map. A shortcut menu now offers the following options:
z
Search nearest address: Displays a list of addresses at the selected location
that you can choose as the destination.
z
Set position: Navigation is started for the selected position.
z
Show POI: Displays information for a point of interest whenever you click a POI
icon.
2.5 POI
POI is the abbreviation for “point of interest”. These points of interest are important sites
such as gas stations, hotels or hospitals.
The POIs are grouped into separate categories. After calling up the POI function, you
must select the desired category.
The list first indicates the top categories. Top categories are displayed in brackets.
Further below all other categories are listed in alphabetical order.
12
maptrip 2.5 User’s Guide
The system will search for corresponding POIs starting from your current location. Note
that this function only works if you are receiving a valid GPS signal. Click a list entry to
select it as your destination. Press the GREEN button to start navigation.
When you click the street map icon (red circle), the selected POI is displayed on the
map.
2.6 POI in City
The POI in City function serves to find a POI located far from your present location. This
function can be very useful, for example, when you are looking for a hospital in another
city.
When you start a POI in City search, you are first requested to enter the city (see
Chapter 2.2.1). The POI is then selected just like any other POI (see Chapter 2.5). The
POIs will searched for within the proximity of the city centre chosen. The radius is
depending on the POI category and the results will be listed by distance to the city
centre.
13
maptrip 2.5 User’s Guide
2.7 POI Text
The POI Text function allows you to search POIs in any one category by entering freeform text. First select the desired category.
Next, enter the keyword, e.g. “Brandenburger” for finding the Brandenburg Gate in
Berlin.
14
maptrip 2.5 User’s Guide
All matching results are shown in a list. Click the map icon (red circle) to display the
location of the POI on the map. Pressing the GREEN button will start navigation to the
selected POI.
2.8 Multi-Stop Route
The Multi-Stop Route function allows you to specify several destinations you want to
travel to successively.
Use the add button (red circle) to add stops to your tour. You can use any of the
available methods for selecting a destination.
15
maptrip 2.5 User’s Guide
You can change the order of the stops using the up/down buttons (red circle).
Click the GREEN button to start navigation to the first stop. Once you reach the first
destination, navigation to the next stop will commence at the touch of a button.
2.9 Coordinates
A destination can be defined by entering a pair of coordinates. First enter the latitude,
then the longitude.
When entering the latitude please select + for North or - for South. Respectively please
select + for East or - for West when entering the longitude.
Coordinates may be entered using the formats decimal degrees or degree-minutesecond.
2.10 Zip Code
The Zip Code function enables you to define your destination by entering a zip code.
16
maptrip 2.5 User’s Guide
This is what the screen looks like after entering “513”.
After selecting the first entry, you can search for a street within the zip code area or
define the center of the zip code area as your destination.
2.11 Previous Destinations
The Previous Destinations function facilitates the selection of destinations you have
previously entered. Upon calling up the Address (cf. Chapter 2.2) or Zip Code (cf.
17
maptrip 2.5 User’s Guide
Chapter 2.10) entry method, the system will initially display a list containing up to 10
destinations entered at a previous time.
Destinations you selected via the map (cf. Chapter 2.4) are indicated in the form of
coordinates.
For example, when you select the name of a city from the list, a new screen will show
the street names previously entered for this city. If you select any of these streets, the
house number last used for this street is displayed. You can then accept this setting or
change it according to your needs.
After you enter a destination for the first time, the destination selection list always shows
the previous destinations. If you want to enter a destination not included in the list, click
the abc button (red circle).
If you want to remove an entry from the previous destinations list, first click the delete
button (red circle) and then select the entry you wish to discard.
18
maptrip 2.5 User’s Guide
2.12 Start Navigation
After you have selected a destination, you can specify the driving mode that is to apply
for the route (cf. Chapter 5.7).
If you don’t want this query to appear each time navigation is started, deselect the
check mark in the Ask before every route calculation field (red circle). Press the GREEN
button to start route calculation.
After calculation the navigation system presents the entire route in an overview map,
including information such as length of the route and expected travel duration. Click the
GREEN button to start navigation. Alternatively, navigation will automatically commence
as soon as you start driving.
2.13 Alternative Routes
After the initial route calculation a similar screen to the one below will appear.
19
maptrip 2.5 User’s Guide
The calculated route can be accepted by pressing the blue OK button. Alternetively you
can press the “Alternative” button to calculate other routes.
To choose one route, press the OK button with the color corresponding to the color of
the selected route.
3 Route Planning
Use the Route Planning function to plan future trips. This allows you to obtain
information on the distance and expected duration ahead of time.
The Route Planning function works much the same as entering a normal destination;
the only difference is that you must indicate a start location in addition to the
destination.
20
maptrip 2.5 User’s Guide
You are first asked to specify the start location. There are several options for doing so
(see Chapter 2).
Once you defined the start location, you must enter the destination.
After you have selected start location and destination, you can specify the driving mode
that is to apply for this trip (cf. Chapter 5.7). If you don’t want this query to appear each
time route calculation and navigation are launched, deselect the checkmark in the Ask
before every route calculation field.
21
maptrip 2.5 User’s Guide
Press the GREEN button to start route calculation.
After calculation the navigation system presents the entire route in an overview map,
including information such as length of the route and expected travel duration. Click the
GREEN button to start a route simulation.
4 Position
The Position function is used to display your current position on the map.
The orientation of the map can be northward or in driving direction. Please see chapter
5.4 for more on these options.
You can use the zoom buttons to zoom into or out of the map. The scroll button allows
you to move the displayed map section.
22
maptrip 2.5 User’s Guide
Press the selection button (red circle) to select destinations on the map and start
navigation. First click the selection button and then click any location on the map. Now
you can select:
z
Search nearest address: Displays a list of addresses at the selected location
that you can choose as the destination.
z
Set position: Navigation is launched for the selected position.
z
Show POI: Displays information for a point of interest whenever you click a POI
icon.
5 Options
5.1 Truckrouting
In this dialog the dimensions of a truck can be entered. Also hazardous materials can
be selected (however, truck types may be selected in the US version only).
Based on the selected profile the navigation software calculates a route which avoids
dimensional restrictions and other restrictions regarding vehicle type.
PLEASE NOTE: This navigation software is an assistance system only. The truck
restrictions in the software may be incomplete. The driver of a vehicle remains
solely responsible for obeying road signs, restrictions and complying with local
driving rules.
5.1.1
Entering Dimensions of a Truck
Tap „Activate Truckrouting“ to activate truck routing in your navigation software.
23
maptrip 2.5 User’s Guide
When truckrouting is activated, the navigation software calculates a route that complies
with the given dimensions. For example the route will not go under a bridge with a
clearance of only 3 meters if you have entered a hight of 3,8 meters (provided that the
truck data that the software uses is complete).
By using the buttons „dimensions“ or „hazardous goods“ (red circles) you can toggle
between the dialogs for entering the vehicle dimensions or for selecting the types of
hazardous materials transported
There are three possible types of hazardous materials to be selected from.
It is advisable to choose „Truck“ from the „Profiles“ menue (see chapter 5.7) as the
software will then calculate routes which are optimized for large truck usage (e.g. the
route will avoid small roads and stay on main roads as long as possible). Large and
heavy trucks will find these routes much easier to navigate then routes calculated with
the „car“ profile.
Roads which are stored in the navigation database as having truck attributes are
marked in the maps with a pink outline. When zooming in, a restrictions sign displays
the concrete restriction in that road. For reason of a good overall overview not all signs
can be displayed in the map. However, they will be used for route guidance when
truckrouting is activated (for map display also refer to Chapter 5.4).
PLEASE NOTE: The absence of a restriction sign does not mean that there is no
restriction on the real road!
24
maptrip 2.5 User’s Guide
5.1.2
Destination in a restricted area
If the chosen destination is in a restricted area and can therefore not be reached with
the current settings (truck routing, route settings 5.6) the navigation software will display
a map of the surrounding area of the destination.
Tap the blue button (red circle) and then a position in the map to choose a new
destination or tap the green button to choose an automatically determined location
closest to the original destination. Tap into the Pop-Up to confirm the new destination.
5.2 Favorites
5.2.1
Adding favorites
Favorites are frequently used addresses you can store in a list. This facilitates quick
access to these destinations. When you start up the system for the first time, the
favorites list is empty.
25
maptrip 2.5 User’s Guide
Click the add icon (indicated by a red circle) to create a new favorite.
There are many options for creating a new favorite. For details on how to do so, please
refer to Chapter 2.
After selecting an address (e.g. by entering the address, see Chapter 2.2), you will be
prompted to provide a name for this favorite. Confirm your entry with the GREEN
button. You can also define this address as your HOME address by clicking the blue
26
maptrip 2.5 User’s Guide
house icon.
5.2.2
Deleting favorites
To delete a favorite, mark the entry in the list and click the trash can icon (red circle).
5.2.3
Renaming favorites
If you want to rename a favorite, mark the entry in the list and click the renaming icon
(red circle).
5.3 Volume
27
maptrip 2.5 User’s Guide
The volume menu allows you to adjust the system volume. If you want to change the
system volume during navigation, please refer to Chapter 6.4.
Tap “Button click sounds” activate or deactivate the feedback sounds when tapping a
button.
5.4 Map View
The (Map View) menu offers several map display options.
z
Northward: The map is ‘northed’, i.e., north always points up.
z
Driving Direction: The map is always displayed in the direction of travel. In
effect, this causes the map to rotate around the car icon.
z
3D: As in Driving Direction, but the view is rendered as a 3D perspective.
28
maptrip 2.5 User’s Guide
If the Show traffic signs function is enabled, the map screen will display the content of
traffic signs to assist you in keeping your bearings when taking turns.
The Auto zoom function ensures that the map is always displayed in a manner that
provides you with a clear overview of your location and the upcoming maneuver. When
auto zoom is enabled, you can use the zoom buttons to zoom into/out of the map. After
a few seconds the map will automatically revert to the optimal display setting.
If you want to set the displayed map section manually, disable the auto zoom function.
To do so, click the check mark to make it disappear.
5.5 POI-Display
In the POI Display menu you can define the POI categories to be displayed on the map.
5.6 Route Settings
29
maptrip 2.5 User’s Guide
The Route Settings menu allows you to specify whether to calculate the shortest or
fastest route.
Use avoid routes to indicate any toll roads, ferries, residential roads or highways to be
avoided during route calculation. Please note that even when checked these roads may
not be excluded from route calculation completely.
“Avoid highways” may be used to calculate small scale detours only. The option is not
suitable when calculating long distance routes.
5.7 Profiles
The Profiles menu offers options for optimizing the route calculation for a specific
vehicle type and/or driving mode.
The profile “car fast” shall be used for passenger cars in general. The option “car slow”
may be used for slow passenger cars as well as for passenger cars with trailers, RVs,
etc.. The “truck” profile is used for heavy trucks.
The profile “truck” has the following implications:
•
Roads not open to trucks are avoided.
•
U-Turns are avoided (with exception of roads with separated roadways for each
direction).
30
maptrip 2.5 User’s Guide
•
Local roads which often are unsuitable for large trucks and often are not
recorded for truck restrictions for this navigation system’s database (cf. Chapter
5.1) are mostly avoided. Larger roads are preferred in the route calculation.
Local roads are used only if the destination cannot be reached otherwise. This
may appear as detour but is intended to be calculated as a route optimized for
heavy trucks.
If you do not want this dialog to appear each time you start navigation, deselect the
check mark in the Ask before every route calculation field..
5.8 GPS-Settings
In the menue „GPS Settings“ the appropriate settings must be made to allow the
navigation software to read GPS data from the receiver.
Please note: For systems for which the GPS receiver has been pre-configured by the
vendor this option will not be available.
After the first installation of the software, this screen should be displayed.
Please click on the blue button with the magnifying glass to start the automatic GPS
search.
Some devices may require manual settings for „Port“ and „Baudrate“. Please refer to
your hardware’s documentation to find the appropriate settings.
With correct GPS settings the following screen should be displayed:
Display
Interpretation
31
maptrip 2.5 User’s Guide
Status: Connection OK
The navigation software has established a
connection with the GPS receiver and is
receiving data.
Count: 18
The navigation software receives one
dataset per second. Since the connection
was established 18 datasets have been
received.
Satellites
Number of satellites from which signals
are currently being received. For a
position fix a minimum of three satellites
must be received.
Time
GPS-Time in GMT
5.9 Units
The Units menu allows you to specify the units to be used for distances and times.
5.10 TMC – Traffic Message Channel
TMC are traffic information which can be considered by your navigation software for
route calculation and for map display.
Prerequisite for using TMC is a TMC receiver (internal or external).
32
maptrip 2.5 User’s Guide
5.10.1 Receive TMC Data
In order to use TMC tap the „receive TMC data“ button. The navigation software
automatically searches for a connected TMC receiver. If no receiver can be
automatically detected please specify the correct settings (see 5.10.3).
The TMC traffic conditions should now be displayed on the map or in the menue
„Traffic“ (see 5.11).
5.10.2 Auto avoid
Activate „Auto avoid“ to let the navigation software automatically calculate alternative
routes around serious traffic conditions (if the detour is advantageous). When „auto
avoid“ is deactivated traffic conditions are displayed in the list and on the map but are
not avoided.
5.10.3 Alternative TMC receiver
Activate „Alternative TMC receiver“ if the automatic search has been unsuccessful. You
then need to specify appropriate settings according to the hardware in use.
Please note: For systems for which the TMC receiver has been pre-configured by the
vendor this option will not be available.
5.11 Traffic
The „Traffic“ menue displays a list of the received traffic conditions. Tap a list entry to
display the full description below.
33
maptrip 2.5 User’s Guide
To sort the list alphabetically tap the „A-Z“ button (red circle). Tap the button again to
sort the list by distance from your current location.
To view only the traffic reports which are relevant to your route tap the button “on route”
(yellow circle).
To view the location of a traffic report on a map, tap a report then tap the map button
(green circle).
5.12 Language
In the Language menu you can select the language used to output spoken driving
instructions and display texts on screen.
5.13 Minimize
Tap the “Minimize” button to show the Windows Taskbar to access other applications or
settings outside the navigation software.
Please note: This option will be available only in case respective functions outside of
the navigation software are accessible on the device.
34
maptrip 2.5 User’s Guide
5.14 Speedwarnings
The menu „Warning“ allows you to select, if you want to be alerted when exceeding the
local speed limit.
The settings allow for acoustic or visual alerts. The shown example gives an acoustic
alert when exceeding the speed limit by 10km/h or more but but never displays a visual
warning.
5.15 GPS-Logs
Your navigation system is able to record GPS logs. To record a GPS log click the red
button and enter a name for the log. You can now use the navigation system as usual
while the GPS data is recorded.
To finish recording click the black button.
35
maptrip 2.5 User’s Guide
To show a GPS track on a map, click the green button and select a track. The track will
be shown on the map with a line of green dots. Please open a mapviewer manually to
do so.
5.16 Blockades
By tapping the button “Blockades” a map with your current location will be displayed. By
first tapping the marker button (red circle) and then the map, any road segment can be
permanently blocked.
To unblock a segment tap it again. The blockades persist even when the navigation
software is being shut down and started.
5.17 About
Displays information about version of the software and copyrights.
36
maptrip 2.5 User’s Guide
6 While on the Road
6.1 Travel Information
The black bar below the map provides you with miscellaneous information about the
trip:
z
The orange action icon indicates the next driving maneuver.
z
140 meters: Indicates the distance remaining until the next maneuver must be
carried out.
z
11:59: Indicates the calculated arrival time.
z
5 min: Indicates the remaining driving time.
z
4.7 km: Indicates the remaining distance.
z
Godesberger Allee: Indicates the name of the street you will turn into after the
next driving maneuver.
z
.
6.2 Zoom
37
maptrip 2.5 User’s Guide
During navigation you can use the plus/minus buttons (red circles) to enlarge or reduce
the displayed map section. After 10 seconds the map will automatically revert to the
optimal display setting. This Auto zoom function can be disabled (cf. Chapter 5.4).
6.3 Route Overview and Destination View
Depending on the size of the display, two buttons are displayed to toggle a route
overview (red circle) or to show the region of the destination (yellow circle).
6.4 Driving Instruction Volume
Click the lower black bar at any time to adjust the volume of the driving instructions.
38
maptrip 2.5 User’s Guide
After a few seconds the volume display automatically disappears.
6.5 Options
Click the map during navigation to display the option dialog.
6.5.1
Mute
Use the Mute button to disable the acoustic driving instructions. Pressing the button
again will enable the spoken instructions.
6.5.2
Map View
The Map View button calls up a menu for performing map display settings (cf. Chapter
5.4).
39
maptrip 2.5 User’s Guide
6.5.3
Night Mode
Press the Night Mode button to display the map in a color scheme optimized for dark
lighting conditions. Press the button again to revert to the normal display mode.
6.5.4
Interstations
The Interstation function allows you to add intermediate destinations while en route to
your destination. For more detailed information on how to select the interstation, please
refer to Chapter 2.
6.5.5
Block KM
The purpose of the Block KM function is to block the upcoming road section for a
certain number of kilometers during active navigation. The navigation system will
determine an alternative route bypassing the blocked section.
This function is useful for circumventing traffic jams or blocked roads.
When you have blocked a road, a button “Free” appears in the Options Menu. Use this
button to free the blocked road.
40
maptrip 2.5 User’s Guide
6.5.6
Traffic
Please see chapter 5.11.
6.5.7
TMC
Please see chapter 5.10.
6.5.8
GPS-Logs
Please see chapter 5.15.
6.5.9
Speedwarnings
Please see chapter 5.14.
6.5.10 Blockades
Please see chapter 5.16.
6.5.11 Quit
Press the Quit button to end navigation. The navigation software returnes to the main
menue.
41
maptrip 2.5 User’s Guide
B
FAQs regarding Truck Navigation
Are truck restrictions captured for all the roads ?
Unfortunately truck restrictions captured have not been captured yet for each and every road. The density
truck restrictions have been added to the map data is depending on the country. But there is no country with
a complete coverage when it comes to truck restrictions.
Particularly truck restrictions for local and residential roads are captured incompletely or even not at all.
Therefore real world traffic signs must be followed in every case.
For the current status on coverage please refer to the enclosed data sheet or ask your local dealer.
My destination is located within a road segment with a truck restriction.
Please refer to chapter 5.1.2.
My route cannot be calculated. How should I proceed ?
The destination address seems to be in an area into which a route cannot be calculated due to local
restrictions. The following message is displayed:
There are several options to proceed:
a) Choose a destination in the proximity of the original destination from the map, which is outside of the
restricted area
b) Use the profile „car slow“. Please note that in this case the truck specific mode will not be used for route
calculation and guidance (cf. chapter 5.7)
c) Check your route settings (cf. chapter 5.6). Permit usage of toll roads, ferries, residential roads or
highways.
d) On your route might be a truck restriction avoiding the successful completion of the calculation. Disable
truck routing. Please note that in this case truck restrictions will not be taken into account for route
calculation and guidance (cf. chapter 5.1)
My destination is located within a road segment with a truck restriction, but residential traffic is
permitted.
The following message is displayed:
42
maptrip 2.5 User’s Guide
When hitting the green button a map will be shown.
When hitting the green button you will be guided to the nearest adjacent road in the proximity of the original
destination which is permitted to use with the current truck settings. When picking the blue button you may
interactively choose another destination from the map (cf. chapter 5.1.2).
I need to drive through a road which is restricted for trucks but is open to residential traffic.
Your route may be divided up into sub routes. Use the function Interstation / Multi-Stop Route (cf. chapter
2.8). As first destination choose an address which is located at the beginning of the restriction. Then enter
your final destination as second address.
Once you have reached the first stop you may pass the restricted segment and subsequently continue to
your final destination.
My current position is located on a road segment with a truck restriction.
The route calculation will be executed anyway.
43
maptrip 2.5 User’s Guide
C
Copyright Notice
The product and the information contained in this document are subject to change without prior notification.
This manual or any parts thereof may not be modified or duplicated without the express written permission
of infoware GmbH.
Data Source
© <2009> Tele Atlas
Austria
© BEV, GZ 1368/2009.
Denmark
© DAV
France
© IGN France
Michelin data © Michelin 2009
Great Britain
This product includes mapping data licensed from Ordnance Survey with the
permission of the Controller of Her Majesty’s Stationery Office. © Crown copyright
and/or database right 2009. All rights reserved. Licence number 100026920
GREAT BRITAIN TMC codes The RDS-TMC traffic information with TMC location
table version number (6G) 3.4, 4.5 and 4.6 from Trafficmaster contained in this
product is derived of the Trafficmaster TMC location table and is subject to the
terms of limitation or exclusion of liability of the license agreement between Tele
Atlas and Trafficmaster. © Trafficmaster. All Rights Reserved".
Northern Ireland
© Ordnance Survey of Northern Ireland
Norway
© Norwegian Mapping Authority, Public Roads Administration /
© Mapsolutions.
Switzerland
© Swisstopo
The Netherlands
Topografische ondergrond Copyright © dienst voor het kadaster en de openbare
registers, Apeldoorn 2009
Turkey
This data has been approved by Turkish Military Forces by the given authority from
Councils of Ministers of Turkey.
All rights reserved.
44
maptrip 2.5 User’s Guide
D
End-User License Agreement („EULA“)
This End-User License Agreement (“EULA”) is a legal agreement between you (either an individual natural
person or a single legal entity) the “End User”, and infoware Gesellschaft für Informationstechnik mbH,
Riemenschneiderstrasse 11, 53175 Bonn, Germany) (“infoware”). This EULA applies to software, preinstalled software on any hardware devices as well as cd-rom, floppy disk, memory card, download package
or any other data carriers and all contents and contents programs (“Software”). The use of our Software is
subject to this EULA including the Limited Warranty terms as set forth below.
BY BREAKING THE SEAL OF THE CD-ROM/FLOPPY DISK/MEMORY CARD, PRESSING THE “I
AGREE” BUTTON FOR A DOWNLOAD, OR BY USING THE SOFTWARE YOU ARE AGREEING TO BE
BOUND BY THE TERMS OF THIS EULA AS WELL AS THE APPLICABLE GENERAL SALE TERMS AND
CONDITIONS.
YOU REPRESENT AND WARRANT THAT YOU HAVE THE RIGHT AND THE AUTHORITY TO ENTER
INTO THIS EULA AND THAT YOU HAVE REACHED THE AGE OF MAJORITY. IF NOT, YOU MAY NOT
USE THE SOFTWARE.
The EULA is subject to Laws of Germany and the Court of Bonn is the only competent court for
disputes related to this EULA or the use of the Software or otherwise. The United Nations Convention on
Contracts for the International Sales of Goods is hereby excluded from application to this EULA.
1) GRANT OF LICENSE: This EULA grants a license (“License”) that permits you to use the infoware
Software if and as rightfully obtained (including the digital (map) data, either downloaded, or included in the
accompanying package acquired with this EULA) on any single computer or (Hardware) device, provided
the Software is installed and/or the Service is used on only one computer or (Hardware) device at any time
and provided the Software is combined only with one (1) navigation system. This License is non-exclusive
and non-transferable. This License does not imply any rights to future upgrades or updates of the Software.
The use of any upgrades or updates of the Software is governed by this EULA and its amendments and
may be subject to additional payments and conditions. This License does not imply any rights to future
delivery of free or paid Service or any other services.
2) COPYRIGHT: The copyrights and other intellectual, industrial and/or proprietary rights to the Software
are owned by infoware or its suppliers. You may either (a) make one copy of the Software solely for backup
or archival purposes, or (b) transfer the Software to a single medium provided you keep the original solely
for backup or archival purposes. You may not copy the product manual(s) or written materials
accompanying the Software, except for own use. You only become the owner of the material data carrier
and you do not acquire the ownership of the Software.
3) OTHER RESTRICTIONS: The hiring, lending, public presentation, performance or broadcasting of the
Software is prohibited.
You, - or anyone else, whether or not in your assignment -, are not permitted to fully or partly modify the
Software, to analyze it by means of reverse-engineering, to decompile or disassemble the Software, or to
make products derived from it. You are explicitly prohibited from downloading the digital maps and programs
contained in the Software or from transferring these to any other software and/or hardware, including
another data carrier, computer or (hardware) device.
4) CONFIDENTIALITY: You acknowledge and agree that the Software were developed at considerable time
and expense by infoware and are confidential to and a trade secret of infoware and/or third parties. You
agree to maintain the Software in strict confidence and not to disclose or provide access thereto to any
person. If you would nevertheless grant another person (unauthorized) access to the Software, you
guarantee that such person accepts the terms and conditions of this EULA and you will indemnify infoware
and its authorized distributors against any claim of such person.
5) LIMITED WARRANTY AND LIMITATION OF LIABILITY:
a) You may only use the Software after having read the instructions supplied with it before you use it. If you
have any difficulty using the Software, consult the instructions to check you are using it correctly.
b) The use of the Software in a navigation system means that calculation errors can occur, for instance
caused by local environmental conditions and/or incomplete data. infoware cannot warrant that the infoware
Software operates error-free.
45
maptrip 2.5 User’s Guide
c) Some countries may not allow the exclusion or limitation of damages. If this Limited Warranty is held to
be invalid or unenforceable, such invalidity or unenforceability shall not invalidate or render unenforceable
the entire Limited Warranty, but rather the Limited Warranty shall be construed as if not containing the
particular invalid or unenforceable provision or provisions, and the rights and obligations of each party shall
be construed and enforced accordingly.
d) Notwithstanding any damages that you might incur for any reason whatsoever (including, without
limitation, all damages referenced herein and all direct or general damages in contract or anything else), the
entire liability of infoware and any of its suppliers under any provision of this EULA and your exclusive
remedy hereunder (except for any remedy of repair or replacement elected by infoware with respect to any
breach of the Limited Warranty) shall be limited to the amount actually paid by you for the Software.
e) Although suppliers of software or other data (“Suppliers”) are not a party to this EULA and shall have no
obligations hereunder, any such supplier is a third party beneficiary of the End User’s rights under this
EULA. Suppliers shall not, to the extent permitted by applicable law, in any way be liable for any damages,
or loss of any kind, whether special, direct, indirect, incidental, or consequential, arising from the use of the
Software. Suppliers do not warrant, whether express or implied, including but not limited to, the implied
warranties of non-infringement, merchantability, completeness, accuracy, and fitness for a particular
purpose of Supplier’s data used in the Software.
6) TERMINATION: Without prejudice to any other rights, infoware may terminate this EULA if you fail to
comply with the terms and conditions of this EULA. In such event, you must destroy all copies of the
Software and all of its component parts.
7) ADDITIONAL SOFWARE/SERVICES: this EULA applies to updates, supplements, add-on components,
or Internet-based services components, of the Software that infoware may provide to you or make available
to you after the date you obtain your initial copy of the Software, unless they are accompanied by separate
terms. infoware reserves the right to discontinue Internet-based services provided to you or made available
to you through the use of the Software.
8) LINKS TO THIRD PARTY SITES: infoware is not responsible for the contents of any third-party sites or
services, any links contained in third-party sites or services, or any changes or updates to third-party sites or
services. infoware is providing these links and access to third-party sites and services to you only as a
convenience, and the inclusion of any link or access does not imply an endorsement by infoware of the
third-party site or service.
9) DISCLAIMER OF WARRANTIES: The Limited Warranty that appears above is the only express warranty
made to you and is provided in lieu of any other express warranties or similar obligations (if any) created by
any advertising, documentation, packaging, or other communications. Except for the Limited Warranty and
to the maximum extent permitted by applicable law, infoware and its suppliers provide the Software and
support services (if any) AS IS AND WITH ALL FAULTS, and hereby disclaim all other warranties and
conditions, whether express, implied or statutory, including, but not limited to, any (if any) implied
warranties, duties or conditions of merchantability, of fitness for a particular purpose, of reliability or
availability, of accuracy or completeness of responses, of results, of workmanlike effort, of lack of viruses,
and of lack of negligence, all with regard to the Software, and the provision of or failure to provide support or
other services, information, software, and related content through the Software or otherwise arising out of
the use of the Software. Also, there is no warranty or condition of title, quiet enjoyment, quiet possession,
correspondence to description or non-infringement with regard to the Software.
10) ENTIRE AGREEMENT; SEVERABILITY: This EULA (including any addendum or amendment to this
EULA which is included with the accompanying package of the Hardware, the Software and/or is
downloaded through the Service) is the entire agreement between you and infoware relating to the Software
and/or the Service and the support services (if any) and they supersede all prior or contemporaneous oral or
written communications, proposals and representations with respect to the Software or any other subject
matter covered by this EULA. To the extent the terms of any infoware policies or programs for support
services conflict with the terms of this EULA, the terms of this EULA shall control. If any provision of this
EULA is held to be void, invalid, unenforceable or illegal, the other provisions shall continue in full force and
effect.
46